Seat Alhambra 2015 Owner's Manual
Manufacturer: SEAT, Model Year: 2015, Model line: Alhambra, Model: Seat Alhambra 2015Pages: 305, PDF Size: 5.46 MB
Page 211 of 305
Checking and refilling levels
● Unscrew the tank cap anticlockwise and in-
sert it in the hole in the tank flap hinge
››› Fig. 159 .
R ef
uelling
The correct petrol type for the vehicle is loca-
ted on a sticker inside the fuel tank flap
››› page 209.
● If the aut
omatic filler nozzle is operated
correctly, it will switch itself off as soon as
the tank is full ››› .
● Do not continue to refuel if it is turned off!
Otherwise, this will fill the expansion cham-
ber and fuel may leak out if the ambient con-
ditions are warm.
Closing the fuel tank cap
● Screw on the tank cap clockwise until it you
hear it click into position.
● Press the tank flap until you hear it click in-
to place. The tank flap must be flush with the
body contour. WARNING
Do not continue refilling once the fuel nozzle
has switched itself off. The fuel tank may be
filled too much. As a result, fuel may spurt
out and spill. This could lead to a fire, explo-
sion and severe injuries. CAUTION
● Always remove any fuel spilled on the vehi-
cle paintwork immediately to avoid damage
to the wheel housing, the tyre and vehicle
paintwork. For the sake of the environment
Spilt fuel can contaminate the environment. Fuel
Introduction You will find a factory-fitted sticker containing
information on the type of fuel for your vehi-
cle on the inside of the fuel tank flap.
WARNING
Refuelling or handling fuel carelessly can
cause an explosion or fire resulting in serious
burns and injuries.
● Fuel is a highly explosive, easily flammable
substance.
● Observe current safety instructions and lo-
cal regulations concerning the handling of
fuel. Types of fuel
The type of fuel to use when refilling will de-
pend on the vehicle's engine. You will find a
factory-fitted sticker containing information
on the type of fuel for your vehicle on the in-
side of the fuel tank flap.
SEAT recommends the use of sulphur-free or
low sulphur fuel to reduce consumption and
prevent engine damage.
Possible
types of fuelAlternative namesFurther in-formation
91 a)
RONNormal petrol, normal
unleaded petrol
››› page 20995 a)
RONPremium unleaded
petrol (95 RON)
98 a)
RONPremium unleaded
petrol (98 RON)
Diesel ››› page 210
a)
RON = Regulation Octane Number
Petrol Petrol types
Vehicles with petrol engines must refuel us-
ing unleaded petrol according to European
norm EN 228
››› .
»
209
Technical specifications
Advice
Operation
Safety
Page 212 of 305
Advice
Petrol types are categorised according to
their octane number (e.g. 91, 95, 98 or 99
RON (RON = “Research Octane Number”).
You may use petrol with a high octane num-
ber than the one recommended for your en-
gine. However, this has no advantage in
terms of fuel consumption and engine power.
SEAT recommends refuelling with a low sul-
phur content or sulphur-free petrol to reduce
fuel consumption for petrol engines.
Petrol additives
The quality of the fuel influences the behav-
iour, power and service life of the engine.
This is why the petrol you use should carry
suitable additives already included by the
petrol industry, free of metals. These addi-
tives will help to prevent corrosion, keep the
fuel system clean and prevent deposits from
building up in the engine.
If good-quality petrol with metal-free addi-
tives is not available or engine problems
arise, the necessary additives must be added
when refuelling ››› .
Not all petrol additives have been shown to
be effective. The use of unsuitable petrol ad-
ditives may cause significant damage to the
engine and the catalytic converter. Metal ad-
ditives should never be used. Metal additives
may also be contained in petrol additives for
improving anti-detonation ratings or octane
ratings ››› . SEAT recommends “genuine Volkswagen
Group Fuel Additives for petrol engines”.
These additives can be bought at SEAT deal-
ers, where information on how to use them
can also be obtained.
CAUTION
● Do not refuel if the filler indicates that the
fuel contains metal. LRP (lead replacement
petrol) fuels contain high concentrations of
metal additives. Using them may damage the
engine!
● Only use fuel with an octane rating that is
in line with the norm EN 228, otherwise sig-
nificant damage could be caused to the en-
gine and fuel system. Furthermore, it could
lead to a loss of performance with the conse-
quent engine fault.
● The use of unsuitable petrol additives could
damage the engine.
● If, in exceptional circumstances, petrol with
a lower octane rating to that recommended is
used, only use moderate engine speeds and a
light throttle. Avoid using full throttle and
overloading the engine. Otherwise you may
damage the engine. Fill up with fuel of a suit-
able octane rating as soon as possible.
● Just one full tank of leaded fuel would seri-
ously impair the efficiency of the catalytic
converter and could damage it. Diesel
Diesel fuel
Diesel fuel must correspond to European
standard EN 590 (In Germany, EN 590 or
DIN 51628).
The use of diesel fuel with a high sulphur
percentage requires shorter service intervals
››› Booklet Maintenance Programme ››› .
Your technical service centre will be able to
tell you which countries have diesel with a
high sulphur content.
Do not mix fuel additives (thinners, or similar
additives) with diesel fuel.
Winter-grade diesel
When using “summer-grade diesel fuel”, dif-
ficulties may be experienced at temperatures
below 0 °C (+32 °F) because the fuel thickens
due to wax separation. For this reason, “win-
ter-grade diesel fuel” is available in Germany,
for example, during the cold months. It can
be used at temperatures as low as -20 °C
(-4 °F).
In countries with different climatic condi-
tions, other types of diesel fuel are available
that are suitable to local temperatures. Tech-
nical service centres and filling stations in
the country concerned will inform you on the
types of diesel fuels available.
210
Page 213 of 305
Checking and refilling levels
A cold diesel engine makes more noise dur-
ing winter temperatures than summer tem-
peratures. Furthermore, the exhaust gases
may turn slightly bluish while the engine is
heating. The quantity of exhaust gases will
depend on the outside temperature.
Filter pre-heater
Vehicles with a diesel engine are fitted with a
fuel filter pre-heating system. This ensures
that the fuel system remains operational to
approx. -24 °C (-11.2 °F), provided you use
winter-grade diesel which is safe to -15 °C
(+5.0 °F).
However, if the fuel has waxed to such an ex-
tent that the engine will not start at tempera-
tures of under -24 °C (-11.2 °F), simply place
the vehicle in a warm garage or workshop for
a while to heat up.
Auxiliary heater
Vehicles with a diesel engine may be fitted
with an auxiliary heater. The heater runs off
the fuel from the fuel tank. On doing so,
smells and steam may be noticed outside the
vehicle for a short period. This is normal and
it is not an indication of a fault in the vehicle.
Whenever there is little fuel in the tank (re-
serve), the auxiliary heater automatically
switches off. WARNING
Never use start boosters. An aerosol start
booster could explode or cause a sudden rise
in engine speed leading to engine damage
and serious injury. CAUTION
● The vehicle is not prepared for the use of
biodiesel. Never, under any circumstances re-
fuel with biodiesel. It could damage the fuel
system and subsequently lead to engine
faults!
● The addition of biodiesel to diesel by the
diesel producer according to Standard EN 590
or other equivalent (DIN 51628 in Germany,
for example) is authorised and causes no
type of damage to the engine or the fuel sys-
tem.
● The diesel engine has been designed for to
use diesel fuel exclusively. Therefore, never
use petrol, fuel oil or other unsuitable fuels.
The composition of these fuels may signifi-
cantly damage the fuel system and the en-
gine.
● The use of diesel fuels with a high sulphur
percentage could considerably reduce the
service life of the diesel particulate filter.
Your technical service centre will be able to
tell you which countries have diesel with a
high sulphur content. Information on fuel consumption
The consumption and emission values indi-
cated do not refer to one specific vehicle.
They are only to be used to compare the val-
ues of the different vehicle versions. The fuel
consumption and CO
2 emissions of a vehicle
not only depend on the effective use of fuel.
They also depend on your driving style and
other non-technical factors.
Calculation of fuel consumption
Fuel consumption and emission values are
determined according to the current version
of the 715/2007/EC or 80/1268/EEC regula-
tion and are valid for the vehicle kerb weight.
The specifications do not
refer to an individu-
al
vehicle. Two measuring cycles are carried
out on a rolling road test bed to calculate fuel
consumption. The test criteria are as follows:
Urban cy-
cleMeasurement of the urban cycle starts
with an engine cold start. City driving is si-
mulated below at between 0 and 50 km/h
(31 mph).
Road cycle
In the road cycle simulation, the car under-
goes frequent acceleration and braking in
all gears, as in normal everyday driving.
The road speed ranges from 0 to
120 km/h (0 and 75 mph).
Combined
The average combined consumption is cal-
culated with a weighting of around 37 %
for the urban cycle and 63 % for the road
cycle.
» 211
Technical specifications
Advice
Operation
Safety
Page 214 of 305
AdviceCO
2 emis-
sions of
the combi-
nationThe exhaust gases are collected during
both driving cycles to calculate carbon di-
oxide emissions (urban and road). The gas
composition is then analysed to evaluate
the CO 2 content and other emissions. Note
● The kerb weight may vary according to the
vehicle equipment. This could raise consump-
tion and the CO 2 emissions slightly.
● In practice, consumption values could be
different to the values calculated based on
the 715/2007/EC or 80/1268/EEC regula-
tions. Selective catalytic reduction*
(AdBlue)
Introduction The AdBlue fill level must be checked when
the vehicle is being serviced.
WARNING
If the AdBlue fill level is too low, the vehicle
may not restart after switching the ignition
off. The emergency start or jump start will not
be possible either!
● Top up with AdBlue at the latest 1,000 km
or 600 miles before it runs out.
● Do not allow the AdBlue to run too low. WARNING
AdBlue is an irritant, corrosive liquid that can
cause injuries if it touches the skin, eyes or
respiratory organs.
● If AdBlue get in contact with eyes and skin,
rinse for at least 15 minutes with plenty of
water and seek medical help.
● If the AdBlue is swallowed, wash your
mouth with plenty of water for at least 15 mi-
nutes. Do not try to provoke vomiting unless
recommended by a Doctor. Seek medical ad-
vice immediately. CAUTION
AdBlue damages surfaces such as painted ve-
hicle parts, plastic, items of clothing and car-
pets. Spilt AdBlue should be removed as
quickly as possible using a damp cloth and
plenty of cold water.
● If the AdBlue has crystallised, remove with
warm water and a sponge. Control and warning lamps
It lights
upPossible causeSolution
(red)
The engine cannot
be restarted! The
level of AdBlue is
too low.Stop the vehicle in a
suitable, safe and flat
area then top up with
the minimum quanti-
ty of AdBlue required
››› page 213.
(red)
with
The engine cannot
be restarted! AdBl-
ue system malfunc-
tion.Contact a specialised
workshop. Have the
system checked
there.
(yellow)The AdBlue reserve
is low.
Refill AdBlue over the
next kilometres or
miles as indicated
››› page 213. SEAT
recommends contact-
ing a specialised
workshop.
(yellow)
together with
There is a fault in
the AdBlue system
or unsuitable AdBl-
ue fluid has been
used.Contact a specialised
workshop. Have the
system checked
there. Several warning and control lamps should
light up for a few seconds when the ignition
is switched on, signalling that the function is
212
Page 215 of 305
Checking and refilling levels
being verified. They will switch off after a few
seconds. WARNING
Observe the safety warnings ››› in Control
and warning lamps on page 47. Information on AdBlue
In vehicles with "Selective Catalytic Reduc-
tion", a special urea solution (AdBlue) is in-
jected into the exhaust gas system in front of
the catalytic converter to reduce nitrogen ox-
ide emissions.
The consumption of AdBlue depends on indi-
vidual driving style, the temperature at which
the system operates and the outside temper-
ature where the vehicle is driven.
AdBlue is kept in an independent tank in the
vehicle and should be refilled at an official
supplier. The AdBlue tank holds about 17 li-
tres.
A message will be displayed on the dash
panel around 2,400 km before the next serv-
ice to indicate that AdBlue must be refilled
››› page 213 . If you ignore this message and
do not r
efill, you will be unable to start the
engine afterwards ›››
page 212.
SEAT recommends contacting a specialised
workshop. If not possible, it should be parti-
ally filled with a minimum 10 litres of AdBlue. Only refill using AdBlue expressly approved
by SEAT.
When the indicators
and
light simulta-
neously, there is a fault. SEAT recommends
visiting the closest specialised workshop.
AdBlue ®
is a registered trademark in the US,
Germany, the European Union and other
countries belonging to the German automo-
bile industry ("Verband der Automobilindus-
trie e. V.", VDA).
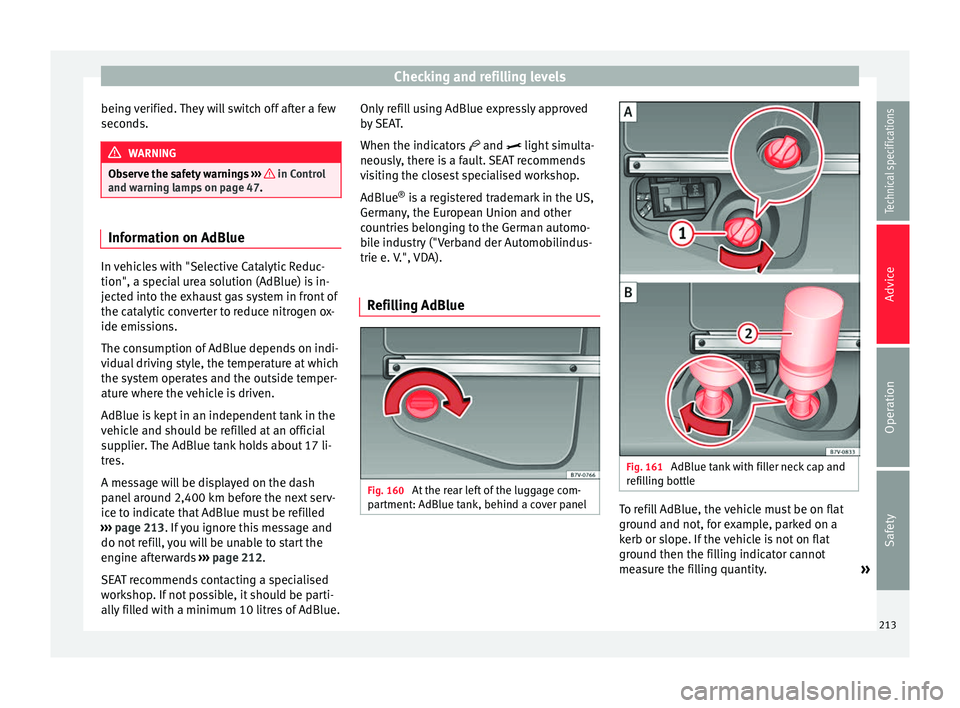
Refilling AdBlue Fig. 160
At the rear left of the luggage com-
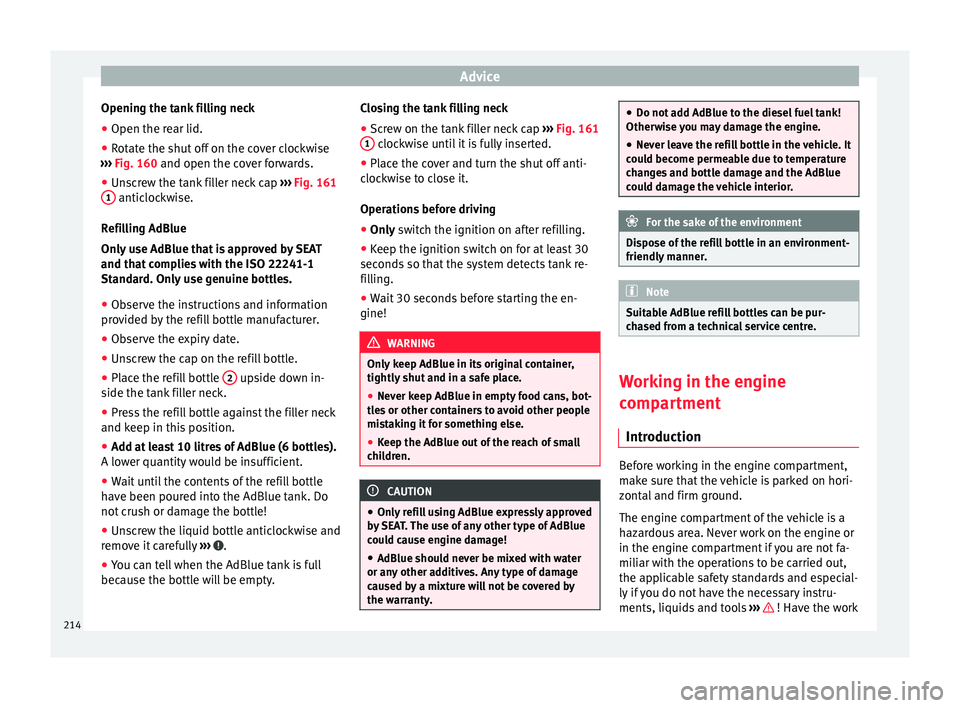
partment: AdBlue tank, behind a cover panel Fig. 161
AdBlue tank with filler neck cap and
refilling bottle To refill AdBlue, the vehicle must be on flat
ground and not, for example, parked on a
kerb or slope. If the vehicle is not on flat
ground then the filling indicator cannot
measure the filling quantity.
»
213
Technical specifications
Advice
Operation
Safety
Page 216 of 305
Advice
Opening the tank filling neck
● Open the rear lid.
● Rotate the shut off on the cover clockwise
››› Fig. 160 and open the cover forwards.
● Un s
crew the tank filler neck cap ››› Fig. 161
1 anticlockwise.
Refilling AdBlue
Only use AdBlue that is approved by SEAT
and that complies with the ISO 22241-1
Standard. Only use genuine bottles.
● Observe the instructions and information
provided by the refill bottle manufacturer.
● Observe the expiry date.
● Unscrew the cap on the refill bottle.
● Place the refill bottle 2 upside down in-
side the tank filler neck.
● Press the refill bottle against the filler neck
and keep in this position.
● Add at least 10 litres of AdBlue (6 bottles).
A lower quantity would be insufficient.
● Wait until the contents of the refill bottle
have been poured into the AdBlue tank. Do
not crush or damage the bottle!
● Unscrew the liquid bottle anticlockwise and
remove it carefully ››› .
● You can tell when the AdBlue tank is full
because the bottle will be empty. Closing the tank filling neck
●
Screw on the tank filler neck cap ››› Fig. 161
1 clockwise until it is fully inserted.
● Place the cover and turn the shut off anti-
clockwise to close it.
Operations before driving
● Only switch the ignition on after refilling.
● Keep the ignition sw
itch on for at least 30
seconds so that the system detects tank re-
filling.
● Wait 30 seconds before starting the en-
gine! WARNING
Only keep AdBlue in its original container,
tightly shut and in a safe place.
● Never keep AdBlue in empty food cans, bot-
tles or other containers to avoid other people
mistaking it for something else.
● Keep the AdBlue out of the reach of small
children. CAUTION
● Only refill using AdBlue expressly approved
by SEAT. The use of any other type of AdBlue
could cause engine damage!
● AdBlue should never be mixed with water
or any other additives. Any type of damage
caused by a mixture will not be covered by
the warranty. ●
Do not add AdBlue to the diesel fuel tank!
Otherwise you may damage the engine.
● Never leave the refill bottle in the vehicle. It
could become permeable due to temperature
changes and bottle damage and the AdBlue
could damage the vehicle interior. For the sake of the environment
Dispose of the refill bottle in an environment-
friendly manner. Note
Suitable AdBlue refill bottles can be pur-
chased from a technical service centre. Working in the engine
compartment
Introduction Before working in the engine compartment,
make sure that the vehicle is parked on hori-
zontal and firm ground.
The engine compartment of the vehicle is a
hazardous area. Never work on the engine or
in the engine compartment if you are not fa-
miliar with the operations to be carried out,
the applicable safety standards and especial-
ly if you do not have the necessary instru-
ments, liquids and tools
››› ! Have the work
214
Page 217 of 305
Checking and refilling levels
carried out by a specialised workshop if you
are uncertain. Negligent work can cause seri-
ous injury. WARNING
If the vehicle moves unexpectedly, this could
cause serious injury.
● Never work under the vehicle if it has not
been immobilized. If you must work under-
neath the vehicle with the wheels in contact
with the ground then it should be parked on
flat ground, the wheels should be prevented
from moving and the key should be removed
from the ignition.
● If you have to work underneath the vehicle,
you must use suitable stands additionally to
support the vehicle, there is a risk of acci-
dent!. The jack is not intended for this kind of
work and its failure could lead to severe inju-
ries. WARNING
The engine compartment is a dangerous area
capable of causing serious injury.
● For all type of work, always take the utmost
precautions, work carefully and note the gen-
eral safety standards in force. Never take per-
sonal risks.
● Never work on the engine or in the engine
compartment if you are not familiar with the
necessary operations. If you are not sure
about procedures then visit a specialised
workshop to carry out the necessary work. Working incorrectly can cause serious inju-
ries.
●
Never open the bonnet if you see steam or
coolant escaping from the engine compart-
ment. This may cause serious burns. Always
wait until you cannot see or hear the sound of
steam or coolant coming from the engine
compartment.
● Always allow the engine to cool down be-
fore opening the bonnet.
● Contact with hot elements of the engine
and the exhaust system can cause burns.
● Once the engine has cooled, follow the in-
structions below before opening the bonnet:
– Turn on the electronic parking brake and
place the gear selector lever in P or the
gearbox lever in neutral.
– Remove the key from the ignition.
– Keep children away from the engine com-
partment and never leave them unsuper-
vised.
● When the engine is warm or hot, the cool-
ing system is pressurised. Do not unscrew
the cap on the expansion tank when the en-
gine is hot. Otherwise, coolant may spray out
under pressure causing burns and serious in-
jury.
– Carefully and slowly unscrew the cap an-
ticlockwise, gently pressing down on it.
– Always protect your face, hands and arms
from hot coolant and steam using a large,
thick cloth. ●
When refilling liquids, avoid spilling them
on parts of the engine and the exhaust sys-
tem. Spilled liquids could cause a fire. WARNING
The high voltages of the electrical system can
give electric shocks as well as causing burns
and serious injury and possibly even death!
● Never cause short circuits in the electrical
system. The battery could explode.
● To minimise the risk of electric shock and
serious consequences while the engine is
running or starting the engine, note the fol-
lowing:
– Never touch the electrical wiring of the
ignition system.
– Never touch electric cables or the gas dis-
charge lamps. WARNING
In the engine compartment, there are rotat-
ing parts that could cause serious injury.
● Never place your hands on or near the radi-
ator fan. Touching the rotor blades could seri-
ously harm you. The ventilator works accord-
ing to the engine temperature and could start
suddenly even when the ignition is turned off
and the key is removed.
● If any work has to be performed when the
engine is started or with the engine running,
there is an additional, potentially fatal, safety » 215Technical specifications
Advice
Operation
Safety
Page 218 of 305
Advice
risk from rotating parts, such as the drive
belts, alternator, radiator fan, etc., as well as
from the high-voltage ignition system. Al-
ways work with the utmost caution.
– Always make sure that no parts of your
body, jewellery, ties, loose clothing and
long hair can be trapped by the rotating
parts of the engine. Before any work, re-
move ties and jewellery (necklaces, etc),
tie long hair back and tie all items of
loose clothing to your body to make sure
that they cannot be trapped by engine
components.
– Take extreme caution when operating the
accelerator and remain attentive. The ve-
hicle could move, even with the electron-
ic parking brake activated.
● Always make sure you have not left any ob-
jects, such as cleaning cloths and tools, in
the engine compartment. If any object is left
in the engine compartment, this could cause
malfunctions, engine faults and even a fire. WARNING
Refill liquids and certain materials can catch
fire easily in the engine compartment, caus-
ing a fire and serious injury!
● Never smoke.
● Never work close to places exposed to
flames or sparks.
● Never pour service fluids over the engine.
These fluid may ignite hot engine parts and
cause injuries. ●
If it is necessary to work on the fuel system
or the electrical system, please follow the in-
structions below:
–Always disconnect the vehicle battery.
When disconnecting the battery, ensure
that the vehicle is unlocked otherwise
the anti-theft alarm will be triggered.
– Never work close to heaters, heat sources
or places exposed to flames or sparks.
● Always keep a recently serviced and per-
fectly working fire extinguisher close by.
● Never cover the engine with additional in-
sulating materials such as a blanket. Risk of
fire! CAUTION
When refilling or changing service liquids,
ensure that you put the liquids into the right
tank. Making a mistake when refilling could
cause serious malfunctions and damage the
engine! For the sake of the environment
Service fluids leaks are harmful to the envi-
ronment. For this reason you should make
regular checks on the ground underneath
your vehicle. Take the vehicle to a specialised
workshop to be checked if you see stains, oil
or other fluids on the ground. Collect any
spilt service fluids and allow a professional to
dispose of them. Opening and closing the bonnet
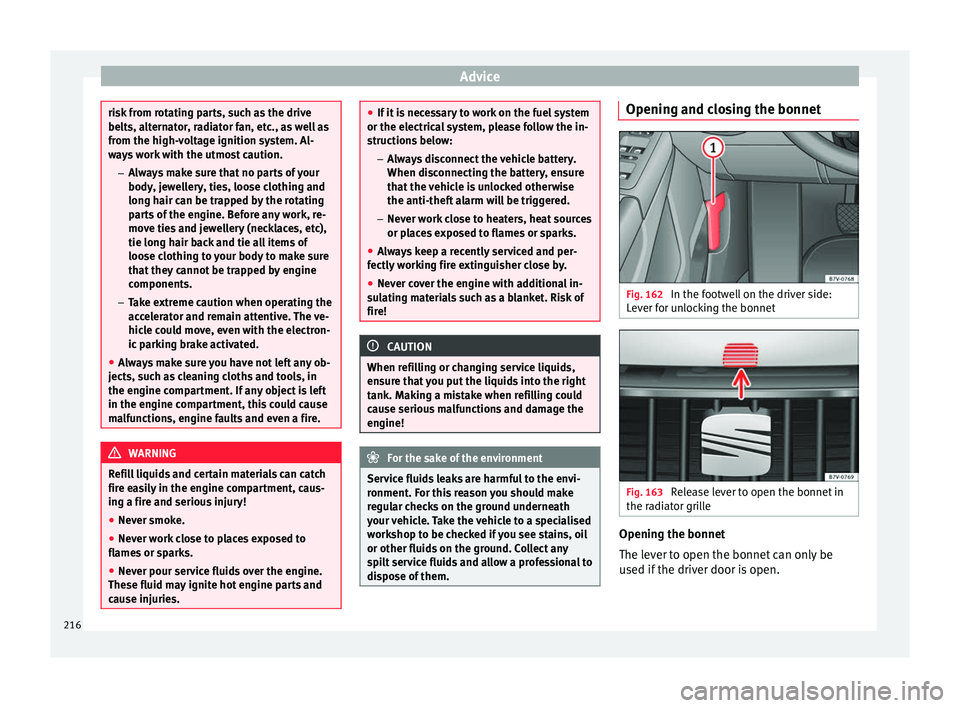
Fig. 162
In the footwell on the driver side:
Lever for unlocking the bonnet Fig. 163
Release lever to open the bonnet in
the radiator grille Opening the bonnet
The lever to open the bonnet can only be
used if the driver door is open.
216
Page 219 of 305
Checking and refilling levels
● Before opening the bonnet, make sure that
the windscreen wiper arms are in place
against the windscreen ››› .
● Open the driver door.
● Pull the release lever ››› Fig. 162 in the di-
r ection of
the arrow. The bonnet is released
from the lock carrier by a spring mechanism
››› .
● Lift the bonnet using the release lever
››› Fig. 163 (arrow) and open the bonnet fully.
The bonnet i
s held open thanks to the gas
strut.
Closing the bonnet
● To close the bonnet, pull it down to over-
come the gas strut pressure ››› .
● Allow the bonnet to fall into the lock carrier.
Do not press down.
If the bonnet is not correctly closed, open it
once again and close it correctly.
The bonnet is correctly closed when it is flush
with the corresponding parts on the body-
work. WARNING
If the bonnet is not correctly closed, it could
suddenly open while driving leaving the driv-
er without visibility. This could result in a se-
rious accident.
● After closing the bonnet, always check that
it is properly secured by the locking mecha- nism in the lock carrier. The bonnet must be
flush with the surrounding body panels.
●
While driving, if you notice that the bonnet
is not correctly closed then stop immediately
and close it correctly.
● Only open and close the bonnet when there
is nobody within its range. CAUTION
● To avoid damage to the bonnet and to the
windscreen wiper arms, only open it when
the windscreen wipers are in place against
the windscreen.
● Before driving, always lower the wiper
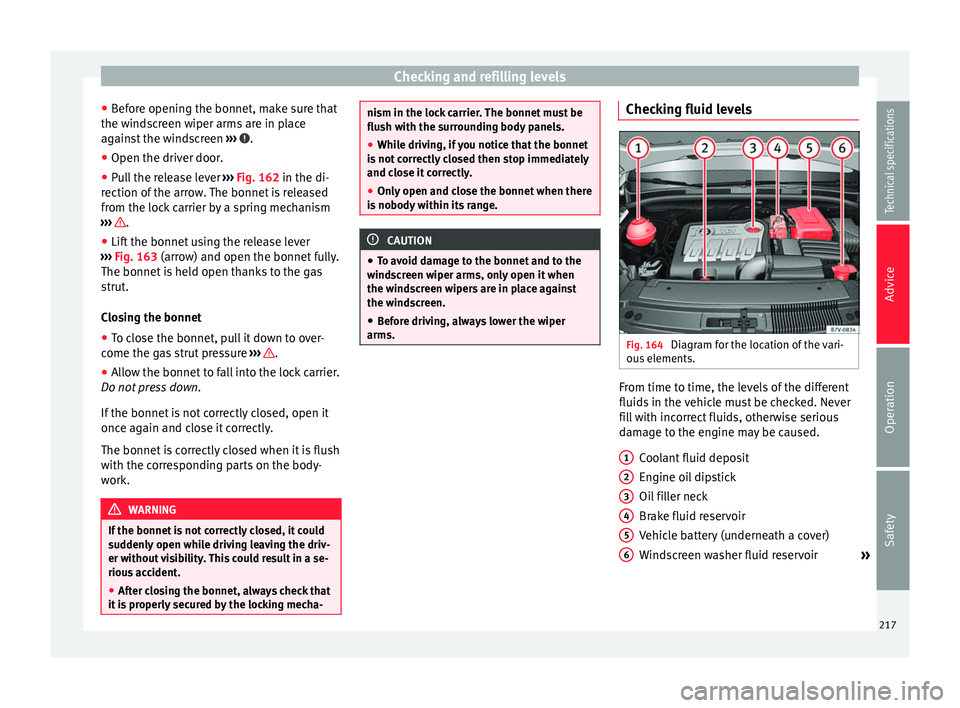
arms. Checking fluid levels
Fig. 164
Diagram for the location of the vari-
ous elements. From time to time, the levels of the different
fluids in the vehicle must be checked. Never
fill with incorrect fluids, otherwise serious
damage to the engine may be caused.
Coolant fluid deposit
Engine oil dipstick
Oil filler neck
Brake fluid reservoir
Vehicle battery (underneath a cover)
Windscreen washer fluid reservoir »
1 2
3
4
5
6
217
Technical specifications
Advice
Operation
Safety
Page 220 of 305
Advice
The checking and refilling of service fluids
are carried out on the components men-
tioned above. These operations are descri-
bed in ››› page 214 .
Ov er
view
Further explanations, instructions and restric-
tions on the technical data are contained as
of ››› page 274
Engine oil Introduction WARNING
Incorrectly handling engine oil can cause in-
jury and serious burns.
● Always protect your eyes when handling
engine oil.
● Oil is toxic and must be kept out of the
reach of children.
● Engine oil should only be kept in its origi-
nal packaging; the same goes for used oil un-
til it is disposed of.
● Never store engine oil in empty food con-
tainers or bottles as other people may acci-
dentally drink it.
● Regular contact with engine oil can be bad
for the skin. If you come into contact with en-
gine oil, wash your skin with soap and water. ●
With the engine running, the engine oil
gets extremely hot and can cause severe skin
burns. Always wait until the engine has fully
cooled. For the sake of the environment
Similar to the other service liquids, spilled
engine oil can be bad for the environment.
Collect these liquids in suitable containers
and dispose of them while respecting the en-
vironment. Warning and control lamps
It lights
upPossible causeSolution
Insufficient engine
oil.Switch the ignition
off. Check the en-
gine oil level
››› page 219.
FlashesPossible causeSolution
Engine oil pres-
sure too low.
Stop the vehicle!
Switch off the en-
gine. Check the en-
gine oil level.
- If the warning lamp
flashes although the
oil level is correct,
do not continue driv-
ing or leave the en-
gine running. Other-
wise, the engine
could be damaged.
Seek specialist as-
sistance.
Engine oil sensor
faulty.Contact a special-
ised workshop. Have
the engine oil sensor
checked.
WARNING
Observe the safety warnings ››› in Control
and warning lamps on page 47. Engine oil specifications
Replacement engine oil must strictly comply
with the specifications.
The correct oil must be used to ensure the
correct operation and long service life of the
engine. The engine comes with a high-quality
multigrade oil that can generally be used all
year round.
218