turn Seat Leon SC 2017 Workshop Manual
[x] Cancel search | Manufacturer: SEAT, Model Year: 2017, Model line: Leon SC, Model: Seat Leon SC 2017Pages: 332, PDF Size: 7.25 MB
Page 121 of 332

Instruments and warning/control lamps
Fuel - Natural Gas level 3 Valid in vehicles equipped with natural gas engine
(GNC)
Fig. 126
Instrument panel: Natural gas gauge The gauges
››
› Fig. 126 and ››› Fig. 125 only
work when the ignition is on. When the dis-
play reaches the reserve mark, the lower LED
lights up in red and the control lamp ap-
pears. When the fuel level is very low, the
lower diode flashes in red.
● The green warning lamp ›››
Fig. 126 1 lights up when the vehicle is running in natu-
r
al
g
as operating mode.
● The green warning lamp 1 turns off
when the n at
ur
al gas is exhausted. The en-
gine changes to operate with petrol.
● The yellow control lamp lights up when
the re
serve level has been reached. Things to note
If the v
ehicle is left parked for a long time im-
mediately after refuelling, the natural gas lev-
el indicator may not accurately indicate the
same level shown after refuelling when the
vehicle is started up again. This is not due to
a leak in the system, but to a drop in pres-
sure in the gas tank for technical reasons af-
ter a cooling phase just after refuelling.
Control lamps
Warning and c
ontrol lamps Read the additional information carefully
› ›
›
page 47.
The control and warning lamps are indicators
of warnings, ››› , faults
››
› or certain func-
tion s.
Some c
ontrol and warning lamps come
on when the ignition is switched on, and
switch off when the engine starts running, or
while driving.
Depending on the model, additional text
messages may be viewed on the instrument
panel display. These may be purely informa-
tive or they may be advising of the need for
action ›››
page 114, Instruments.
Depending upon the equipment fitted in the
vehicle, instead of a warning lamp, some- times a symbol may be displayed on the in-
strument p
anel.
When certain control and warning lamps are
lit, an audible warning is also heard. WARNING
If the warning lamps and messages are ignor-
ed, the v ehic
le may stall in traffic, or may
cause accidents and severe injuries.
● Never ignore the warning lamps or text
mess
ages.
● Stop the vehicle safely as soon as possible.
● Park the vehicle away from traffic and en-
sure th
at there are no highly flammable ma-
terials under the vehicle that could come into
contact with the exhaust system (e.g. dry
grass, fuel).
● A faulty vehicle represents a risk of acci-
dent for the driv
er and for other road users. If
necessary, switch on the hazard warning
lamps and put out the warning triangle to ad-
vise other drivers.
● Before opening the bonnet, switch off the
engine and al
low it to cool.
● In any vehicle, the engine compartment is a
hazar
dous area and could cause severe inju-
ries ››› page 270. CAUTION
Failure to heed the control lamps and text
mes s
ages when they appear may result in
faults in the vehicle. 119
Technical data
Advice
Operation
Emergencies
Safety
Page 123 of 332
Communications and multimedia
Communications and multimedia
St eerin
g wheel
controls*
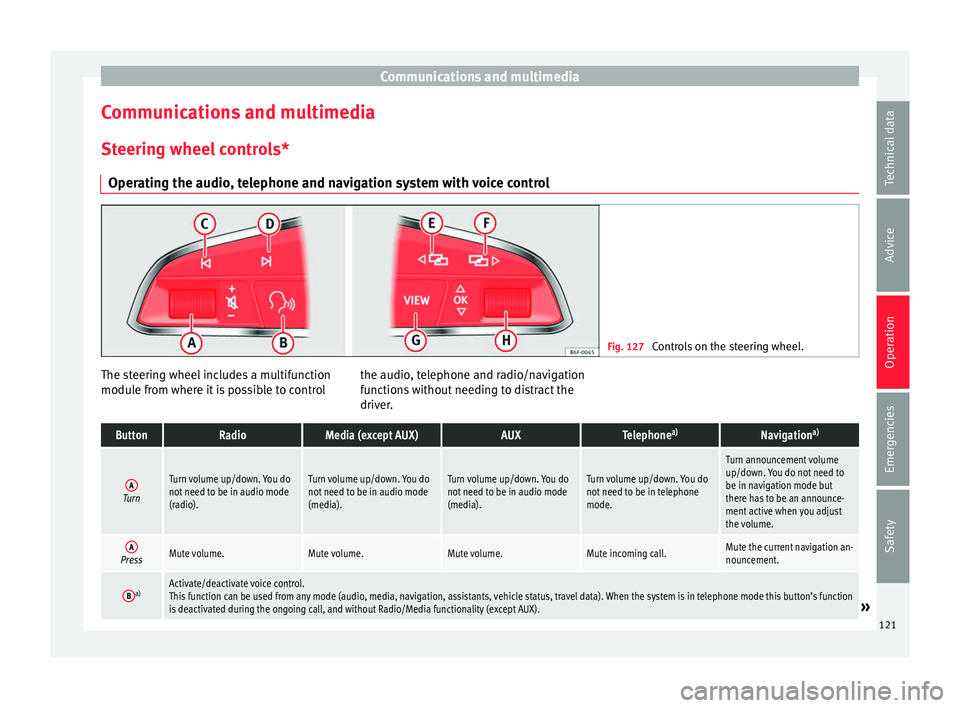
Operating the audio, telephone and navigation system with voice control Fig. 127
Controls on the steering wheel. The steering wheel includes a multifunction
modu
l
e fr
om where it is possible to control the audio, telephone and radio/navigation
function
s without needing to distract the
driver.
ButtonRadioMedia (except AUX)AUXTelephone a)Navigation a)
ATurn
Turn volume up/down. You do
not need to be in audio mode
(radio).Turn volume up/down. You do
not need to be in audio mode
(media).Turn volume up/down. You do
not need to be in audio mode
(media).Turn volume up/down. You do
not need to be in telephone
mode.
Turn announcement volume
up/down. You do not need to
be in navigation mode but
there has to be an announce-
ment active when you adjust
the volume.
APressMute volume.Mute volume.Mute volume.Mute incoming call.Mute the current navigation an-
nouncement.
Ba)Activate/deactivate voice control.
This function can be used from any mode (audio, media, navigation, assistants, vehicle status, travel data). When the system is in telephone mode this button’s function
is deactivated during the ongoing call, and without Radio/Media functionality (except AUX).
» 121
Technical data
Advice
Operation
Emergencies
Safety
Page 124 of 332
OperationButtonRadioMedia (except AUX)AUXTelephone
a)Navigation a)
C /
DSearch for the previous/next
station b)
.
Short press: Switch to the pre-
vious/next song.
Hold down: Fast rewind/for-
ward c)
.
No function
– There is no active call: Ra-
dio/Media functionality (ex-
cept AUX)
– Active call: no functionNo function for the other
modes (navigation, assistants,
vehicle status, travel data).
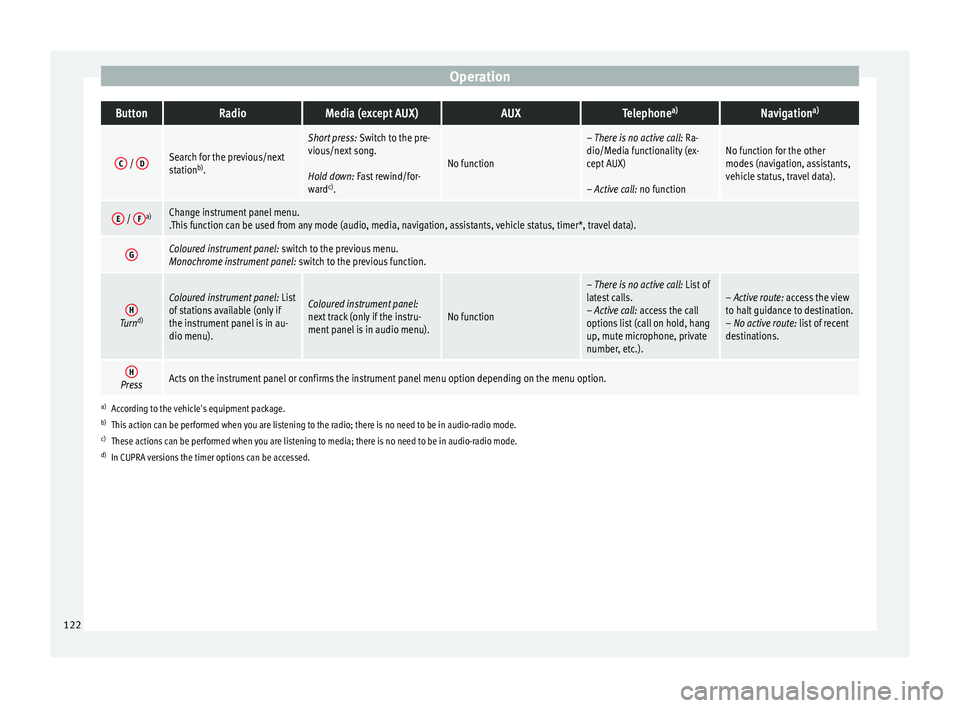
E / Fa)Change instrument panel menu.
.This function can be used from any mode (audio, media, navigation, assistants, vehicle status, timer*, travel data).
GColoured instrument panel:
switch to the previous menu.
Monochrome instrument panel: switch to the previous function.
HTurnd)
Coloured instrument panel:
List
of stations available (only if
the instrument panel is in au-
dio menu).Coloured instrument panel:
next track (only if the instru-
ment panel is in audio menu).No function
– There is no active call: List of
latest calls.
– Active call: access the call
options list (call on hold, hang
up, mute microphone, private
number, etc.).– Active route: access the view
to halt guidance to destination.
– No active route: list of recent
destinations.
HPressActs on the instrument panel or confirms the instrument panel menu option depending on the menu option.
a) According to the vehicle's equipment package.
b) This action can be performed when you are listening to the radio; there is no need to be in audio-radio mode.
c) These actions can be performed when you are listening to media; there is no need to be in audio-radio mode.
d) In CUPRA versions the timer options can be accessed. 122
Page 127 of 332

Opening and closing
Opening and closing C entr
a
l locking system
Description Read the additional information carefully
›› ›
page 15
The vehicle can be locked and unlocked via
the central locking system. There are several
methods, depending on the vehicle equip-
ment:
● key with remote control ››
›
page 127 ,
● lock on driver door (emergency opening
›››
page 15) or
● interior central locking switch ›››
page 128.
Unlocking one side of the vehicle only
When you lock the vehicle with the key, the
doors and the rear lid are locked. When you
open the door, you can either unlock only the
driver door, or all the vehicle doors. To select
the required option, use Easy Connect*
››› page 128.
Auto Lock*
The Auto Lock function locks the doors and
the rear lid when the vehicle exceeds a speed
of about 15 km/h (9 mph). The vehicle is unlocked again when the igni-
tion key i
s removed. Alternatively, the vehicle
can also be unlocked via the central locking
switch or by pulling one of the inside door
handles. The Auto Lock function can be
switched on and off on the sound system or
on the Easy Connect* system ››› page 128.
In the event of an accident in which the air-
bags inflate, the doors will be automatically
unlocked to facilitate access and assistance.
Anti-theft alarm system*
If the anti-theft alarm system senses interfer-
ence with the vehicle it triggers an audible
and visible alarm.
The anti-theft alarm system is automatically
switched on when locking the vehicle. It
switches off when the vehicle is unlocked
from a distance.
When the driver door is unlocked with the
key, you should switch on the ignition within
15 seconds. Otherwise the alarm will be trig-
gered. On some export versions, the alarm is
triggered immediately when you open a door.
To deactivate the alarm, press the button
on the remote control key, or switch on the
ignition. After a certain time, the alarm will
automatically switch off.
Switch off the vehicle interior monitoring and
tow-away protection if you wish to prevent the alarm from being triggered accidentally
››› page 135.
Turn signals
The turn signals will flash twice when the ve-
hicle is unlocked and once when the vehicle
is locked.
If it does not flash, this indicates that one of
the doors, the rear lid or the bonnet is not
closed correctly.
Accidental lock-out
The central locking system prevents you from
being locked out of the vehicle in the follow-
ing situations: ● If the driver door is open, the vehicle can-
not be lock
ed with the central locking switch
››› page 128.
Lock the vehicle with the remote control key,
when all the doors and the rear lid have been
closed. This prevents the accidental locking
of the vehicle. WARNING
Do not leave anyone (especially children) in
the v ehic
le if it is locked from the outside and
the anti-theft security system* is enabled, as
the doors and windows cannot then be
opened from the inside. Locked doors could
delay assistance in an emergency, potentially
putting lives at risk. » 125
Technical data
Advice
Operation
Emergencies
Safety
Page 128 of 332
Operation
Note
● Never l e
ave any valuable items in the vehi-
cle unattended. Even a locked vehicle is not a
safe.
● If the diode on the driver door sill lights up
for about 30 sec
onds when the vehicle is
locked, the central locking system or anti-
theft alarm* is not working properly. You
should have the fault repaired at a SEAT Offi-
cial Service or specialised workshop.
● The vehicle interior monitoring of the anti-
theft a
larm* system will only function as in-
tended if the windows and the sunroof* are
closed. Car key
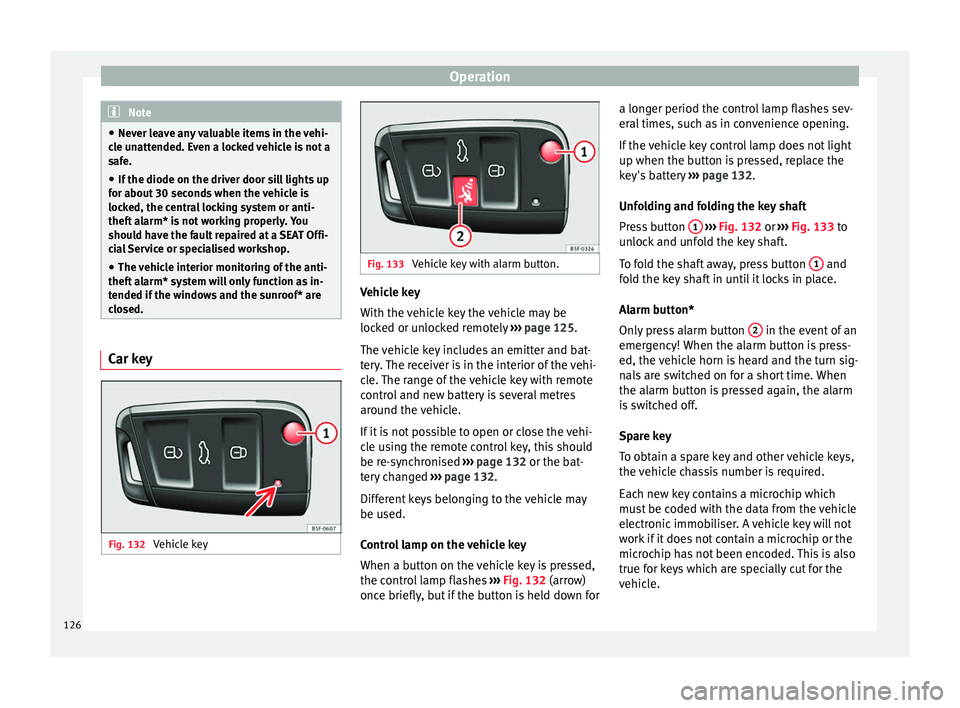
Fig. 132
Vehicle key Fig. 133
Vehicle key with alarm button. Vehicle key
W
ith the
v
ehicle key the vehicle may be
locked or unlocked remotely ››› page 125.
The vehicle key includes an emitter and bat-
tery. The receiver is in the interior of the vehi-
cle. The range of the vehicle key with remote
control and new battery is several metres
around the vehicle.
If it is not possible to open or close the vehi-
cle using the remote control key, this should
be re-synchronised ››› page 132 or the bat-
tery changed ››› page 132.
Different keys belonging to the vehicle may
be used.
Control lamp on the vehicle key
When a button on the vehicle key is pressed,
the control lamp flashes ››› Fig. 132 (arrow)
once briefly, but if the button is held down for a longer period the control lamp flashes sev-
eral time
s, such as in convenience opening.
If the vehicle key control lamp does not light
up when the button is pressed, replace the
key's battery ››› page 132.
Unfolding and folding the key shaft
Press button 1
› ››
Fig. 132
or ›
›› Fig. 133 to
unlock and unfold the key shaft.
To fold the shaft away, press button 1 and
f o
l
d the key shaft in until it locks in place.
Alarm button*
Only press alarm button 2 in the event of an
emer g
ency!
When the alarm button is press-
ed, the vehicle horn is heard and the turn sig-
nals are switched on for a short time. When
the alarm button is pressed again, the alarm
is switched off.
Spare key
To obtain a spare key and other vehicle keys,
the vehicle chassis number is required.
Each new key contains a microchip which
must be coded with the data from the vehicle
electronic immobiliser. A vehicle key will not
work if it does not contain a microchip or the
microchip has not been encoded. This is also
true for keys which are specially cut for the
vehicle.
126
Page 129 of 332

Opening and closing
The vehicle keys or new spare keys can be
o bt
ained fr
om a SEAT Official Service, a spe-
cialised workshop or an approved key service
qualified to create this kind of key.
New keys or spare keys must be synchron-
ised before use ››› page 132. CAUTION
All of the vehicle keys contain electronic com-
ponents. Pr ot
ect them from damage, impacts
and humidity. Note
● Only u
se the key button when you require
the corresponding function. Pushing the but-
ton unnecessarily could accidentally unlock
the vehicle or trigger the alarm. It is also pos-
sible even when you are outside the radius of
action.
● Key operation can be greatly influenced by
overl
apping radio signals close to the vehicle
working in the same range of frequencies, for
example, radio transmitters or mobile tele-
phones.
● Obstacles between the remote control and
the vehic
le, bad weather conditions and dis-
charged batteries can considerably reduce
the range of the remote control.
● If the buttons of the vehicle key are press-
ed ›››
Fig. 132 or ››› Fig. 133 or one of the cen-
tral locking buttons ››› page 128 is pressed
repeatedly in short succession, the central
locking briefly disconnects as protection against overloading. The vehicle is then un-
lock
ed. L
ock it if necessary. Unlocking/Locking by remote control
Read the additional information carefully
›› ›
page 15
The vehicle will be locked again automatical-
ly if you do not open one of the doors or the
rear lid within 30 seconds after unlocking the
car. This function prevents the vehicle from
remaining unlocked if the unlocking button is
pressed by mistake. This does not apply if
you press the button for at least one sec-
ond.
In vehicles with a security central locking
feature (selective unlocking of side doors)
››› page 127, when the button is pressed
once, only the driver door and the fuel tank
flap are unlocked. When the button is press-
ed a second time, all the vehicle doors are unlocked. WARNING
Observe the safety warnings ›››
in Descrip-
tion on pag e 125
. Note
● Do not u se the r
emote control key until the
vehicle is visible. ●
Other fu nction
s of the remote control key
››› page 137, Convenience opening and clos-
ing. Selective unlocking system
The selective unlocking system allows you to
only
u
nlock the driver door and the fuel tank
flap. All other doors and the rear lid remain
locked.
Unlocking the driver door and tank flap
– Press ( once) the b utt
on on the remote
control key or turn the key once in the
opening direction.
Unlocking all the doors, the rear lid and the
tank flap simultaneously. – Within 5 seconds, press ( twice) the
but-
ton on the remote control key, or turn the
key twice within 5 seconds in the opening
direction.
The anti-theft security system* and the anti-
theft alarm* are immediately disabled if you
unlock only the driver door, without unlock-
ing the other doors.
In vehicles with Easy Connect*, you can pro-
gramme the security central locking system
directly ››› page 128.
127
Technical data
Advice
Operation
Emergencies
Safety
Page 130 of 332
Operation
Adjusting the central locking You can use Easy Connect* to select which
doors
ar
e unlocked with the central locking
system. Using the radio or the Easy Connect*
system, you can select whether the vehicle
automatically closes with the “Auto Lock”
programme at speeds of more than 15 km/h
(9 mph).
Programming the unlocking of the doors (ve-
hicles with Easy Connect)
– Select: button > SETTINGS
fu
nction
b
utton > Opening and closing > Cen-
tral locking > Unlocking doors .
Programming the Auto Lock (vehicles with
Easy Connect)
– Select: button > SETTINGS
fu
nction
b
utton > Opening and closing > Cen-
tral locking > Locking while
driving .
Programming the Auto Lock (vehicles with
radio)
– Select: SETUP button > control button
Central locking > Locking while
driving .
Un loc
k
ing doors
You can choose to unlock all the doors or
only the driver door when you unlock the vehicle. In all
the options, the fuel
tank flap
is also unlocked.
With the Driver setting, when you press the
button on the remote control key once, on-
ly the driver door is unlocked. If that button is
pressed twice, the rest of the doors and the
rear lid will be unlocked.
In vehicles with a conventional key, turn the
key in the door lock, in the direction of open-
ing, twice within 2 seconds.
If the button is pressed, all the vehicle
doors are locked. At the same time, a confir-
mation signal* is heard.
Auto Lock while driving
If you select on, all the vehicle doors are
locked at speeds above 15 km/h (9 mph).
Central locking switch Read the additional information carefully
› ›
›
page 15
Please note the following when using the
central locking switch to lock your vehicle:
● It is not possible to open the doors or the
rear lid fr
om the outside (for safety reasons,
e.g. when stopped at traffic lights).
● The LED in the central locking switch lights
up when all the door
s are closed and locked. ●
You can open the door
s individually from
the inside by pulling the inside door handle.
● In the event of an accident in which the air-
bags
inflate, doors locked from the inside will
be automatically unlocked to facilitate access
and assistance. WARNING
● The centr a
l locking switch also operates
when the ignition is switched off and auto-
matically locks all the vehicle doors when the
button is pressed.
● The central locking switch does not operate
if the v
ehicle is locked from the outside and
the anti-theft security system is switched on.
● Locked doors could delay assistance in an
emergency
, potentially putting lives at risk.
Do not leave anyone, especially children, in
the vehicle. Note
Your vehicle will lock automatically when it
re ac
hes a speed of about 15 km/h (9 mph)
(Auto Lock) ››› page 125. You can unlock the
vehicle again using the button on the cen-
tral locking switch. 128
Page 133 of 332

Opening and closing
● Mo v
e the g
ear lever to position P (if the ve-
hicle has automatic gearbox), since other-
wise the vehicle cannot be locked.
● Close the door.
● Push the central locking button on the
remote c
ontrol and touch the locking sensor
surface ››› Fig. 136 B on the driver door han-
dl e onc
e w
ithin the following 5 seconds. Do
not grip the door handle, otherwise the vehi-
cle will not lock. Deactivation is also possible
if the vehicle is locked through the driver’s
door lock.
● To check that the function has been deacti-
vated, w
ait at least 10 seconds, grip and pull
on the door handle. The door should not
open.
The next time the door can only be unlocked
via the remote control or the lock cylinder.
The next time the door is locked/unlocked,
Keyless Access will be active again.
Convenience functions
To close all the electric windows and the sun-
roof using the convenience function, keep a
finger for a few seconds on the locking sen-
sor surface B (arrow) of the door handle un-
ti l
the w
indows and roof have closed.
The doors opened by touching the sensor
surface of the door handle depend on the
settings that have been activated in the info-
tainment system with the button and theSETTINGS and
Openin
g and c
lo
sing function but-
t on
s. CAUTION
The sensor surfaces on the door handles
cou l
d engage if hit with a water jet or high
pressure steam if there is a valid vehicle key
in the proximity. If at least one of the electric
windows is open and the sensor surface B (arrow) on one of the handles is activated
continuou
s
ly, all windows will close. Note
● If the v
ehicle battery has little or no charge,
or the vehicle key battery is almost or entire-
ly out of charge, you will probably not be able
to lock or unlock the vehicle with the Keyless
Access system. The vehicle can be unlocked
or locked manually ››› page 97.
● To control the proper locking of the vehicle,
the rele
ase function is disabled for approx. 2
seconds.
● If the message Keyless access system
faulty is di
splayed on the screen of the
dash panel, abnormalities may occur in the
operation of the Keyless Access system. Con-
tact a specialised workshop. SEAT recom-
mends visiting a SEAT dealership for this.
● Depending on the function set on the info-
tainment sy
stem for the mirrors, the exterior
mirrors will unfold and the surround lighting
will come on when unlocking the vehicle us-
ing the sensor surface on the driver and pas-
senger door handles ››› page 150. ●
If ther e i
s no valid key inside the vehicle or
the system fails to detect one, a warning will
display on the dash panel screen. This could
happen if any other radio frequency signal in-
terferes with the key signal (e.g. from a mo-
bile device accessory) or if the key is covered
by another object (e.g. an aluminium case).
● If the sensors are very dirty, e.g. have a lay-
er of sa
lt, the correct functioning of the sen-
sors on the door handles may be affected. In
this case, clean the vehicle.
● If the vehicle is equipped with an automatic
gearbo
x, it may only be locked in the gear
stick is in position P. Anti-theft security system (Safelock)*
The following message is displayed on the in-
s
trument
p
anel to remind the driver that
when the vehicle is closed from the outside,
the anti-theft security system is switched on. Do not forget the Safelock.
Please see Instruction Manual . The
vehicle cannot be opened from inside. This
makes it more difficult for unauthorised per-
sons to break into the vehicle ››› in De-
s c
ription on p
age 125.
The anti-theft security system can be switch-
ed off each time the vehicle is locked:
● Turn the key a second time to the lock posi-
tion, in the door lock, w
ithin two seconds. If »
131
Technical data
Advice
Operation
Emergencies
Safety
Page 135 of 332

Opening and closing
Childproof lock 3 Applies to vehicles with 5 doors:
Fig. 139
Childproof lock on the left hand side
door . The childproof lock prevents the rear doors
fr
om bein
g opened fr
om the inside. This sys-
tem prevents minors from opening a door ac-
cidentally while the vehicle is running.
This function is independent of the vehicle
electronic opening and locking systems. It
only affects rear doors. It can only be activa-
ted and deactivated manually, as described
below:
Activating the childproof lock
– Unlock the vehicle and open the door in
which y
ou wish to activate the childproof
lock.
– With the door open, rotate the groove in
the door usin
g the ignition key, clockwise
for the left hand side doors ››› Fig. 139 and anti-clockwise for the right hand side
doors.
De
activating the childproof lock
– Unlock the vehicle and open the door
whose chi
ldproof lock you want to deacti-
vate.
– With the door open, rotate the groove in
the door usin
g the ignition key, anti-clock-
wise for the left hand side doors ››› Fig. 139
and clockwise for the right hand side
doors.
Once the childproof lock is activated, the
door can only be opened from the outside.
The childproof lock can be activated or deac-
tivated by inserting the key in the groove
when the door is open, as described above.
Anti-theft alarm system* Des
cription The anti-theft alarm makes it more difficult to
br
e
ak
into the vehicle or steal it.
The anti-theft alarm is automatically turned
on when the vehicle is locked with the key.
● The turn signal light will flash twice on
opening and deactiv
ating the alarm. ●
The turn sign
al light will flash once on clos-
ing and activating the alarm.
When does the system trigger an alarm?
The anti-theft alarm siren will be triggered for
about 30 seconds accompanied by sound
and optical (flashing) warning signals and
will be repeated about ten times when the
vehicle is locked and the following unauthor-
ised actions are attempted:
● Opening a door that is mechanically un-
locked u
sing the vehicle key without switch-
ing on the ignition in the next 15 seconds (in
certain markets, such as the Netherlands,
there is no 15 second waiting time and the
alarm is activated immediately on opening
the door).
● A door is opened.
● The bonnet is opened.
● The rear lid is opened.
● When the ignition is switched on with a
non-authorised k
ey.
● When the vehicle battery is disconnected.
● Movement inside the vehicle (in vehicles
with interior monit
oring ››› page 135).
● When the vehicle is towed (in vehicles with
anti-tow sy
stem ››› page 135).
● When the vehicle is raised (in vehicles with
anti-to w sy
stem ››› page 135). »
133
Technical data
Advice
Operation
Emergencies
Safety
Page 136 of 332
Operation
● When the v
ehic
le is transported on a ferry
or by rail (vehicles with an anti-tow system or
vehicle interior monitoring ››› page 135).
● When a trailer connected to the anti-theft
alarm sys
tem is disconnected.
How to turn OFF the alarm
Unlock the vehicle with the unlocking button
on the key or turn on the ignition with a valid
key. Note
● Aft er 28 d
ays, the indicator light will be
switched off to prevent the battery from ex-
hausting if the vehicle has been left parked
for a long period of time. The alarm system
remains activated.
● If, after the audible warning goes off, an-
other monitored ar
ea is accessed (e.g. the
rear lid is opened after a door has been
opened), the alarm is triggered again.
● The anti-theft alarm is not activated when
the vehic
le is locked from within using the
central locking button .
● If the driver door is unlocked mechanically
with the key
, only the driver door is unlocked,
the rest of the doors remain locked. Only
when the ignition has been turned on will the
other doors be available - but not unlocked -
and the central locking button will be activa-
ted. ●
If the v
ehicle battery is run down or flat
then the anti-theft alarm will not operate cor-
rectly.
● Vehicle monitoring remains active even if
the batter
y is disconnected or not working for
any reason.
● The alarm is triggered immediately if one of
the batter
y cables is disconnected while the
alarm system is active. Vehicle interior monitoring and anti-
to
w sy
stem* It is a monitoring or control function incorpo-
r
at
ed in the anti-thef
t alarm* which detects
unauthorised vehicle entry by means of ultra-
sound.
Activation
– It is automatically switched on when the
anti-theft al
arm is activated.
Deactivation – Open the vehicle with the key, either me-
chanic
ally or by pressing the button on
the remote control. The time period from
when the door is opened until the key is in-
serted in the contact should not exceed 15
seconds, otherwise the alarm will be trig-
gered. –
Pres
s the button on the remote control
twice. The volumetric sensor and tilt sen-
sors will be deactivated. The alarm system
remains activated.
The vehicle interior monitoring and the anti-
tow system are automatically switched on
again next time the vehicle is locked.
The vehicle interior monitoring and anti-tow
sensor (tilt sensor) are automatically switch-
ed on when the anti-theft alarm is switched
on. In order to activate it, all the doors and
the rear lid must be closed.
If you wish to switch off the vehicle interior
monitoring and the anti-tow system, it must
be done each time that the vehicle is locked;
if not, they will be automatically switched on.
The vehicle interior monitoring and the anti-
tow system should be switched off if animals
are left inside the locked vehicle (otherwise,
their movements will trigger the alarm) or
when, for example, the vehicle is transported
or has to be towed with only one axle on the
ground.
False alarms
Interior monitoring will only operate correctly
if the vehicle is completely closed. Please ob-
serve related legal requirements.
The following cases may cause a false alarm:
● Open windows (partially or fully).
134