Indicator SKODA OCTAVIA 2016 3.G / (5E) User Guide
[x] Cancel search | Manufacturer: SKODA, Model Year: 2016, Model line: OCTAVIA, Model: SKODA OCTAVIA 2016 3.G / (5E)Pages: 324, PDF Size: 48.85 MB
Page 198 of 324
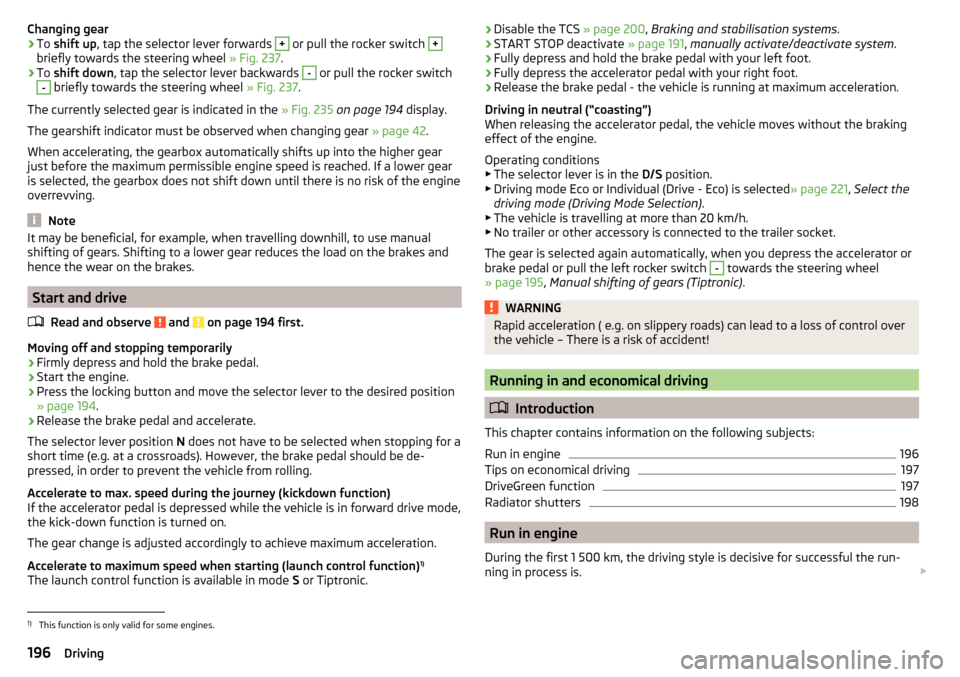
Changing gear›To shift up , tap the selector lever forwards + or pull the rocker switch +
briefly towards the steering wheel » Fig. 237.
›
To shift down , tap the selector lever backwards
-
or pull the rocker switch
-
briefly towards the steering wheel » Fig. 237.
The currently selected gear is indicated in the » Fig. 235 on page 194 display.
The gearshift indicator must be observed when changing gear » page 42.
When accelerating, the gearbox automatically shifts up into the higher gear
just before the maximum permissible engine speed is reached. If a lower gear
is selected, the gearbox does not shift down until there is no risk of the engine
overrevving.
Note
It may be beneficial, for example, when travelling downhill, to use manual
shifting of gears. Shifting to a lower gear reduces the load on the brakes and
hence the wear on the brakes.
Start and drive
Read and observe
and on page 194 first.
Moving off and stopping temporarily
›
Firmly depress and hold the brake pedal.
›
Start the engine.
›
Press the locking button and move the selector lever to the desired position
» page 194 .
›
Release the brake pedal and accelerate.
The selector lever position N does not have to be selected when stopping for a
short time (e.g. at a crossroads). However, the brake pedal should be de-
pressed, in order to prevent the vehicle from rolling.
Accelerate to max. speed during the journey (kickdown function)
If the accelerator pedal is depressed while the vehicle is in forward drive mode,
the kick-down function is turned on.
The gear change is adjusted accordingly to achieve maximum acceleration.
Accelerate to maximum speed when starting (launch control function) 1)
The launch control function is available in mode S or Tiptronic.
› Disable the TCS
» page 200, Braking and stabilisation systems .›START STOP deactivate » page 191, manually activate/deactivate system .›
Fully depress and hold the brake pedal with your left foot.
›
Fully depress the accelerator pedal with your right foot.
›
Release the brake pedal - the vehicle is running at maximum acceleration.
Driving in neutral (“coasting”)
When releasing the accelerator pedal, the vehicle moves without the braking
effect of the engine.
Operating conditions
▶ The selector lever is in the D/S position.
▶ Driving mode Eco or Individual (Drive - Eco) is selected » page 221, Select the
driving mode (Driving Mode Selection) .
▶ The vehicle is travelling at more than 20 km/h.
▶ No trailer or other accessory is connected to the trailer socket.
The gear is selected again automatically, when you depress the accelerator or
brake pedal or pull the left rocker switch
-
towards the steering wheel
» page 195 , Manual shifting of gears (Tiptronic) .
WARNINGRapid acceleration ( e.g. on slippery roads) can lead to a loss of control over
the vehicle – There is a risk of accident!
Running in and economical driving
Introduction
This chapter contains information on the following subjects:
Run in engine
196
Tips on economical driving
197
DriveGreen function
197
Radiator shutters
198
Run in engine
During the first 1 500 km, the driving style is decisive for successful the run-
ning in process is.
1)
This function is only valid for some engines.
196Driving
Page 202 of 324
The sensor is a component of the ACC » page 214 and Front Assist
» page 219 systems.
The sensor function may be impaired in the events of one of the following. ▶ The sensor cover is soiled (e.g. with mud, snow etc.).
▶ The area in front of and around the sensor cover is obscured (e.g. by labels,
auxiliary headlights etc.).
▶ When visibility is poor, (e.g. fog, heavy rain, thick snowfall).
If the sensor is covered or dirty, the corresponding message appears in the in-
strument cluster display for the ACC system » page 218, Malfunctions or Front
Assist system » page 221, Malfunctions .WARNING■
If you suspect that the sensor is damaged, deactivate the ACC system and
Front Assist system » page 216» page 220 . Have the sensor checked by a
specialist garage.■
A collision or damage in the front or lower area of the vehicle could affect
the sensor function - there is risk of accident! Have the sensor checked by
a specialist garage.
■
Do not cover the area in front of and around the sensor cover. This can
lead to impaired function of the sensor - risk of accidents!
CAUTION
Remove the snow with a brush and the ice with a solvent-free de-icer.
Braking and stabilisation systems
Introduction
This chapter contains information on the following subjects:
Stability Control (ESC)
200
ESC Sport
200
Anti-lock braking system (ABS)
201
Engine drag torque control (MSR)
201
Traction control (TCS)
201
Electronic Differential Lock (EDL and XDS)
201
Active steering assist (DSR)
202
Brake Assist (HBA)
202
Hill Start Assist (HHC)
202Multicollision brake (MCB)202Trailer stabilisation system (TSA)202
The brake and stabilization systems are automatically activated each time the
ignition is switched on, unless otherwise indicated.
The error display is in Chapter » page 32, Warning lights .
WARNINGThe general information relating to the use of assistance systems must be
observed » page 199, in section Introduction .
Stability Control (ESC)
Read and observe
on page 200 first.
ESC improves vehicle stability in critical driving situations (e.g. if the vehicle
starts to skid) by the braking the individual wheels to maintain the direction.
If there is a TCS intervention, the indicator light flashes in the instrument
cluster.
ESC Sport
Read and observe
on page 200 first.
ESC Sport allows for a sportier driving style. With ESC Sport activated, no ESC
intervention takes place when the vehicle slightly oversteers and understeers,
and ASR is so limited that the drive wheels can be spun.
Activation
›
Press and hold down the
» Fig. 241 on page 201 button.
›
or: On Infotainment, press the button
→ Press the function area
→
ESC system:
→
ESC Sport
.
With activation the warning light
lights up in the instrument cluster and an
appropriate message is displayed in the instrument cluster.
Deactivation
›
Press the
» Fig. 241 on page 201 button.
›
or: On Infotainment, press the button
→ Press the function area
→
ESC system:
→
Activated
.
With deactivation the warning light extinguishes in the instrument cluster
and an appropriate message is displayed in the instrument cluster.
200Driving
Page 203 of 324
Anti-lock braking system (ABS)Read and observe
on page 200 first.
ABS prevents the wheels locking when braking. Thus helping the driver to
maintain control of the vehicle.
The intervention of the ABS is noticeable from the pulsating movements of
the brake pedal which is accompanied by noises.
When the ABS system is active, do not brake periodically or reduce the pres-
sure on the brake pedal.
Engine drag torque control (MSR)
Read and observe
on page 200 first.
MSR counteracts the tendency of the drive wheels to lock during downshifts
or sudden deceleration (e.g. on icy or an otherwise slippery road surface).
If the drive wheels should lock, then the engine speed is automatically in-
creased. This reduces the braking effect of the engine and the wheels can ro-
tate freely again.
Traction control (TCS)
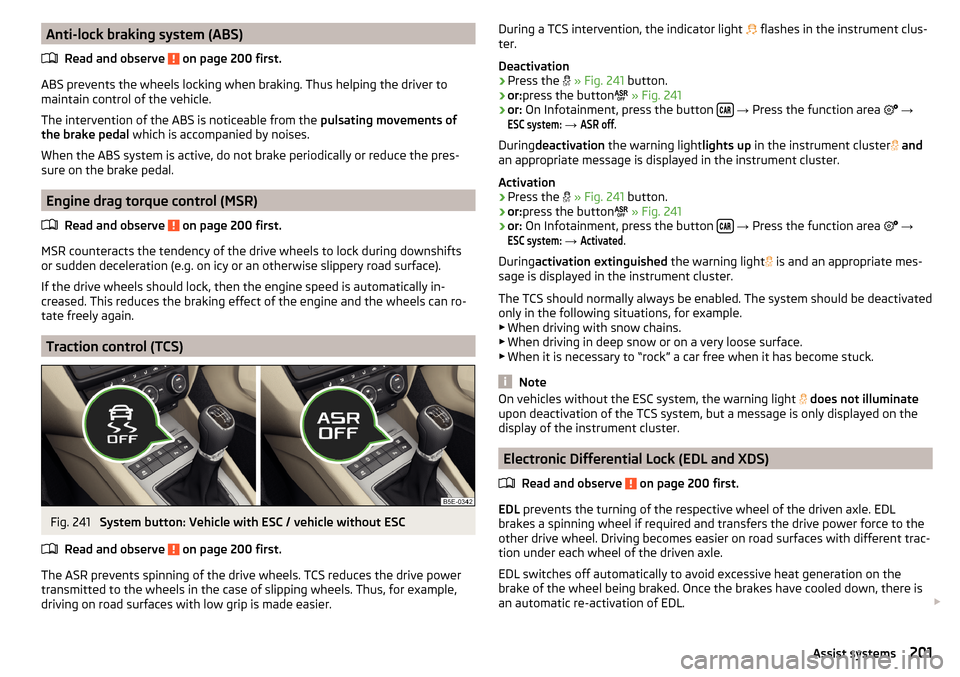
Fig. 241
System button: Vehicle with ESC / vehicle without ESC
Read and observe
on page 200 first.
The ASR prevents spinning of the drive wheels. TCS reduces the drive power transmitted to the wheels in the case of slipping wheels. Thus, for example,
driving on road surfaces with low grip is made easier.
During a TCS intervention, the indicator light flashes in the instrument clus-
ter.
Deactivation›
Press the
» Fig. 241 button.
›
or:press the button
» Fig. 241
›
or: On Infotainment, press the button
→ Press the function area
→
ESC system:
→
ASR off
.
During deactivation the warning light lights up in the instrument cluster
and
an appropriate message is displayed in the instrument cluster.
Activation
›
Press the
» Fig. 241 button.
›
or:press the button
» Fig. 241
›
or: On Infotainment, press the button
→ Press the function area
→
ESC system:
→
Activated
.
During activation extinguished the warning light
is and an appropriate mes-
sage is displayed in the instrument cluster.
The TCS should normally always be enabled. The system should be deactivated
only in the following situations, for example. ▶ When driving with snow chains.
▶ When driving in deep snow or on a very loose surface.
▶ When it is necessary to “rock” a car free when it has become stuck.
Note
On vehicles without the ESC system, the warning light does not illuminate
upon deactivation of the TCS system, but a message is only displayed on the
display of the instrument cluster.
Electronic Differential Lock (EDL and XDS)
Read and observe
on page 200 first.
EDL prevents the turning of the respective wheel of the driven axle. EDL
brakes a spinning wheel if required and transfers the drive power force to the
other drive wheel. Driving becomes easier on road surfaces with different trac-
tion under each wheel of the driven axle.
EDL switches off automatically to avoid excessive heat generation on the
brake of the wheel being braked. Once the brakes have cooled down, there is
an automatic re-activation of EDL.
201Assist systems
Page 213 of 324
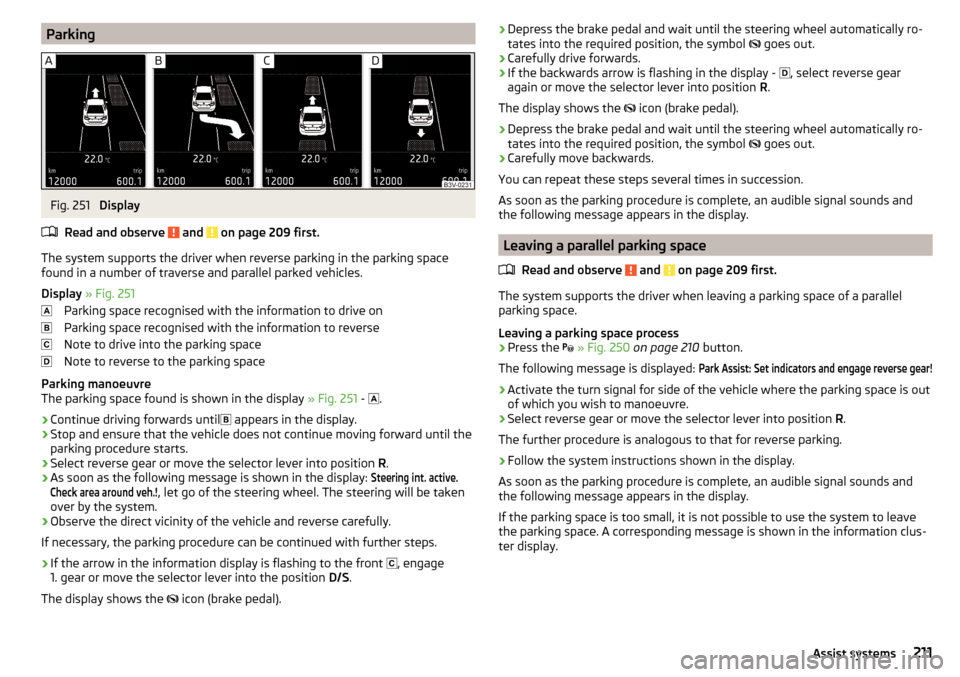
ParkingFig. 251
Display
Read and observe
and on page 209 first.
The system supports the driver when reverse parking in the parking space
found in a number of traverse and parallel parked vehicles.
Display » Fig. 251
Parking space recognised with the information to drive on
Parking space recognised with the information to reverse
Note to drive into the parking space
Note to reverse to the parking space
Parking manoeuvre
The parking space found is shown in the display » Fig. 251 -
.
›
Continue driving forwards until
appears in the display.
›
Stop and ensure that the vehicle does not continue moving forward until the
parking procedure starts.
›
Select reverse gear or move the selector lever into position R.
›
As soon as the following message is shown in the display:
Steering int. active.Check area around veh.!
, let go of the steering wheel. The steering will be taken
over by the system.
›
Observe the direct vicinity of the vehicle and reverse carefully.
If necessary, the parking procedure can be continued with further steps.
›
If the arrow in the information display is flashing to the front , engage
1. gear or move the selector lever into the position D/S.
The display shows the icon (brake pedal).
›Depress the brake pedal and wait until the steering wheel automatically ro-
tates into the required position, the symbol goes out.›
Carefully drive forwards.
›
If the backwards arrow is flashing in the display -
, select reverse gear
again or move the selector lever into position R.
The display shows the
icon (brake pedal).
›
Depress the brake pedal and wait until the steering wheel automatically ro-
tates into the required position, the symbol
goes out.
›
Carefully move backwards.
You can repeat these steps several times in succession.
As soon as the parking procedure is complete, an audible signal sounds and the following message appears in the display.
Leaving a parallel parking space
Read and observe
and on page 209 first.
The system supports the driver when leaving a parking space of a parallel
parking space.
Leaving a parking space process
›
Press the
» Fig. 250 on page 210 button.
The following message is displayed:
Park Assist: Set indicators and engage reverse gear!›
Activate the turn signal for side of the vehicle where the parking space is out
of which you wish to manoeuvre.
›
Select reverse gear or move the selector lever into position R.
The further procedure is analogous to that for reverse parking.
›
Follow the system instructions shown in the display.
As soon as the parking procedure is complete, an audible signal sounds and
the following message appears in the display.
If the parking space is too small, it is not possible to use the system to leave
the parking space. A corresponding message is shown in the information clus-
ter display.
211Assist systems
Page 215 of 324
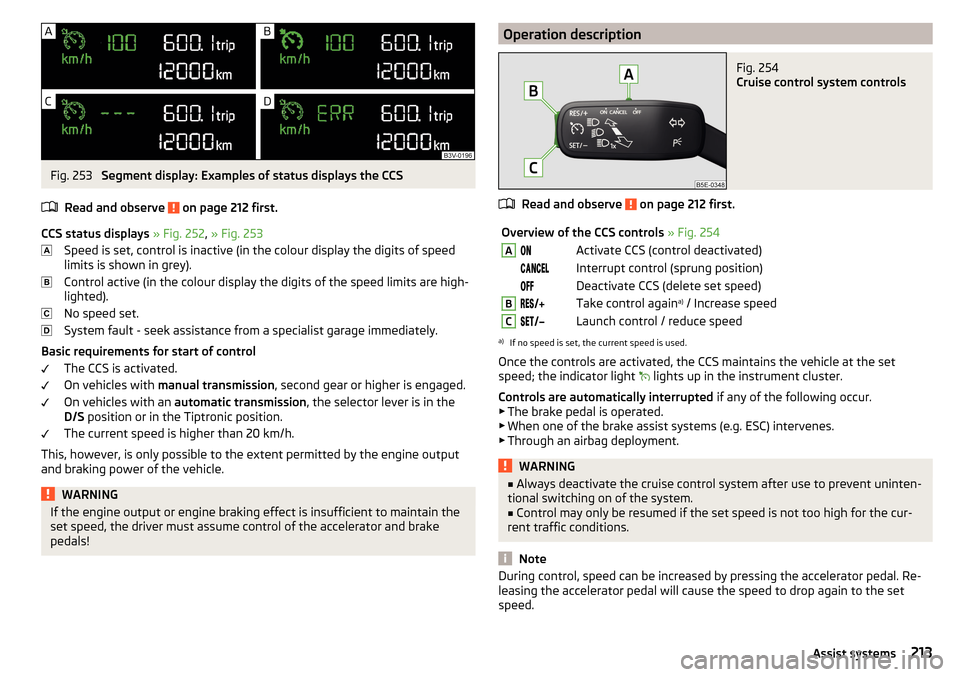
Fig. 253
Segment display: Examples of status displays the CCS
Read and observe
on page 212 first.
CCS status displays » Fig. 252 , » Fig. 253
Speed is set, control is inactive (in the colour display the digits of speed
limits is shown in grey).
Control active (in the colour display the digits of the speed limits are high-
lighted).
No speed set.
System fault - seek assistance from a specialist garage immediately.
Basic requirements for start of control The CCS is activated.
On vehicles with manual transmission , second gear or higher is engaged.
On vehicles with an automatic transmission , the selector lever is in the
D/S position or in the Tiptronic position.
The current speed is higher than 20 km/h.
This, however, is only possible to the extent permitted by the engine output
and braking power of the vehicle.
WARNINGIf the engine output or engine braking effect is insufficient to maintain the
set speed, the driver must assume control of the accelerator and brake
pedals!Operation descriptionFig. 254
Cruise control system controls
Read and observe on page 212 first.
Overview of the CCS controls » Fig. 254AActivate CCS (control deactivated) Interrupt control (sprung position) Deactivate CCS (delete set speed)BTake control again a)
/ Increase speedCLaunch control / reduce speeda)
If no speed is set, the current speed is used.
Once the controls are activated, the CCS maintains the vehicle at the set
speed; the indicator light lights up in the instrument cluster.
Controls are automatically interrupted if any of the following occur.
▶ The brake pedal is operated.
▶ When one of the brake assist systems (e.g. ESC) intervenes.
▶ Through an airbag deployment.
WARNING■ Always deactivate the cruise control system after use to prevent uninten-
tional switching on of the system.■
Control may only be resumed if the set speed is not too high for the cur-
rent traffic conditions.
Note
During control, speed can be increased by pressing the accelerator pedal. Re-
leasing the accelerator pedal will cause the speed to drop again to the set
speed.213Assist systems
Page 261 of 324
CAUTIONEnsure that battery acid does not come into contact with the bodywork –
There is a risk of damage to the vehicle.
Note
■ We recommend having all work on the vehicle battery carried out by a spe-
cialist garage.■
You should replace batteries older than 5 years.
Check condition
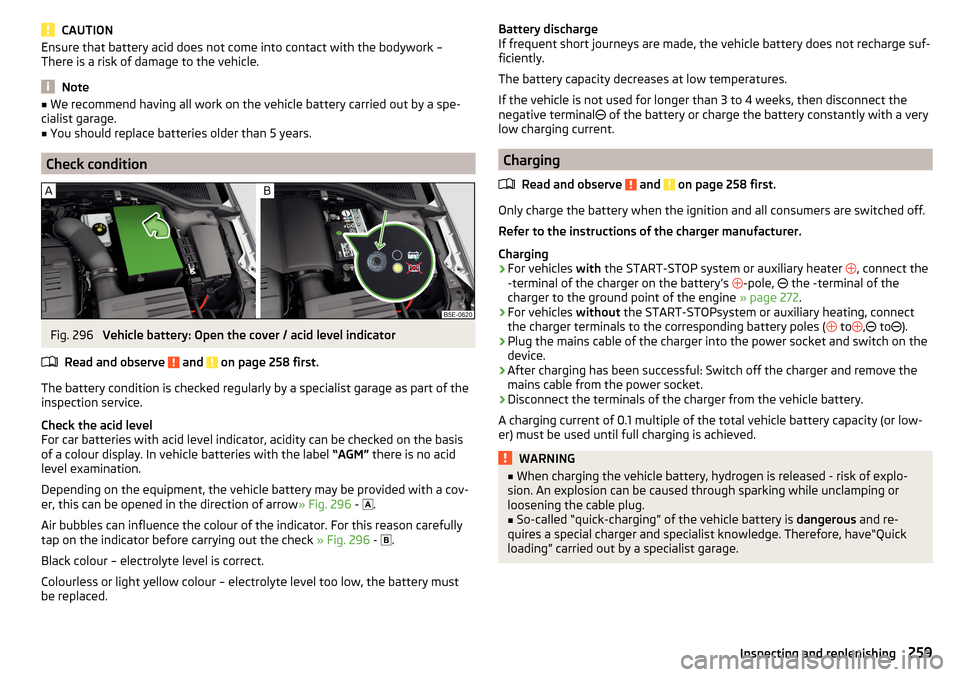
Fig. 296
Vehicle battery: Open the cover / acid level indicator
Read and observe
and on page 258 first.
The battery condition is checked regularly by a specialist garage as part of the
inspection service.
Check the acid level
For car batteries with acid level indicator, acidity can be checked on the basis
of a colour display. In vehicle batteries with the label “AGM” there is no acid
level examination.
Depending on the equipment, the vehicle battery may be provided with a cov-
er, this can be opened in the direction of arrow » Fig. 296 -
.
Air bubbles can influence the colour of the indicator. For this reason carefully
tap on the indicator before carrying out the check » Fig. 296 -
.
Black colour – electrolyte level is correct.
Colourless or light yellow colour – electrolyte level too low, the battery must be replaced.
Battery discharge
If frequent short journeys are made, the vehicle battery does not recharge suf- ficiently.
The battery capacity decreases at low temperatures.
If the vehicle is not used for longer than 3 to 4 weeks, then disconnect the
negative terminal
of the battery or charge the battery constantly with a very
low charging current.
Charging
Read and observe
and on page 258 first.
Only charge the battery when the ignition and all consumers are switched off.
Refer to the instructions of the charger manufacturer.
Charging
›
For vehicles with the START-STOP system or auxiliary heater
, connect the
-terminal of the charger on the battery’s -pole,
the -terminal of the
charger to the ground point of the engine » page 272.
›
For vehicles without the START-STOPsystem or auxiliary heating, connect
the charger terminals to the corresponding battery poles ( to
,
to
).
›
Plug the mains cable of the charger into the power socket and switch on the
device.
›
After charging has been successful: Switch off the charger and remove the
mains cable from the power socket.
›
Disconnect the terminals of the charger from the vehicle battery.
A charging current of 0.1 multiple of the total vehicle battery capacity (or low-
er) must be used until full charging is achieved.
WARNING■ When charging the vehicle battery, hydrogen is released - risk of explo-
sion. An explosion can be caused through sparking while unclamping or
loosening the cable plug.■
So-called “quick-charging” of the vehicle battery is dangerous and re-
quires a special charger and specialist knowledge. Therefore, have“Quick
loading” carried out by a specialist garage.
259Inspecting and replenishing
Page 264 of 324
WARNING■Do not drive with incorrect tyre pressure, there is a risk of an accident.■In the event of very rapid pressure loss (e.g. in the event of tyre damage)
an attempt should be made to bring the vehicle carefully to a stop without
sudden steering movements and without any hard braking - risk of acci-
dent.
Note
The declaration of conformity (the COC document) can be obtained from a
ŠKODA partner 1)
.
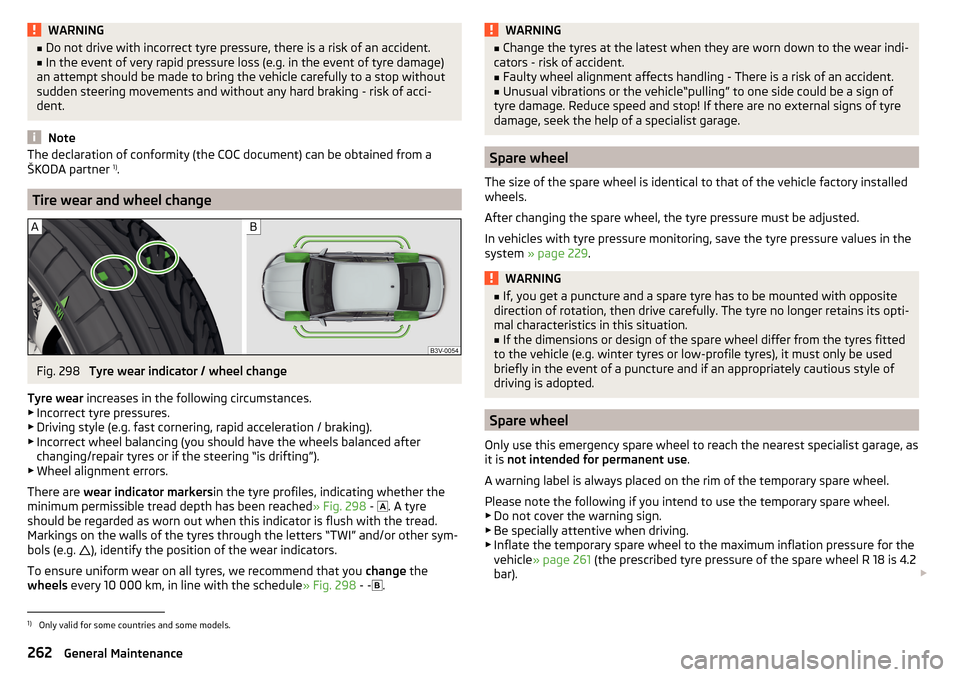
Tire wear and wheel change
Fig. 298
Tyre wear indicator / wheel change
Tyre wear increases in the following circumstances.
▶ Incorrect tyre pressures.
▶ Driving style (e.g. fast cornering, rapid acceleration / braking).
▶ Incorrect wheel balancing (you should have the wheels balanced after
changing/repair tyres or if the steering “is drifting”).
▶ Wheel alignment errors.
There are wear indicator markers in the tyre profiles, indicating whether the
minimum permissible tread depth has been reached » Fig. 298 -
. A tyre
should be regarded as worn out when this indicator is flush with the tread.
Markings on the walls of the tyres through the letters “TWI” and/or other sym-
bols (e.g. ), identify the position of the wear indicators.
To ensure uniform wear on all tyres, we recommend that you change the
wheels every 10 000 km, in line with the schedule » Fig. 298 - -
.
WARNING■
Change the tyres at the latest when they are worn down to the wear indi-
cators - risk of accident.■
Faulty wheel alignment affects handling - There is a risk of an accident.
■
Unusual vibrations or the vehicle“pulling” to one side could be a sign of
tyre damage. Reduce speed and stop! If there are no external signs of tyre
damage, seek the help of a specialist garage.
Spare wheel
The size of the spare wheel is identical to that of the vehicle factory installed
wheels.
After changing the spare wheel, the tyre pressure must be adjusted.
In vehicles with tyre pressure monitoring, save the tyre pressure values in the
system » page 229 .
WARNING■
If, you get a puncture and a spare tyre has to be mounted with opposite
direction of rotation, then drive carefully. The tyre no longer retains its opti-
mal characteristics in this situation.■
If the dimensions or design of the spare wheel differ from the tyres fitted
to the vehicle (e.g. winter tyres or low-profile tyres), it must only be used
briefly in the event of a puncture and if an appropriately cautious style of
driving is adopted.
Spare wheel
Only use this emergency spare wheel to reach the nearest specialist garage, as
it is not intended for permanent use .
A warning label is always placed on the rim of the temporary spare wheel.
Please note the following if you intend to use the temporary spare wheel. ▶ Do not cover the warning sign.
▶ Be specially attentive when driving.
▶ Inflate the temporary spare wheel to the maximum inflation pressure for the
vehicle » page 261 (the prescribed tyre pressure of the spare wheel R 18 is 4.2
bar).
1)
Only valid for some countries and some models.
262General Maintenance
Page 272 of 324
CAUTIONIt is important to ensure that the jack is correctly positioned against the bar of
the lower beam - otherwise there is a risk of damage to the vehicle.
Breakdown kit
Introduction
This chapter contains information on the following subjects:
Description of the breakdown kit
270
Preparing to use the breakdown kit
271
Sealing and inflating tyres
271
Information on driving with repaired tyres
271
The following information applies for the breakdown kit supplied ex-factory.
The breakdown kit can be used to seal punctures with a diameter of up to
about 4 mm.
Performing a repair with the breakdown kit not at all intended to replace a
permanent repair on the tyre. Its purpose is to get you to the nearest specialist
garage.
Replace the tyre that was repaired using the breakdown kit as soon as possi-
ble, or consult a specialist garage about repair options.
Do not remove foreign bodies which have penetrated into the tyre (e.g. nails).
Do not use the breakdown kit in the following cases.
▶ The rim is damaged.
▶ The outdoor temperature is below the minimum temperature indicated in
the instruction manual of the tyre filling bottle with sealant.
▶ Tyre punctures greater than 4 mm.
▶ Damage to the tyre wall.
▶ The use-by date (see inflation bottle) has passed.
WARNING■ If there is skin contact with the sealant wash the affected area immedi-
ately.■
Observe the manufacturer's usage instructions for the breakdown kit.
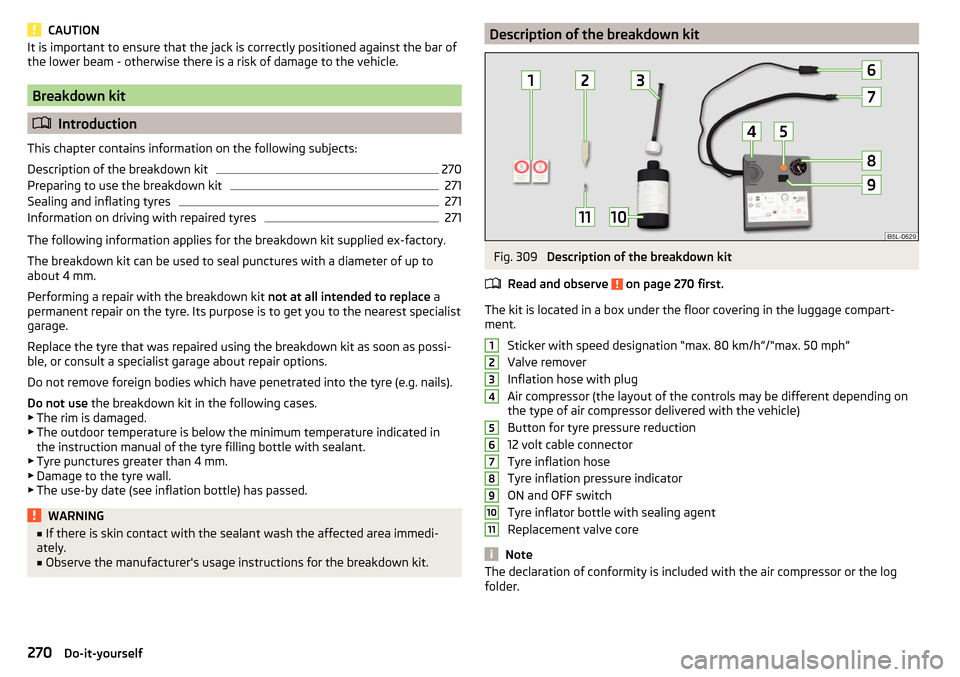
Description of the breakdown kitFig. 309
Description of the breakdown kit
Read and observe
on page 270 first.
The kit is located in a box under the floor covering in the luggage compart-
ment.
Sticker with speed designation “max. 80 km/h”/“max. 50 mph”Valve remover
Inflation hose with plug
Air compressor (the layout of the controls may be different depending on
the type of air compressor delivered with the vehicle)
Button for tyre pressure reduction
12 volt cable connector
Tyre inflation hose
Tyre inflation pressure indicator
ON and OFF switch
Tyre inflator bottle with sealing agent
Replacement valve core
Note
The declaration of conformity is included with the air compressor or the log
folder.1234567891011270Do-it-yourself
Page 282 of 324
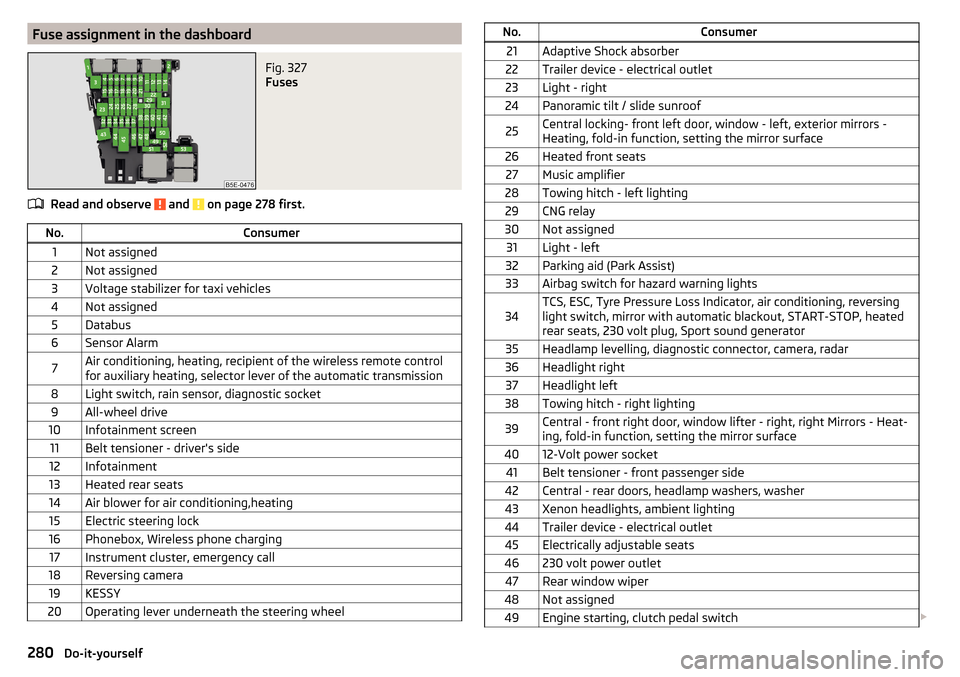
Fuse assignment in the dashboardFig. 327
Fuses
Read and observe and on page 278 first.
No.Consumer1Not assigned2Not assigned3Voltage stabilizer for taxi vehicles4Not assigned5Databus6Sensor Alarm7Air conditioning, heating, recipient of the wireless remote control
for auxiliary heating, selector lever of the automatic transmission8Light switch, rain sensor, diagnostic socket9All-wheel drive10Infotainment screen11Belt tensioner - driver's side12Infotainment13Heated rear seats14Air blower for air conditioning,heating15Electric steering lock16Phonebox, Wireless phone charging17Instrument cluster, emergency call18Reversing camera19KESSY20Operating lever underneath the steering wheelNo.Consumer21Adaptive Shock absorber22Trailer device - electrical outlet23Light - right24Panoramic tilt / slide sunroof25Central locking- front left door, window - left, exterior mirrors -
Heating, fold-in function, setting the mirror surface26Heated front seats27Music amplifier28Towing hitch - left lighting29CNG relay30Not assigned31Light - left32Parking aid (Park Assist)33Airbag switch for hazard warning lights34TCS, ESC, Tyre Pressure Loss Indicator, air conditioning, reversing
light switch, mirror with automatic blackout, START-STOP, heated
rear seats, 230 volt plug, Sport sound generator35Headlamp levelling, diagnostic connector, camera, radar36Headlight right37Headlight left38Towing hitch - right lighting39Central - front right door, window lifter - right, right Mirrors - Heat-
ing, fold-in function, setting the mirror surface4012-Volt power socket41Belt tensioner - front passenger side42Central - rear doors, headlamp washers, washer43Xenon headlights, ambient lighting44Trailer device - electrical outlet45Electrically adjustable seats46230 volt power outlet47Rear window wiper48Not assigned49Engine starting, clutch pedal switch 280Do-it-yourself
Page 316 of 324
Swing Main menu151
Telephone151
Telephone book158
Telephone call160
Text messages (SMS)161
User profile126, 132
Voicemail157
Telephone book158
Telephone call160
Telephone connection types149
Telephone functions157
Telephone number157
Telephone Premium rSAP
155
Text messages161
New161
Received162
Through-loading bag89
Ticket holder83
Tilt / slide sunroof Activate operation
62
Operation62
Sunblind63
Time42, 123, 130
Tiptronic195
Tire Wear indicator
262
TMC Detail of the traffic report
186
dynamic route186
List of traffic reports185
Requirements185
TMC (Traffic reports)185
Tone dialling160
Tools266
Top speeds129
TOP TETHER26
Touch screen115
Towing274
Towing away273
Towing device Accessories
235
Description231
Vertical load230
Towing eye274
Towing protection56
Towing the vehicle273
Traction control (TCS)34, 201
Traffic Detail of the traffic report
186
dynamic route186
List of traffic reports185
Requirements185
Traffic jam ahead186
Traffic obstruction186
Traffic program (TP)136
Traffic reports (TMC) Detail of the traffic report
186
List of traffic reports185
Requirements185
Traffic sign recognition226
Traffic Sign Recognition dysfunction
228
Information messages228
Settings in Infotainment227
Traffic signs see Traffic sign recognition
226
Trailer Connect and disconnect
235
Load236
loading236
Trailer operation239
Trailer operation239
Trailer stabilisation system (TSA)202
Trailer towing230
navigation180
Transit point182
Transport Luggage compartment93
Roof rack103
Towing device and trailer230
Transporting children22
Triangle265
TSA202
Turning off Infotainment117
Turning on Infotainment117
Turn signal65
Turn signal system Warning light
36
Tyre load capacity263
Tyre pressure261
Warning light35
Tyre pressure monitor refer to the tyre pressure monitoring
229
Tyre pressure monitoring229
Warning light35
Tyre repair270
Tyres260
damage260
Explanation of the label263
new260
Tyre pressure261
Tyre size263
U
Umbrella Tray
87
Units123, 130
Unlatch KESSY
52
Key51
Unlock Individual settings
53
314Index