SKODA SUPERB 2016 3.G / (B8/3V) Owner's Manual
Manufacturer: SKODA, Model Year: 2016, Model line: SUPERB, Model: SKODA SUPERB 2016 3.G / (B8/3V)Pages: 336, PDF Size: 53.89 MB
Page 151 of 336
Select the audio source
Tap - selection of the parent folder / Hold - selection of the audio source
Audio sources
Introduction to the subject
›
To playback connect or insert the desired audio source. Starts playback auto-
matically, then select the audio source » page 146.
If AUX is selected as the audio source, the playback must be started on the
connected device.
CAUTION
■ Do not save any important data or that which has not been backed up on the
connected audio sources. ŠKODA assumes no responsibility for lost or dam-
aged files or connected audio sources.■
When changing or connecting an audio source, this may cause sudden
changes in volume. Reduce the volume before changing or connecting an au-
dio source.
■
When connecting an external audio source, the external source information
messages can be displayed. These messages must be observed and confirmed
if necessary (e.g. enabling data transfer etc).
Note
The national copyright laws that apply in your country must be observed.
CD / DVD
Only applies to Infotainment Columbus.
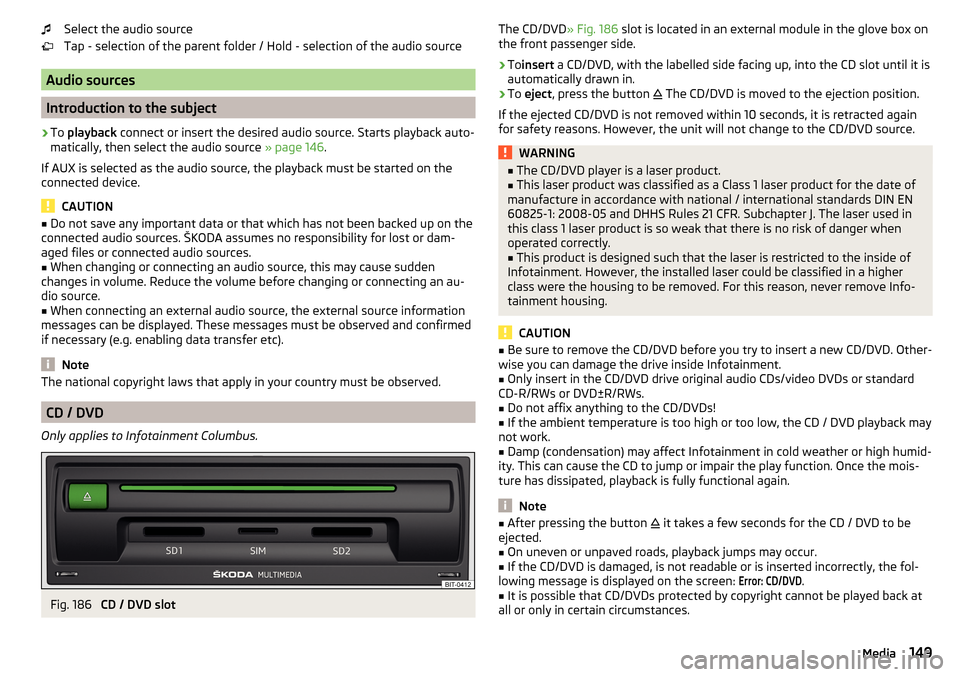
Fig. 186
CD / DVD slot
The CD/DVD
» Fig. 186 slot is located in an external module in the glove box on
the front passenger side.›
To insert a CD/DVD, with the labelled side facing up, into the CD slot until it is
automatically drawn in.
›
To eject , press the button
The CD/DVD is moved to the ejection position.
If the ejected CD/DVD is not removed within 10 seconds, it is retracted again
for safety reasons. However, the unit will not change to the CD/DVD source.
WARNING■ The CD/DVD player is a laser product.■This laser product was classified as a Class 1 laser product for the date of
manufacture in accordance with national / international standards DIN EN
60825-1: 2008-05 and DHHS Rules 21 CFR. Subchapter J. The laser used in
this class 1 laser product is so weak that there is no risk of danger when
operated correctly.■
This product is designed such that the laser is restricted to the inside of
Infotainment. However, the installed laser could be classified in a higher
class were the housing to be removed. For this reason, never remove Info-
tainment housing.
CAUTION
■ Be sure to remove the CD/DVD before you try to insert a new CD/DVD. Other-
wise you can damage the drive inside Infotainment.■
Only insert in the CD/DVD drive original audio CDs/video DVDs or standard
CD-R/RWs or DVD±R/RWs.
■
Do not affix anything to the CD/DVDs!
■
If the ambient temperature is too high or too low, the CD / DVD playback may
not work.
■
Damp (condensation) may affect Infotainment in cold weather or high humid-
ity. This can cause the CD to jump or impair the play function. Once the mois-
ture has dissipated, playback is fully functional again.
Note
■ After pressing the button it takes a few seconds for the CD / DVD to be
ejected.■
On uneven or unpaved roads, playback jumps may occur.
■
If the CD/DVD is damaged, is not readable or is inserted incorrectly, the fol-
lowing message is displayed on the screen:
Error: CD/DVD
.
■
It is possible that CD/DVDs protected by copyright cannot be played back at
all or only in certain circumstances.
149Media
Page 152 of 336
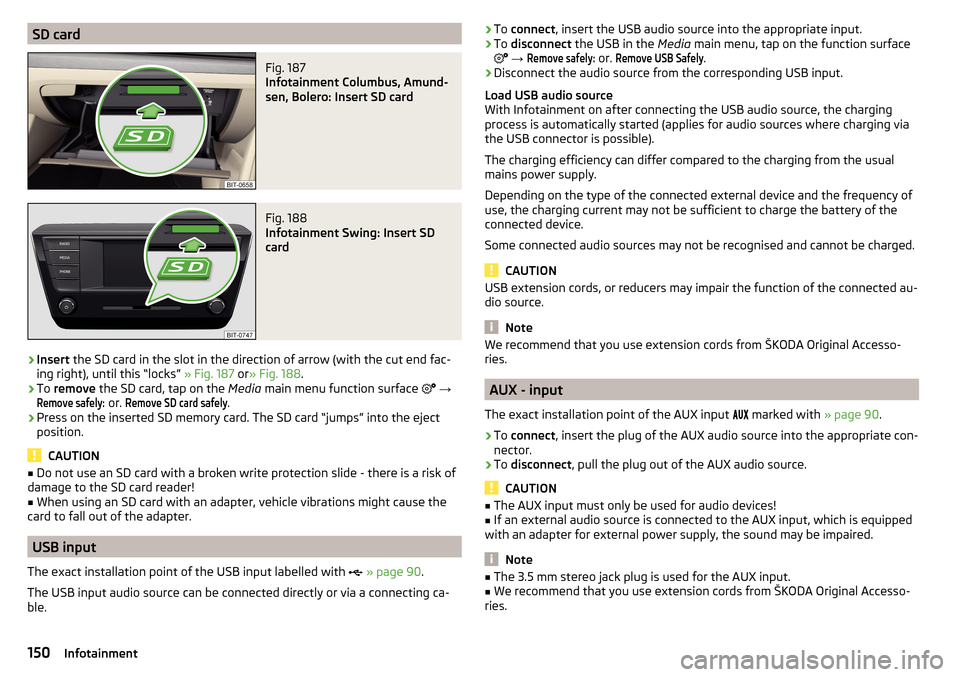
SD cardFig. 187
Infotainment Columbus, Amund-
sen, Bolero: Insert SD card
Fig. 188
Infotainment Swing: Insert SD
card
›
Insert the SD card in the slot in the direction of arrow (with the cut end fac-
ing right), until this “locks” » Fig. 187 or» Fig. 188 .
›
To remove the SD card, tap on the Media main menu function surface
→
Remove safely:
or.
Remove SD card safely
.
›
Press on the inserted SD memory card. The SD card “jumps” into the eject
position.
CAUTION
■ Do not use an SD card with a broken write protection slide - there is a risk of
damage to the SD card reader!■
When using an SD card with an adapter, vehicle vibrations might cause the
card to fall out of the adapter.
USB input
The exact installation point of the USB input labelled with
» page 90 .
The USB input audio source can be connected directly or via a connecting ca-
ble.
› To
connect , insert the USB audio source into the appropriate input.›To disconnect the USB in the Media main menu, tap on the function surface
→
Remove safely:
or.
Remove USB Safely
.
›
Disconnect the audio source from the corresponding USB input.
Load USB audio source
With Infotainment on after connecting the USB audio source, the charging
process is automatically started (applies for audio sources where charging via
the USB connector is possible).
The charging efficiency can differ compared to the charging from the usual
mains power supply.
Depending on the type of the connected external device and the frequency of
use, the charging current may not be sufficient to charge the battery of the
connected device.
Some connected audio sources may not be recognised and cannot be charged.
CAUTION
USB extension cords, or reducers may impair the function of the connected au-
dio source.
Note
We recommend that you use extension cords from ŠKODA Original Accesso-
ries.
AUX - input
The exact installation point of the AUX input
marked with » page 90.
›
To connect , insert the plug of the AUX audio source into the appropriate con-
nector.
›
To disconnect , pull the plug out of the AUX audio source.
CAUTION
■
The AUX input must only be used for audio devices!■If an external audio source is connected to the AUX input, which is equipped
with an adapter for external power supply, the sound may be impaired.
Note
■ The 3.5 mm stereo jack plug is used for the AUX input.■We recommend that you use extension cords from ŠKODA Original Accesso-
ries.150Infotainment
Page 153 of 336
Bluetooth®
player
Infotainment allows audio files of a connected Bluetooth ®
player to play using
the A2DP and AVRCP audio profile.
With Infotainment, multiple devices can be paired using Bluetooth ®
, but only
one of them can be used as a Bluetooth ®
player.
Connect /disconnect›
To connect the Bluetooth ®
player with Infotainment- follow the same in-
structions as for pairing Infotainment with a telephone » page 164.
›
To disconnect the Bluetooth ®
player, end the connection in the list of paired
external devices » page 164.
Replace Bluetooth ®
player (applies to Infotainment Amundsen, Bolero)
If you would like to replace a Bluetooth ®
Player which is connected to Infotain-
ment as a Telephone at the same time, then a relevant information message
appears in the Infotainment screen.
›
End the connection to the currently connected Bluetooth ®
player and repeat
the pairing procedure » page 164, Managing paired external devices .
CAUTION
If an external device is connected to Infotainment using Apple CarPlay
orAndroid Auto, then it cannot be connected using Bluetooth ®
.
Jukebox
Only applies to Infotainment Columbus.
In the Jukebox (in the internal Infotainment memory) Supported audio / video
files can be imported from connected external devices.
Import files
›
Tap on the function surface in the Media main menu
→
Manage jukebox
→
Import
.
›
Select the desired source.
›
Select the desired folders or files.
›
Tap on the function surface
.
Delete files
›
Tap on the function surface in the Media main menu
→
Manage jukebox
→
Delete
.
›
Select the desired folder or files in the selected category.
›
Tap on the function surface
→
Delete
.
Show level of infotainment memory›Tap on the function surface in the Media main menu →
Manage jukebox
.
It displays information about occupied and free space of the Infotainment
memory and the number of files that can still be imported.
Note
■ Files that have already been copied are recognised and cannot be copied
again (shown in grey).■
It is not possible to copy files while simultaneously playing back audio/video
files in the CD/DVD drive.
WLAN
Applies to Infotainment Columbus, Amundsen.
Infotainment allows you to play audio files from one of the external devices
connected to the Infotainment WLAN.
›
Connect an external device that supports the DLNA (Digital Living Network
Alliance), with the Infotainment WLAN » page 174.
›
If necessary use the UPnP application (Universal Plug and Play) in the con-
nected device, which allows playback to start.
›
Select the audio source Select
WLAN
.
151Media
Page 154 of 336
Supported audio sources and file formats - Columbus, Amundsen,
Bolero
Supported audio sourcesSourceInterfaceTypeSpecificationFile sys- temSD cardSD readerStandard sizeSD, SDHC, SDXC
FAT16
FAT32
exFAT NTFSUSB
devices
USB 1.x; 2.x and 3.x or
higher with support
fromUSB 2.x
MSC
USB stick;
HDD (without any special software); USB devices sup- porting MSC op- eration
MTP
Devices with theAndroid operat- ing system or
Windows Tele- phone (mobile
Telephone, tab- let)
Apple
Devices with theiOS operating
system (iPhone, iPod, iPad)CD/DVD
(applies to Infotain-
ment Co- lumbus)
CD/DVD Drive
Audio CD (Up to 80 min);
CD-R / RW (Up to 700 MB);
DVD±R/RW; DVD Audio,DVD Video
ISO9660;
Joliet (Level 1,2,3); UDF 1.x;UDF 2.x
-
Supported audio file formatsCodec type
(File formats)File suffixMax bit rateMaximumsampling rateMulti
channels a)PlaylistsWindows Media
Audio
9 and 10wma384 kbit / s
96 kHz
no
m3upls
wpl
m3u8 asx
WAVwav
Defined bythe format (approx.
1.5 Mbit/s)MPEG-1; 2 and 2.5
layer 3mp3320 kbit / s
48 kHz
MPEG-2 and 4aac; mp4;m4a
yes
FLAC;
Vorbisflac; ogg
Defined by the format (approx.
5.5 Mbit/s)a)
Applies to the CANTON sound system.
The GPT standards (GUID partition table) method structured audio sources are
not supported by Infotainment.
Files that are protected by Digital Rights Management (DRM) technology can-
not be played back by Infotainment.
152Infotainment
Page 155 of 336
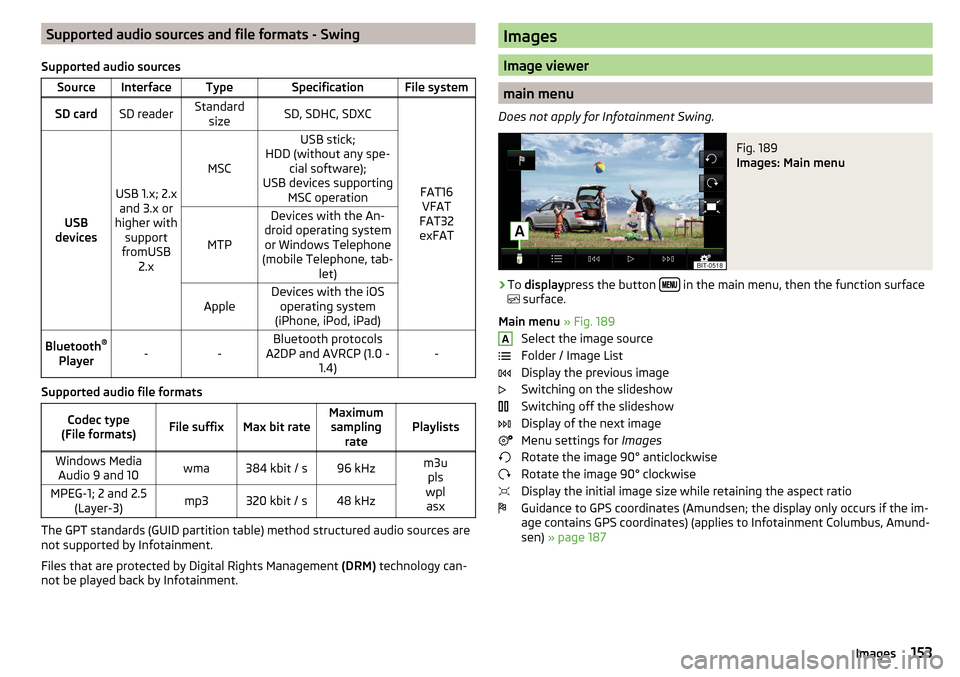
Supported audio sources and file formats - Swing
Supported audio sourcesSourceInterfaceTypeSpecificationFile systemSD cardSD readerStandard sizeSD, SDHC, SDXC
FAT16VFAT
FAT32
exFATUSB
devices
USB 1.x; 2.x and 3.x or
higher with support
fromUSB 2.x
MSC
USB stick;
HDD (without any spe- cial software);
USB devices supporting MSC operation
MTP
Devices with the An-
droid operating system or Windows Telephone
(mobile Telephone, tab- let)AppleDevices with the iOSoperating system
(iPhone, iPod, iPad)Bluetooth ®
Player--Bluetooth protocols
A2DP and AVRCP (1.0 - 1.4)-
Supported audio file formats
Codec type
(File formats)File suffixMax bit rateMaximum sampling ratePlaylistsWindows MediaAudio 9 and 10wma384 kbit / s96 kHzm3u pls
wpl asxMPEG-1; 2 and 2.5 (Layer-3)mp3320 kbit / s48 kHz
The GPT standards (GUID partition table) method structured audio sources are
not supported by Infotainment.
Files that are protected by Digital Rights Management (DRM) technology can-
not be played back by Infotainment.
Images
Image viewer
main menu
Does not apply for Infotainment Swing.
Fig. 189
Images: Main menu
›
To display press the button in the main menu, then the function surface
surface.
Main menu » Fig. 189
Select the image source
Folder / Image List
Display the previous image
Switching on the slideshow
Switching off the slideshow
Display of the next image
Menu settings for Images
Rotate the image 90° anticlockwise
Rotate the image 90° clockwise
Display the initial image size while retaining the aspect ratio
Guidance to GPS coordinates (Amundsen; the display only occurs if the im-
age contains GPS coordinates) (applies to Infotainment Columbus, Amund-
sen) » page 187
A153Images
Page 156 of 336
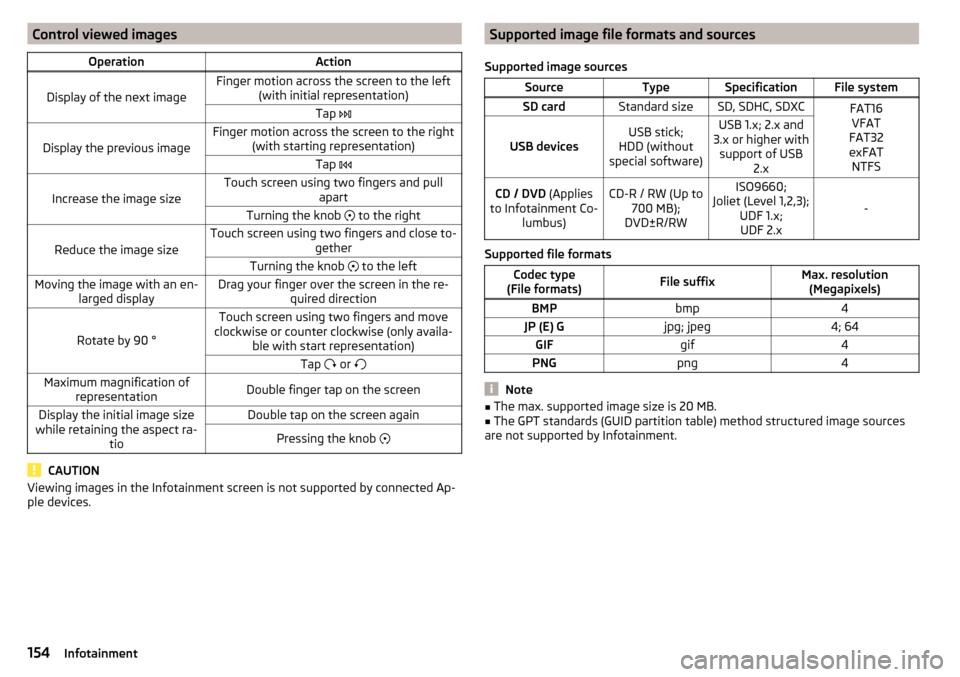
Control viewed imagesOperationAction
Display of the next image
Finger motion across the screen to the left(with initial representation)Tap
Display the previous image
Finger motion across the screen to the right
(with starting representation)Tap
Increase the image size
Touch screen using two fingers and pull
apartTurning the knob to the right
Reduce the image size
Touch screen using two fingers and close to-
getherTurning the knob to the leftMoving the image with an en-
larged displayDrag your finger over the screen in the re- quired direction
Rotate by 90 °
Touch screen using two fingers and move
clockwise or counter clockwise (only availa- ble with start representation)Tap or Maximum magnification of
representationDouble finger tap on the screenDisplay the initial image size
while retaining the aspect ra- tioDouble tap on the screen againPressing the knob
CAUTION
Viewing images in the Infotainment screen is not supported by connected Ap-
ple devices.Supported image file formats and sources
Supported image sourcesSourceTypeSpecificationFile systemSD cardStandard sizeSD, SDHC, SDXCFAT16 VFAT
FAT32
exFAT NTFS
USB devicesUSB stick;
HDD (without
special software)USB 1.x; 2.x and
3.x or higher with support of USB 2.xCD / DVD (Applies
to Infotainment Co- lumbus)CD-R / RW (Up to700 MB);
DVD±R/RWISO9660;
Joliet (Level 1,2,3); UDF 1.x;UDF 2.x
-
Supported file formats
Codec type
(File formats)File suffixMax. resolution (Megapixels)BMPbmp4JP (E) Gjpg; jpeg4; 64GIFgif4PNGpng4
Note
■ The max. supported image size is 20 MB.■The GPT standards (GUID partition table) method structured image sources
are not supported by Infotainment.154Infotainment
Page 157 of 336
Video DVD
Video player
Main menu
Only applies to Infotainment Columbus.
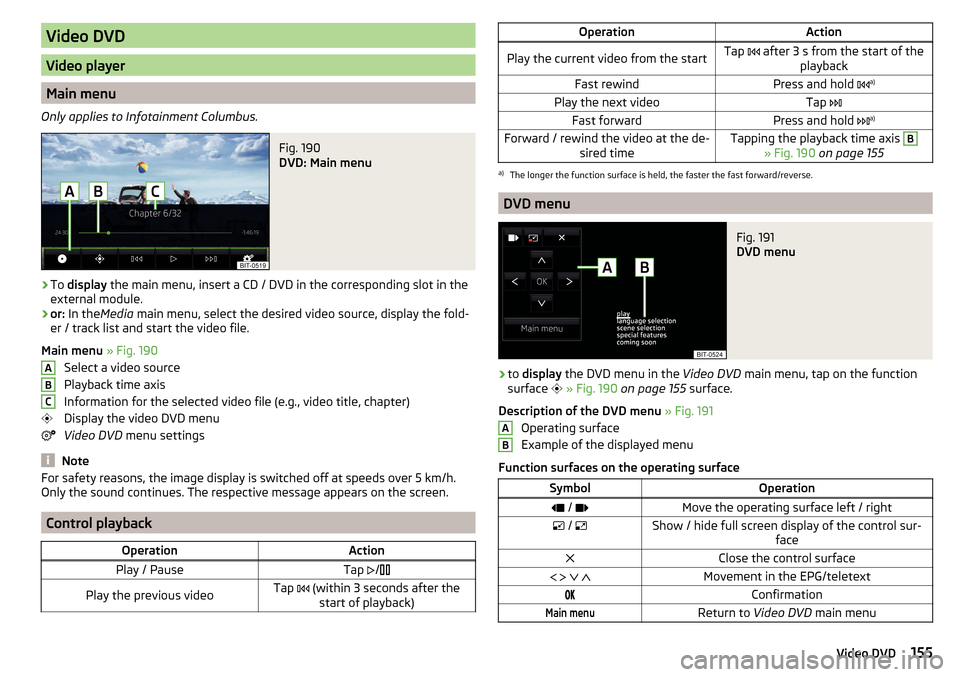
Fig. 190
DVD: Main menu
›
To display the main menu, insert a CD / DVD in the corresponding slot in the
external module.
›
or: In the Media main menu, select the desired video source, display the fold-
er / track list and start the video file.
Main menu » Fig. 190
Select a video source
Playback time axis
Information for the selected video file (e.g., video title, chapter)
Display the video DVD menu
Video DVD menu settings
Note
For safety reasons, the image display is switched off at speeds over 5 km/h.
Only the sound continues. The respective message appears on the screen.
Control playback
OperationActionPlay / PauseTap /Play the previous videoTap (within 3 seconds after the
start of playback)ABCOperationActionPlay the current video from the startTap after 3 s from the start of the
playbackFast rewindPress and hold a)Play the next videoTap
Fast forwardPress and hold a)Forward / rewind the video at the de-
sired timeTapping the playback time axis B
» Fig. 190 on page 155
a)
The longer the function surface is held, the faster the fast forward/reverse.
DVD menu
Fig. 191
DVD menu
›
to display the DVD menu in the Video DVD main menu, tap on the function
surface
» Fig. 190 on page 155 surface.
Description of the DVD menu » Fig. 191
Operating surface
Example of the displayed menu
Function surfaces on the operating surface
SymbolOperation / Move the operating surface left / right / Show / hide full screen display of the control sur-
faceClose the control surface Movement in the EPG/teletextConfirmationMain menuReturn to Video DVD main menuAB155Video DVD
Page 158 of 336
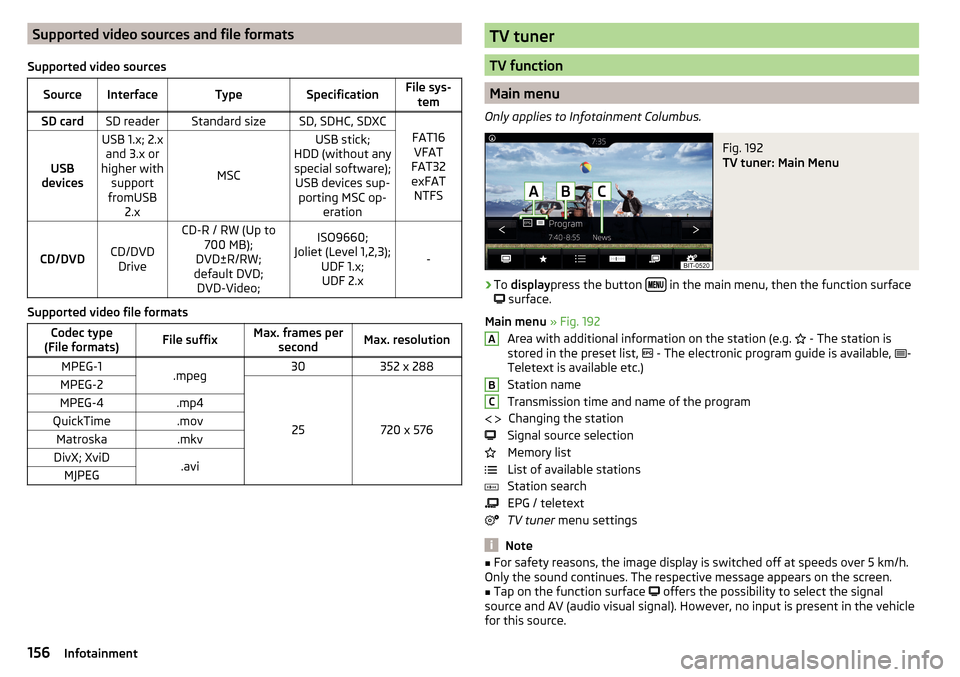
Supported video sources and file formats
Supported video sourcesSourceInterfaceTypeSpecificationFile sys- temSD cardSD readerStandard sizeSD, SDHC, SDXC
FAT16VFAT
FAT32
exFAT NTFSUSB
devices
USB 1.x; 2.x and 3.x or
higher with support
fromUSB 2.x
MSC
USB stick;
HDD (without any special software); USB devices sup- porting MSC op- eration
CD/DVDCD/DVDDrive
CD-R / RW (Up to 700 MB);
DVD±R/RW;
default DVD; DVD-Video;ISO9660;
Joliet (Level 1,2,3); UDF 1.x;UDF 2.x
-
Supported video file formats
Codec type
(File formats)File suffixMax. frames per secondMax. resolutionMPEG-1.mpeg30352 x 288MPEG-2
25720 x 576
MPEG-4.mp4QuickTime.movMatroska.mkvDivX; XviD.aviMJPEGTV tuner
TV function
Main menu
Only applies to Infotainment Columbus.
Fig. 192
TV tuner: Main Menu
›
To display press the button in the main menu, then the function surface
surface.
Main menu » Fig. 192
Area with additional information on the station (e.g. - The station is
stored in the preset list, - The electronic program guide is available,
-
Teletext is available etc.)
Station name
Transmission time and name of the program Changing the station
Signal source selection
Memory list
List of available stations
Station search
EPG / teletext
TV tuner menu settings
Note
■
For safety reasons, the image display is switched off at speeds over 5 km/h.
Only the sound continues. The respective message appears on the screen.■
Tap on the function surface
offers the possibility to select the signal
source and AV (audio visual signal). However, no input is present in the vehicle
for this source.
ABC 156Infotainment
Page 159 of 336
List of available stations / preset list
In the list of available stations, stations are presented in alphabetical order
with a sufficiently strong signal.›
to Display the list of available stations , from theTV tunermain menu, tap the
function surface
or rotate the slider
.
›
To store a station on a station button first tap the function surface
Store
in
the list of available stations and then touch the corresponding station but-
ton.
Up to 99 stations can be stored in the memory list.
Find available stations and select
Infotainment features a TV tuner to receive digital TV channels Freeview and DVB-T2 (Only codec h. 264).
Setting stations
›
In the TV tuner main menu , tap on the function surface
→
or
surface.
A search commences in the selected direction and stops at the next station
group with sufficient signal strength.
The search is carried out by pressing the function button again or
stopped.
Select a station from the preset list
›
In the TV tuner main menu , tap on the function surface
surface.
›
Select the desired station.
Select the station from the station list
›
In the TV tuner main menu, turn the controller
Or tap on the function sur-
face .
›
Select the desired station.
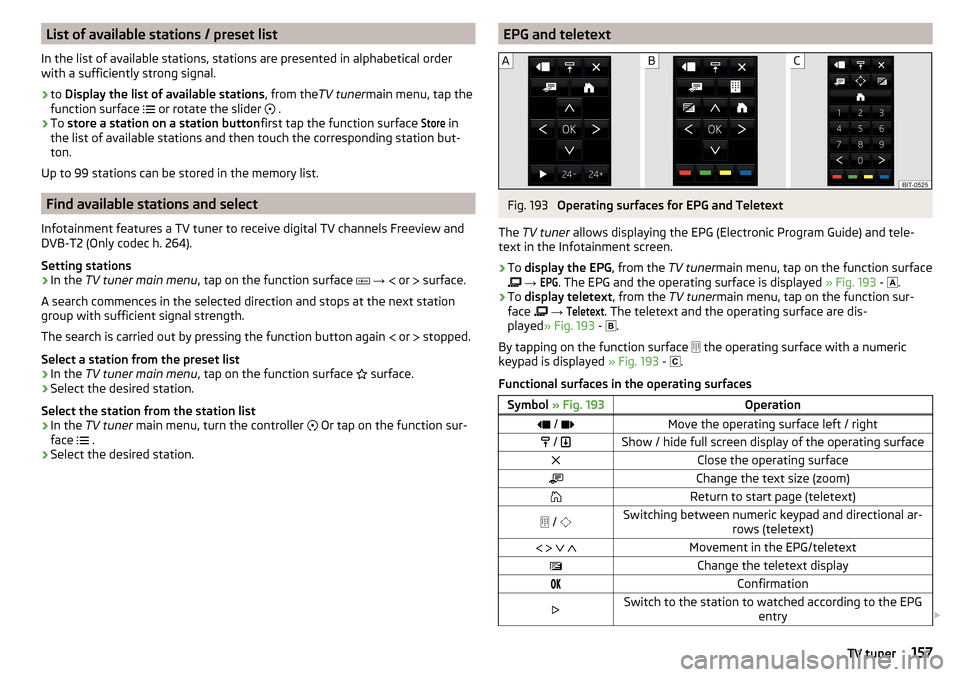
EPG and teletextFig. 193
Operating surfaces for EPG and Teletext
The TV tuner allows displaying the EPG (Electronic Program Guide) and tele-
text in the Infotainment screen.
›
To display the EPG , from the TV tunermain menu, tap on the function surface
→
EPG
. The EPG and the operating surface is displayed » Fig. 193 -
.
›
To
display teletext , from the TV tunermain menu, tap on the function sur-
face
→
Teletext
. The teletext and the operating surface are dis-
played » Fig. 193 -
.
By tapping on the function surface the operating surface with a numeric
keypad is displayed » Fig. 193 -
.
Functional surfaces in the operating surfaces
Symbol » Fig. 193Operation / Move the operating surface left / right / Show / hide full screen display of the operating surfaceClose the operating surfaceChange the text size (zoom)Return to start page (teletext) / Switching between numeric keypad and directional ar-
rows (teletext) Movement in the EPG/teletextChange the teletext displayConfirmationSwitch to the station to watched according to the EPG
entry 157TV tuner
Page 160 of 336
Symbol » Fig. 193OperationDisplay program information for the last 24 hours (EPG)Display program information for the next 24 hours (EPG) Display the specified line in the lower teletext page (the
same colour field or number)Media Command
Operation
Introduction to the subject
Applies to Infotainment Amundsen.
The Media Command function allows playback of audio files or videos in up to
two Tablets That are connected to Infotainment via WLAN, to control Infotain-
ment .
The Media Command function enables operation of tablets with the operating
system Android or iOS.
Connect tablet to Infotainment
›
Turn on the Infotainment hotspot (WLAN) (press the button then tap on
the function surface Tap
→
WLAN
→
Mobile hotspot
→
Mobile hotspot
).
›
Turn on Wi-Fi in the tablet.
›
Establishing a Wi-Fi connection in the tablet » page 174, Hotspot (WLAN) .
›
In the tablet, start the application ŠKODA Media Command.
CAUTION
If several devices are connected to Infotainment via WLAN, there is a risk that
the quality of the WLAN connection, and thus the function of Media Command
may be affected.
Main Menu - connected to a tablet
Fig. 194
Main menu: a tablet is connected
›
To display the Media Command main menu, press the button , then tap
on the function surface
.
158Infotainment