sensor SSANGYONG KORANDO 1997 Service Repair Manual
[x] Cancel search | Manufacturer: SSANGYONG, Model Year: 1997, Model line: KORANDO, Model: SSANGYONG KORANDO 1997Pages: 2053, PDF Size: 88.33 MB
Page 1389 of 2053

TRANSFER CASE 5D1-67
SSANGYONG MY2002
KAA5D260
KAA5D270
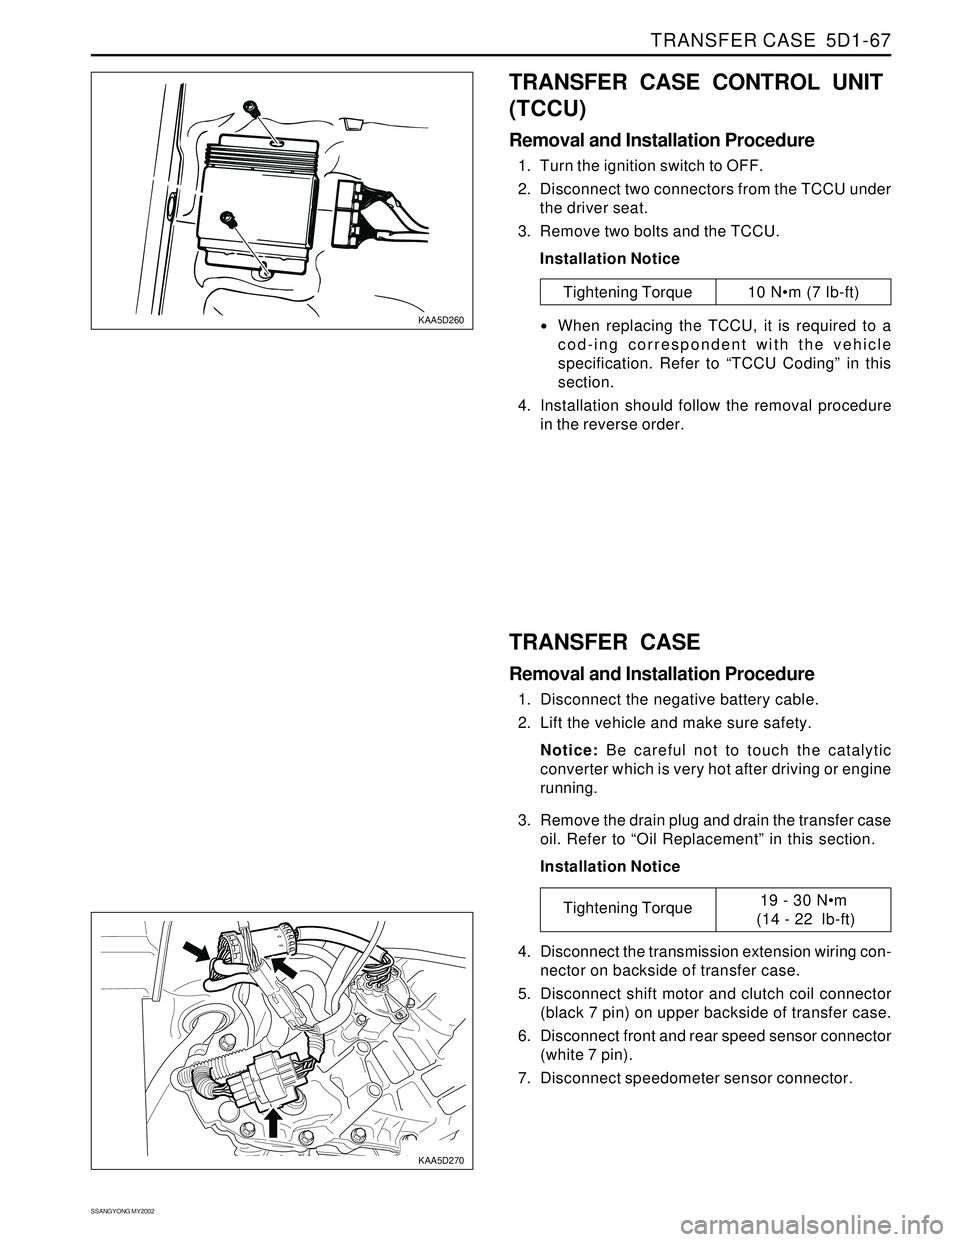
TRANSFER CASE CONTROL UNIT
(TCCU)
Removal and Installation Procedure
1. Turn the ignition switch to OFF.
2. Disconnect two connectors from the TCCU under
the driver seat.
3. Remove two bolts and the TCCU.
Installation Notice
Tightening Torque 10 Nm (7 lb-ft)
When replacing the TCCU, it is required to a
cod-ing correspondent with the vehicle
specification. Refer to “TCCU Coding” in this
section.
4. Installation should follow the removal procedure
in the reverse order.
TRANSFER CASE
Removal and Installation Procedure
1. Disconnect the negative battery cable.
2. Lift the vehicle and make sure safety.
Notice: Be careful not to touch the catalytic
converter which is very hot after driving or engine
running.
3. Remove the drain plug and drain the transfer case
oil. Refer to “Oil Replacement” in this section.
Installation Notice
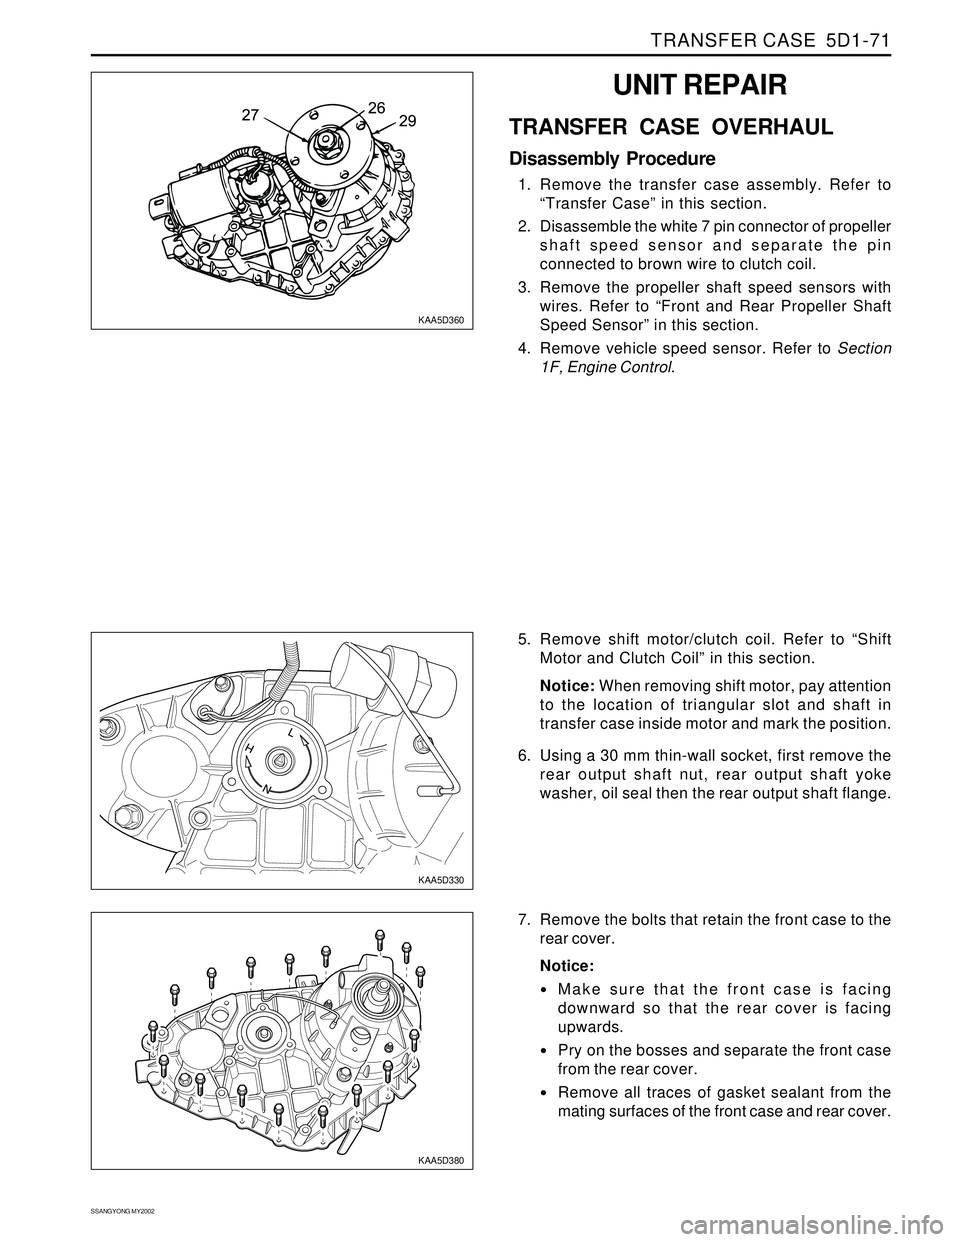
4. Disconnect the transmission extension wiring con-
nector on backside of transfer case.
5. Disconnect shift motor and clutch coil connector
(black 7 pin) on upper backside of transfer case.
6. Disconnect front and rear speed sensor connector
(white 7 pin).
7. Disconnect speedometer sensor connector.
Tightening Torque19 - 30 Nm
(14 - 22 lb-ft)
Page 1392 of 2053

SSANGYONG MY2002
5D1-70 TRANSFER CASE
KAA5D340
KAA5D350
FRONT AND REAR PROPELLER
SHAFT SPEED SENSOR
Removal and Installation Procedure
1. Disconnect negative battery cable.
2. Disconnect front and rear speed sensor connector
(white 7 pin).
3. Remove shift motor. Refer to “Shift Motor” in this
sec-tion.
4. Remove front and rear propeller shaft speed
sensor retaining bolts.
Installation Notice
6. Disassemble the connector of front and rear
propeller shaft speed sensor.
7. Replace front or rear propeller shaft speed sensor,
as necessary.
Notice:
While replacing the speed sensor, make sure
the proper pin position.
Do not remove one wire to clutch coil in the
transfer case.
Make tidy on the wiring harness including
conduct tube.
8. Installation should follow the removal procedure
in the reverse order. 5. Remove the speed sensors by lifting up using
a tool such as flat screw drive.
Notice: Do not shock the speed sensor because
it is too sensitive at shock.
Tightening Torque3 - 6 Nm
(27 - 53 lb-in)
Page 1393 of 2053

TRANSFER CASE 5D1-71
SSANGYONG MY2002
KAA5D360
KAA5D330
KAA5D380
UNIT REPAIR
TRANSFER CASE OVERHAUL
Disassembly Procedure
1. Remove the transfer case assembly. Refer to
“Transfer Case” in this section.
2. Disassemble the white 7 pin connector of propeller
shaft speed sensor and separate the pin
connected to brown wire to clutch coil.
3. Remove the propeller shaft speed sensors with
wires. Refer to “Front and Rear Propeller Shaft
Speed Sensor” in this section.
4. Remove vehicle speed sensor. Refer to Section
1F, Engine Control.
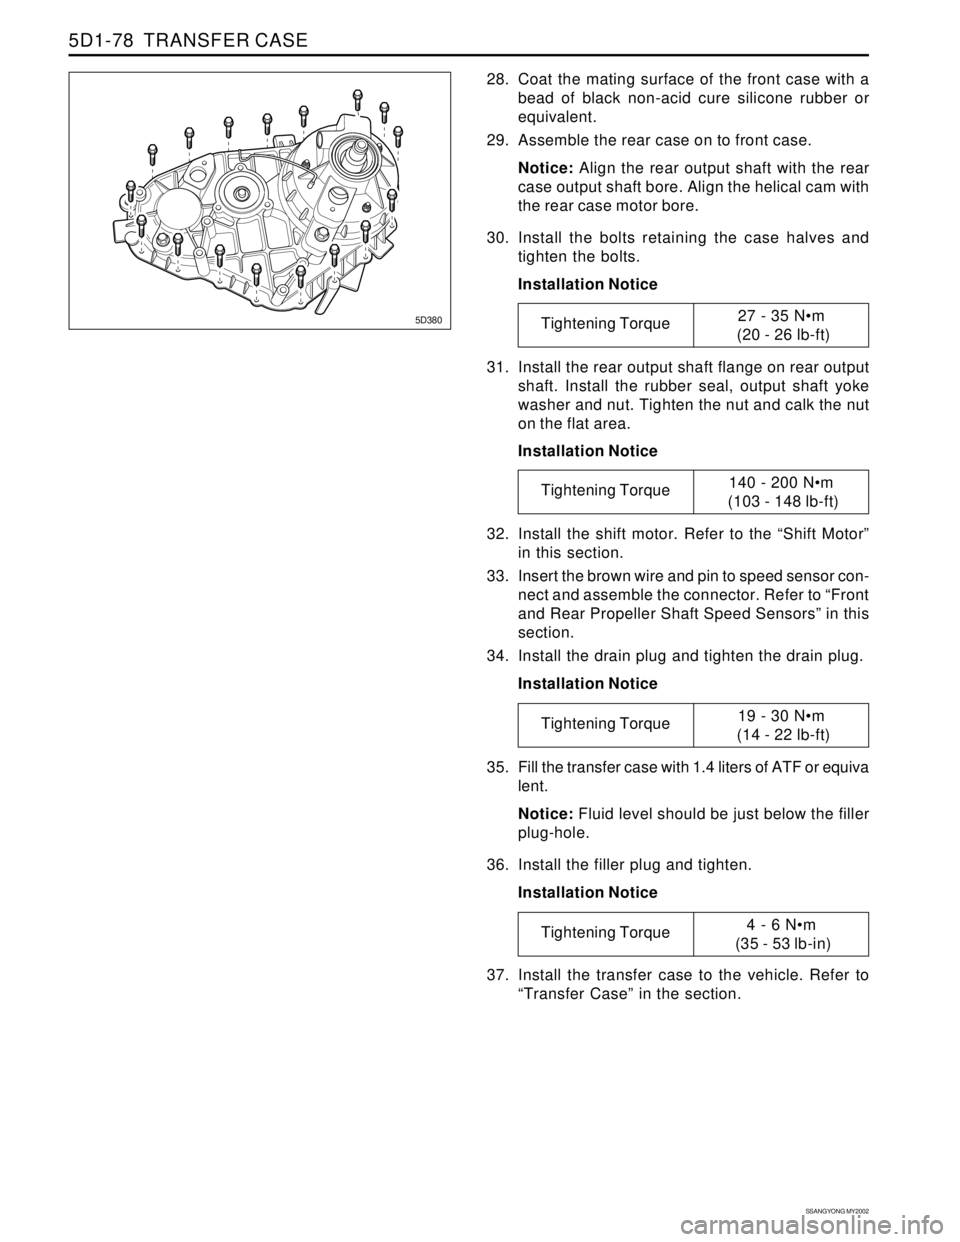
7. Remove the bolts that retain the front case to the
rear cover.
Notice:
Make sure that the front case is facing
downward so that the rear cover is facing
upwards.
Pry on the bosses and separate the front case
from the rear cover.
Remove all traces of gasket sealant from the
mating surfaces of the front case and rear cover. 5. Remove shift motor/clutch coil. Refer to “Shift
Motor and Clutch Coil” in this section.
Notice: When removing shift motor, pay attention
to the location of triangular slot and shaft in
transfer case inside motor and mark the position.
6. Using a 30 mm thin-wall socket, first remove the
rear output shaft nut, rear output shaft yoke
washer, oil seal then the rear output shaft flange.
Page 1394 of 2053

SSANGYONG MY2002
5D1-72 TRANSFER CASE
KAA5D390
KAA5D400
KAA5D410
KAA5D420
8. Remove the rear output shaft oil seal and discard
it, if required.
9. Remove the speedometer drive gear and rear pro-
peller shaft speed sensor tooth wheel.
10. Remove the internal snap ring that retains the rear
output shaft bearing in the bore.
Notice: Push the bearing from the outside of the
case.
14. Remove the balls, apply cam and wave washer
from the output shaft.
15. Remove snap ring from output shaft.
16. Remove clutch pack assembly from output shaft. 12. Remove thrust bearing from the rear output shaft.
13. Remove the clutch coil housing from the rear
output shaft. 11. Remove three nuts retaining the clutch coil assem-
bly and pull the clutch coil assembly along with
the wire from the case.
Page 1395 of 2053

TRANSFER CASE 5D1-73
SSANGYONG MY2002
KAA5D430
KAA5D440
KAA5D450
KAA5D460
17. Remove the front propeller shaft speed sensor
tooth wheel.
18. Remove the chain, driven sprocket and drive
sprocket as an assembly.
19. Remove thrust washer from output shaft.
25. With expanding the tangs of the snap ring under
the planetary carrier assembly using SST snap ring
plier support the input shaft against a bench, push
the case down and slide the input shaft bearing.
Remove the input shaft and planetary carrier.
26. Remove and discard the input shaft oil seal as re
quired.
27. Remove the internal snap ring from the planetary
carrier and separate the planetary carrier from the
input shaft. 22. Remove the helical cam and shift rail as an assem-
bly by gently pulling out the shift rail. Check the
helical cam for damages and replace it if required.
23. Remove the high-low shift fork and high-low collar
as an assembly.
24. Remove the shift shaft. 20. Remove the magnet from the slot in the front of
the case bottom.
21. Remove the rear output shaft and oil pump as an
as-sembly.
Notice: If there is removal resistance, do not
pound or use force to disassemble the pump. Do
not disassemble oil pump. It is serviced only as
an assembly. Check the pump to make sure the
pump rotates freely.
Page 1398 of 2053

SSANGYONG MY2002
5D1-76 TRANSFER CASE
KAA5D440
KAA5D430
KAA5D420
KAA5D410
11. Install the output shaft and oil pump in the input
shaft
Notice:
If a new pump is used, align the flat of the
output shaft and the flat of the pump. Slide the
pump onto the rear output shaft.
Do not remove the plastic insert from the bore
of the new pump. Discard it after it slides out
during pump installation to the rear output shaft.
While turning the output shaft, prime the pump
through the oil filter pickup tube or housing inlet
hole with clean ATF or equivalent.
12. Install the magnet in the slot in the front case just
above the oil filter leg.
13. Install the thrust washer on the rear output shaft.
14. Install the chain, drive sprocket and driven
sprocket as an assembly over the output shafts.
Notice: The driven sprocket on the front output
shaft must be installed with the marking REAR
facing toward the rear case, if so marked.
15. Install front propeller shaft speed sensor tooth
wheel onto the front output shaft.
19. Install cam and coil housing assembly onto rear
out-put shaft.
20. Install thrust bearing assembly onto output shaft.
21. Install the rear output shaft bearing, if removed.
Notice: Make sure that the bearing is not cocked
in the bore.
22. Install the internal snap ring that retains the
bearing to the rear case. 16. Install clutch pack assembly onto the rear output
shaft
17. Install snap ring onto the rear output shaft.
Notice: If the snap ring will not install, the thrust
washer inside the clutch pack may not be seated
properly.
18. Install wave spring, apply cam and balls.
Page 1399 of 2053

TRANSFER CASE 5D1-77
SSANGYONG MY2002
KAA5D420
KAA5D590
23. Install the clutch coil and tighten three bolts.
Installation Notice
Caution: Do not kink or trap the wire while
seating the clutch coil to the case.
24. Install the pin on the tang end of the helical cam
into the hole in the front case.
25. Position the torsion spring tangs so that they are
pointing toward the top side of the transfer case
and just touching the high-low shift fork.
Caution: Do not bend the helical cam during
installation to the front case because of possible
damage to the pin at the tang end of the motor
shaft.
26. Install the shift rail through the high-low shift fork
and make sure that the reverse gear shift rail is
seated in the front case bore.
27. Install rear propeller shaft speed sensor toothed
wheel, vehicle speedometer gear and rear output
shaft seal if removed. Use oil seal installer or equiv-
alent.
Tightening Torque8 - 11 Nm
(6 - 8 lb-ft)
Page 1400 of 2053

SSANGYONG MY2002
5D1-78 TRANSFER CASE
31. Install the rear output shaft flange on rear output
shaft. Install the rubber seal, output shaft yoke
washer and nut. Tighten the nut and calk the nut
on the flat area.
Installation Notice
32. Install the shift motor. Refer to the “Shift Motor”
in this section.
33. Insert the brown wire and pin to speed sensor con-
nect and assemble the connector. Refer to “Front
and Rear Propeller Shaft Speed Sensors” in this
section.
34. Install the drain plug and tighten the drain plug.
Installation Notice
35. Fill the transfer case with 1.4 liters of ATF or equiva
lent.
Notice: Fluid level should be just below the filler
plug-hole.
36. Install the filler plug and tighten.
Installation Notice
37. Install the transfer case to the vehicle. Refer to
“Transfer Case” in the section.
5D380
28. Coat the mating surface of the front case with a
bead of black non-acid cure silicone rubber or
equivalent.
29. Assemble the rear case on to front case.
Notice: Align the rear output shaft with the rear
case output shaft bore. Align the helical cam with
the rear case motor bore.
30. Install the bolts retaining the case halves and
tighten the bolts.
Installation Notice
Tightening Torque27 - 35 Nm
(20 - 26 lb-ft)
Tightening Torque140 - 200 Nm
(103 - 148 lb-ft)
Tightening Torque19 - 30 Nm
(14 - 22 lb-ft)
Tightening Torque4 - 6 Nm
(35 - 53 lb-in)
Page 1410 of 2053

SSANGYONG MY2002
5D2-10 TRANSFER CASE (PART TIME - 4408)
DIAGNOSTIC INFORMATION AND PROCEDURES
GENERAL DIAGNOSIS
Faulty or damaged TCCU, speed
sensor, motor, clutch or internal wirings
Damaged or worn shift cam, hub, fork
and rail shift
Binding shift fork, hub collar or gear
Broken drive chain
Improper or low oil
Loosened bolts or mounted parts
Noisy T/C bearing
Gear abnormal noise
Worn or damaged sprockets or drive
chain
Incorrect tire pressure
Cracked transfer case
Leakage from other parts
Breather clogging
Improper or too much oil
Loosened sealing bolts
Improperly applied sealant
Worn or damaged oil seal
Overhaul and check, replace if neces-
sary.
Overhaul and check for wear and
damage.
Replace if necessary.
Check sliding parts, replace if neces-
sary.
Drain and replace with specified oil.
Retighten as specified.
Disassemble bearings and parts and
check for wear or damage. Replace if
necessary.
Check for wear and damage including
speedometer gear, replace if neces-
sary.
Disassemble and check for wear and
damage, replace if necessary.
Adjust tire pressure.
Replace the case.
Clean case and parts and check for
leakage.
Remove breather hose and clean,
replace if necessary.
Use specified oil and adjust oil level.
Retighten
Use specified sealant and retighten.
Replace Check Symptoms
Electric shift problems
Cannot front wheel
drive when shifted 4H,
4L
Noise in 4WD opera-
tion
Noise in 4H or 4L
Transfer case oil
leakage
Action
Page 1411 of 2053

TRANSFER CASE (PART TIME - 4408) 5D2-11
SSANGYONG MY2002
KAA5D080
KAA5D090
KAA5D100
SELF-DIAGNOSIS TEST
System Description
1. TCCU detects transfer case system malfunctions
and indicates malfunctioning part(s) through
flashing 4H, 4L indicator lights.
Using a service connector, connect it to the
diagnosis box in under instrument pannel and read
the flashing of the “4WD CHECK” indicator light.
The flashing indicator light will show you defective
code(s).
2. Identify 7 defective codes after reading the
flashing indicator light.
TCCU
Shift motor
Magnetic synchronizer clutch
Speed sensor
Hub solenoid
Selector switch
Motor position sensor
KAA5D110
3. Transfer case system is malfunctioning when:
4H, 4L indicator lights are remain on after 0.6
second when turning the ignition switch ON.
4H, 4L indicator lights are continuously come
on during driving.
4. If only 1 part is malfunctioning, 4WD CHECK
indicator light will display defective code 3 times
continuously.
5. If more then 2 part is malfunctioning, the first
malfunctioning part will be displayed 3 times and
following malfunctioning parts will be displayed .
6. To read defective code, connect the service
connector and turn the ignition switch ‘ON’.
7. After repairing, eliminate the defective code stored
in the TCCU.
Notice: Before replacing the malfunction parts with
defective code, check the wires and connectors
for proper condition.