engine SSANGYONG KORANDO 1997 Service Repair Manual
[x] Cancel search | Manufacturer: SSANGYONG, Model Year: 1997, Model line: KORANDO, Model: SSANGYONG KORANDO 1997Pages: 2053, PDF Size: 88.33 MB
Page 750 of 2053

OM600 ENGINE COOLING 1D3 -- 15
D AEW OO M Y_2000
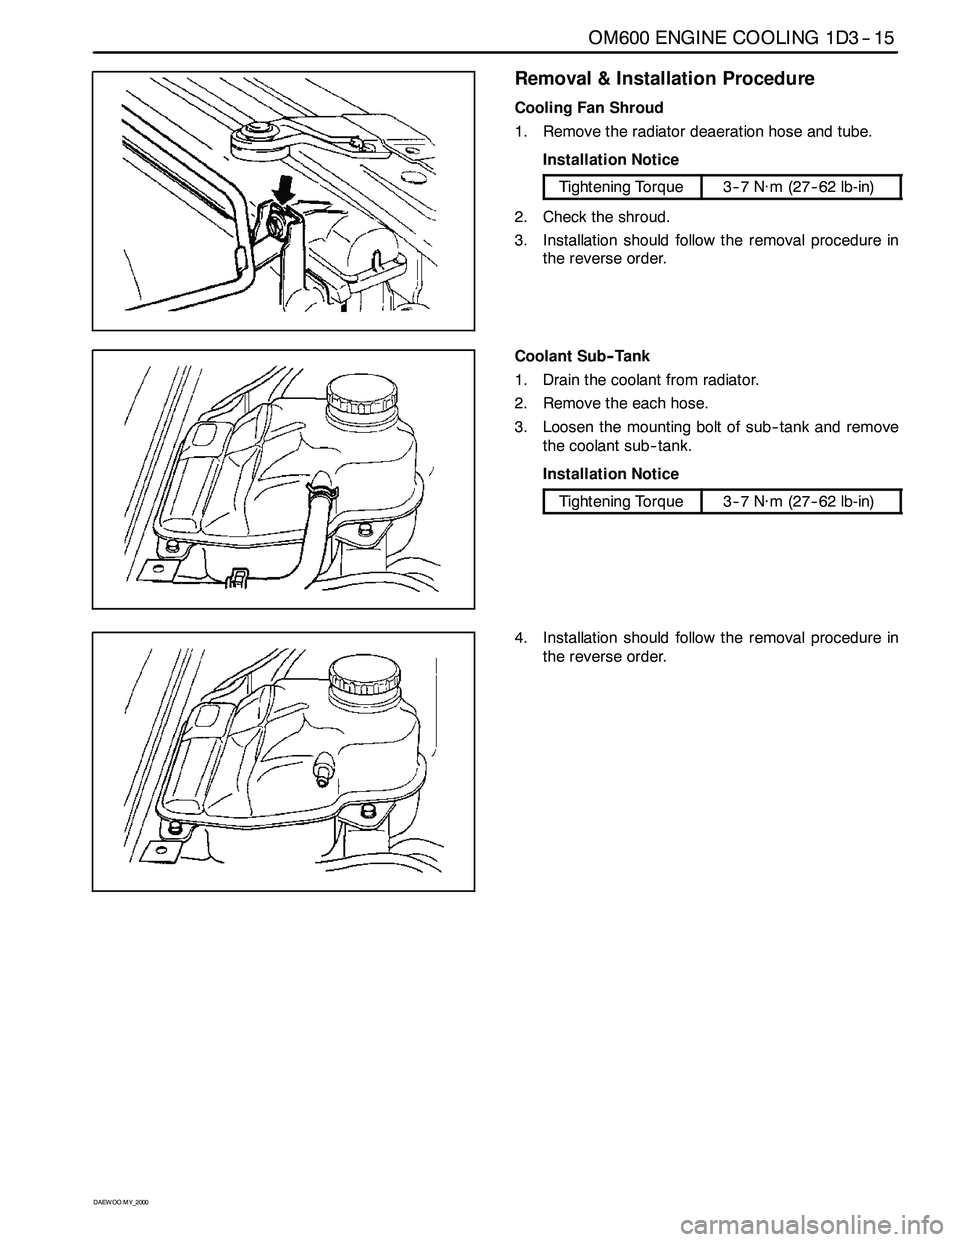
Removal & Installation Procedure
Cooling Fan Shroud
1. Remove the radiator deaeration hose and tube.
Installation Notice
Tightening Torque3--7 N∙m (27-- 62 lb-in)
2. Check the shroud.
3. Installation should follow the removal procedure in
the reverse order.
Coolant Sub-- Tank
1. Drain the coolant from radiator.
2. Remove the each hose.
3. Loosen the mounting bolt of sub-- tank and remove
the coolant sub-- tank.
Installation Notice
Tightening Torque3--7 N∙m (27-- 62 lb-in)
4. Installation should follow the removal procedure in
the reverse order.
Page 751 of 2053

1D3 -- 16 OM600 ENGINE COOLING
D AEW OO M Y_2000
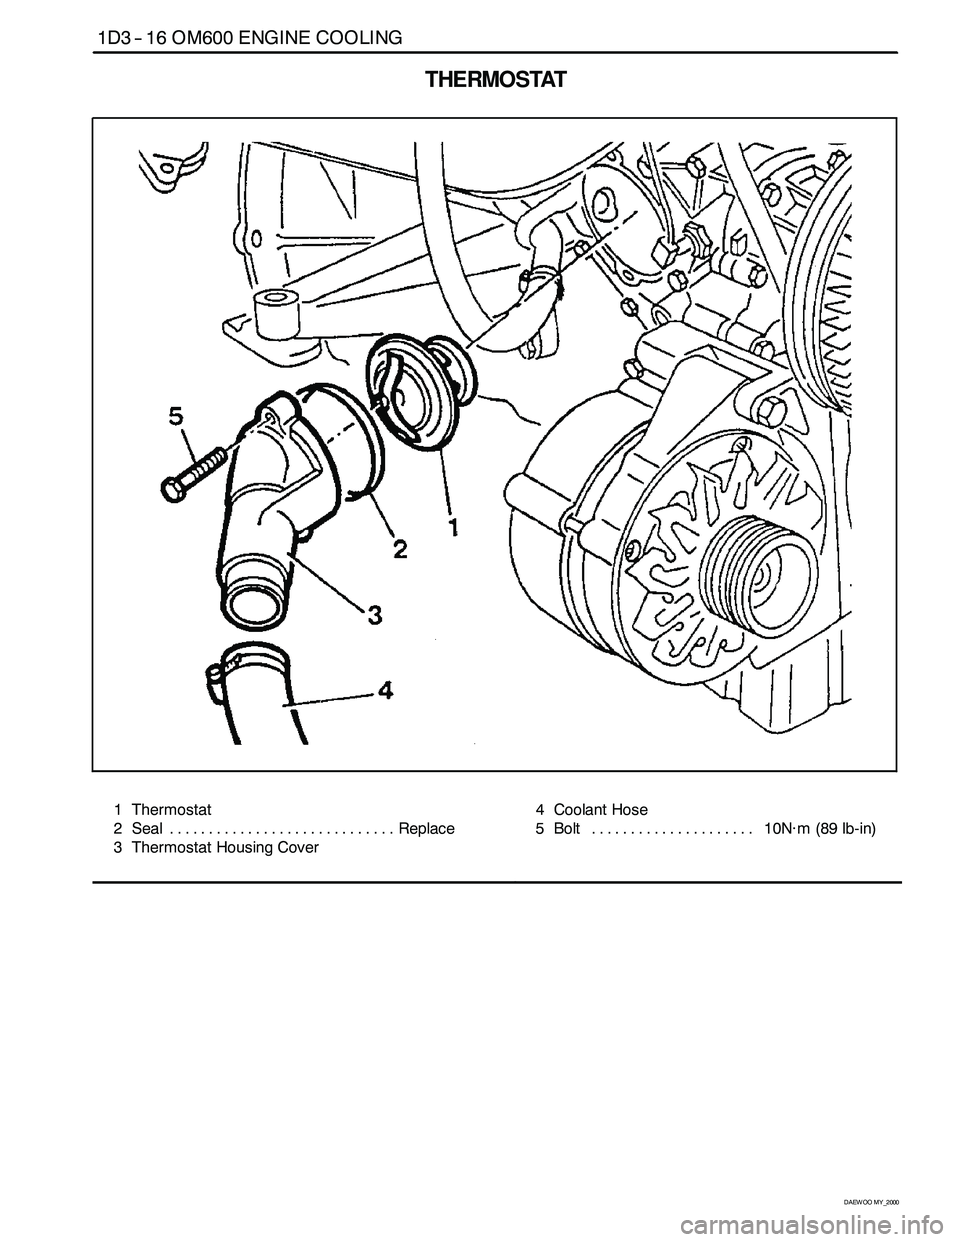
THERMOSTAT
1 Thermostat
2 Seal Replace.............................
3 Thermostat Housing Cover4 Coolant Hose
5 Bolt 10N∙m(89lb-in) .....................
Page 752 of 2053

OM600 ENGINE COOLING 1D3 -- 17
D AEW OO M Y_2000
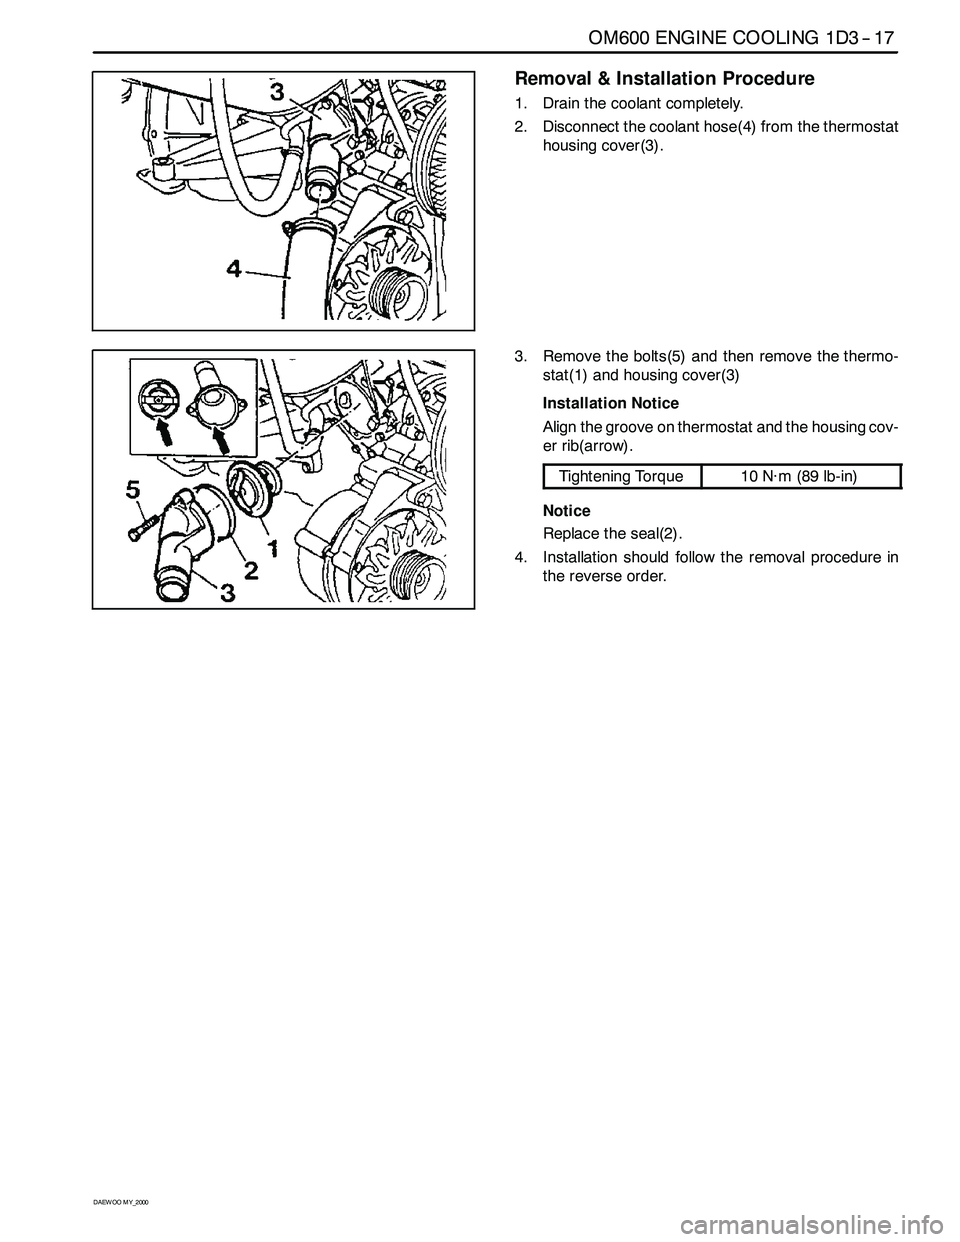
Removal & Installation Procedure
1. Drain the coolant completely.
2. Disconnect the coolant hose(4) from the thermostat
housing cover(3).
3. Remove the bolts(5) and then remove the thermo-
stat(1) and housing cover(3)
Installation Notice
Align the groove on thermostat and the housing cov-
er rib(arrow).
Tightening Torque10 N∙m(89lb-in)
Notice
Replace the seal(2).
4. Installation should follow the removal procedure in
the reverse order.
Page 753 of 2053

D AEW OO M Y_2000
SECTION 1E3
OM600 ENGINE ELECTRICAL
Caution: Disconnect the negative battery cable before removing or installing any electrical unit or when a
tool or equipment could easily come in contact with exposed electrical terminals. Disconnecting this cable
will help prevent personal injury and damage to the vehicle. The ignition must also be in LOCK unless other -
wise noted.
TABLE OF CONTENTS
Specifications 1E3 -- 1............................
General Specifications 1E3-- 1....................
Maintenance and Repair 1E3 -- 2...................
On-- Vehicle Service 1E3-- 2.........................Glow Plug 1E3-- 2...............................
Generator 1E3-- 6...............................
Starter Motor 1E3-- 8............................
SPECIFICATIONS
GENERAL SPECIFICATIONS
ApplicationDescription
Generator12V -- 75A
Starter12V -- 2.2kW
Glow Plug11. 5 V
Page 754 of 2053

1B3 -- 2 OM600 ENGINE MECHANICAL
D AEW OO M Y_2000
SPECIFICATIONS
FASTENER TIGHTENING SPECIFICATIONS
Engine Assembly
ApplicationNSmLb-- FtLb-- In
Skid Plate Bolt28 -- 4721 -- 35--
Drain Plug Bolt3022--
Coolong Fan Shroud Bolt3--7--27 -- 62
Control Linkage Nut8--186--13--
Clutch Linkage Cylinder Nut20 -- 3415 -- 25--
Exhaust Manifold Bolt3022--
Propeller Shaft Bolt & Nut (Axle)70 -- 8052 -- 59--
Propeller Shaft Bolt & Nut (T/C)81 -- 8960 -- 66--
Engine Mounting Nut50 -- 7537 -- 55--
Crankshaft Assembly
ApplicationNSmLb-- FtLb-- In
Cooling Fan Belt Pulley Bolt10--89
Socket Bolt2317--
Tighten The Bolt200 / 90_148 / 90_--
End Cover Bolt10--89
Crankshaft Bearing Cap Bolt55 / 90_41 / 90_--
Ball Bearing45 / 90_33 / 90_--
Camshaft Sprocket Bolt25 / 90_18 / 90_--
Oil Pump Sprocket Bolt2518--
Piston
ApplicationNSmLb-- FtLb-- In
Connecting Rod Bolt35 / 90_26 / 90_--
Flywheel
ApplicationNSmLb-- FtLb-- In
12-- Sided Stretch Bolt45 / 90_33 / 90_--
Page 755 of 2053

OM600 ENGINE MECHANICAL 1B3 -- 3
D AEW OO M Y_2000
Cylinder Head
ApplicationNSmLb-- FtLb-- In
Prechamber Threaded Ring13096--
Cylinder Head Cover Bolt10--89
Fuel Injsction Pipe Nut1813--
Socket Bolt2518--
Fuel Filter Pipe Bolt2518--
Idle Pulley Bolt2317--
Damper Bolt2115--
Camshaft Bearing Cap Bolt2518--
Camshaft Sprocket Bolt25 / 90_18 / 90_--
Exhaust Pipe Bolt& Nut2518--
Chain Tensioner8059--
Injection Nozzle4030--
Intake Manifold Not2518--
Injection Nozzle Pipe Not1813--
Oil Dipstick Tube Bolt10--89
Screw Plug M18 x 155037--
Cam Support & Shaft
ApplicationNSmLb-- FtLb-- In
Stud Bolt12--106
Exhaust Manifold Not2518--
CamShaft Bearing Cap Bolt2518--
12-- Sided Bolt (M11)25 / 90_18 / 90_--
Timing Cover
ApplicationNSmLb-- FtLb-- In
Oil Pan Bolt -- Socket Bolt10--89
Oil Pan Bolt--M610--89
Oil Pan Bolt--M232317--
Belt Pulley Bolt3224--
Guide Pulley Bolt4--35
Guide Pulley Bracket Nut2317--
Chain Tensioner8059--
Tesioning Lever Bolt2317--
Page 760 of 2053

1E3 -- 6 OM600 ENGINE ELECTRICAL
D AEW OO M Y_2000
GENERATOR
Preceding Work : Removal of poly V-- belt
1 Cooling Fan
2Bolt 45N∙m (33 lb-ft) .....................
3Bolt 45N∙m (33 lb-ft) .....................4 Generator
5 Plug Connection
Page 761 of 2053

OM600 ENGINE ELECTRICAL 1E3 -- 7
D AEW OO M Y_2000
Removal & Installation Procedure
1. Disconnect the negative terminal of the battery.
2. Disconnect the plug connection (5).
3. OM 662 Engine
Align the groove of cooling fan with bolt (2) (arrow).
4. Remove the bolts (2, 3) and take out the alternator.
Tightening Torque45 N∙m (33 lb-ft)
5. Installation should follow the removal procedure in
the reverse order.
Page 762 of 2053

1E3 -- 8 OM600 ENGINE ELECTRICAL
D AEW OO M Y_2000
STARTER MOTOR
1 Starter Motor
2 Washer3Nut 15N∙m (11 lb-ft) ......................
4Bolt 48N∙m (35 lb-ft) .....................
Removal & Installation Procedure
1. Disconnect the battery terminals.
2. Disconnect the starter motor cable harnesses.
3. Remove the bolts and then remove the starter mo-
tor.
4. Installation should follow the removal procedure in
the reverse order.
Page 763 of 2053

D AEW OO M Y_2000
SECTION 1F3
OM600 ENGINE CONTROLS
Caution: Disconnect the negative battery cable before removing or installing any electrical unit or when a
tool or equipment could easily come in contact with exposed electrical terminals. Disconnecting this cable
will help prevent personal injury and damage to the vehicle. The ignition must also be in LOCK unless other -
wise noted.
TABLE OF CONTENTS
Specifications 1F3 -- 1............................
Fastener Tightening Specifications 1F3 -- 1..........
Maintenance and Repair 1F3 -- 2...................
On -- Vehicle Service 1F3 -- 2.........................
Fuel System 1F3 -- 2.............................
Fuel Injection Pump Coding 1F3 -- 3................
Fuel Tank 1F3 -- 4...............................
Vacuum Control System Test 1F3 -- 5..............
Vacuum Pump Test 1F3 -- 10......................
Vacuum Pump 1F3 -- 12..........................
Vacuum Unit Replacement 1F3 -- 14...............
Idle Speed Adjustment 1F3 -- 15...................Fuel Pump Test 1F3 -- 17.........................
Fuel Pump 1F3 -- 20.............................
Injection Nozzle Test 1F3-- 21.....................
Injection Nozzles 1F3-- 24........................
Injection Nozzle Repair 1F3 -- 26...................
Removal and Installation of
Injection Timing Device 1F3 -- 29.................
Injection Timing Device 1F3 -- 34...................
StartofDeliveryTest
(Position Sensor, RIV Method) 1F3 -- 36..........
Fuel Injection Pump 1F3 -- 45.....................
SPECIFICATIONS
FASTENER TIGHTENING SPECIFICATIONS
ApplicationN∙mLb-- FtLb-In
Fuel Tank Mounting Nut28 -- 4721 -- 35--
Fuel Pump Pressure Line1310--
Fuel Injection Nozzle35 -- 4026 -- 30--
Fuel Injection Pipe1813--
Nozzle Tensioning Nut8059--
Screw Plug3022--
Left -- Hand Thread Bolt4634--