SSANGYONG KORANDO 1997 Service Repair Manual
KORANDO 1997
SSANGYONG
SSANGYONG
https://www.carmanualsonline.info/img/67/57502/w960_57502-0.png
SSANGYONG KORANDO 1997 Service Repair Manual
Trending: oil filter, door lock, open gas tank, technical specifications, oil, octane, fuel additives
Page 771 of 2053
1F3 -- 14 OM600 ENGINE CONTROLS
D AEW OO M Y_2000
VACUUM UNIT REPLACEMENT
1 Bracket
2Bolt
3 Vacuum Unit
4 Vacuum Line
5 Seal Replace.............................
Page 772 of 2053
OM600 ENGINE CONTROLS 1F3 -- 15
D AEW OO M Y_2000
IDLE SPEED ADJUSTMENT
Service Data
EngineIdle Speed
OM661LA Engine750 -- 850 rpm
OM662LA Engine720 -- 820 rpm
Tools Required
667 589 00 21 00 TDC Pulse Generato
Commercial Tool
Digital Testere.g. Bosch, MOT 001.03g
Sun, DIT 9000
Adjustment Procedure
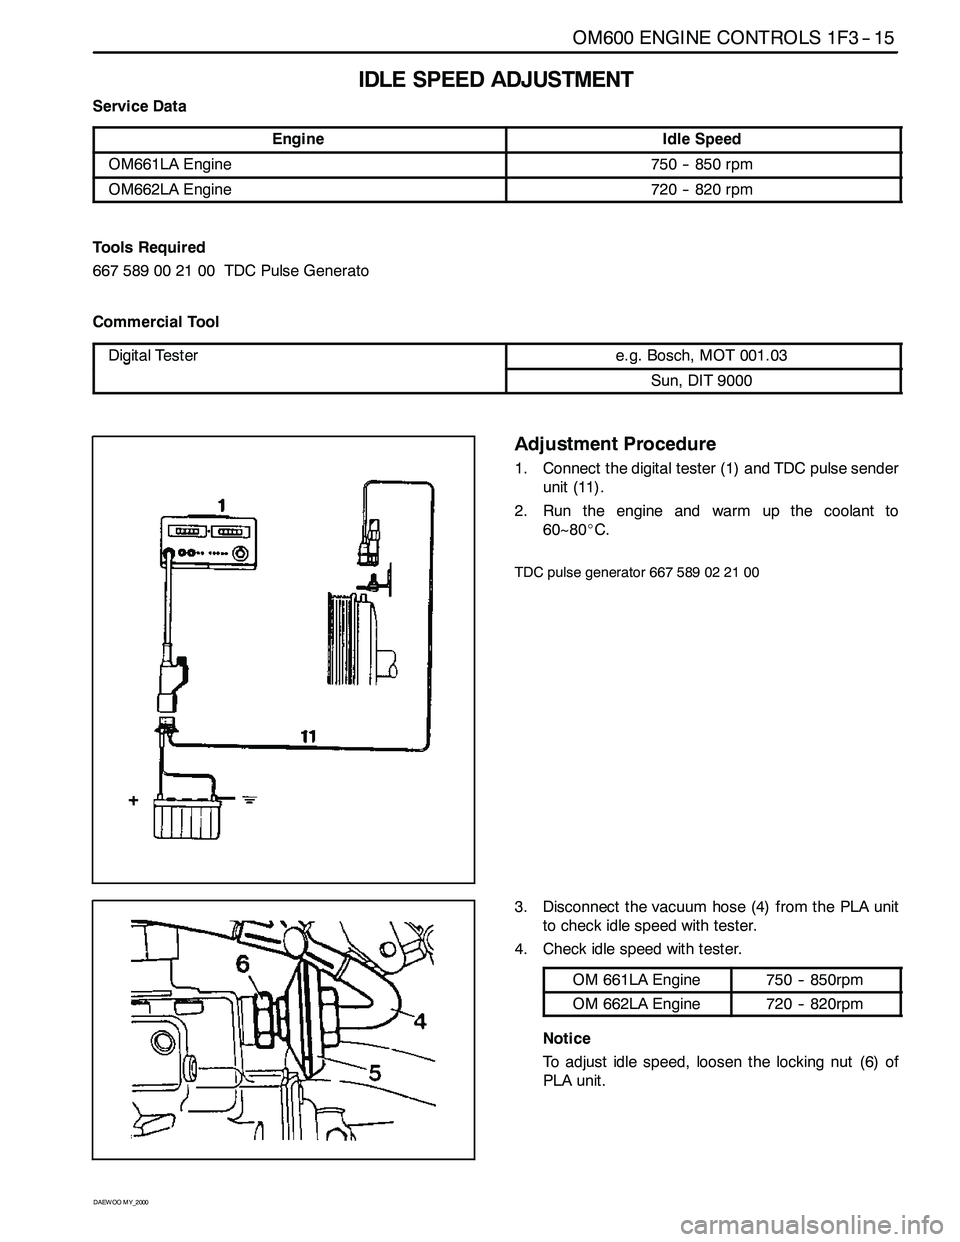
1. Connect the digital tester (1) and TDC pulse sender
unit (11).
2. Run the engine and warm up the coolant to
60~80_C.
TDC pulse generator 667 589 02 21 00
3. Disconnect the vacuum hose (4) from the PLA unit
to check idle speed with tester.
4. Check idle speed with tester.
OM 661LA Engine750 -- 850rpm
OM 662LA Engine720 -- 820rpm
Notice
To adjust idle speed, loosen the locking nut (6) of
PLA unit.
Page 773 of 2053
1F3 -- 16 OM600 ENGINE CONTROLS
D AEW OO M Y_2000
5. Ensure not to damage the idle spring in the governor
and adjust idle speed by turning the PLA unit (5)
slowly.
ClockwiseRPM Decrease
CounterclockwiseRPM Increase
Notice
Do not rotate the PLA unit over 1/2 turn from the
position marking. If do, idle spring in the governor
will be severely damaged.
6. After adjustment, tighten the locking nut and place
the position marking with different color of paint.
Notice
If there are no changes in idle speed with PLA unit
adjustment, perform the service at a BOSCH Ser-
vice Center.
7. Connect the vacuum pump to the PLA vacuum unit
and build up vacuum approx. 500mbar. If engine
rpm increases by approx. 100rpm, It is normal.
Vacuum Pump 001 589 73 21 00
8. Connect the vacuum line (4).
9. Switch on all ancillaries and check the idle speed.
Page 774 of 2053
OM600 ENGINE CONTROLS 1F3 -- 17
D AEW OO M Y_2000
FUEL PUMP TEST
Notice
Before test, replace the fuel filter cartridge and fuel pre-
filter.
Fuel Feed Test
1. Disconnect the fuel return line (1) and seal up it with
plug.
2. Insert the plastic hose (5) and put the end into the
measuring beaker (6).
3. Disconnect the vacuum line (4) from vacuum unit
(engine stop) (5) and connect the vacuum pump (7)
to the vacuum unit.
4. To avoid the engine starting, build up vacuum
(approx. 500 mbar).
5. Operate the starter motor for exactly 30 seconds
and measure fuel volume in the beaker.
Min. volume150cm3for 30 seconds
Page 775 of 2053
1F3 -- 18 OM600 ENGINE CONTROLS
D AEW OO M Y_2000
Fuel Pressure Test
Page 776 of 2053
OM600 ENGINE CONTROLS 1F3 -- 19
D AEW OO M Y_2000
Tools Required
617589042100 Tester
1. Disconnect the fuel line (2) from the fuel filter.
2. Remove the banjo bolt (4) from the fuel injection
pump and remove the seals (3) and fuel line (2).
3. Connect the tester (5).
4. Start the engine and read off the fuel pressure on
tester (5).
Notice
At Idle Speed> 0.3bar
At Full load> 0.5bar
If out of standard, replace the fuel feed pump.
Tester 617 589 04 21 00
5. Stop the engine.
6. Remove the tester.
7. Replace the seal and connect the fuel line (2).
Page 777 of 2053
1F3 -- 20 OM600 ENGINE CONTROLS
D AEW OO M Y_2000
FUEL PUMP
1 Fuel Injection Pump
2 Pressure Line 13N∙m (10 lb-ft) ..............
3 Suction Line
4 Hose Clip Replace........................5 Gasket Replace..........................
6 Spring Lock Washer
7 Hexagon Nuts
8 Fuel Pump
Page 778 of 2053
OM600 ENGINE CONTROLS 1F3 -- 21
D AEW OO M Y_2000
INJECTION NOZZLE TEST
Preceding Work : Removal of fuel injection nozzle
1 Fuel Injection Nozzle New : 115-- 125 bar....
Used : min. 100bar
A Closed Spray = good
B Stringy Spray = poor2Tester
3Valve
Page 779 of 2053
1F3 -- 22 OM600 ENGINE CONTROLS
D AEW OO M Y_2000
Tools Required
000589142700 Tester
Notice
When testing the injection nozzle, do not place your
hand into the spray of a nozzle. The spraywill penetrate
deep into the skin and destroy the tissue.
1. Connect the fuel injection nozzle to the tester (2).
Tester 000 589 14 27 00
2. Close the valve (3) and pump 5 times strongly.
3. Chatter test :
Slowly operate the hand lever at tester (approx. 1
stroke per second). The nozzlemust spray with a
gentle chattering.
4. Spray pattern test :
Operate the hand lever at tester rapidly (approx.
2~3 strokes per second).
DGood
The spray pattern shows closed and well atom-
ized.
DPoor
The spray pattern shows split, too wide and
stringy.
(Repair the fuel injection nozzle)
Page 780 of 2053
OM600 ENGINE CONTROLS 1F3 -- 23
D AEW OO M Y_2000
5. Opening pressure test :
Open the valve (3) and slowly operate the hand le-
ver at tester (approx. 1 stroke / second) and mea-
sure opening pressure.
New Nozzle115 -- 125bar
Used NozzleMin. 100bar
Difference Between NozzlesMax. 5bar
Notice
If out of standard, repair the injection nozzle.
6. Leak test
Slowly operate the hand lever at the tester until get a
pressure of approx. 90bar. Maintain this pressure
for more than 20 seconds and within this period no
drop of fuel should build up at the nozzle tip.
Trending: brakes, alternator, check engine, coolant capacity, coolant, warning lights, clutch


