SSANGYONG KORANDO 1997 Service Manual Online
KORANDO 1997
SSANGYONG
SSANGYONG
https://www.carmanualsonline.info/img/67/57502/w960_57502-0.png
SSANGYONG KORANDO 1997 Service Manual Online
Page 363 of 2053
1B2 -- 70 M161 ENGINE MECHANICAL
D AEW OO M Y_2000
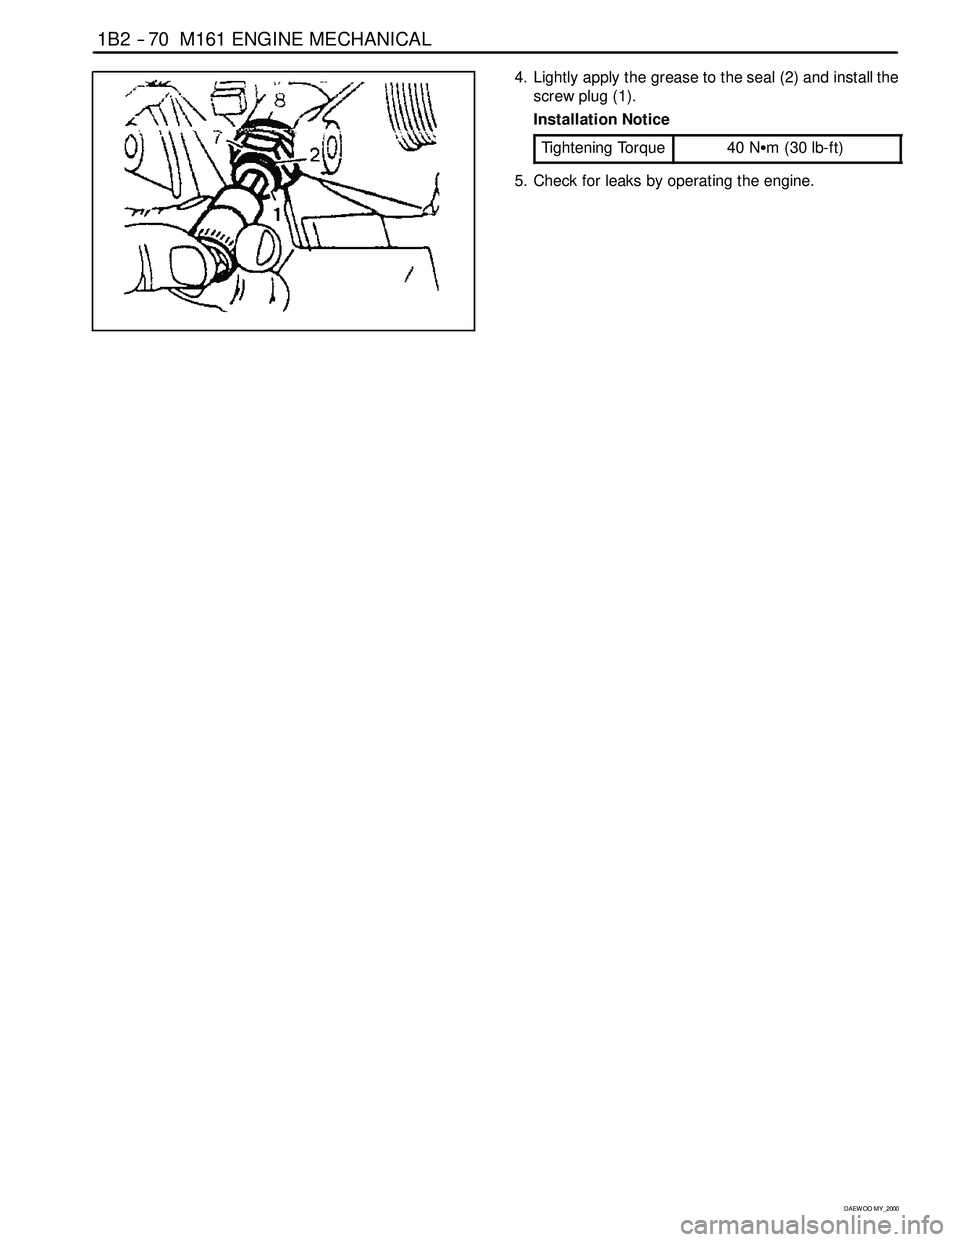
4. Lightly apply the grease to the seal (2) and install the
screw plug (1).
Installation Notice
Tightening Torque
40 NSm (30 lb-ft)
5. Check for leaks by operating the engine.
Page 369 of 2053
1B2 -- 76 M161 ENGINE MECHANICAL
D AEW OO M Y_2000
17. Rivet the link pin.
Check the condition and it again if necessary.
18. Install the chain tensioner.
Installation Notice
Ti
ghteningScrew Plug40 NSm
(30 lb-ft)
Tightening
TorqueTensioner
Assembly72 -- 88 NSm
(53 -- 65 lb-ft)
19. Check the camshaft timing position.
Page 378 of 2053
M161 ENGINE MECHANICAL 1B2 -- 85
D AEW OO M Y_2000
1. Check the piston ring gap and apply the engine oil to
the piston pin and the connecting rod bushing.
2. Connect the piston and the connecting rod by press-
ing in the piston pin (6) and install the snap ring to the
groove.
3. Clean the cylinder bore, connecting rod bearing jour-
nal, connecting rod bearing shell and the piston and
coat them with engine oil.
4. Install the piston ring.
5. Install the piston so that the arrow on the piston head
faces to the forward of the vehicle.
6. After aligning the connecting rod and the bearing cap
mark (// or a number), tighten the bolts.
Installation Notice
TighteningTorque1st step: 40 NSm (30 lb-ft)TighteningTorque2nd step: 90°
Apply the engine oil to the bearing cap upper and low-
er bearing shells.
7. Check if the crankshaft rotates without any trouble by
rotating it.
Page 380 of 2053
M161 ENGINE MECHANICAL 1B2 -- 87
D AEW OO M Y_2000
Inspection
1. Measure the basic bore of the connecting rod bear-
ing.
Notice:If the basic bore exceeds the value of
51.614mm, replace the bearing or check the connecting
rod.
2. Check connecting rod bolts.
Length When New (L)
51.7 -- 52 mm
Max. Length (L)52.9 mm
TighteningTo rque
1st step: 40 NSm
(30 lb-ft)
TighteningTorque
2nd step: 90°
Notice:If the length exceeds max. length, replace it.
3. Check the assembly mark (indication//or number:ar-
row) of the connecting rods and the bearing cap when
installing.
Notice
DMake sure it doesn’t exceed over 4g with other con-
necting rods when replacing the connecting rods.
DCheck if the connecting rod and the bearing cap are
accurately seated on the groove when replacing the
bearing.
Page 383 of 2053
1B2 -- 90 M161 ENGINE MECHANICAL
D AEW OO M Y_2000
OIL PAN
1Bolt
2Bolt
3Bolt
4Bolt5Bolt
6OilPan
7 Gasket
Removal & Installation Procedure
1. Remove the drain plug and drain the oil completely.
2. Unscrew the bolts and remove the oil pan and gasket.
Notice:Arrange the bolts according to each size.
3. Clean the inside of oil pan and sealing surface, then
apply the sealant.
4. Replace the gasket with new one.
5. Install the oil pan with gasket, and tighten each bolt in
specified torque.
6. Check for oil leaks while running the engine.
Page 387 of 2053
M161 ENGINE MECHANICAL 1B2 -- 99
D AEW OO M Y_2000
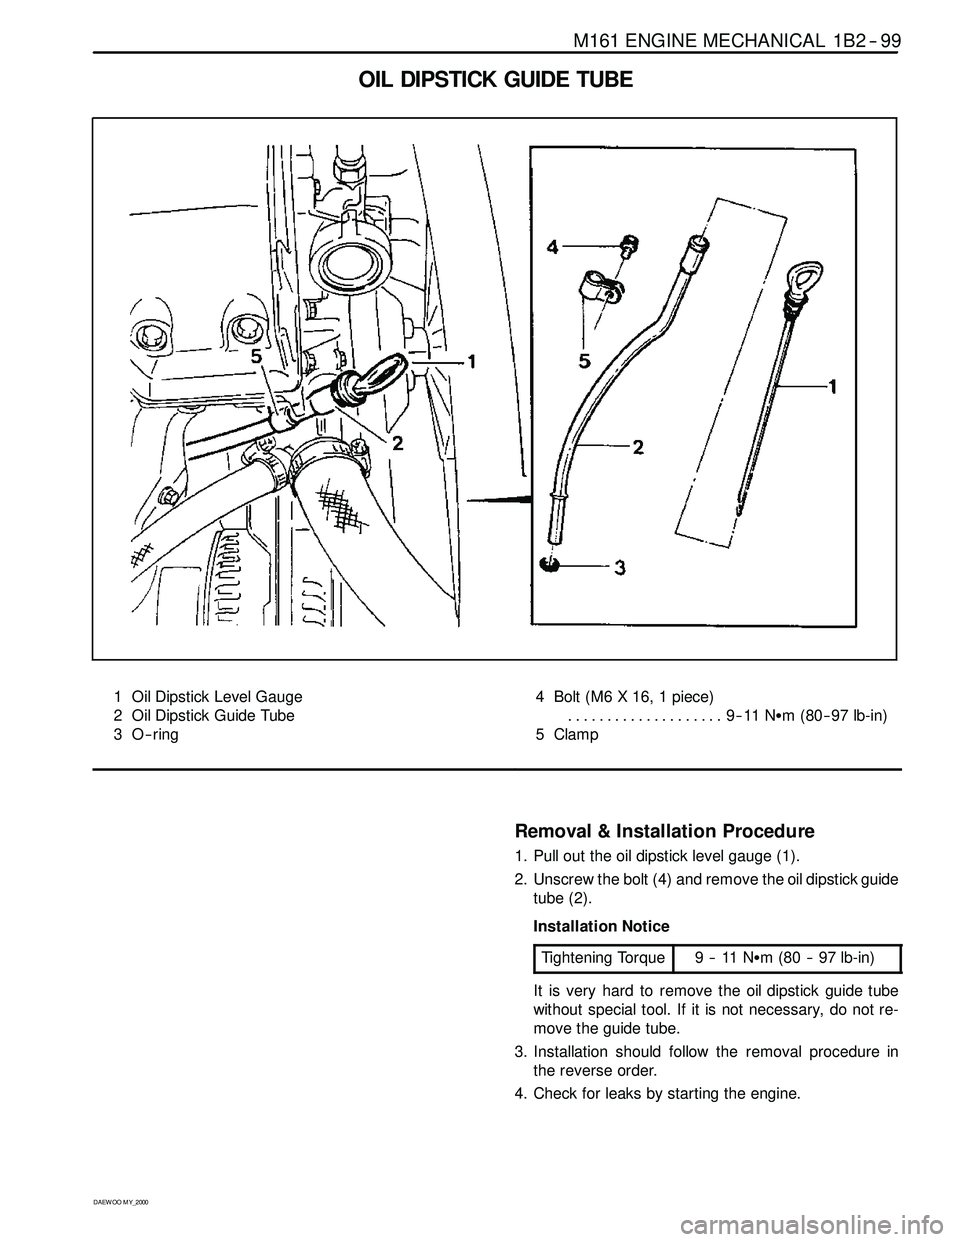
OIL DIPSTICK GUIDE TUBE
1 Oil Dipstick Level Gauge
2 Oil Dipstick Guide Tube
3O--ring4 Bolt (M6 X 16, 1 piece)
9--11 NSm (80-- 97 lb-in) ....................
5 Clamp
Removal & Installation Procedure
1. Pull out the oil dipstick level gauge (1).
2. Unscrew the bolt (4) and remove the oil dipstick guide
tube (2).
Installation Notice
Tightening Torque
9--11NSm (80 -- 97 lb-in)
It is very hard to remove the oil dipstick guide tube
without special tool. If it is not necessary, do not re-
move the guide tube.
3. Installation should follow the removal procedure in
the reverse order.
4. Check for leaks by starting the engine.
Page 389 of 2053
M161 ENGINE MECHANICAL 1B2 -- 101
D AEW OO M Y_2000
Tools Required
102589001500 Drift
Replacement Procedure
1. Remove the intake and exhaust manifolds.
2. Pull back the core plug until the end of one side
comes out using the screw driver.
3. Pull out the plug carefully using a pliers.
4. Clean the sealing surface and apply Loctite 241.
5. Press in new plug using a drift.
Notice:Wait for about 45minutes before filling the cool-
ant so that the Loctite 241 hardens.
6. Warm up the engine and check the coolant for leaks.
Page 395 of 2053
M161 ENGINE MECHANICAL 1B2 -- 107
D AEW OO M Y_2000
Measurement of Mating Surfac
1. Measure the height (H) of the cylinder head(refer to
Service data standard).
2. Check the mating surface of the cylinder head.
3. Mill the sharp edge of the combustion chamber.
4. Re-- measure the height (H) of the cylinder head.
5. Seal the intake and exhaust valves.
6. Measure the dimension (T) between the camshaft
bearing and the valve system(refer to Service data
standard).
7. Mill the cylinder head valve seat(refer to Service data
standard).
Universal Tool
Surface Grinding Machine
Sceledum, Type RTY
Roaro
Schio/Italy
Page 399 of 2053
1D2 -- 4 M161 ENGINE COOLING
D AEW OO M Y_2000
DIAGNOSIS
SYSTEM LEAKAGE TEST
Tools Required
124 589 15 21 00 Tester
Test Procedure
1. Loosen the cap a little and release pressure and re-
move the cap.
Notice:For the risk of scalding, cap must not be opened
unless the coolant temperature is below 90°C.
2. Fill coolant up to upper edge (arrow) of reservoir.
3. Connect the special tool to the reservoir filler cap and
apply 1.4 bar of pressure.
Tester 124 589 15 21 00
4. If the pressure on the tester drops, check leakage at
the all coolant hoses and pipes and each connec-
tions. Replace or retighten if necessary.
Page 401 of 2053
1D2 -- 6 M161 ENGINE COOLING
D AEW OO M Y_2000
4. After complete draining of the coolant, remove the
hose connector to drain plug and reinstall the drain
plug.
Installation Notice
Tightening Torque
30 NSm (22 lb-ft)
5. Tighten the radiator lower drain cock.
6. Remove the de-- aeration hose clamp in the water
pump and remove the de-- aeration hose.
7. Fill up the coolant through the coolant reservoir
tank.
Notice
DMatchtheanti--freezeandthewaterratioto50:50.
DSupplement the coolant until the coolant overflows to
the deaeration hose.
8. Insert the de--aeration hose and completely tighten
the clamp.
9. Check the coolant level in the coolant reservoir tank.
10. Warm up(until thermostat is opened) the engine and
recheck the coolant level in the reservoir tank and fill
up the coolant if necessary.


