SSANGYONG KORANDO 2012 Service Manual
KORANDO 2012
SSANGYONG
SSANGYONG
https://www.carmanualsonline.info/img/67/57504/w960_57504-0.png
SSANGYONG KORANDO 2012 Service Manual
Trending: wheel size, remote control, oil pressure, low oil pressure, wheel, M11, Drive belt tensioner
Page 421 of 1082
07-4
2. MAINTENANCE
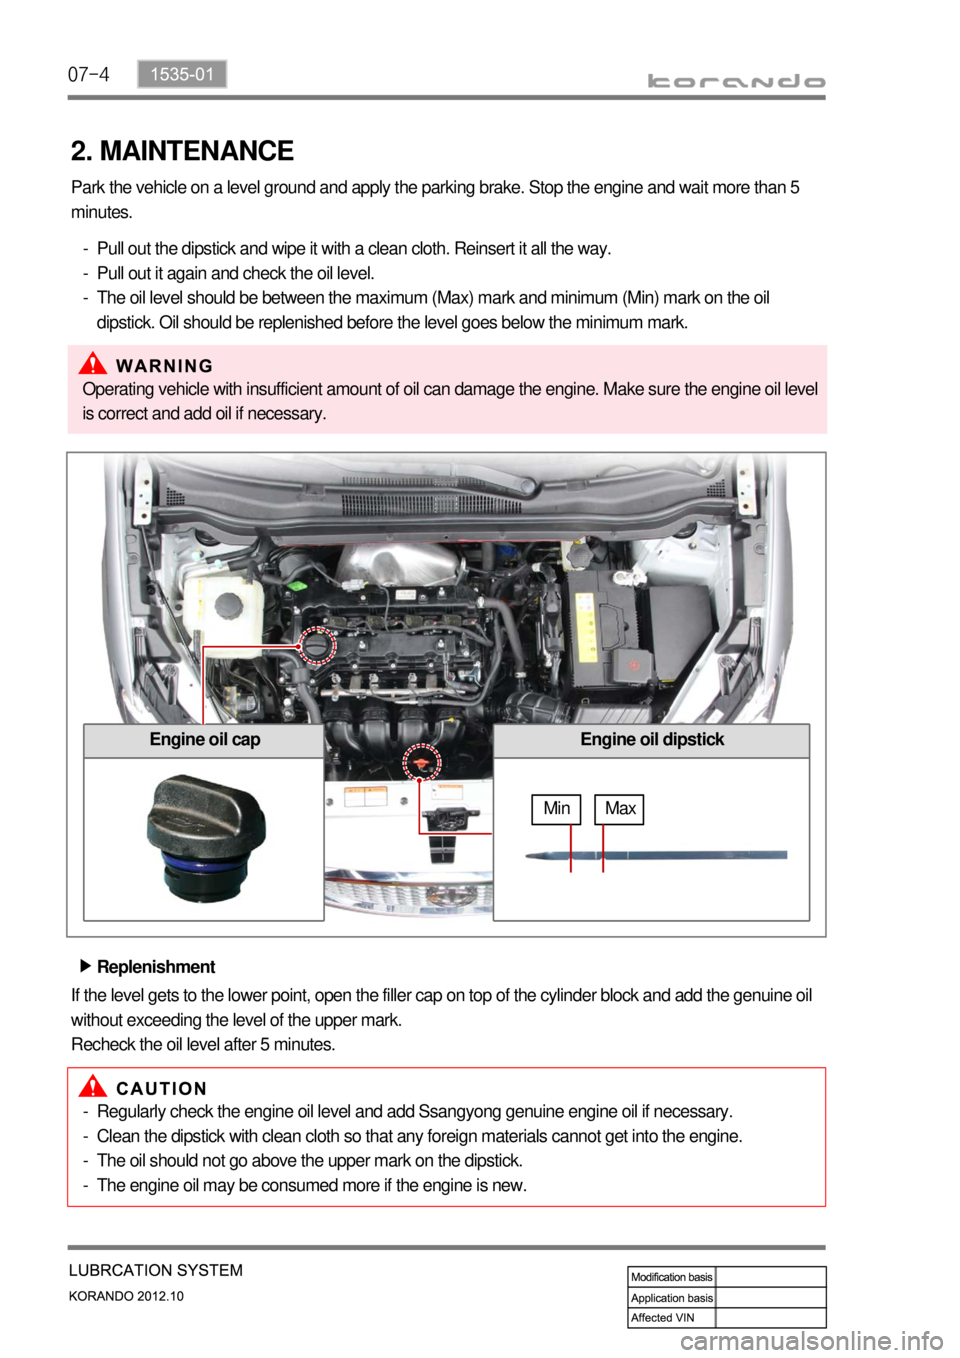
Park the vehicle on a level ground and apply the parking brake. Stop the engine and wait more than 5
minutes.
Pull out the dipstick and wipe it with a clean cloth. Reinsert it all the way.
Pull out it again and check the oil level.
The oil level should be between the maximum (Max) mark and minimum (Min) mark on the oil
dipstick. Oil should be replenished before the level goes below the minimum mark. -
-
-
Engine oil dipstickEngine oil cap
Max Min
Replenishment ▶
If the level gets to the lower point, open the filler cap on top of the cylinder block and add the genuine oil
without exceeding the level of the upper mark.
Recheck the oil level after 5 minutes.Operating vehicle with insufficient amount of oil can damage the engine. Make sure the engine oil level
is correct and add oil if necessary.
Regularly check the engine oil level and add Ssangyong genuine engine oil if necessary.
Clean the dipstick with clean cloth so that any foreign materials cannot get into the engine.
The oil should not go above the upper mark on the dipstick.
The engine oil may be consumed more if the engine is new. -
-
-
-
Page 422 of 1082
07-51535-01
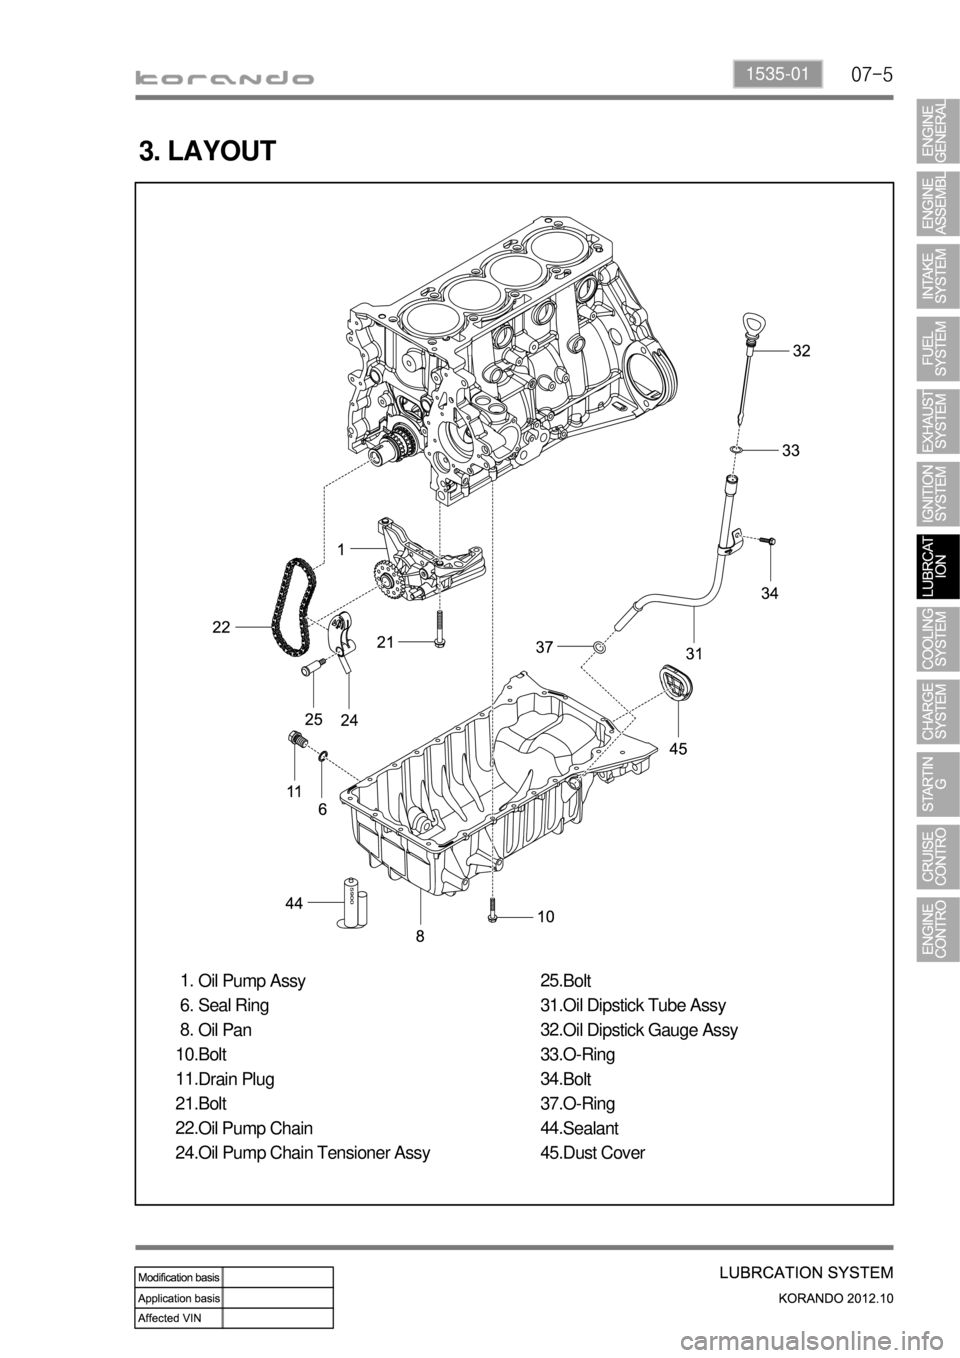
3. LAYOUT
Oil Pump Assy
Seal Ring
Oil Pan
Bolt
Drain Plug
Bolt
Oil Pump Chain
Oil Pump Chain Tensioner Assy 1.
6.
8.
10.
11.
21.
22.
24.Bolt
Oil Dipstick Tube Assy
Oil Dipstick Gauge Assy
O-Ring
Bolt
O-Ring
Sealant
Dust Cover 25.
31.
32.
33.
34.
37.
44.
45.
Page 423 of 1082
07-6
Oil Filter Assy
Oil Filter Cover
Oil Filter Element Kit
Drain Plug 1.
2.
9.
10.O-Ring
Oil Filter Bypass Valve Assy
Oil Filter Housing Gasket
Bolt
Oil pressure switch 11.
26.
30.
31.
35.
Page 424 of 1082
07-71535-01
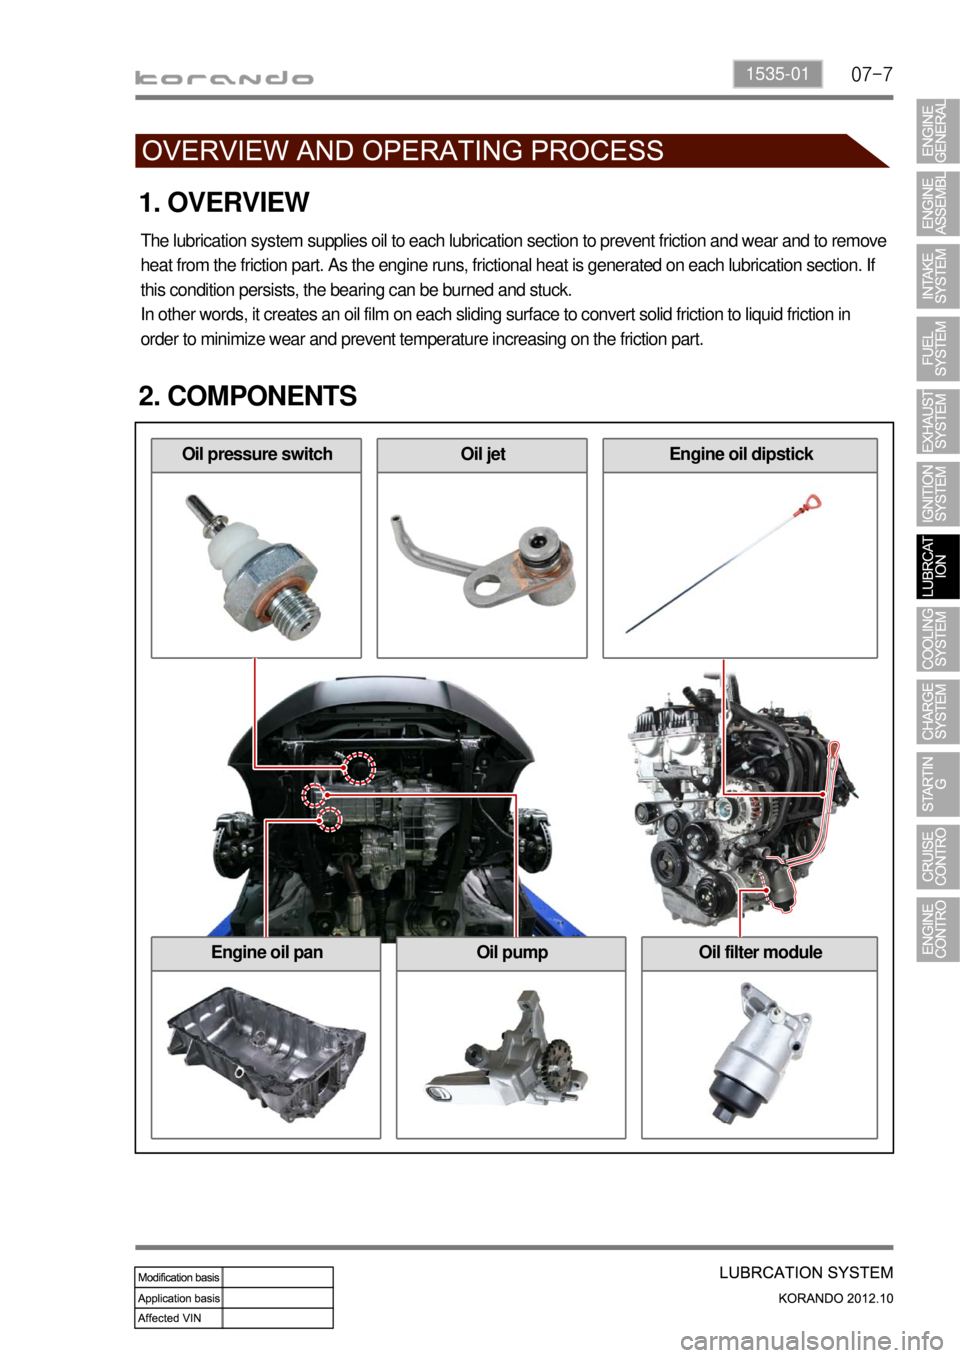
Oil pressure switch
1. OVERVIEW
The lubrication system supplies oil to each lubrication section to prevent friction and wear and to remove
heat from the friction part. As the engine runs, frictional heat is generated on each lubrication section. If
this condition persists, the bearing can be burned and stuck.
In other words, it creates an oil film on each sliding surface to convert solid friction to liquid friction in
order to minimize wear and prevent temperature increasing on the friction part.
2. COMPONENTS
Engine oil dipstickOil jet
Engine oil panOil pumpOil filter module
Page 425 of 1082
07-8
1) Operation Flow
3. OPERATING PROCESS
CVVT
Cam journal
bearing
Main oil gallery
in cylinder block
Oil pressure
switch
Oil filter assembly
Oil supply Oil pump Main journal bearingChain
tensioner
Oil jet
Page 426 of 1082
08-32112-01
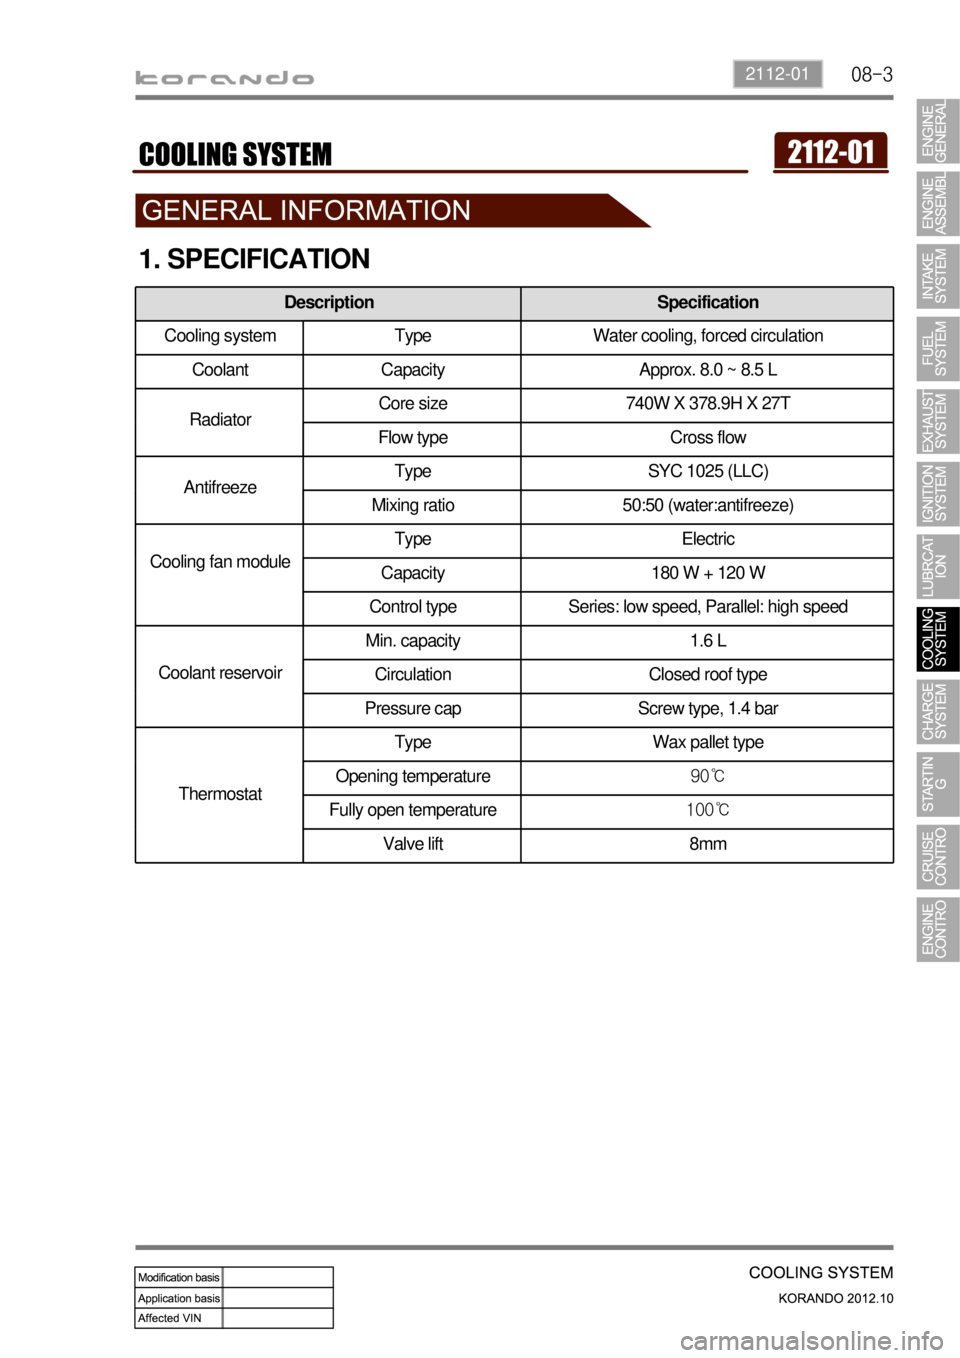
1. SPECIFICATION
Description Specification
Cooling system Type Water cooling, forced circulation
Coolant Capacity Approx. 8.0 ~ 8.5 L
RadiatorCore size 740W X 378.9H X 27T
Flow type Cross flow
AntifreezeType SYC 1025 (LLC)
Mixing ratio 50:50 (water:antifreeze)
Cooling fan moduleType Electric
Capacity 180 W + 120 W
Control type Series: low speed, Parallel: high speed
Coolant reservoirMin. capacity 1.6 L
Circulation Closed roof type
Pressure cap Screw type, 1.4 bar
ThermostatType Wax pallet type
Opening temperature90℃
Fully open temperature100℃
Valve lift 8mm
Page 427 of 1082
08-4
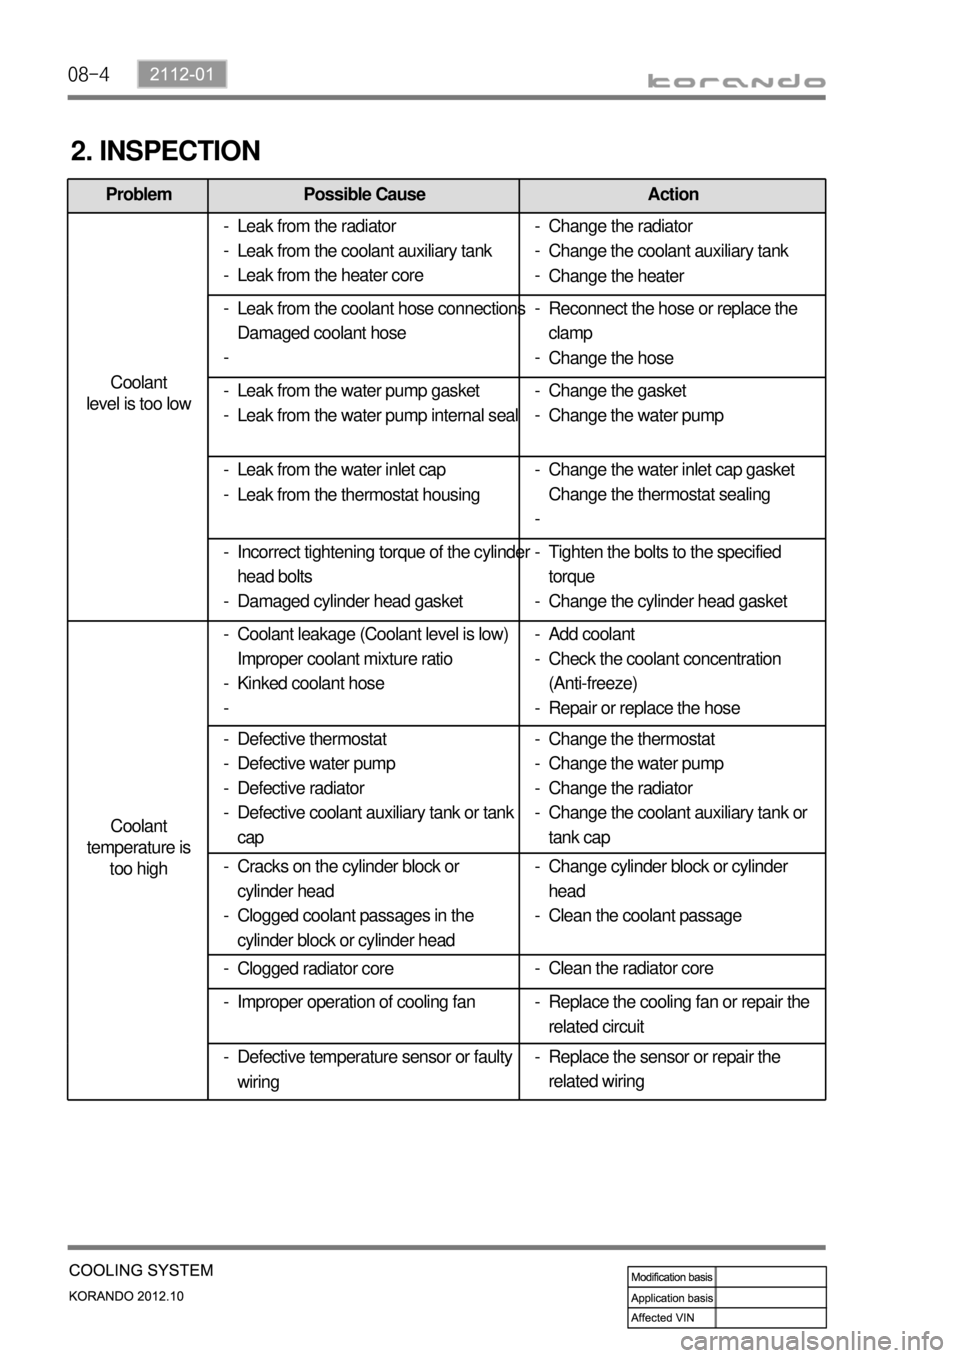
Problem Possible Cause Action
Coolant
level is too low
Coolant
temperature is
too high
2. INSPECTION
Leak from the radiator
Leak from the coolant auxiliary tank
Leak from the heater core -
-
-
Leak from the water inlet cap
Leak from the thermostat housing -
-Reconnect the hose or replace the
clamp
Change the hose -
- Leak from the coolant hose connections
Damaged coolant hose -
-
Change the gasket
Change the water pump -
- Leak from the water pump gasket
Leak from the water pump internal seal -
-
Tighten the bolts to the specified
torque
Change the cylinder head gasket -
- Incorrect tightening torque of the cylinder
head bolts
Damaged cylinder head gasket -
-Change the water inlet cap gasket
Change the thermostat sealing -
-
Coolant leakage (Coolant level is low)
Improper coolant mixture ratio
Kinked coolant hose -
-
-Add coolant
Check the coolant concentration
(Anti-freeze)
Repair or replace the hose -
-
-
Defective thermostat
Defective water pump
Defective radiator
Defective coolant auxiliary tank or tank
cap -
-
-
-Change the thermostat
Change the water pump
Change the radiator
Change the coolant auxiliary tank or
tank cap -
-
-
-Change the radiator
Change the coolant auxiliary tank
Change the heater -
-
-
Cracks on the cylinder block or
cylinder head
Clogged coolant passages in the
cylinder block or cylinder head -
-Change cylinder block or cylinder
head
Clean the coolant passage -
-
Clogged radiator core -
Replace the sensor or repair the
related wiring - Improper operation of cooling fan -Clean the radiator core -
Defective temperature sensor or faulty
wiring -Replace the cooling fan or repair the
related circuit -
Page 428 of 1082
08-52112-01
Problem Possible Cause Action
Coolant
temperature is
too low
Thermostat is stuck open -
Replace the cooling fan or repair the
related circuit -
Improper operation of cooling fan -
Replace the sensor or repair the
related wiring -
Defective temperature sensor or faulty
wiring -Change the thermostat -
Page 429 of 1082
08-6
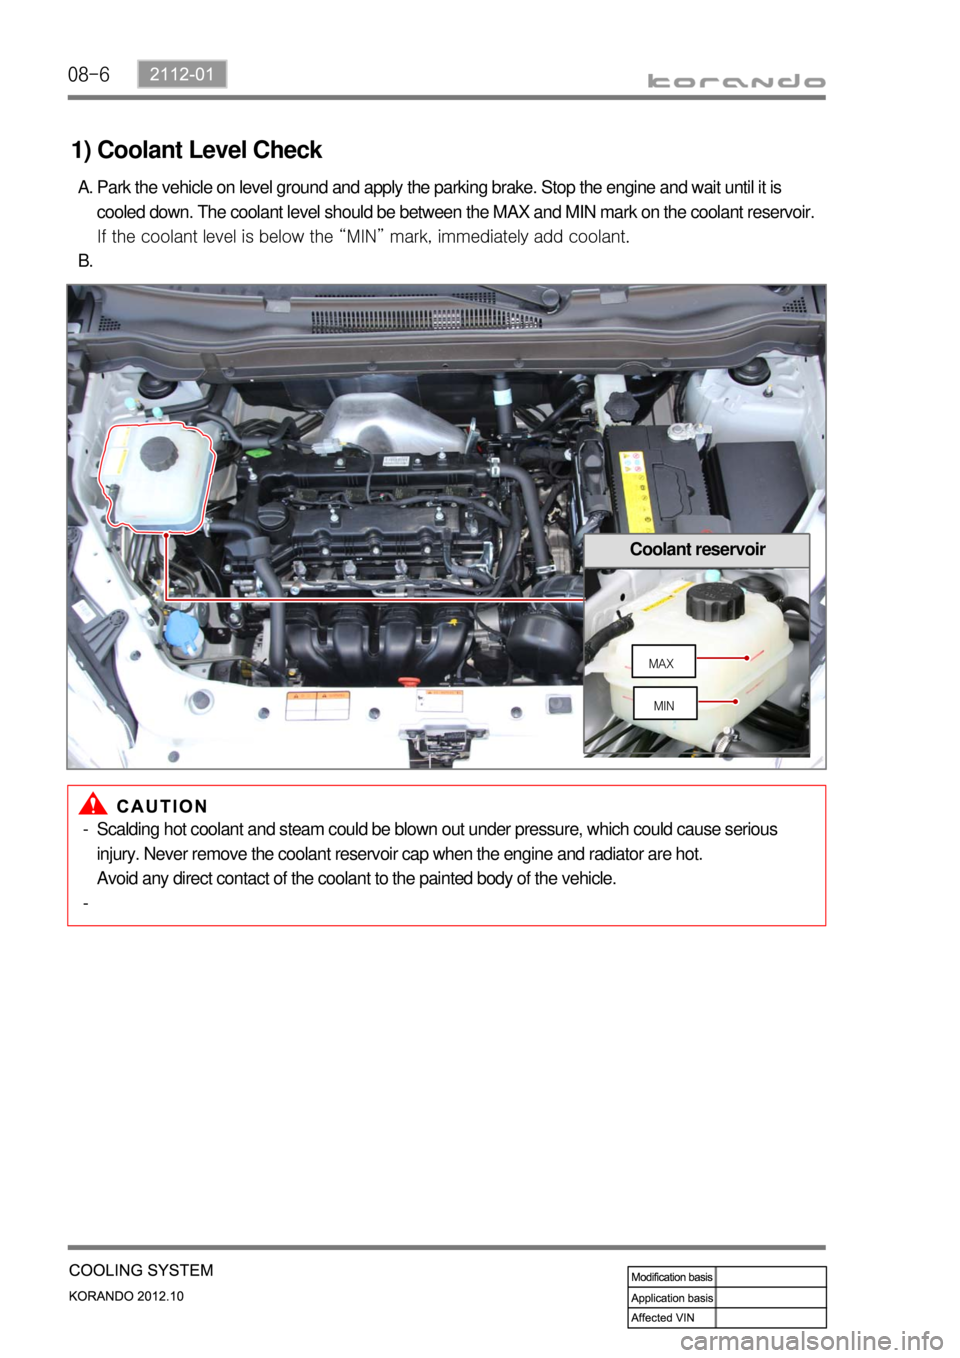
1) Coolant Level Check
Park the vehicle on level ground and apply the parking brake. Stop the engine and wait until it is
cooled down. The coolant level should be between the MAX and MIN mark on the coolant reservoir.
If the coolant level is below the “MIN” mark, immediately add coolant. A.
B.
Coolant reservoir
MAX
MIN
Scalding hot coolant and steam could be blown out under pressure, which could cause serious
injury. Never remove the coolant reservoir cap when the engine and radiator are hot.
Avoid any direct contact of the coolant to the painted body of the vehicle. -
-
Page 430 of 1082
08-72112-01
2) Leak Test
Release the pressure in the system by
loosening the pressure cap of the coolant
reservoir slightly. Then, remove the pressure
cap completely. A.
Never open the cap until the coolant
temperature becomes under 90℃ to
prevent any burn.
Add the coolant so that the coolant level is
between MAX and MIN mark on the coolant
auxiliary tank.
Connect the tester to the tank filler and apply
pressure (1.4 bar).
Check all the coolant hoses, pipes and
connections for leaks when the pressure of
the tester drops, and replace or tighten, if
necessary. B.
C.
D.
3) Thermostat
Immerse the thermostat into the water. Heat the
water and check the valve opening temperature.
Valve opening
temperature90±2℃
Trending: seats, instrument panel, Bulb, check oil, clock, engine, Glow plug

