SUBARU FORESTER 2004 Service Repair Manual
Manufacturer: SUBARU, Model Year: 2004, Model line: FORESTER, Model: SUBARU FORESTER 2004Pages: 2870, PDF Size: 38.67 MB
Page 1151 of 2870

EN(H4SO)-53
ENGINE (DIAGNOSTIC)
Malfunction Indicator Light
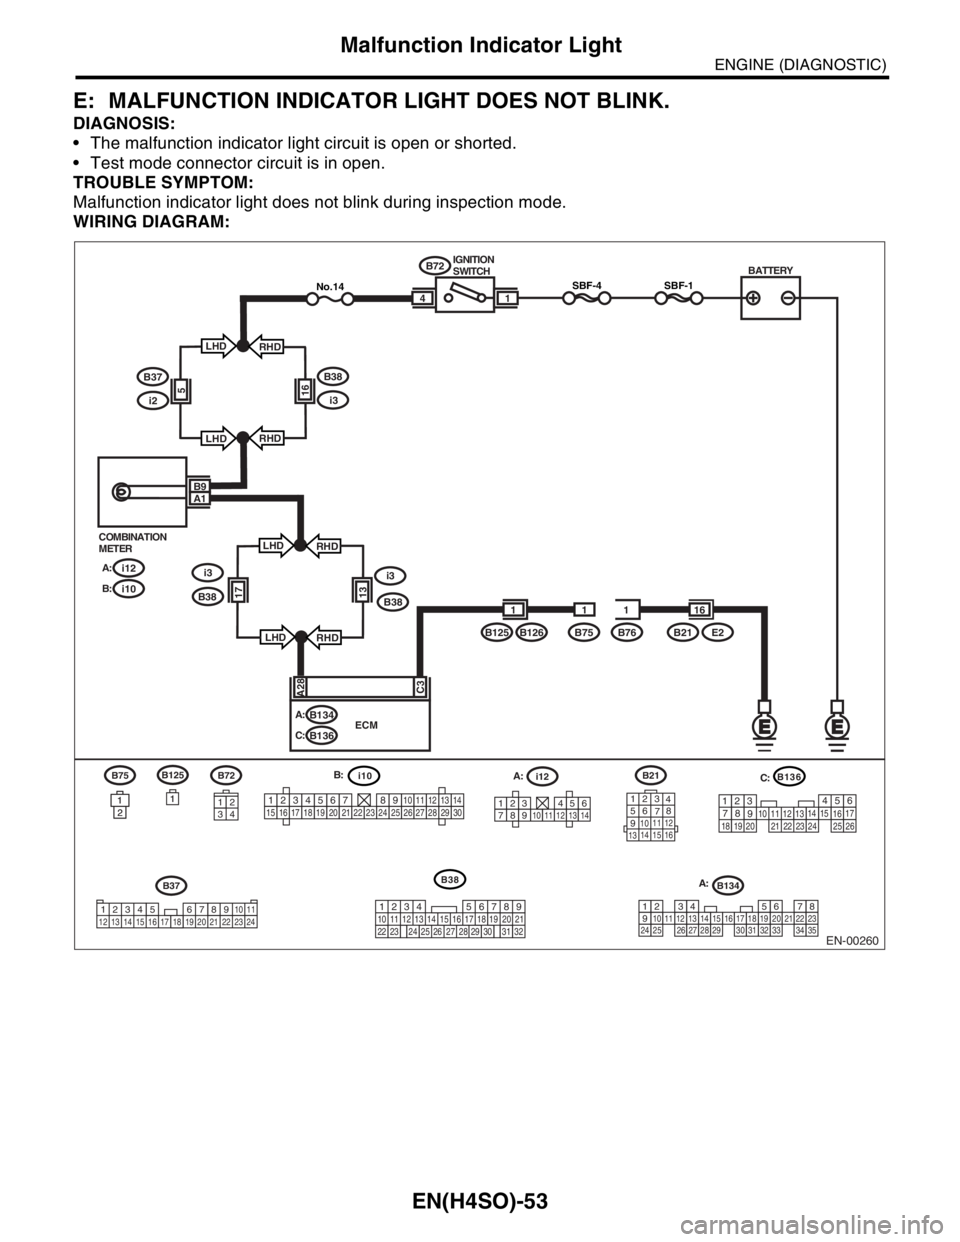
E: MALFUNCTION INDICATOR LIGHT DOES NOT BLINK.
DIAGNOSIS:
The malfunction indicator light circuit is open or shorted.
Test mode connector circuit is in open.
TROUBLE SYMPTOM:
Malfunction indicator light does not blink during inspection mode.
WIRING DIAGRAM:
EN-00260
i10
123456789101112131415161718192021222324252627282930
B37
34 12 8910 11
12 13 14 15 16 17 18 19 20 21 22 23 24567
BATTERY
1
B72
B125B75B76B126 IGNITION
SWITCH
i12 COMBINATION
METER
A:
i10 B:
B134 A:
B136 C:
SBF-44
A28C3
ECM
B9A1
i12
1234568791011121314
B134
1234567891011121314151617181920212223242526272829303132333435
B72
34
12
SBF-1No.14
1
B21E2
1611
1 B125
B75
1
21
21
B21
123
4
56
78
9
1011 12
1314 15 16
B136
5
2
84
3923 20 211011
221617
24
2512136
261915
14
1
7
18
B38
219
32
1234 5610 11 12 13 14 15716
23 3019 20
22 26 27 28 29817
24 3118
25
B37
i2
B38
i3165
LHD
LHDRHD
RHD
i3i3
B381317
LHD
LHDRHD
RHD B38
A:
C:
A: B:
Page 1152 of 2870

EN(H4SO)-54
ENGINE (DIAGNOSTIC)
Malfunction Indicator Light
Step Check Yes No
1 CHECK STATUS OF MALFUNCTION INDI-
CATOR LIGHT.
1) Turn the ignition switch to OFF.
2) Disconnect the test mode connectors
3) Turn the ignition switch to ON. (engine
OFF)Does malfunction indicator
light illuminate?Go to step 2.Repair the mal-
function indictor
light circuit.
MALFUNCTION
INDICATOR
LIGHT DOES
NOT COME ON,
Malfunction Indica-
tor Light.>
2 CHECK HARNESS BETWEEN COMBINA-
TION METER AND ECM CONNECTOR.
1) Turn the ignition switch to OFF.
2) Disconnect the connector from ECM.
3) Turn the ignition switch to ON.Does malfunction indicator
light illuminate?Repair short circuit
in harness
between combina-
tion meter and
ECM connector.Go to step 3.
3 CHECK HARNESS BETWEEN TEST MODE
CONNECTOR AND CHASSIS GROUND.
1) Turn the ignition switch to OFF.
2) Disconnect the connector from ECM.
3) Measure the resistance of harness
between test mode connector and chassis
ground.
Connector & terminal
(B76) No. 1 — Chassis ground:Is the resistance less than 1
Ω?Go to step 4.Repair harness
and connector.
N
OTE:
In this case repair
the following:
Open circuit in
harness between
test mode connec-
tor and chassis
ground
4 CHECK POOR CONTACT.
Check poor contact in ECM connector.Is there poor contact in ECM
connector?Repair the poor
contact in ECM
connector.Go to step 5.
5 CHECK HARNESS BETWEEN ECM AND
TEST MODE CONNECTOR.
1) Connect the test mode connector.
2) Measure the resistance of harness
between ECM and chassis ground.
Connector & terminal
(B136) No. 3 — Chassis ground:Is the resistance less than 1
Ω?Go to step 6.Repair open circuit
in harness
between ECM and
test mode connec-
tor.
6 CHECK POOR CONTACT.
Check poor contact in ECM connector.Is there poor contact in ECM
connector?Repair the poor
contact in ECM
connector.Replace the ECM.
Engine Control
Module (ECM).>
Page 1153 of 2870

EN(H4SO)-55
ENGINE (DIAGNOSTIC)
Malfunction Indicator Light
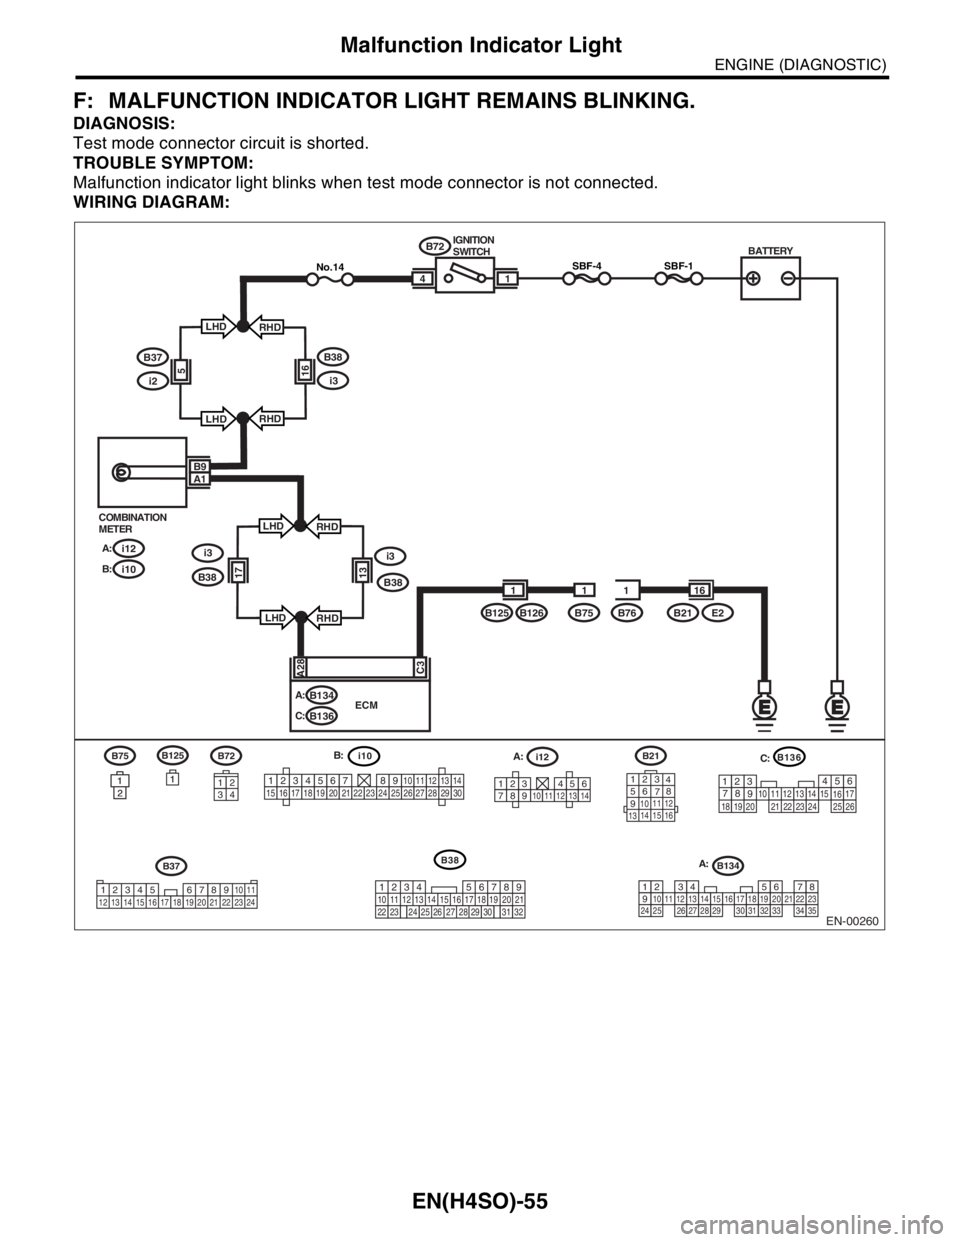
F: MALFUNCTION INDICATOR LIGHT REMAINS BLINKING.
DIAGNOSIS:
Test mode connector circuit is shorted.
TROUBLE SYMPTOM:
Malfunction indicator light blinks when test mode connector is not connected.
WIRING DIAGRAM:
EN-00260
i10
123456789101112131415161718192021222324252627282930
B37
34 12 8910 11
12 13 14 15 16 17 18 19 20 21 22 23 24567
BATTERY
1
B72
B125B75B76B126 IGNITION
SWITCH
i12 COMBINATION
METER
A:
i10 B:
B134 A:
B136 C:
SBF-44
A28C3
ECM
B9A1
i12
1234568791011121314
B134
1234567891011121314151617181920212223242526272829303132333435
B72
34
12
SBF-1No.14
1
B21E2
1611
1 B125
B75
1
21
21
B21
123
4
56
78
9
1011 12
1314 15 16
B136
5
2
84
3923 20 211011
221617
24
2512136
261915
14
1
7
18
B38
219
32
1234 5610 11 12 13 14 15716
23 3019 20
22 26 27 28 29817
24 3118
25
B37
i2
B38
i3165
LHD
LHDRHD
RHD
i3i3
B381317
LHD
LHDRHD
RHD B38
A:
C:
A: B:
Page 1154 of 2870

EN(H4SO)-56
ENGINE (DIAGNOSTIC)
Malfunction Indicator Light
Step Check Yes No
1 CHECK TEST MODE CONNECTOR.
1) Disconnect the test mode connectors
2) Turn the ignition switch to ON.Does the malfunction indicator
light blink?Go to step 2.System is in good
order.
N
OTE:
Malfunction indica-
tor light blinks at a
cycle of 3 Hz when
test mode connec-
tor is connected.
2 CHECK HARNESS BETWEEN ECM CON-
NECTOR AND CHASSIS GROUNDING TER-
MINAL.
1) Turn the ignition switch to OFF.
2) Disconnect the connector from ECM.
3) Measure the resistance of harness
between ECM connector and chassis ground.
Connector & terminal
(B136) No. 3 — Chassis ground:Is the resistance less than 5
Ω?Repair the short
circuit in harness
between ECM and
test mode connec-
tor.Replace the ECM.
Engine Control
Module (ECM).>
Page 1155 of 2870

EN(H4SO)-57
ENGINE (DIAGNOSTIC)
Diagnostics for Engine Starting Failure
17.Diagnostics for Engine Starting Failure
A: PROCEDURE
1. Check for fuel amount.
↓
2. Inspection of starter motor circuit.
↓
3. Inspection of ECM power supply and ground line.
↓
4. Inspection of ignition control system.
↓
5. Inspection of fuel pump circuit.
↓
6. Inspection of fuel injector circuit.
Page 1156 of 2870

EN(H4SO)-58
ENGINE (DIAGNOSTIC)
Diagnostics for Engine Starting Failure
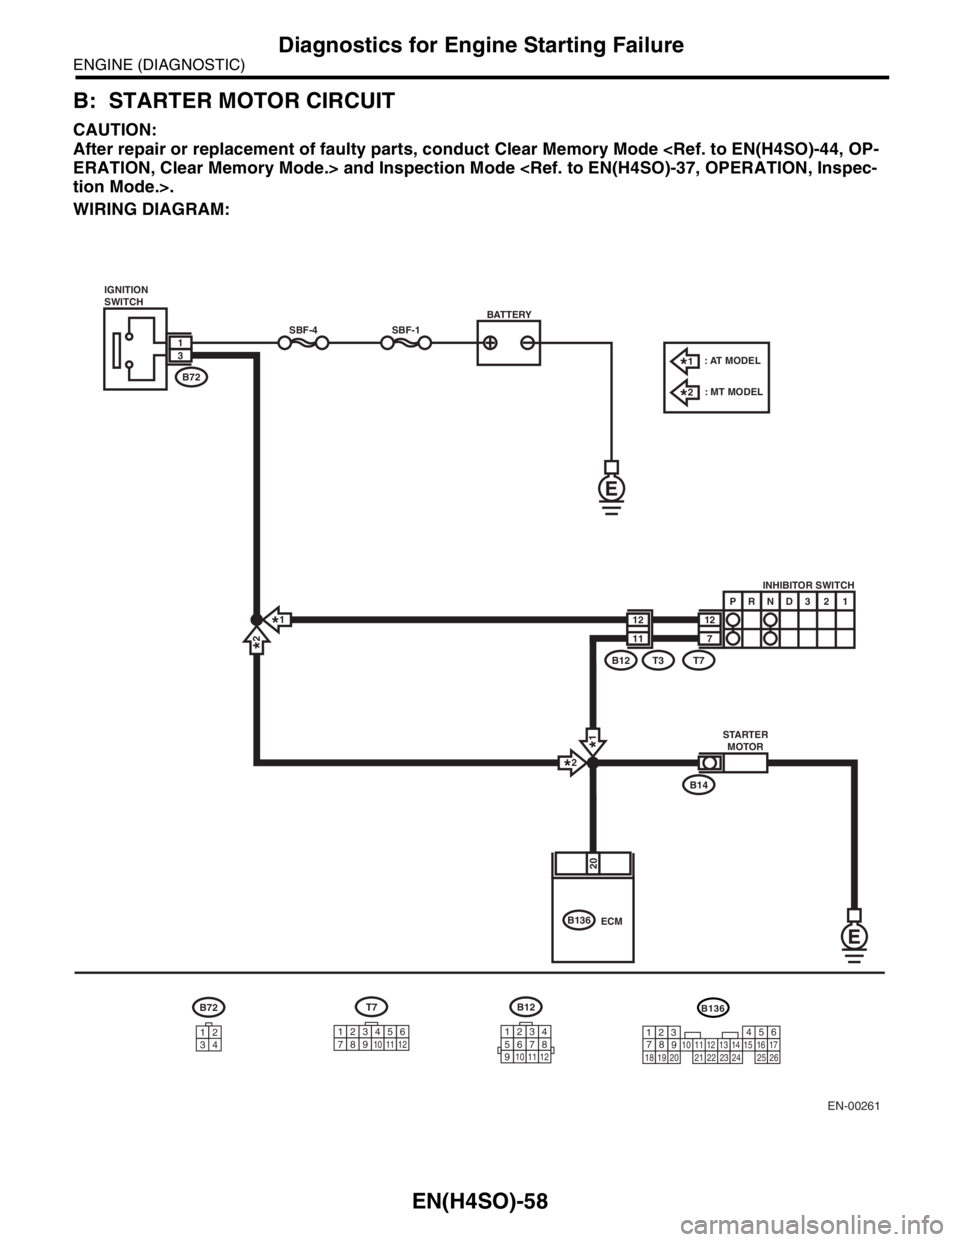
B: STARTER MOTOR CIRCUIT
CAUTION:
After repair or replacement of faulty parts, conduct Clear Memory Mode
WIRING DIAGRAM:
EN-00261
12INHIBITOR SWITCH
STARTER
MOTOR
7P
RND321
SBF-4SBF-1
B14
B72
12
11
T7T3B12
13
IGNITION
SWITCH
1*2*
1*
2*
T7
123456789101112
B72
34
12
20
B136ECM
: AT MODEL
: MT MODEL1*
2*
BATTERY
B12
123456789101112
B136
5
2
84
3923 20 211011
221617
24
2512136
261915
14
1
7
18
Page 1157 of 2870

EN(H4SO)-59
ENGINE (DIAGNOSTIC)
Diagnostics for Engine Starting Failure
Step Check Yes No
1 CHECK BATTERY.
Check the battery voltage.Is the voltage more than 12 V? Go to step 2.Charge or replace
the battery.
2 CHECK INPUT SIGNAL FOR STARTER MO-
TOR.
1) Turn the ignition switch to OFF.
2) Disconnect the connector from starter
motor.
3) Turn the ignition switch to START.
4) Measure the power supply voltage between
starter motor connector terminal and engine
ground.
Connector & terminal
(B14) No. 1 (+) — Engine ground (
−):
N
OTE:
For AT model, shift the select lever to “P” or
“N” range.
For MT model, depress the clutch pedal.Is the voltage more than 10 V? Go to step 3.Go to step 4.
3 CHECK GROUND CIRCUIT OF STARTER
MOTOR.
1) Turn the ignition switch to OFF.
2) Disconnect the ground cable terminal from
starter motor.
3) Measure the resistance of ground cable
between ground cable terminal and engine
ground.Is the resistance less than 5
Ω?Check the starter
motor.
Starter.>Repair open circuit
of ground cable.
4 CHECK HARNESS BETWEEN BATTERY
AND IGNITION SWITCH CONNECTOR.
1) Disconnect the connector from ignition
switch.
2) Measure the power supply voltage between
ignition switch connector and chassis ground.
Connector & terminal
(B72) No. 1 (+) — Chassis ground (
−):Is the voltage more than 10 V? Go to step 5.Repair open circuit
in harness
between ignition
switch and bat-
tery, and check
fuse SBF No. 4
and SBF No. 1.
5 CHECK IGNITION SWITCH.
1) Disconnect the connector from ignition
switch.
2) Measure the resistance between ignition
switch terminals while turning the ignition
switch to START position.
Te r m i n a l s
No. 1 — No. 3:Is the resistance less than 5
Ω?Go to step 6.Replace the igni-
tion switch.
6 CHECK TRANSMISSION TYPE.Is the transmission type AT? Go to step 7.Temporary poor
contact occurs.
Check poor con-
tact in each con-
nectors.
7 CHECK INHIBITOR SWITCH INPUT VOLT-
AGE.
1) Turn the ignition switch to OFF.
2) Disconnect the connector from inhibitor
switch.
3) Connect the connector to ignition switch.
4) Measure the input voltage between inhibitor
switch connector terminal and engine ground
while turning the ignition switch to START posi-
tion.
Connector & terminal
(B12) No. 12 (+) — Engine ground (
−):Is the voltage more than 10 V? Go to step 8.Repair open or
ground short cir-
cuit in harness
between inhibitor
switch and ignition
switch.
N
OTE:
Check security sys-
tem (if equipped).
Page 1158 of 2870

EN(H4SO)-60
ENGINE (DIAGNOSTIC)
Diagnostics for Engine Starting Failure
8 CHECK INHIBITOR SWITCH.
1) Shift the select lever in the “P” or “N” range.
2) Measure the resistance between inhibitor
switch terminals.
Connector & terminal
(T3) No. 11 — No. 12:Is the resistance less than 1
Ω?Repair open or
ground short cir-
cuit in harness
between inhibitor
switch and starter
motor.Replace inhibitor
switch.
Switch.> Step Check Yes No
Page 1159 of 2870

EN(H4SO)-61
ENGINE (DIAGNOSTIC)
Diagnostics for Engine Starting Failure
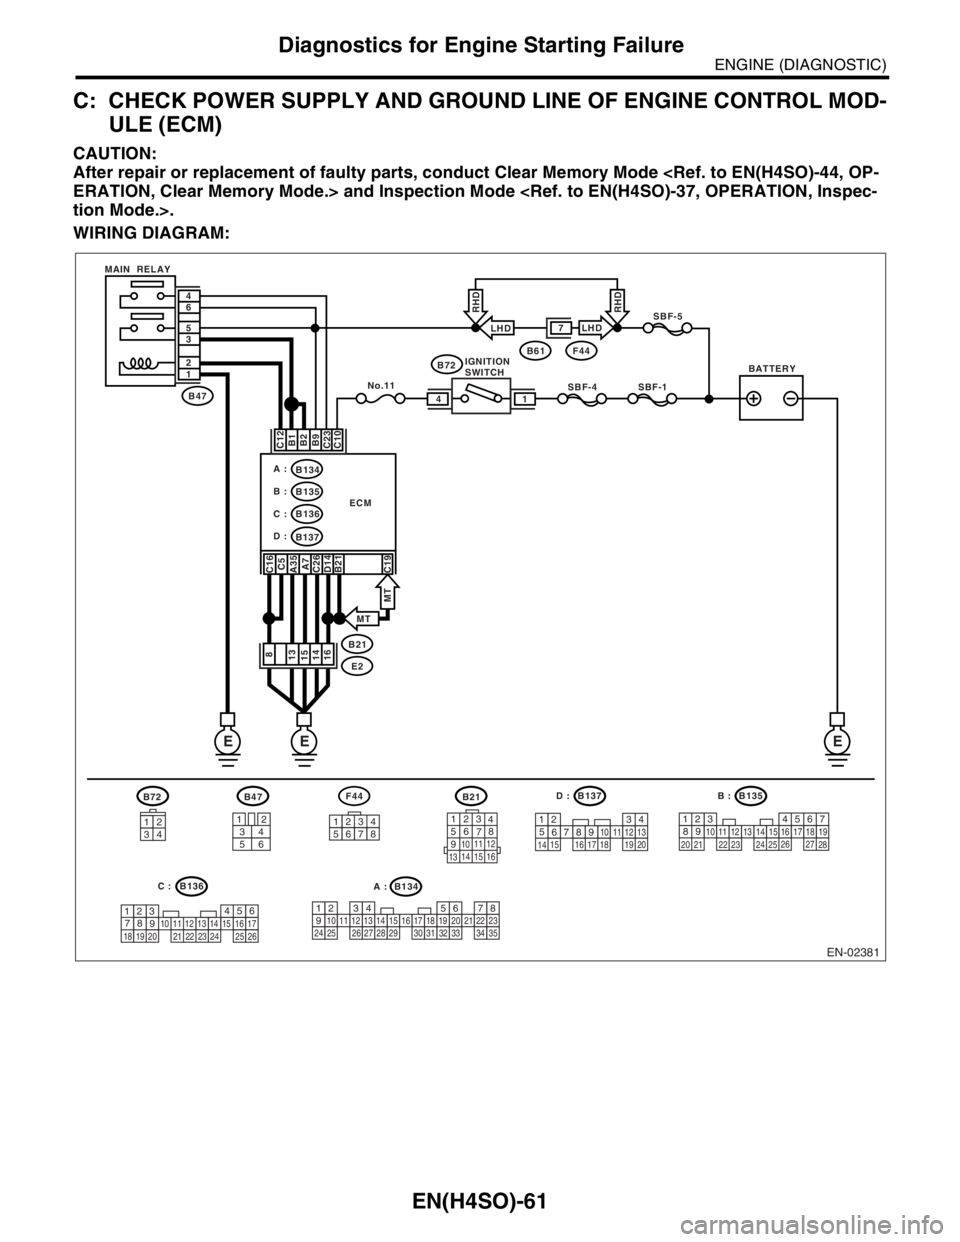
C: CHECK POWER SUPPLY AND GROUND LINE OF ENGINE CONTROL MOD-
ULE (ECM)
CAUTION:
After repair or replacement of faulty parts, conduct Clear Memory Mode
WIRING DIAGRAM:
EN-02381
B72
3412
BATTERYIGNITION
SWITCH MAIN RELAY
SBF-4SBF-1
SBF-5
B72B61F44
B2 B1 C12 C16
B21C5
A35
A7
C26
D14B9
C10 C23
No.11B47
E2 B21 1 2 3 5 6 4
ECM
EE
1
7
4
B134
B135
B136 A :
C :
D :B137 B :
C19
8
15
16 14 13
E
3412
56
123
4
56
78
9
1011 12
1314 15 16
B137B135B21B47
MT
MT
F44
B134
12345678
1234567891011121314151617181920212223242526272829303132333435
567
82 1
94
310
24 22 23 251112131415
26 27
281617181920 21
4
1
53
2618 15 167891011
17 19
20121314
B136
5
2
84
3923 20 211011
221617
24
2512136
261915
14
1
7
18
A : C :D :B :
LHDLHD
RHDRHD
Page 1160 of 2870

EN(H4SO)-62
ENGINE (DIAGNOSTIC)
Diagnostics for Engine Starting Failure
Step Check Yes No
1 CHECK MAIN RELAY.
1) Turn the ignition switch to OFF.
2) Remove the main relay.
3) Connect the battery to main relay terminals
No. 1 and No. 2.
4) Measure the resistance between main relay
terminals.
Te r m i n a l s
No. 3 — No. 5:
No. 4 — No. 6:Is the resistance less than 10
Ω?Go to step 2.Replace the main
relay.
2 CHECK GROUND CIRCUIT FOR ECM.
1) Disconnect the connector from ECM.
2) Measure the resistance of harness
between ECM and chassis ground.
Connector & terminal
(B134) No. 7 — Chassis ground:
(B134) No. 35 — Chassis ground:
(B135) No. 21 — Chassis ground:
(B136) No. 5 — Chassis ground:
(B136) No. 16 — Chassis ground:
(B136) No. 19 — Chassis ground: (MT
model)
(B136) No. 26 — Chassis ground:
(B137) No. 14 — Chassis ground:Is the resistance less than 5
Ω?Go to step 3.Repair open circuit
in harness
between ECM
connector and
engine ground ter-
minal.
3 CHECK INPUT VOLTAGE OF ECM.
Measure the voltage between ECM connector
and chassis ground.
Connector & terminal
(B135) No. 9 (+) — Chassis ground (
−):Is the voltage more than 10 V? Go to step 4.Repair open or
ground short cir-
cuit of power sup-
ply circuit.
4 CHECK INPUT VOLTAGE OF ECM.
1) Turn the ignition switch to ON.
2) Measure the voltage between ECM con-
nector and chassis ground.
Connector & terminal
(B136) No. 10 (+) — Chassis ground (
−):Is the voltage more than 10 V? Go to step 5.Repair open or
ground short cir-
cuit of power sup-
ply circuit.
5 CHECK HARNESS BETWEEN ECM AND
MAIN RELAY CONNECTOR.
1) Turn the ignition switch to OFF.
2) Measure the resistance between ECM and
chassis ground.
Connector & terminal
(B136) No. 12 — Chassis ground:Is the resistance more than 1
MΩ?Go to step 6.Repair ground
short circuit in har-
ness between
ECM connector
and main relay
connector, then
replace the ECM.
6 CHECK OUTPUT VOLTAGE FROM ECM.
1) Connect the connector to ECM.
2) Turn the ignition switch to ON.
3) Measure the voltage between ECM con-
nector and chassis ground.
Connector & terminal
(B136) No. 12 (+) — Chassis ground (
−):Is the voltage more than 10 V? Go to step 7.Replace the ECM.
Engine Control
Module (ECM).>
7 CHECK INPUT VOLTAGE OF MAIN RELAY.
Measure the voltage between main relay con-
nector and chassis ground.
Connector & terminal
(B47) No. 2 (+) — Chassis ground (
−):Is the voltage more than 10 V? Go to step 8.Repair open circuit
in harness
between ECM
connector and
main relay connec-
tor.