SUBARU FORESTER 2004 Service Repair Manual
Manufacturer: SUBARU, Model Year: 2004, Model line: FORESTER, Model: SUBARU FORESTER 2004Pages: 2870, PDF Size: 38.67 MB
Page 721 of 2870

RM-6
RECOMMENDED MATERIAL
Recommended Materials
8. ADHESIVES
Use the adhesives shown in the table below, or equivalent.
Grease MT main shaft FX 2200 clutch grease 000040901 —
Clutch master cylinder
push rodSlicolube G-40M 004404003 —
Gear shift lever
Select lever
Clutch operating cyl-
inder
Accelerator pedal
Clutch pedal
Brake pedal
Hill holder
Clutch bearing
Clutch release lever
Steering shaft bear-
ingSUNLIGHT2 003602010 —
Steering gearbox Valiant grease M-2 003608001 —
Disc brake Niglube RX-2 K0779GA102 —
Drum brake
Drum brake wheel
cylinderMolykote No. 7439 003602001 —
Brake pad
Brake shoeMolykote AS-880N K0777YA010 —
Front axle AARi One luber C — —
Front axle AC HTBJ — —
Rear axle BJ Molylex No. 2 003601001 —
Rear axle EBJ NTG2218 — —
Rear axle DOJ VU-3A702 23223GA050 —
Water pump
Door latch
Door strikerSlicolube G-30M 004404002 —
Adhesive Application point Recommended Item number Alternative
Adhesive Windshield and body Dow Automotive’s
Adhesive: Gurit-ESSEX
Betaseal 1502 or equivalent
Glass primer: Betawipe VP
04604 or Betawipe 5001
Paint surface primer: Betap-
rime 5402——
Soft vinyl Cemedine 540 — 3M’s EC-776 EC-847 or EC-1022
(Spray type)
Momentary sealant Cemedine 3000 — Armstrong’s Eastman 910
Inner rearview mirror
baseREPAIR KIT IN MR 65029FC000 — Grease Application point Recommended Item number Alternative
Page 722 of 2870

RM-7
RECOMMENDED MATERIAL
Recommended Materials
9. SEAL MATERIAL
Use seal material shown in the table below, or equivalent.
Seal material Application point Recommended Item number Alternative
Seal material Engine case
Torque converter
clutch case
Transmission case
(5MT)Three Bond 1215B 004403007 Dow Corning’s No. 7038
Transmission Three Bond 1217B K0877YA020 —
Rear differential Three Bond 1324 004403042 —
Rear differential Three Bond 1105 004403010 Dow Corning’s No. 7038
Weather strip Starcalking B-33A 000018901 Butyl Rubber sealant
Steering adjusting screw Three Bond 1102 004403006 —
SOHC camshaft cap Three Bond 1280B K0877YA018 —
Page 723 of 2870

RM-8
RECOMMENDED MATERIAL
Recommended Materials
Page 724 of 2870

PRE-DELIVERY INSPECTION
PI
Page
1. Pre-delivery Inspection................................................................................2
Page 725 of 2870

PI-2
PRE-DELIVERY INSPECTION
Pre-delivery Inspection
1. Pre-delivery Inspection
A: GENERAL
The purposes of the pre-delivery inspection (PDI)
are as follows.
Remove the additional parts used for ensuring
the vehicle quality during transportation and restore
the vehicle to its normal state.
Check if the vehicle before delivery is in a normal
state.
Check for any damage or missing parts that may
have taken place during transportation or storage.
Make sure to deliver a complete vehicle to the
customer.
Because of the above reasons, all SUBARU distrib-
utor service must always carry out the PDIs before
delivering a vehicle.
In addition, all SUBARU distributor service and PDI
centers must check the status of every vehicle re-
ceived to identify who is responsible for any possi-
ble defects.
Page 726 of 2870

PI-3
PRE-DELIVERY INSPECTION
Pre-delivery Inspection
B: PDI PROCEDURE
Follow the procedures shown in the table below.
Static Checks Just After Vehicle Receipt
Step Check point
1. Appearance check (1) If the vehicle is covered with protective coating, visually check the vehicle
body for damage and dents. If the protective coating has been removed,
visually check the body paints for small areas of damage or stains.
(2) Visually check the glass and light lenses for any damage and cracks or
excessive gaps to the body sheet metal.
(3) Visually check the plated parts for any damage.
2. Tire check (1) Check the tires for damage, abnormal conditions, and dents on the
wheels.
(2) Check the tire air pressure.
3. Fuse installation If the vehicle is about to be delivered to the customer, attach a room light
fuse.
4. Connection of air conditioner harness If the vehicle is about to be delivered to the customer, connect the air condi-
tioner harness.
5. Check the doors for lock/unlock and open/close
operations.(1) Using the key, check if the door can be locked and unlocked normally.
(2) Open and close all doors to see that there are no abnormal conditions.
6. Operation check of double lock Check that the double lock operates normally.
7. Operation check of the child safety lock system. Check the child safety lock system operates normally.
8. Check the rear gate for lock/unlock and open/
close operations.(1) Check if the rear gate can be unlocked normally from the emergency
door.
(2) Open and close the rear gate to see that there are no abnormal condi-
tions.
(3) Operate the power door locking switch to check that the rear gate is
locked and unlocked normally.
9. Operation check of fuel lid opener lock release
leverOperate the fuel lid opener to check that the fuel lid is unlocked normally.
10. Accessory check Check that the following accessories are provided:
Owner’s manual
Warranty booklet
Service booklet
Spare key
Jack
Tool set
Spare tire
11. Operation check of hood lock release system Operate the hood lock release lever to check that the hood opens normally.
12. Battery Check the battery for any abnormal conditions such as rust and trace of bat-
tery fluid leaks.
13. Brake fluid Check the fluid amount.
14. Engine oil Check the oil amount.
15. Transmission fluid (1) Check the fluid amount.
(2) For AT, check the front differential oil.
16. AT front differential oil Check the AT front differential oil amount.
17. Coolant Check the coolant amount.
18. Clutch fluid Check the clutch fluid amount.
19. Window washer fluid Check the window washer fluid amount.
20. Hood latch check Check that the hood is closed and latched securely.
21. Keyless entry system Check that the keyless entry system operates normally.
22. Security system Check that the security system operates normally.
23. Seat (1) Check the seat surfaces for smears or dirt.
(2) Check the seat installation conditions and functionality.
24. Seat belt Check the seat belt installation conditions and functionality.
25. Wheel alignment Check that the wheel alignments are properly adjusted.
Page 727 of 2870

PI-4
PRE-DELIVERY INSPECTION
Pre-delivery Inspection
Checks with the Engine Running
Dynamic Test with the Vehicle Running
Checks after Dynamic Test
Step Check point
26. Test mode connectors Test mode connectors
27. Starting condition Start the engine and check that the engine starts smoothly.
28. Exhaust system Check that the exhaust noise is normal and no leaks are found.
29. Indicator light Check that all the indicator lights operate normally.
30. Clock Check that the clock operates normally.
31. Radio Check that the radio system operates normally.
32. Front accessory power supply socket Check that the front accessory power supply socket operates normally.
33. Lighting system Check that the lighting systems operate normally.
34. Window washer Check that the window washer system operates normally.
35. Wiper Check that the wiper system operates normally.
36. Power window operation check Check the power window for correct operations.
Step Check point
37. Brake test Check that the foot brake operates normally.
38. Parking brake Check that the parking brake operates normally.
39. AT shift control Check the AT shift patterns are correct.
40. Heater & ventilation Check that the heater & ventilation system operates normally.
41. Air conditioner Check that the air conditioner operates normally.
42. Speed control Check that the speed control operates normally.
Step Check point
43. ATF level Check that the ATF level is normal.
44. Power steering fluid level Check that the power steering fluid level is normal.
45. Fluid leak check Check for fluid/oil leaks.
46. Water leak check Spray the vehicle with water and check for water leaks.
47. Appearance check 2 (1) Remove the protective coating (wrap guard).(if any)
(2) Check the body paints for damage and smears.
(3) Check the plated parts for damage and rust.
Page 728 of 2870

PI-5
PRE-DELIVERY INSPECTION
Pre-delivery Inspection
1. APPEARANCE CHECK
1) If the vehicle is covered with protective coating,
visually check the vehicle body for damage and
dents.
2) If there is no protective coating, check the body
paints for small areas of damage or stains and re-
pair as necessary.
3) Check the window glass, door glass, and lights
for any cracks or damage and repair or replace the
parts as necessary.
4) Check the plated parts, such as the grilles and
door knobs, for damage or loss of gloss and repair
or replace the parts as necessary.
2. TIRE CHECK
Check the tire outer faces for any damage.
Check the tire air pressure by referring to the fol-
lowing table.
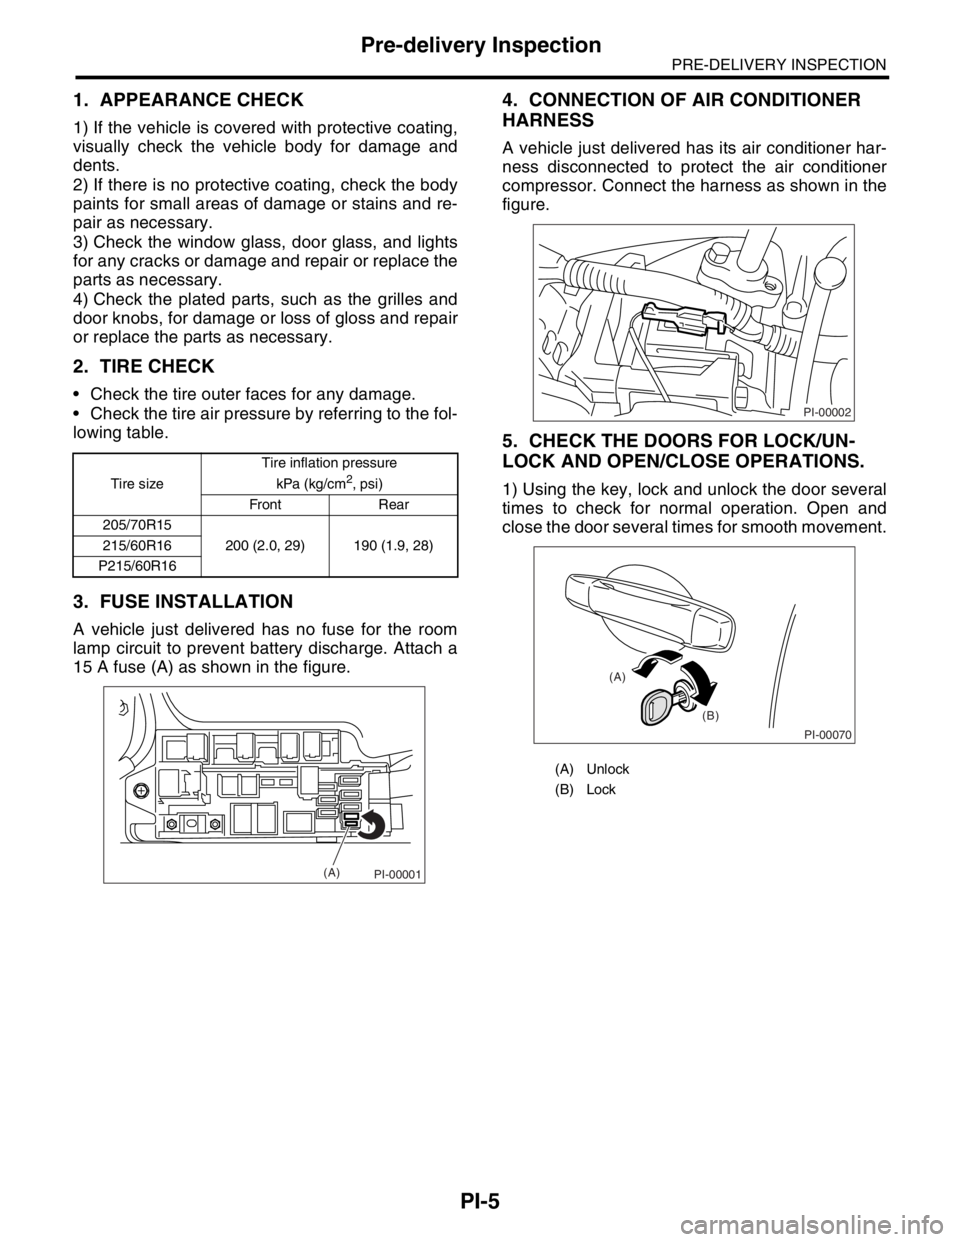
3. FUSE INSTALLATION
A vehicle just delivered has no fuse for the room
lamp circuit to prevent battery discharge. Attach a
15 A fuse (A) as shown in the figure.
4. CONNECTION OF AIR CONDITIONER
HARNESS
A vehicle just delivered has its air conditioner har-
ness disconnected to protect the air conditioner
compressor. Connect the harness as shown in the
figure.
5. CHECK THE DOORS FOR LOCK/UN-
LOCK AND OPEN/CLOSE OPERATIONS.
1) Using the key, lock and unlock the door several
times to check for normal operation. Open and
close the door several times for smooth movement.Tire sizeTire inflation pressure
kPa (kg/cm2, psi)
Front Rear
205/70R15
200 (2.0, 29) 190 (1.9, 28) 215/60R16
P215/60R16
PI-00001(A)
(A) Unlock
(B) Lock
PI-00002
PI-00070
(A)
(B)
Page 729 of 2870

PI-6
PRE-DELIVERY INSPECTION
Pre-delivery Inspection
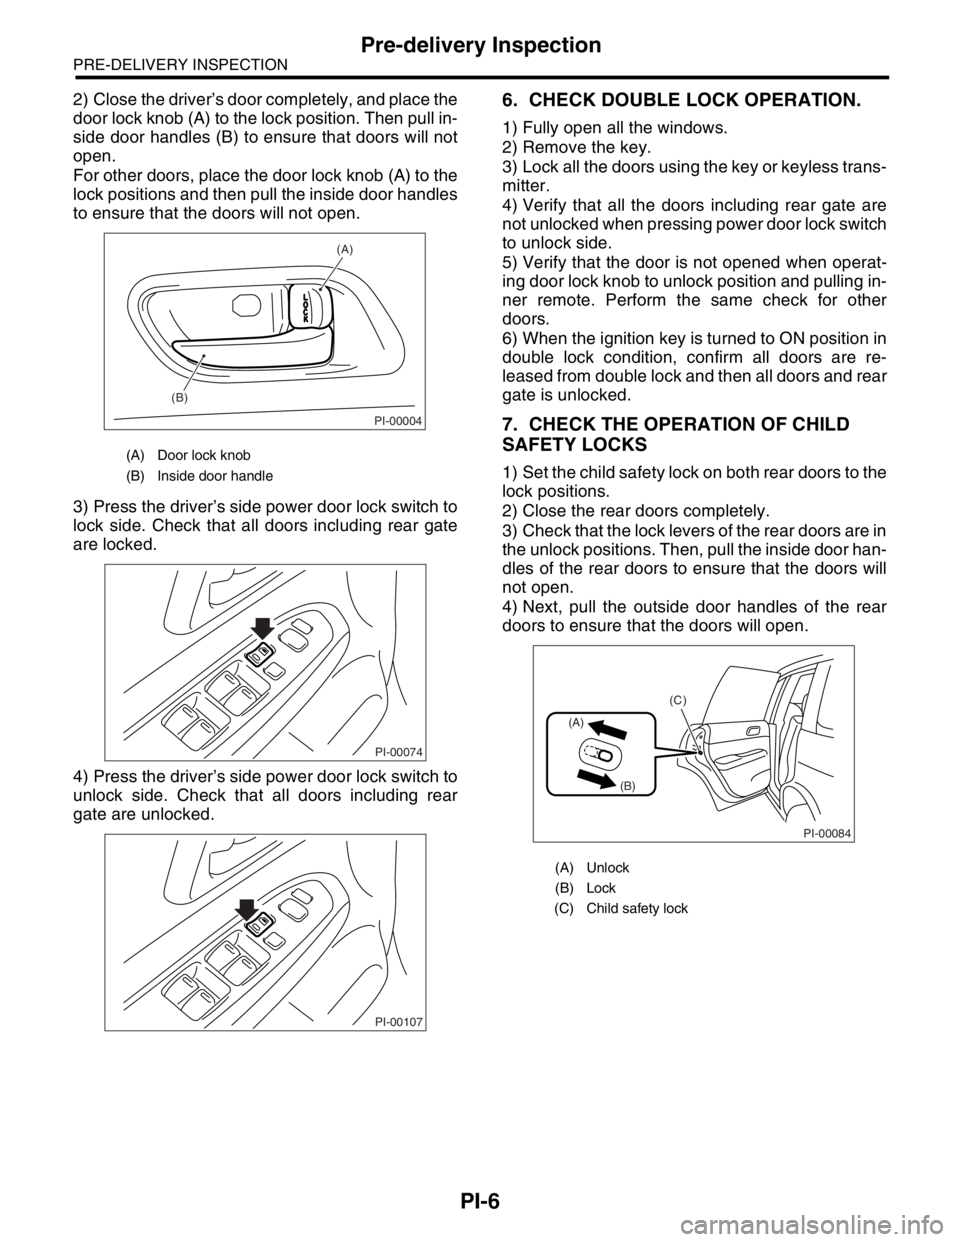
2) Close the driver’s door completely, and place the
door lock knob (A) to the lock position. Then pull in-
side door handles (B) to ensure that doors will not
open.
For other doors, place the door lock knob (A) to the
lock positions and then pull the inside door handles
to ensure that the doors will not open.
3) Press the driver’s side power door lock switch to
lock side. Check that all doors including rear gate
are locked.
4) Press the driver’s side power door lock switch to
unlock side. Check that all doors including rear
gate are unlocked.6. CHECK DOUBLE LOCK OPERATION.
1) Fully open all the windows.
2) Remove the key.
3) Lock all the doors using the key or keyless trans-
mitter.
4) Verify that all the doors including rear gate are
not unlocked when pressing power door lock switch
to unlock side.
5) Verify that the door is not opened when operat-
ing door lock knob to unlock position and pulling in-
ner remote. Perform the same check for other
doors.
6) When the ignition key is turned to ON position in
double lock condition, confirm all doors are re-
leased from double lock and then all doors and rear
gate is unlocked.
7. CHECK THE OPERATION OF CHILD
SAFETY LOCKS
1) Set the child safety lock on both rear doors to the
lock positions.
2) Close the rear doors completely.
3) Check that the lock levers of the rear doors are in
the unlock positions. Then, pull the inside door han-
dles of the rear doors to ensure that the doors will
not open.
4) Next, pull the outside door handles of the rear
doors to ensure that the doors will open.
(A) Door lock knob
(B) Inside door handle
PI-00004
(A)
(B)
PI-00074
PI-00107
(A) Unlock
(B) Lock
(C) Child safety lock
PI-00084
(A)
(B)
(C)
Page 730 of 2870

PI-7
PRE-DELIVERY INSPECTION
Pre-delivery Inspection
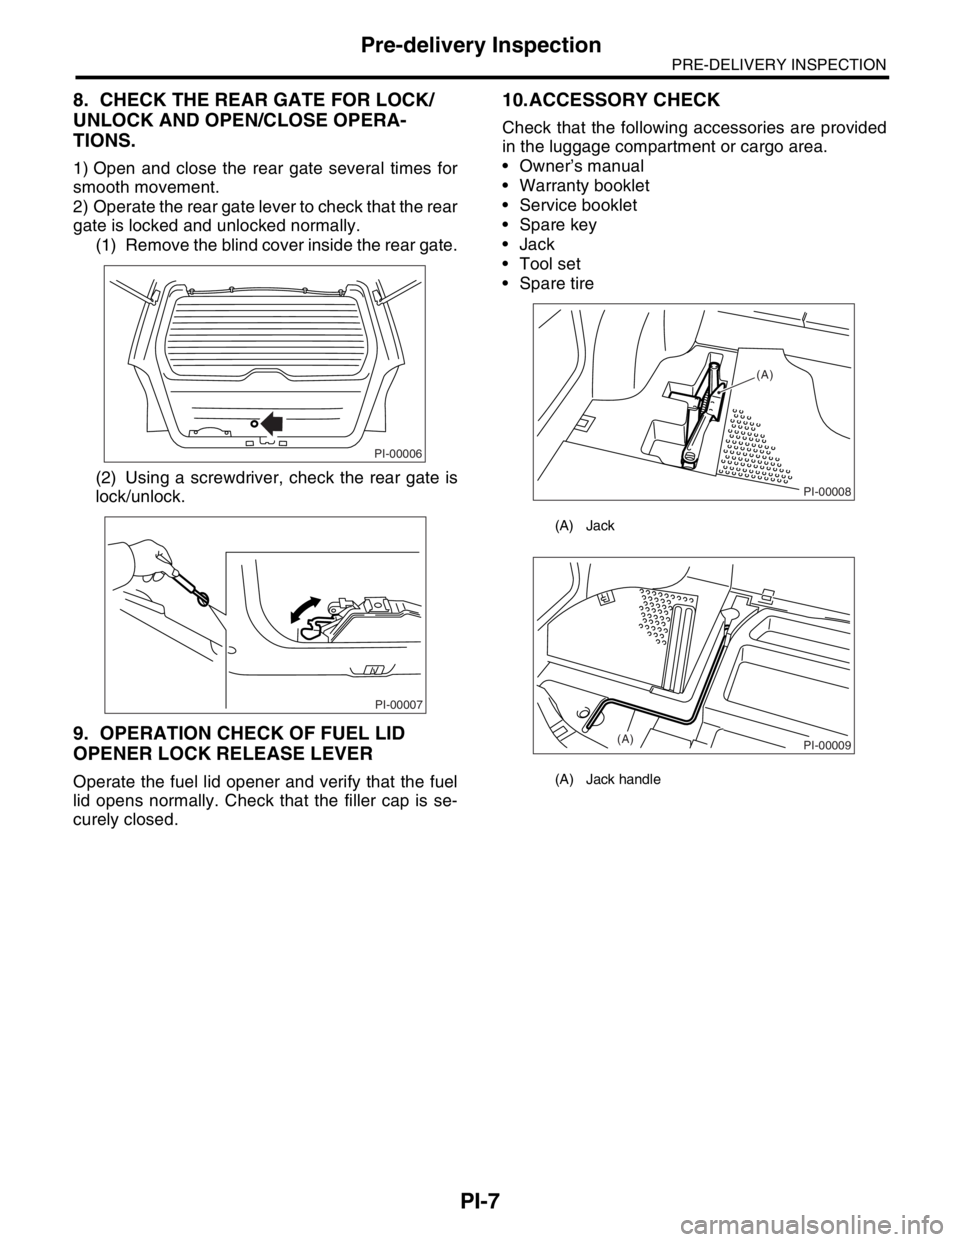
8. CHECK THE REAR GATE FOR LOCK/
UNLOCK AND OPEN/CLOSE OPERA-
TIONS.
1) Open and close the rear gate several times for
smooth movement.
2) Operate the rear gate lever to check that the rear
gate is locked and unlocked normally.
(1) Remove the blind cover inside the rear gate.
(2) Using a screwdriver, check the rear gate is
lock/unlock.
9. OPERATION CHECK OF FUEL LID
OPENER LOCK RELEASE LEVER
Operate the fuel lid opener and verify that the fuel
lid opens normally. Check that the filler cap is se-
curely closed.
10.ACCESSORY CHECK
Check that the following accessories are provided
in the luggage compartment or cargo area.
Owner’s manual
Warranty booklet
Service booklet
Spare key
Jack
Tool set
Spare tire
PI-00006
PI-00007
(A) Jack
(A) Jack handle
PI-00008
(A)
PI-00009(A)