SUBARU FORESTER 2004 Service Repair Manual
Manufacturer: SUBARU, Model Year: 2004, Model line: FORESTER, Model: SUBARU FORESTER 2004Pages: 2870, PDF Size: 38.67 MB
Page 801 of 2870
FU(H4SO)-19
FUEL INJECTION (FUEL SYSTEM)
Intake Manifold
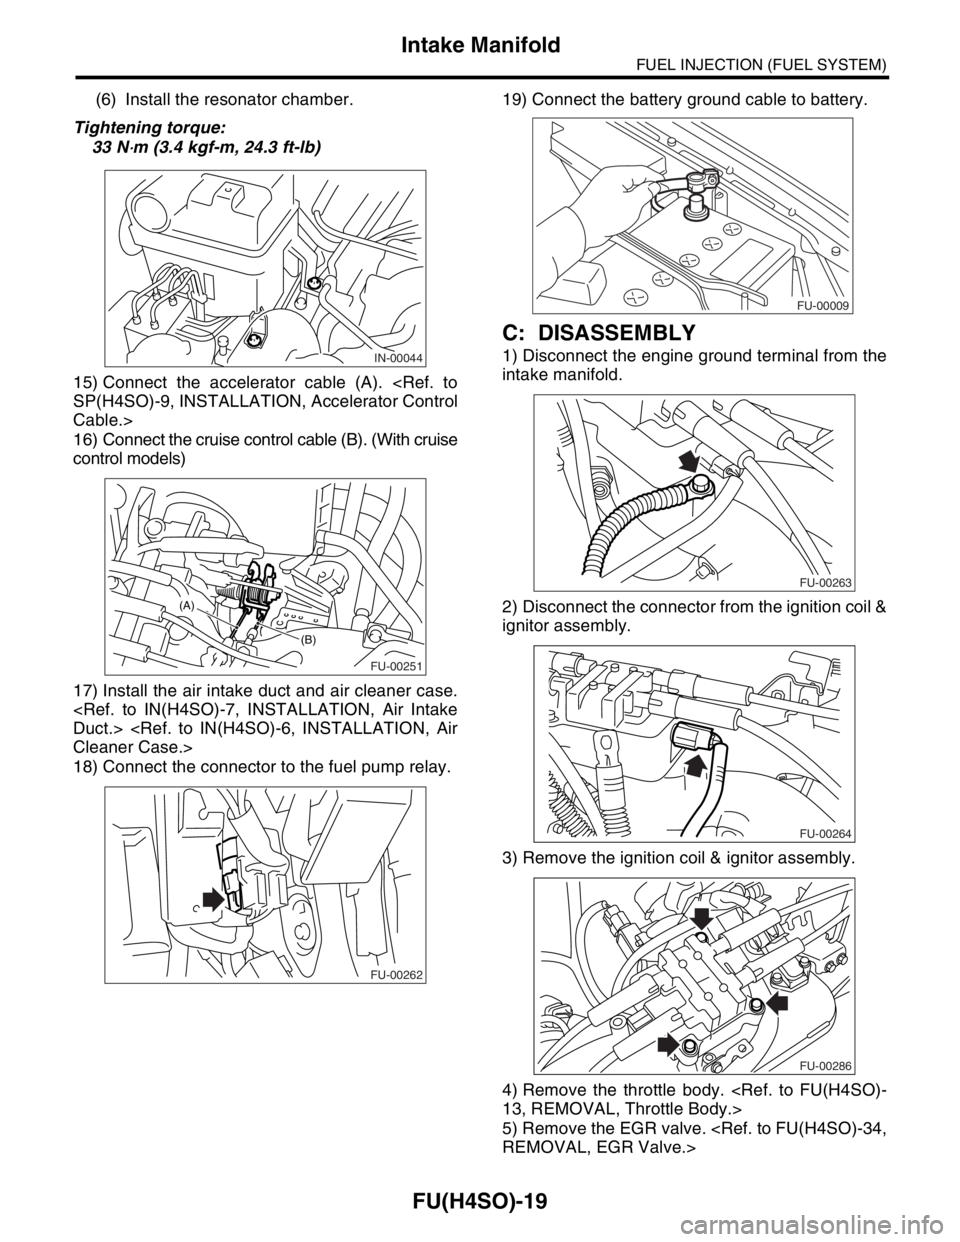
(6) Install the resonator chamber.
Tightening torque:
33 N
⋅m (3.4 kgf-m, 24.3 ft-lb)
15) Connect the accelerator cable (A).
Cable.>
16) Connect the cruise control cable (B). (With cruise
control models)
17) Install the air intake duct and air cleaner case.
18) Connect the connector to the fuel pump relay.19) Connect the battery ground cable to battery.
C: DISASSEMBLY
1) Disconnect the engine ground terminal from the
intake manifold.
2) Disconnect the connector from the ignition coil &
ignitor assembly.
3) Remove the ignition coil & ignitor assembly.
4) Remove the throttle body.
5) Remove the EGR valve.
FU-00251
(B)
(A)
FU-00262
FU-00009
FU-00263
FU-00264
FU-00286
Page 802 of 2870
FU(H4SO)-20
FUEL INJECTION (FUEL SYSTEM)
Intake Manifold
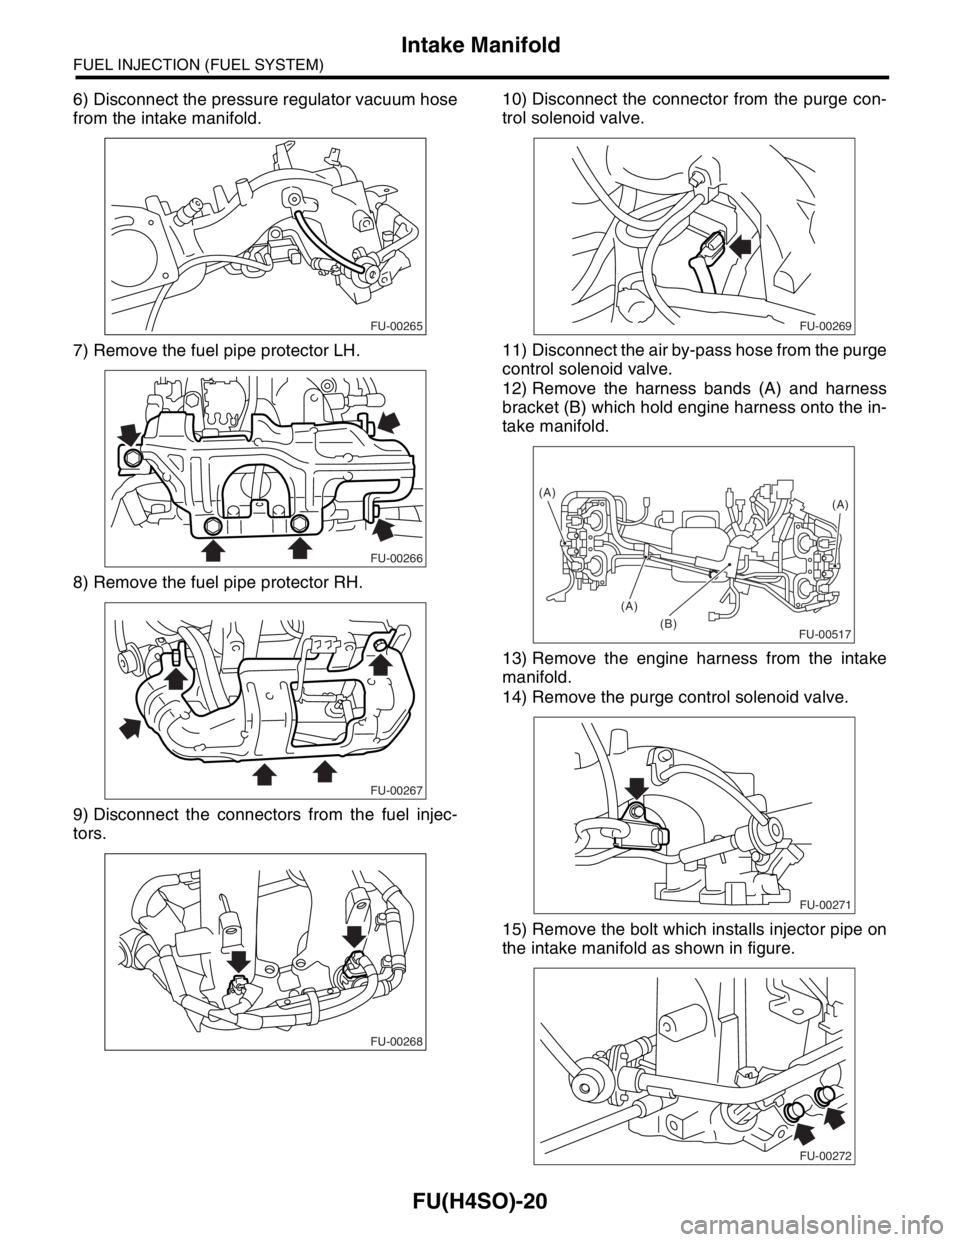
6) Disconnect the pressure regulator vacuum hose
from the intake manifold.
7) Remove the fuel pipe protector LH.
8) Remove the fuel pipe protector RH.
9) Disconnect the connectors from the fuel injec-
tors.10) Disconnect the connector from the purge con-
trol solenoid valve.
11) Disconnect the air by-pass hose from the purge
control solenoid valve.
12) Remove the harness bands (A) and harness
bracket (B) which hold engine harness onto the in-
take manifold.
13) Remove the engine harness from the intake
manifold.
14) Remove the purge control solenoid valve.
15) Remove the bolt which installs injector pipe on
the intake manifold as shown in figure.
FU-00265
FU-00266
FU-00267
FU-00268
FU-00269
FU-00517(B)(A)
(A)
(A)
FU-00271
FU-00272
Page 803 of 2870
FU(H4SO)-21
FUEL INJECTION (FUEL SYSTEM)
Intake Manifold
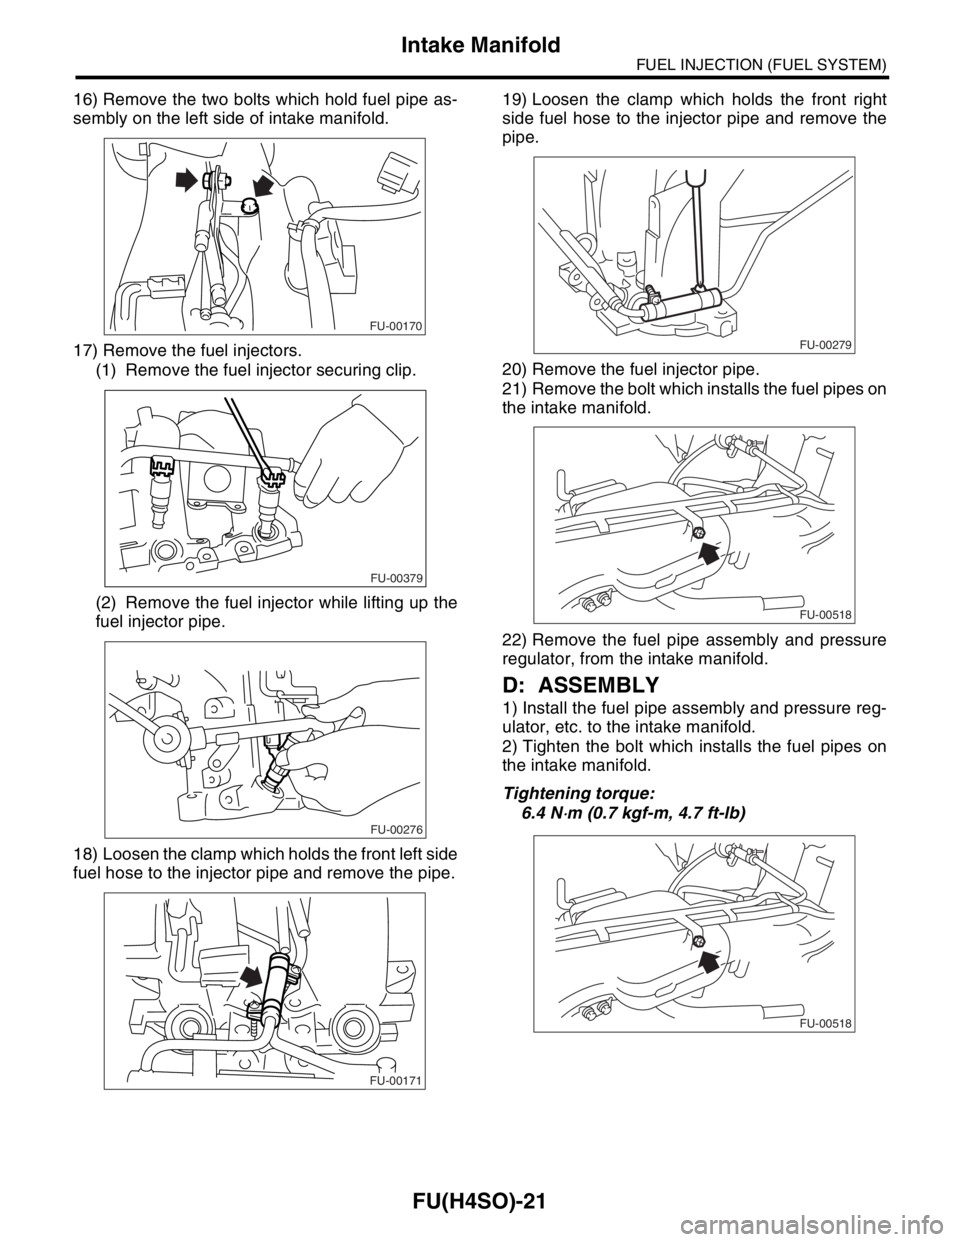
16) Remove the two bolts which hold fuel pipe as-
sembly on the left side of intake manifold.
17) Remove the fuel injectors.
(1) Remove the fuel injector securing clip.
(2) Remove the fuel injector while lifting up the
fuel injector pipe.
18) Loosen the clamp which holds the front left side
fuel hose to the injector pipe and remove the pipe.19) Loosen the clamp which holds the front right
side fuel hose to the injector pipe and remove the
pipe.
20) Remove the fuel injector pipe.
21) Remove the bolt which installs the fuel pipes on
the intake manifold.
22) Remove the fuel pipe assembly and pressure
regulator, from the intake manifold.
D: ASSEMBLY
1) Install the fuel pipe assembly and pressure reg-
ulator, etc. to the intake manifold.
2) Tighten the bolt which installs the fuel pipes on
the intake manifold.
Tightening torque:
6.4 N
⋅m (0.7 kgf-m, 4.7 ft-lb)
FU-00170
FU-00379
FU-00276
FU-00171
FU-00279
FU-00518
FU-00518
Page 804 of 2870
FU(H4SO)-22
FUEL INJECTION (FUEL SYSTEM)
Intake Manifold
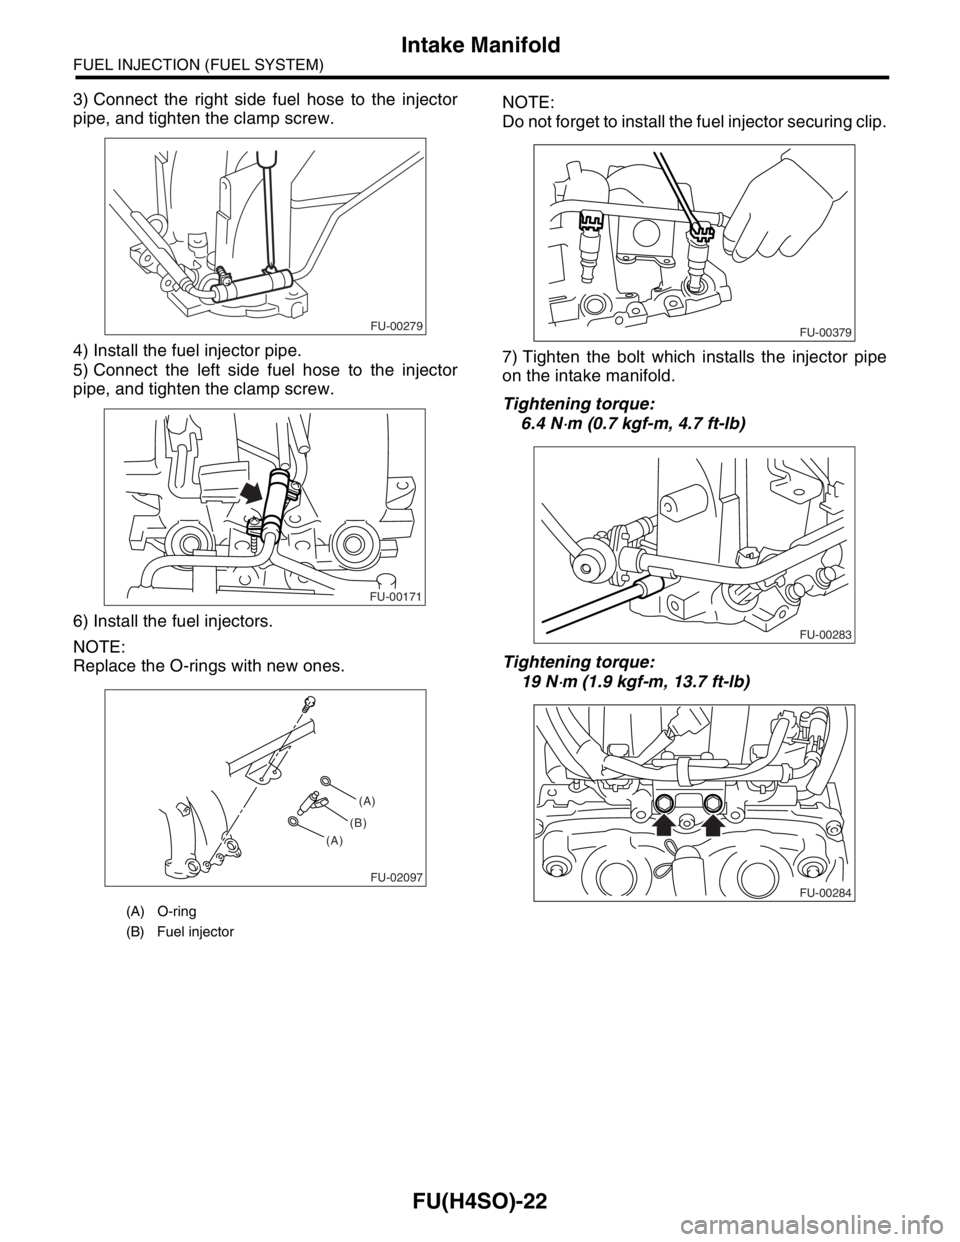
3) Connect the right side fuel hose to the injector
pipe, and tighten the clamp screw.
4) Install the fuel injector pipe.
5) Connect the left side fuel hose to the injector
pipe, and tighten the clamp screw.
6) Install the fuel injectors.
NOTE:
Replace the O-rings with new ones.NOTE:
Do not forget to install the fuel injector securing clip.
7) Tighten the bolt which installs the injector pipe
on the intake manifold.
Tightening torque:
6.4 N
⋅m (0.7 kgf-m, 4.7 ft-lb)
Tightening torque:
19 N
⋅m (1.9 kgf-m, 13.7 ft-lb)
(A) O-ring
(B) Fuel injector
FU-00279
FU-00171
FU-02097
(A)
(A)(B)
FU-00379
FU-00283
FU-00284
Page 805 of 2870
FU(H4SO)-23
FUEL INJECTION (FUEL SYSTEM)
Intake Manifold
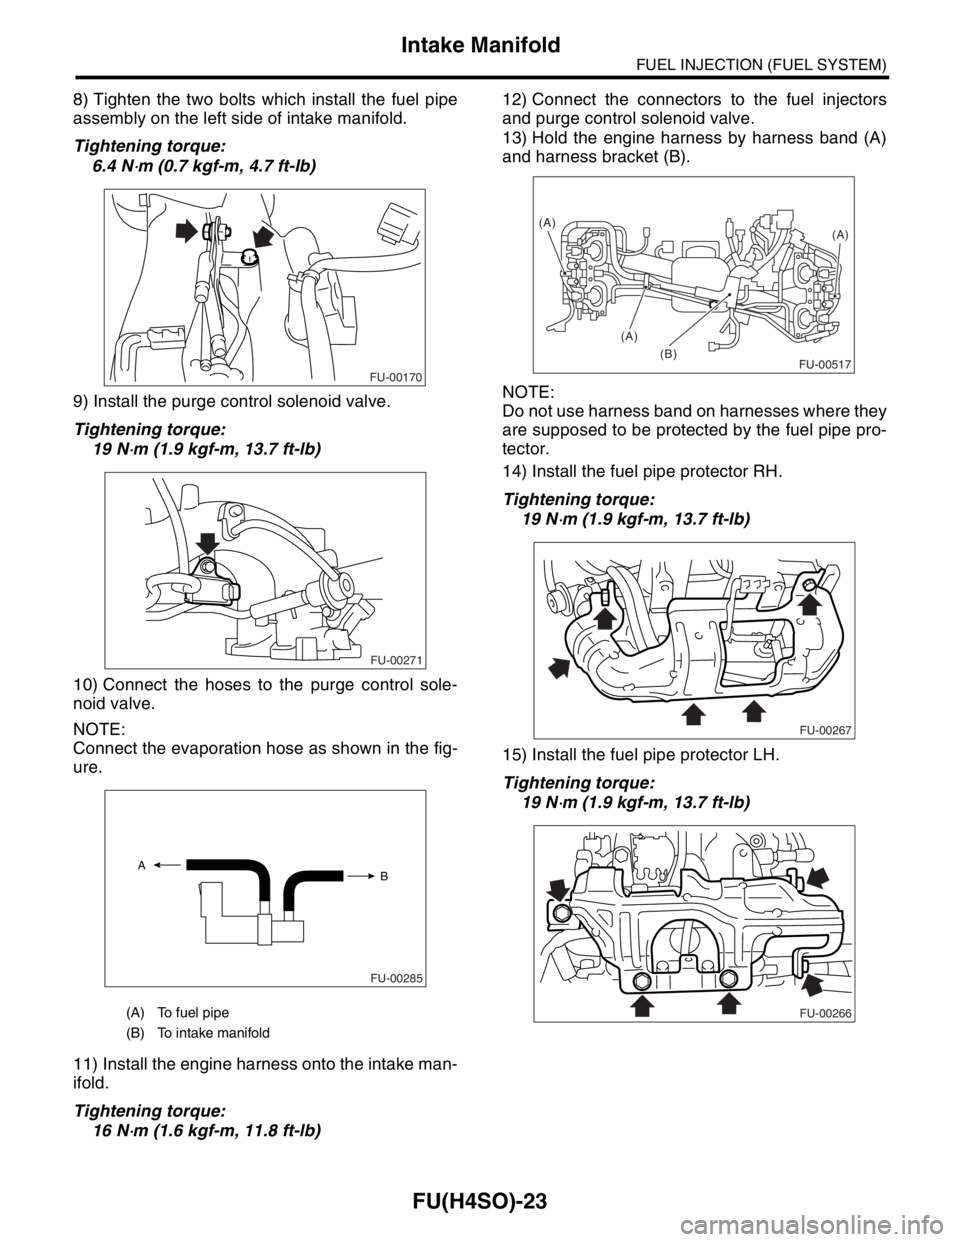
8) Tighten the two bolts which install the fuel pipe
assembly on the left side of intake manifold.
Tightening torque:
6.4 N
⋅m (0.7 kgf-m, 4.7 ft-lb)
9) Install the purge control solenoid valve.
Tightening torque:
19 N
⋅m (1.9 kgf-m, 13.7 ft-lb)
10) Connect the hoses to the purge control sole-
noid valve.
NOTE:
Connect the evaporation hose as shown in the fig-
ure.
11) Install the engine harness onto the intake man-
ifold.
Tightening torque:
16 N
⋅m (1.6 kgf-m, 11.8 ft-lb)12) Connect the connectors to the fuel injectors
and purge control solenoid valve.
13) Hold the engine harness by harness band (A)
and harness bracket (B).
NOTE:
Do not use harness band on harnesses where they
are supposed to be protected by the fuel pipe pro-
tector.
14) Install the fuel pipe protector RH.
Tightening torque:
19 N
⋅m (1.9 kgf-m, 13.7 ft-lb)
15) Install the fuel pipe protector LH.
Tightening torque:
19 N
⋅m (1.9 kgf-m, 13.7 ft-lb)
(A) To fuel pipe
(B) To intake manifold
FU-00170
FU-00271
FU-00285
A
B
FU-00517(B)(A)
(A)
(A)
FU-00267
FU-00266
Page 806 of 2870
FU(H4SO)-24
FUEL INJECTION (FUEL SYSTEM)
Intake Manifold
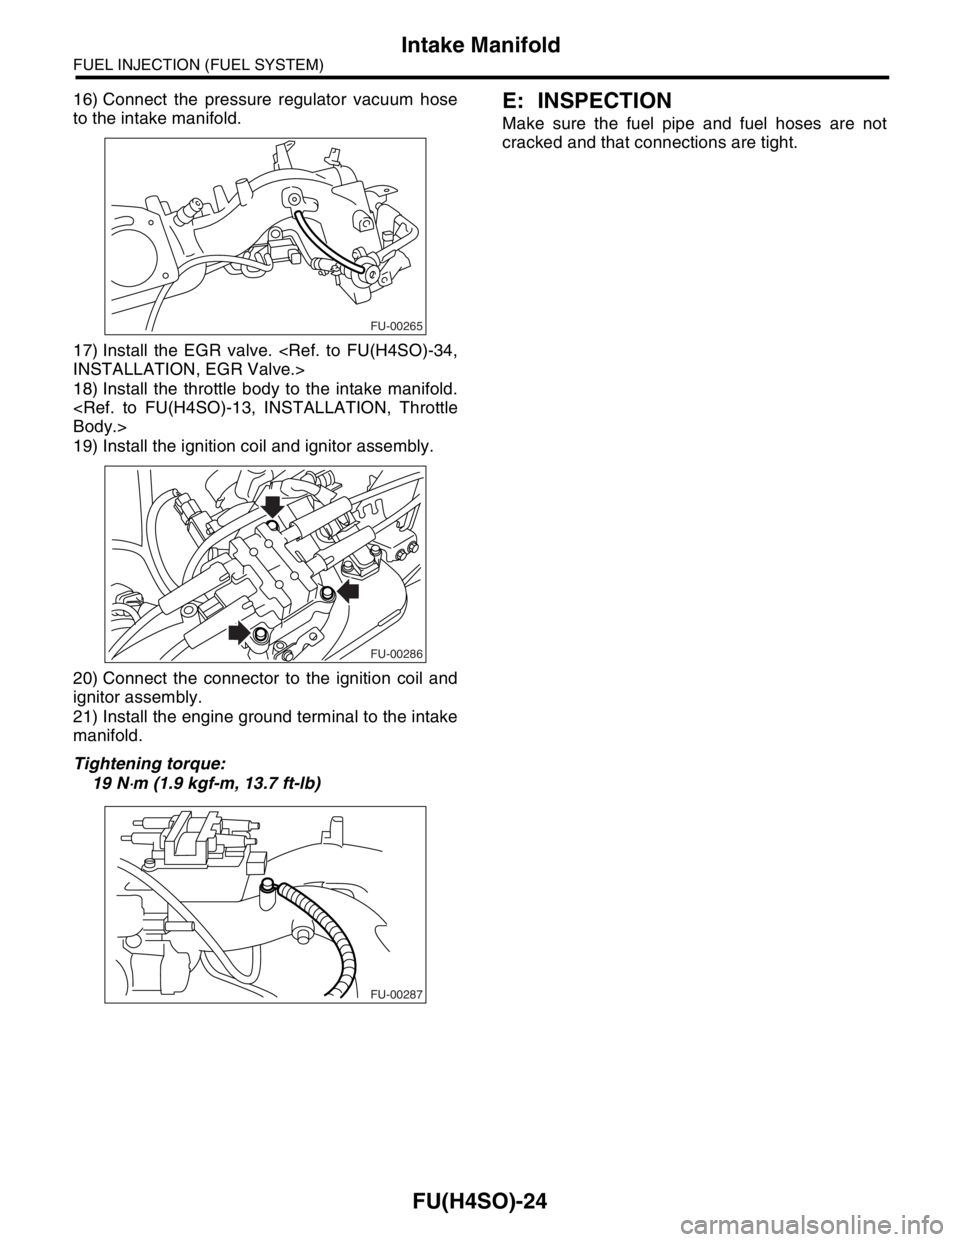
16) Connect the pressure regulator vacuum hose
to the intake manifold.
17) Install the EGR valve.
18) Install the throttle body to the intake manifold.
19) Install the ignition coil and ignitor assembly.
20) Connect the connector to the ignition coil and
ignitor assembly.
21) Install the engine ground terminal to the intake
manifold.
Tightening torque:
19 N
⋅m (1.9 kgf-m, 13.7 ft-lb)
E: INSPECTION
Make sure the fuel pipe and fuel hoses are not
cracked and that connections are tight.
FU-00265
FU-00286
FU-00287
Page 807 of 2870
FU(H4SO)-25
FUEL INJECTION (FUEL SYSTEM)
Engine Coolant Temperature Sensor
4. Engine Coolant Temperature
Sensor
A: REMOVAL
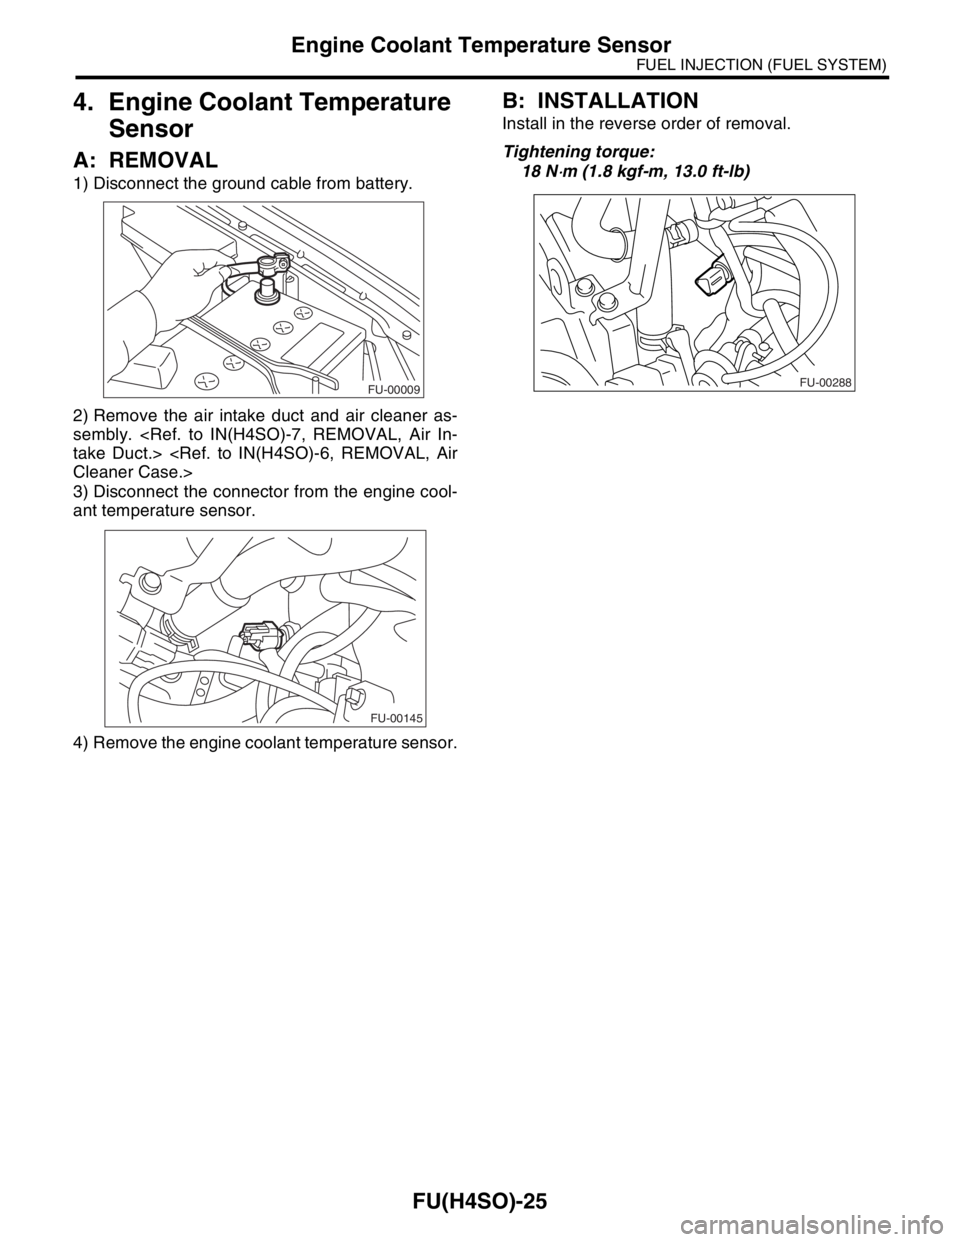
1) Disconnect the ground cable from battery.
2) Remove the air intake duct and air cleaner as-
sembly.
3) Disconnect the connector from the engine cool-
ant temperature sensor.
4) Remove the engine coolant temperature sensor.
B: INSTALLATION
Install in the reverse order of removal.
Tightening torque:
18 N
⋅m (1.8 kgf-m, 13.0 ft-lb)
FU-00009
FU-00145
FU-00288
Page 808 of 2870
FU(H4SO)-26
FUEL INJECTION (FUEL SYSTEM)
Crankshaft Position Sensor
5. Crankshaft Position Sensor
A: REMOVAL
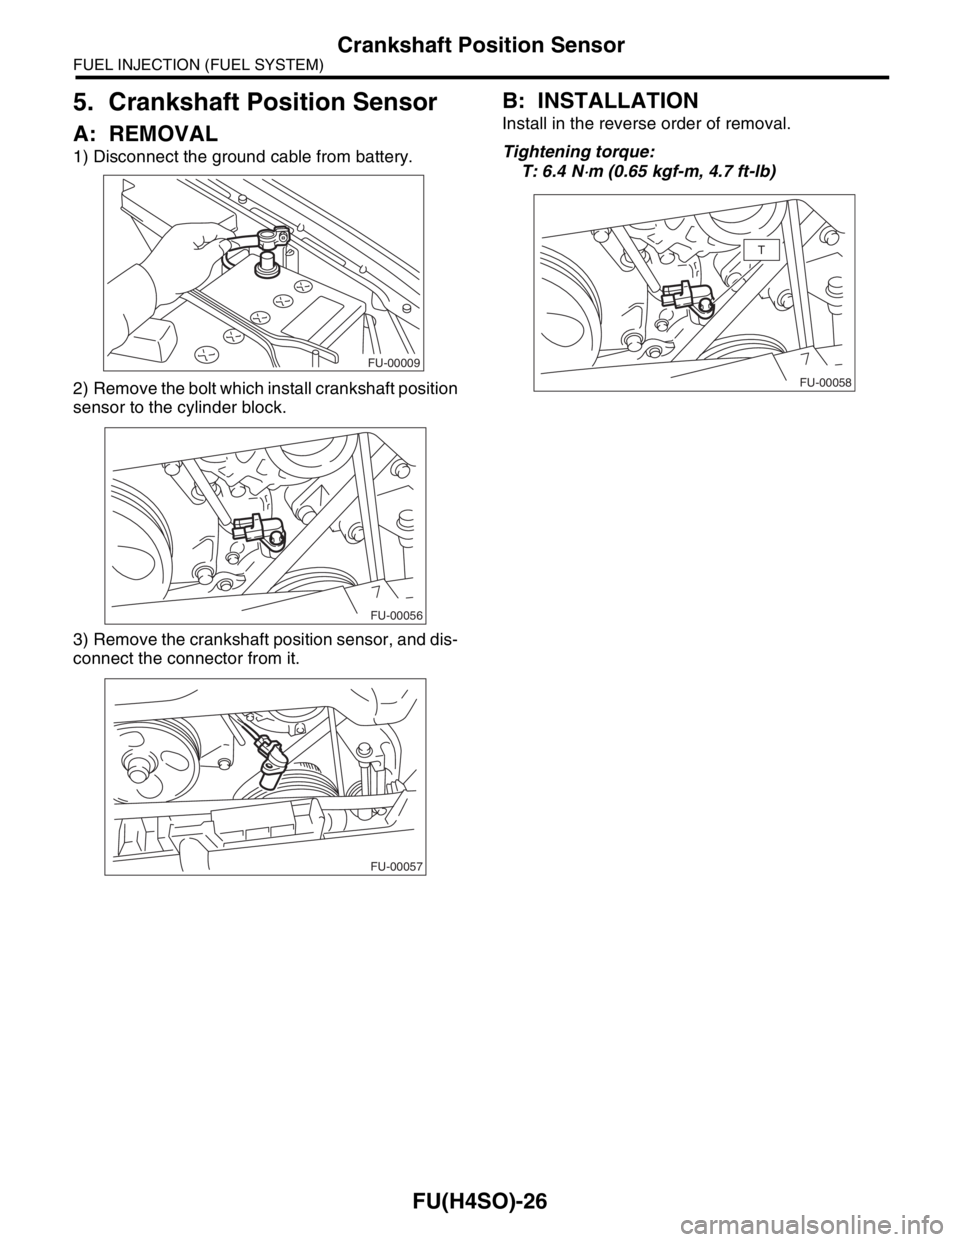
1) Disconnect the ground cable from battery.
2) Remove the bolt which install crankshaft position
sensor to the cylinder block.
3) Remove the crankshaft position sensor, and dis-
connect the connector from it.
B: INSTALLATION
Install in the reverse order of removal.
Tightening torque:
T: 6.4 N
⋅m (0.65 kgf-m, 4.7 ft-lb)
FU-00009
FU-00056
FU-00057
FU-00058
T
Page 809 of 2870
FU(H4SO)-27
FUEL INJECTION (FUEL SYSTEM)
Camshaft Position Sensor
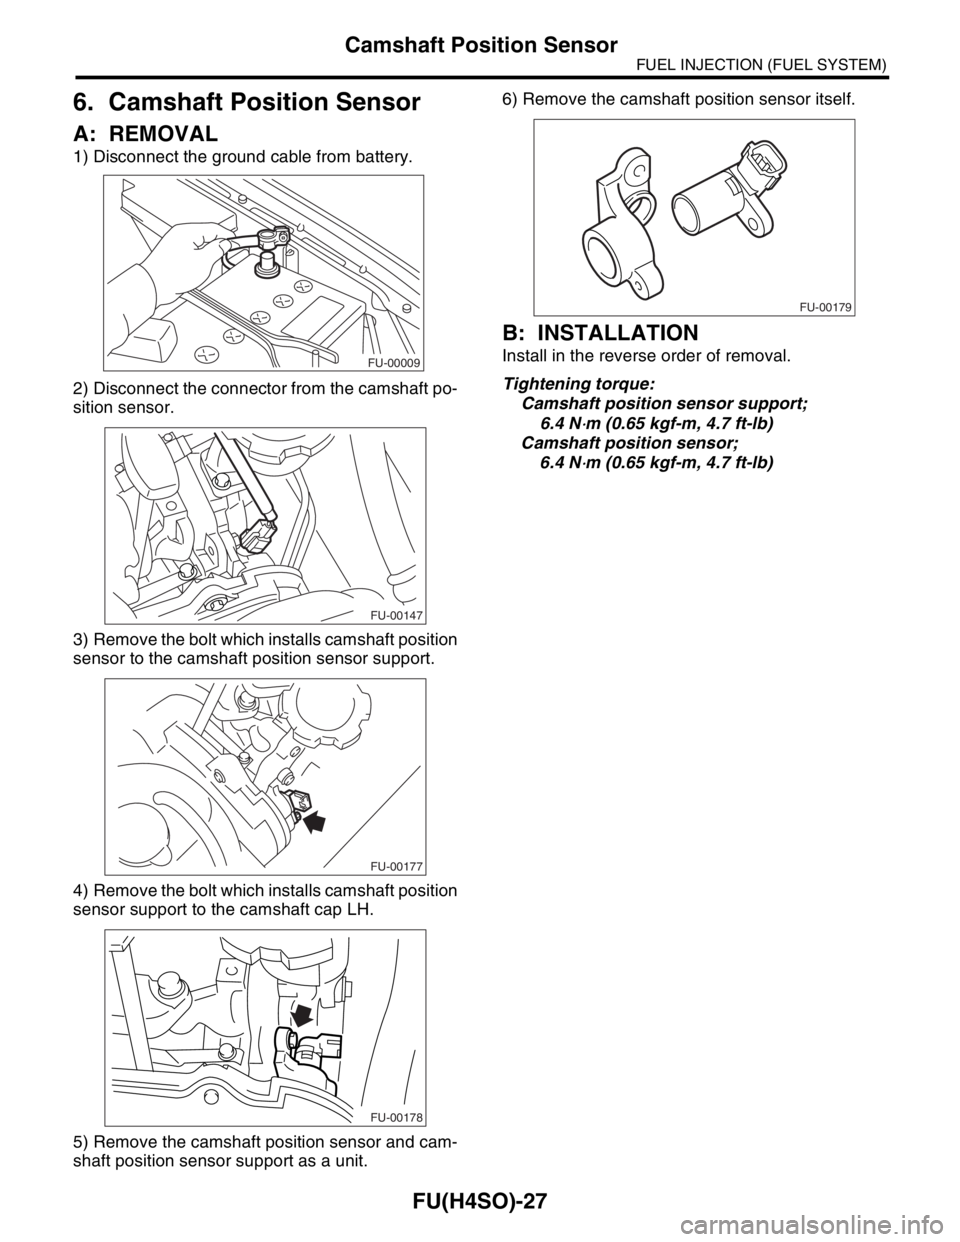
6. Camshaft Position Sensor
A: REMOVAL
1) Disconnect the ground cable from battery.
2) Disconnect the connector from the camshaft po-
sition sensor.
3) Remove the bolt which installs camshaft position
sensor to the camshaft position sensor support.
4) Remove the bolt which installs camshaft position
sensor support to the camshaft cap LH.
5) Remove the camshaft position sensor and cam-
shaft position sensor support as a unit.6) Remove the camshaft position sensor itself.
B: INSTALLATION
Install in the reverse order of removal.
Tightening torque:
Camshaft position sensor support;
6.4 N
⋅m (0.65 kgf-m, 4.7 ft-lb)
Camshaft position sensor;
6.4 N
⋅m (0.65 kgf-m, 4.7 ft-lb)
FU-00009
FU-00147
FU-00177
FU-00178
FU-00179
Page 810 of 2870
FU(H4SO)-28
FUEL INJECTION (FUEL SYSTEM)
Knock Sensor
7. Knock Sensor
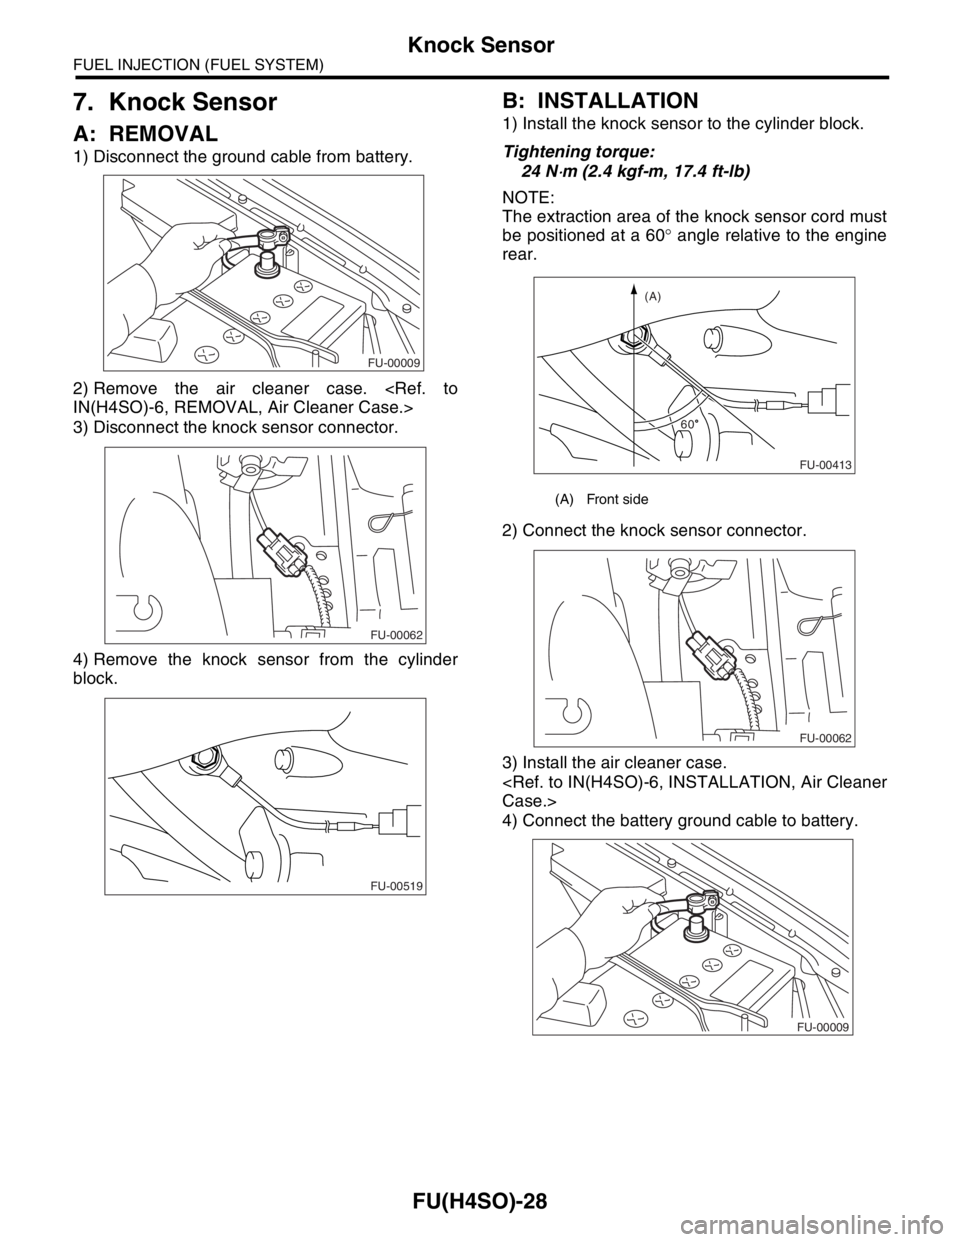
A: REMOVAL
1) Disconnect the ground cable from battery.
2) Remove the air cleaner case.
3) Disconnect the knock sensor connector.
4) Remove the knock sensor from the cylinder
block.
B: INSTALLATION
1) Install the knock sensor to the cylinder block.
Tightening torque:
24 N
⋅m (2.4 kgf-m, 17.4 ft-lb)
NOTE:
The extraction area of the knock sensor cord must
be positioned at a 60° angle relative to the engine
rear.
2) Connect the knock sensor connector.
3) Install the air cleaner case.
4) Connect the battery ground cable to battery.
FU-00009
FU-00062
FU-00519
(A) Front side
FU-00413
(A)
60
FU-00062
FU-00009