SUBARU LEGACY 1999 Service Repair Manual
LEGACY 1999
SUBARU
SUBARU
https://www.carmanualsonline.info/img/17/57435/w960_57435-0.png
SUBARU LEGACY 1999 Service Repair Manual
Trending: radiator cap, airbag, compressor, wheel torque, lug nut torque, power steering, Fuel system diagram
Page 1141 of 1456
Page 1142 of 1456
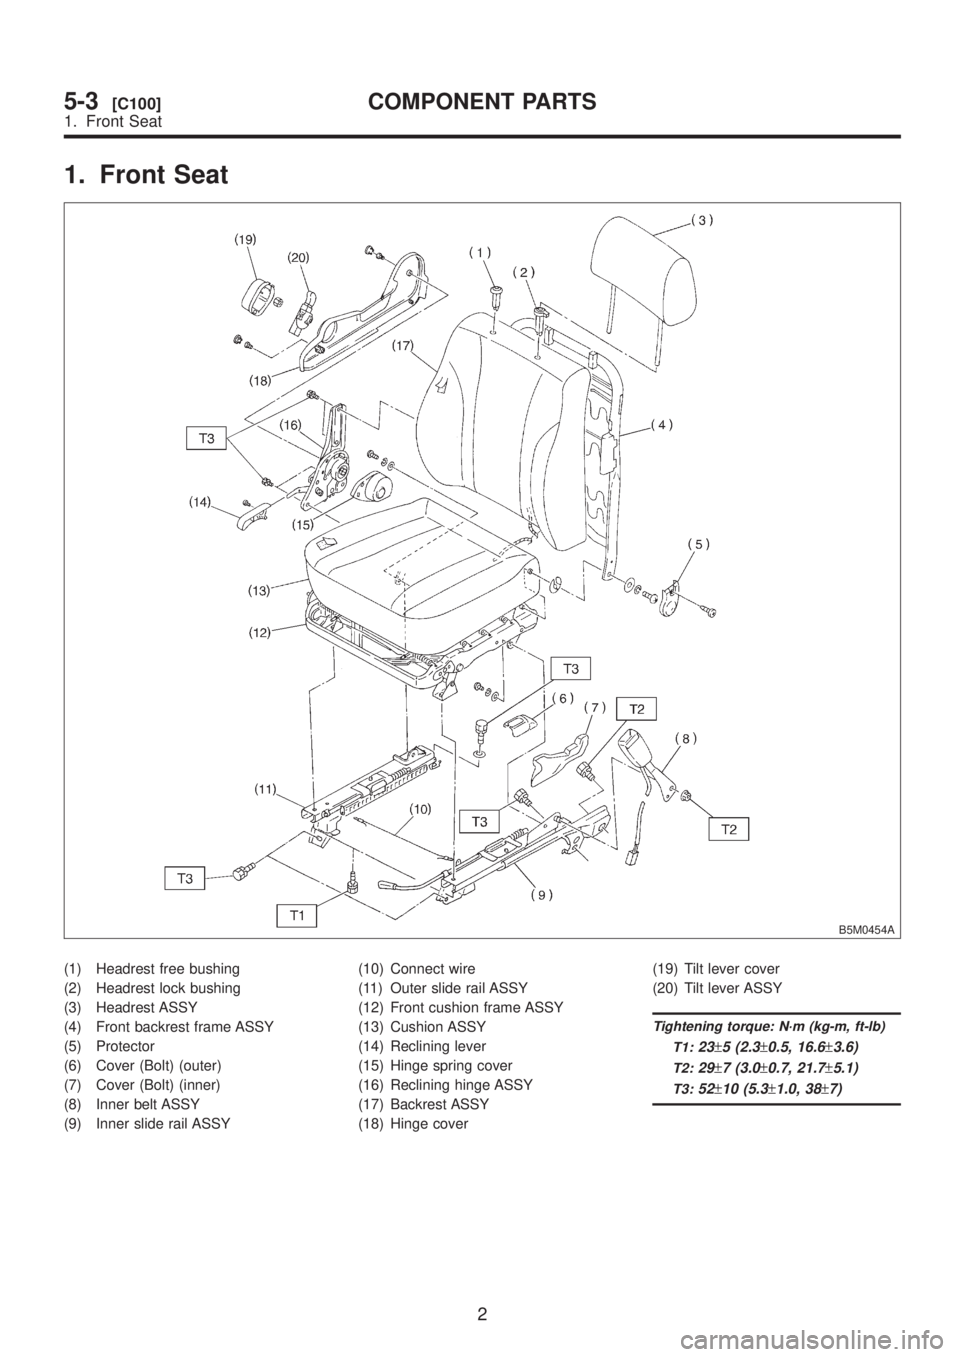
1. Front Seat
B5M0454A
(1) Headrest free bushing
(2) Headrest lock bushing
(3) Headrest ASSY
(4) Front backrest frame ASSY
(5) Protector
(6) Cover (Bolt) (outer)
(7) Cover (Bolt) (inner)
(8) Inner belt ASSY
(9) Inner slide rail ASSY(10) Connect wire
(11) Outer slide rail ASSY
(12) Front cushion frame ASSY
(13) Cushion ASSY
(14) Reclining lever
(15) Hinge spring cover
(16) Reclining hinge ASSY
(17) Backrest ASSY
(18) Hinge cover(19) Tilt lever cover
(20) Tilt lever ASSY
Tightening torque: N´m (kg-m, ft-lb)
T1:
23±5 (2.3±0.5, 16.6±3.6)
T2:29±7 (3.0±0.7, 21.7±5.1)
T3:52±10 (5.3±1.0, 38±7)
2
5-3[C100]COMPONENT PARTS
1. Front Seat
Page 1143 of 1456
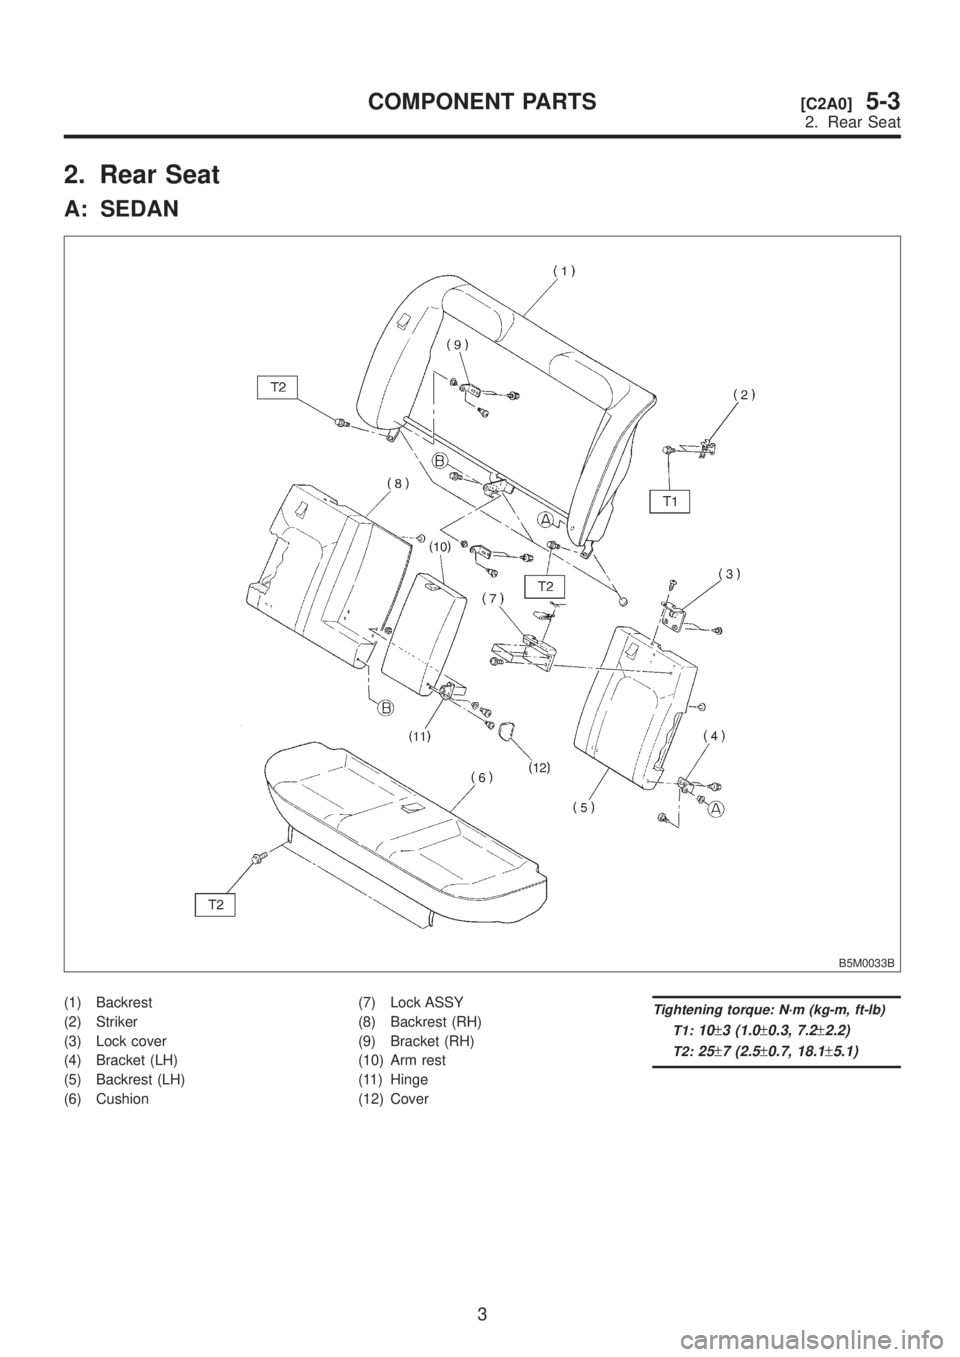
2. Rear Seat
A: SEDAN
B5M0033B
(1) Backrest
(2) Striker
(3) Lock cover
(4) Bracket (LH)
(5) Backrest (LH)
(6) Cushion(7) Lock ASSY
(8) Backrest (RH)
(9) Bracket (RH)
(10) Arm rest
(11) Hinge
(12) CoverTightening torque: N´m (kg-m, ft-lb)
T1:
10±3 (1.0±0.3, 7.2±2.2)
T2:25±7 (2.5±0.7, 18.1±5.1)
3
[C2A0]5-3COMPONENT PARTS
2. Rear Seat
Page 1144 of 1456
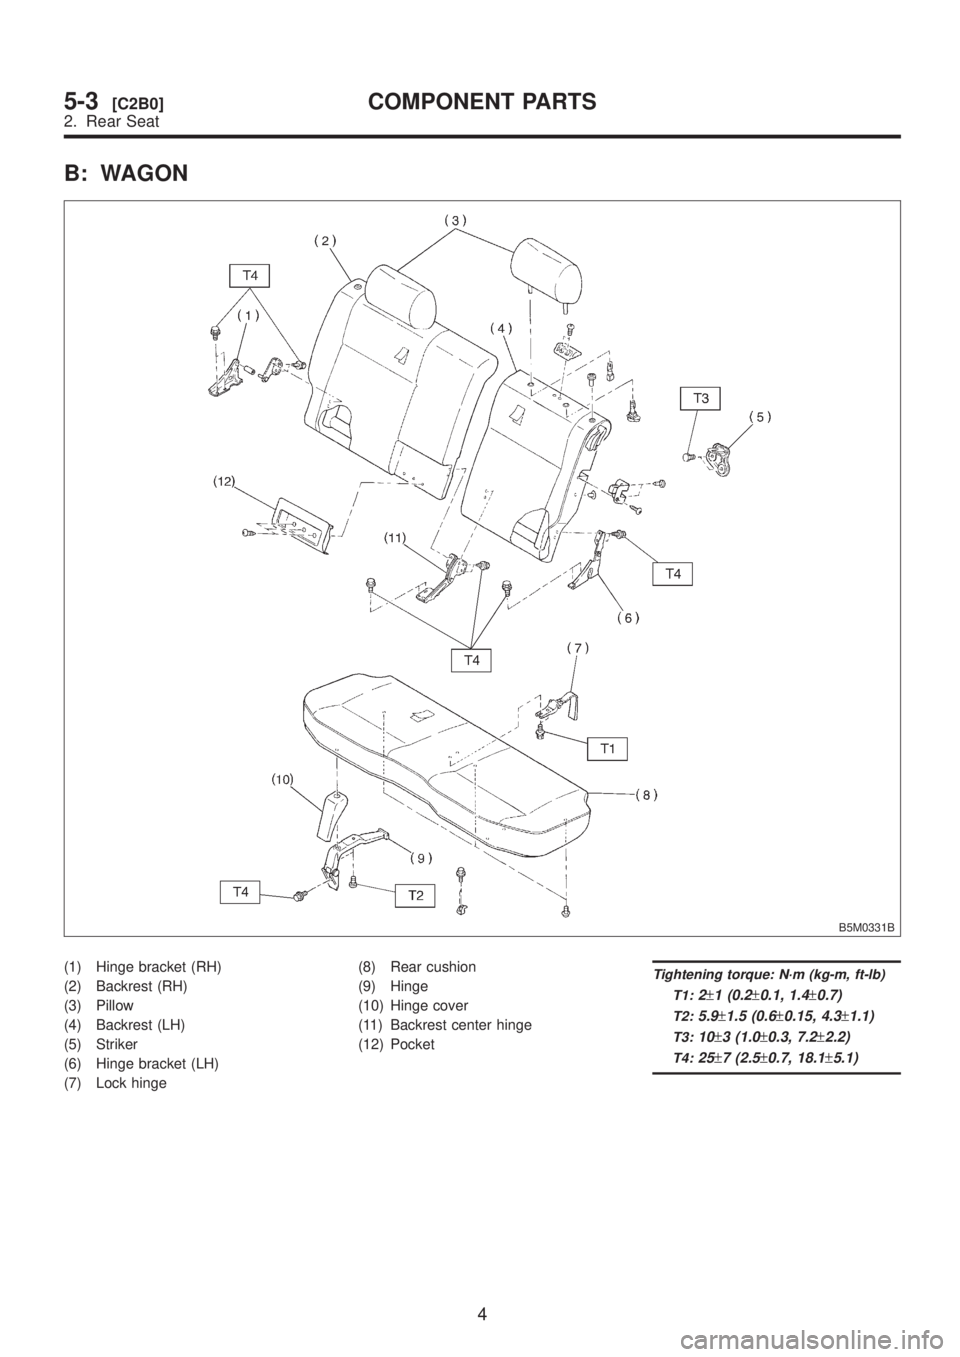
B: WAGON
B5M0331B
(1) Hinge bracket (RH)
(2) Backrest (RH)
(3) Pillow
(4) Backrest (LH)
(5) Striker
(6) Hinge bracket (LH)
(7) Lock hinge(8) Rear cushion
(9) Hinge
(10) Hinge cover
(11) Backrest center hinge
(12) PocketTightening torque: N´m (kg-m, ft-lb)
T1:
2±1 (0.2±0.1, 1.4±0.7)
T2:5.9±1.5 (0.6±0.15, 4.3±1.1)
T3:10±3 (1.0±0.3, 7.2±2.2)
T4:25±7 (2.5±0.7, 18.1±5.1)
4
5-3[C2B0]COMPONENT PARTS
2. Rear Seat
Page 1145 of 1456
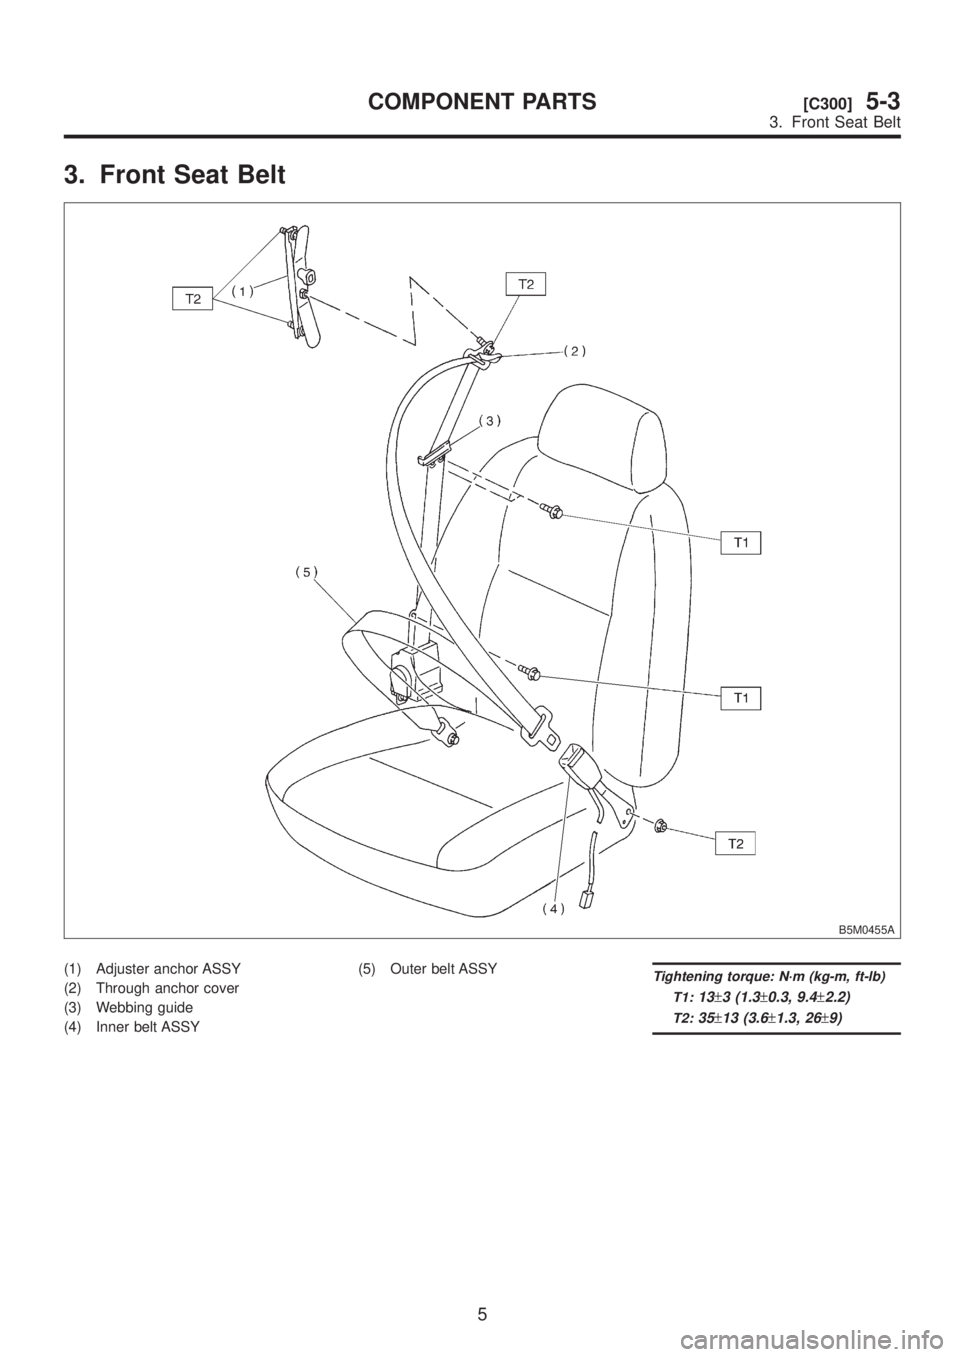
3. Front Seat Belt
B5M0455A
(1) Adjuster anchor ASSY
(2) Through anchor cover
(3) Webbing guide
(4) Inner belt ASSY(5) Outer belt ASSYTightening torque: N´m (kg-m, ft-lb)
T1:
13±3 (1.3±0.3, 9.4±2.2)
T2:35±13 (3.6±1.3, 26±9)
5
[C300]5-3COMPONENT PARTS
3. Front Seat Belt
Page 1146 of 1456
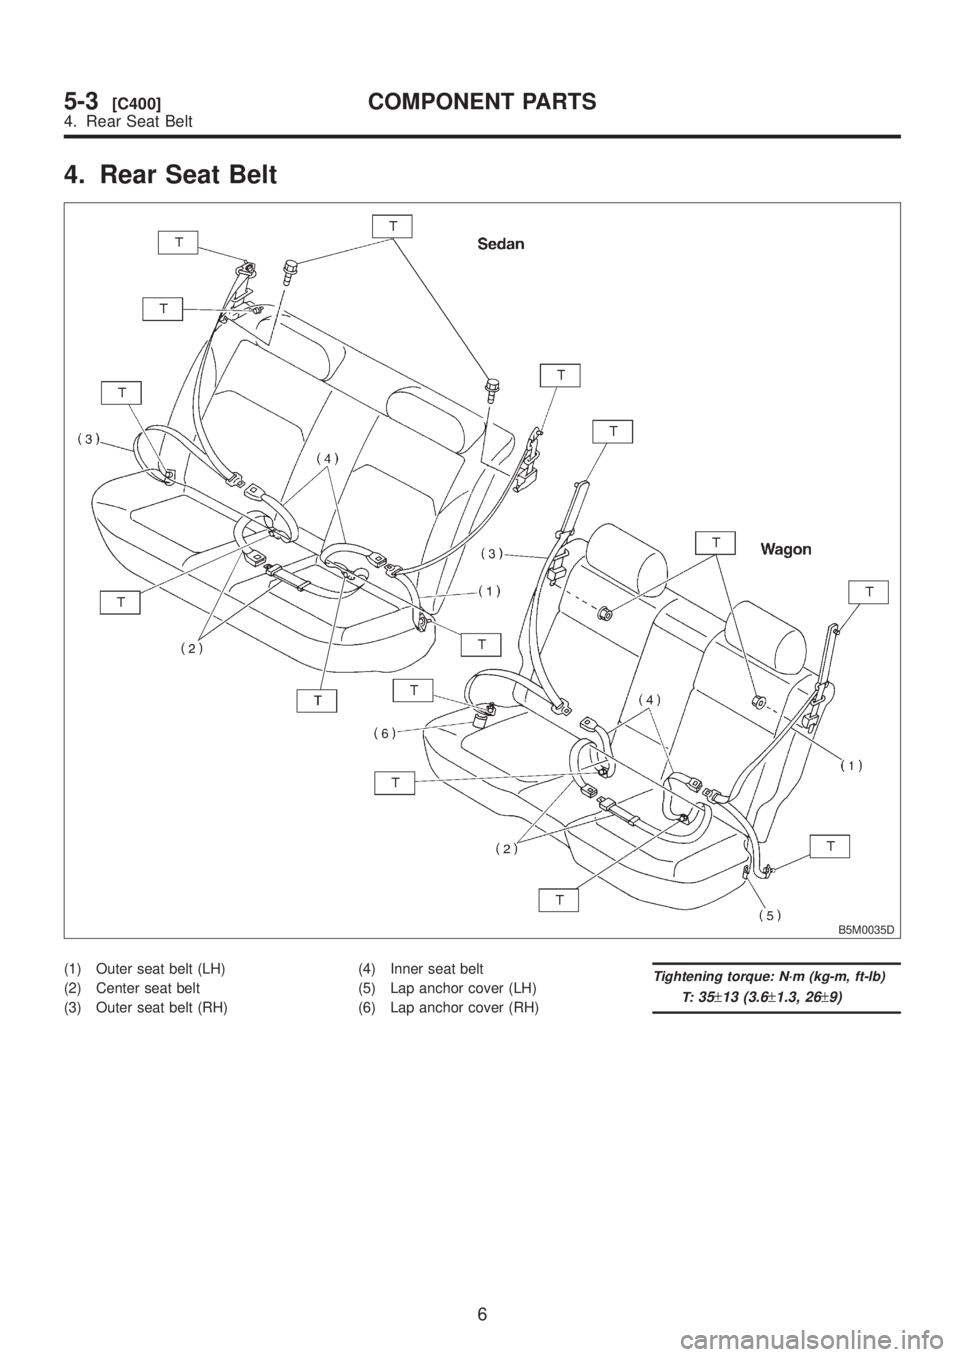
4. Rear Seat Belt
B5M0035D
(1) Outer seat belt (LH)
(2) Center seat belt
(3) Outer seat belt (RH)(4) Inner seat belt
(5) Lap anchor cover (LH)
(6) Lap anchor cover (RH)Tightening torque: N´m (kg-m, ft-lb)
T:
35±13 (3.6±1.3, 26±9)
6
5-3[C400]COMPONENT PARTS
4. Rear Seat Belt
Page 1147 of 1456
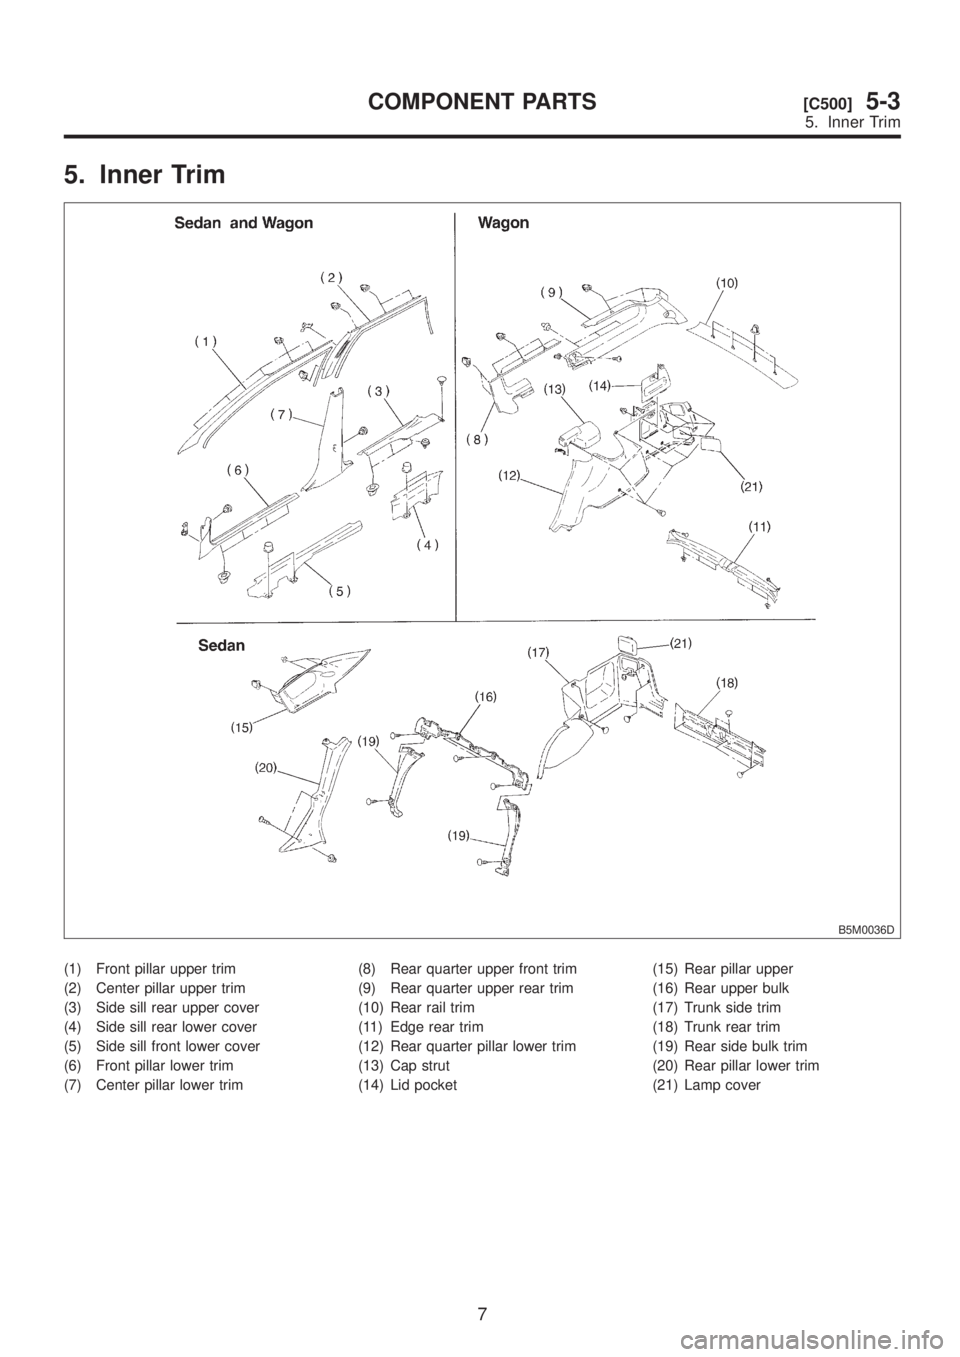
5. Inner Trim
B5M0036D
(1) Front pillar upper trim
(2) Center pillar upper trim
(3) Side sill rear upper cover
(4) Side sill rear lower cover
(5) Side sill front lower cover
(6) Front pillar lower trim
(7) Center pillar lower trim(8) Rear quarter upper front trim
(9) Rear quarter upper rear trim
(10) Rear rail trim
(11) Edge rear trim
(12) Rear quarter pillar lower trim
(13) Cap strut
(14) Lid pocket(15) Rear pillar upper
(16) Rear upper bulk
(17) Trunk side trim
(18) Trunk rear trim
(19) Rear side bulk trim
(20) Rear pillar lower trim
(21) Lamp cover
7
[C500]5-3COMPONENT PARTS
5. Inner Trim
Page 1148 of 1456
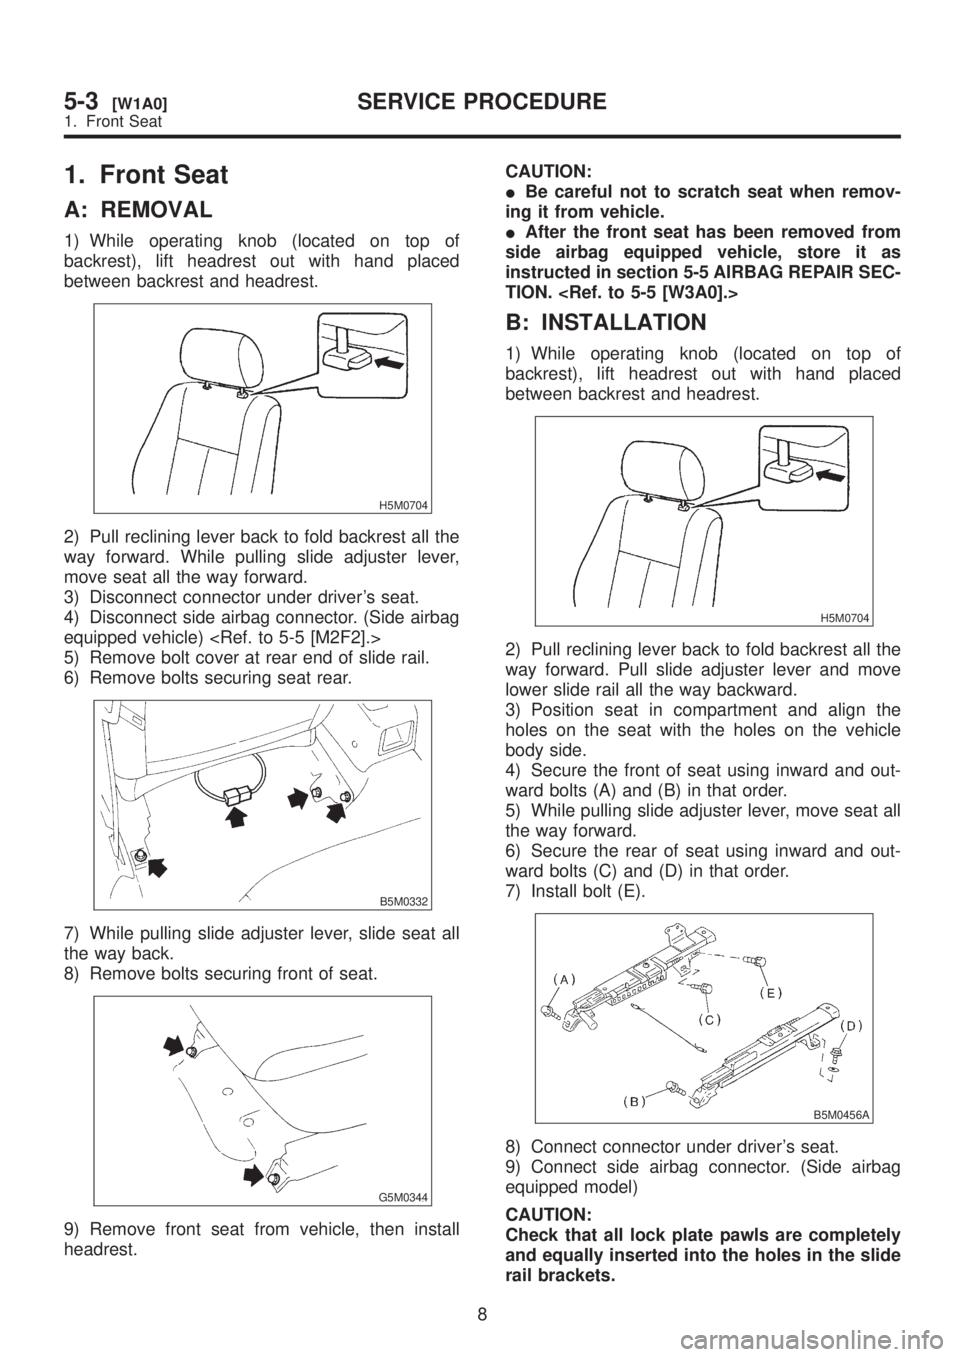
1. Front Seat
A: REMOVAL
1) While operating knob (located on top of
backrest), lift headrest out with hand placed
between backrest and headrest.
H5M0704
2) Pull reclining lever back to fold backrest all the
way forward. While pulling slide adjuster lever,
move seat all the way forward.
3) Disconnect connector under driver's seat.
4) Disconnect side airbag connector. (Side airbag
equipped vehicle)
5) Remove bolt cover at rear end of slide rail.
6) Remove bolts securing seat rear.
B5M0332
7) While pulling slide adjuster lever, slide seat all
the way back.
8) Remove bolts securing front of seat.
G5M0344
9) Remove front seat from vehicle, then install
headrest.CAUTION:
IBe careful not to scratch seat when remov-
ing it from vehicle.
IAfter the front seat has been removed from
side airbag equipped vehicle, store it as
instructed in section 5-5 AIRBAG REPAIR SEC-
TION.
B: INSTALLATION
1) While operating knob (located on top of
backrest), lift headrest out with hand placed
between backrest and headrest.
H5M0704
2) Pull reclining lever back to fold backrest all the
way forward. Pull slide adjuster lever and move
lower slide rail all the way backward.
3) Position seat in compartment and align the
holes on the seat with the holes on the vehicle
body side.
4) Secure the front of seat using inward and out-
ward bolts (A) and (B) in that order.
5) While pulling slide adjuster lever, move seat all
the way forward.
6) Secure the rear of seat using inward and out-
ward bolts (C) and (D) in that order.
7) Install bolt (E).
B5M0456A
8) Connect connector under driver's seat.
9) Connect side airbag connector. (Side airbag
equipped model)
CAUTION:
Check that all lock plate pawls are completely
and equally inserted into the holes in the slide
rail brackets.
8
5-3[W1A0]SERVICE PROCEDURE
1. Front Seat
Page 1149 of 1456
10) After installation, ensure that all mechanisms
operate properly and lock.
11) If any mechanism does not function properly,
loosen bolts (C), (D) and (E), slide seat as
required, insert all lock plate pawls into holes in
slide rail brackets, and tighten bolts (C), (D) and
(E) in that order.
12) Install bolt cover on rear end of slide rail.
13) Install headrest on backrest.
NOTE:
Tighten bolts in the designated order.2. Rear Seat
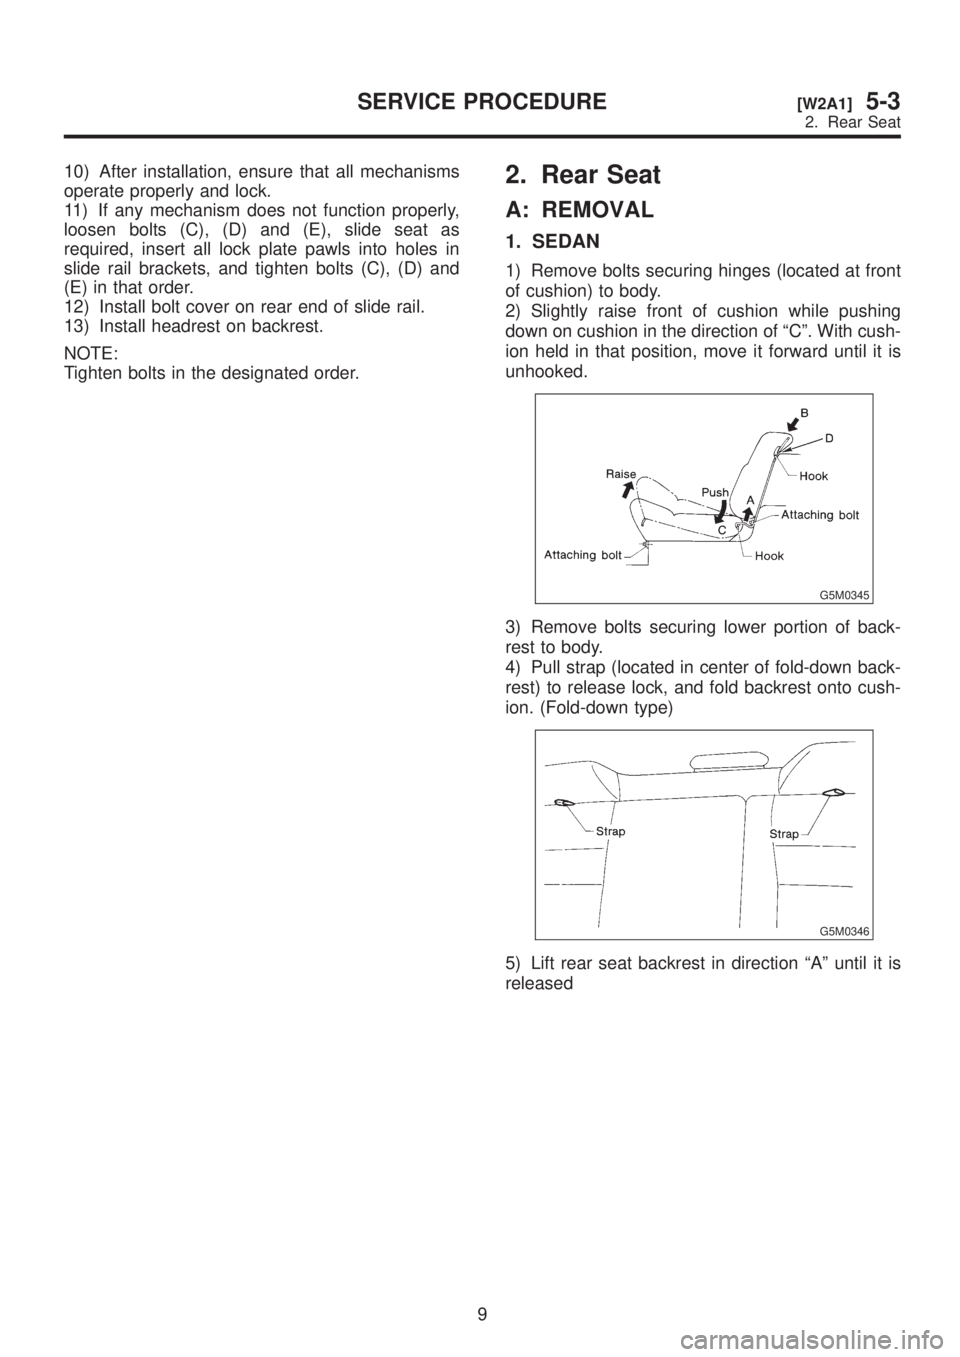
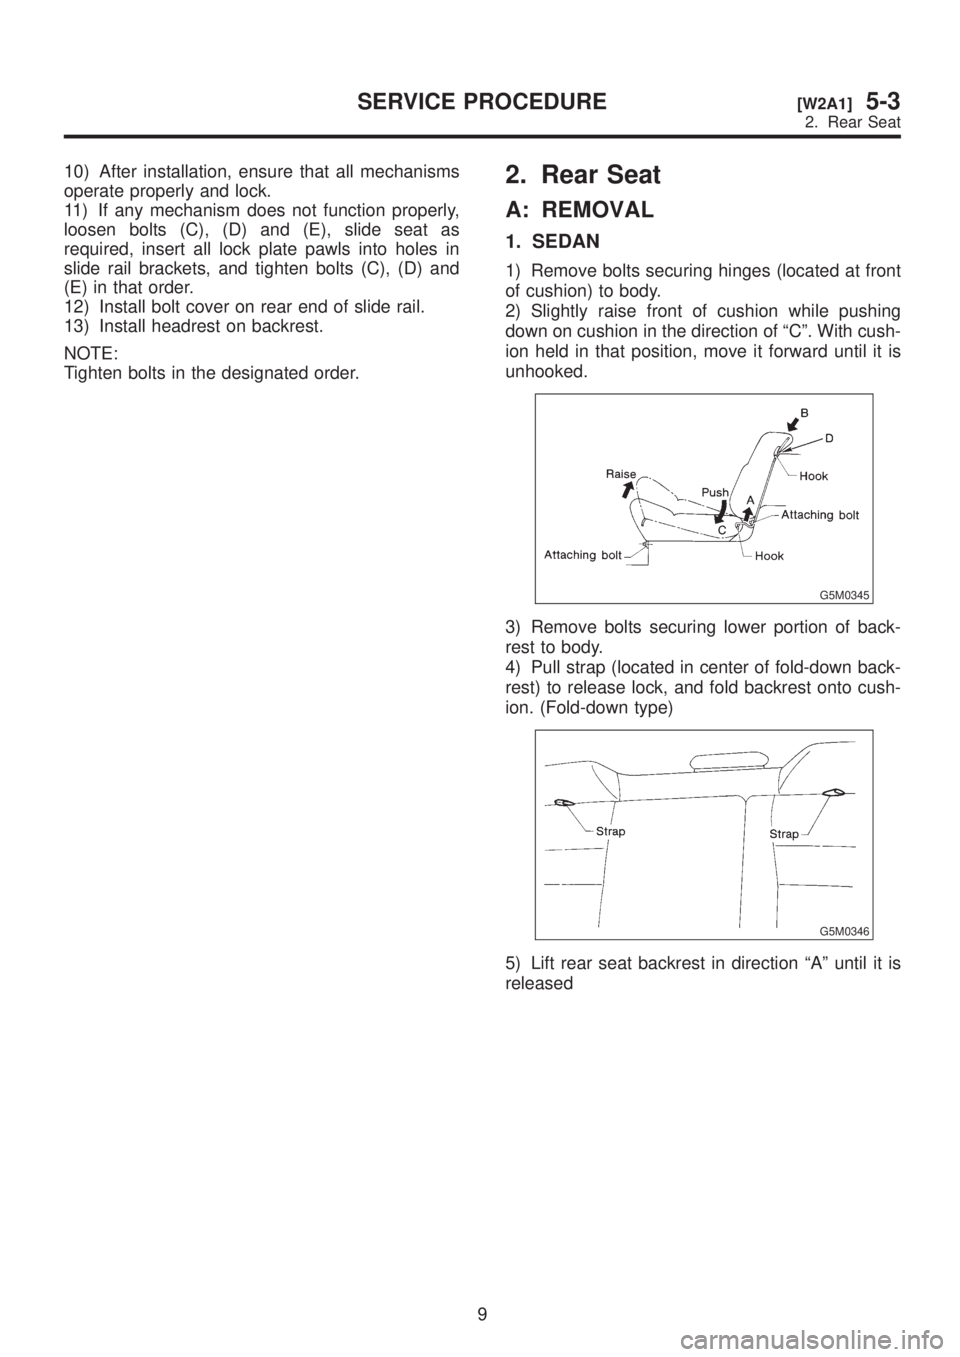
A: REMOVAL
1. SEDAN
1) Remove bolts securing hinges (located at front
of cushion) to body.
2) Slightly raise front of cushion while pushing
down on cushion in the direction of ªCº. With cush-
ion held in that position, move it forward until it is
unhooked.
G5M0345
3) Remove bolts securing lower portion of back-
rest to body.
4) Pull strap (located in center of fold-down back-
rest) to release lock, and fold backrest onto cush-
ion. (Fold-down type)
G5M0346
5) Lift rear seat backrest in direction ªAº until it is
released
9
[W2A1]5-3SERVICE PROCEDURE
2. Rear Seat
Page 1150 of 1456
10) After installation, ensure that all mechanisms
operate properly and lock.
11) If any mechanism does not function properly,
loosen bolts (C), (D) and (E), slide seat as
required, insert all lock plate pawls into holes in
slide rail brackets, and tighten bolts (C), (D) and
(E) in that order.
12) Install bolt cover on rear end of slide rail.
13) Install headrest on backrest.
NOTE:
Tighten bolts in the designated order.2. Rear Seat
A: REMOVAL
1. SEDAN
1) Remove bolts securing hinges (located at front
of cushion) to body.
2) Slightly raise front of cushion while pushing
down on cushion in the direction of ªCº. With cush-
ion held in that position, move it forward until it is
unhooked.
G5M0345
3) Remove bolts securing lower portion of back-
rest to body.
4) Pull strap (located in center of fold-down back-
rest) to release lock, and fold backrest onto cush-
ion. (Fold-down type)
G5M0346
5) Lift rear seat backrest in direction ªAº until it is
released
9
[W2A1]5-3SERVICE PROCEDURE
2. Rear Seat
Trending: set clock, fuel cap, service indicator, turn signal, knock, lug nut torque, air filter

