fuse SUBARU TRIBECA 2009 1.G Service Owner's Guide
[x] Cancel search | Manufacturer: SUBARU, Model Year: 2009, Model line: TRIBECA, Model: SUBARU TRIBECA 2009 1.GPages: 2453, PDF Size: 46.32 MB
Page 402 of 2453
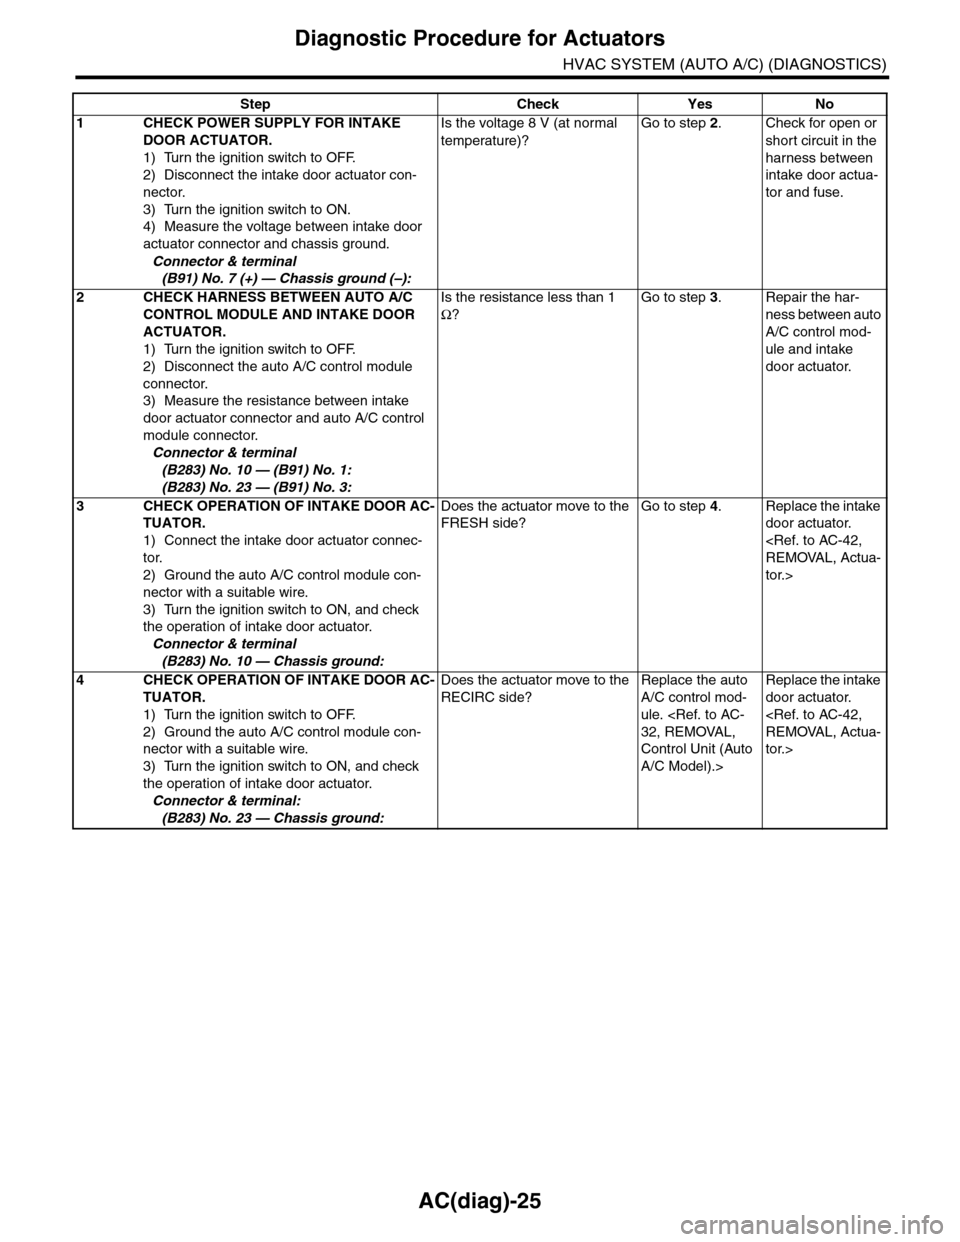
AC(diag)-25
Diagnostic Procedure for Actuators
HVAC SYSTEM (AUTO A/C) (DIAGNOSTICS)
Step Check Yes No
1CHECK POWER SUPPLY FOR INTAKE
DOOR ACTUATOR.
1) Turn the ignition switch to OFF.
2) Disconnect the intake door actuator con-
nector.
3) Turn the ignition switch to ON.
4) Measure the voltage between intake door
actuator connector and chassis ground.
Connector & terminal
(B91) No. 7 (+) — Chassis ground (–):
Is the voltage 8 V (at normal
temperature)?
Go to step 2.Check for open or
short circuit in the
harness between
intake door actua-
tor and fuse.
2CHECK HARNESS BETWEEN AUTO A/C
CONTROL MODULE AND INTAKE DOOR
ACTUATOR.
1) Turn the ignition switch to OFF.
2) Disconnect the auto A/C control module
connector.
3) Measure the resistance between intake
door actuator connector and auto A/C control
module connector.
Connector & terminal
(B283) No. 10 — (B91) No. 1:
(B283) No. 23 — (B91) No. 3:
Is the resistance less than 1
Ω?
Go to step 3.Repair the har-
ness between auto
A/C control mod-
ule and intake
door actuator.
3CHECK OPERATION OF INTAKE DOOR AC-
TUATOR.
1) Connect the intake door actuator connec-
tor.
2) Ground the auto A/C control module con-
nector with a suitable wire.
3) Turn the ignition switch to ON, and check
the operation of intake door actuator.
Connector & terminal
(B283) No. 10 — Chassis ground:
Does the actuator move to the
FRESH side?
Go to step 4.Replace the intake
door actuator.
tor.>
4CHECK OPERATION OF INTAKE DOOR AC-
TUATOR.
1) Turn the ignition switch to OFF.
2) Ground the auto A/C control module con-
nector with a suitable wire.
3) Turn the ignition switch to ON, and check
the operation of intake door actuator.
Connector & terminal:
(B283) No. 23 — Chassis ground:
Does the actuator move to the
RECIRC side?
Replace the auto
A/C control mod-
ule.
Control Unit (Auto
A/C Model).>
Replace the intake
door actuator.
tor.>
Page 416 of 2453
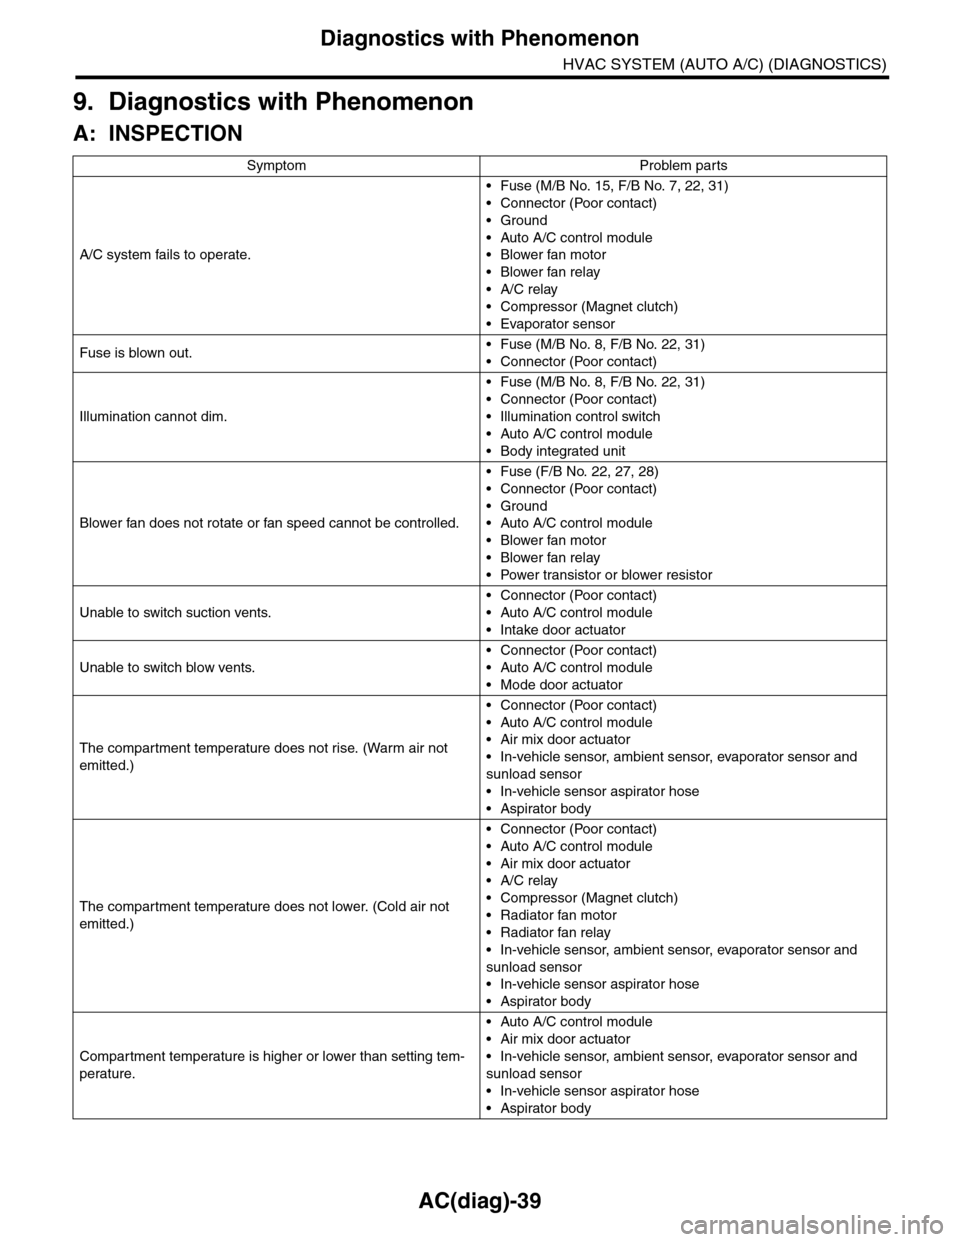
AC(diag)-39
Diagnostics with Phenomenon
HVAC SYSTEM (AUTO A/C) (DIAGNOSTICS)
9. Diagnostics with Phenomenon
A: INSPECTION
Symptom Problem parts
A/C system fails to operate.
•Fuse (M/B No. 15, F/B No. 7, 22, 31)
•Connector (Poor contact)
•Ground
•Auto A/C control module
•Blower fan motor
•Blower fan relay
•A/C relay
•Compressor (Magnet clutch)
•Evaporator sensor
Fuse is blown out.•Fuse (M/B No. 8, F/B No. 22, 31)
•Connector (Poor contact)
Illumination cannot dim.
•Fuse (M/B No. 8, F/B No. 22, 31)
•Connector (Poor contact)
•Illumination control switch
•Auto A/C control module
•Body integrated unit
Blower fan does not rotate or fan speed cannot be controlled.
•Fuse (F/B No. 22, 27, 28)
•Connector (Poor contact)
•Ground
•Auto A/C control module
•Blower fan motor
•Blower fan relay
•Power transistor or blower resistor
Unable to switch suction vents.
•Connector (Poor contact)
•Auto A/C control module
•Intake door actuator
Unable to switch blow vents.
•Connector (Poor contact)
•Auto A/C control module
•Mode door actuator
The compar tment temperature does not rise. (Warm air not
emitted.)
•Connector (Poor contact)
•Auto A/C control module
•Air mix door actuator
•In-vehicle sensor, ambient sensor, evaporator sensor and
sunload sensor
•In-vehicle sensor aspirator hose
•Aspirator body
The compar tment temperature does not lower. (Cold air not
emitted.)
•Connector (Poor contact)
•Auto A/C control module
•Air mix door actuator
•A/C relay
•Compressor (Magnet clutch)
•Radiator fan motor
•Radiator fan relay
•In-vehicle sensor, ambient sensor, evaporator sensor and
sunload sensor
•In-vehicle sensor aspirator hose
•Aspirator body
Compartment temperature is higher or lower than setting tem-
perature.
•Auto A/C control module
•Air mix door actuator
•In-vehicle sensor, ambient sensor, evaporator sensor and
sunload sensor
•In-vehicle sensor aspirator hose
•Aspirator body
Page 427 of 2453
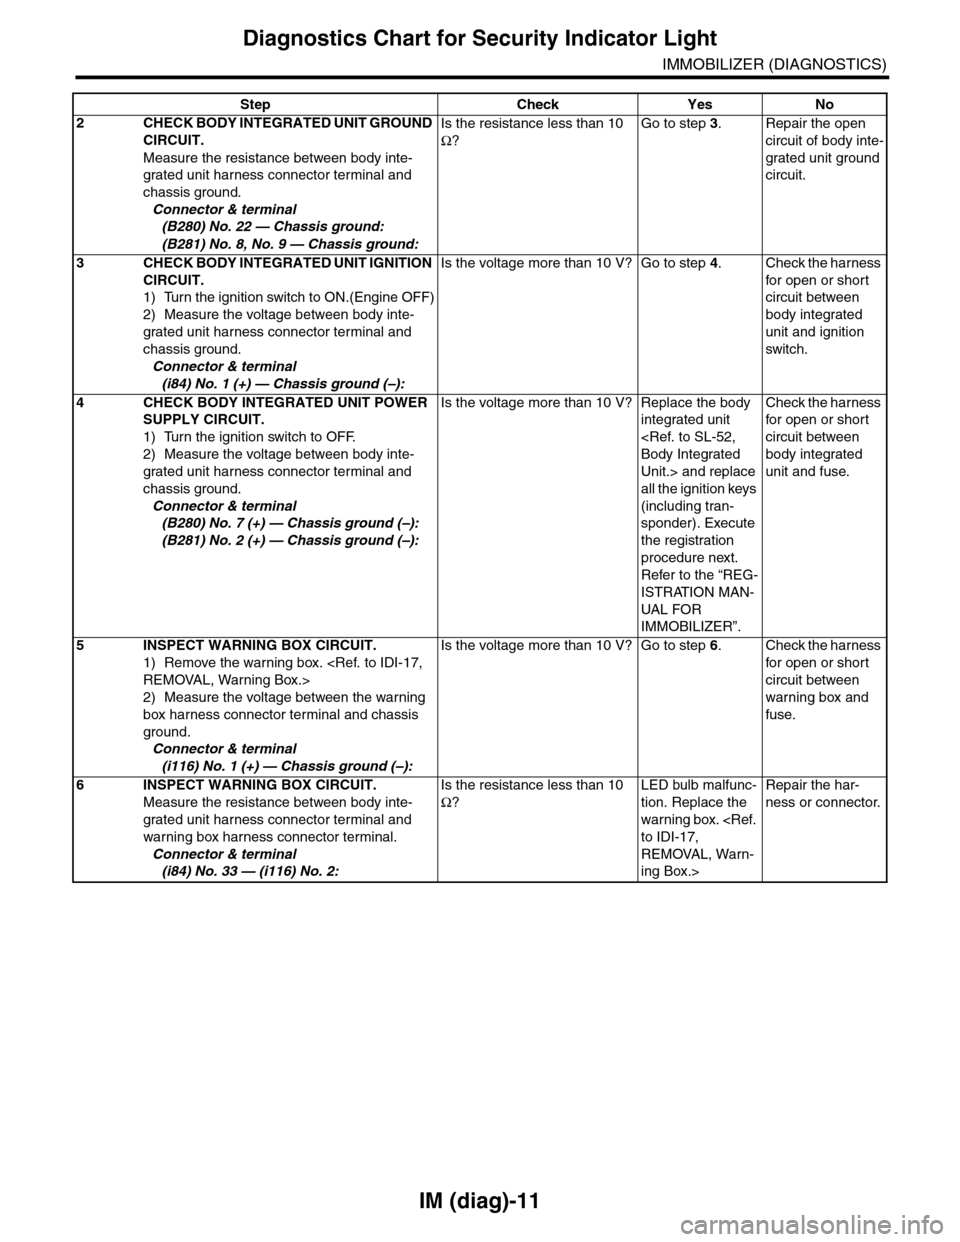
IM (diag)-11
Diagnostics Chart for Security Indicator Light
IMMOBILIZER (DIAGNOSTICS)
2CHECK BODY INTEGRATED UNIT GROUND
CIRCUIT.
Measure the resistance between body inte-
grated unit harness connector terminal and
chassis ground.
Connector & terminal
(B280) No. 22 — Chassis ground:
(B281) No. 8, No. 9 — Chassis ground:
Is the resistance less than 10
Ω?
Go to step 3.Repair the open
circuit of body inte-
grated unit ground
circuit.
3CHECK BODY INTEGRATED UNIT IGNITION
CIRCUIT.
1) Turn the ignition switch to ON.(Engine OFF)
2) Measure the voltage between body inte-
grated unit harness connector terminal and
chassis ground.
Connector & terminal
(i84) No. 1 (+) — Chassis ground (–):
Is the voltage more than 10 V? Go to step 4.Check the harness
for open or shor t
circuit between
body integrated
unit and ignition
switch.
4CHECK BODY INTEGRATED UNIT POWER
SUPPLY CIRCUIT.
1) Turn the ignition switch to OFF.
2) Measure the voltage between body inte-
grated unit harness connector terminal and
chassis ground.
Connector & terminal
(B280) No. 7 (+) — Chassis ground (–):
(B281) No. 2 (+) — Chassis ground (–):
Is the voltage more than 10 V? Replace the body
integrated unit
Unit.> and replace
all the ignition keys
(including tran-
sponder). Execute
the registration
procedure next.
Refer to the “REG-
ISTRATION MAN-
UAL FO R
IMMOBILIZER”.
Check the harness
for open or shor t
circuit between
body integrated
unit and fuse.
5INSPECT WARNING BOX CIRCUIT.
1) Remove the warning box.
2) Measure the voltage between the warning
box harness connector terminal and chassis
ground.
Connector & terminal
(i116) No. 1 (+) — Chassis ground (–):
Is the voltage more than 10 V? Go to step 6.Check the harness
for open or shor t
circuit between
warning box and
fuse.
6INSPECT WARNING BOX CIRCUIT.
Measure the resistance between body inte-
grated unit harness connector terminal and
warning box harness connector terminal.
Connector & terminal
(i84) No. 33 — (i116) No. 2:
Is the resistance less than 10
Ω?
LED bulb malfunc-
tion. Replace the
warning box.
REMOVAL, Warn-
ing Box.>
Repair the har-
ness or connector.
Step Check Yes No
Page 429 of 2453
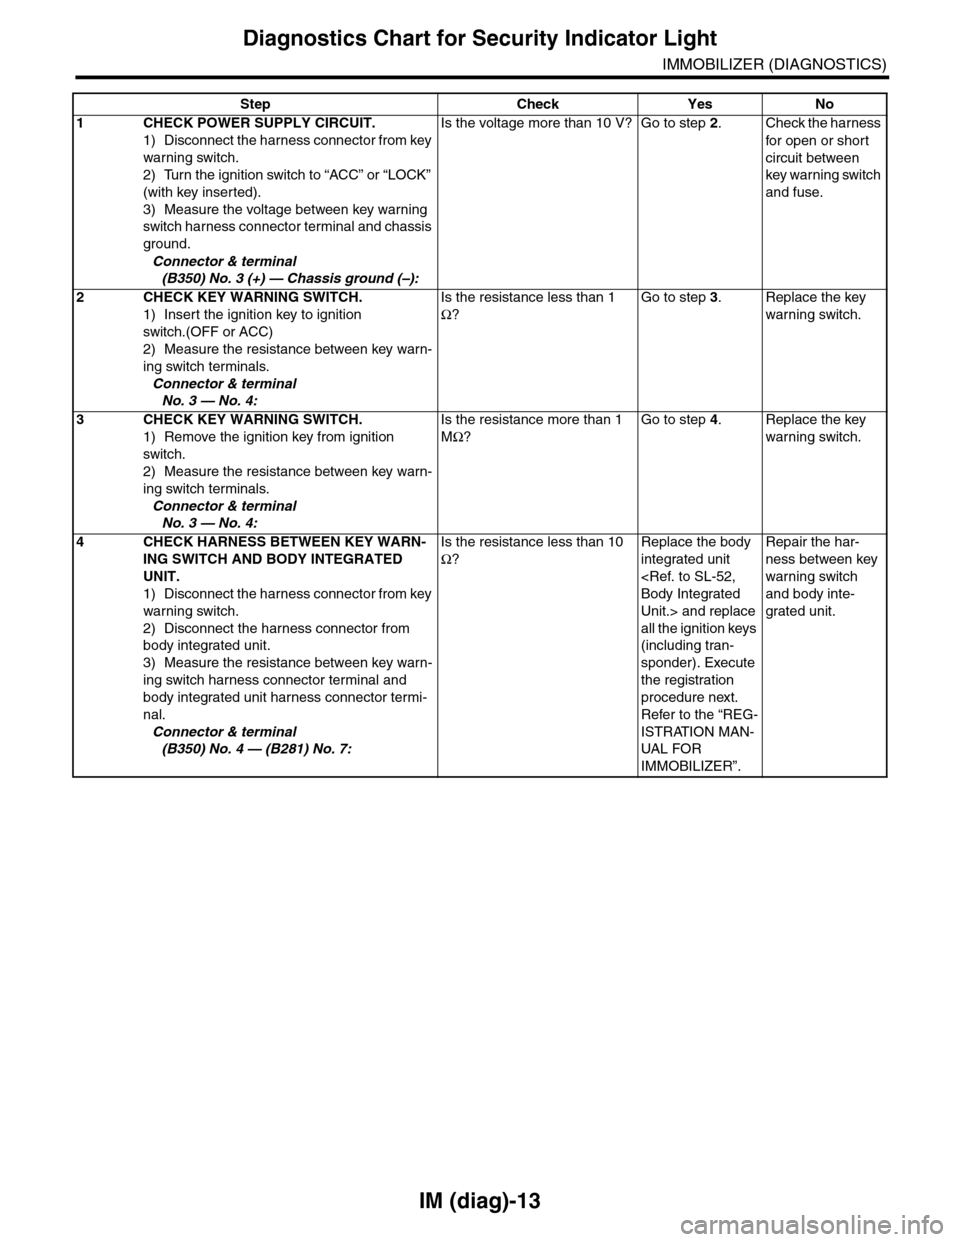
IM (diag)-13
Diagnostics Chart for Security Indicator Light
IMMOBILIZER (DIAGNOSTICS)
Step Check Yes No
1CHECK POWER SUPPLY CIRCUIT.
1) Disconnect the harness connector from key
warning switch.
2) Turn the ignition switch to “ACC” or “LOCK”
(with key inserted).
3) Measure the voltage between key warning
switch harness connector terminal and chassis
ground.
Connector & terminal
(B350) No. 3 (+) — Chassis ground (–):
Is the voltage more than 10 V? Go to step 2.Check the harness
for open or shor t
circuit between
key warning switch
and fuse.
2 CHECK KEY WARNING SWITCH.
1) Insert the ignition key to ignition
switch.(OFF or ACC)
2) Measure the resistance between key warn-
ing switch terminals.
Connector & terminal
No. 3 — No. 4:
Is the resistance less than 1
Ω?
Go to step 3.Replace the key
warning switch.
3 CHECK KEY WARNING SWITCH.
1) Remove the ignition key from ignition
switch.
2) Measure the resistance between key warn-
ing switch terminals.
Connector & terminal
No. 3 — No. 4:
Is the resistance more than 1
MΩ?
Go to step 4.Replace the key
warning switch.
4CHECK HARNESS BETWEEN KEY WARN-
ING SWITCH AND BODY INTEGRATED
UNIT.
1) Disconnect the harness connector from key
warning switch.
2) Disconnect the harness connector from
body integrated unit.
3) Measure the resistance between key warn-
ing switch harness connector terminal and
body integrated unit harness connector termi-
nal.
Connector & terminal
(B350) No. 4 — (B281) No. 7:
Is the resistance less than 10
Ω?
Replace the body
integrated unit
Unit.> and replace
all the ignition keys
(including tran-
sponder). Execute
the registration
procedure next.
Refer to the “REG-
ISTRATION MAN-
UAL FO R
IMMOBILIZER”.
Repair the har-
ness between key
warning switch
and body inte-
grated unit.
Page 436 of 2453
IM (diag)-20
Diagnostic Procedure with Diagnostic Trouble Code (DTC)
IMMOBILIZER (DIAGNOSTICS)
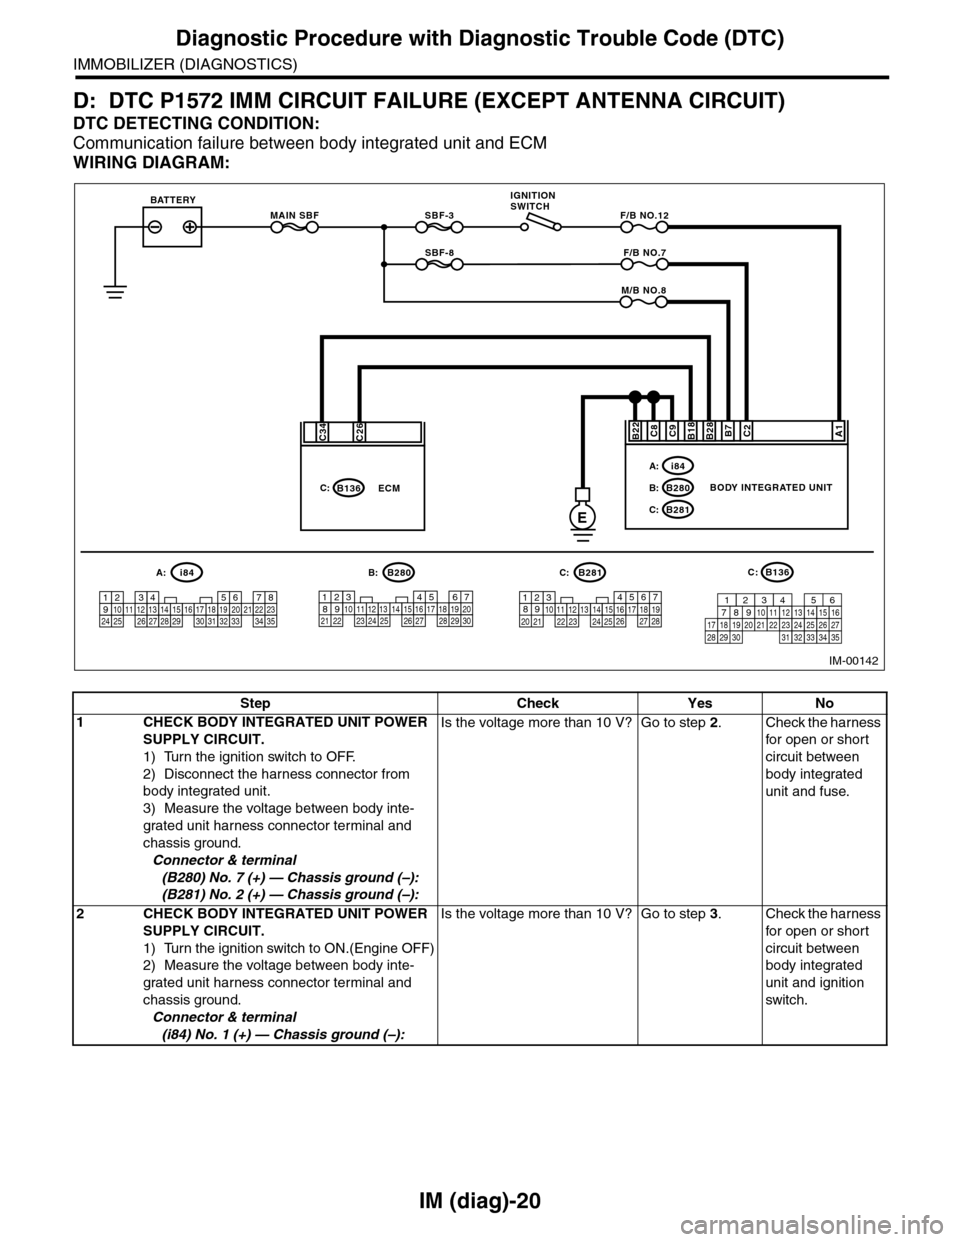
D: DTC P1572 IMM CIRCUIT FAILURE (EXCEPT ANTENNA CIRCUIT)
DTC DETECTING CONDITION:
Communication failure between body integrated unit and ECM
WIRING DIAGRAM:
MAIN SBF
SBF-8
SBF-3BATTERYF/B NO.12
IGNITIONSWITCH
A1B28B18C9C2B7C8
E
F/B NO.7
M/B NO.8
BODY INTEGRATED UNIT
i84A:
B280B:
B281C:
B22
567821943102422 23 25111213141526 27281617181920 21
B281i84
1234567891011121314151617181920212223242526272829303132333435
5467821931022 231112131415242526 2716171828 29192021 30
B280A:C:B:B136C:
C26C34
B136C:ECM
IM-00142
16101112131415252430
9871718192028212223293231
123456
2726333435
Step Check Yes No
1CHECK BODY INTEGRATED UNIT POWER
SUPPLY CIRCUIT.
1) Turn the ignition switch to OFF.
2) Disconnect the harness connector from
body integrated unit.
3) Measure the voltage between body inte-
grated unit harness connector terminal and
chassis ground.
Connector & terminal
(B280) No. 7 (+) — Chassis ground (–):
(B281) No. 2 (+) — Chassis ground (–):
Is the voltage more than 10 V? Go to step 2.Check the harness
for open or shor t
circuit between
body integrated
unit and fuse.
2CHECK BODY INTEGRATED UNIT POWER
SUPPLY CIRCUIT.
1) Turn the ignition switch to ON.(Engine OFF)
2) Measure the voltage between body inte-
grated unit harness connector terminal and
chassis ground.
Connector & terminal
(i84) No. 1 (+) — Chassis ground (–):
Is the voltage more than 10 V? Go to step 3.Check the harness
for open or shor t
circuit between
body integrated
unit and ignition
switch.
Page 446 of 2453
IDI-7
Combination Meter System
INSTRUMENTATION/DRIVER INFO
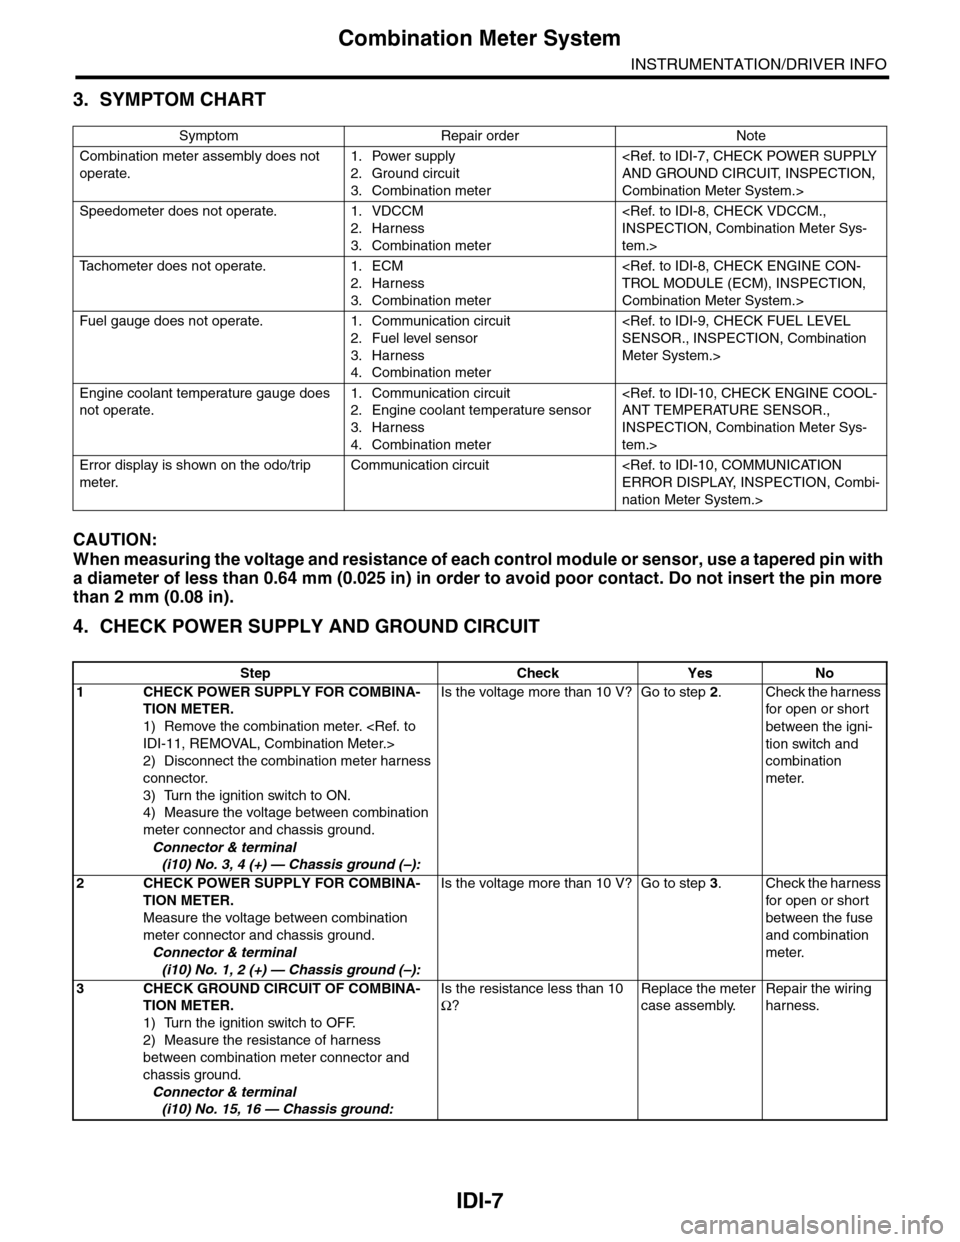
3. SYMPTOM CHART
CAUTION:
When measuring the voltage and resistance of each control module or sensor, use a tapered pin with
a diameter of less than 0.64 mm (0.025 in) in order to avoid poor contact. Do not insert the pin more
than 2 mm (0.08 in).
4. CHECK POWER SUPPLY AND GROUND CIRCUIT
Symptom Repair order Note
Combination meter assembly does not
operate.
1. Power supply
2. Ground circuit
3. Combination meter
Combination Meter System.>
Speedometer does not operate. 1. VDCCM
2. Harness
3. Combination meter
tem.>
Ta c h o m e t e r d o e s n o t o p e r a t e . 1 . E C M
2. Harness
3. Combination meter
Combination Meter System.>
Fuel gauge does not operate. 1. Communication circuit
2. Fuel level sensor
3. Harness
4. Combination meter
Meter System.>
Engine coolant temperature gauge does
not operate.
1. Communication circuit
2. Engine coolant temperature sensor
3. Harness
4. Combination meter
INSPECTION, Combination Meter Sys-
tem.>
Error display is shown on the odo/trip
meter.
Communication circuit
nation Meter System.>
Step Check Yes No
1CHECK POWER SUPPLY FOR COMBINA-
TION METER.
1) Remove the combination meter.
2) Disconnect the combination meter harness
connector.
3) Turn the ignition switch to ON.
4) Measure the voltage between combination
meter connector and chassis ground.
Connector & terminal
(i10) No. 3, 4 (+) — Chassis ground (–):
Is the voltage more than 10 V? Go to step 2.Check the harness
for open or shor t
between the igni-
tion switch and
combination
meter.
2CHECK POWER SUPPLY FOR COMBINA-
TION METER.
Measure the voltage between combination
meter connector and chassis ground.
Connector & terminal
(i10) No. 1, 2 (+) — Chassis ground (–):
Is the voltage more than 10 V? Go to step 3.Check the harness
for open or shor t
between the fuse
and combination
meter.
3CHECK GROUND CIRCUIT OF COMBINA-
TION METER.
1) Turn the ignition switch to OFF.
2) Measure the resistance of harness
between combination meter connector and
chassis ground.
Connector & terminal
(i10) No. 15, 16 — Chassis ground:
Is the resistance less than 10
Ω?
Replace the meter
case assembly.
Repair the wiring
harness.
Page 461 of 2453
LAN(diag)-5
General Description
LAN SYSTEM (DIAGNOSTICS)
3. General Description
A: CAUTION
1. SRS AIRBAG SYSTEM
Airbag system wiring harness is routed near the
body integrated unit and twisted pair line.
CAUTION:
•All airbag system wiring harness and con-
nectors are colored yellow. Do not use the elec-
trical test equipment on these circuits.
•Be careful not to damage the airbag system
wiring harness when servicing the body inte-
grated unit and LAN system.
•Refer to “Airbag System” when disconnect-
ing the air bag system connector.
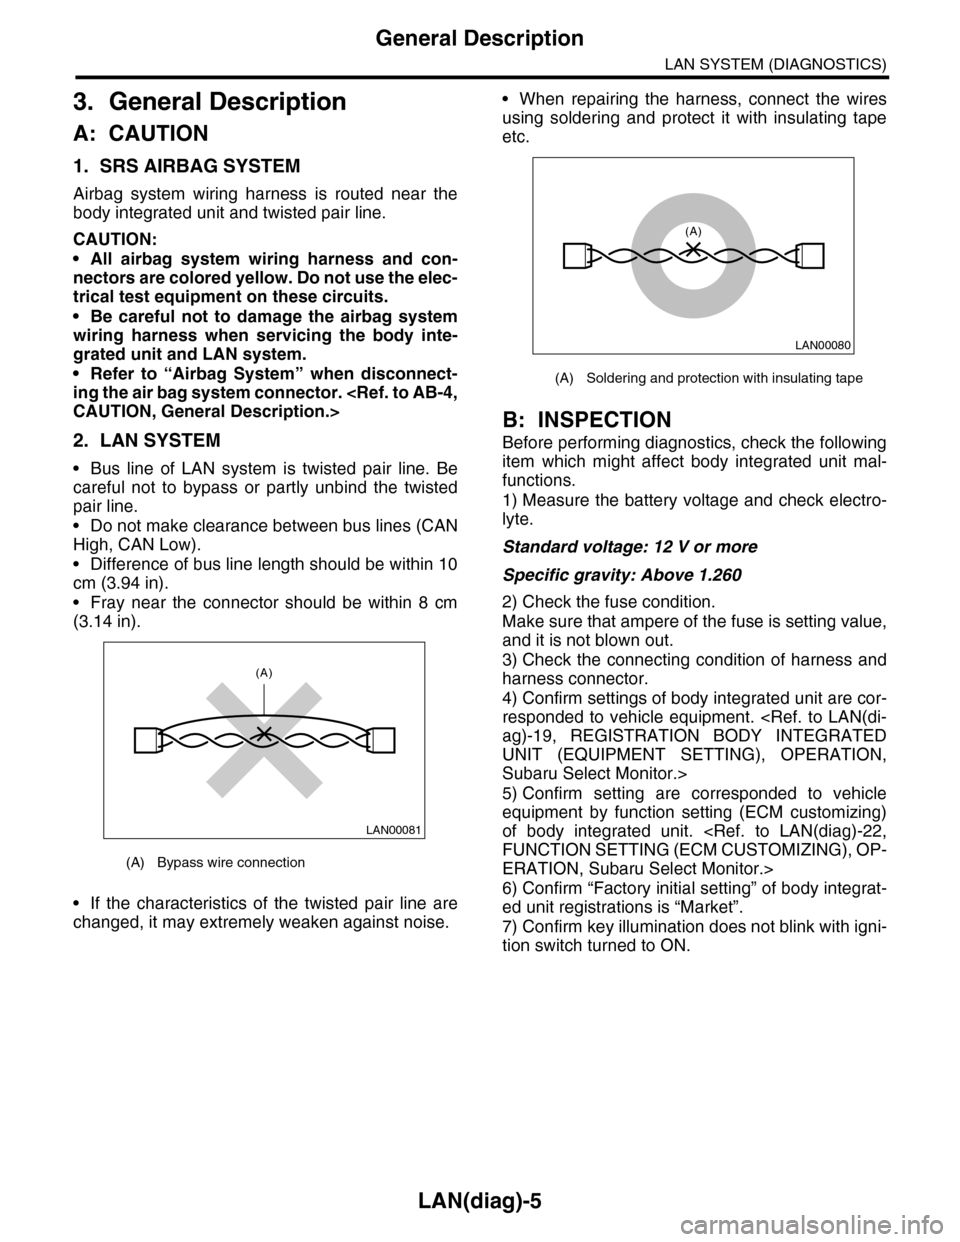
2. LAN SYSTEM
•Bus line of LAN system is twisted pair line. Be
careful not to bypass or partly unbind the twisted
pair line.
•Do not make clearance between bus lines (CAN
High, CAN Low).
•Difference of bus line length should be within 10
cm (3.94 in).
•Fray near the connector should be within 8 cm
(3.14 in).
•If the characteristics of the twisted pair line are
changed, it may extremely weaken against noise.
•When repairing the harness, connect the wires
using soldering and protect it with insulating tape
etc.
B: INSPECTION
Before performing diagnostics, check the following
item which might affect body integrated unit mal-
functions.
1) Measure the battery voltage and check electro-
lyte.
Standard voltage: 12 V or more
Specific gravity: Above 1.260
2) Check the fuse condition.
Make sure that ampere of the fuse is setting value,
and it is not blown out.
3) Check the connecting condition of harness and
harness connector.
4) Confirm settings of body integrated unit are cor-
responded to vehicle equipment.
UNIT (EQUIPMENT SETTING), OPERATION,
Subaru Select Monitor.>
5) Confirm setting are corresponded to vehicle
equipment by function setting (ECM customizing)
of body integrated unit.
ERATION, Subaru Select Monitor.>
6) Confirm “Factory initial setting” of body integrat-
ed unit registrations is “Market”.
7) Confirm key illumination does not blink with igni-
tion switch turned to ON.
(A) Bypass wire connection
LAN00081
(A)
(A) Soldering and protection with insulating tape
LAN00080
(A)
Page 493 of 2453
LAN(diag)-37
Diagnostic Procedure with Diagnostic Trouble Code (DTC)
LAN SYSTEM (DIAGNOSTICS)
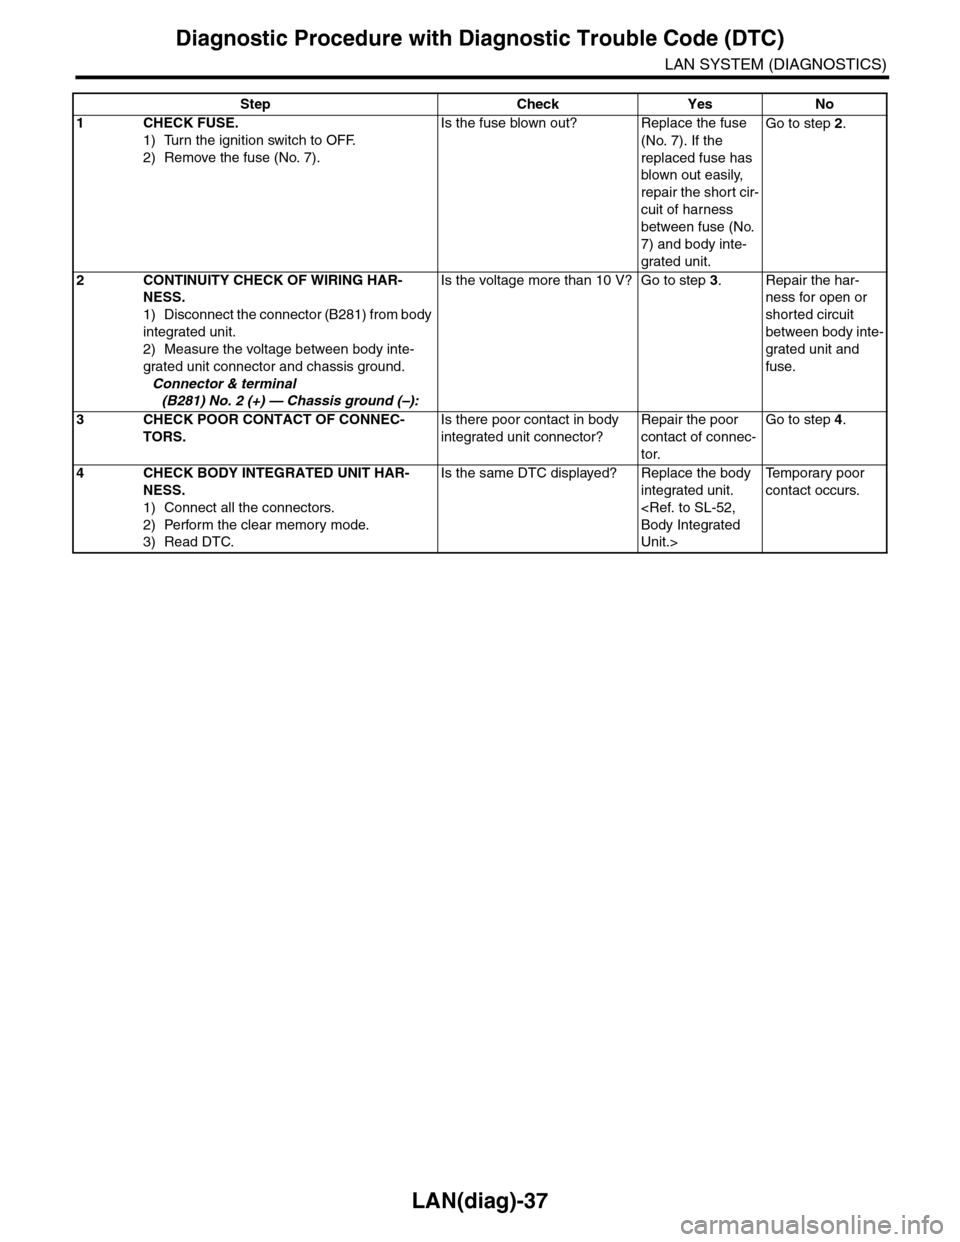
Step Check Yes No
1CHECK FUSE.
1) Turn the ignition switch to OFF.
2) Remove the fuse (No. 7).
Is the fuse blown out? Replace the fuse
(No. 7). If the
replaced fuse has
blown out easily,
repair the short cir-
cuit of harness
between fuse (No.
7) and body inte-
grated unit.
Go to step 2.
2CONTINUITY CHECK OF WIRING HAR-
NESS.
1) Disconnect the connector (B281) from body
integrated unit.
2) Measure the voltage between body inte-
grated unit connector and chassis ground.
Connector & terminal
(B281) No. 2 (+) — Chassis ground (–):
Is the voltage more than 10 V? Go to step 3.Repair the har-
ness for open or
shorted circuit
between body inte-
grated unit and
fuse.
3CHECK POOR CONTACT OF CONNEC-
TORS.
Is there poor contact in body
integrated unit connector?
Repair the poor
contact of connec-
tor.
Go to step 4.
4CHECK BODY INTEGRATED UNIT HAR-
NESS.
1) Connect all the connectors.
2) Perform the clear memory mode.
3) Read DTC.
Is the same DTC displayed? Replace the body
integrated unit.
Unit.>
Te m p o r a r y p o o r
contact occurs.
Page 495 of 2453
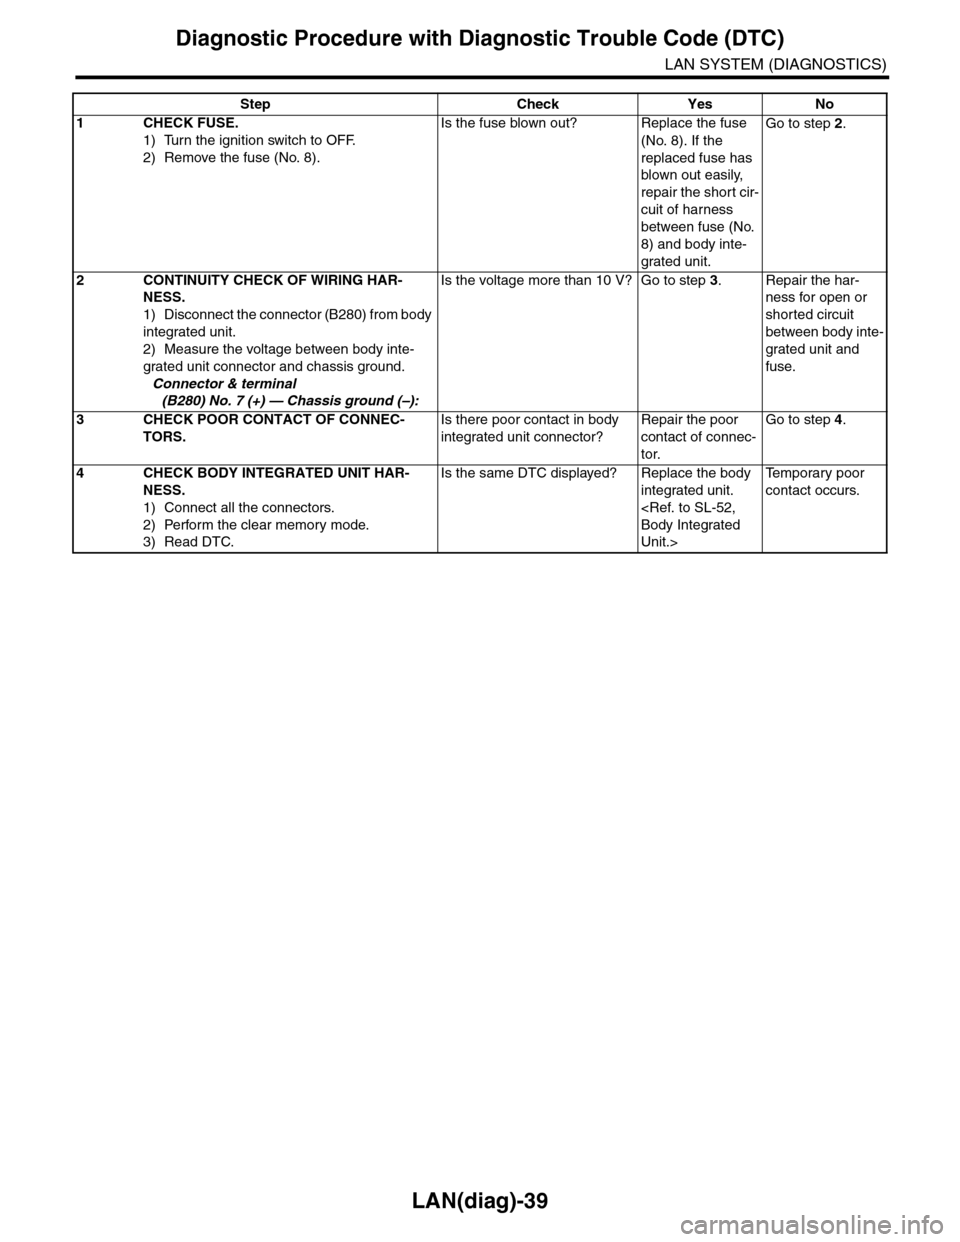
LAN(diag)-39
Diagnostic Procedure with Diagnostic Trouble Code (DTC)
LAN SYSTEM (DIAGNOSTICS)
Step Check Yes No
1CHECK FUSE.
1) Turn the ignition switch to OFF.
2) Remove the fuse (No. 8).
Is the fuse blown out? Replace the fuse
(No. 8). If the
replaced fuse has
blown out easily,
repair the short cir-
cuit of harness
between fuse (No.
8) and body inte-
grated unit.
Go to step 2.
2CONTINUITY CHECK OF WIRING HAR-
NESS.
1) Disconnect the connector (B280) from body
integrated unit.
2) Measure the voltage between body inte-
grated unit connector and chassis ground.
Connector & terminal
(B280) No. 7 (+) — Chassis ground (–):
Is the voltage more than 10 V? Go to step 3.Repair the har-
ness for open or
shorted circuit
between body inte-
grated unit and
fuse.
3CHECK POOR CONTACT OF CONNEC-
TORS.
Is there poor contact in body
integrated unit connector?
Repair the poor
contact of connec-
tor.
Go to step 4.
4CHECK BODY INTEGRATED UNIT HAR-
NESS.
1) Connect all the connectors.
2) Perform the clear memory mode.
3) Read DTC.
Is the same DTC displayed? Replace the body
integrated unit.
Unit.>
Te m p o r a r y p o o r
contact occurs.
Page 496 of 2453
LAN(diag)-40
Diagnostic Procedure with Diagnostic Trouble Code (DTC)
LAN SYSTEM (DIAGNOSTICS)
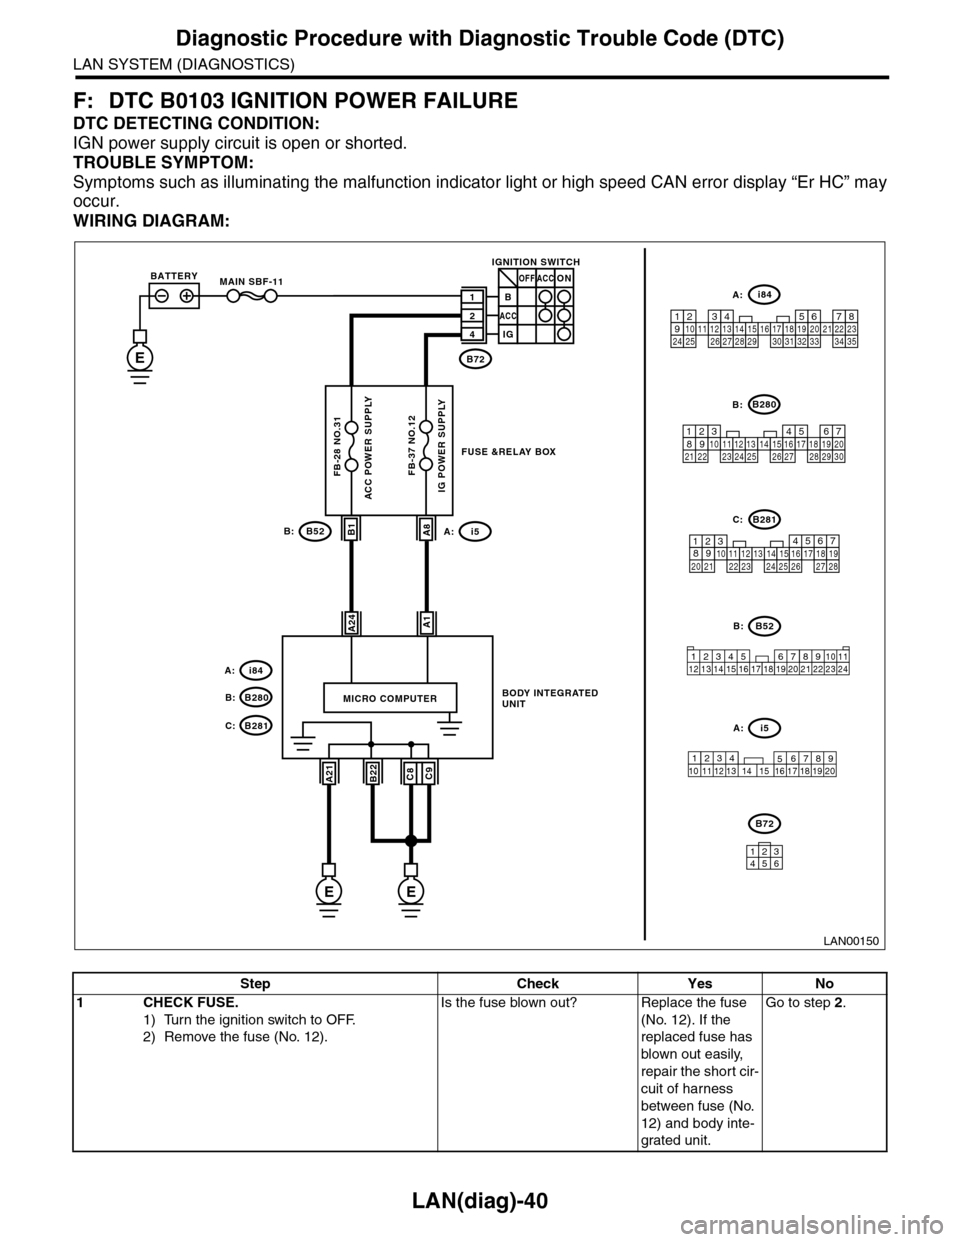
F: DTC B0103 IGNITION POWER FAILURE
DTC DETECTING CONDITION:
IGN power supply circuit is open or shorted.
TROUBLE SYMPTOM:
Symptoms such as illuminating the malfunction indicator light or high speed CAN error display “Er HC” may
occur.
WIRING DIAGRAM:
LAN00150
BODY INTEGRATED UNIT
A1A24
MICRO COMPUTER
B1A8
B72
IGNITION SWITCH
1B
2
4
ACC
ACCOFF
IG
ON
B52B:
34128910 1112 13 14 15 16 17 18 19 20 21 22 23 24567
B280B:
B281C:
567821943102422 2325111213141526 27281617181920 21
5467821931022 23111213141524 25 26 2716171828 29192021 30
i84A:
1234567891011121314151617181920212223242526272829303132333435
12345678910 11 12 19 2013 14 15 16 17 18
i5A:
ACC POWER SUPPLY
B52i5A:B:
E
MAIN SBF-11
FB-28 NO.31
BATTERY
IG POWER SUPPLY
i84
B280B:
A:
B281C:
A21C9B22C8
EE
FB-37 NO.12
B72
134562
FUSE &RELAY BOX
Step Check Yes No
1CHECK FUSE.
1) Turn the ignition switch to OFF.
2) Remove the fuse (No. 12).
Is the fuse blown out? Replace the fuse
(No. 12). If the
replaced fuse has
blown out easily,
repair the short cir-
cuit of harness
between fuse (No.
12) and body inte-
grated unit.
Go to step 2.