engine oil SUBARU TRIBECA 2009 1.G Service Repair Manual
[x] Cancel search | Manufacturer: SUBARU, Model Year: 2009, Model line: TRIBECA, Model: SUBARU TRIBECA 2009 1.GPages: 2453, PDF Size: 46.32 MB
Page 1394 of 2453
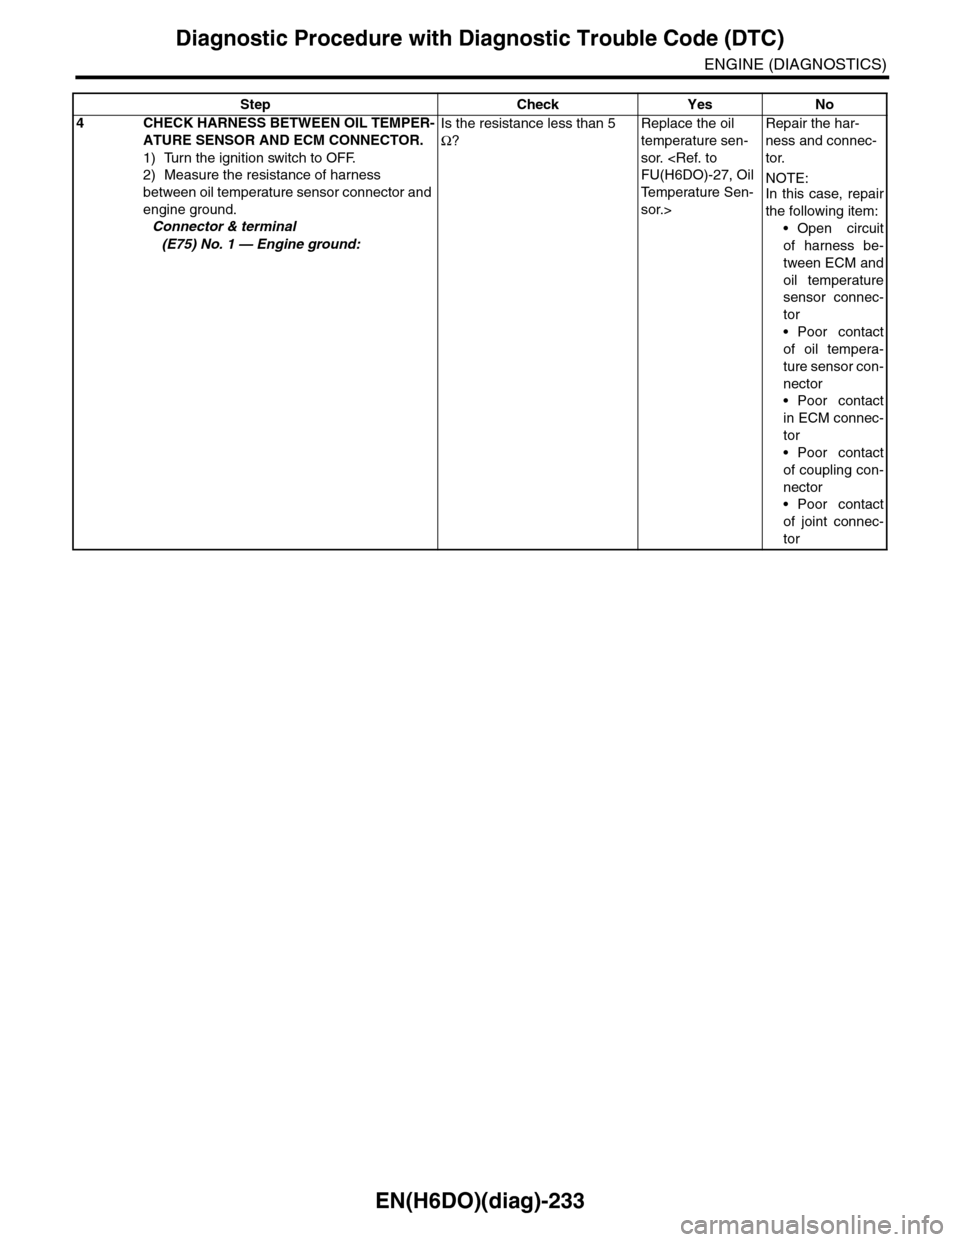
EN(H6DO)(diag)-233
Diagnostic Procedure with Diagnostic Trouble Code (DTC)
ENGINE (DIAGNOSTICS)
4CHECK HARNESS BETWEEN OIL TEMPER-
ATURE SENSOR AND ECM CONNECTOR.
1) Turn the ignition switch to OFF.
2) Measure the resistance of harness
between oil temperature sensor connector and
engine ground.
Connector & terminal
(E75) No. 1 — Engine ground:
Is the resistance less than 5
Ω?
Replace the oil
temperature sen-
sor.
Te m p e r a t u r e S e n -
sor.>
Repair the har-
ness and connec-
tor.
NOTE:In this case, repair
the following item:
•Open circuit
of harness be-
tween ECM and
oil temperature
sensor connec-
tor
•Poor contact
of oil tempera-
ture sensor con-
nector
•Poor contact
in ECM connec-
tor
•Poor contact
of coupling con-
nector
•Poor contact
of joint connec-
tor
Step Check Yes No
Page 1408 of 2453
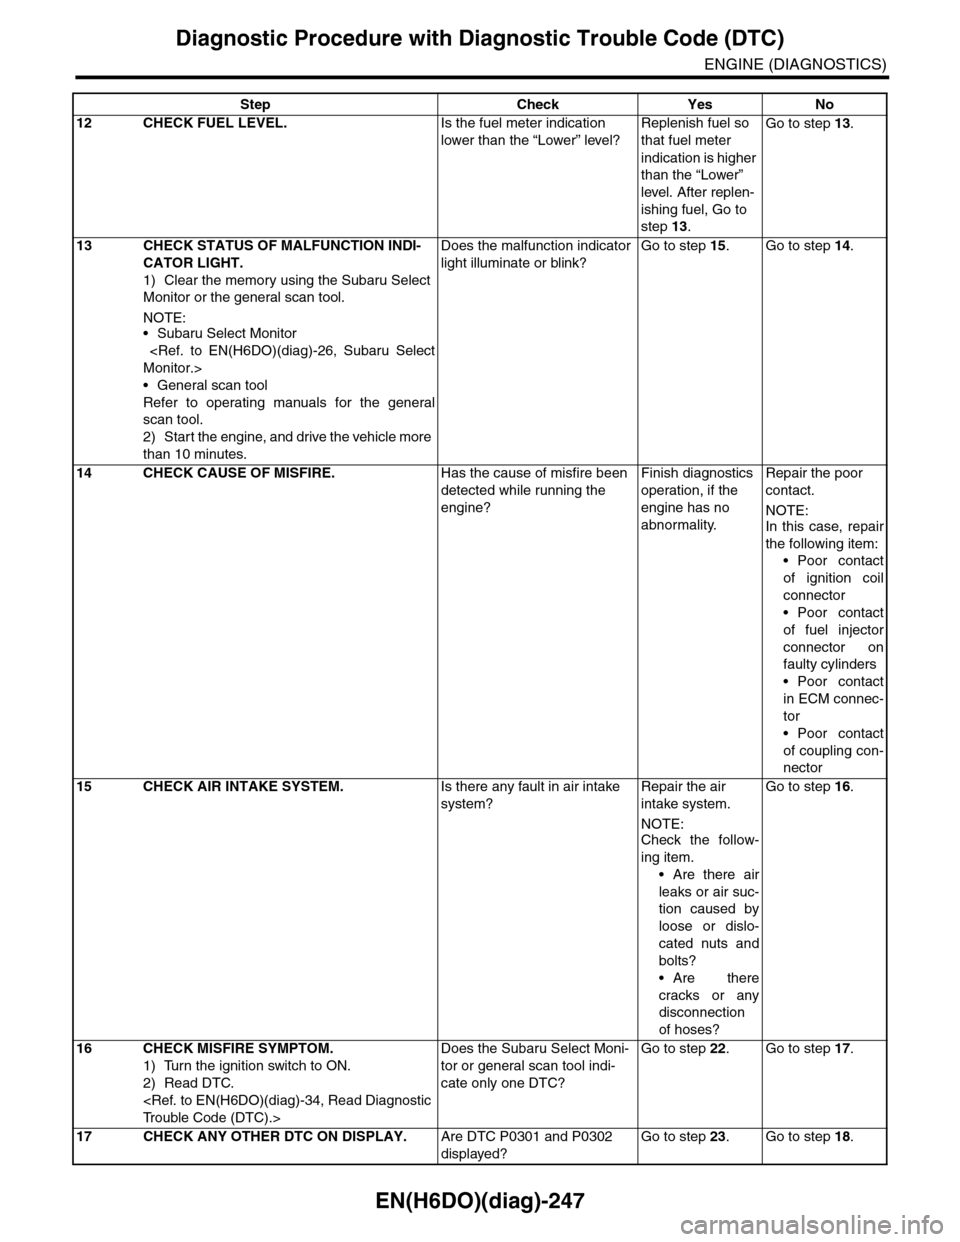
EN(H6DO)(diag)-247
Diagnostic Procedure with Diagnostic Trouble Code (DTC)
ENGINE (DIAGNOSTICS)
12 CHECK FUEL LEVEL.Is the fuel meter indication
lower than the “Lower” level?
Replenish fuel so
that fuel meter
indication is higher
than the “Lower”
level. After replen-
ishing fuel, Go to
step 13.
Go to step 13.
13 CHECK STATUS OF MALFUNCTION INDI-
CATOR LIGHT.
1) Clear the memory using the Subaru Select
Monitor or the general scan tool.
NOTE:•Subaru Select Monitor
•General scan tool
Refer to operating manuals for the general
scan tool.
2) Start the engine, and drive the vehicle more
than 10 minutes.
Does the malfunction indicator
light illuminate or blink?
Go to step 15.Go to step 14.
14 CHECK CAUSE OF MISFIRE.Has the cause of misfire been
detected while running the
engine?
Finish diagnostics
operation, if the
engine has no
abnormality.
Repair the poor
contact.
NOTE:In this case, repair
the following item:
•Poor contact
of ignition coil
connector
•Poor contact
of fuel injector
connector on
faulty cylinders
•Poor contact
in ECM connec-
tor
•Poor contact
of coupling con-
nector
15 CHECK AIR INTAKE SYSTEM.Is there any fault in air intake
system?
Repair the air
intake system.
NOTE:
Check the follow-
ing item.
•Are there air
leaks or air suc-
tion caused by
loose or dislo-
cated nuts and
bolts?
•Are there
cracks or any
disconnection
of hoses?
Go to step 16.
16 CHECK MISFIRE SYMPTOM.
1) Turn the ignition switch to ON.
2) Read DTC.
Does the Subaru Select Moni-
tor or general scan tool indi-
cate only one DTC?
Go to step 22.Go to step 17.
17 CHECK ANY OTHER DTC ON DISPLAY.Are DTC P0301 and P0302
displayed?
Go to step 23.Go to step 18.
Step Check Yes No
Page 1409 of 2453
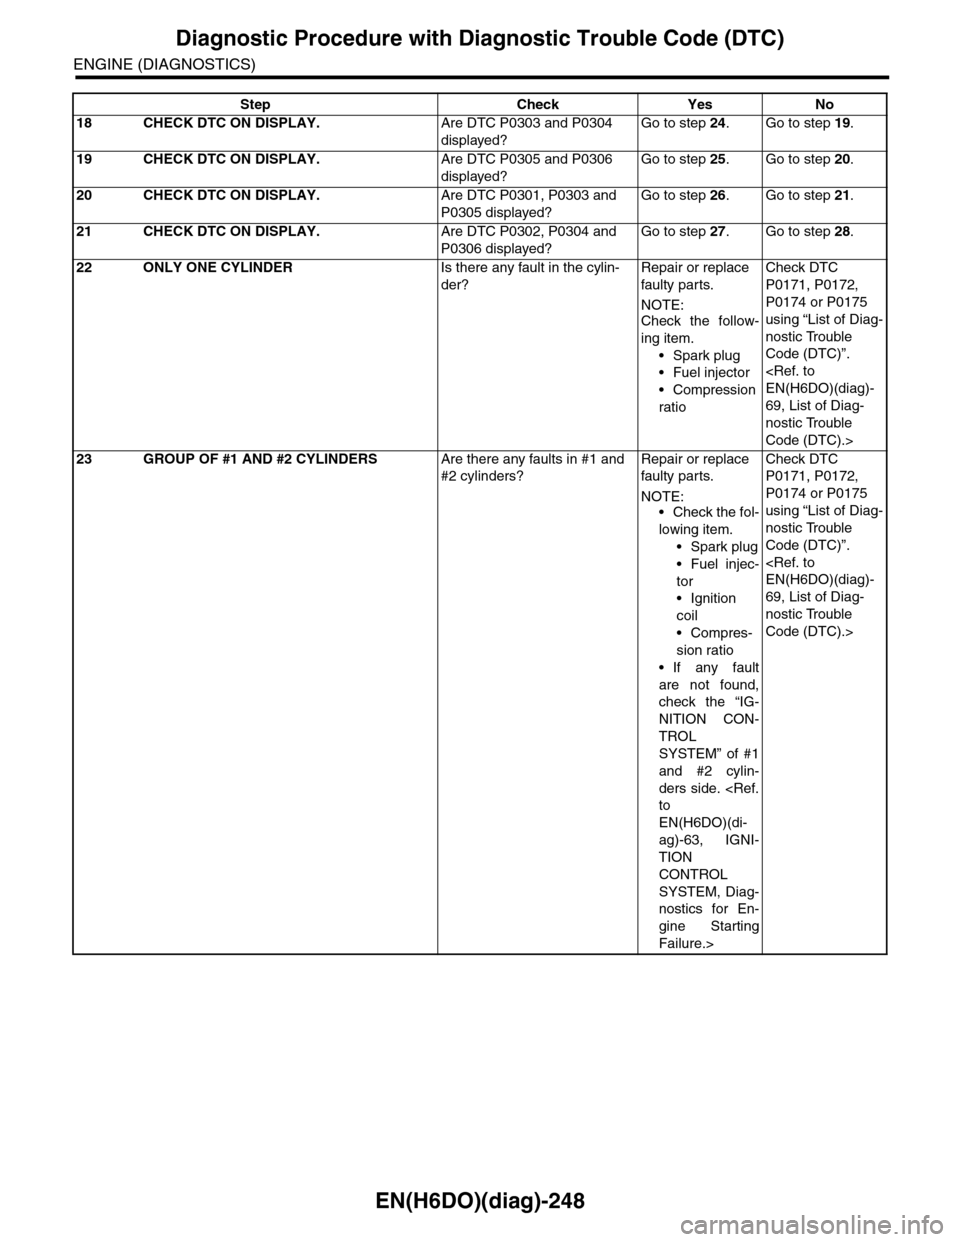
EN(H6DO)(diag)-248
Diagnostic Procedure with Diagnostic Trouble Code (DTC)
ENGINE (DIAGNOSTICS)
18 CHECK DTC ON DISPLAY.Are DTC P0303 and P0304
displayed?
Go to step 24.Go to step 19.
19 CHECK DTC ON DISPLAY.Are DTC P0305 and P0306
displayed?
Go to step 25.Go to step 20.
20 CHECK DTC ON DISPLAY.Are DTC P0301, P0303 and
P0305 displayed?
Go to step 26.Go to step 21.
21 CHECK DTC ON DISPLAY.Are DTC P0302, P0304 and
P0306 displayed?
Go to step 27.Go to step 28.
22 ONLY ONE CYLINDERIs there any fault in the cylin-
der?
Repair or replace
faulty par ts.
NOTE:Check the follow-
ing item.
•Spark plug
•Fuel injector
•Compression
ratio
Check DTC
P0171, P0172,
P0174 or P0175
using “List of Diag-
nostic Trouble
Code (DTC)”.
69, List of Diag-
nostic Trouble
Code (DTC).>
23 GROUP OF #1 AND #2 CYLINDERSAre there any faults in #1 and
#2 cylinders?
Repair or replace
faulty par ts.
NOTE:•Check the fol-
lowing item.
•Spark plug
•Fuel injec-
tor
•Ignition
coil
•Compres-
sion ratio
•If any fault
are not found,
check the “IG-
NITION CON-
TROL
SYSTEM” of #1
and #2 cylin-
ders side.
EN(H6DO)(di-
ag)-63, IGNI-
TION
CONTROL
SYSTEM, Diag-
nostics for En-
gine Starting
Failure.>
Check DTC
P0171, P0172,
P0174 or P0175
using “List of Diag-
nostic Trouble
Code (DTC)”.
69, List of Diag-
nostic Trouble
Code (DTC).>
Step Check Yes No
Page 1410 of 2453
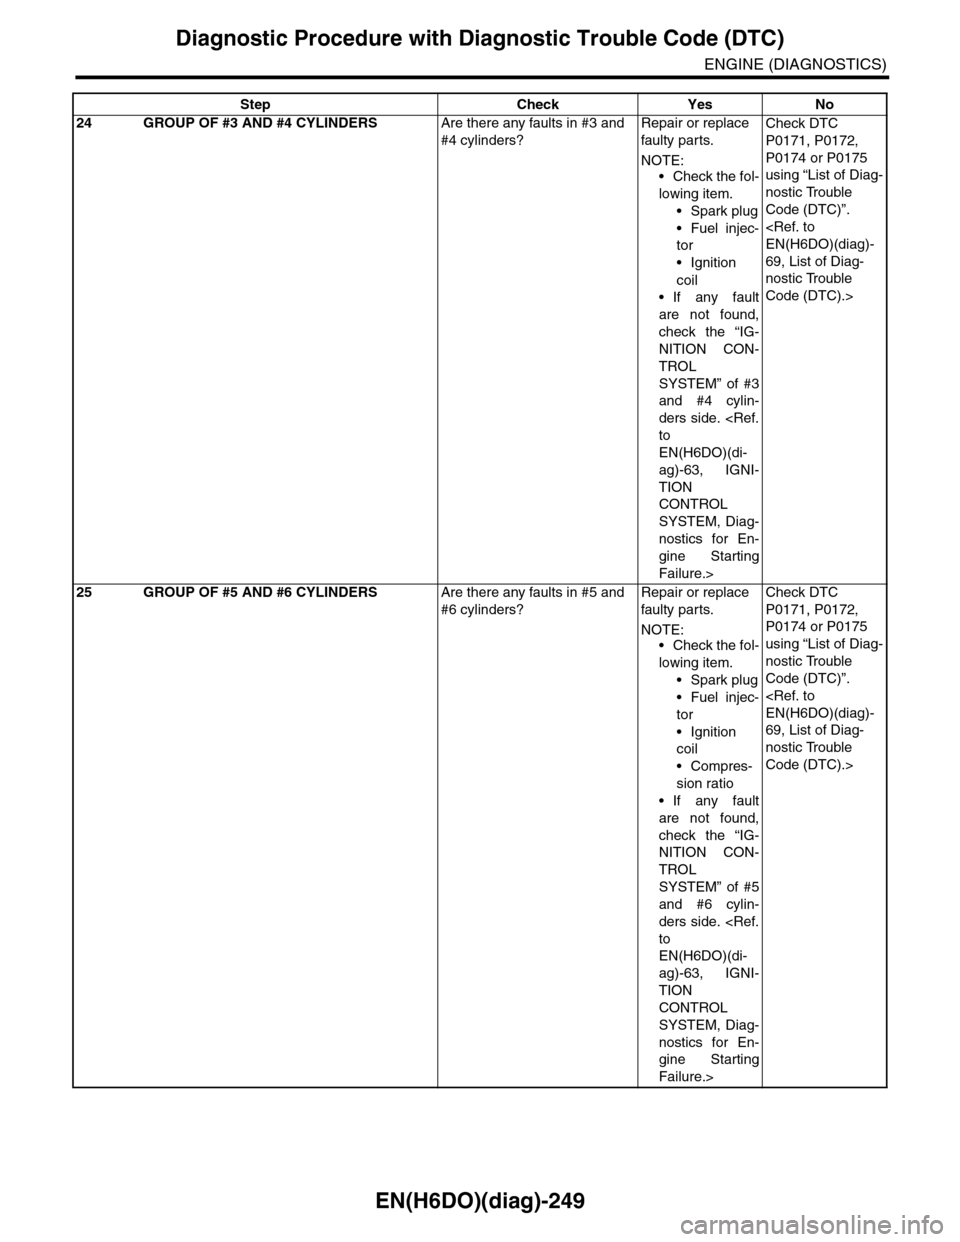
EN(H6DO)(diag)-249
Diagnostic Procedure with Diagnostic Trouble Code (DTC)
ENGINE (DIAGNOSTICS)
24 GROUP OF #3 AND #4 CYLINDERSAre there any faults in #3 and
#4 cylinders?
Repair or replace
faulty par ts.
NOTE:
•Check the fol-
lowing item.
•Spark plug
•Fuel injec-
tor
•Ignition
coil
•If any fault
are not found,
check the “IG-
NITION CON-
TROL
SYSTEM” of #3
and #4 cylin-
ders side.
EN(H6DO)(di-
ag)-63, IGNI-
TION
CONTROL
SYSTEM, Diag-
nostics for En-
gine Starting
Failure.>
Check DTC
P0171, P0172,
P0174 or P0175
using “List of Diag-
nostic Trouble
Code (DTC)”.
69, List of Diag-
nostic Trouble
Code (DTC).>
25 GROUP OF #5 AND #6 CYLINDERSAre there any faults in #5 and
#6 cylinders?
Repair or replace
faulty par ts.
NOTE:•Check the fol-
lowing item.
•Spark plug
•Fuel injec-
tor
•Ignition
coil
•Compres-
sion ratio
•If any fault
are not found,
check the “IG-
NITION CON-
TROL
SYSTEM” of #5
and #6 cylin-
ders side.
EN(H6DO)(di-
ag)-63, IGNI-
TION
CONTROL
SYSTEM, Diag-
nostics for En-
gine Starting
Failure.>
Check DTC
P0171, P0172,
P0174 or P0175
using “List of Diag-
nostic Trouble
Code (DTC)”.
69, List of Diag-
nostic Trouble
Code (DTC).>
Step Check Yes No
Page 1481 of 2453
EN(H6DO)(diag)-320
Diagnostic Procedure with Diagnostic Trouble Code (DTC)
ENGINE (DIAGNOSTICS)
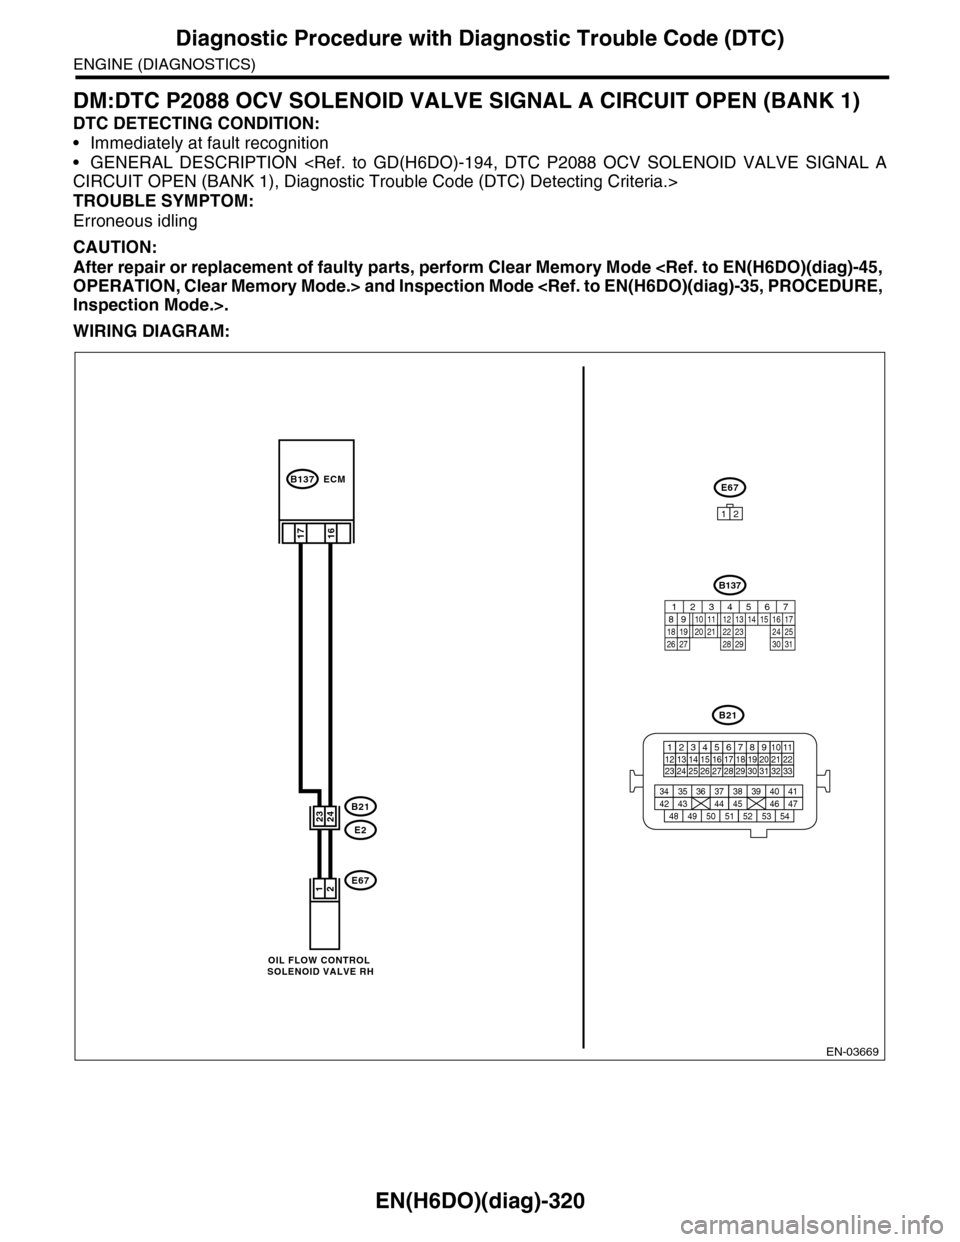
DM:DTC P2088 OCV SOLENOID VALVE SIGNAL A CIRCUIT OPEN (BANK 1)
DTC DETECTING CONDITION:
•Immediately at fault recognition
•GENERAL DESCRIPTION
TROUBLE SYMPTOM:
Erroneous idling
CAUTION:
After repair or replacement of faulty parts, perform Clear Memory Mode
WIRING DIAGRAM:
EN-03669
B21
E2
B137
E67
16
21
2423
E67
12
17
ECM
B21
123412131415567816171819910 1120212223 24 25 2627 28 29 3031 32 33
3534 37363938 41404342 4445 47464948 51505352 54
OIL FLOW CONTROL SOLENOID VALVE RH
B137
85610 11 12 13 14 157213416
3019 20 2228 29
91718 2521 23 243126 27
Page 1482 of 2453
EN(H6DO)(diag)-321
Diagnostic Procedure with Diagnostic Trouble Code (DTC)
ENGINE (DIAGNOSTICS)
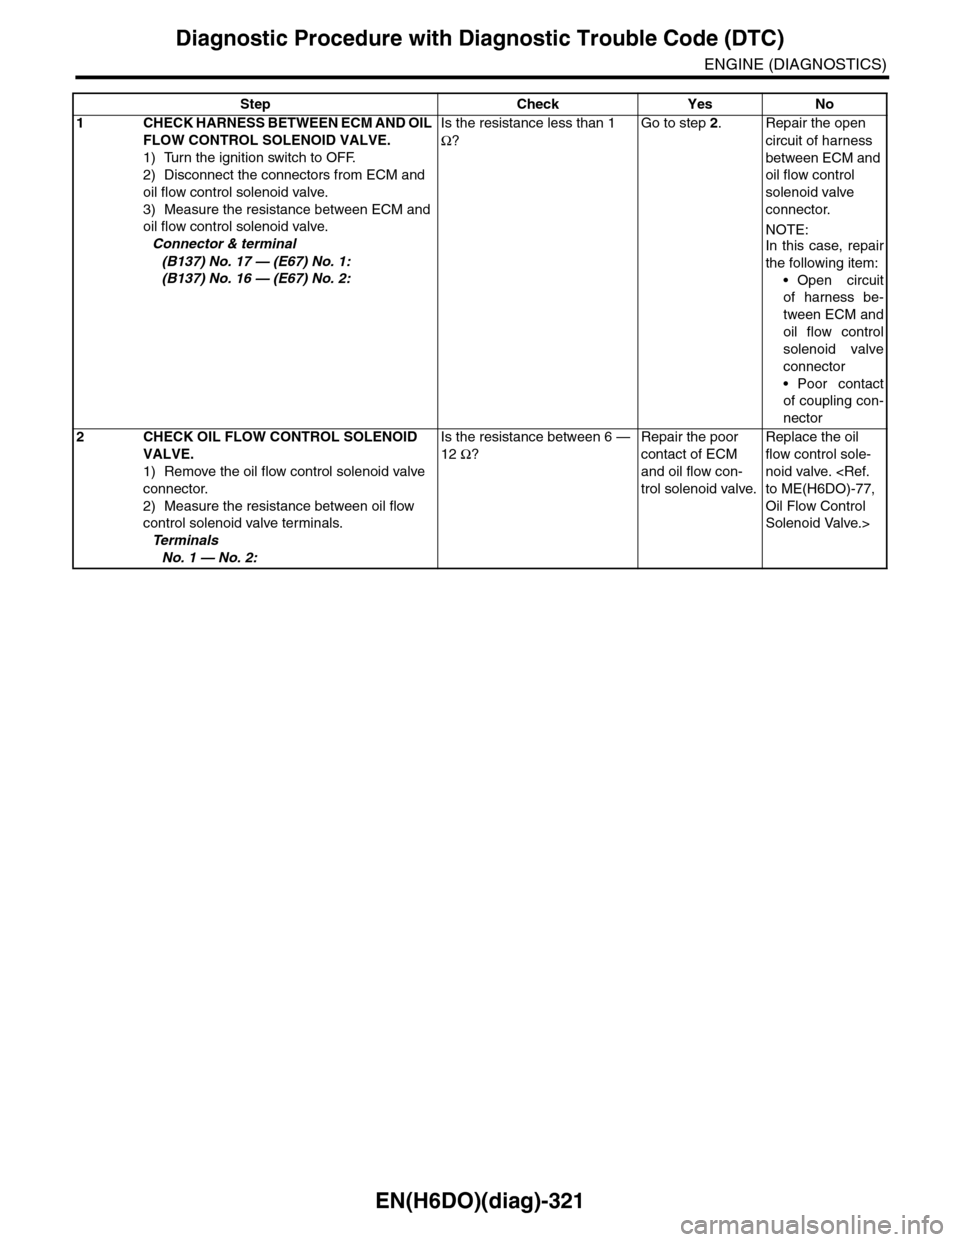
Step Check Yes No
1CHECK HARNESS BETWEEN ECM AND OIL
FLOW CONTROL SOLENOID VALVE.
1) Turn the ignition switch to OFF.
2) Disconnect the connectors from ECM and
oil flow control solenoid valve.
3) Measure the resistance between ECM and
oil flow control solenoid valve.
Connector & terminal
(B137) No. 17 — (E67) No. 1:
(B137) No. 16 — (E67) No. 2:
Is the resistance less than 1
Ω?
Go to step 2.Repair the open
circuit of harness
between ECM and
oil flow control
solenoid valve
connector.
NOTE:In this case, repair
the following item:
•Open circuit
of harness be-
tween ECM and
oil flow control
solenoid valve
connector
•Poor contact
of coupling con-
nector
2CHECK OIL FLOW CONTROL SOLENOID
VALVE.
1) Remove the oil flow control solenoid valve
connector.
2) Measure the resistance between oil flow
control solenoid valve terminals.
Te r m i n a l s
No. 1 — No. 2:
Is the resistance between 6 —
12 Ω?
Repair the poor
contact of ECM
and oil flow con-
trol solenoid valve.
Replace the oil
flow control sole-
noid valve.
Oil Flow Control
Solenoid Valve.>
Page 1483 of 2453
EN(H6DO)(diag)-322
Diagnostic Procedure with Diagnostic Trouble Code (DTC)
ENGINE (DIAGNOSTICS)
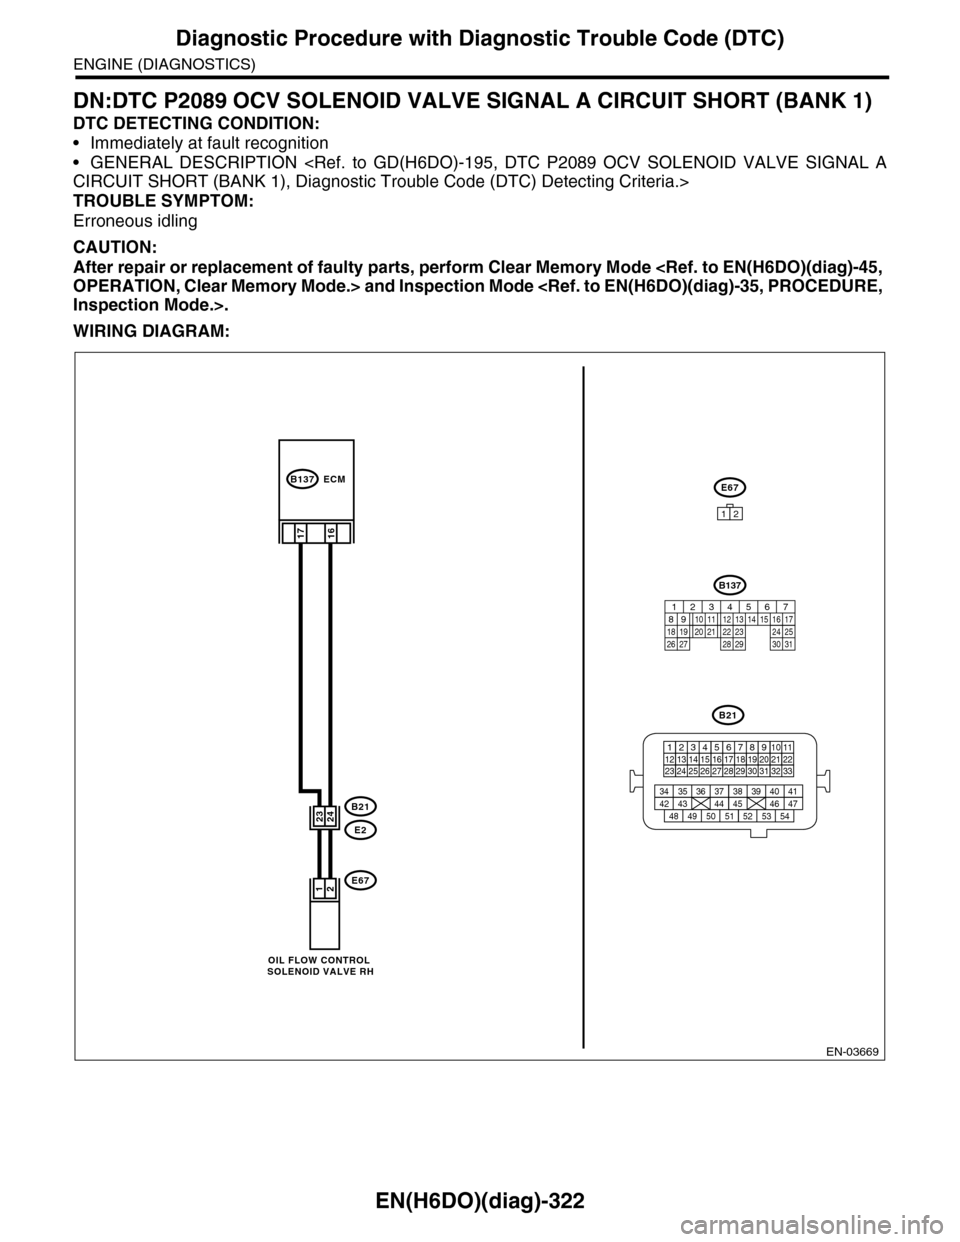
DN:DTC P2089 OCV SOLENOID VALVE SIGNAL A CIRCUIT SHORT (BANK 1)
DTC DETECTING CONDITION:
•Immediately at fault recognition
•GENERAL DESCRIPTION
TROUBLE SYMPTOM:
Erroneous idling
CAUTION:
After repair or replacement of faulty parts, perform Clear Memory Mode
WIRING DIAGRAM:
EN-03669
B21
E2
B137
E67
16
21
2423
E67
12
17
ECM
B21
123412131415567816171819910 1120212223 24 25 2627 28 29 3031 32 33
3534 37363938 41404342 4445 47464948 51505352 54
OIL FLOW CONTROL SOLENOID VALVE RH
B137
85610 11 12 13 14 157213416
3019 20 2228 29
91718 2521 23 243126 27
Page 1484 of 2453
EN(H6DO)(diag)-323
Diagnostic Procedure with Diagnostic Trouble Code (DTC)
ENGINE (DIAGNOSTICS)
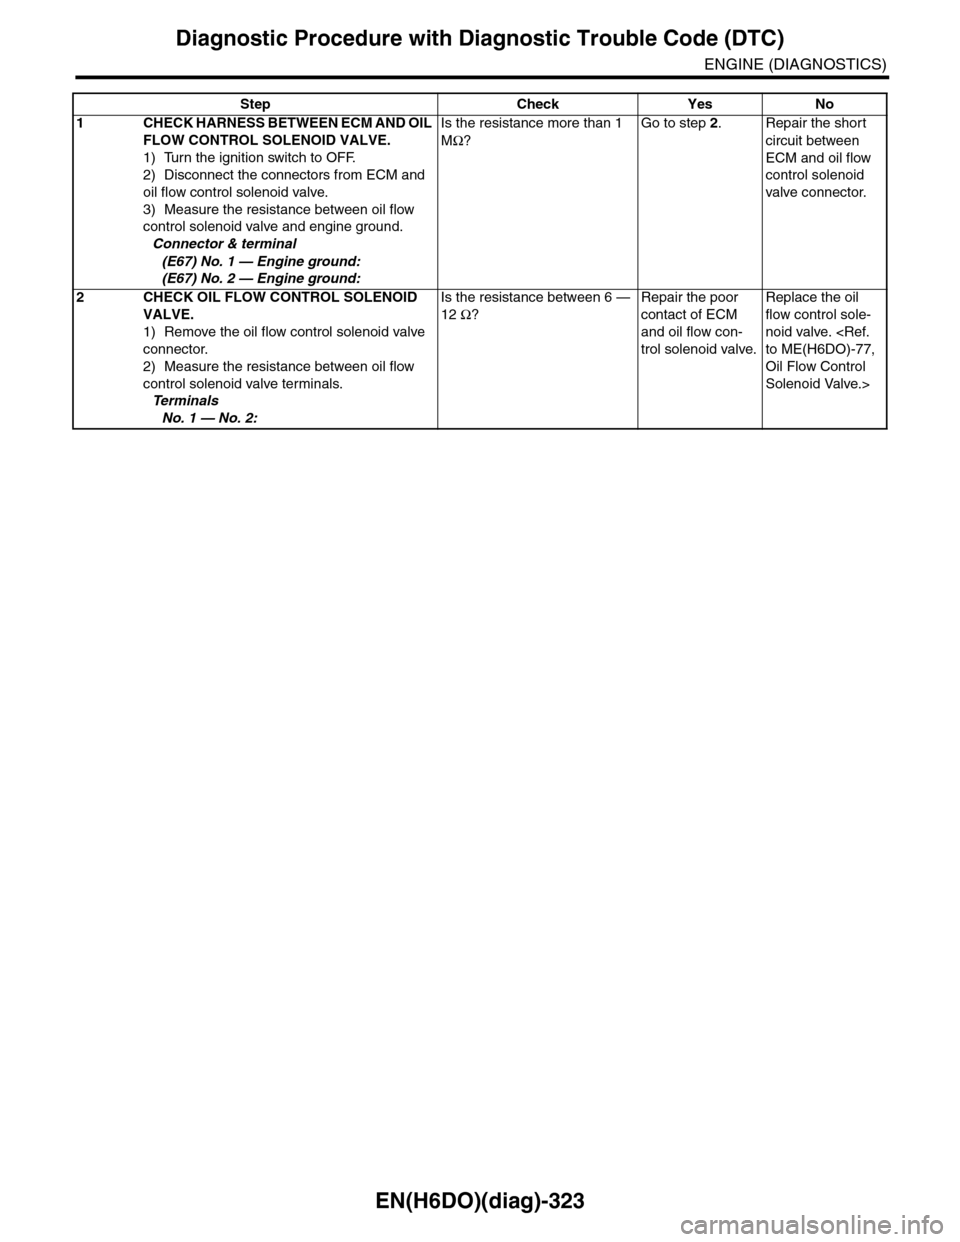
Step Check Yes No
1CHECK HARNESS BETWEEN ECM AND OIL
FLOW CONTROL SOLENOID VALVE.
1) Turn the ignition switch to OFF.
2) Disconnect the connectors from ECM and
oil flow control solenoid valve.
3) Measure the resistance between oil flow
control solenoid valve and engine ground.
Connector & terminal
(E67) No. 1 — Engine ground:
(E67) No. 2 — Engine ground:
Is the resistance more than 1
MΩ?
Go to step 2.Repair the short
circuit between
ECM and oil flow
control solenoid
valve connector.
2CHECK OIL FLOW CONTROL SOLENOID
VALVE.
1) Remove the oil flow control solenoid valve
connector.
2) Measure the resistance between oil flow
control solenoid valve terminals.
Te r m i n a l s
No. 1 — No. 2:
Is the resistance between 6 —
12 Ω?
Repair the poor
contact of ECM
and oil flow con-
trol solenoid valve.
Replace the oil
flow control sole-
noid valve.
Oil Flow Control
Solenoid Valve.>
Page 1485 of 2453
EN(H6DO)(diag)-324
Diagnostic Procedure with Diagnostic Trouble Code (DTC)
ENGINE (DIAGNOSTICS)
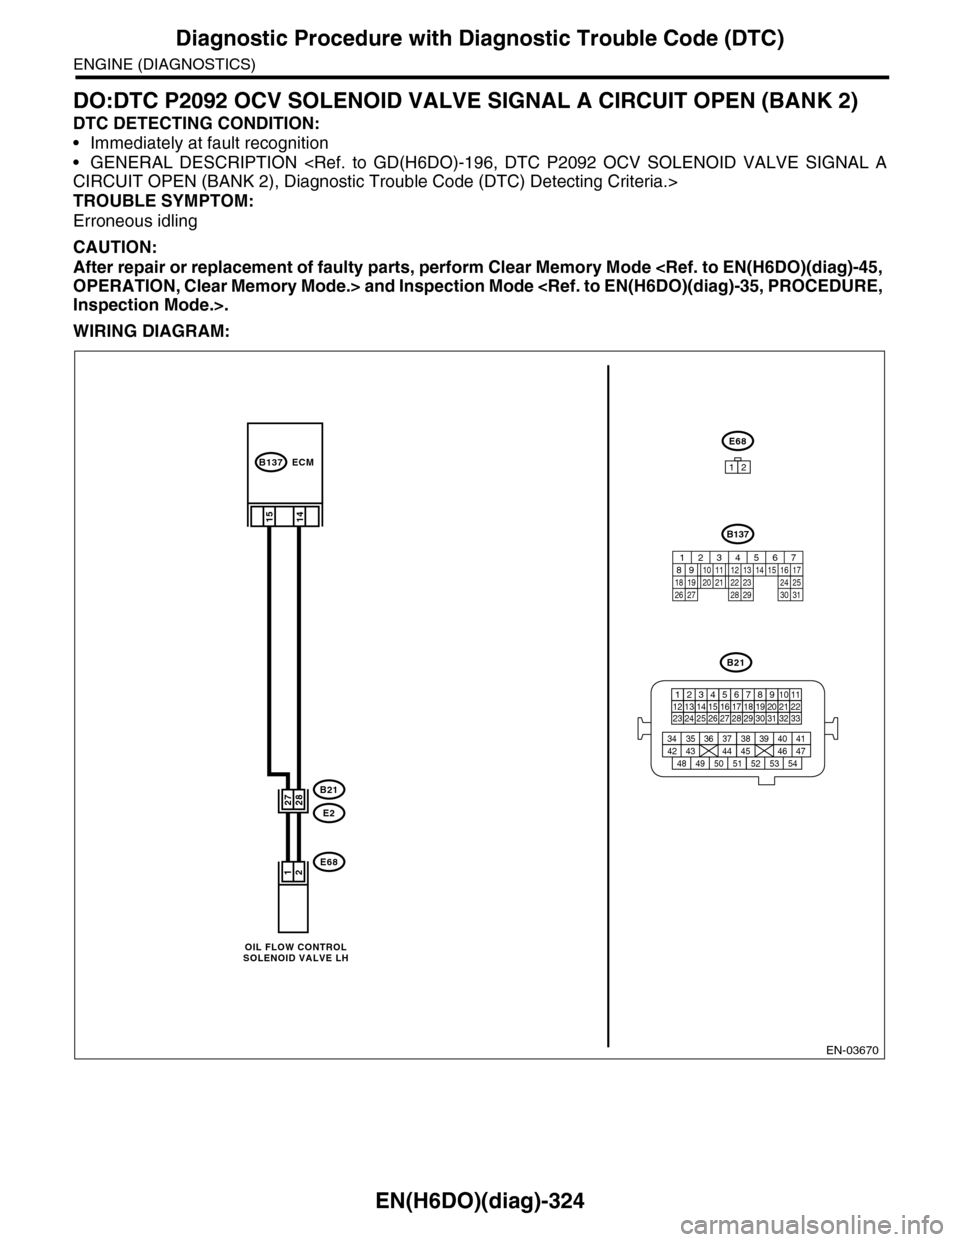
DO:DTC P2092 OCV SOLENOID VALVE SIGNAL A CIRCUIT OPEN (BANK 2)
DTC DETECTING CONDITION:
•Immediately at fault recognition
•GENERAL DESCRIPTION
TROUBLE SYMPTOM:
Erroneous idling
CAUTION:
After repair or replacement of faulty parts, perform Clear Memory Mode
WIRING DIAGRAM:
EN-03670
B21
E2
B137
E68
14
21
2827
E68
12
15
ECM
B21
123412131415567816171819910 1120212223 24 25 2627 28 29 3031 32 33
3534 37363938 41404342 4445 47464948 51505352 54
OIL FLOW CONTROLSOLENOID VALVE LH
B137
85610 11 12 13 14 157213416
3019 20 2228 29
91718 2521 23 243126 27
Page 1486 of 2453
EN(H6DO)(diag)-325
Diagnostic Procedure with Diagnostic Trouble Code (DTC)
ENGINE (DIAGNOSTICS)
Step Check Yes No
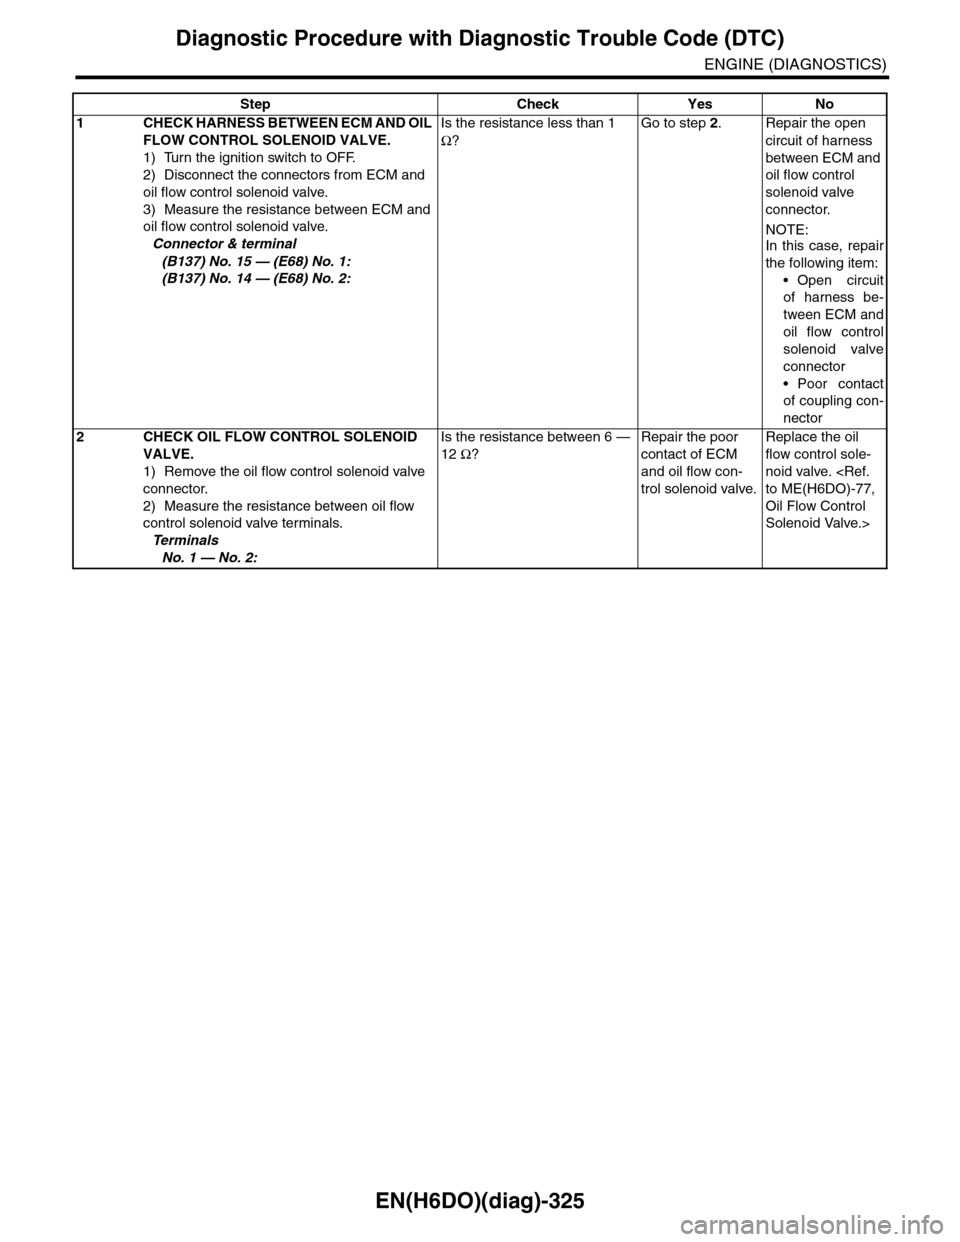
1CHECK HARNESS BETWEEN ECM AND OIL
FLOW CONTROL SOLENOID VALVE.
1) Turn the ignition switch to OFF.
2) Disconnect the connectors from ECM and
oil flow control solenoid valve.
3) Measure the resistance between ECM and
oil flow control solenoid valve.
Connector & terminal
(B137) No. 15 — (E68) No. 1:
(B137) No. 14 — (E68) No. 2:
Is the resistance less than 1
Ω?
Go to step 2.Repair the open
circuit of harness
between ECM and
oil flow control
solenoid valve
connector.
NOTE:In this case, repair
the following item:
•Open circuit
of harness be-
tween ECM and
oil flow control
solenoid valve
connector
•Poor contact
of coupling con-
nector
2CHECK OIL FLOW CONTROL SOLENOID
VALVE.
1) Remove the oil flow control solenoid valve
connector.
2) Measure the resistance between oil flow
control solenoid valve terminals.
Te r m i n a l s
No. 1 — No. 2:
Is the resistance between 6 —
12 Ω?
Repair the poor
contact of ECM
and oil flow con-
trol solenoid valve.
Replace the oil
flow control sole-
noid valve.
Oil Flow Control
Solenoid Valve.>