SUZUKI GRAND VITARA 1987 Service Repair Manual
Manufacturer: SUZUKI, Model Year: 1987, Model line: GRAND VITARA, Model: SUZUKI GRAND VITARA 1987Pages: 962, PDF Size: 27.87 MB
Page 131 of 962
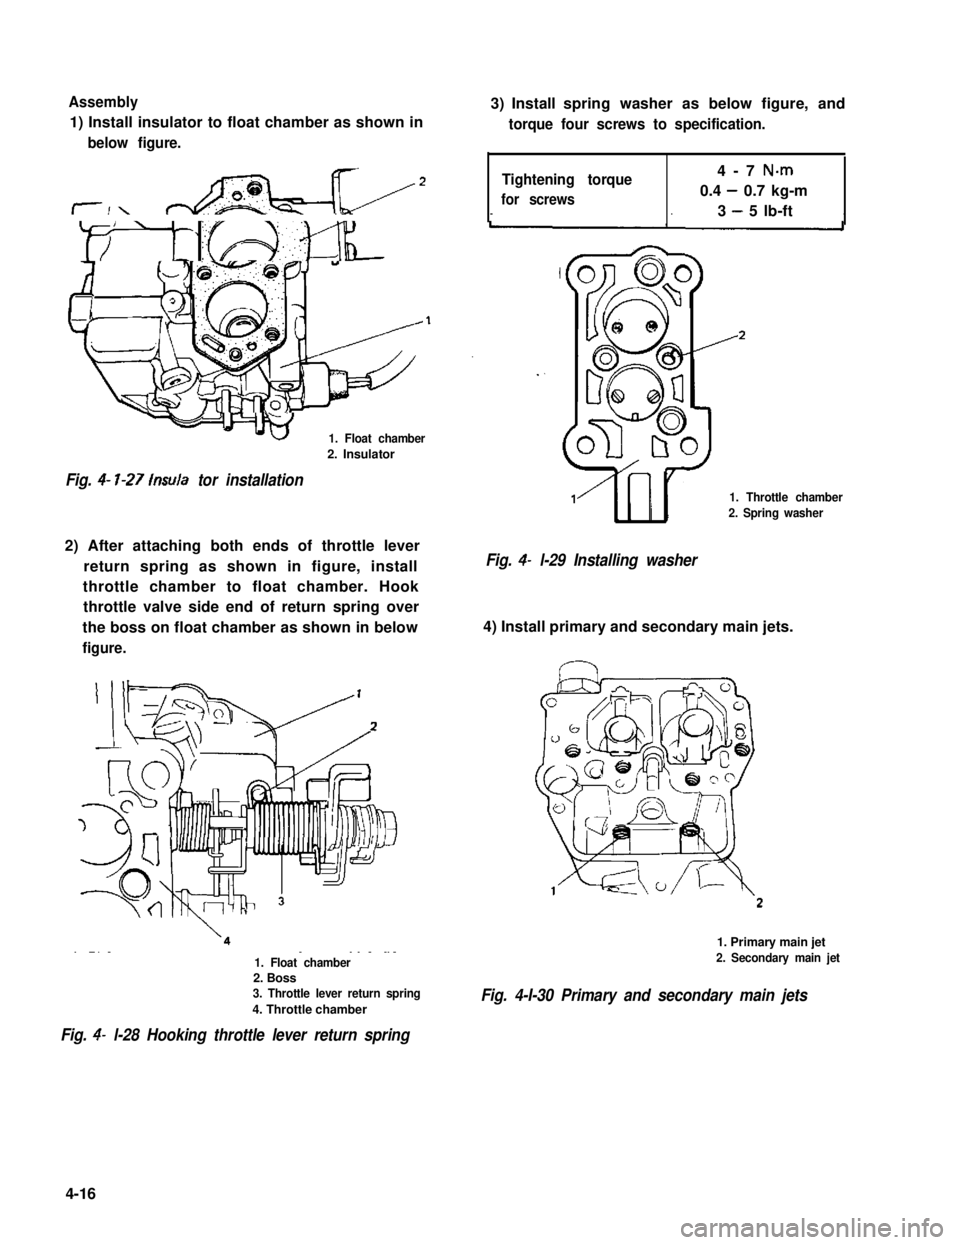
Assembly
1) Install insulator to float chamber as shown in
below figure.
1. Float chamber
2. Insulator
Fig. 4- l-27 lnsula tor installation
2) After attaching both ends of throttle lever
return spring as shown in figure, install
throttle chamber to float chamber. Hook
throttle valve side end of return spring over
the boss on float chamber as shown in below
figure.
3) Install spring washer as below figure, and
torque four screws to specification.
Tightening torque
for screws
4-7 N-m
0.4 - 0.7 kg-m
3 - 5 lb-ft
1. Throttle chamber
2. Spring washer
Fig. 4- l-29 Installing washer
4) Install primary and secondary main jets.
1. Float chamber2. Boss3. Throttle lever return spring
4. Throttle chamber
Fig. 4- l-28 Hooking throttle lever return spring
1. Primary main jet
2. Secondary main jet
Fig. 4-I-30 Primary and secondary main jets
4-16
Page 132 of 962
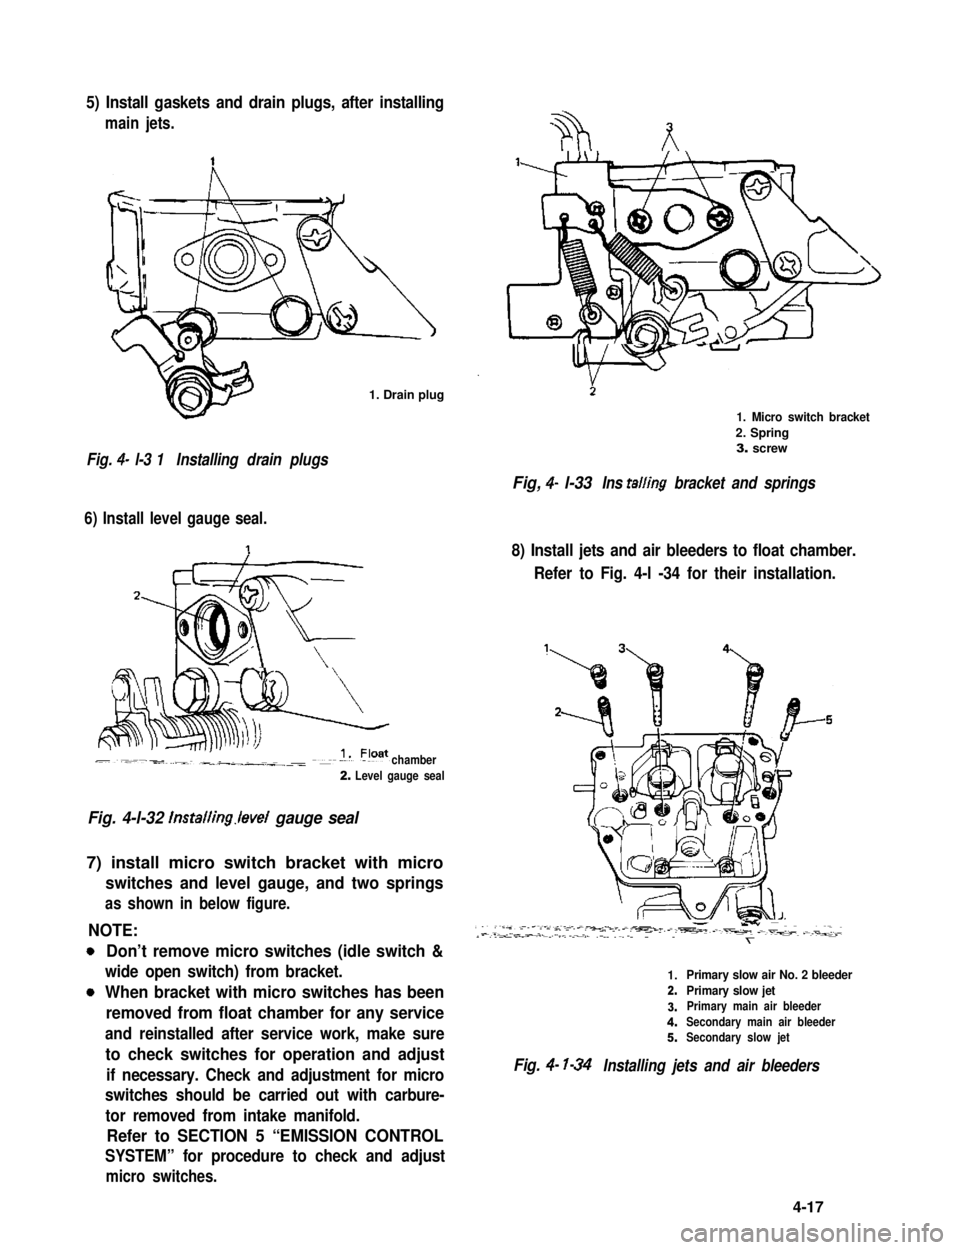
5) Install gaskets and drain plugs, after installing
main jets.
1. Drain plug
Fig. 4- l-3 1Installing drain plugs
6) Install level gauge seal.
chamber
2. Level gauge seal
Fig. 4-l-32 lnstalling.level gauge seal
7) install micro switch bracket with micro
switches and level gauge, and two springs
as shown in below figure.
NOTE:
0
0
Don’t remove micro switches (idle switch &
wide open switch) from bracket.
When bracket with micro switches has been
removed from float chamber for any service
and reinstalled after service work, make sure
to check switches for operation and adjust
if necessary. Check and adjustment for micro
switches should be carried out with carbure-
tor removed from intake manifold.
Refer to SECTION 5 “EMISSION CONTROL
SYSTEM” for procedure to check and adjust
micro switches.
1. Micro switch bracket
2. Spring3. screw
Fig, 4- l-33Ins tailing bracket and springs
8) Install jets and air bleeders to float chamber.
Refer to Fig. 4-l -34 for their installation.
1.Primary slow air No. 2 bleeder
2.Primary slow jet
3.Primary main air bleeder
4.Secondary main air bleeder
5.Secondary slow jet
Fig. 4- l-34Installing jets and air bleeders
4-17
Page 133 of 962
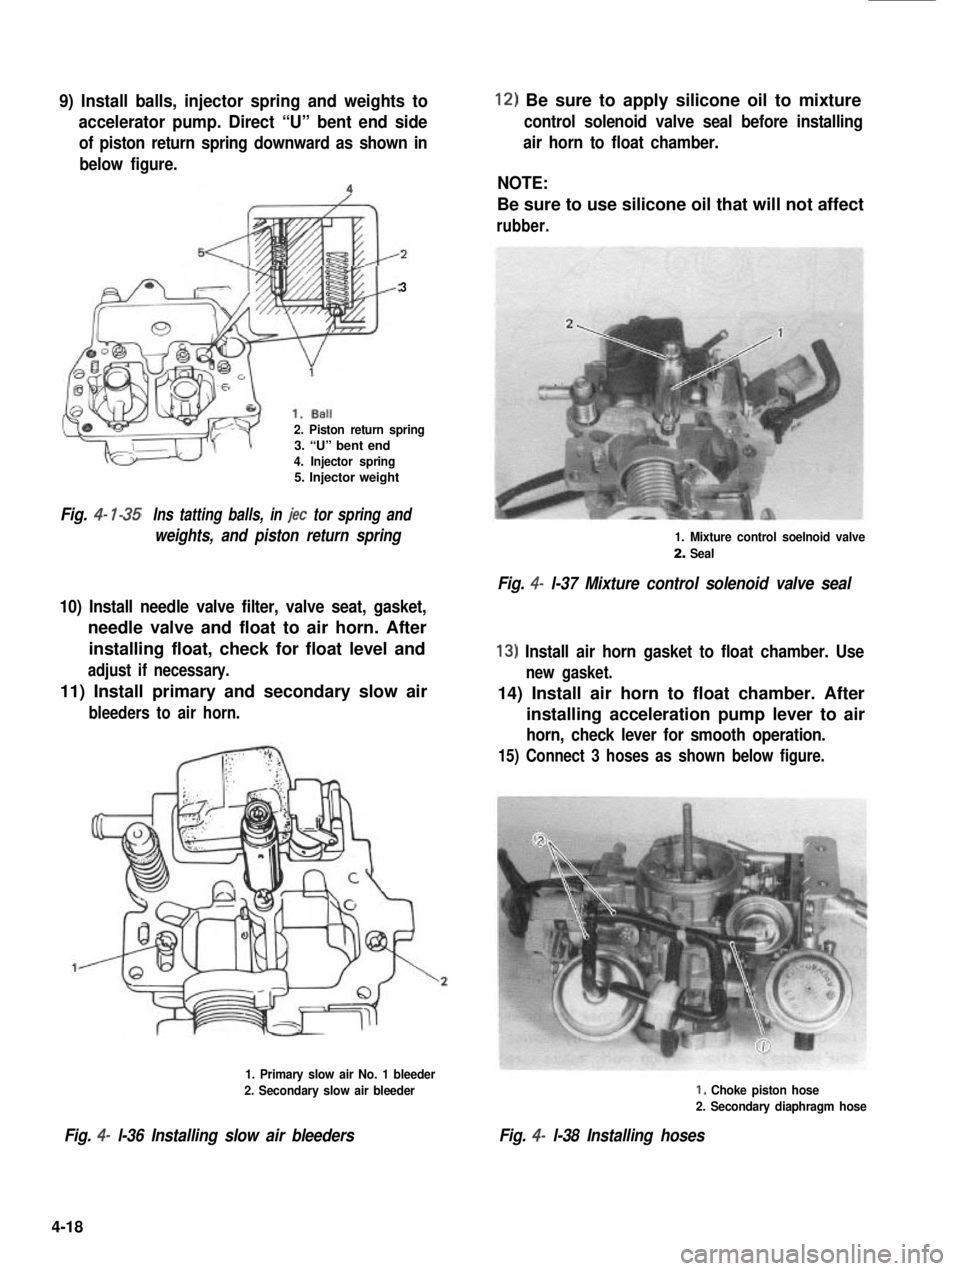
9) Install balls, injector spring and weights to
accelerator pump. Direct “U” bent end side
of piston return spring downward as shown in
below figure.
3
2. Piston return spring3. “U” bent end4. Injector spring5. Injector weight
Fig. 4- l-35Ins tatting balls, in jet tor spring and
weights, and piston return spring
10) Install needle valve filter, valve seat, gasket,
needle valve and float to air horn. After
installing float, check for float level and
adjust if necessary.
11) Install primary and secondary slow air
bleeders to air horn.
1. Primary slow air No. 1 bleeder
2. Secondary slow air bleeder
Fig. 4- l-36 Installing slow air bleeders
12) Be sure to apply silicone oil to mixture
control solenoid valve seal before installing
air horn to float chamber.
NOTE:
Be sure to use silicone oil that will not affect
rubber.
1. Mixture control soelnoid valve
2. Seal
Fig. 4- l-37 Mixture control solenoid valve seal
13) Install air horn gasket to float chamber. Use
new gasket.
14) Install air horn to float chamber. After
installing acceleration pump lever to air
horn, check lever for smooth operation.
15) Connect 3 hoses as shown below figure.
I, Choke piston hose
2. Secondary diaphragm hose
Fig. 4- l-38 Installing hoses
4-18
Page 134 of 962
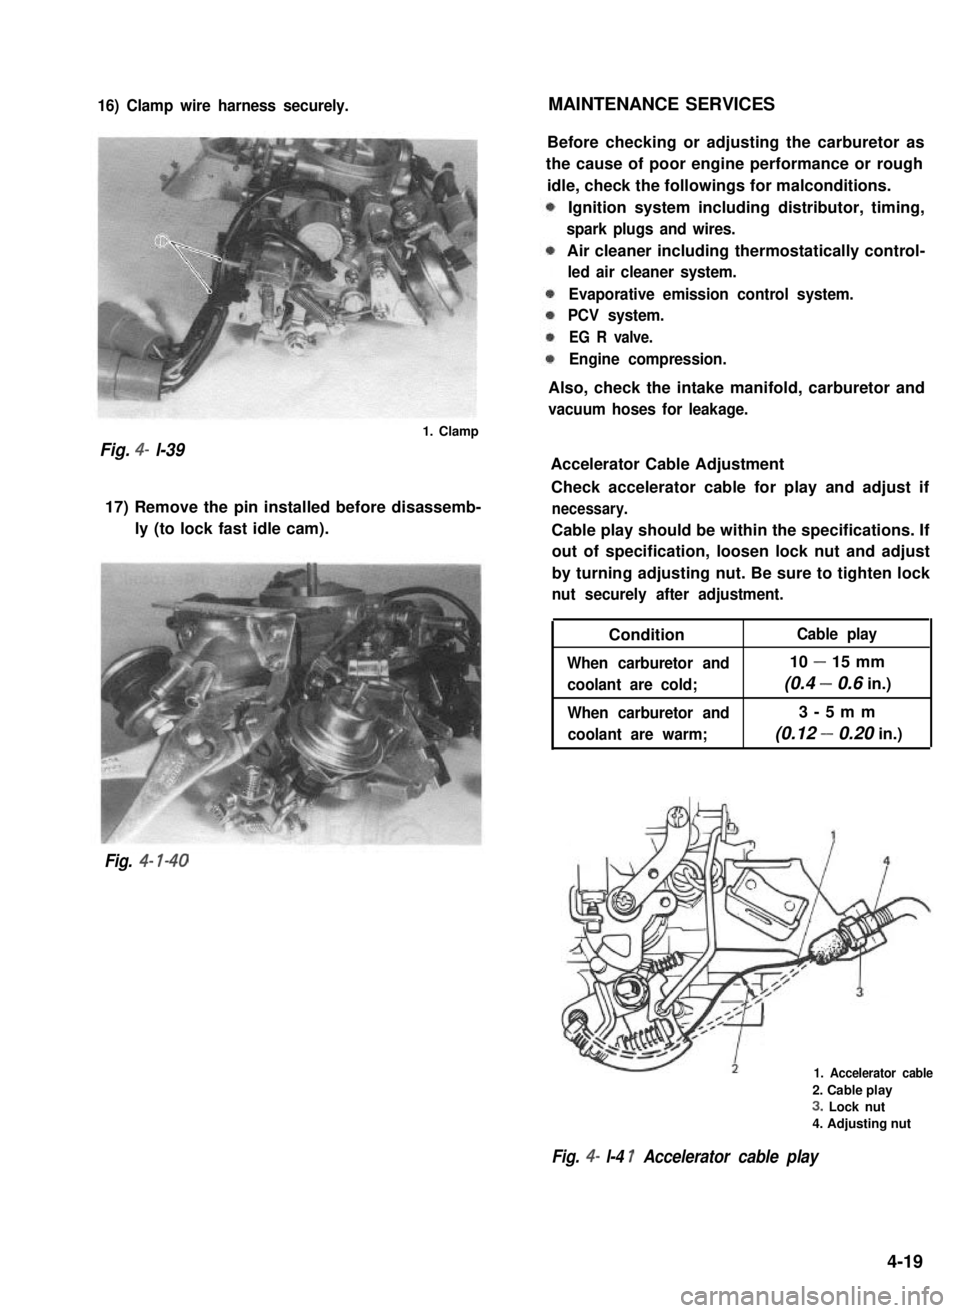
16) Clamp wire harness securely.MAINTENANCE SERVICES
Fig. 4- l-39
1. Clamp
17) Remove the pin installed before disassemb-
ly (to lock fast idle cam).
Fig. 4- l-40
Before checking or adjusting the carburetor as
the cause of poor engine performance or rough
idle, check the followings for malconditions.
Ignition system including distributor, timing,
spark plugs and wires.
Air cleaner including thermostatically control-
led air cleaner system.
Evaporative emission control system.
PCV system.
EG R valve.
Engine compression.
Also, check the intake manifold, carburetor and
vacuum hoses for leakage.
Accelerator Cable Adjustment
Check accelerator cable for play and adjust if
necessary.
Cable play should be within the specifications. If
out of specification, loosen lock nut and adjust
by turning adjusting nut. Be sure to tighten lock
nut securely after adjustment.
Condition
When carburetor and
coolant are cold;
When carburetor and
coolant are warm;
Cable play
10 - 15 mm
(0.4 - 0.6 in.)
3-5mm
(0.12 - 0.20 in.)
1. Accelerator cable
2. Cable play
3. Lock nut
4. Adjusting nut
Fig. 4- l-4 1 Accelerator cable play
4-19
Page 135 of 962
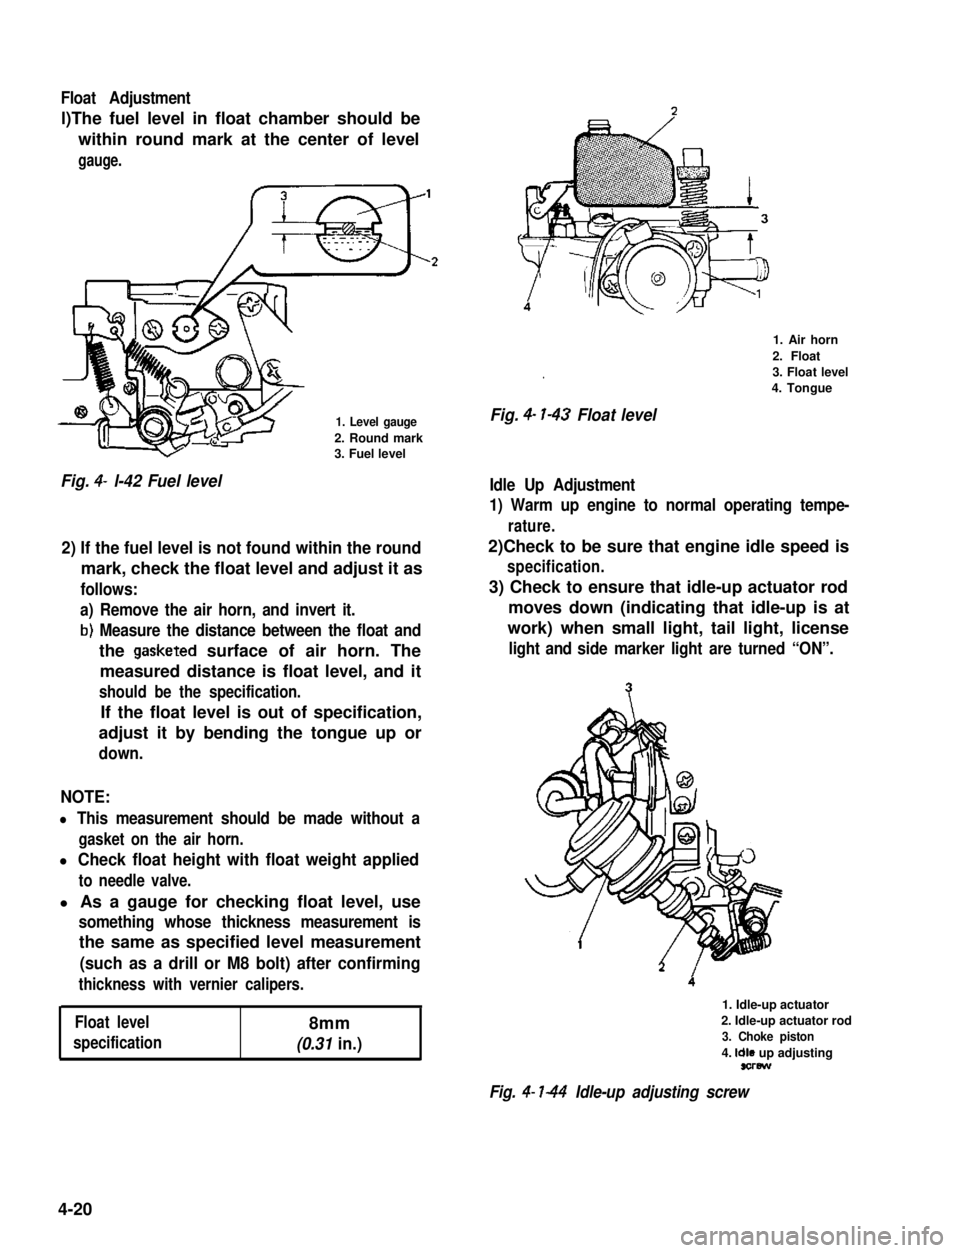
Float Adjustment
l)The fuel level in float chamber should be
within round mark at the center of level
gauge.
1. Level gauge
2. Round mark3. Fuel level
Fig. 4- l-42 Fuel level
2) If the fuel level is not found within the round
mark, check the float level and adjust it as
follows:
a) Remove the air horn, and invert it.
b) Measure the distance between the float and
the gasketed surface of air horn. The
measured distance is float level, and it
should be the specification.
If the float level is out of specification,
adjust it by bending the tongue up or
down.
NOTE:
l This measurement should be made without a
gasket on the air horn.
l Check float height with float weight applied
to needle valve.
l As a gauge for checking float level, use
something whose thickness measurement is
the same as specified level measurement
(such as a drill or M8 bolt) after confirming
thickness with vernier calipers.
Float level8mm
specification(0.31 in.)
.
Fig. 4- l-43 Float level
1. Air horn
2. Float
3. Float level
4. Tongue
Idle Up Adjustment
1) Warm up engine to normal operating tempe-
rature.
2)Check to be sure that engine idle speed is
specification.
3) Check to ensure that idle-up actuator rod
moves down (indicating that idle-up is at
work) when small light, tail light, license
light and side marker light are turned “ON”.
1. Idle-up actuator
2. Idle-up actuator rod
3. Choke piston
4. Idle up adjustingsorew
Fig. 4- l-44 Idle-up adjusting screw
4-20
Page 136 of 962
4) With lights (head light) turned “ON”, check
engine rpm (idle-up speed). Be sure that
heater fan, rear defogger (if equipped), and
air conditioner (if equipped) are all turned
“OFF”.
Idle-up speed900 - 1,000 r/min.
If idle-up speed is not within specification,
adjust by turning adjusting screw.
5) After idle-up adjustment, check to ensure that
idle-up adjusting screw moves as in step 3)
when only heater fan is operated and then
only rear defogger is operated (small light, tail
light, side marker light and license light should
be “OFF” in this cases).
If found faulty in step 3), check following parts
individually according to each procedure.
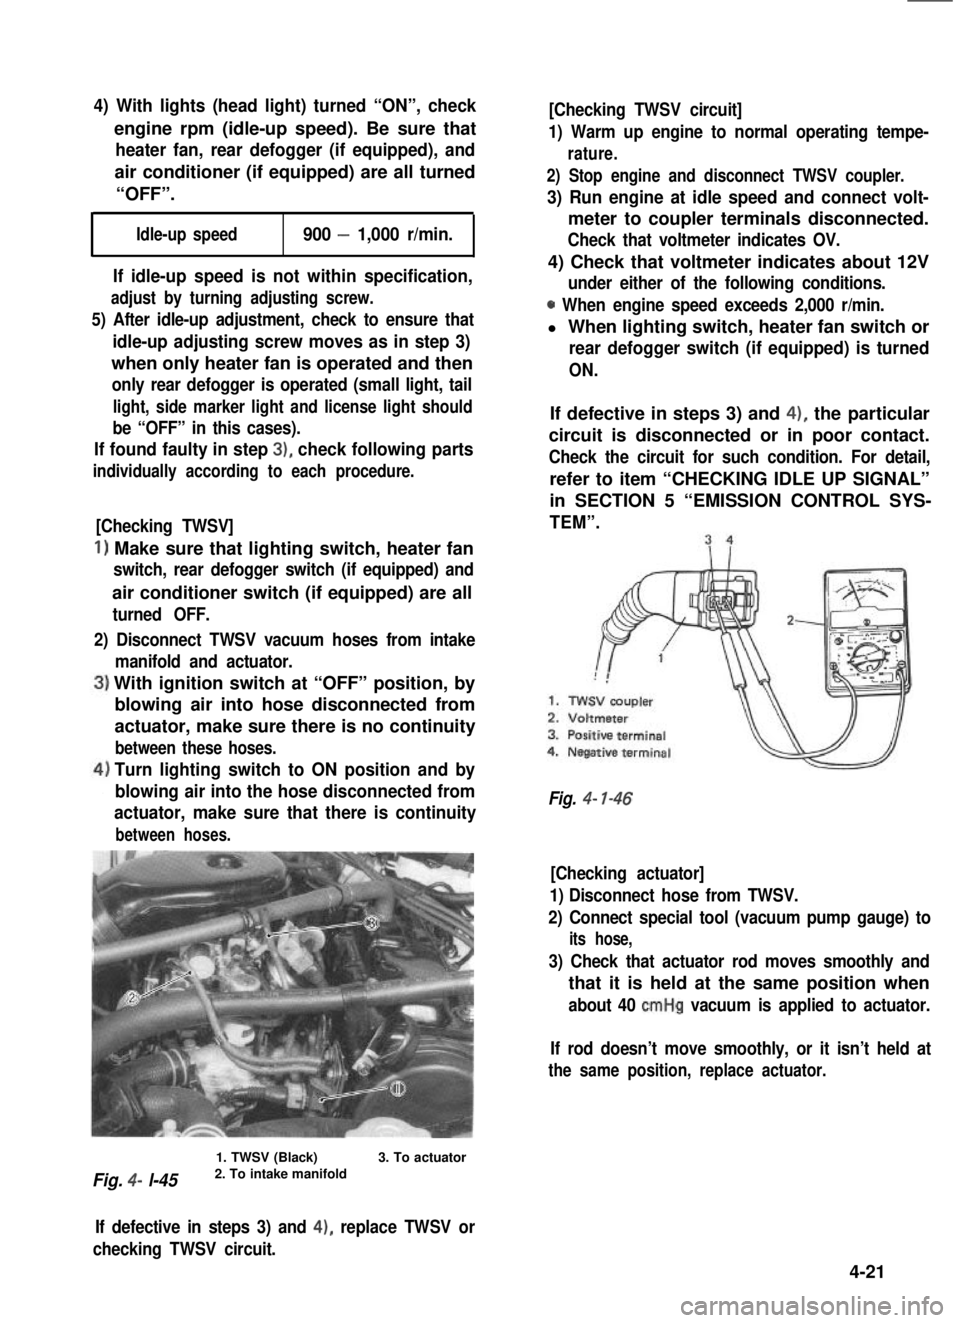
[Checking TWSV]
1) Make sure that lighting switch, heater fan
switch, rear defogger switch (if equipped) and
air conditioner switch (if equipped) are all
turned OFF.
2) Disconnect TWSV vacuum hoses from intake
manifold and actuator.
With ignition switch at “OFF” position, by
blowing air into hose disconnected from
actuator, make sure there is no continuity
between these hoses.
Turn lighting switch to ON position and by
blowing air into the hose disconnected from
actuator, make sure that there is continuity
between hoses.
Fig. 4- l-45
1. TWSV (Black)2. To intake manifold3. To actuator
[Checking TWSV circuit]
1) Warm up engine to normal operating tempe-
rature.
2) Stop engine and disconnect TWSV coupler.
3) Run engine at idle speed and connect volt-
meter to coupler terminals disconnected.
Check that voltmeter indicates OV.
4) Check that voltmeter indicates about 12V
under either of the following conditions.
0 When engine speed exceeds 2,000 r/min.
l When lighting switch, heater fan switch or
rear defogger switch (if equipped) is turned
ON.
If defective in steps 3) and 4), the particular
circuit is disconnected or in poor contact.
Check the circuit for such condition. For detail,
refer to item “CHECKING IDLE UP SIGNAL”
in SECTION 5 “EMISSION CONTROL SYS-
TEM”.
Fig. 4- l-46
[Checking actuator]
1) Disconnect hose from TWSV.
2) Connect special tool (vacuum pump gauge) to
its hose,
3) Check that actuator rod moves smoothly and
that it is held at the same position when
about 40 cmHg vacuum is applied to actuator.
If rod doesn’t move smoothly, or it isn’t held at
the same position, replace actuator.
If defective in steps 3) and 4), replace TWSV or
checking TWSV circuit.
4-21
Page 137 of 962
![SUZUKI GRAND VITARA 1987 Service Repair Manual Ambient temperatureClearance
Fig. 4-l-47
Choke Adjustment
Perform following check and adjustments with
air intake case removed when engine is cold.
[Choke valve]
1) Check choke valve for smooth moveme SUZUKI GRAND VITARA 1987 Service Repair Manual Ambient temperatureClearance
Fig. 4-l-47
Choke Adjustment
Perform following check and adjustments with
air intake case removed when engine is cold.
[Choke valve]
1) Check choke valve for smooth moveme](/img/20/57437/w960_57437-136.png)
Ambient temperatureClearance
Fig. 4-l-47
Choke Adjustment
Perform following check and adjustments with
air intake case removed when engine is cold.
[Choke valve]
1) Check choke valve for smooth movement by
pushing it with a finger.
Fig. 4-l-48 Choke valve
2) Make sure that choke valve is closed almost
completely when ambient temperature is
below 25°C (77” F) and engine is cold.
3) Check to ensure that choke valve to carbure-
tor bore clearance is within following specifi-
cations when engine is cool.
I.6 mmC&n*?.:.. \
NOTE:
As ambient temperature or engine coolant
temperature rises high, clearance increases.
1. Choke valve2. Thickness gauge
Fig. 4- 149 Choke valve to carbure tar bore
clearance
4) If clearance is found excessively large or
small in the above check, check strangler
spring, choke piston and each link in choke
system for smooth operation. Lubricate
choke valve shaft and each link with spray
lubricant if necessary.
Fig. 4-l-50
4-22
Page 138 of 962
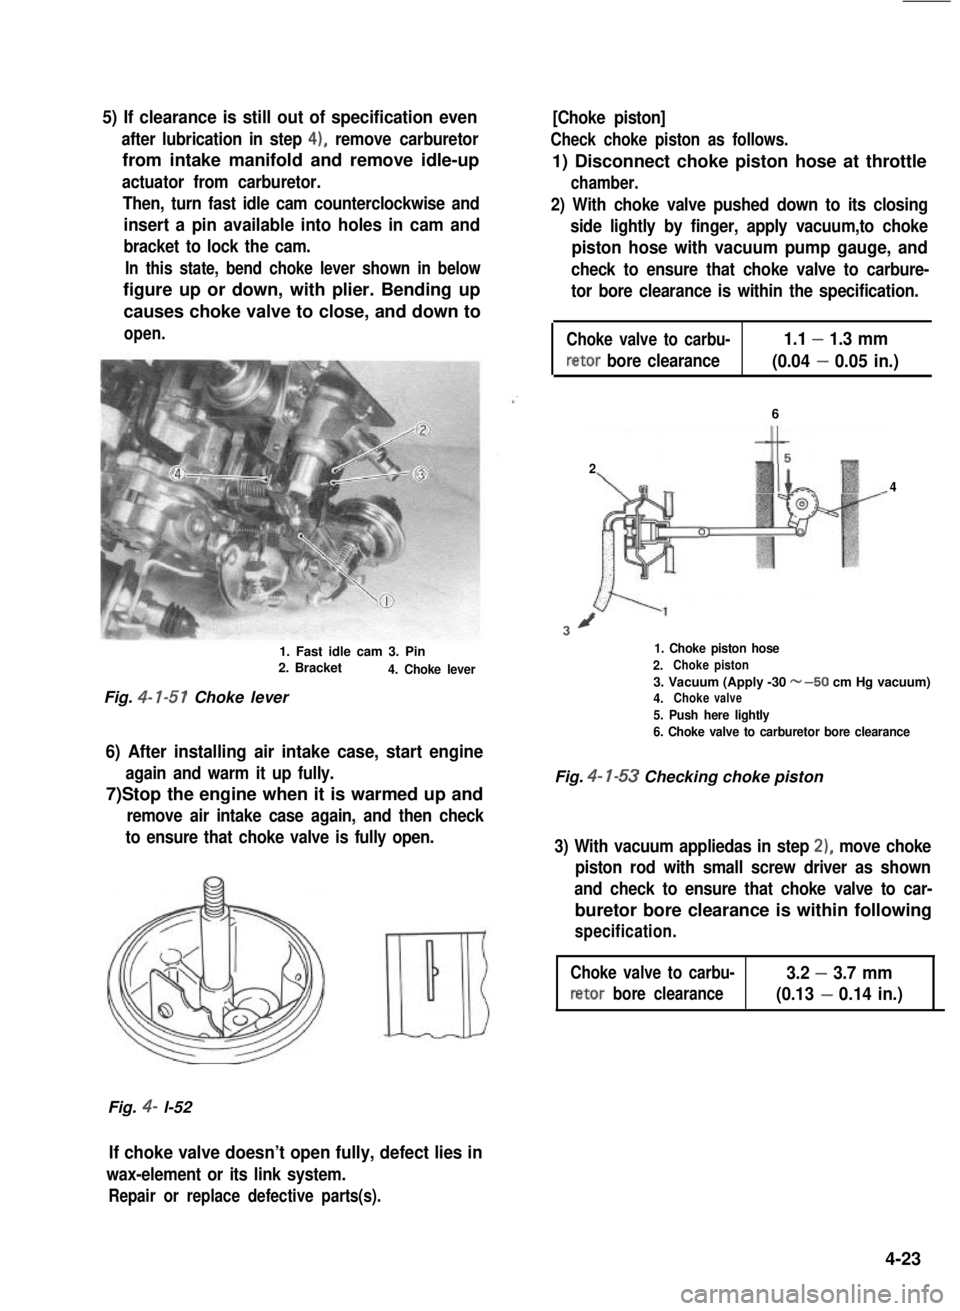
5) If clearance is still out of specification even
after lubrication in step 4), remove carburetor
from intake manifold and remove idle-up
actuator from carburetor.
Then, turn fast idle cam counterclockwise and
insert a pin available into holes in cam and
bracket to lock the cam.
In this state, bend choke lever shown in below
figure up or down, with plier. Bending up
causes choke valve to close, and down to
open.
1. Fast idle cam 3. Pin2. Bracket4. Choke lever
Fig. 4- l-51 Choke lever
6) After installing air intake case, start engine
again and warm it up fully.
7)Stop the engine when it is warmed up and
remove air intake case again, and then check
to ensure that choke valve is fully open.
Fig. 4- l-52
[Choke piston]
Check choke piston as follows.
1) Disconnect choke piston hose at throttle
chamber.
2) With choke valve pushed down to its closing
side lightly by finger, apply vacuum,to choke
piston hose with vacuum pump gauge, and
check to ensure that choke valve to carbure-
tor bore clearance is within the specification.
Choke valve to carbu-1.1 - 1.3 mm
retor bore clearance(0.04 - 0.05 in.)
6
2
4
3/
1. Choke piston hose
2.Chokepiston
3. Vacuum (Apply -30 w-50 cm Hg vacuum)4.Chokevalve
5. Push here lightly
6. Choke valve to carburetor bore clearance
Fig. 4- l-53 Checking choke piston
3) With vacuum appliedas in step 2), move choke
piston rod with small screw driver as shown
and check to ensure that choke valve to car-
buretor bore clearance is within following
specification.
Choke valve to carbu-3.2 - 3.7 mm
retor bore clearance(0.13 - 0.14 in.)
If choke valve doesn’t open fully, defect lies in
wax-element or its link system.
Repair or replace defective parts(s).
4-23
Page 139 of 962
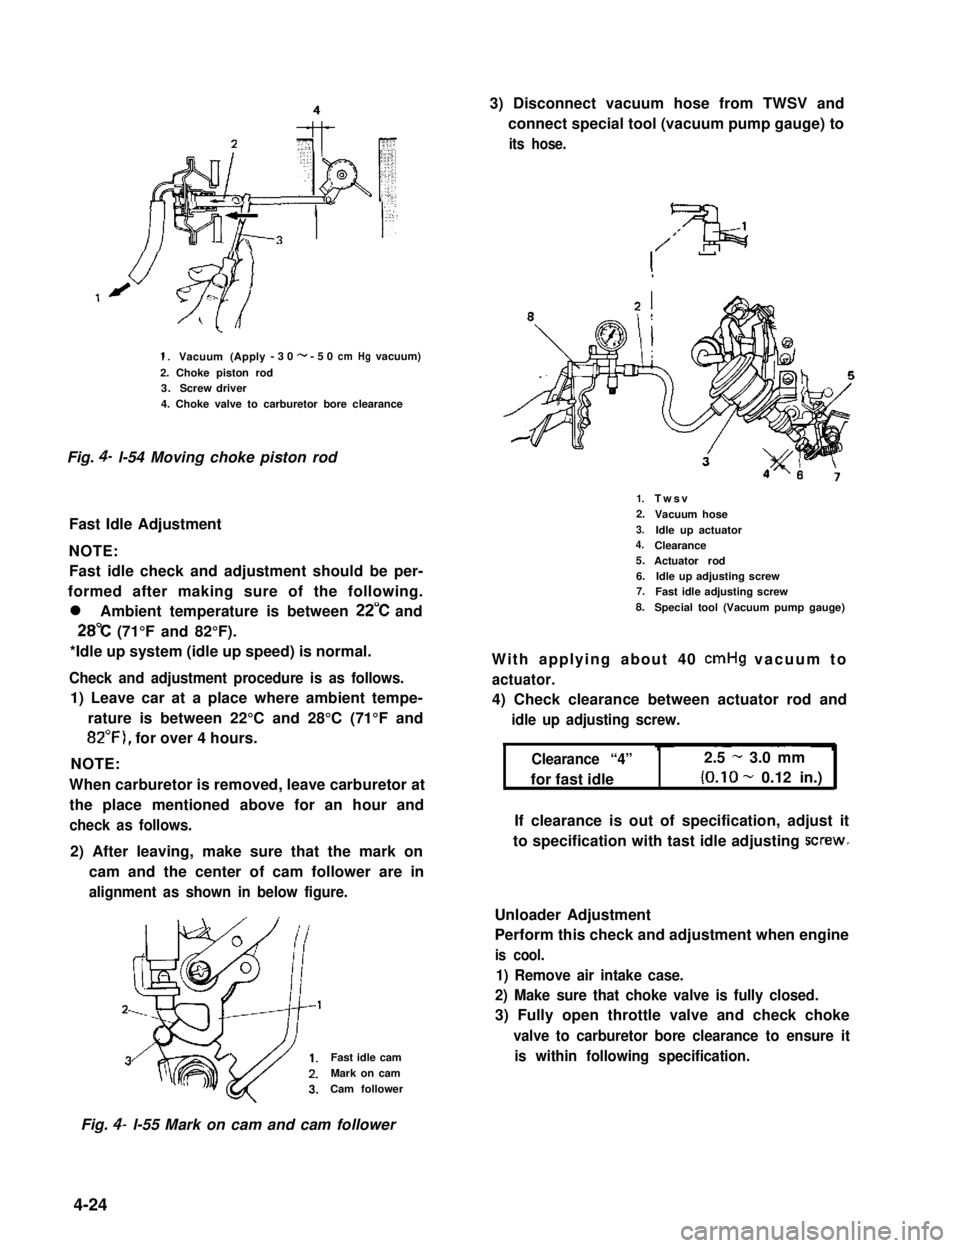
1.Vacuum (Apply-30w-50cmHgvacuum)
2. Choke piston rod3.Screw driver
4. Choke valve to carburetor bore clearance
Fig. 4- l-54 Moving choke piston rod
Fast Idle Adjustment
NOTE:
Fast idle check and adjustment should be per-
formed after making sure of the following.
l Ambient temperature is between 22°C and
28°C (71°F and 82°F).
*Idle up system (idle up speed) is normal.
Check and adjustment procedure is as follows.
1) Leave car at a place where ambient tempe-
rature is between 22°C and 28°C (71°F and
82”F), for over 4 hours.
NOTE:
When carburetor is removed, leave carburetor at
the place mentioned above for an hour and
check as follows.
2) After leaving, make sure that the mark on
cam and the center of cam follower are in
alignment as shown in below figure.
Fast idle cam
Mark on cam
Cam follower
3) Disconnect vacuum hose from TWSV and
connect special tool (vacuum pump gauge) to
its hose.
,
1.2.
3.4.
5.
6.7.
8.
Twsv
Vacuum hose
Idle up actuatorClearanceActuator rodIdle up adjusting screwFast idle adjusting screw
Special tool (Vacuum pump gauge)
With applying about 40 cmHg vacuum to
actuator.
4) Check clearance between actuator rod and
idle up adjusting screw.
Clearance “4”
for fast idle
2.5 - 3.0 mm
(O.lO- 0.12 in.)
If clearance is out of specification, adjust it
to specification with tast idle adjusting screw-
Unloader Adjustment
Perform this check and adjustment when engine
is cool.
1) Remove air intake case.
2) Make sure that choke valve is fully closed.
3) Fully open throttle valve and check choke
valve to carburetor bore clearance to ensure it
is within following specification.
Fig. 4- l-55 Mark on cam and cam follower
4-24
Page 140 of 962

4) If clearance is out of specification, adjust by
bending the unloader arm indicated in belowfigure.
‘
Choke valve to carbu-2.5 - 3.2 mm
retor bore clearance(0.10 - 0.12 in.)
Checking Secondary System
1) Remove air intake case.
2) Disconnect hose @ from 3 way joint, and
connect vacuum pump gauge.
3) Open primary throttly valve fully.
4) Check if secondary throttle valve opens smoothly and is held there when vacuum
(10 cmHg) is applied to actuator.
5) Disconnect hose @ from 3 way joint and
connect vacuum pump gauge to its hose.
Plug hose @ with finger.
. 6) Turn ignition switch to “ON” position and
open primary throttle valve fully. 5 or 6
seconds later, make the .same check as in
above step 4).
1. Unloader arm
2. Fast idle cam
3. Accelerator cable
Fig. 4-
7-57
Unloader lever arm
Checking Acceleration Pump
1) Remove air intake case.
2) Make sure that fuel comes out of pump
discharge nozzle when accelerator pedal is
depressed.
Fig. 4- l-59 2. Hose
4. vsv
If check result in step 4) is not satisfactory,
check VTV, and if that in step 6) is not satis-
factory, check VSV.
If not satisfactory in either step 4) or 6) and both
VTV and VSV are in good condition, replace
actuator.
[VTV (Vacuum Transmitting Valve)]
Remove VTV. Use a vacuum pump gauge for
VTV check. If pointer of vacuum pump gauge reacts as described below in each condition,
VTV is in good condition.
1
I, Pump discharge nozzle
2. Choke,valve
Fig. 4- 1-58 Pump discharge nozzle With vacuum pump gauge set at Brown side of
VTV, when pump is operated, pointer doesn’t
move (remains at zero position).
4- 25