SUZUKI GRAND VITARA 1999 2.G Owners Manual
Manufacturer: SUZUKI, Model Year: 1999, Model line: GRAND VITARA, Model: SUZUKI GRAND VITARA 1999 2.GPages: 656, PDF Size: 14.31 MB
Page 531 of 656
8E-10 CRUISE CONTROL SYSTEM
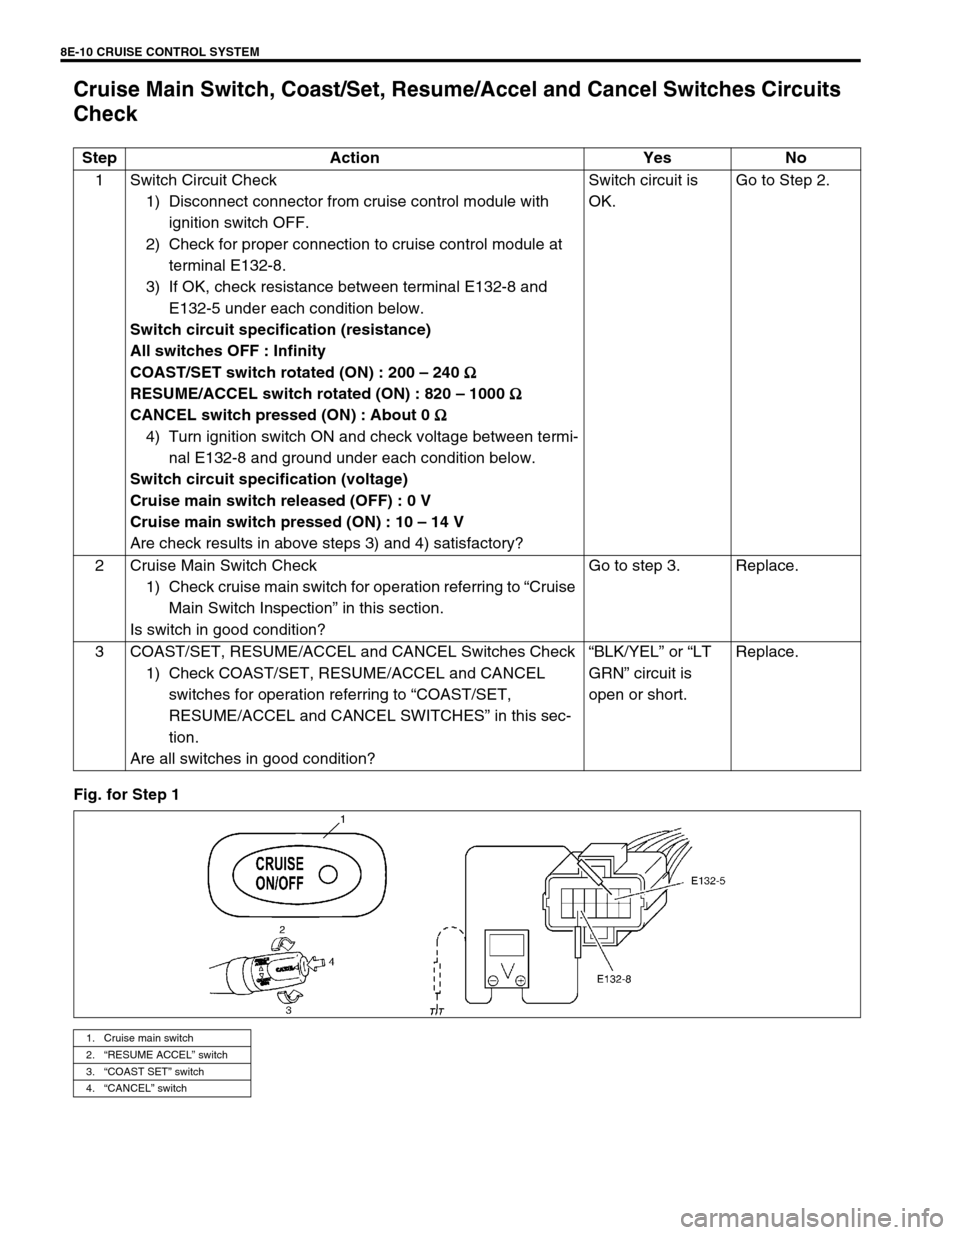
Cruise Main Switch, Coast/Set, Resume/Accel and Cancel Switches Circuits
Check
Fig. for Step 1Step Action Yes No
1 Switch Circuit Check
1) Disconnect connector from cruise control module with
ignition switch OFF.
2) Check for proper connection to cruise control module at
terminal E132-8.
3) If OK, check resistance between terminal E132-8 and
E132-5 under each condition below.
Switch circuit specification (resistance)
All switches OFF : Infinity
COAST/SET switch rotated (ON) : 200 – 240 Ω
ΩΩ Ω
RESUME/ACCEL switch rotated (ON) : 820 – 1000 Ω
ΩΩ Ω
CANCEL switch pressed (ON) : About 0 Ω
ΩΩ Ω
4) Turn ignition switch ON and check voltage between termi-
nal E132-8 and ground under each condition below.
Switch circuit specification (voltage)
Cruise main switch released (OFF) : 0 V
Cruise main switch pressed (ON) : 10 – 14 V
Are check results in above steps 3) and 4) satisfactory?Switch circuit is
OK.Go to Step 2.
2 Cruise Main Switch Check
1) Check cruise main switch for operation referring to “Cruise
Main Switch Inspection” in this section.
Is switch in good condition?Go to step 3. Replace.
3 COAST/SET, RESUME/ACCEL and CANCEL Switches Check
1) Check COAST/SET, RESUME/ACCEL and CANCEL
switches for operation referring to “COAST/SET,
RESUME/ACCEL and CANCEL SWITCHES” in this sec-
tion.
Are all switches in good condition?“BLK/YEL” or “LT
GRN” circuit is
open or short.Replace.
1. Cruise main switch
2.“RESUME ACCEL” switch
3.“COAST SET” switch
4.“CANCEL” switch
Page 532 of 656
CRUISE CONTROL SYSTEM 8E-11
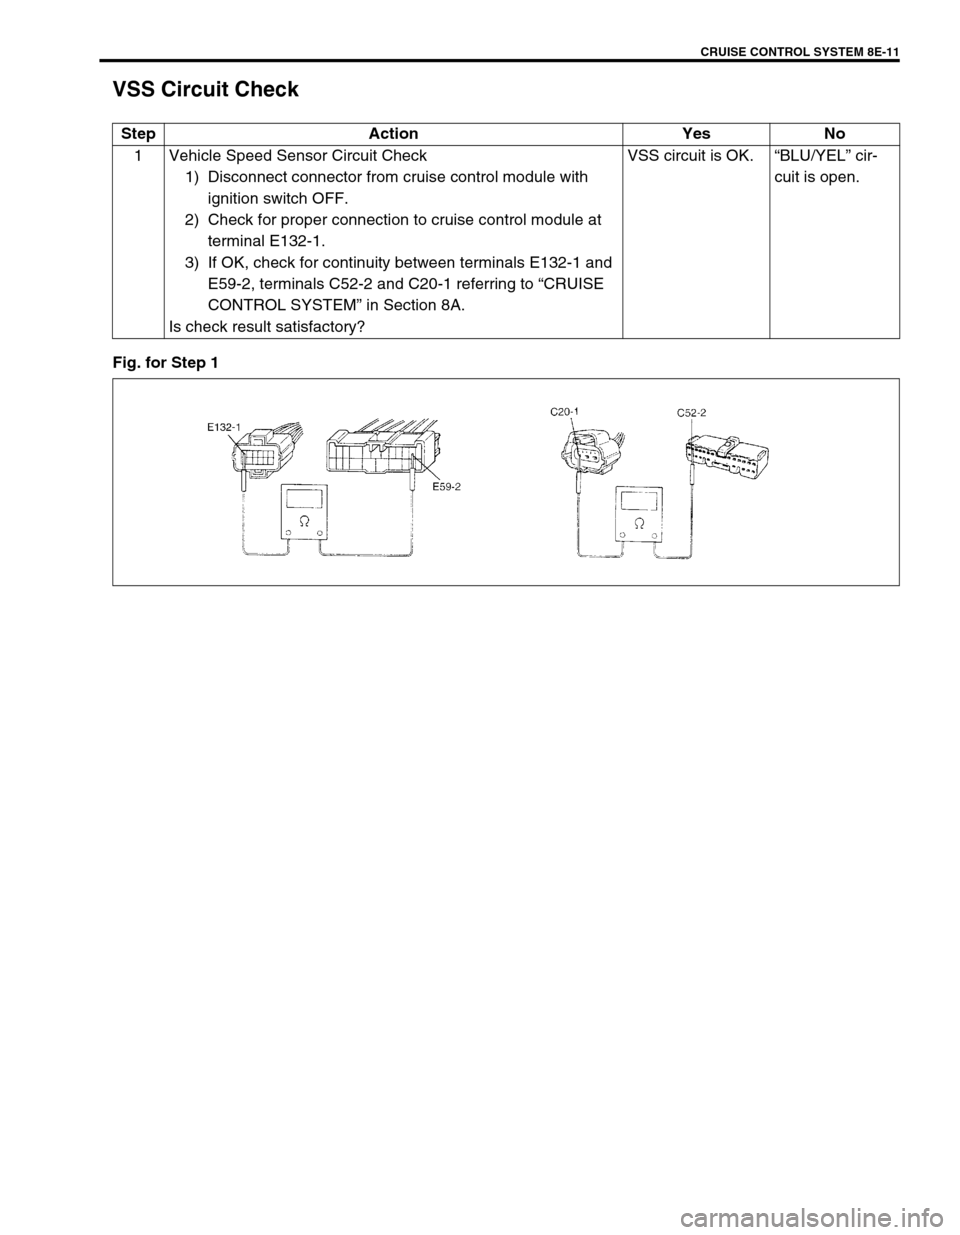
VSS Circuit Check
Fig. for Step 1Step Action Yes No
1 Vehicle Speed Sensor Circuit Check
1) Disconnect connector from cruise control module with
ignition switch OFF.
2) Check for proper connection to cruise control module at
terminal E132-1.
3) If OK, check for continuity between terminals E132-1 and
E59-2, terminals C52-2 and C20-1 referring to “CRUISE
CONTROL SYSTEM” in Section 8A.
Is check result satisfactory?VSS circuit is OK.“BLU/YEL” cir-
cuit is open.
Page 533 of 656
8E-12 CRUISE CONTROL SYSTEM
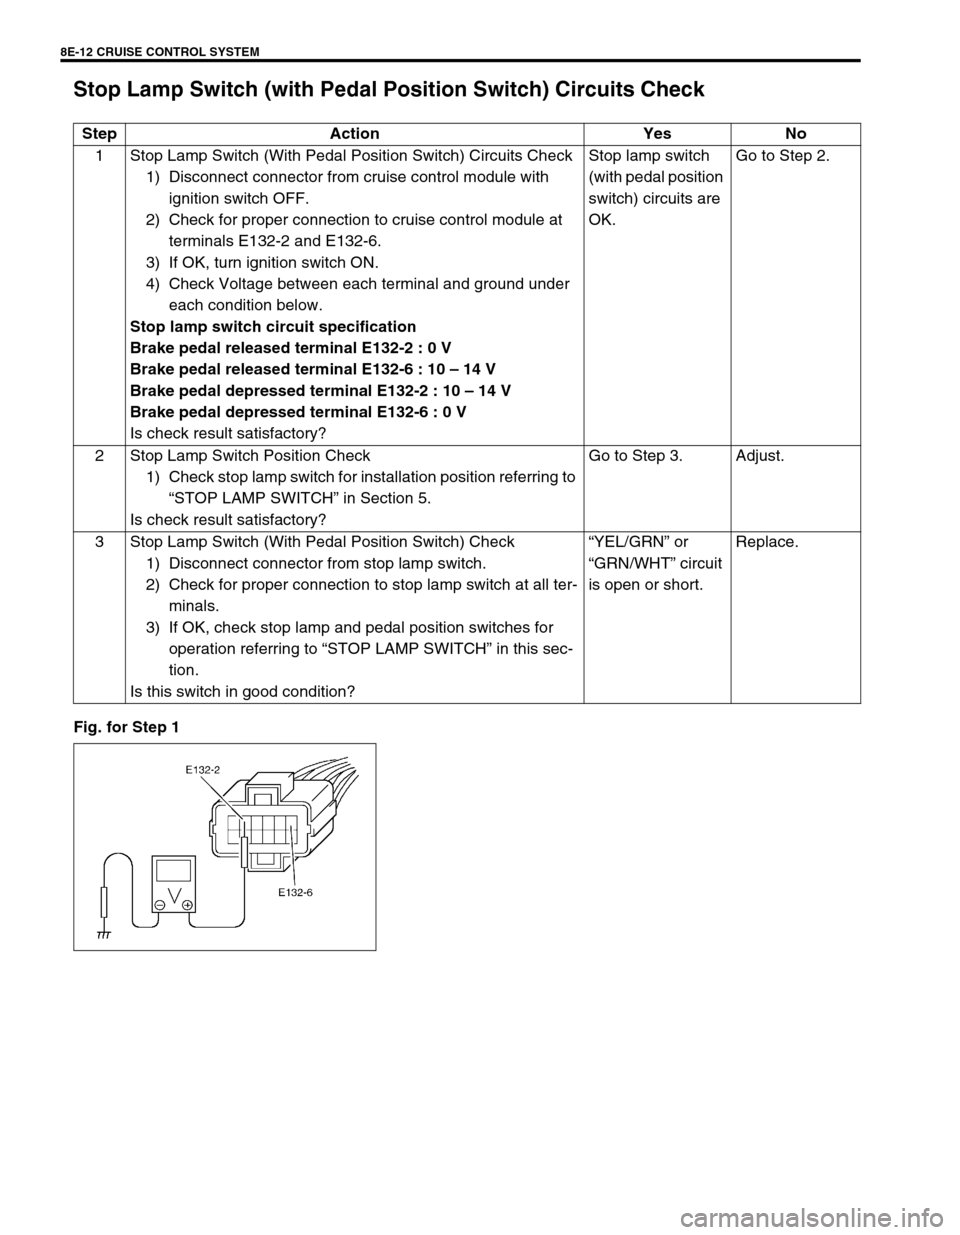
Stop Lamp Switch (with Pedal Position Switch) Circuits Check
Fig. for Step 1Step Action Yes No
1 Stop Lamp Switch (With Pedal Position Switch) Circuits Check
1) Disconnect connector from cruise control module with
ignition switch OFF.
2) Check for proper connection to cruise control module at
terminals E132-2 and E132-6.
3) If OK, turn ignition switch ON.
4) Check Voltage between each terminal and ground under
each condition below.
Stop lamp switch circuit specification
Brake pedal released terminal E132-2 : 0 V
Brake pedal released terminal E132-6 : 10 – 14 V
Brake pedal depressed terminal E132-2 : 10 – 14 V
Brake pedal depressed terminal E132-6 : 0 V
Is check result satisfactory?Stop lamp switch
(with pedal position
switch) circuits are
OK.Go to Step 2.
2 Stop Lamp Switch Position Check
1) Check stop lamp switch for installation position referring to
“STOP LAMP SWITCH” in Section 5.
Is check result satisfactory?Go to Step 3. Adjust.
3 Stop Lamp Switch (With Pedal Position Switch) Check
1) Disconnect connector from stop lamp switch.
2) Check for proper connection to stop lamp switch at all ter-
minals.
3) If OK, check stop lamp and pedal position switches for
operation referring to “STOP LAMP SWITCH” in this sec-
tion.
Is this switch in good condition?“YEL/GRN” or
“GRN/WHT” circuit
is open or short.Replace.
Page 534 of 656
CRUISE CONTROL SYSTEM 8E-13
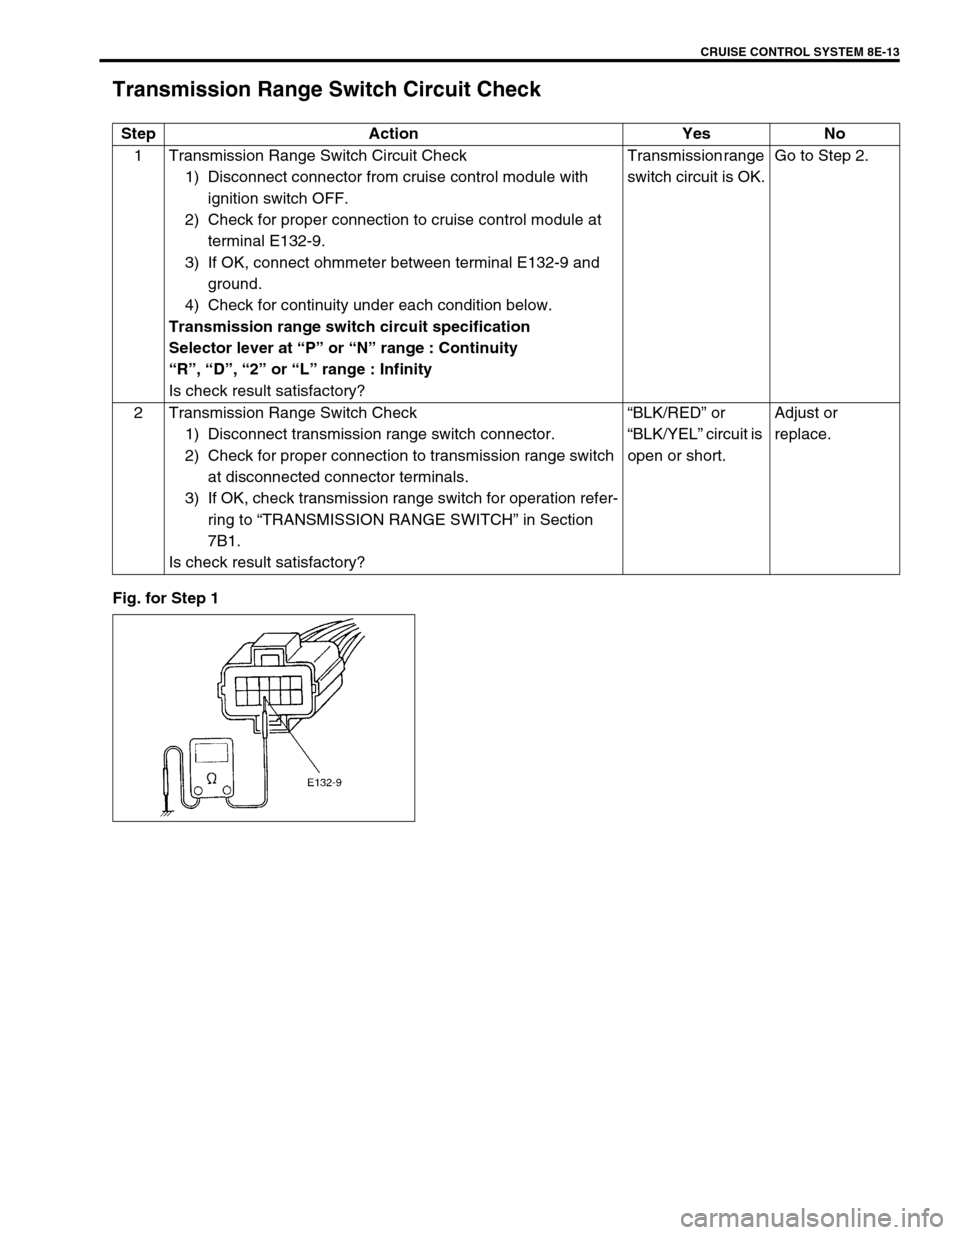
Transmission Range Switch Circuit Check
Fig. for Step 1Step Action Yes No
1 Transmission Range Switch Circuit Check
1) Disconnect connector from cruise control module with
ignition switch OFF.
2) Check for proper connection to cruise control module at
terminal E132-9.
3) If OK, connect ohmmeter between terminal E132-9 and
ground.
4) Check for continuity under each condition below.
Transmission range switch circuit specification
Selector lever at “P” or “N” range : Continuity
“R”, “D”, “2” or “L” range : Infinity
Is check result satisfactory?Transmission range
switch circuit is OK.Go to Step 2.
2 Transmission Range Switch Check
1) Disconnect transmission range switch connector.
2) Check for proper connection to transmission range switch
at disconnected connector terminals.
3) If OK, check transmission range switch for operation refer-
ring to “TRANSMISSION RANGE SWITCH” in Section
7B1.
Is check result satisfactory?“BLK/RED” or
“BLK/YEL” circuit is
open or short.Adjust or
replace.
Page 535 of 656
8E-14 CRUISE CONTROL SYSTEM
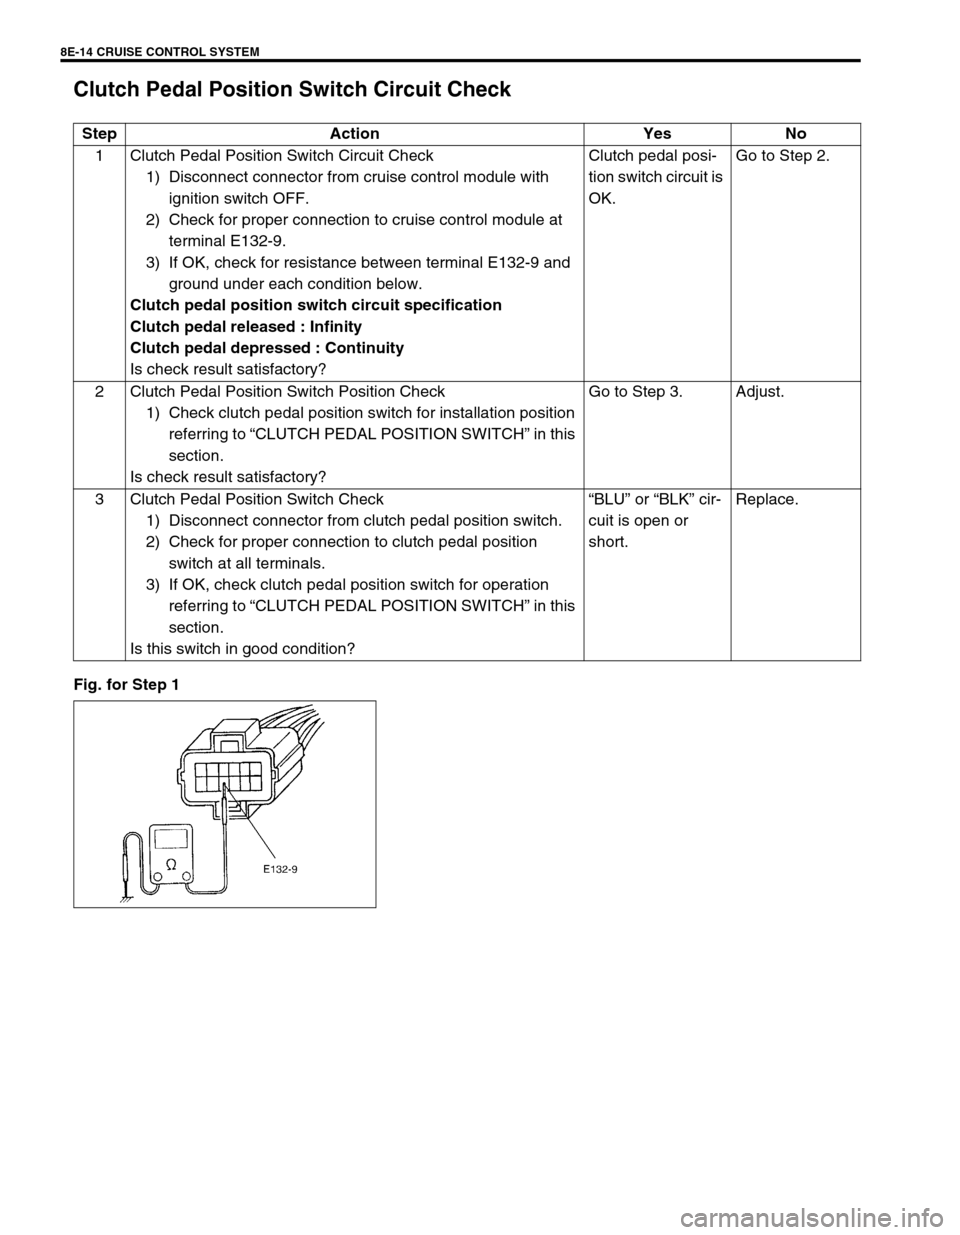
Clutch Pedal Position Switch Circuit Check
Fig. for Step 1Step Action Yes No
1 Clutch Pedal Position Switch Circuit Check
1) Disconnect connector from cruise control module with
ignition switch OFF.
2) Check for proper connection to cruise control module at
terminal E132-9.
3) If OK, check for resistance between terminal E132-9 and
ground under each condition below.
Clutch pedal position switch circuit specification
Clutch pedal released : Infinity
Clutch pedal depressed : Continuity
Is check result satisfactory?Clutch pedal posi-
tion switch circuit is
OK.Go to Step 2.
2 Clutch Pedal Position Switch Position Check
1) Check clutch pedal position switch for installation position
referring to “CLUTCH PEDAL POSITION SWITCH” in this
section.
Is check result satisfactory?Go to Step 3. Adjust.
3 Clutch Pedal Position Switch Check
1) Disconnect connector from clutch pedal position switch.
2) Check for proper connection to clutch pedal position
switch at all terminals.
3) If OK, check clutch pedal position switch for operation
referring to “CLUTCH PEDAL POSITION SWITCH” in this
section.
Is this switch in good condition?“BLU” or “BLK” cir-
cuit is open or
short.Replace.
Page 536 of 656
CRUISE CONTROL SYSTEM 8E-15
Throttle Valve Opening Signal Circuit Check
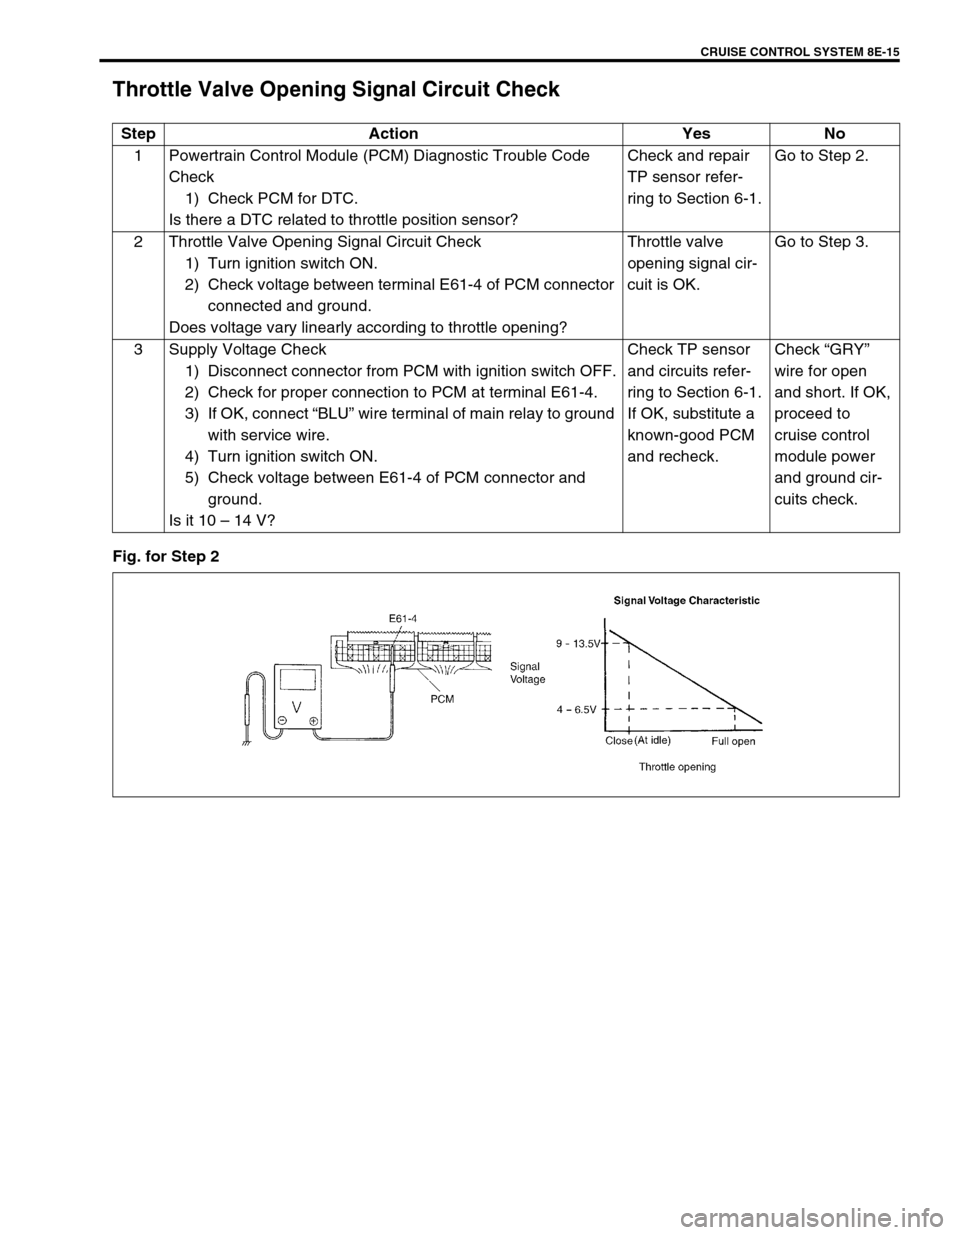
Fig. for Step 2Step Action Yes No
1 Powertrain Control Module (PCM) Diagnostic Trouble Code
Check
1) Check PCM for DTC.
Is there a DTC related to throttle position sensor?Check and repair
TP sensor refer-
ring to Section 6-1.Go to Step 2.
2 Throttle Valve Opening Signal Circuit Check
1) Turn ignition switch ON.
2) Check voltage between terminal E61-4 of PCM connector
connected and ground.
Does voltage vary linearly according to throttle opening?Throttle valve
opening signal cir-
cuit is OK.Go to Step 3.
3 Supply Voltage Check
1) Disconnect connector from PCM with ignition switch OFF.
2) Check for proper connection to PCM at terminal E61-4.
3) If OK, connect “BLU” wire terminal of main relay to ground
with service wire.
4) Turn ignition switch ON.
5) Check voltage between E61-4 of PCM connector and
ground.
Is it 10 – 14 V?Check TP sensor
and circuits refer-
ring to Section 6-1.
If OK, substitute a
known-good PCM
and recheck.Check “GRY”
wire for open
and short. If OK,
proceed to
cruise control
module power
and ground cir-
cuits check.
Page 537 of 656
8E-16 CRUISE CONTROL SYSTEM
Overdrive and TCC off Command Signal Circuit Check
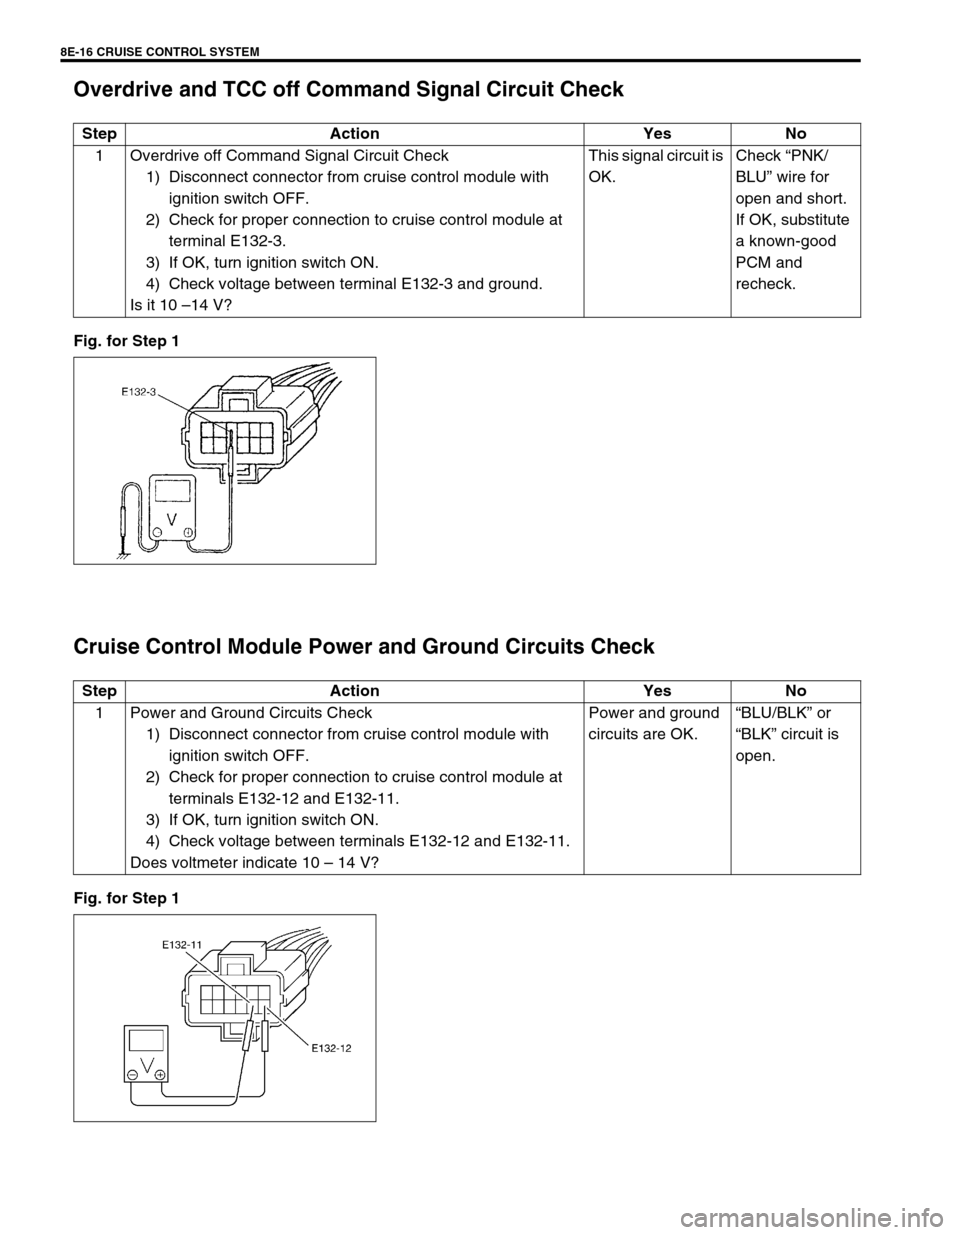
Fig. for Step 1
Cruise Control Module Power and Ground Circuits Check
Fig. for Step 1Step Action Yes No
1 Overdrive off Command Signal Circuit Check
1) Disconnect connector from cruise control module with
ignition switch OFF.
2) Check for proper connection to cruise control module at
terminal E132-3.
3) If OK, turn ignition switch ON.
4) Check voltage between terminal E132-3 and ground.
Is it 10 –14 V?This signal circuit is
OK.Check “PNK/
BLU” wire for
open and short.
If OK, substitute
a known-good
PCM and
recheck.
Step Action Yes No
1 Power and Ground Circuits Check
1) Disconnect connector from cruise control module with
ignition switch OFF.
2) Check for proper connection to cruise control module at
terminals E132-12 and E132-11.
3) If OK, turn ignition switch ON.
4) Check voltage between terminals E132-12 and E132-11.
Does voltmeter indicate 10 – 14 V?Power and ground
circuits are OK.“BLU/BLK” or
“BLK” circuit is
open.
Page 538 of 656
CRUISE CONTROL SYSTEM 8E-17
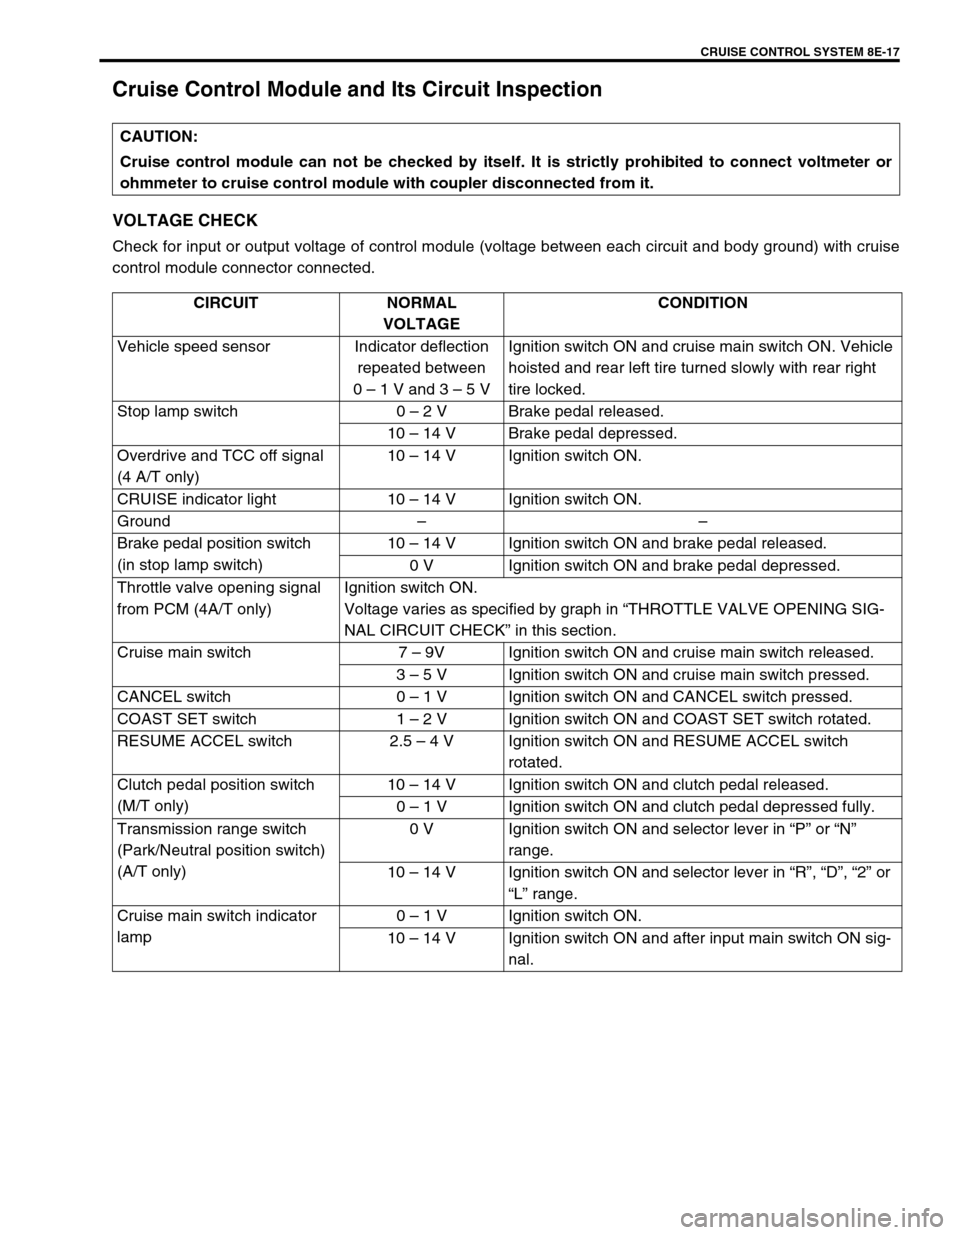
Cruise Control Module and Its Circuit Inspection
VOLTAGE CHECK
Check for input or output voltage of control module (voltage between each circuit and body ground) with cruise
control module connector connected.CAUTION:
Cruise control module can not be checked by itself. It is strictly prohibited to connect voltmeter or
ohmmeter to cruise control module with coupler disconnected from it.
CIRCUIT NORMAL
VOLTAGECONDITION
Vehicle speed sensor Indicator deflection
repeated between
0 – 1 V and 3 – 5 VIgnition switch ON and cruise main switch ON. Vehicle
hoisted and rear left tire turned slowly with rear right
tire locked.
Stop lamp switch 0 – 2 V Brake pedal released.
10 – 14 V Brake pedal depressed.
Overdrive and TCC off signal
(4 A/T only) 10 – 14 V Ignition switch ON.
CRUISE indicator light 10 – 14 V Ignition switch ON.
Ground––
Brake pedal position switch
(in stop lamp switch) 10 – 14 V Ignition switch ON and brake pedal released.
0 V Ignition switch ON and brake pedal depressed.
Throttle valve opening signal
from PCM (4A/T only)Ignition switch ON.
Voltage varies as specified by graph in “THROTTLE VALVE OPENING SIG-
NAL CIRCUIT CHECK” in this section.
Cruise main switch 7 – 9V Ignition switch ON and cruise main switch released.
3 – 5 V Ignition switch ON and cruise main switch pressed.
CANCEL switch 0 – 1 V Ignition switch ON and CANCEL switch pressed.
COAST SET switch 1 – 2 V Ignition switch ON and COAST SET switch rotated.
RESUME ACCEL switch 2.5 – 4 V Ignition switch ON and RESUME ACCEL switch
rotated.
Clutch pedal position switch
(M/T only)10 – 14 V Ignition switch ON and clutch pedal released.
0 – 1 V Ignition switch ON and clutch pedal depressed fully.
Transmission range switch
(Park/Neutral position switch)
(A/T only)0 V Ignition switch ON and selector lever in “P” or “N”
range.
10 – 14 V Ignition switch ON and selector lever in “R”, “D”, “2” or
“L” range.
Cruise main switch indicator
lamp0 – 1 V Ignition switch ON.
10 – 14 V Ignition switch ON and after input main switch ON sig-
nal.
Page 539 of 656
8E-18 CRUISE CONTROL SYSTEM
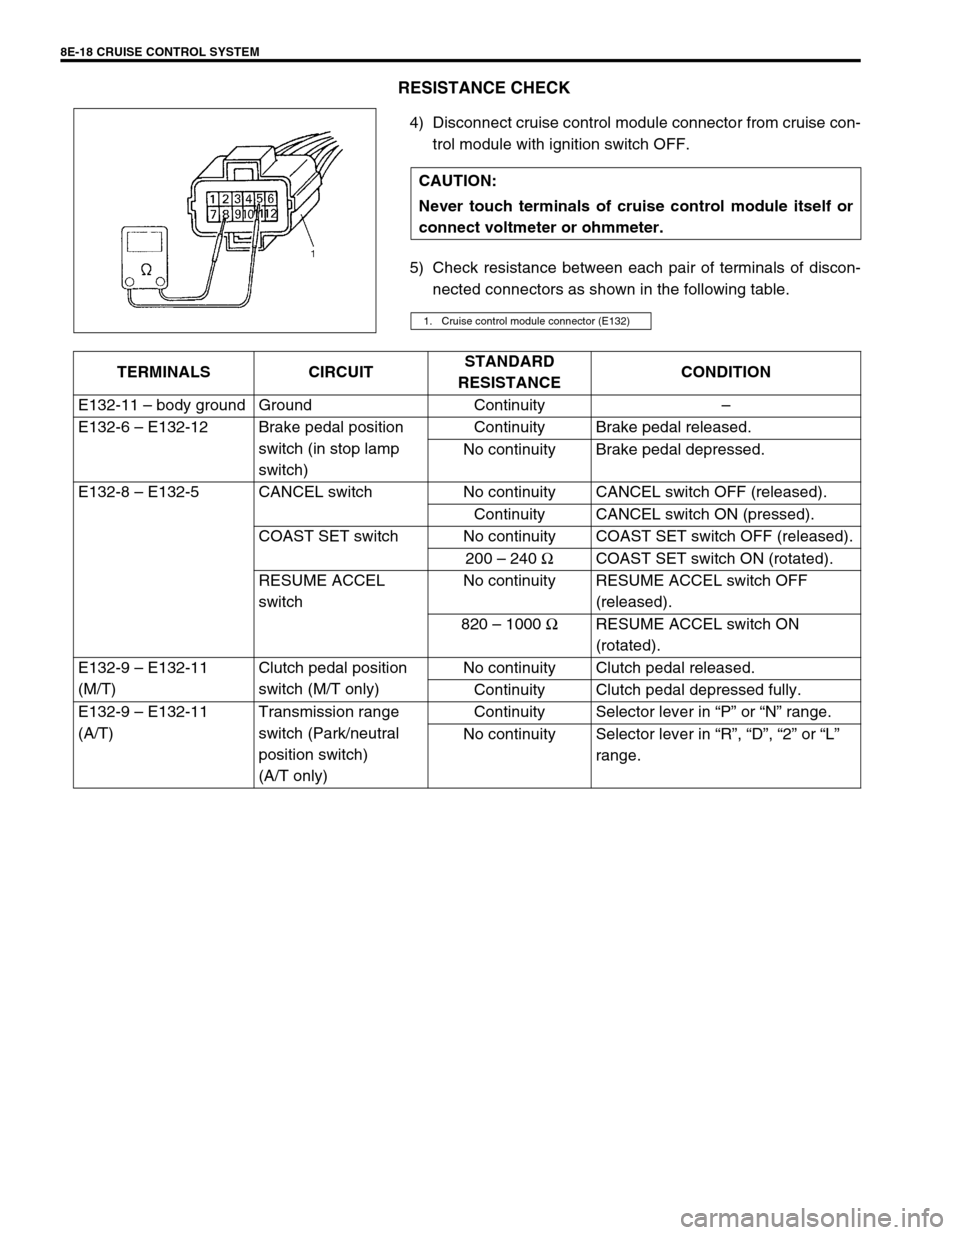
RESISTANCE CHECK
4) Disconnect cruise control module connector from cruise con-
trol module with ignition switch OFF.
5) Check resistance between each pair of terminals of discon-
nected connectors as shown in the following table. CAUTION:
Never touch terminals of cruise control module itself or
connect voltmeter or ohmmeter.
1. Cruise control module connector (E132)
TERMINALS CIRCUITSTANDARD
RESISTANCECONDITION
E132-11 – body ground Ground Continuity–
E132-6 – E132-12 Brake pedal position
switch (in stop lamp
switch)Continuity Brake pedal released.
No continuity Brake pedal depressed.
E132-8 – E132-5 CANCEL switch No continuity CANCEL switch OFF (released).
Continuity CANCEL switch ON (pressed).
COAST SET switch No continuity COAST SET switch OFF (released).
200 – 240 ΩCOAST SET switch ON (rotated).
RESUME ACCEL
switchNo continuity RESUME ACCEL switch OFF
(released).
820 – 1000 ΩRESUME ACCEL switch ON
(rotated).
E132-9 – E132-11
(M/T)Clutch pedal position
switch (M/T only)No continuity Clutch pedal released.
Continuity Clutch pedal depressed fully.
E132-9 – E132-11
(A/T)Transmission range
switch (Park/neutral
position switch)
(A/T only)Continuity Selector lever in “P” or “N” range.
No continuity Selector lever in “R”, “D”, “2” or “L”
range.
Page 540 of 656
CRUISE CONTROL SYSTEM 8E-19
Cruise Cable Play Inspection and Adjustment
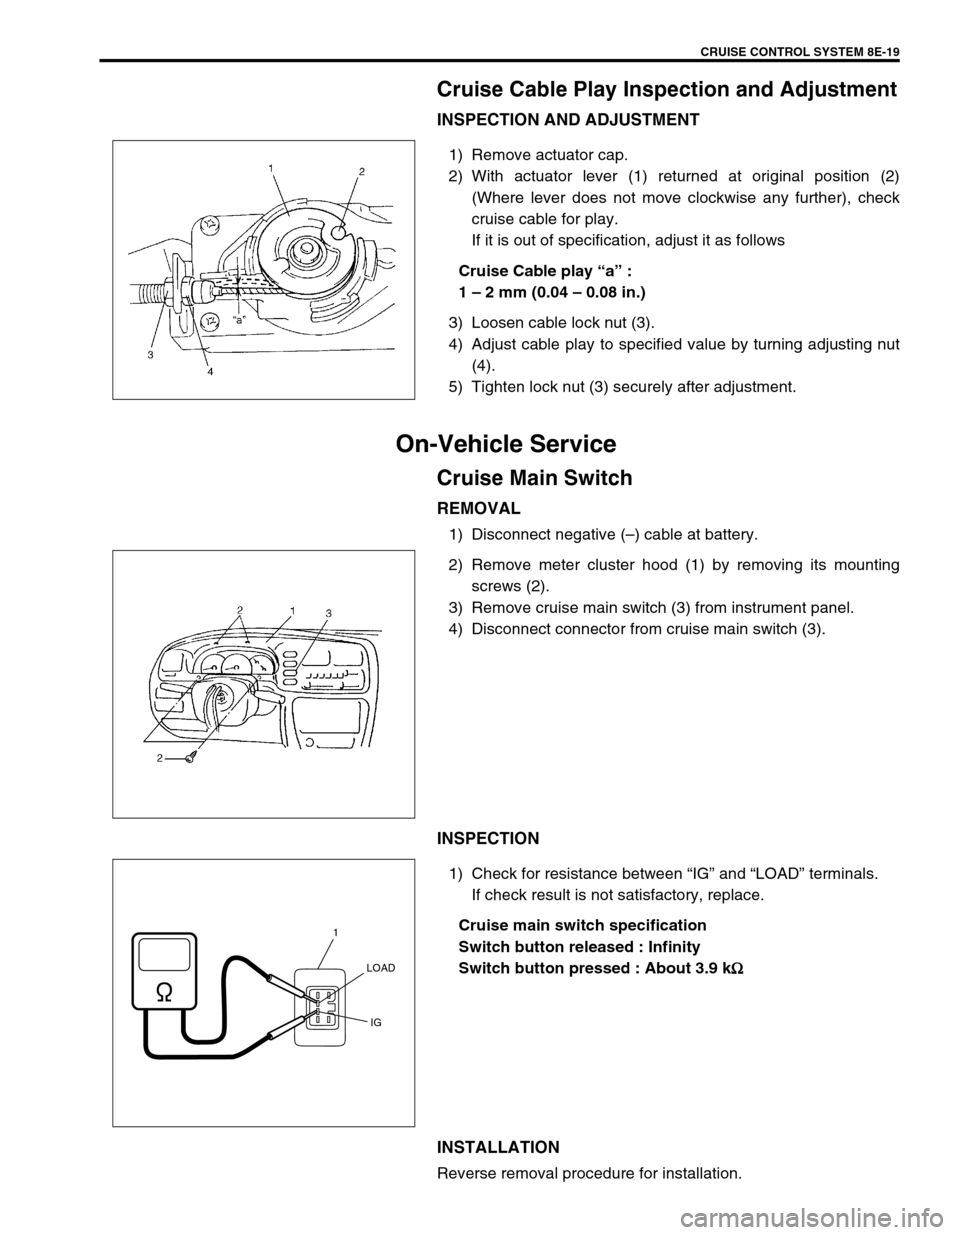
INSPECTION AND ADJUSTMENT
1) Remove actuator cap.
2) With actuator lever (1) returned at original position (2)
(Where lever does not move clockwise any further), check
cruise cable for play.
If it is out of specification, adjust it as follows
Cruise Cable play “a” :
1 – 2 mm (0.04 – 0.08 in.)
3) Loosen cable lock nut (3).
4) Adjust cable play to specified value by turning adjusting nut
(4).
5) Tighten lock nut (3) securely after adjustment.
On-Vehicle Service
Cruise Main Switch
REMOVAL
1) Disconnect negative (–) cable at battery.
2) Remove meter cluster hood (1) by removing its mounting
screws (2).
3) Remove cruise main switch (3) from instrument panel.
4) Disconnect connector from cruise main switch (3).
INSPECTION
1) Check for resistance between “IG” and “LOAD” terminals.
If check result is not satisfactory, replace.
Cruise main switch specification
Switch button released : Infinity
Switch button pressed : About 3.9 kΩ
ΩΩ Ω
INSTALLATION
Reverse removal procedure for installation.
1
LOAD
IG