SUZUKI GRAND VITARA 1999 2.G Owners Manual
GRAND VITARA 1999 2.G
SUZUKI
SUZUKI
https://www.carmanualsonline.info/img/20/7583/w960_7583-0.png
SUZUKI GRAND VITARA 1999 2.G Owners Manual
Trending: tilt, service, change wheel, steering wheel, fluid, sensor, valve cover
Page 551 of 656
9-6 BODY SERVICE
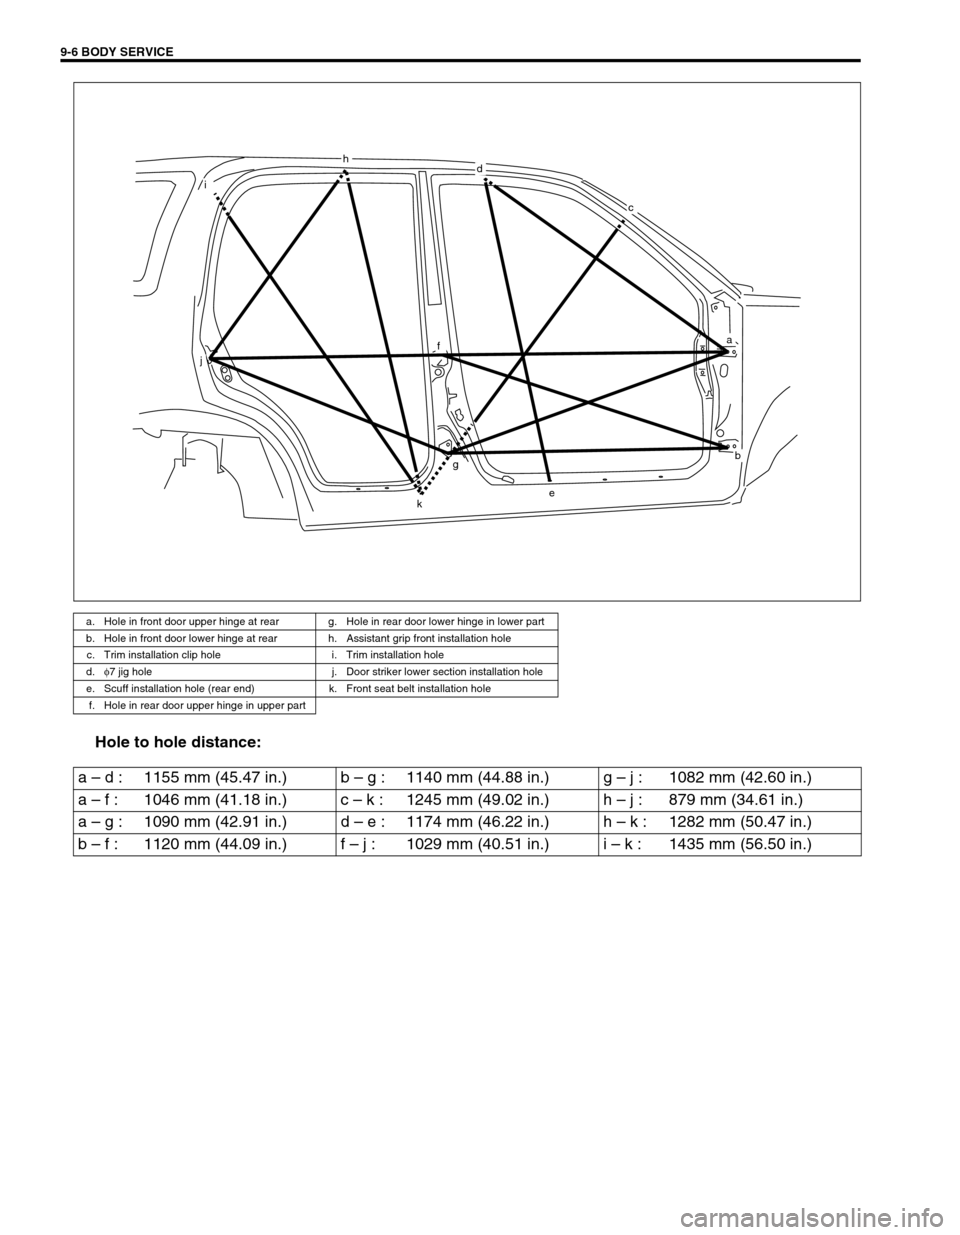
Hole to hole distance:
a. Hole in front door upper hinge at rear g. Hole in rear door lower hinge in lower part
b. Hole in front door lower hinge at rear h. Assistant grip front installation hole
c. Trim installation clip hole i. Trim installation hole
d.φ
7 jig hole j. Door striker lower section installation hole
e. Scuff installation hole (rear end) k. Front seat belt installation hole
f. Hole in rear door upper hinge in upper part
hd
c
f
i
j
ke
gb
a
a – d : 1155 mm (45.47 in.) b – g : 1140 mm (44.88 in.) g – j : 1082 mm (42.60 in.)
a – f : 1046 mm (41.18 in.) c – k : 1245 mm (49.02 in.) h – j : 879 mm (34.61 in.)
a – g : 1090 mm (42.91 in.) d – e : 1174 mm (46.22 in.) h – k : 1282 mm (50.47 in.)
b – f : 1120 mm (44.09 in.) f – j : 1029 mm (40.51 in.) i – k : 1435 mm (56.50 in.)
Page 552 of 656
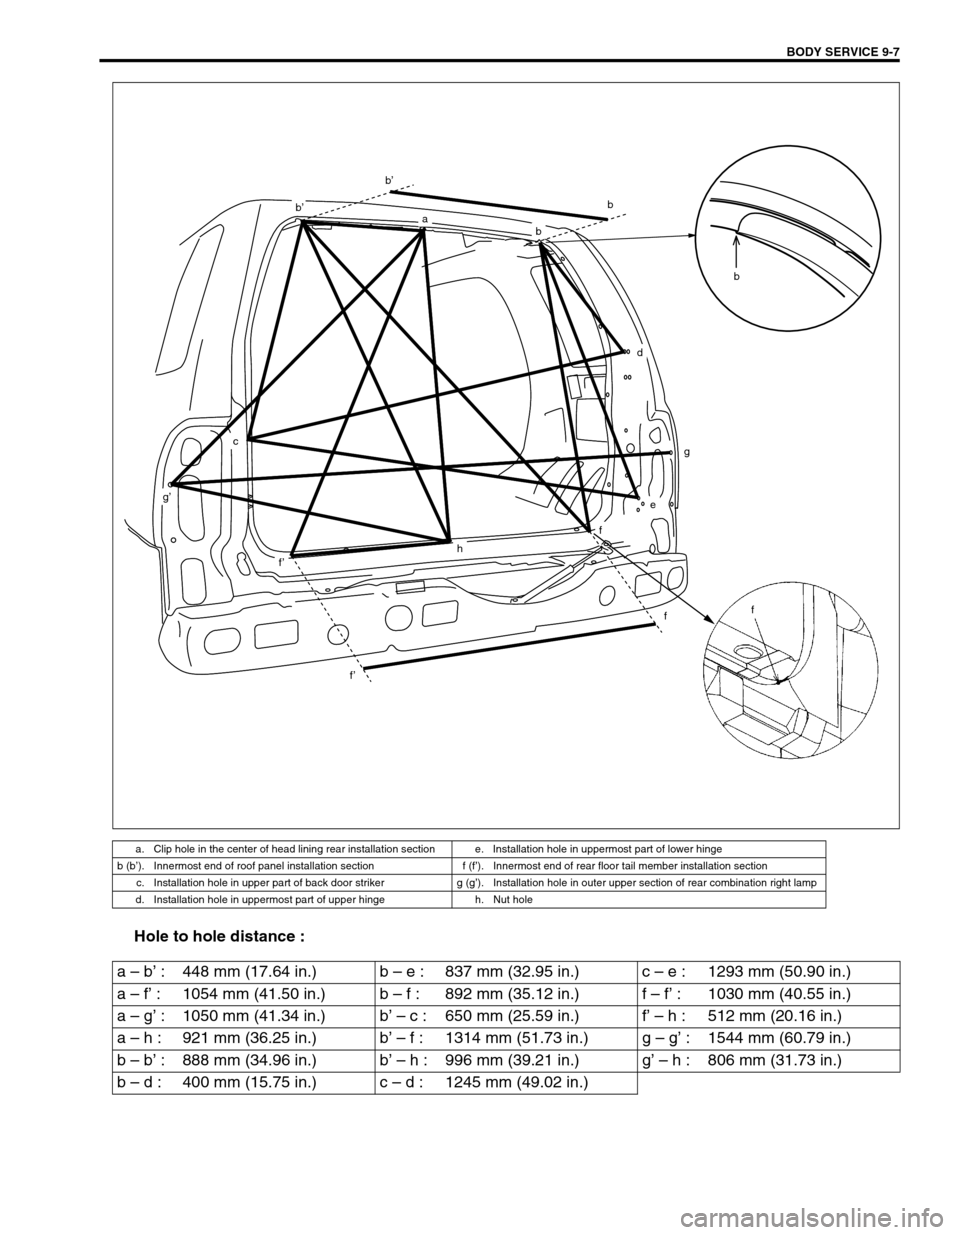
BODY SERVICE 9-7
Hole to hole distance :
a. Clip hole in the center of head lining rear installation section e. Installation hole in uppermost part of lower hinge
b (b’). Innermost end of roof panel installation section f (f’). Innermost end of rear floor tail member installation section
c. Installation hole in upper part of back door striker g (g’). Installation hole in outer upper section of rear combination right lamp
d. Installation hole in uppermost part of upper hinge h. Nut hole
b
ba
b’
b’
c
g’
f’
f’
h
f
f
e
g
d
f
b
a – b’ : 448 mm (17.64 in.) b – e : 837 mm (32.95 in.) c – e : 1293 mm (50.90 in.)
a – f’ : 1054 mm (41.50 in.) b – f : 892 mm (35.12 in.) f – f’ : 1030 mm (40.55 in.)
a – g’ : 1050 mm (41.34 in.) b’ – c : 650 mm (25.59 in.) f’ – h : 512 mm (20.16 in.)
a – h : 921 mm (36.25 in.) b’ – f : 1314 mm (51.73 in.) g – g’ : 1544 mm (60.79 in.)
b – b’ : 888 mm (34.96 in.) b’ – h : 996 mm (39.21 in.) g’ – h : 806 mm (31.73 in.)
b – d : 400 mm (15.75 in.) c – d : 1245 mm (49.02 in.)
Page 553 of 656
9-8 BODY SERVICE
Seat
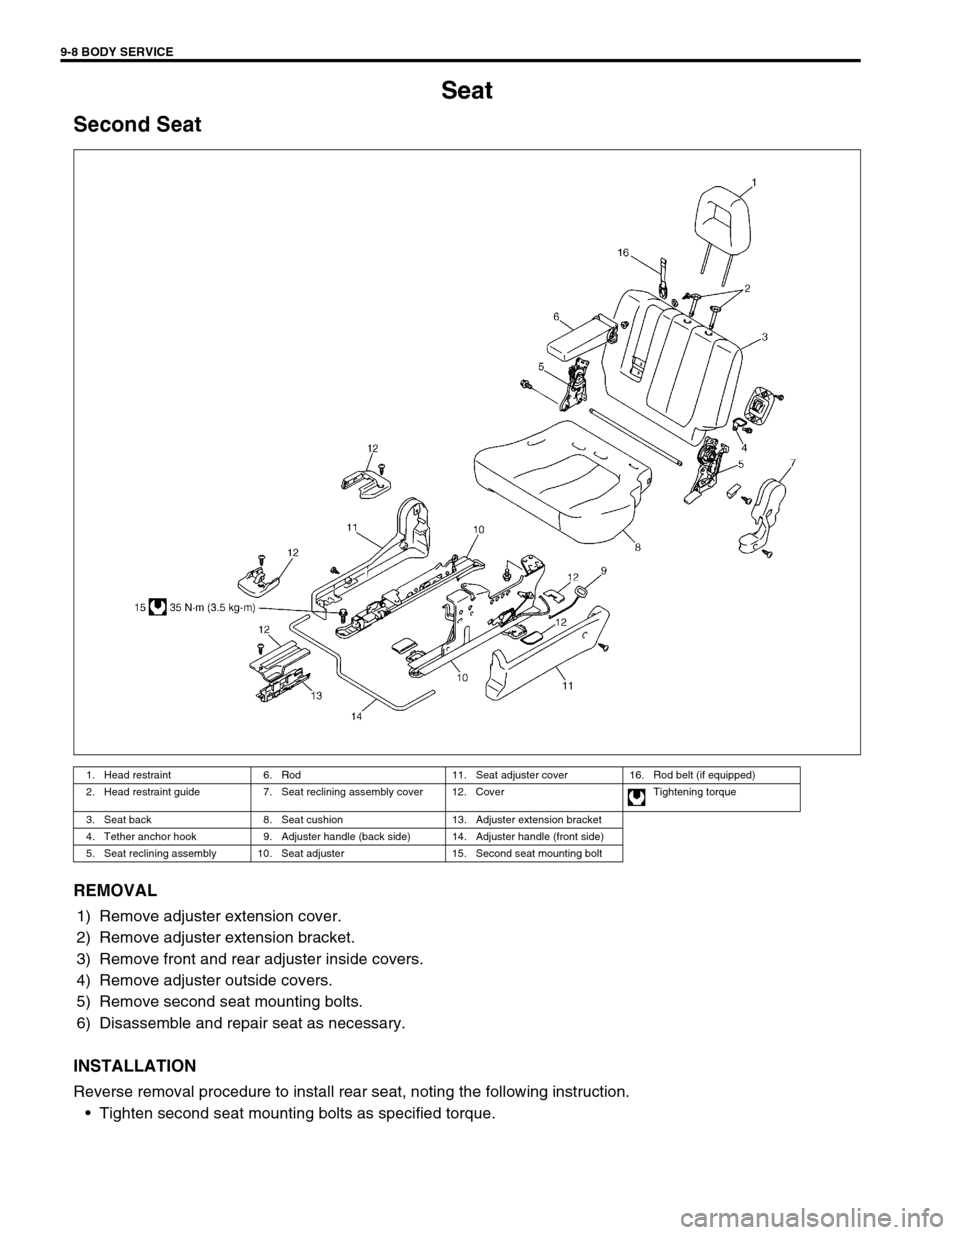
Second Seat
REMOVAL
1) Remove adjuster extension cover.
2) Remove adjuster extension bracket.
3) Remove front and rear adjuster inside covers.
4) Remove adjuster outside covers.
5) Remove second seat mounting bolts.
6) Disassemble and repair seat as necessary.
INSTALLATION
Reverse removal procedure to install rear seat, noting the following instruction.
•Tighten second seat mounting bolts as specified torque.
1. Head restraint 6. Rod 11. Seat adjuster cover 16. Rod belt (if equipped)
2. Head restraint guide 7. Seat reclining assembly cover 12. Cover Tightening torque
3. Seat back 8. Seat cushion 13. Adjuster extension bracket
4. Tether anchor hook 9. Adjuster handle (back side) 14. Adjuster handle (front side)
5. Seat reclining assembly 10. Seat adjuster 15. Second seat mounting bolt
Page 554 of 656
BODY SERVICE 9-9
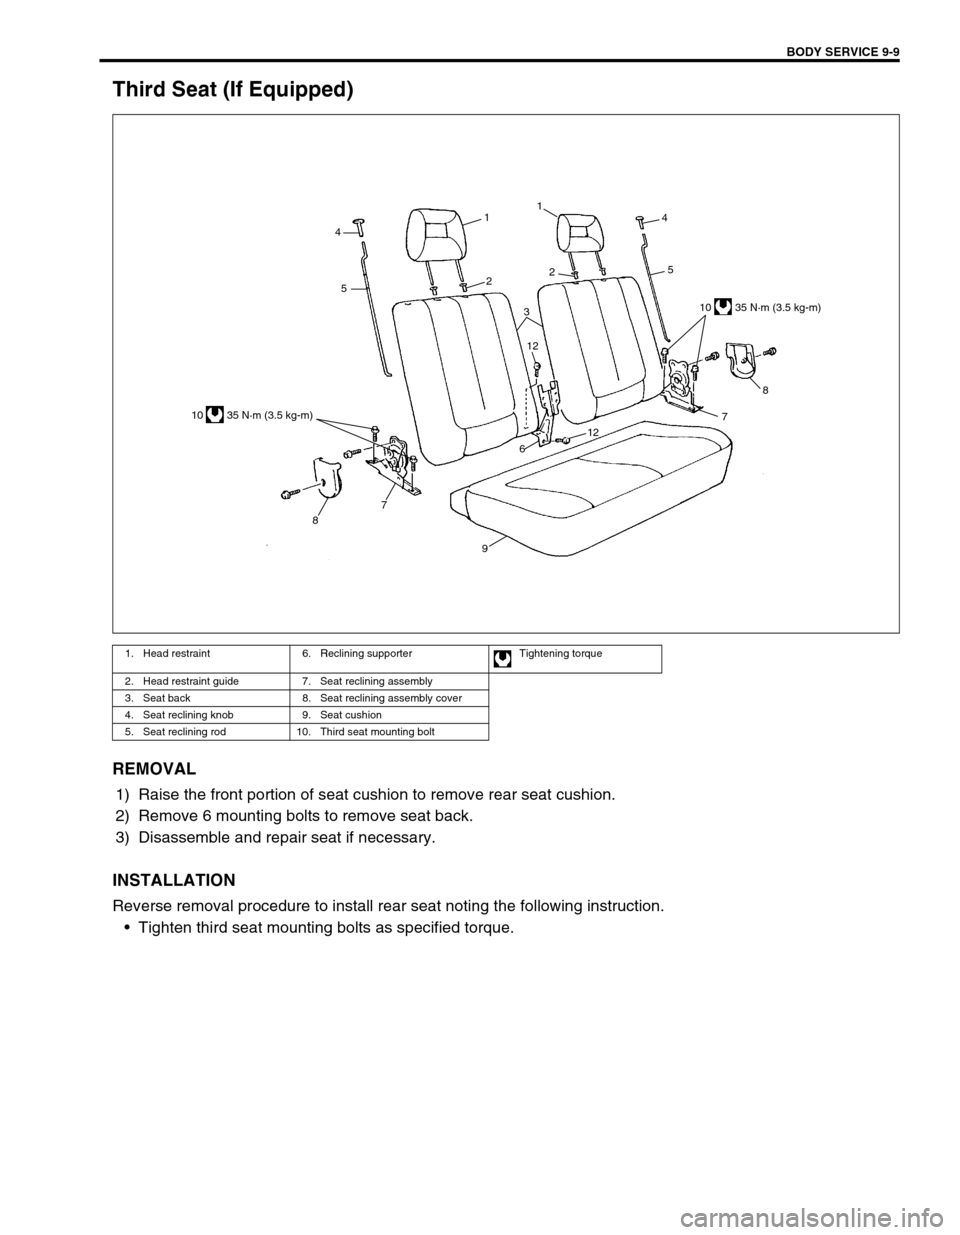
Third Seat (If Equipped)
REMOVAL
1) Raise the front portion of seat cushion to remove rear seat cushion.
2) Remove 6 mounting bolts to remove seat back.
3) Disassemble and repair seat if necessary.
INSTALLATION
Reverse removal procedure to install rear seat noting the following instruction.
•Tighten third seat mounting bolts as specified torque.
1. Head restraint 6. Reclining supporter Tightening torque
2. Head restraint guide 7. Seat reclining assembly
3. Seat back 8. Seat reclining assembly cover
4. Seat reclining knob 9. Seat cushion
5. Seat reclining rod 10. Third seat mounting bolt
4
5
87
91
21
24
5
8
7
12
612 3
10 35 N·m (3.5 kg-m)10 35 N·m (3.5 kg-m)
Page 555 of 656
9-10 BODY SERVICE
Paint and Coatings
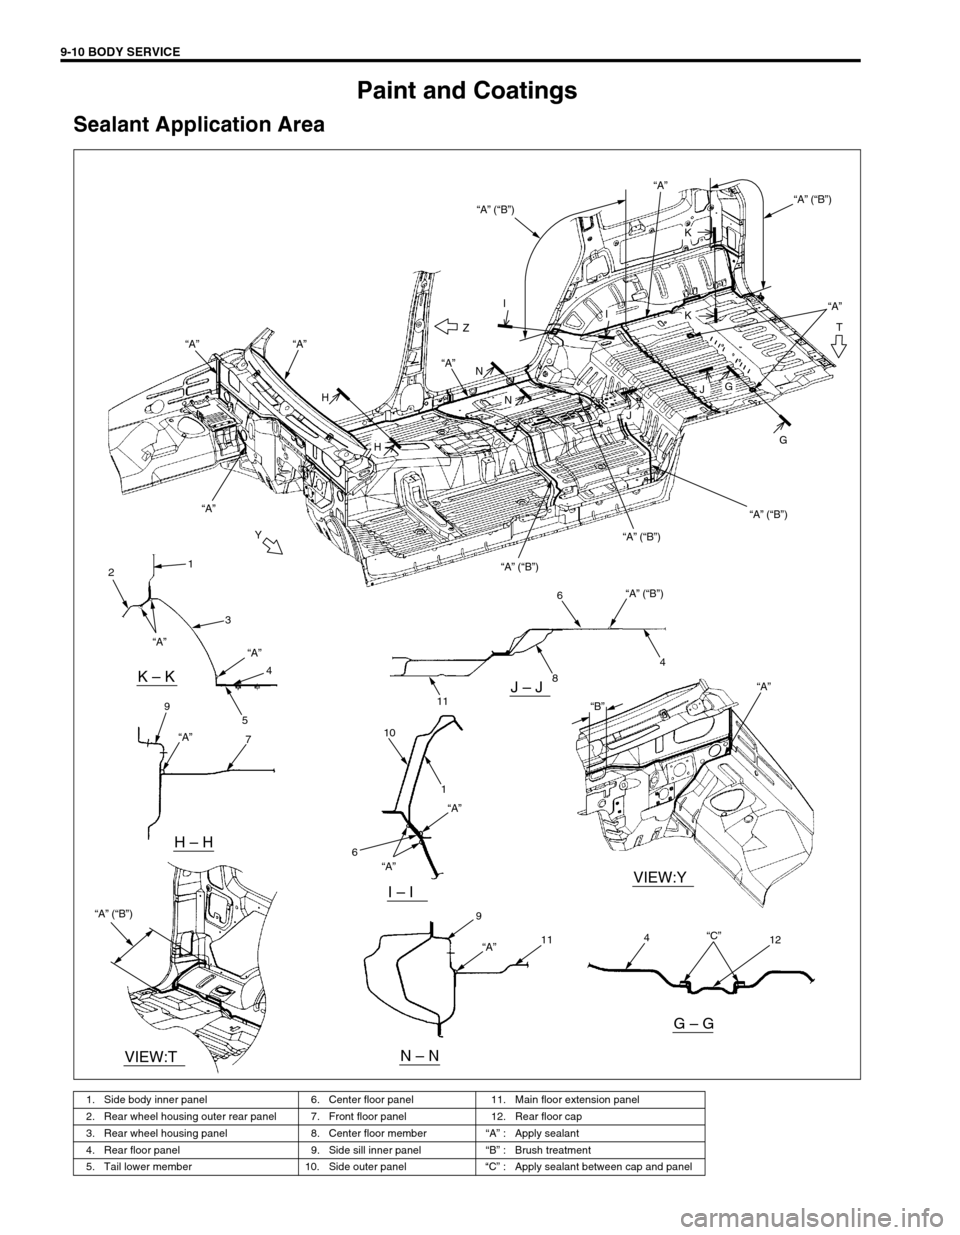
Sealant Application Area
1. Side body inner panel 6. Center floor panel 11. Main floor extension panel
2. Rear wheel housing outer rear panel 7. Front floor panel 12. Rear floor cap
3. Rear wheel housing panel 8. Center floor member“A” : Apply sealant
4. Rear floor panel 9. Side sill inner panel“B” : Brush treatment
5. Tail lower member 10. Side outer panel“C” : Apply sealant between cap and panel
Y
T
H
N “A”
“A” (“B”)“A”“A”
“A” (“B”)
“A” (“B”)
“A” (“B”)
“A” (“B”) “A”Z
“A”
“A” “A”
II
H
N
J
GJ
G
K
K
1
2
3
4
7 5 9
11
8
1
4 6
10“A” (“B”) “A” (“B”)
“A”“A”
“A”
“A” “A”
“A”
6
9
114
12
“B”
“C”
VIEW:Y
VIEW:T
K – KJ – J
I – I
H – H
N – N
G – G
Page 556 of 656
BODY SERVICE 9-11
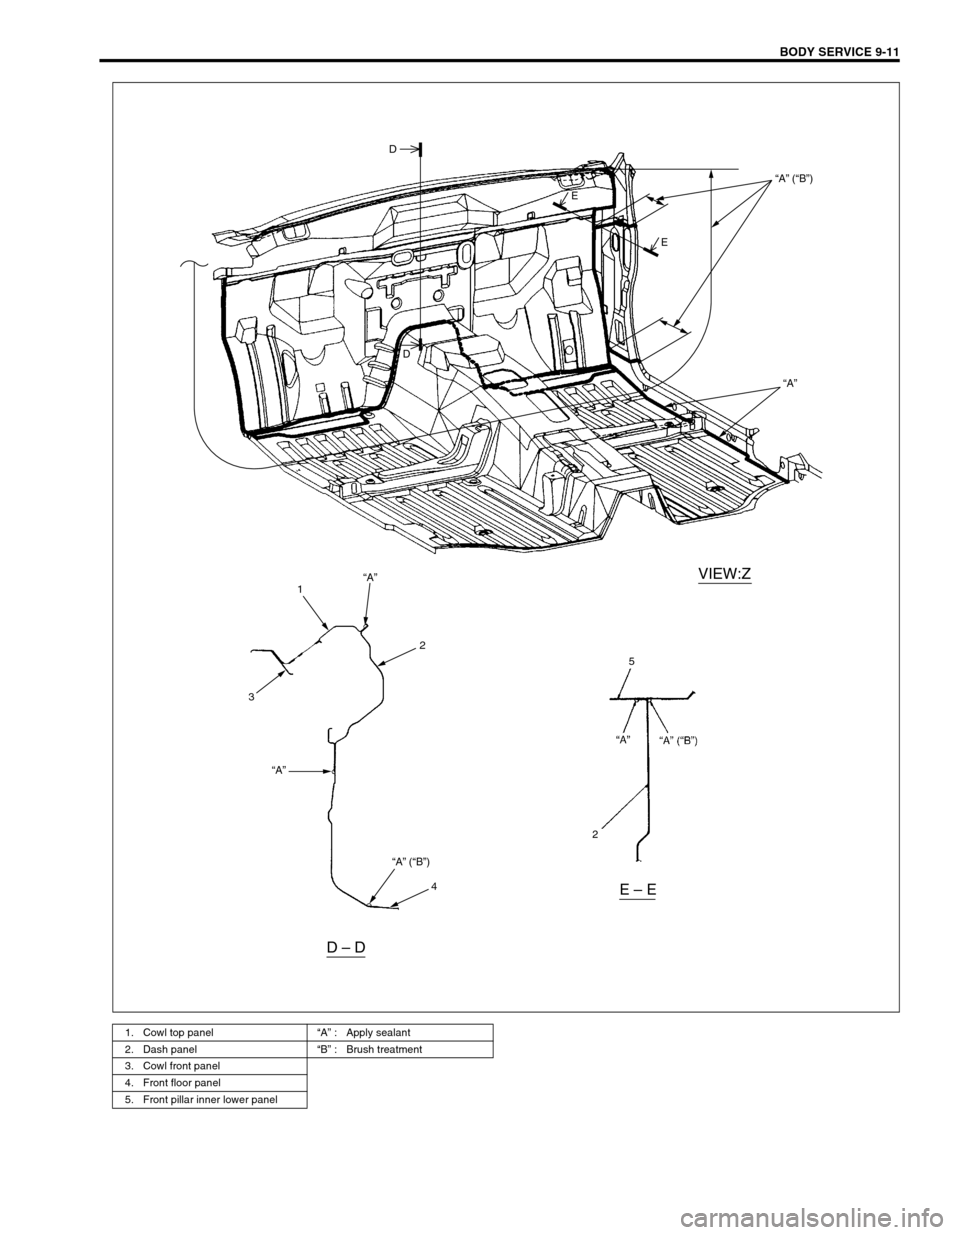
1. Cowl top panel“A” : Apply sealant
2. Dash panel“B” : Brush treatment
3. Cowl front panel
4. Front floor panel
5. Front pillar inner lower panel
E
E
D
D
“A” (“B”)
“A”
“A”
“A” (“B”) “A”
VIEW:Z
D – D
E – E
31
2
4
5
2
Page 557 of 656
9-12 BODY SERVICE
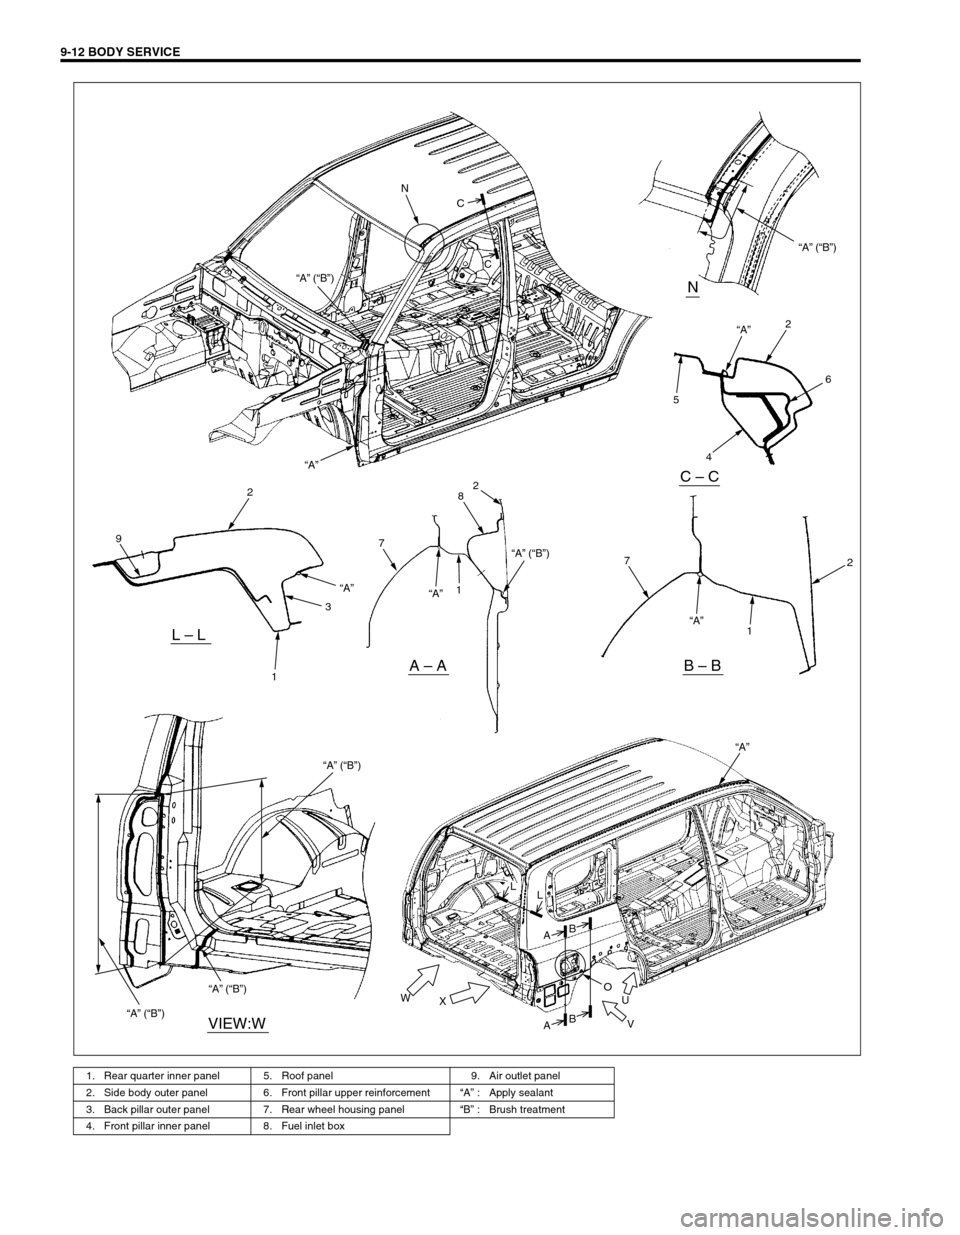
1. Rear quarter inner panel 5. Roof panel 9. Air outlet panel
2. Side body outer panel 6. Front pillar upper reinforcement“A” : Apply sealant
3. Back pillar outer panel 7. Rear wheel housing panel“B” : Brush treatment
4. Front pillar inner panel 8. Fuel inlet box
N
“A” (“B”)“A” (“B”)
C
C
“A”5“A”
“A” (“B”)
“A” (“B”)
“A” (“B”)
“A”
“A” “A”2
6
4
117
82
97 2
13
O
U
V X W2“A” (“B”)
A
AB B L
L
“A”
N
C – C
B – BA – A
L – L
VIEW:W
Page 558 of 656
BODY SERVICE 9-13
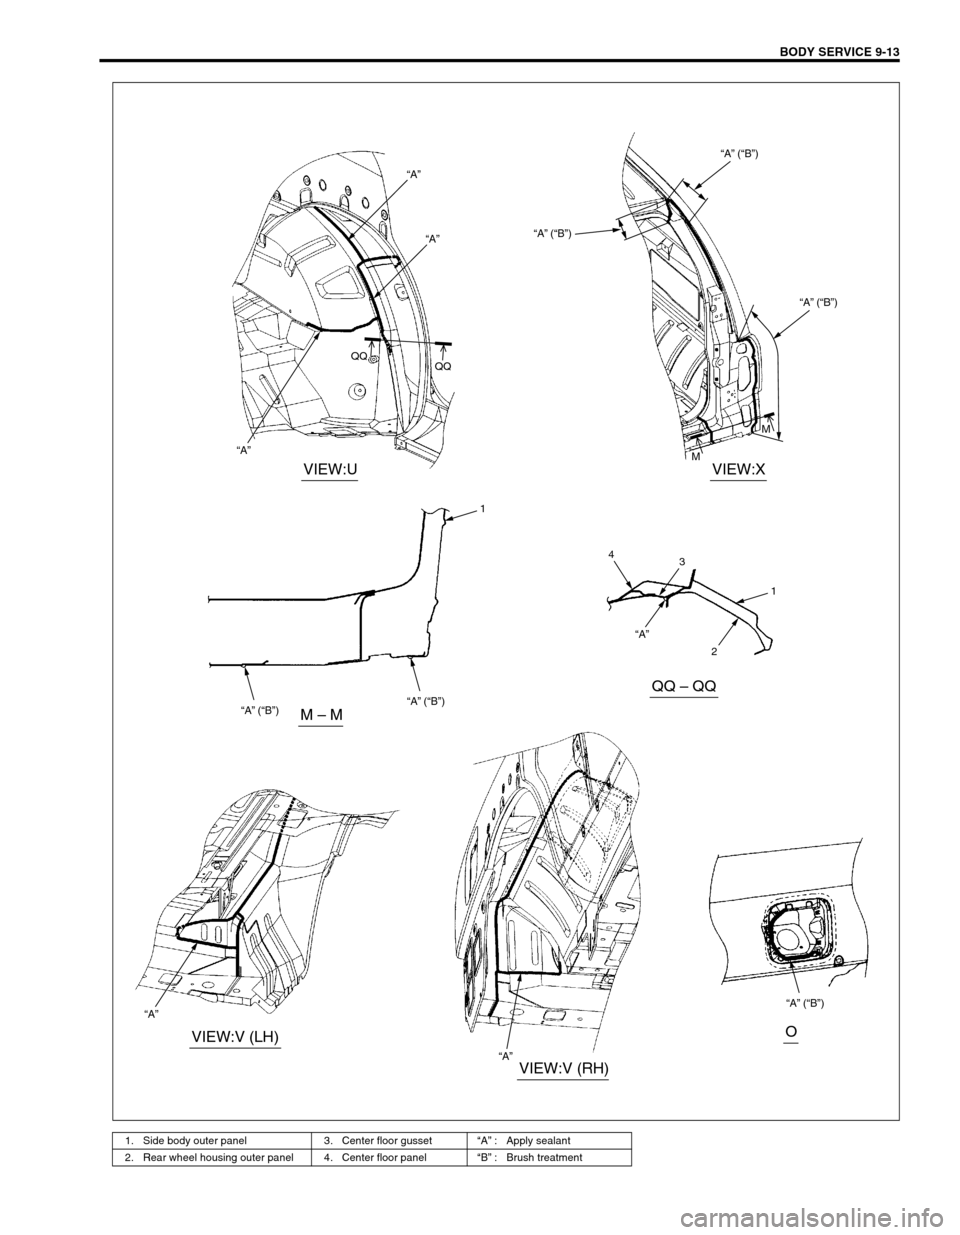
1. Side body outer panel 3. Center floor gusset“A” : Apply sealant
2. Rear wheel housing outer panel 4. Center floor panel“B” : Brush treatment
“A”
“A”
“A”“A” 1
1
2 3 “A” “A”
QQ
QQ
“A” (“B”)
“A” (“B”)
“A” (“B”)
“A” (“B”)
“A” (“B”) “A” (“B”)
M
M
4
VIEW:UVIEW:X
VIEW:V (LH)
M – M
QQ – QQ
VIEW:V (RH)
O
Page 559 of 656
9-14 BODY SERVICE
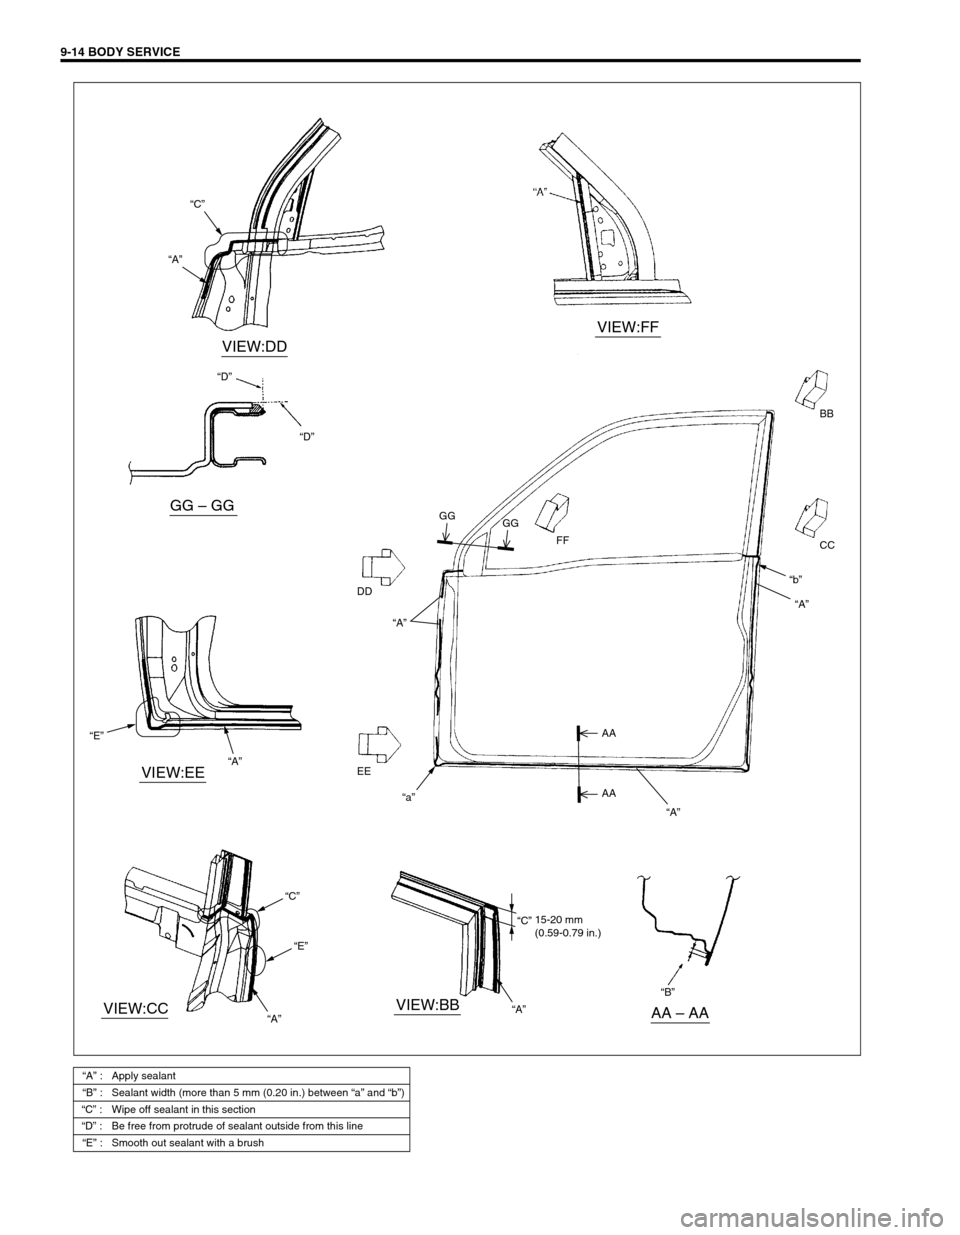
“A” : Apply sealant
“B” : Sealant width (more than 5 mm (0.20 in.) between “a” and “b”)
“C” : Wipe off sealant in this section
“D” : Be free from protrude of sealant outside from this line
“E” : Smooth out sealant with a brush
“A”“C”
VIEW:DD
VIEW:FF
VIEW:BBVIEW:CC
VIEW:EE
GG – GG
AA – AA
“D”
“D”
“B”“A”
“B” “a”“b”
“E”
“A”
“b”
“C”
“E”
“A”
“A”
“C”
DDFF
CC BB
EE
AA
AA GG
GG
15-20 mm
(0.59-0.79 in.)
“B”
“A” “B”
“A”
Page 560 of 656
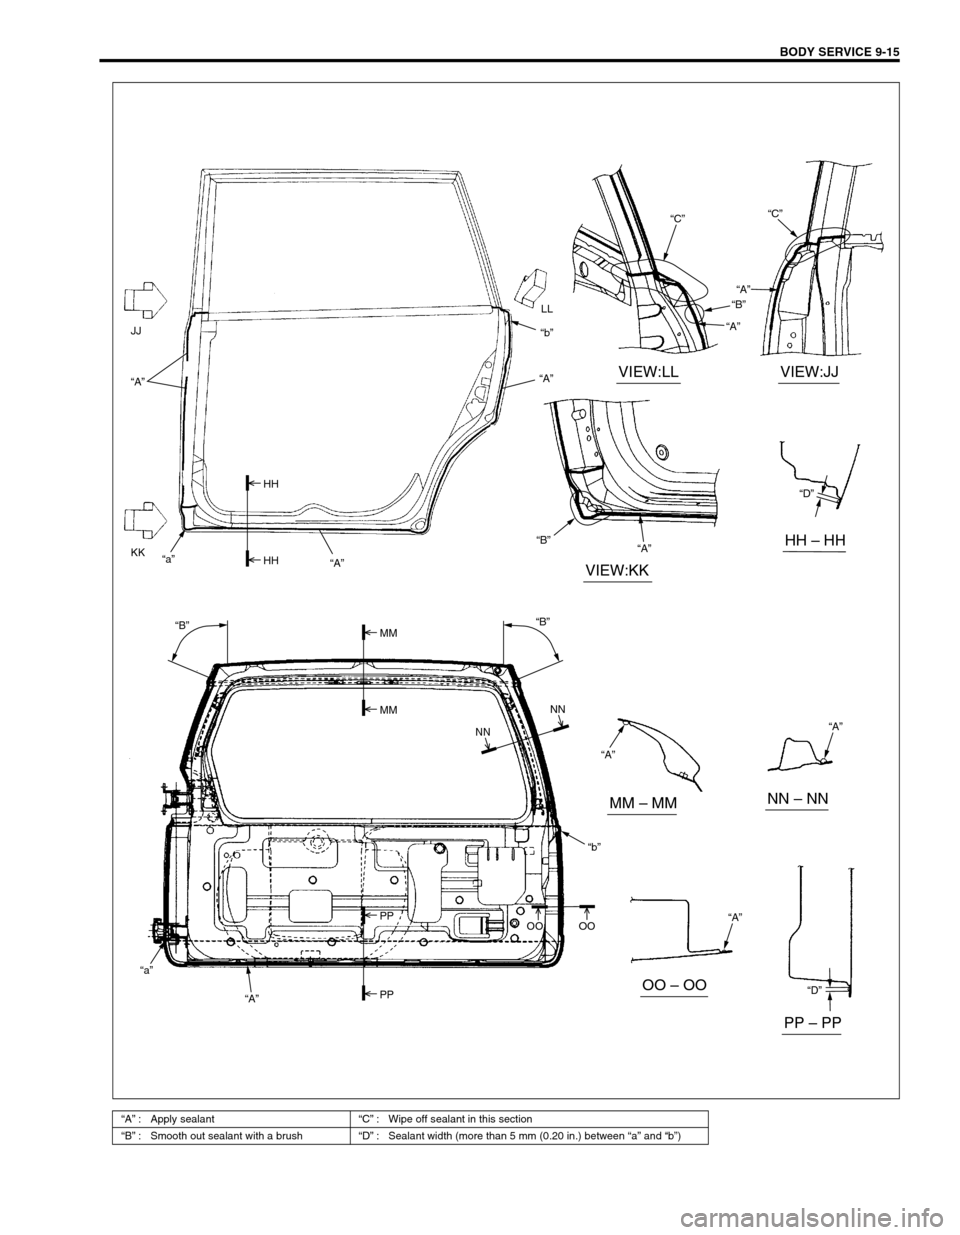
BODY SERVICE 9-15
“A” : Apply sealant“C” : Wipe off sealant in this section
“B” : Smooth out sealant with a brush“D” : Sealant width (more than 5 mm (0.20 in.) between “a” and “b”)
“C”
“B”
“A”
“b”
“b”
“a”
“A”
“A”
“A”
“a”
“A”
“A”
“B” “A”
“C”
“D”
“D”
JJ
KKLL
“A”
“A”
“A”
PP PP
MM
NNNN
MM
HH
HH
“B”“B”
OO OO
PP – PP
OO – OO
NN – NNMM – MM
HH – HH
VIEW:KK
VIEW:LLVIEW:JJ
Trending: batteri, fuel tank, fuses, 5A10A, cruise control, cruise, 5A-10
