Torque SUZUKI SWIFT 2000 1.G RG413 Service Workshop Manual
[x] Cancel search | Manufacturer: SUZUKI, Model Year: 2000, Model line: SWIFT, Model: SUZUKI SWIFT 2000 1.GPages: 698, PDF Size: 16.01 MB
Page 522 of 698
ENGINE MECHANICAL (M13 ENGINE) 6A1-21
4) Install exhaust manifold cover (1) .
5) Connect heated oxygen sensor coupler (2) and fit coupler to
bracket securely (if equipped).
6) Install heat insulator panel and front bumper with front grille
by referring to Section 9.
7) Connect negative cable at battery.
8) Check exhaust system for exhaust gas leakage.
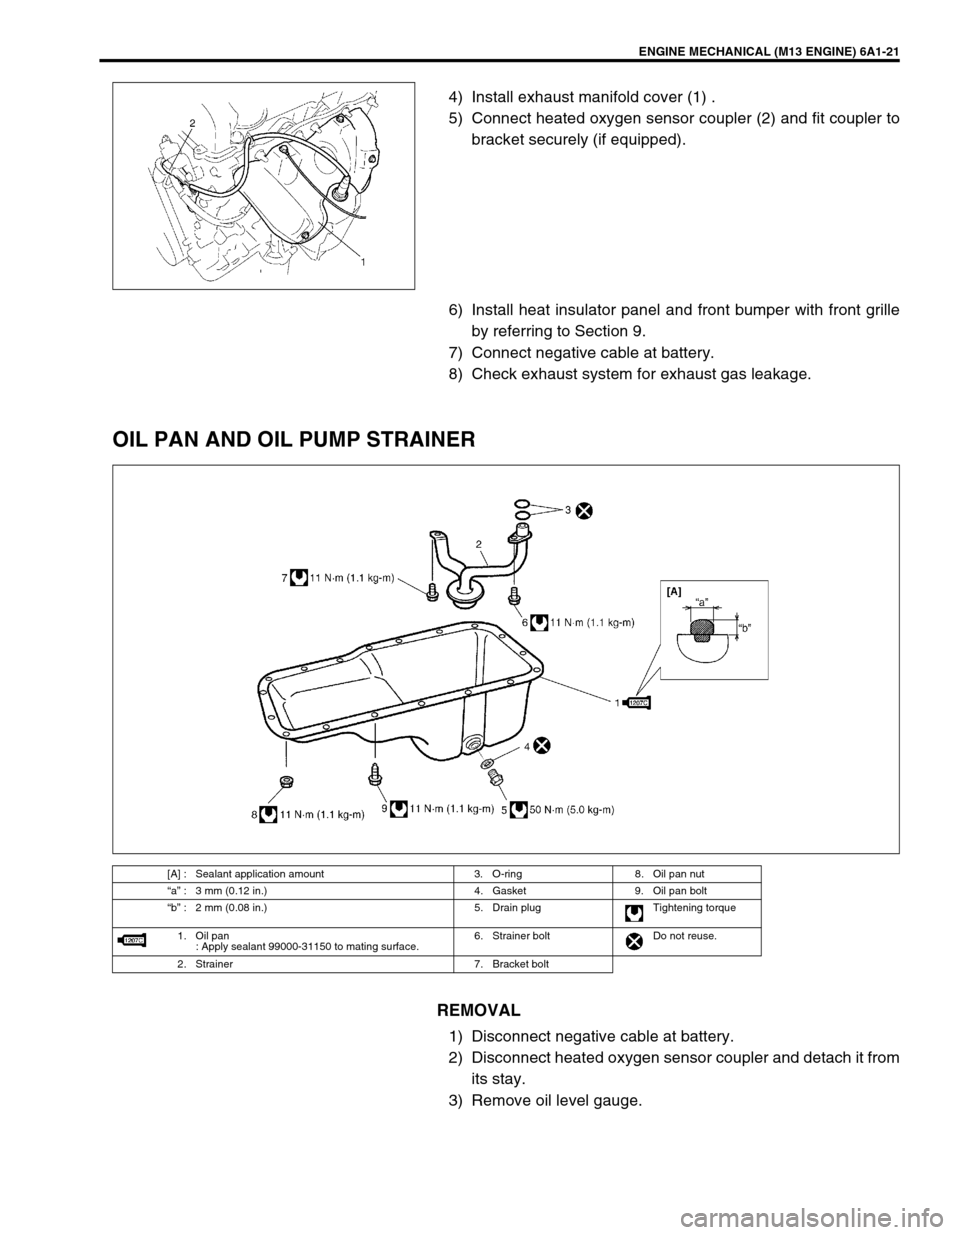
OIL PAN AND OIL PUMP STRAINER
REMOVAL
1) Disconnect negative cable at battery.
2) Disconnect heated oxygen sensor coupler and detach it from
its stay.
3) Remove oil level gauge.
[A] : Sealant application amount 3. O-ring 8. Oil pan nut
“a” : 3 mm (0.12 in.) 4. Gasket 9. Oil pan bolt
“b” : 2 mm (0.08 in.) 5. Drain plug Tightening torque
1. Oil pan
: Apply sealant 99000-31150 to mating surface.6. Strainer bolt Do not reuse.
2. Strainer 7. Bracket bolt
Page 523 of 698
6A1-22 ENGINE MECHANICAL (M13 ENGINE)
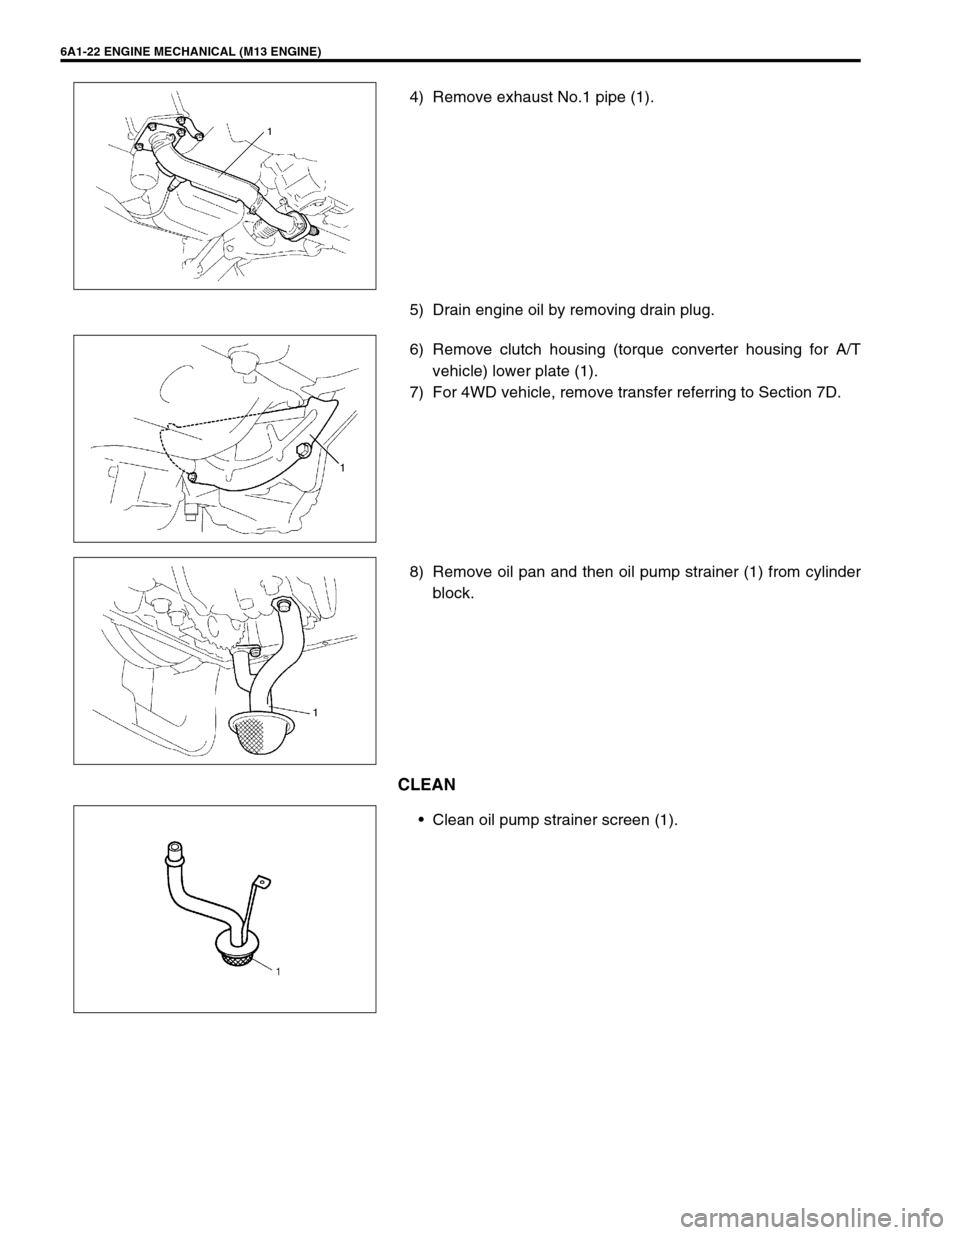
4) Remove exhaust No.1 pipe (1).
5) Drain engine oil by removing drain plug.
6) Remove clutch housing (torque converter housing for A/T
vehicle) lower plate (1).
7) For 4WD vehicle, remove transfer referring to Section 7D.
8) Remove oil pan and then oil pump strainer (1) from cylinder
block.
CLEAN
Clean oil pump strainer screen (1).
Page 524 of 698
ENGINE MECHANICAL (M13 ENGINE) 6A1-23
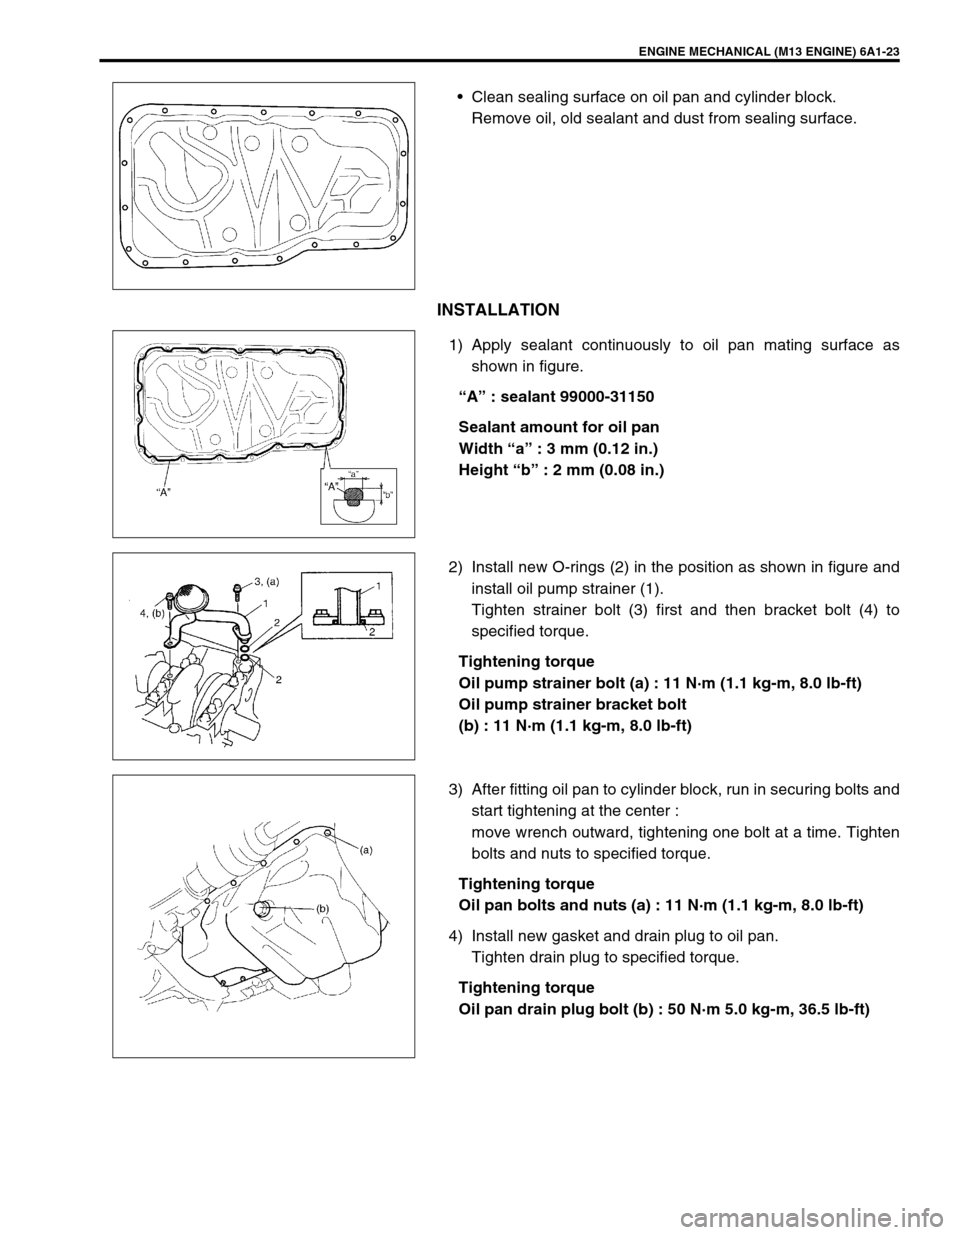
Clean sealing surface on oil pan and cylinder block.
Remove oil, old sealant and dust from sealing surface.
INSTALLATION
1) Apply sealant continuously to oil pan mating surface as
shown in figure.
“A” : sealant 99000-31150
Sealant amount for oil pan
Width “a” : 3 mm (0.12 in.)
Height “b” : 2 mm (0.08 in.)
2) Install new O-rings (2) in the position as shown in figure and
install oil pump strainer (1).
Tighten strainer bolt (3) first and then bracket bolt (4) to
specified torque.
Tightening torque
Oil pump strainer bolt (a) : 11 N·m (1.1 kg-m, 8.0 lb-ft)
Oil pump strainer bracket bolt
(b) : 11 N·m (1.1 kg-m, 8.0 lb-ft)
3) After fitting oil pan to cylinder block, run in securing bolts and
start tightening at the center :
move wrench outward, tightening one bolt at a time. Tighten
bolts and nuts to specified torque.
Tightening torque
Oil pan bolts and nuts (a) : 11 N·m (1.1 kg-m, 8.0 lb-ft)
4) Install new gasket and drain plug to oil pan.
Tighten drain plug to specified torque.
Tightening torque
Oil pan drain plug bolt (b) : 50 N·m 5.0 kg-m, 36.5 lb-ft)
Page 525 of 698
6A1-24 ENGINE MECHANICAL (M13 ENGINE)
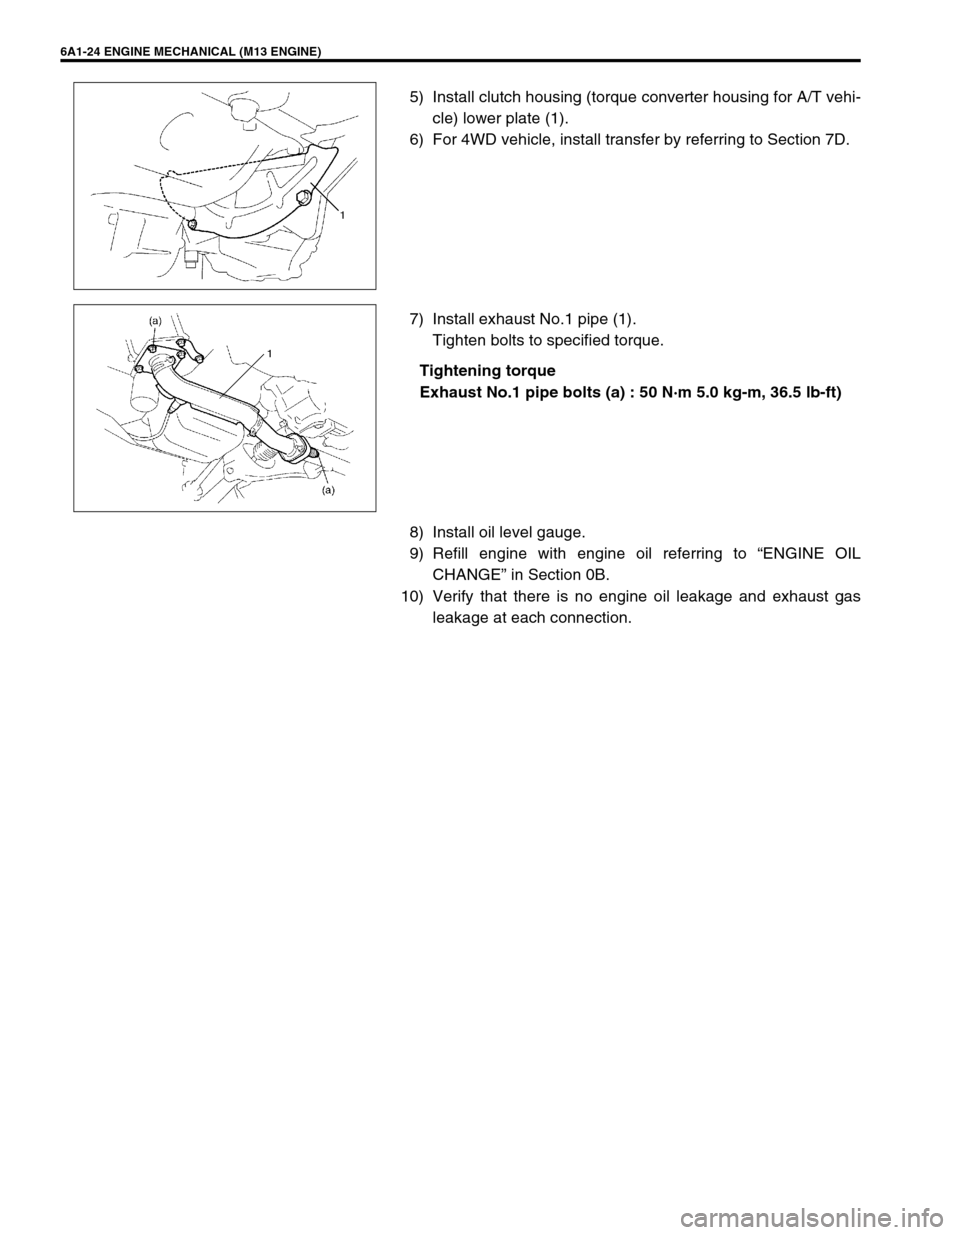
5) Install clutch housing (torque converter housing for A/T vehi-
cle) lower plate (1).
6) For 4WD vehicle, install transfer by referring to Section 7D.
7) Install exhaust No.1 pipe (1).
Tighten bolts to specified torque.
Tightening torque
Exhaust No.1 pipe bolts (a) : 50 N·m 5.0 kg-m, 36.5 lb-ft)
8) Install oil level gauge.
9) Refill engine with engine oil referring to “ENGINE OIL
CHANGE” in Section 0B.
10) Verify that there is no engine oil leakage and exhaust gas
leakage at each connection.
Page 526 of 698
ENGINE MECHANICAL (M13 ENGINE) 6A1-25
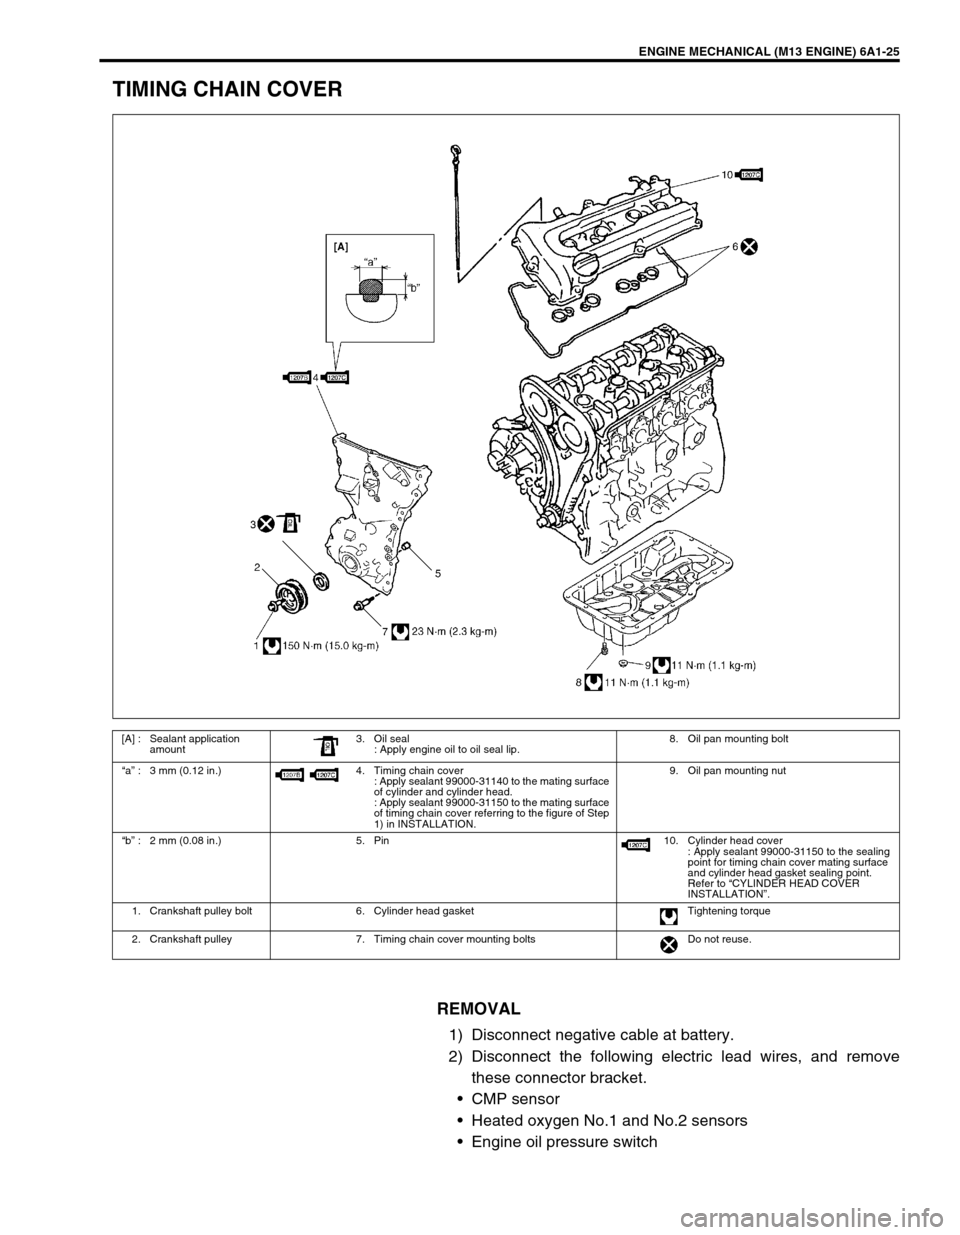
TIMING CHAIN COVER
REMOVAL
1) Disconnect negative cable at battery.
2) Disconnect the following electric lead wires, and remove
these connector bracket.
CMP sensor
Heated oxygen No.1 and No.2 sensors
Engine oil pressure switch
[A] : Sealant application
amount
3. Oil seal
: Apply engine oil to oil seal lip.8. Oil pan mounting bolt
“a” : 3 mm (0.12 in.) 4. Timing chain cover
: Apply sealant 99000-31140 to the mating surface
of cylinder and cylinder head.
: Apply sealant 99000-31150 to the mating surface
of timing chain cover referring to the figure of Step
1) in INSTALLATION.9. Oil pan mounting nut
“b” : 2 mm (0.08 in.) 5. Pin 10. Cylinder head cover
: Apply sealant 99000-31150 to the sealing
point for timing chain cover mating surface
and cylinder head gasket sealing point.
Refer to “CYLINDER HEAD COVER
INSTALLATION”.
1. Crankshaft pulley bolt 6. Cylinder head gasket Tightening torque
2. Crankshaft pulley 7. Timing chain cover mounting bolts Do not reuse.
Page 529 of 698
6A1-28 ENGINE MECHANICAL (M13 ENGINE)
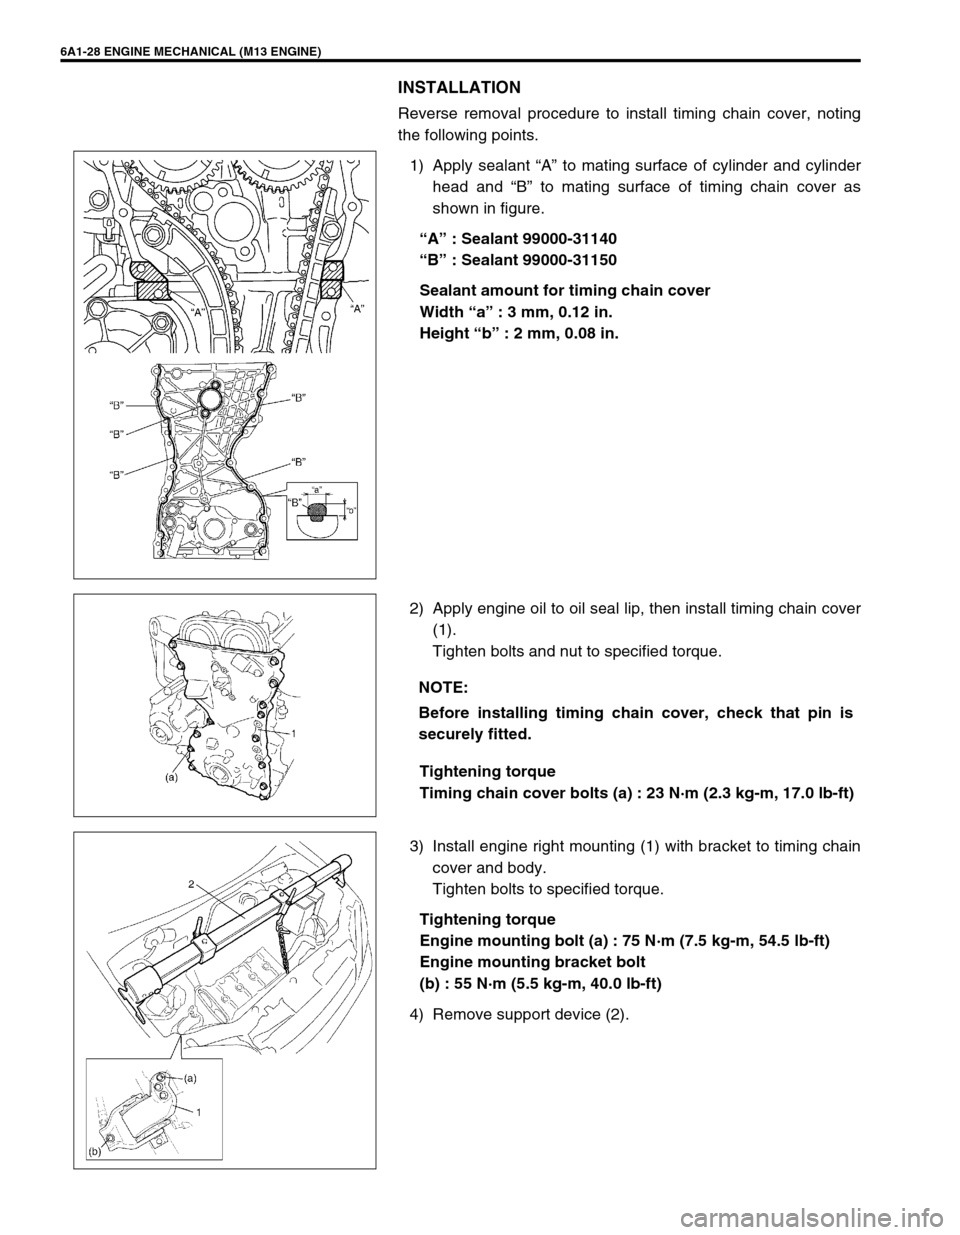
INSTALLATION
Reverse removal procedure to install timing chain cover, noting
the following points.
1) Apply sealant “A” to mating surface of cylinder and cylinder
head and “B” to mating surface of timing chain cover as
shown in figure.
“A” : Sealant 99000-31140
“B” : Sealant 99000-31150
Sealant amount for timing chain cover
Width “a” : 3 mm, 0.12 in.
Height “b” : 2 mm, 0.08 in.
2) Apply engine oil to oil seal lip, then install timing chain cover
(1).
Tighten bolts and nut to specified torque.
Tightening torque
Timing chain cover bolts (a) : 23 N·m (2.3 kg-m, 17.0 lb-ft)
3) Install engine right mounting (1) with bracket to timing chain
cover and body.
Tighten bolts to specified torque.
Tightening torque
Engine mounting bolt (a) : 75 N·m (7.5 kg-m, 54.5 lb-ft)
Engine mounting bracket bolt
(b) : 55 N·m (5.5 kg-m, 40.0 lb-ft)
4) Remove support device (2).
NOTE:
Before installing timing chain cover, check that pin is
securely fitted.
Page 530 of 698
ENGINE MECHANICAL (M13 ENGINE) 6A1-29
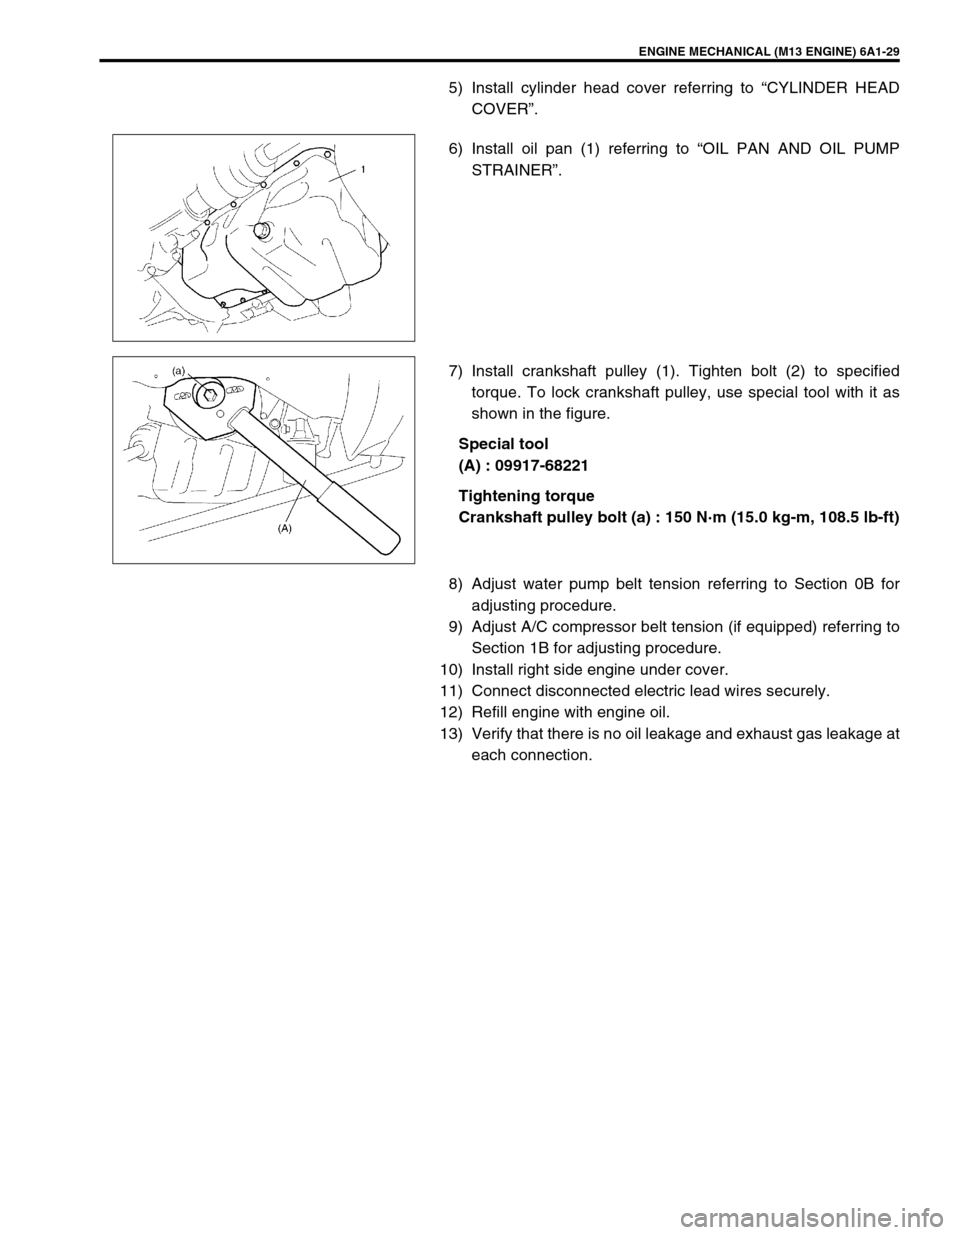
5) Install cylinder head cover referring to “CYLINDER HEAD
COVER”.
6) Install oil pan (1) referring to “OIL PAN AND OIL PUMP
STRAINER”.
7) Install crankshaft pulley (1). Tighten bolt (2) to specified
torque. To lock crankshaft pulley, use special tool with it as
shown in the figure.
Special tool
(A) : 09917-68221
Tightening torque
Crankshaft pulley bolt (a) : 150 N·m (15.0 kg-m, 108.5 lb-ft)
8) Adjust water pump belt tension referring to Section 0B for
adjusting procedure.
9) Adjust A/C compressor belt tension (if equipped) referring to
Section 1B for adjusting procedure.
10) Install right side engine under cover.
11) Connect disconnected electric lead wires securely.
12) Refill engine with engine oil.
13) Verify that there is no oil leakage and exhaust gas leakage at
each connection.
Page 531 of 698

6A1-30 ENGINE MECHANICAL (M13 ENGINE)
OIL PUMP
REMOVAL
1) Disconnect negative cable at battery.
2) Remove timing chain cover, referring to “TIMING CHAIN
COVER”.
DISASSEMBLY
1) Remove rotor plate (1) by removing its mounting bolts.
[A] : Sealant application
amount4. Timing chain cover
: Apply sealant 99000-31140 to the mating surface of cylinder and
cylinder head.
: Apply sealant 99000-31150 to mating surface of timing chain cover
referring to the figure of Step 1) in “TIMING CHAIN COVER
INSTALLATION”.10. Circlip
“a” : 3 mm (0.12 in.) 5. Pin 11. Oil pump mounting bolt
“b” : 2 mm (0.08 in.) 6. Oil seal 12. Timing chain cover mounting bolts
1. Rotor plate 7. Relief valve
Tightening torque
2. Outer rotor 8. Spring
Do not reuse.
3. Inner rotor 9. Retainer
Apply thin coat of engine oil to sliding
surface of each parts.
Page 534 of 698

ENGINE MECHANICAL (M13 ENGINE) 6A1-33
ASSEMBLY
1) Wash, clean and then dry all disassembled parts.
2) Apply thin coat of engine oil to inner and outer rotors, oil seal
lip portion, and inside surfaces of oil pump case and plate.
3) Install outer (1) and inner rotors (2) to oil pump case.
4) Install relief valve component (1) to rotor plate (2).
5) Install rotor plate and tighten all bolts to specified torque.
After installing plate, check to be sure that rotors turn
smoothly by hand (0.3 N·m (0.03 kg-m, 0.25 lb-ft) torque or
below).
Tightening torque
Oil pump rotor plate bolts (a) : 11 N·m (1.1 kg-m, 8.0 lb-ft)
INSTALLATION
For installation referring to “TIMING CHAIN COVER”.
Page 535 of 698
6A1-34 ENGINE MECHANICAL (M13 ENGINE)
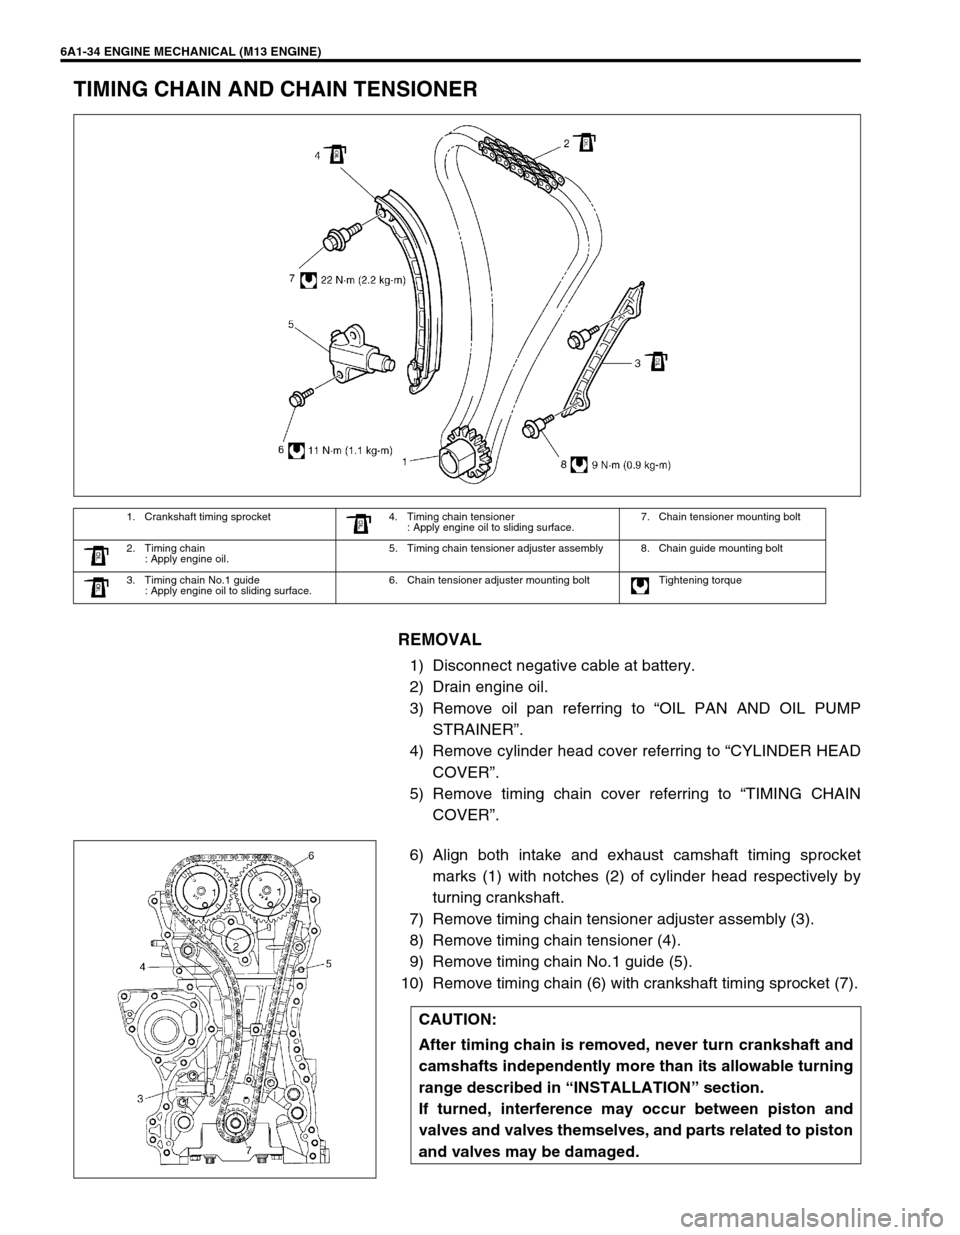
TIMING CHAIN AND CHAIN TENSIONER
REMOVAL
1) Disconnect negative cable at battery.
2) Drain engine oil.
3) Remove oil pan referring to “OIL PAN AND OIL PUMP
STRAINER”.
4) Remove cylinder head cover referring to “CYLINDER HEAD
COVER”.
5) Remove timing chain cover referring to “TIMING CHAIN
COVER”.
6) Align both intake and exhaust camshaft timing sprocket
marks (1) with notches (2) of cylinder head respectively by
turning crankshaft.
7) Remove timing chain tensioner adjuster assembly (3).
8) Remove timing chain tensioner (4).
9) Remove timing chain No.1 guide (5).
10) Remove timing chain (6) with crankshaft timing sprocket (7).
1. Crankshaft timing sprocket 4. Timing chain tensioner
: Apply engine oil to sliding surface.7. Chain tensioner mounting bolt
2. Timing chain
: Apply engine oil.5. Timing chain tensioner adjuster assembly 8. Chain guide mounting bolt
3. Timing chain No.1 guide
: Apply engine oil to sliding surface.6. Chain tensioner adjuster mounting bolt Tightening torque
CAUTION:
After timing chain is removed, never turn crankshaft and
camshafts independently more than its allowable turning
range described in “INSTALLATION” section.
If turned, interference may occur between piston and
valves and valves themselves, and parts related to piston
and valves may be damaged.