Torque SUZUKI SWIFT 2000 1.G RG413 Service Workshop Manual
[x] Cancel search | Manufacturer: SUZUKI, Model Year: 2000, Model line: SWIFT, Model: SUZUKI SWIFT 2000 1.GPages: 698, PDF Size: 16.01 MB
Page 388 of 698
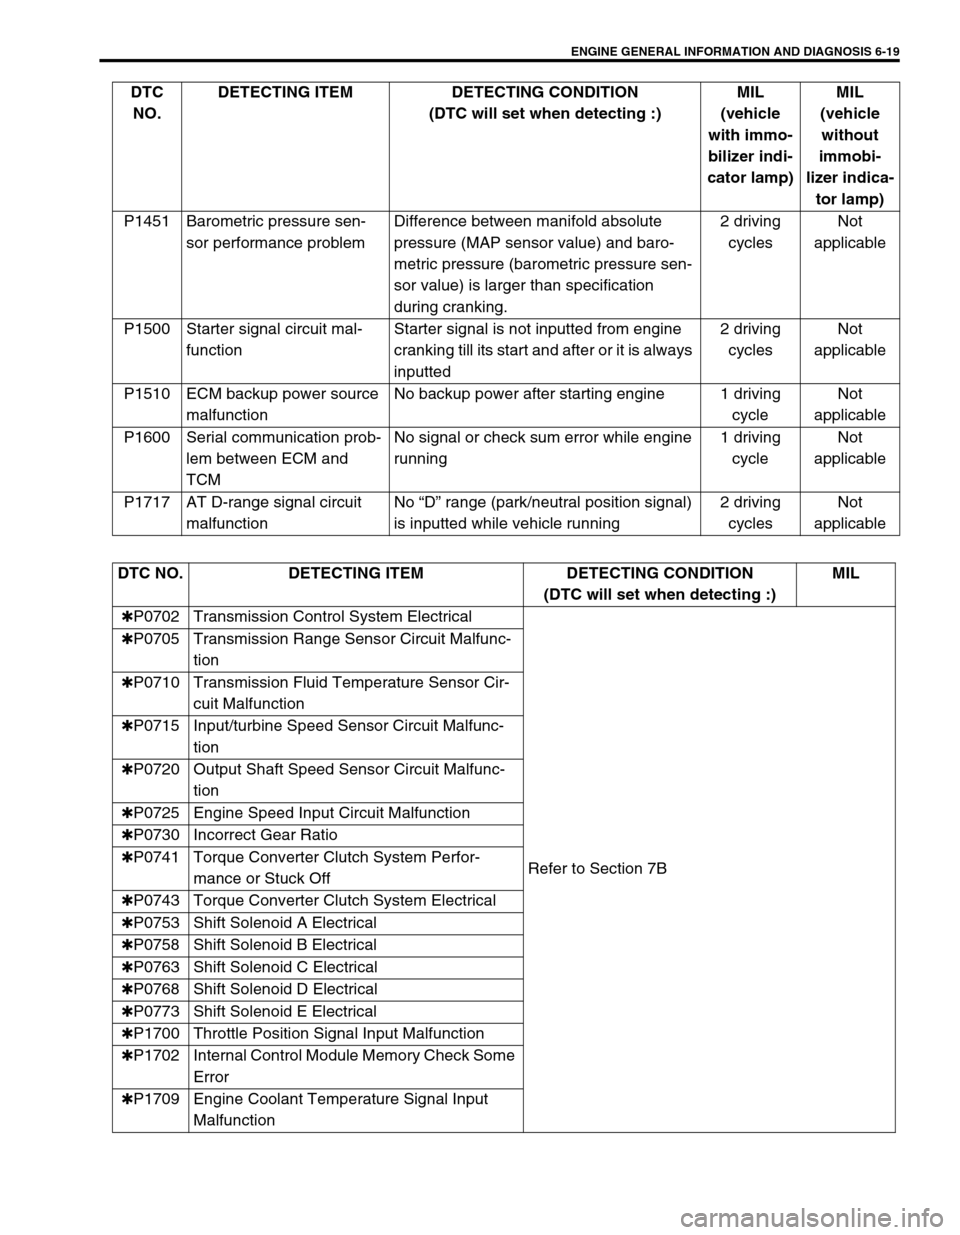
ENGINE GENERAL INFORMATION AND DIAGNOSIS 6-19
P1451 Barometric pressure sen-
sor performance problemDifference between manifold absolute
pressure (MAP sensor value) and baro-
metric pressure (barometric pressure sen-
sor value) is larger than specification
during cranking.2 driving
cyclesNot
applicable
P1500 Starter signal circuit mal-
functionStarter signal is not inputted from engine
cranking till its start and after or it is always
inputted2 driving
cyclesNot
applicable
P1510 ECM backup power source
malfunctionNo backup power after starting engine 1 driving
cycleNot
applicable
P1600 Serial communication prob-
lem between ECM and
TCMNo signal or check sum error while engine
running1 driving
cycleNot
applicable
P1717 AT D-range signal circuit
malfunctionNo “D” range (park/neutral position signal)
is inputted while vehicle running2 driving
cyclesNot
applicable DTC
NO.DETECTING ITEM DETECTING CONDITION
(DTC will set when detecting :)MIL
(vehicle
with immo-
bilizer indi-
cator lamp)MIL
(vehicle
without
immobi-
lizer indica-
tor lamp)
DTC NO. DETECTING ITEM DETECTING CONDITION
(DTC will set when detecting :)MIL
✱P0702 Transmission Control System Electrical
Refer to Section 7B ✱P0705 Transmission Range Sensor Circuit Malfunc-
tion
✱P0710 Transmission Fluid Temperature Sensor Cir-
cuit Malfunction
✱P0715 Input/turbine Speed Sensor Circuit Malfunc-
tion
✱P0720 Output Shaft Speed Sensor Circuit Malfunc-
tion
✱P0725 Engine Speed Input Circuit Malfunction
✱P0730 Incorrect Gear Ratio
✱P0741 Torque Converter Clutch System Perfor-
mance or Stuck Off
✱P0743 Torque Converter Clutch System Electrical
✱P0753 Shift Solenoid A Electrical
✱P0758 Shift Solenoid B Electrical
✱P0763 Shift Solenoid C Electrical
✱P0768 Shift Solenoid D Electrical
✱P0773 Shift Solenoid E Electrical
✱P1700 Throttle Position Signal Input Malfunction
✱P1702 Internal Control Module Memory Check Some
Error
✱P1709 Engine Coolant Temperature Signal Input
Malfunction
Page 502 of 698
ENGINE MECHANICAL (M13 ENGINE) 6A1-1
6F1
6A1
6G
6H
6K
7A
7A1
7B1
7C1
7D
7E
7F
8A
8B
8C
8D
8E
9
10B
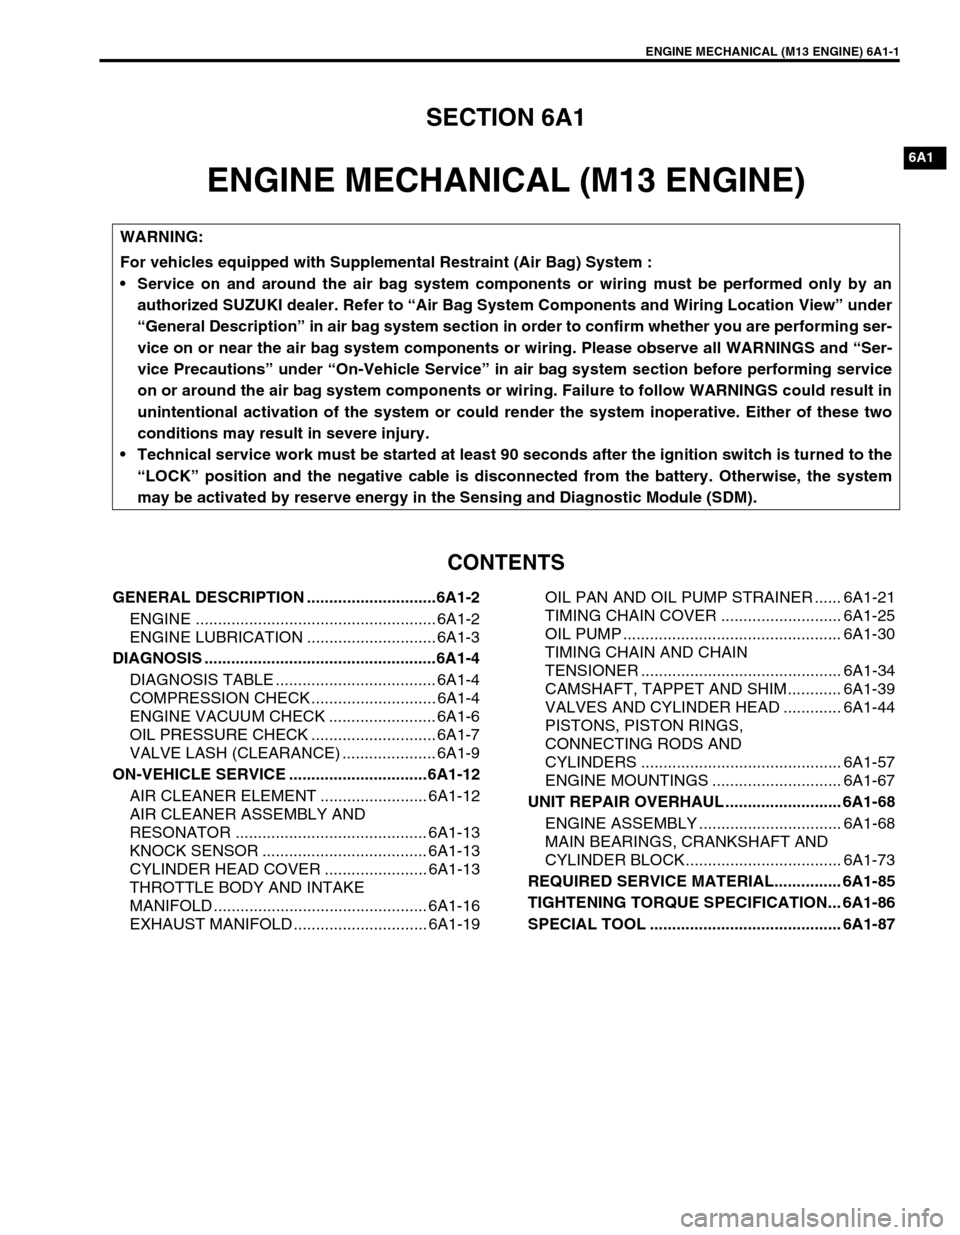
SECTION 6A1
ENGINE MECHANICAL (M13 ENGINE)
CONTENTS
GENERAL DESCRIPTION .............................6A1-2
ENGINE ...................................................... 6A1-2
ENGINE LUBRICATION ............................. 6A1-3
DIAGNOSIS ....................................................6A1-4
DIAGNOSIS TABLE .................................... 6A1-4
COMPRESSION CHECK ............................ 6A1-4
ENGINE VACUUM CHECK ........................ 6A1-6
OIL PRESSURE CHECK ............................ 6A1-7
VALVE LASH (CLEARANCE) ..................... 6A1-9
ON-VEHICLE SERVICE ...............................6A1-12
AIR CLEANER ELEMENT ........................ 6A1-12
AIR CLEANER ASSEMBLY AND
RESONATOR ........................................... 6A1-13
KNOCK SENSOR ..................................... 6A1-13
CYLINDER HEAD COVER ....................... 6A1-13
THROTTLE BODY AND INTAKE
MANIFOLD ................................................ 6A1-16
EXHAUST MANIFOLD .............................. 6A1-19OIL PAN AND OIL PUMP STRAINER ...... 6A1-21
TIMING CHAIN COVER ........................... 6A1-25
OIL PUMP ................................................. 6A1-30
TIMING CHAIN AND CHAIN
TENSIONER ............................................. 6A1-34
CAMSHAFT, TAPPET AND SHIM............ 6A1-39
VALVES AND CYLINDER HEAD ............. 6A1-44
PISTONS, PISTON RINGS,
CONNECTING RODS AND
CYLINDERS ............................................. 6A1-57
ENGINE MOUNTINGS ............................. 6A1-67
UNIT REPAIR OVERHAUL .......................... 6A1-68
ENGINE ASSEMBLY ................................ 6A1-68
MAIN BEARINGS, CRANKSHAFT AND
CYLINDER BLOCK................................... 6A1-73
REQUIRED SERVICE MATERIAL............... 6A1-85
TIGHTENING TORQUE SPECIFICATION... 6A1-86
SPECIAL TOOL ........................................... 6A1-87
WARNING:
For vehicles equipped with Supplemental Restraint (Air Bag) System :
Service on and around the air bag system components or wiring must be performed only by an
authorized SUZUKI dealer. Refer to “Air Bag System Components and Wiring Location View” under
“General Description” in air bag system section in order to confirm whether you are performing ser-
vice on or near the air bag system components or wiring. Please observe all WARNINGS and “Ser-
vice Precautions” under “On-Vehicle Service” in air bag system section before performing service
on or around the air bag system components or wiring. Failure to follow WARNINGS could result in
unintentional activation of the system or could render the system inoperative. Either of these two
conditions may result in severe injury.
Technical service work must be started at least 90 seconds after the ignition switch is turned to the
“LOCK” position and the negative cable is disconnected from the battery. Otherwise, the system
may be activated by reserve energy in the Sensing and Diagnostic Module (SDM).
Page 509 of 698
6A1-8 ENGINE MECHANICAL (M13 ENGINE)
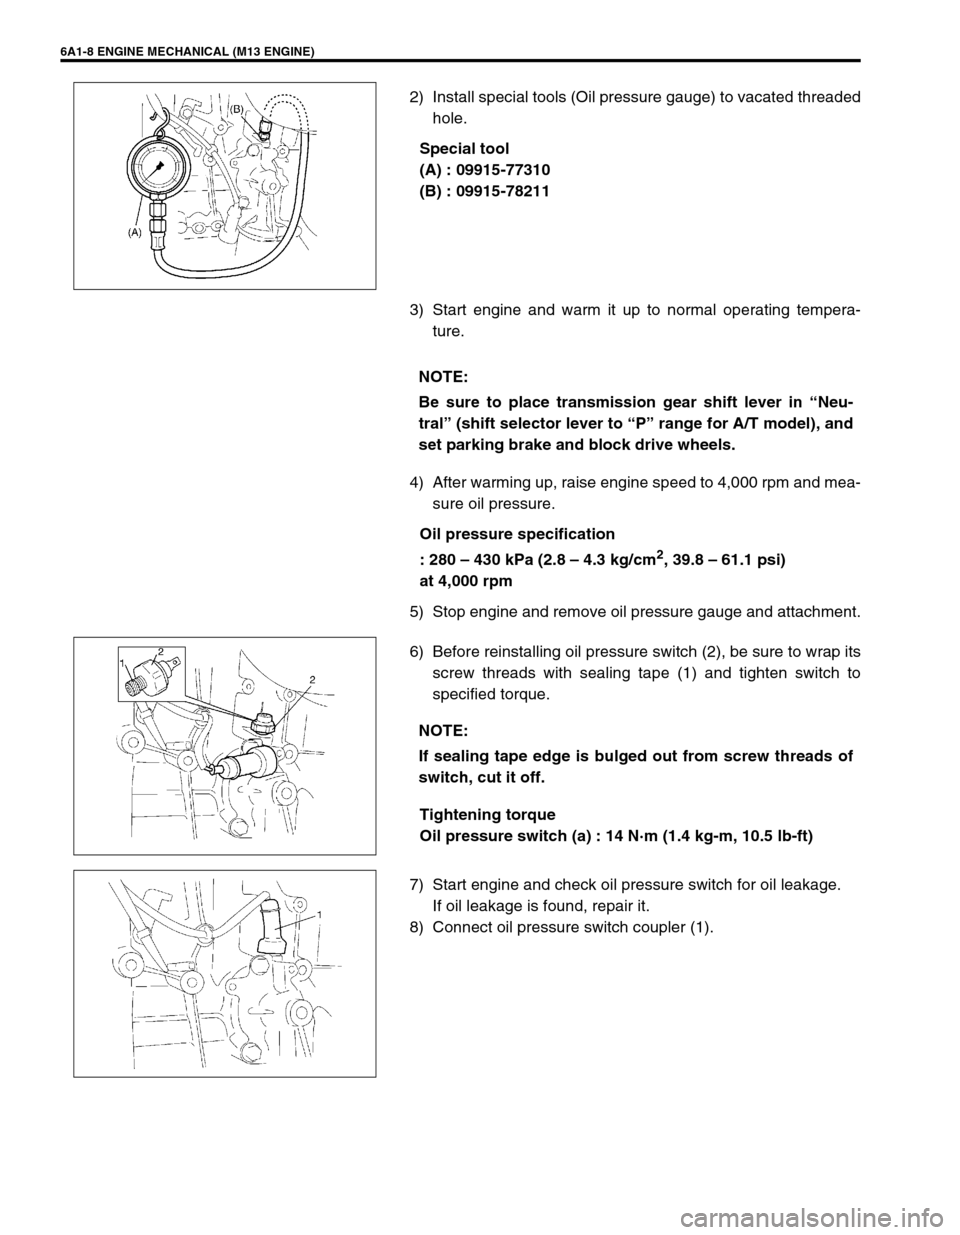
2) Install special tools (Oil pressure gauge) to vacated threaded
hole.
Special tool
(A) : 09915-77310
(B) : 09915-78211
3) Start engine and warm it up to normal operating tempera-
ture.
4) After warming up, raise engine speed to 4,000 rpm and mea-
sure oil pressure.
Oil pressure specification
: 280 – 430 kPa (2.8 – 4.3 kg/cm
2, 39.8 – 61.1 psi)
at 4,000 rpm
5) Stop engine and remove oil pressure gauge and attachment.
6) Before reinstalling oil pressure switch (2), be sure to wrap its
screw threads with sealing tape (1) and tighten switch to
specified torque.
Tightening torque
Oil pressure switch (a) : 14 N·m (1.4 kg-m, 10.5 lb-ft)
7) Start engine and check oil pressure switch for oil leakage.
If oil leakage is found, repair it.
8) Connect oil pressure switch coupler (1).
NOTE:
Be sure to place transmission gear shift lever in “Neu-
tral” (shift selector lever to “P” range for A/T model), and
set parking brake and block drive wheels.
NOTE:
If sealing tape edge is bulged out from screw threads of
switch, cut it off.
Page 511 of 698
6A1-10 ENGINE MECHANICAL (M13 ENGINE)
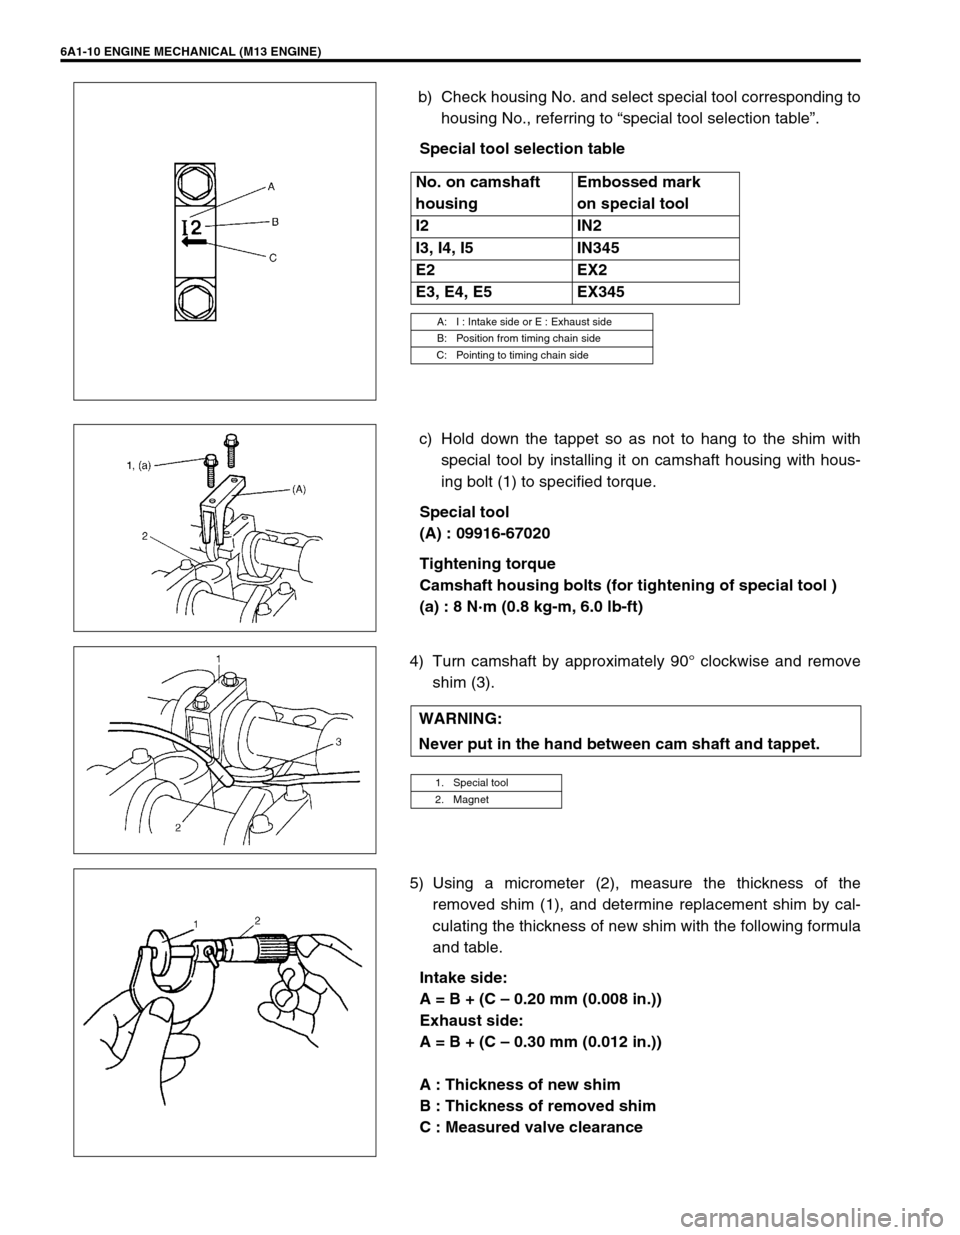
b) Check housing No. and select special tool corresponding to
housing No., referring to “special tool selection table”.
Special tool selection table
c) Hold down the tappet so as not to hang to the shim with
special tool by installing it on camshaft housing with hous-
ing bolt (1) to specified torque.
Special tool
(A) : 09916-67020
Tightening torque
Camshaft housing bolts (for tightening of special tool )
(a) : 8 N·m (0.8 kg-m, 6.0 lb-ft)
4) Turn camshaft by approximately 90° clockwise and remove
shim (3).
5) Using a micrometer (2), measure the thickness of the
removed shim (1), and determine replacement shim by cal-
culating the thickness of new shim with the following formula
and table.
Intake side:
A = B + (C – 0.20 mm (0.008 in.))
Exhaust side:
A = B + (C – 0.30 mm (0.012 in.))
A : Thickness of new shim
B : Thickness of removed shim
C : Measured valve clearance No. on camshaft
housingEmbossed mark
on special tool
I2 IN2
I3, I4, I5 IN345
E2 EX2
E3, E4, E5 EX345
A: I : Intake side or E : Exhaust side
B: Position from timing chain side
C: Pointing to timing chain side
WARNING:
Never put in the hand between cam shaft and tappet.
1. Special tool
2. Magnet
Page 513 of 698
6A1-12 ENGINE MECHANICAL (M13 ENGINE)
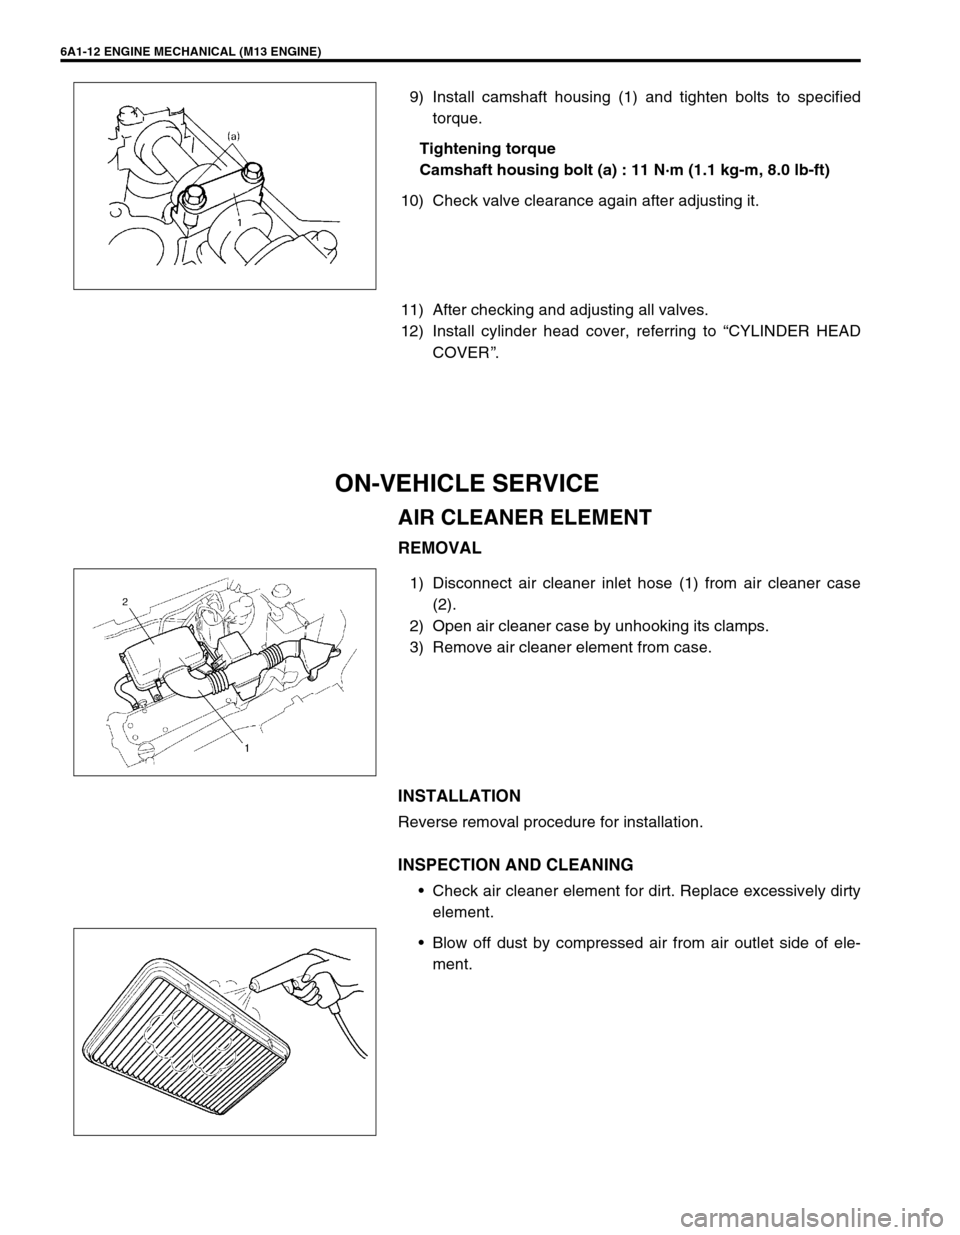
9) Install camshaft housing (1) and tighten bolts to specified
torque.
Tightening torque
Camshaft housing bolt (a) : 11 N·m (1.1 kg-m, 8.0 lb-ft)
10) Check valve clearance again after adjusting it.
11) After checking and adjusting all valves.
12) Install cylinder head cover, referring to “CYLINDER HEAD
COVER”.
ON-VEHICLE SERVICE
AIR CLEANER ELEMENT
REMOVAL
1) Disconnect air cleaner inlet hose (1) from air cleaner case
(2).
2) Open air cleaner case by unhooking its clamps.
3) Remove air cleaner element from case.
INSTALLATION
Reverse removal procedure for installation.
INSPECTION AND CLEANING
Check air cleaner element for dirt. Replace excessively dirty
element.
Blow off dust by compressed air from air outlet side of ele-
ment.
Page 516 of 698
ENGINE MECHANICAL (M13 ENGINE) 6A1-15
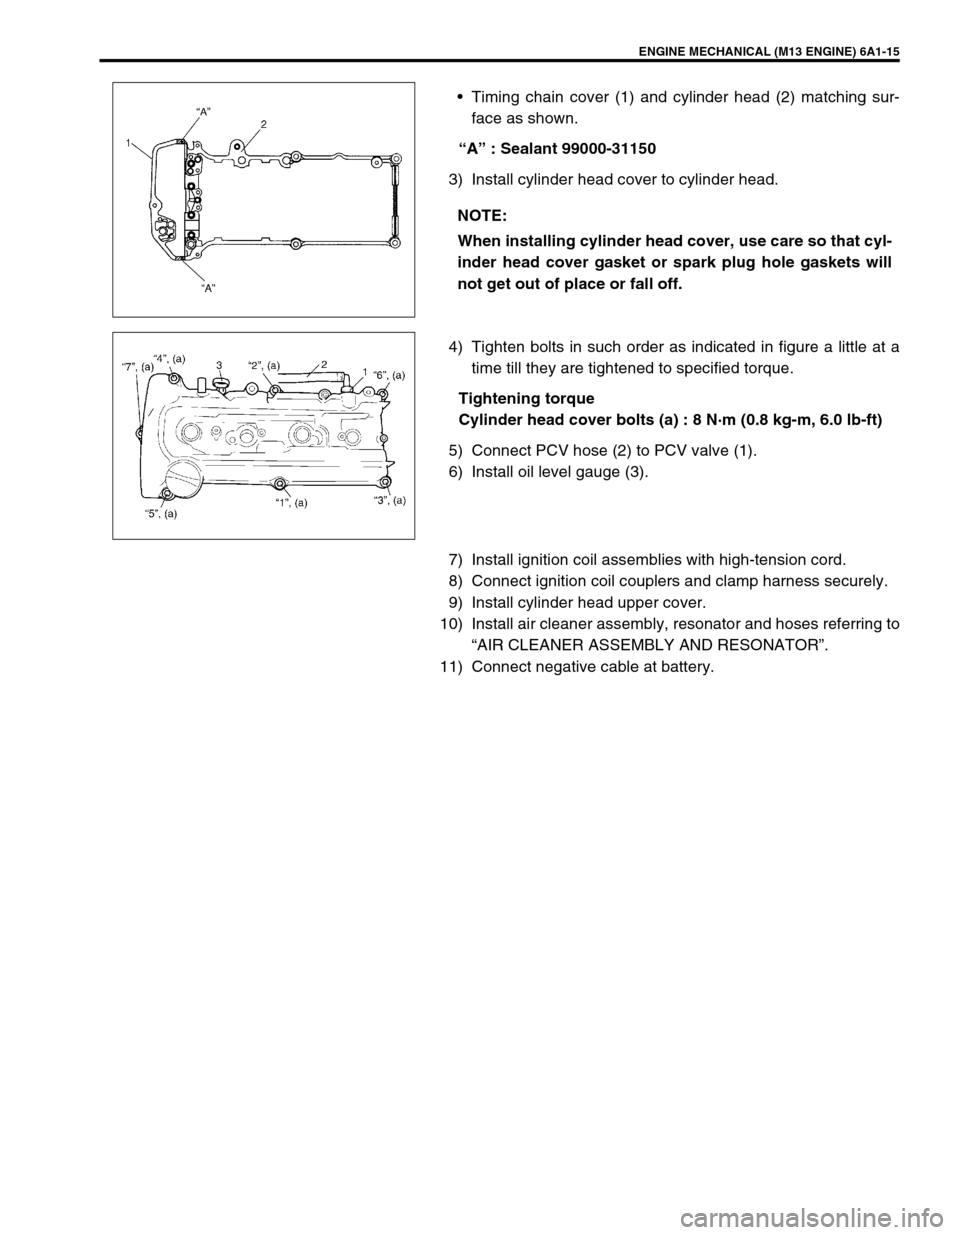
Timing chain cover (1) and cylinder head (2) matching sur-
face as shown.
“A” : Sealant 99000-31150
3) Install cylinder head cover to cylinder head.
4) Tighten bolts in such order as indicated in figure a little at a
time till they are tightened to specified torque.
Tightening torque
Cylinder head cover bolts (a) : 8 N·m (0.8 kg-m, 6.0 lb-ft)
5) Connect PCV hose (2) to PCV valve (1).
6) Install oil level gauge (3).
7) Install ignition coil assemblies with high-tension cord.
8) Connect ignition coil couplers and clamp harness securely.
9) Install cylinder head upper cover.
10) Install air cleaner assembly, resonator and hoses referring to
“AIR CLEANER ASSEMBLY AND RESONATOR”.
11) Connect negative cable at battery.NOTE:
When installing cylinder head cover, use care so that cyl-
inder head cover gasket or spark plug hole gaskets will
not get out of place or fall off.
Page 517 of 698
6A1-16 ENGINE MECHANICAL (M13 ENGINE)
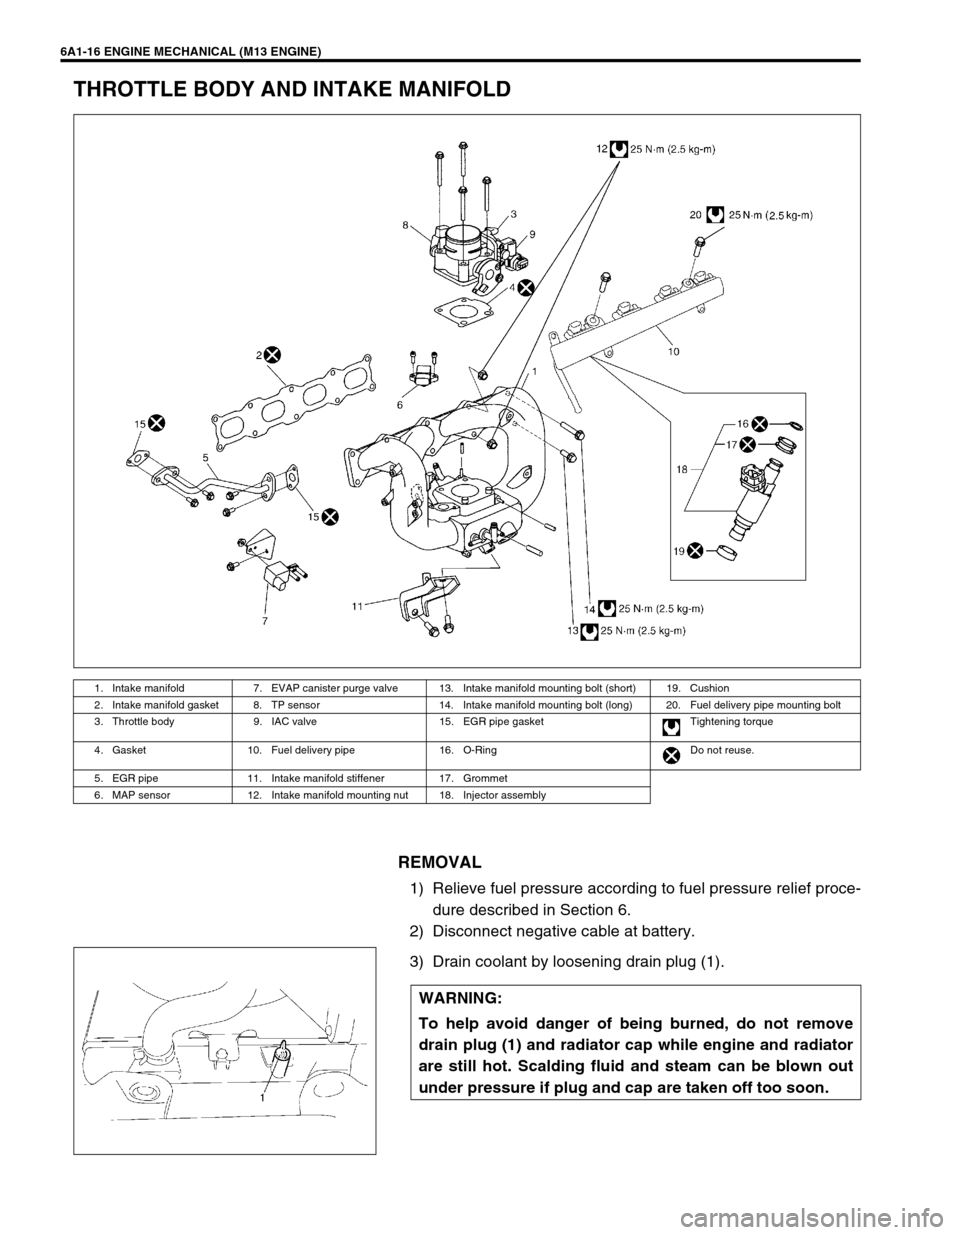
THROTTLE BODY AND INTAKE MANIFOLD
REMOVAL
1) Relieve fuel pressure according to fuel pressure relief proce-
dure described in Section 6.
2) Disconnect negative cable at battery.
3) Drain coolant by loosening drain plug (1).
1. Intake manifold 7. EVAP canister purge valve 13. Intake manifold mounting bolt (short) 19. Cushion
2. Intake manifold gasket 8. TP sensor 14. Intake manifold mounting bolt (long) 20. Fuel delivery pipe mounting bolt
3. Throttle body 9. IAC valve 15. EGR pipe gasket Tightening torque
4. Gasket 10. Fuel delivery pipe 16. O-Ring Do not reuse.
5. EGR pipe 11. Intake manifold stiffener 17. Grommet
6. MAP sensor 12. Intake manifold mounting nut 18. Injector assembly
WARNING:
To help avoid danger of being burned, do not remove
drain plug (1) and radiator cap while engine and radiator
are still hot. Scalding fluid and steam can be blown out
under pressure if plug and cap are taken off too soon.
Page 519 of 698
6A1-18 ENGINE MECHANICAL (M13 ENGINE)
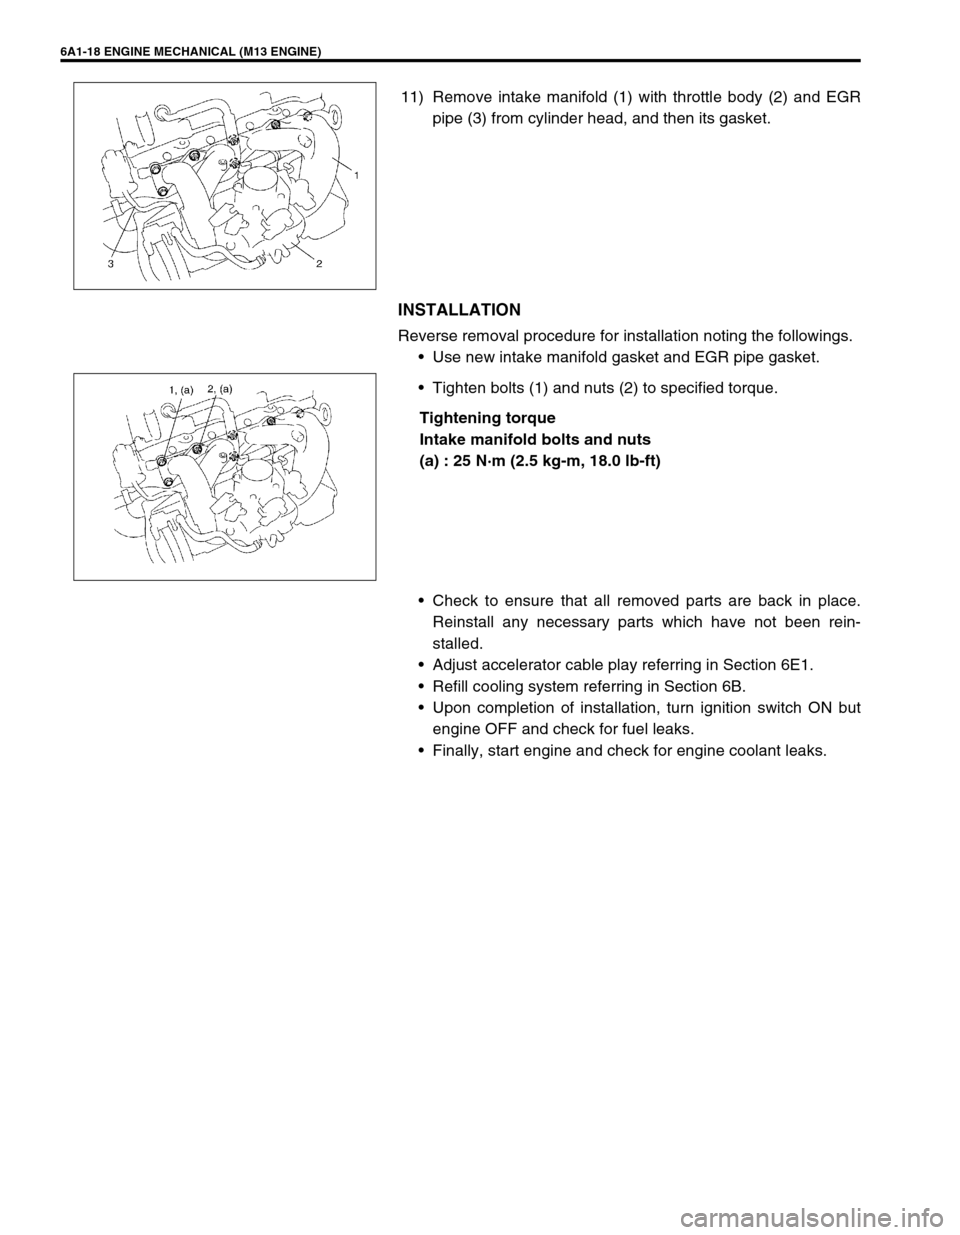
11) Remove intake manifold (1) with throttle body (2) and EGR
pipe (3) from cylinder head, and then its gasket.
INSTALLATION
Reverse removal procedure for installation noting the followings.
Use new intake manifold gasket and EGR pipe gasket.
Tighten bolts (1) and nuts (2) to specified torque.
Tightening torque
Intake manifold bolts and nuts
(a) : 25 N·m (2.5 kg-m, 18.0 lb-ft)
Check to ensure that all removed parts are back in place.
Reinstall any necessary parts which have not been rein-
stalled.
Adjust accelerator cable play referring in Section 6E1.
Refill cooling system referring in Section 6B.
Upon completion of installation, turn ignition switch ON but
engine OFF and check for fuel leaks.
Finally, start engine and check for engine coolant leaks.
Page 520 of 698
ENGINE MECHANICAL (M13 ENGINE) 6A1-19
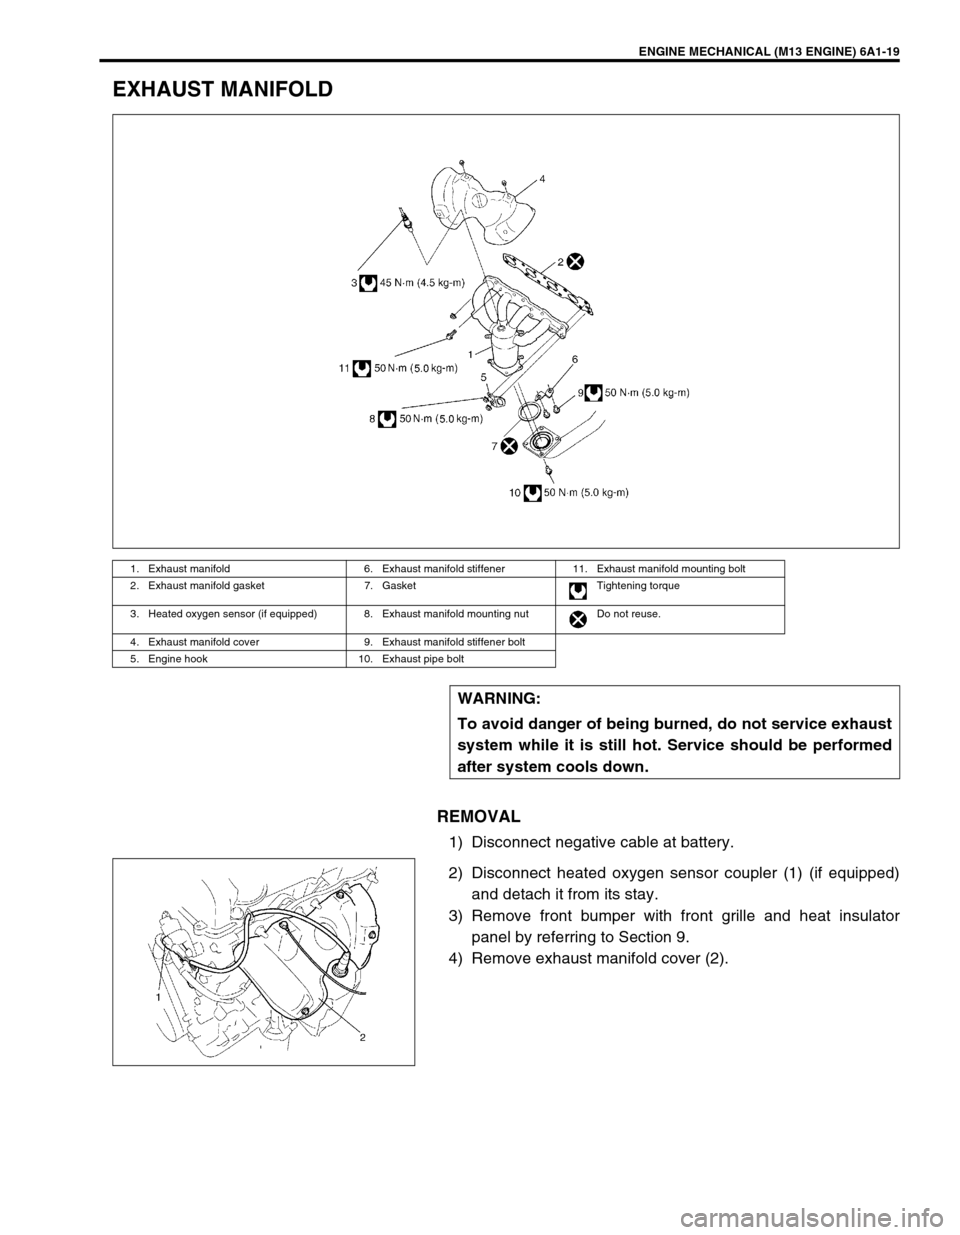
EXHAUST MANIFOLD
REMOVAL
1) Disconnect negative cable at battery.
2) Disconnect heated oxygen sensor coupler (1) (if equipped)
and detach it from its stay.
3) Remove front bumper with front grille and heat insulator
panel by referring to Section 9.
4) Remove exhaust manifold cover (2).
1. Exhaust manifold 6. Exhaust manifold stiffener 11. Exhaust manifold mounting bolt
2. Exhaust manifold gasket 7. Gasket Tightening torque
3. Heated oxygen sensor (if equipped) 8. Exhaust manifold mounting nut Do not reuse.
4. Exhaust manifold cover 9. Exhaust manifold stiffener bolt
5. Engine hook 10. Exhaust pipe bolt
WARNING:
To avoid danger of being burned, do not service exhaust
system while it is still hot. Service should be performed
after system cools down.
Page 521 of 698
6A1-20 ENGINE MECHANICAL (M13 ENGINE)
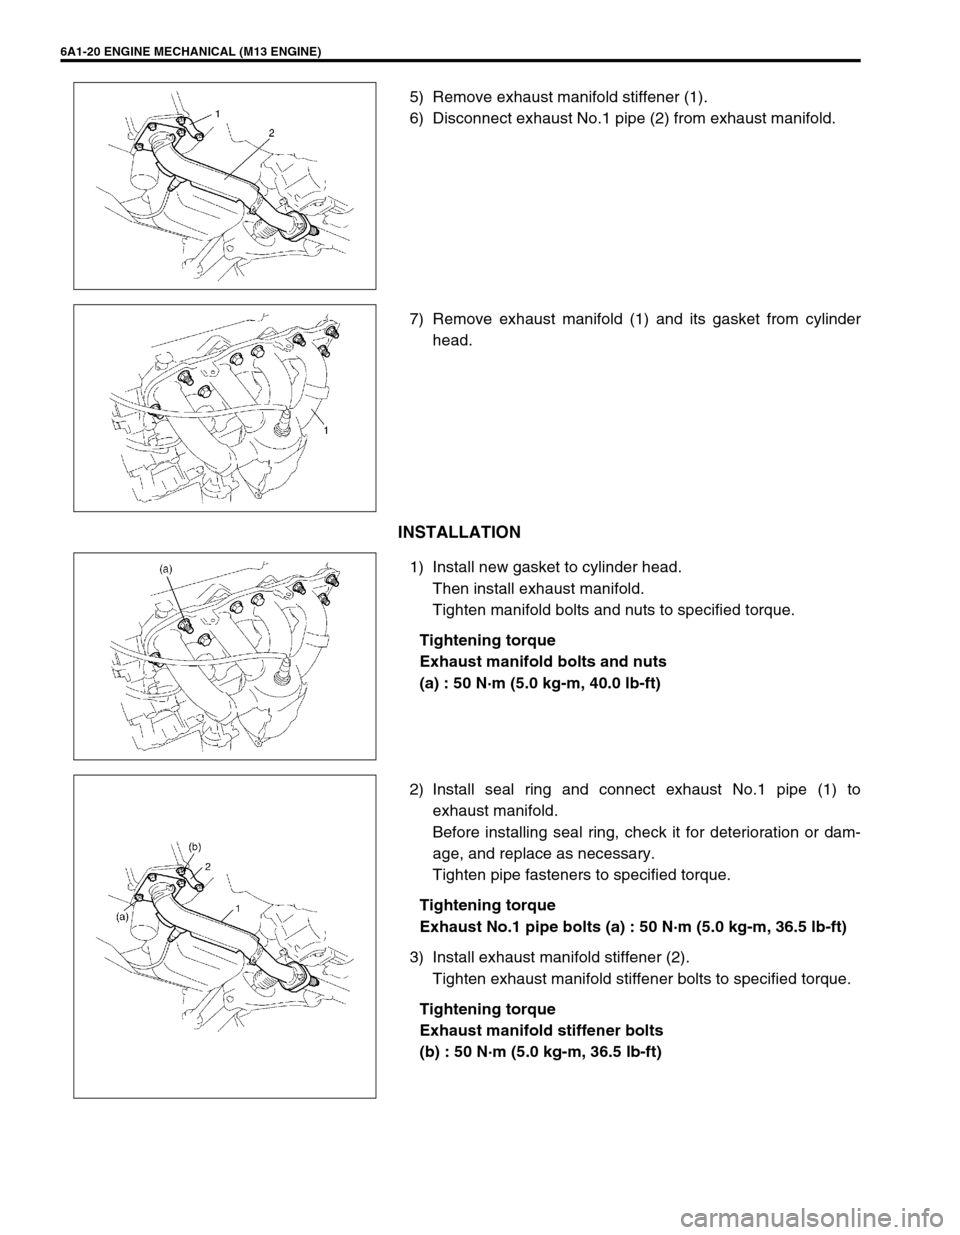
5) Remove exhaust manifold stiffener (1).
6) Disconnect exhaust No.1 pipe (2) from exhaust manifold.
7) Remove exhaust manifold (1) and its gasket from cylinder
head.
INSTALLATION
1) Install new gasket to cylinder head.
Then install exhaust manifold.
Tighten manifold bolts and nuts to specified torque.
Tightening torque
Exhaust manifold bolts and nuts
(a) : 50 N·m (5.0 kg-m, 40.0 lb-ft)
2) Install seal ring and connect exhaust No.1 pipe (1) to
exhaust manifold.
Before installing seal ring, check it for deterioration or dam-
age, and replace as necessary.
Tighten pipe fasteners to specified torque.
Tightening torque
Exhaust No.1 pipe bolts (a) : 50 N·m (5.0 kg-m, 36.5 lb-ft)
3) Install exhaust manifold stiffener (2).
Tighten exhaust manifold stiffener bolts to specified torque.
Tightening torque
Exhaust manifold stiffener bolts
(b) : 50 N·m (5.0 kg-m, 36.5 lb-ft)