SUZUKI SWIFT 2000 1.G Transmission Service Repair Manual
Manufacturer: SUZUKI, Model Year: 2000, Model line: SWIFT, Model: SUZUKI SWIFT 2000 1.GPages: 447, PDF Size: 10.54 MB
Page 51 of 447
AUTOMATIC TRANSMISSION (4 A/T) 7B-9
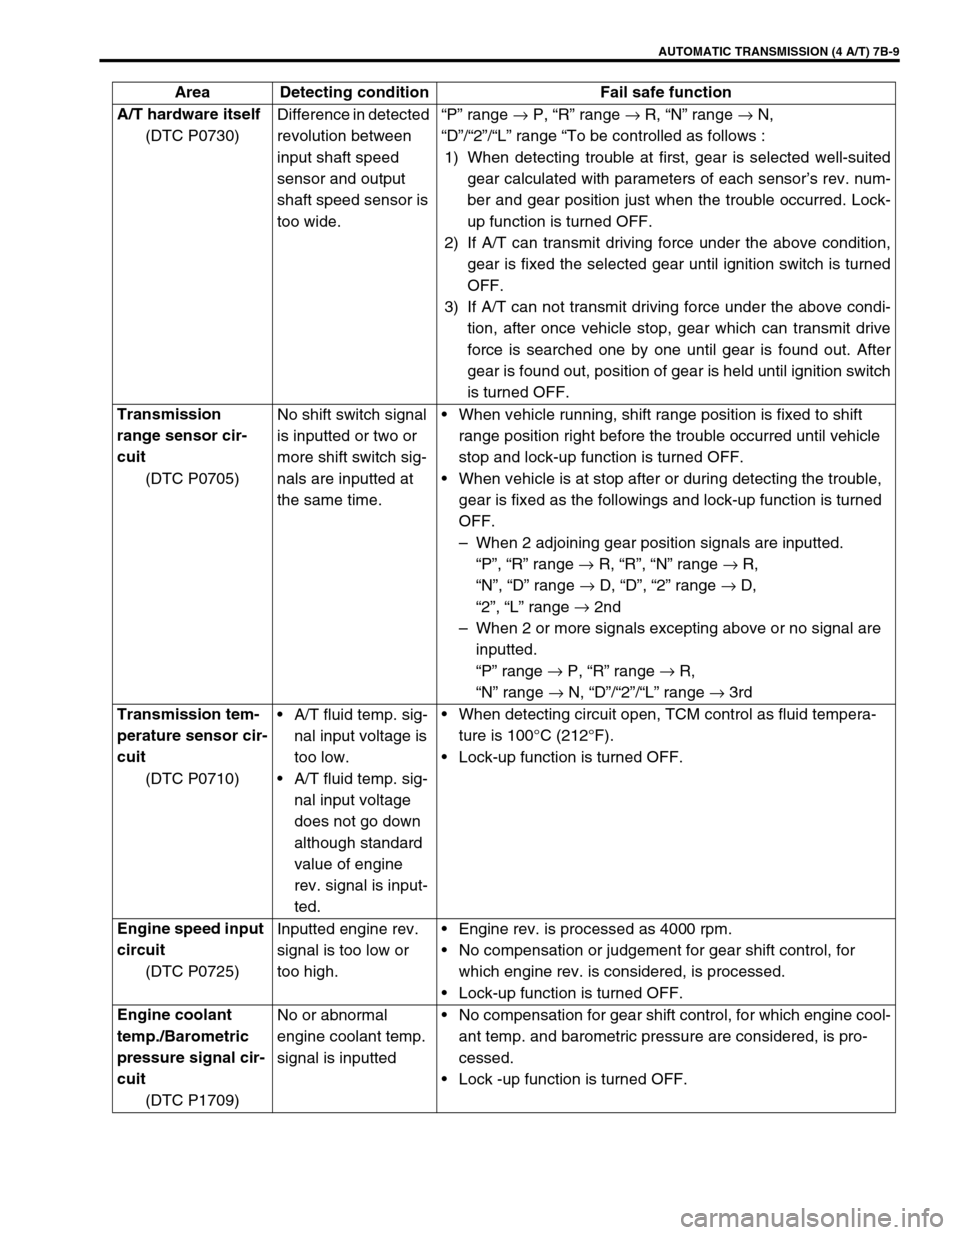
A/T hardware itself
(DTC P0730)Difference in detected
revolution between
input shaft speed
sensor and output
shaft speed sensor is
too wide.“P” range →
P, “R” range →
R, “N” range →
N,
“D”/“2”/“L” range “To be controlled as follows :
1) When detecting trouble at first, gear is selected well-suited
gear calculated with parameters of each sensor’s rev. num-
ber and gear position just when the trouble occurred. Lock-
up function is turned OFF.
2) If A/T can transmit driving force under the above condition,
gear is fixed the selected gear until ignition switch is turned
OFF.
3) If A/T can not transmit driving force under the above condi-
tion, after once vehicle stop, gear which can transmit drive
force is searched one by one until gear is found out. After
gear is found out, position of gear is held until ignition switch
is turned OFF.
Transmission
range sensor cir-
cuit
(DTC P0705)No shift switch signal
is inputted or two or
more shift switch sig-
nals are inputted at
the same time.When vehicle running, shift range position is fixed to shift
range position right before the trouble occurred until vehicle
stop and lock-up function is turned OFF.
When vehicle is at stop after or during detecting the trouble,
gear is fixed as the followings and lock-up function is turned
OFF.
–When 2 adjoining gear position signals are inputted.
“P”, “R” range →
R, “R”, “N” range →
R,
“N”, “D” range →
D, “D”, “2” range →
D,
“2”, “L” range →
2nd
–When 2 or more signals excepting above or no signal are
inputted.
“P” range →
P, “R” range →
R,
“N” range →
N, “D”/“2”/“L” range →
3rd
Transmission tem-
perature sensor cir-
cuit
(DTC P0710)A/T fluid temp. sig-
nal input voltage is
too low.
A/T fluid temp. sig-
nal input voltage
does not go down
although standard
value of engine
rev. signal is input-
ted.When detecting circuit open, TCM control as fluid tempera-
ture is 100°C (212°F).
Lock-up function is turned OFF.
Engine speed input
circuit
(DTC P0725)Inputted engine rev.
signal is too low or
too high.Engine rev. is processed as 4000 rpm.
No compensation or judgement for gear shift control, for
which engine rev. is considered, is processed.
Lock-up function is turned OFF.
Engine coolant
temp./Barometric
pressure signal cir-
cuit
(DTC P1709)No or abnormal
engine coolant temp.
signal is inputtedNo compensation for gear shift control, for which engine cool-
ant temp. and barometric pressure are considered, is pro-
cessed.
Lock -up function is turned OFF. Area Detecting condition Fail safe function
Page 52 of 447
7B-10 AUTOMATIC TRANSMISSION (4 A/T)
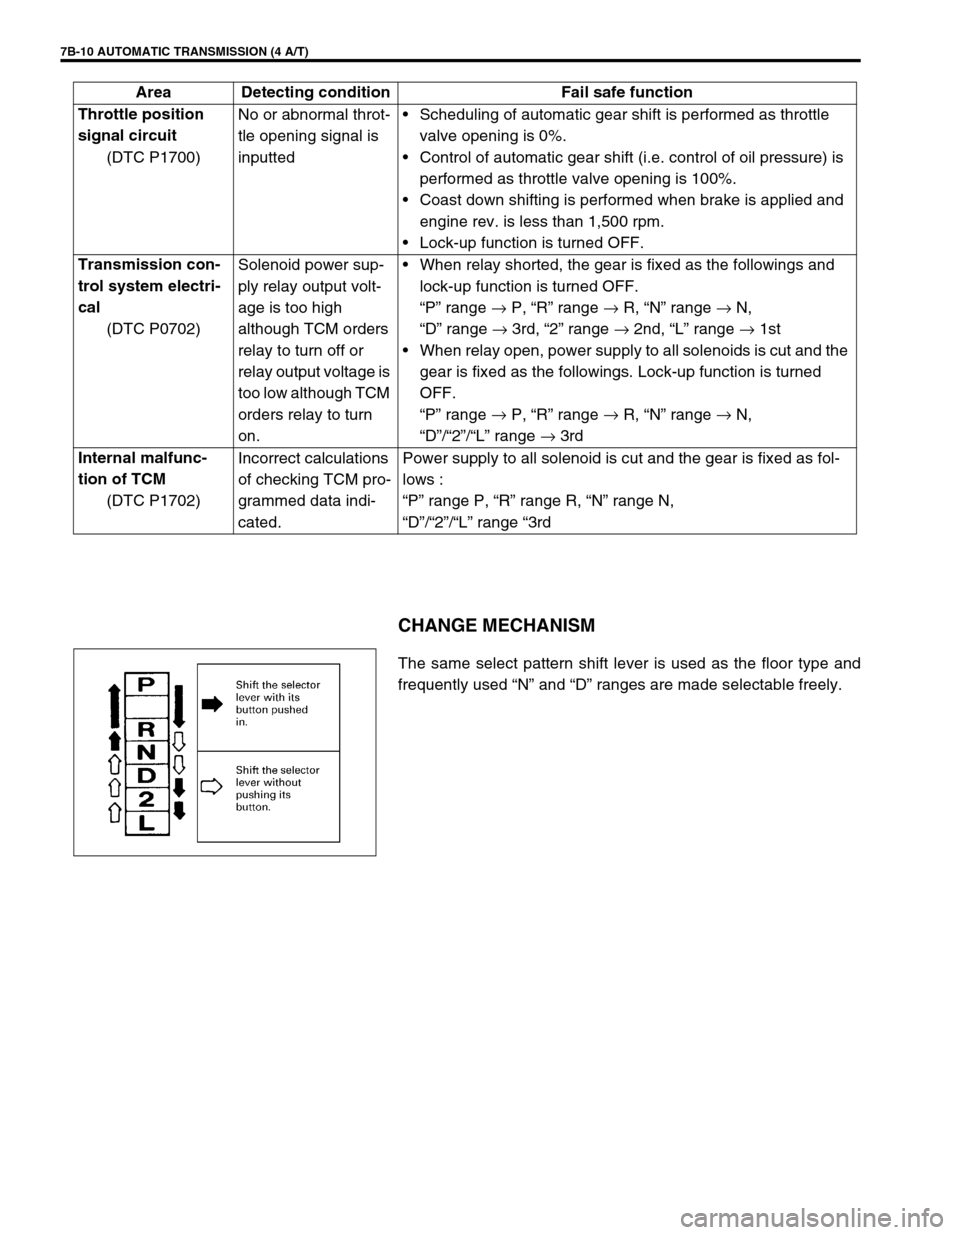
CHANGE MECHANISM
The same select pattern shift lever is used as the floor type and
frequently used “N” and “D” ranges are made selectable freely. Throttle position
signal circuit
(DTC P1700)No or abnormal throt-
tle opening signal is
inputtedScheduling of automatic gear shift is performed as throttle
valve opening is 0%.
Control of automatic gear shift (i.e. control of oil pressure) is
performed as throttle valve opening is 100%.
Coast down shifting is performed when brake is applied and
engine rev. is less than 1,500 rpm.
Lock-up function is turned OFF.
Transmission con-
trol system electri-
cal
(DTC P0702)Solenoid power sup-
ply relay output volt-
age is too high
although TCM orders
relay to turn off or
relay output voltage is
too low although TCM
orders relay to turn
on.When relay shorted, the gear is fixed as the followings and
lock-up function is turned OFF.
“P” range →
P, “R” range →
R, “N” range →
N,
“D” range →
3rd, “2” range →
2nd, “L” range →
1st
When relay open, power supply to all solenoids is cut and the
gear is fixed as the followings. Lock-up function is turned
OFF.
“P” range →
P, “R” range →
R, “N” range →
N,
“D”/“2”/“L” range →
3rd
Internal malfunc-
tion of TCM
(DTC P1702)Incorrect calculations
of checking TCM pro-
grammed data indi-
cated.Power supply to all solenoid is cut and the gear is fixed as fol-
lows :
“P” range P, “R” range R, “N” range N,
“D”/“2”/“L” range “3rd Area Detecting condition Fail safe function
Page 53 of 447
![SUZUKI SWIFT 2000 1.G Transmission Service Repair Manual AUTOMATIC TRANSMISSION (4 A/T) 7B-11
AUTOMATIC GEAR SHIFT DIAGRAM
Automatic shift schedule as a result of shift control is shown below.
[For 2WD model]
Gear Shift Diagram
TCC Lock-up Diagram
Shift
Thr SUZUKI SWIFT 2000 1.G Transmission Service Repair Manual AUTOMATIC TRANSMISSION (4 A/T) 7B-11
AUTOMATIC GEAR SHIFT DIAGRAM
Automatic shift schedule as a result of shift control is shown below.
[For 2WD model]
Gear Shift Diagram
TCC Lock-up Diagram
Shift
Thr](/img/20/7605/w960_7605-52.png)
AUTOMATIC TRANSMISSION (4 A/T) 7B-11
AUTOMATIC GEAR SHIFT DIAGRAM
Automatic shift schedule as a result of shift control is shown below.
[For 2WD model]
Gear Shift Diagram
TCC Lock-up Diagram
Shift
Throttle opening 1→
22→
33→
44→
33→
22→
1
Full throttle 44 98 - 135 87 35
Closed throttle 13 26 43 34 9 9
Page 54 of 447
![SUZUKI SWIFT 2000 1.G Transmission Service Repair Manual 7B-12 AUTOMATIC TRANSMISSION (4 A/T)
[For 4WD model]
Gear Shift Diagram
TCC Lock-up Diagram
Shift
Throttle opening 1→
22→
33→
44→
33→
22→
1
Full throttle 40 90 143 124 80 32
Closed throttl SUZUKI SWIFT 2000 1.G Transmission Service Repair Manual 7B-12 AUTOMATIC TRANSMISSION (4 A/T)
[For 4WD model]
Gear Shift Diagram
TCC Lock-up Diagram
Shift
Throttle opening 1→
22→
33→
44→
33→
22→
1
Full throttle 40 90 143 124 80 32
Closed throttl](/img/20/7605/w960_7605-53.png)
7B-12 AUTOMATIC TRANSMISSION (4 A/T)
[For 4WD model]
Gear Shift Diagram
TCC Lock-up Diagram
Shift
Throttle opening 1→
22→
33→
44→
33→
22→
1
Full throttle 40 90 143 124 80 32
Closed throttle 12 24 40 31 9 9
Page 55 of 447

AUTOMATIC TRANSMISSION (4 A/T) 7B-13
DIAGNOSIS
This vehicle is equipped with an electronic transmission control system, which controls the automatic shift up
and shift down timing, etc. suitably to vehicle driving conditions.
When diagnosing a trouble in the transmission including this system, follow “AUTOMATIC TRANSMISSION
DIAGNOSTIC FLOW TABLE” given below to obtain correct result smoothly.
AUTOMATIC TRANSMISSION DIAGNOSTIC FLOW TABLE
NOTE:
For the details of each step, refer to the following pages.
Step Action Yes No
1 Customer Complaint Analysis
1) Perform customer complaint analysis refer-
ring to the following page.
Was customer complaint analysis performed
according to instruction on the following page?Go to Step 2. Perform customer com-
plaint analysis.
2 Diagnostic Trouble Code (DTC) Check, Record
and Clearance
1) Check for DTC referring to the following
page.
Is there any DTC(s)?1) Print DTC or write it
down and clear it by
referring to “DTC
CLEARANCE” in this
section.
2) Go to Step 3.Go to Step 4.
3 Visual Inspection
1) Perform visual inspection referring to the fol-
lowing page.
Is there any faulty condition?1) Repair or replace mal-
function part.
2) Go to Step 11.Go to Step 5.
4 Visual Inspection
1) Perform visual inspection referring to the fol-
lowing page.
Is there any faulty condition?Go to Step 8.
5 Trouble Symptom Confirmation
1) Confirm trouble symptom referring to the fol-
lowing page.
Is trouble symptom identified?Go to Step 6. Go to Step 7.
6 Rechecking and Record of DTC.
1) Recheck for DTC referring to “DTC CHECK”
in this section.
Is there any DTC(s)?Go to Step 9. Go to Step 8.
7 Rechecking and Record of DTC.
1) Recheck for DTC referring to “DTC CHECK”
in this section.
Is there any DTC(s)?Go to Step 9. Go to Step 10.
Page 56 of 447

7B-14 AUTOMATIC TRANSMISSION (4 A/T)
8 Automatic Transmission Basic Check and Trou-
ble Diagnosis Table
1) Check and repair according to “A/T BASIC
CHECK” and “TROUBLE DIAGNOSIS
TABLE” in this section.
Are check and repair complete?Go to Step 11. 1) Check and repair
malfunction part(s).
2) Go to Step 11.
9 Troubleshooting for DTC
1) Check and repair according to applicable
DTC Diagnostic Flow Table.
Are check and repair complete?
10 Check for Intermittent Problems
1) Check for intermittent problems referring to
the following page.
Is there any faulty condition?1) Repair or replace mal-
function part(s).
2) Go to Step 11.Go to Step 11.
11 Final Confirmation Test
1) Clear DTC if any.
2) Perform final confirmation test referring to
the following page.
Is there any problem symptom, DTC or abnor-
mal condition?Go to Step 6. End. Step Action Yes No
Page 57 of 447

AUTOMATIC TRANSMISSION (4 A/T) 7B-15
1. CUSTOMER COMPLAINT ANALYSIS
Record details of the problem (failure, complaint) and how it occurred as described by the customer. For this
purpose, use of such a questionnaire form as shown below will facilitate collecting information to the point
required for proper analysis and diagnosis.
CUSTOMER QUESTIONNAIRE (EXAMPLE)
NOTE:
The above form is a standard sample. It should be modified according to conditions
characteristic of each market.
Page 58 of 447
7B-16 AUTOMATIC TRANSMISSION (4 A/T)
2. DIAGNOSTIC TROUBLE CODE (DTC) CHECK, RECORD AND CLEARANCE
To check DTC, refer to “DTC CHECK” in this section. When a DTC exists, it means existence of a malfunction in
the system represented by that code but whether it still exists (current) or it occurred in the past and has gone
(history) is unknown. To know it, clear this DTC once (Refer to “DTC CLEARANCE” in this section.), perform
test drive and/or “TROUBLE SYMPTOM CONFIRMATION” in this section and then check DTC again as
described in “DTC CHECK”. Attempt to diagnose the trouble based on the DTC recorded in this step only or fail-
ure to clear the DTC in this step may mislead the diagnosis or make diagnosing difficult. Even after checking the
DTC with the SUZUKI scan tool, diagnosis should be performed according to this flow chart to check TCM for
proper self-diagnosis function.
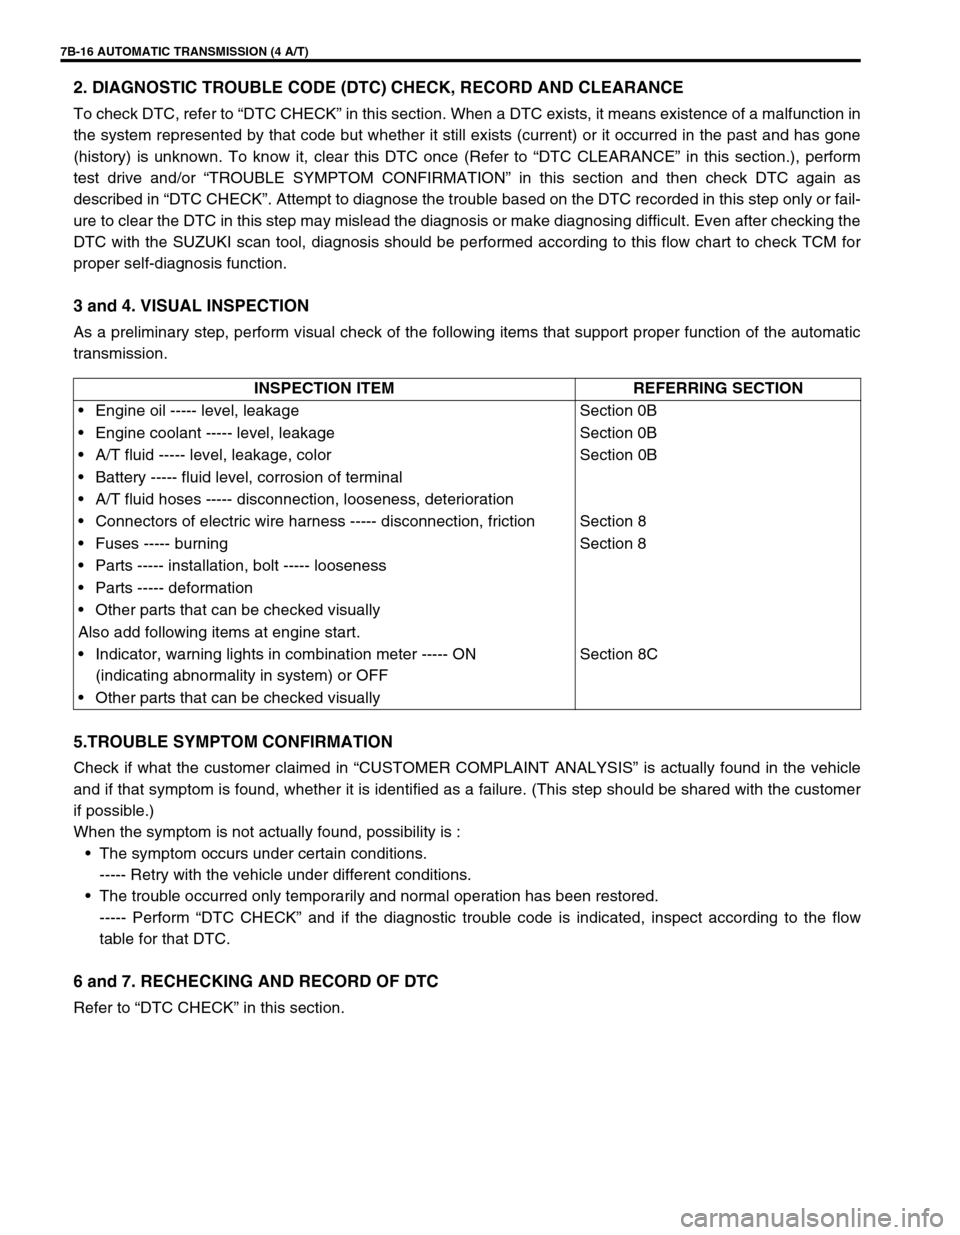
3 and 4. VISUAL INSPECTION
As a preliminary step, perform visual check of the following items that support proper function of the automatic
transmission.
5.TROUBLE SYMPTOM CONFIRMATION
Check if what the customer claimed in “CUSTOMER COMPLAINT ANALYSIS” is actually found in the vehicle
and if that symptom is found, whether it is identified as a failure. (This step should be shared with the customer
if possible.)
When the symptom is not actually found, possibility is :
The symptom occurs under certain conditions.
----- Retry with the vehicle under different conditions.
The trouble occurred only temporarily and normal operation has been restored.
----- Perform “DTC CHECK” and if the diagnostic trouble code is indicated, inspect according to the flow
table for that DTC.
6 and 7. RECHECKING AND RECORD OF DTC
Refer to “DTC CHECK” in this section.INSPECTION ITEM REFERRING SECTION
Engine oil ----- level, leakage Section 0B
Engine coolant ----- level, leakage Section 0B
A/T fluid ----- level, leakage, color Section 0B
Battery ----- fluid level, corrosion of terminal
A/T fluid hoses ----- disconnection, looseness, deterioration
Connectors of electric wire harness ----- disconnection, friction Section 8
Fuses ----- burning Section 8
Parts ----- installation, bolt ----- looseness
Parts ----- deformation
Other parts that can be checked visually
Also add following items at engine start.
Indicator, warning lights in combination meter ----- ON
(indicating abnormality in system) or OFFSection 8C
Other parts that can be checked visually
Page 59 of 447
AUTOMATIC TRANSMISSION (4 A/T) 7B-17
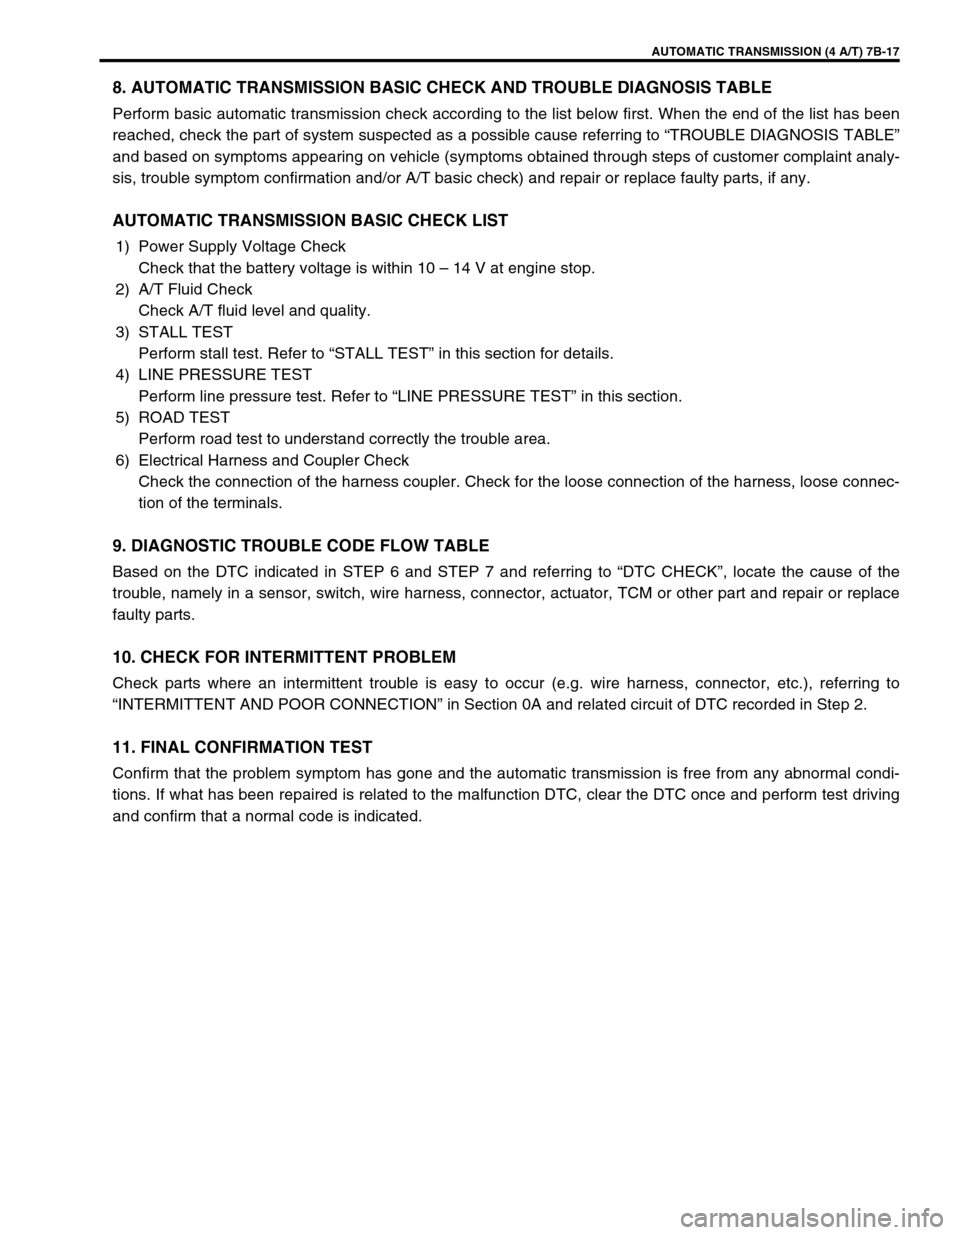
8. AUTOMATIC TRANSMISSION BASIC CHECK AND TROUBLE DIAGNOSIS TABLE
Perform basic automatic transmission check according to the list below first. When the end of the list has been
reached, check the part of system suspected as a possible cause referring to “TROUBLE DIAGNOSIS TABLE”
and based on symptoms appearing on vehicle (symptoms obtained through steps of customer complaint analy-
sis, trouble symptom confirmation and/or A/T basic check) and repair or replace faulty parts, if any.
AUTOMATIC TRANSMISSION BASIC CHECK LIST
1) Power Supply Voltage Check
Check that the battery voltage is within 10 – 14 V at engine stop.
2) A/T Fluid Check
Check A/T fluid level and quality.
3) STALL TEST
Perform stall test. Refer to “STALL TEST” in this section for details.
4) LINE PRESSURE TEST
Perform line pressure test. Refer to “LINE PRESSURE TEST” in this section.
5) ROAD TEST
Perform road test to understand correctly the trouble area.
6) Electrical Harness and Coupler Check
Check the connection of the harness coupler. Check for the loose connection of the harness, loose connec-
tion of the terminals.
9. DIAGNOSTIC TROUBLE CODE FLOW TABLE
Based on the DTC indicated in STEP 6 and STEP 7 and referring to “DTC CHECK”, locate the cause of the
trouble, namely in a sensor, switch, wire harness, connector, actuator, TCM or other part and repair or replace
faulty parts.
10. CHECK FOR INTERMITTENT PROBLEM
Check parts where an intermittent trouble is easy to occur (e.g. wire harness, connector, etc.), referring to
“INTERMITTENT AND POOR CONNECTION” in Section 0A and related circuit of DTC recorded in Step 2.
11. FINAL CONFIRMATION TEST
Confirm that the problem symptom has gone and the automatic transmission is free from any abnormal condi-
tions. If what has been repaired is related to the malfunction DTC, clear the DTC once and perform test driving
and confirm that a normal code is indicated.
Page 60 of 447
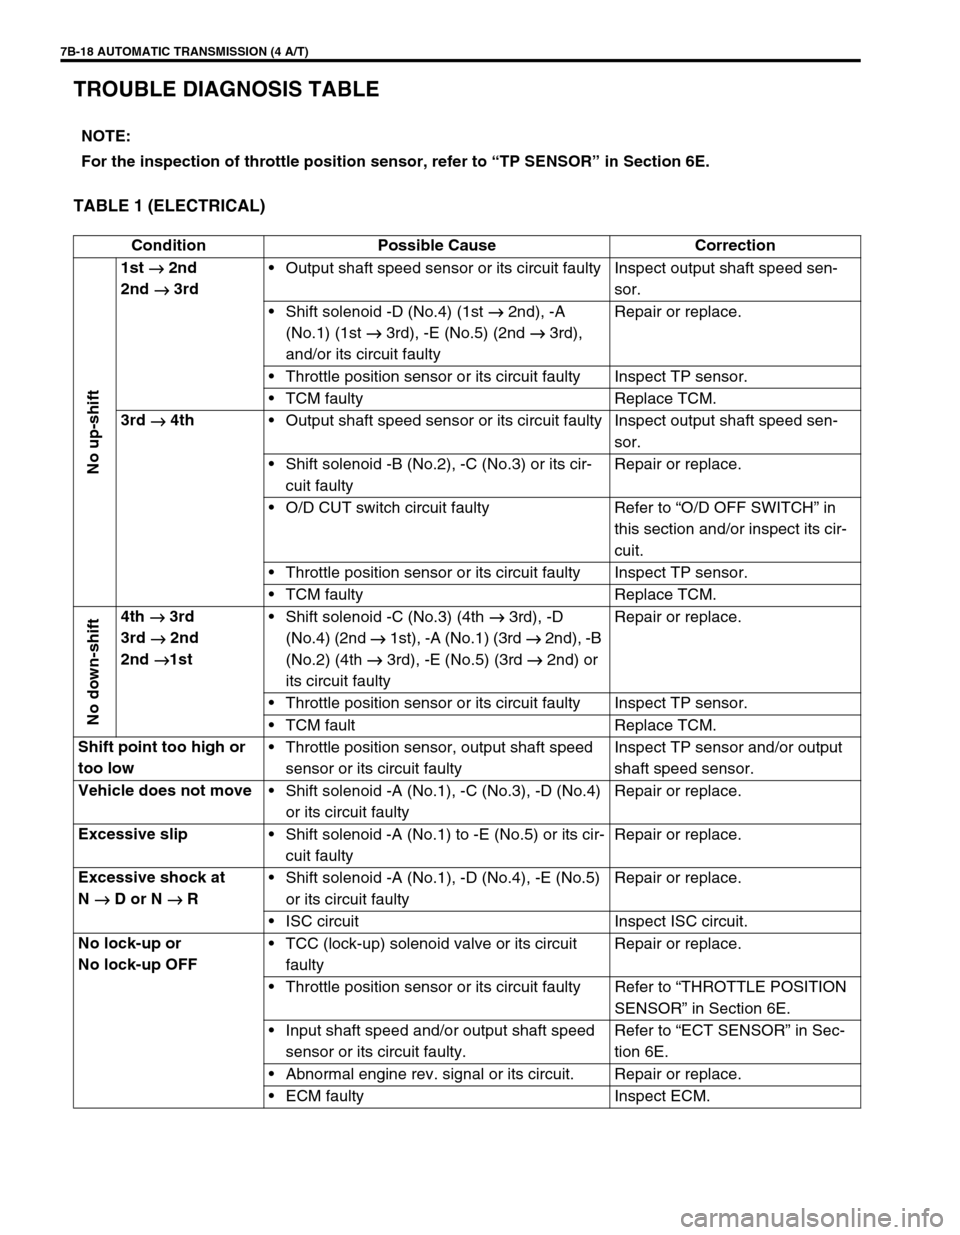
7B-18 AUTOMATIC TRANSMISSION (4 A/T)
TROUBLE DIAGNOSIS TABLE
TABLE 1 (ELECTRICAL)
NOTE:
For the inspection of throttle position sensor, refer to “TP SENSOR” in Section 6E.
Condition Possible Cause Correction
No up-shift
1st
→
→→ → 2nd
2nd
→
→→ → 3rdOutput shaft speed sensor or its circuit faulty Inspect output shaft speed sen-
sor.
Shift solenoid -D (No.4) (1st →
→→ →
2nd), -A
(No.1) (1st →
→→ →
3rd), -E (No.5) (2nd →
→→ →
3rd),
and/or its circuit faultyRepair or replace.
Throttle position sensor or its circuit faulty Inspect TP sensor.
TCM faulty Replace TCM.
3rd
→
→→ → 4th
Output shaft speed sensor or its circuit faulty Inspect output shaft speed sen-
sor.
Shift solenoid -B (No.2), -C (No.3) or its cir-
cuit faultyRepair or replace.
O/D CUT switch circuit faulty Refer to “O/D OFF SWITCH” in
this section and/or inspect its cir-
cuit.
Throttle position sensor or its circuit faulty Inspect TP sensor.
TCM faulty Replace TCM.
No down-shift
4th
→
→→ → 3rd
3rd
→
→→ → 2nd
2nd
→
→→ →1stShift solenoid -C (No.3) (4th →
→→ →
3rd), -D
(No.4) (2nd →
→→ →
1st), -A (No.1) (3rd →
→→ →
2nd), -B
(No.2) (4th →
→→ →
3rd), -E (No.5) (3rd →
→→ →
2nd) or
its circuit faultyRepair or replace.
Throttle position sensor or its circuit faulty Inspect TP sensor.
TCM fault Replace TCM.
Shift point too high or
too lowThrottle position sensor, output shaft speed
sensor or its circuit faultyInspect TP sensor and/or output
shaft speed sensor.
Vehicle does not move
Shift solenoid -A (No.1), -C (No.3), -D (No.4)
or its circuit faultyRepair or replace.
Excessive slip
Shift solenoid -A (No.1) to -E (No.5) or its cir-
cuit faultyRepair or replace.
Excessive shock at
N
→
→→ → D or N
→
→→ → RShift solenoid -A (No.1), -D (No.4), -E (No.5)
or its circuit faultyRepair or replace.
ISC circuit Inspect ISC circuit.
No lock-up or
No lock-up OFFTCC (lock-up) solenoid valve or its circuit
faultyRepair or replace.
Throttle position sensor or its circuit faulty Refer to “THROTTLE POSITION
SENSOR” in Section 6E.
Input shaft speed and/or output shaft speed
sensor or its circuit faulty.Refer to “ECT SENSOR” in Sec-
tion 6E.
Abnormal engine rev. signal or its circuit. Repair or replace.
ECM faulty Inspect ECM.