SUZUKI SWIFT 2000 1.G Transmission Service User Guide
Manufacturer: SUZUKI, Model Year: 2000, Model line: SWIFT, Model: SUZUKI SWIFT 2000 1.GPages: 447, PDF Size: 10.54 MB
Page 11 of 447
MANUAL TRANSMISSION 7A-11
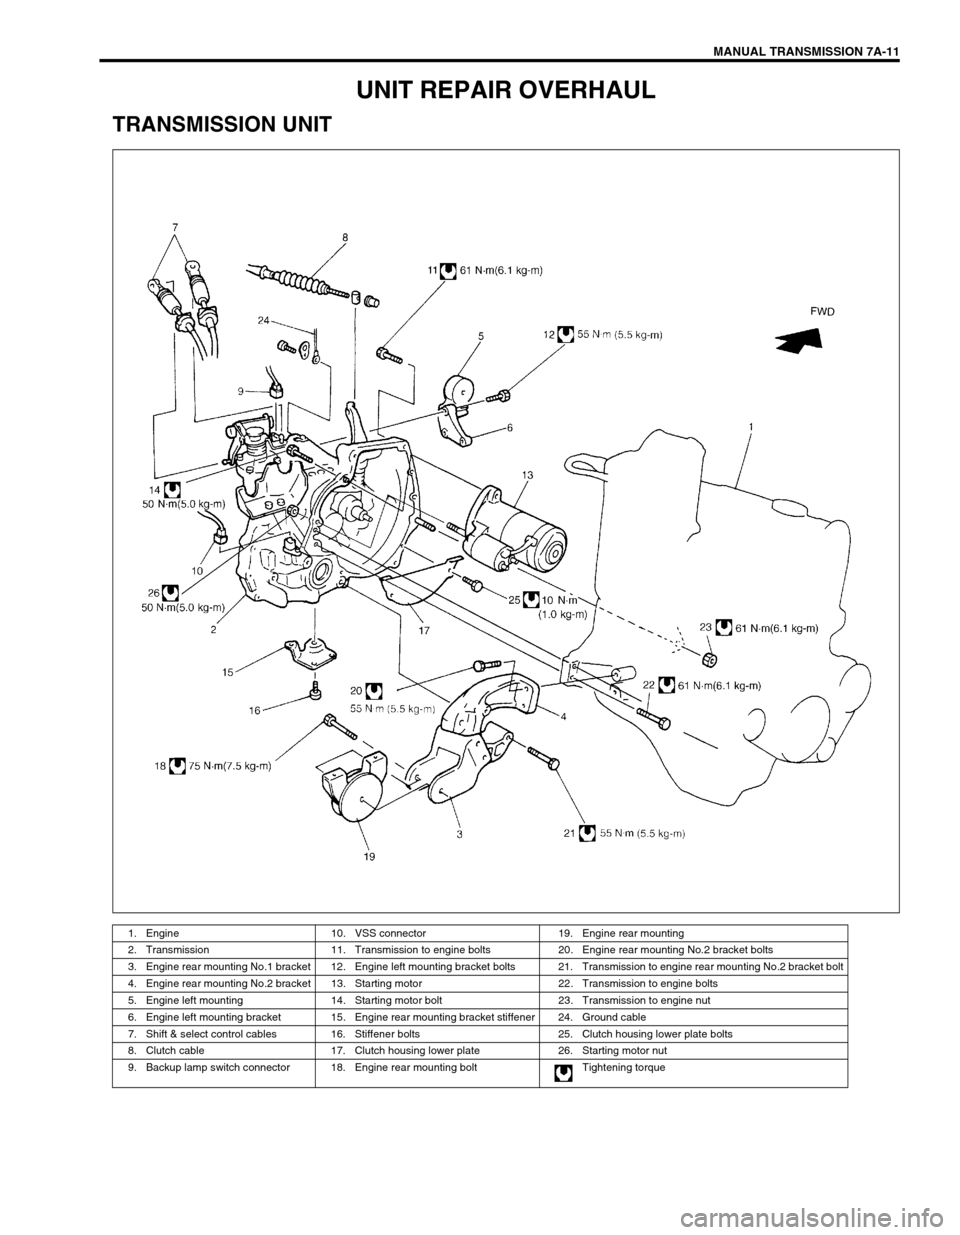
UNIT REPAIR OVERHAUL
TRANSMISSION UNIT
1. Engine 10. VSS connector 19. Engine rear mounting
2. Transmission 11. Transmission to engine bolts 20. Engine rear mounting No.2 bracket bolts
3. Engine rear mounting No.1 bracket 12. Engine left mounting bracket bolts 21. Transmission to engine rear mounting No.2 bracket bolt
4. Engine rear mounting No.2 bracket 13. Starting motor 22. Transmission to engine bolts
5. Engine left mounting 14. Starting motor bolt 23. Transmission to engine nut
6. Engine left mounting bracket 15. Engine rear mounting bracket stiffener 24. Ground cable
7. Shift & select control cables 16. Stiffener bolts 25. Clutch housing lower plate bolts
8. Clutch cable 17. Clutch housing lower plate 26. Starting motor nut
9. Backup lamp switch connector 18. Engine rear mounting bolt Tightening torque
Page 12 of 447
7A-12 MANUAL TRANSMISSION
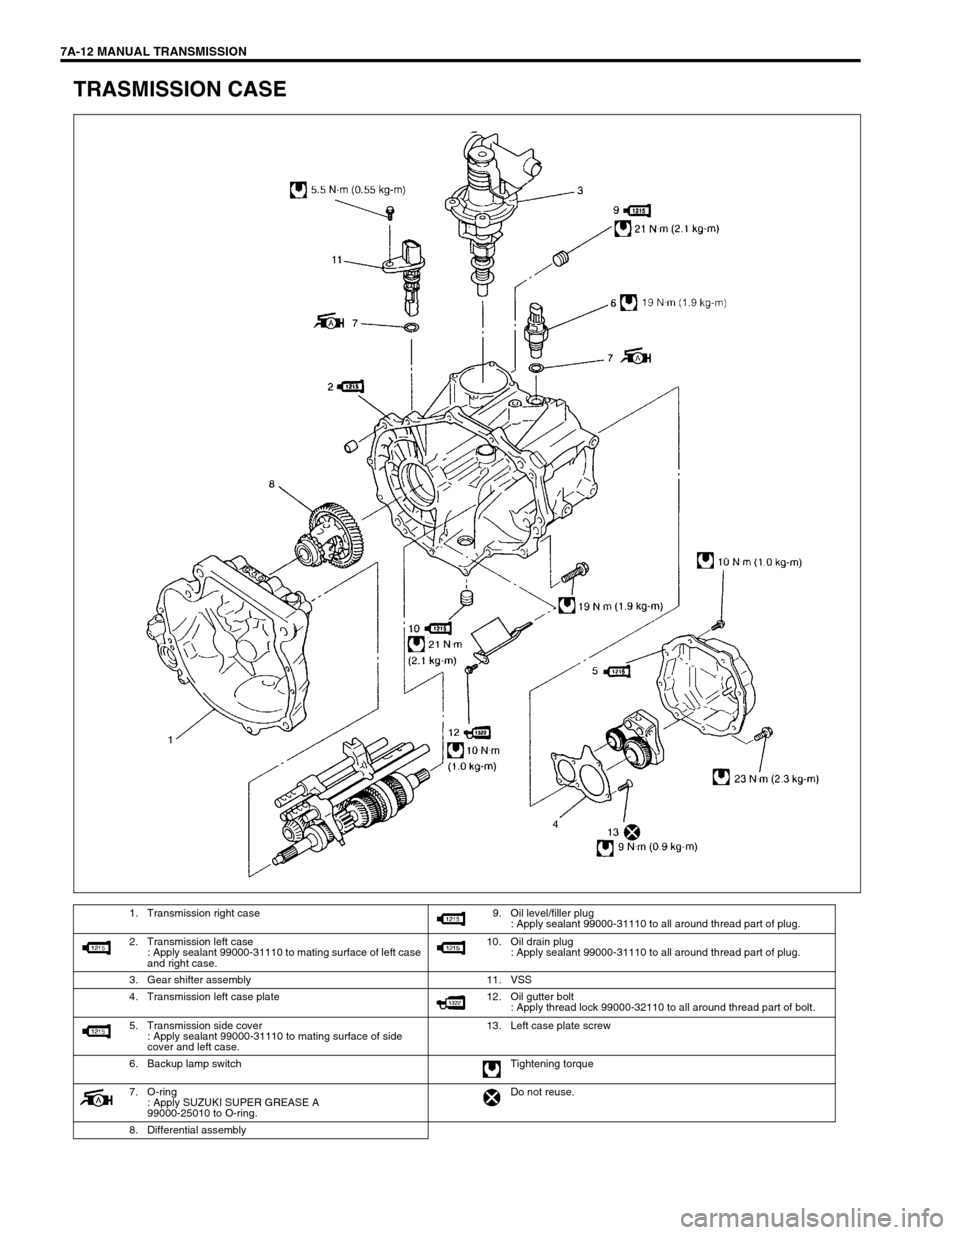
TRASMISSION CASE
1. Transmission right case 9. Oil level/filler plug
: Apply sealant 99000-31110 to all around thread part of plug.
2. Transmission left case
: Apply sealant 99000-31110 to mating surface of left case
and right case.10. Oil drain plug
: Apply sealant 99000-31110 to all around thread part of plug.
3. Gear shifter assembly 11. VSS
4. Transmission left case plate 12. Oil gutter bolt
: Apply thread lock 99000-32110 to all around thread part of bolt.
5. Transmission side cover
: Apply sealant 99000-31110 to mating surface of side
cover and left case.13. Left case plate screw
6. Backup lamp switch Tightening torque
7. O-ring
: Apply SUZUKI SUPER GREASE A
99000-25010 to O-ring.Do not reuse.
8. Differential assembly
Page 13 of 447

MANUAL TRANSMISSION 7A-13
INPUT & COUNTER SHAFT
1. Input shaft 13. Input shaft 5th gear 26. Countershaft
2. Oil seal
: Apply grease 99000-25010 to oil seal lip14. 5th gear spacer 27. Countershaft 1st gear
3. Input shaft right bearing 15. 5th gear needle bearing
(separated steel cage type)28. 1st gear synchronizer ring
4. Input shaft 3rd gear 16. 5th speed synchronizer ring 29. Low speed synchronizer spring
5. Needle bearing (resin cage type) 17. 5th synchronizer spring 30. Low speed sleeve & hub
5-1. Needle bearing (resin cage type) 18. 5th speed sleeve & hub 31. Low speed synchronizer key
6. High speed synchronizer ring 19. 5th synchronizer key 32. Circlip
7. High speed synchronizer spring 20. 5th synchronizer hub plate 33. 2nd gear synchronizer outer ring
8. High speed sleeve & hub 21. Circlip 34. Needle bearing
(separated steel cage type)
9. High speed synchronizer key 22. Reverse gear shaft 34-1. Needle bearing (steel cage type)
10. Circlip 23. Reverse idler gear 35. Countershaft 2nd gear
11. Input shaft 4th gear 24. Reverse shaft washer 36. Countershaft 3rd gear
12. Input shaft left bearing 25. Countershaft right bearing 37. 3rd & 4th gear spacer
Page 14 of 447
7A-14 MANUAL TRANSMISSION
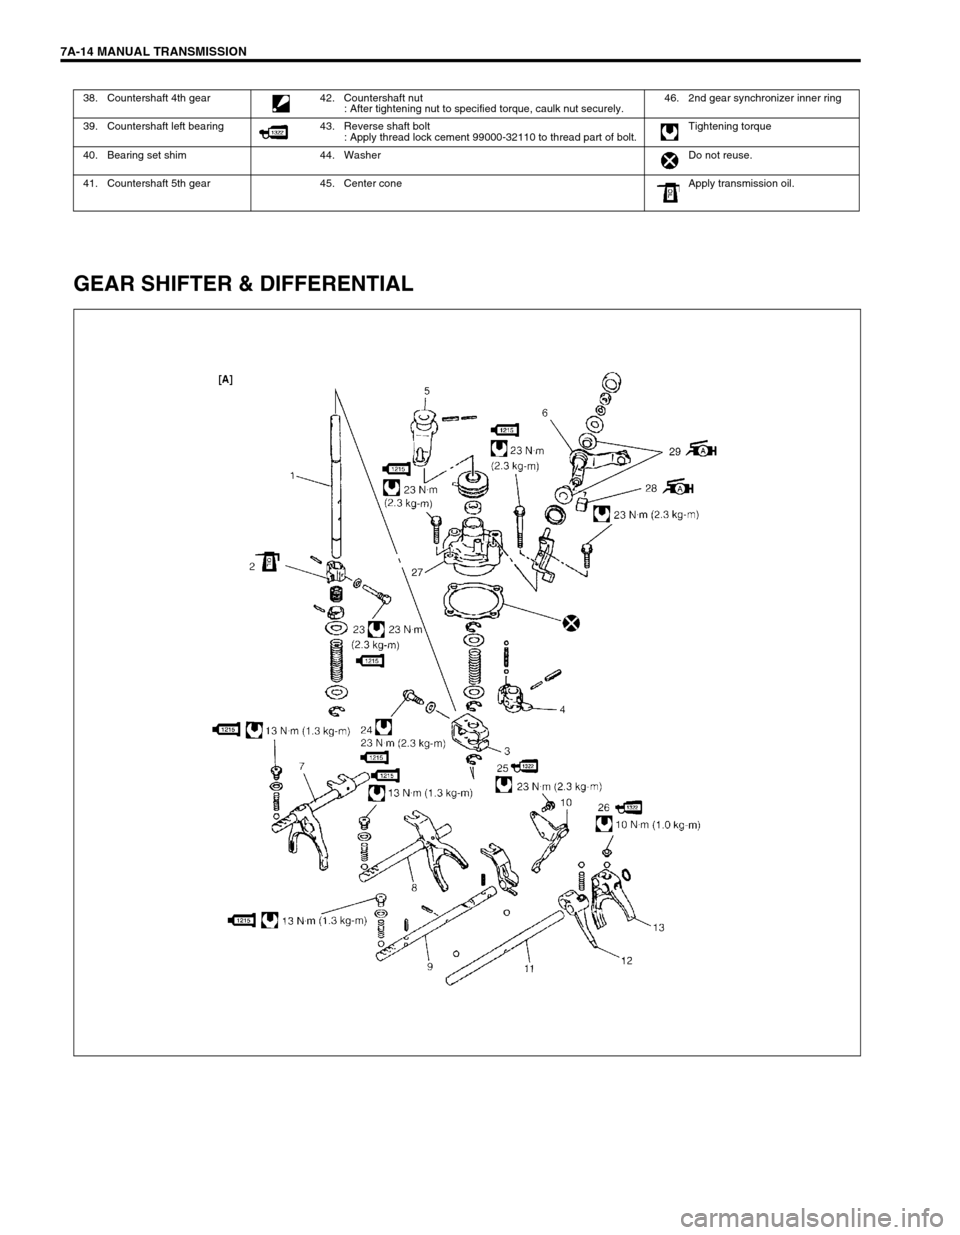
GEAR SHIFTER & DIFFERENTIAL
38. Countershaft 4th gear 42. Countershaft nut
: After tightening nut to specified torque, caulk nut securely.46. 2nd gear synchronizer inner ring
39. Countershaft left bearing 43. Reverse shaft bolt
: Apply thread lock cement 99000-32110 to thread part of bolt.Tightening torque
40. Bearing set shim 44. Washer Do not reuse.
41. Countershaft 5th gear 45. Center cone Apply transmission oil.
Page 15 of 447
![SUZUKI SWIFT 2000 1.G Transmission Service User Guide MANUAL TRANSMISSION 7A-15
[A] : GEAR SHIFTER 12. Reverse gear shift arm 25. Reverse gear shift lever bolt
: Apply thread lock 99000-32110 to all around
thread part of bolt.
[B] : DIFFERENTIAL 13. 5th SUZUKI SWIFT 2000 1.G Transmission Service User Guide MANUAL TRANSMISSION 7A-15
[A] : GEAR SHIFTER 12. Reverse gear shift arm 25. Reverse gear shift lever bolt
: Apply thread lock 99000-32110 to all around
thread part of bolt.
[B] : DIFFERENTIAL 13. 5th](/img/20/7605/w960_7605-14.png)
MANUAL TRANSMISSION 7A-15
[A] : GEAR SHIFTER 12. Reverse gear shift arm 25. Reverse gear shift lever bolt
: Apply thread lock 99000-32110 to all around
thread part of bolt.
[B] : DIFFERENTIAL 13. 5th gear shift fork 26. 5th gear shift fork plug
: Apply thread lock 99000-32110 to all around
thread part of plug.
1. Gear shift & select shaft 14. Side gear washer 27. Guide case
2. 5th & reverse gear shift cam 15. Differential side pinion gear 28. Select lever shaft bush
: Apply grease 99000-25010 to whole area of
bush.
3. Gear shift interlock plate 16. Differential side gear 29. Select lever boss
: Apply grease 99000-25010 to internal and exter-
nal diameter
4. Gear shift & select lever 17. Side gear washer 30. Final gear bolt
: Apply thread lock 99000-32110 to all around
thread part of bolt
5. Shift cable lever 18. Differential side oil seal
: Apply grease 99000- 25010 to oil
seal lip.31. Differential pinion shaft
6. Select cable lever 19. Differential side bearing 32. Differential pinion shaft pin
7. Low speed gear shift shaft 20. Speed sensor ring Tightening torque
8. High speed gear shift shaft 21. Differential case Do not reuse.
9. 5th & reverse gear shift shaft 22. Final gear Apply transmission oil.
10. Reverse gear shift lever 23. 5th to reverse interlock guide bolt
: Apply sealant 99000-31110 to bolt
thread.
11. 5th & reverse gear shift guide
shaft24. Gear shift interlock bolt
: Apply sealant 99000-31110 to bolt
thread.
Page 16 of 447
7A-16 MANUAL TRANSMISSION
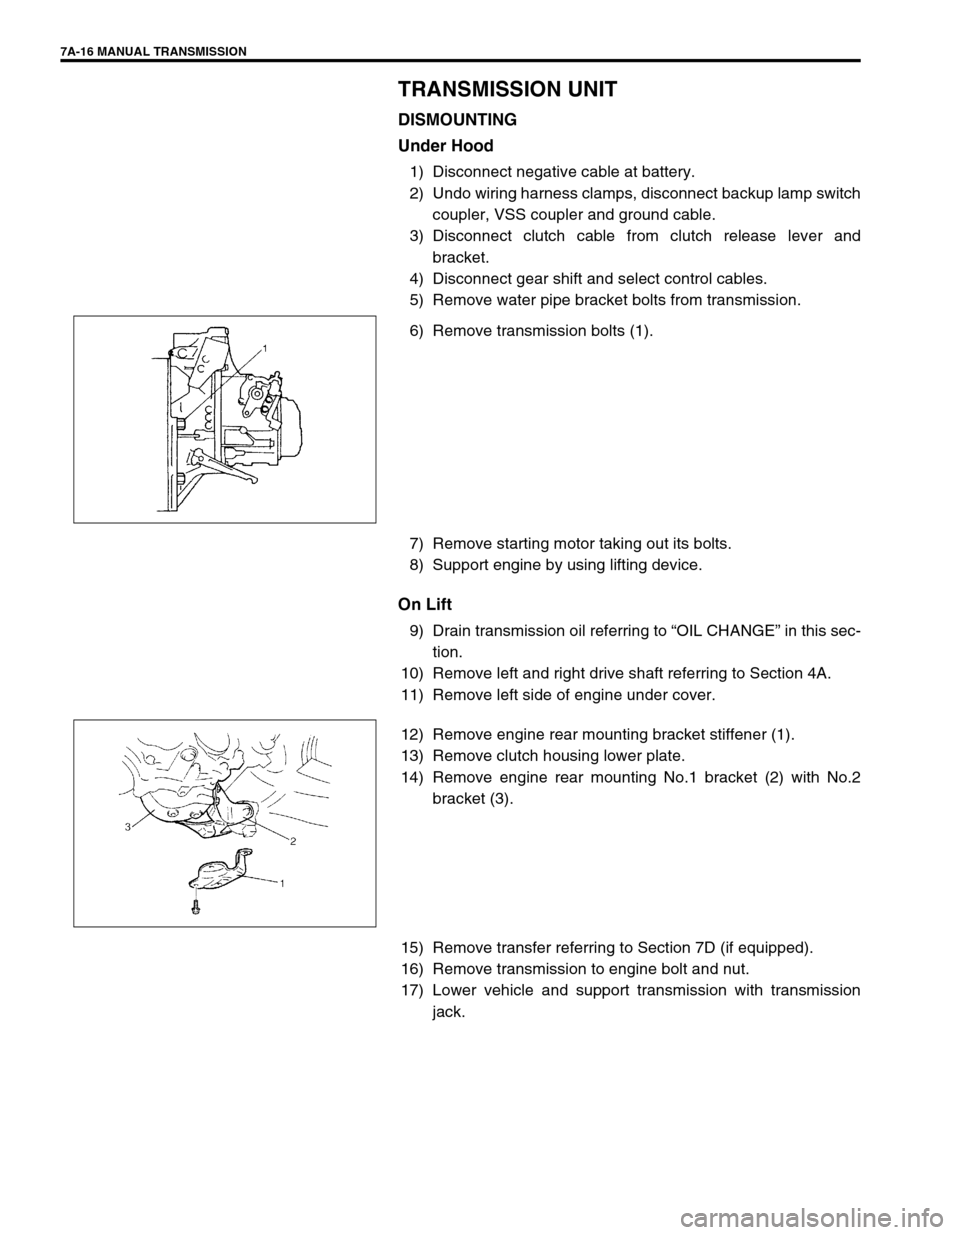
TRANSMISSION UNIT
DISMOUNTING
Under Hood
1) Disconnect negative cable at battery.
2) Undo wiring harness clamps, disconnect backup lamp switch
coupler, VSS coupler and ground cable.
3) Disconnect clutch cable from clutch release lever and
bracket.
4) Disconnect gear shift and select control cables.
5) Remove water pipe bracket bolts from transmission.
6) Remove transmission bolts (1).
7) Remove starting motor taking out its bolts.
8) Support engine by using lifting device.
On Lift
9) Drain transmission oil referring to “OIL CHANGE” in this sec-
tion.
10) Remove left and right drive shaft referring to Section 4A.
11) Remove left side of engine under cover.
12) Remove engine rear mounting bracket stiffener (1).
13) Remove clutch housing lower plate.
14) Remove engine rear mounting No.1 bracket (2) with No.2
bracket (3).
15) Remove transfer referring to Section 7D (if equipped).
16) Remove transmission to engine bolt and nut.
17) Lower vehicle and support transmission with transmission
jack.
Page 17 of 447
MANUAL TRANSMISSION 7A-17
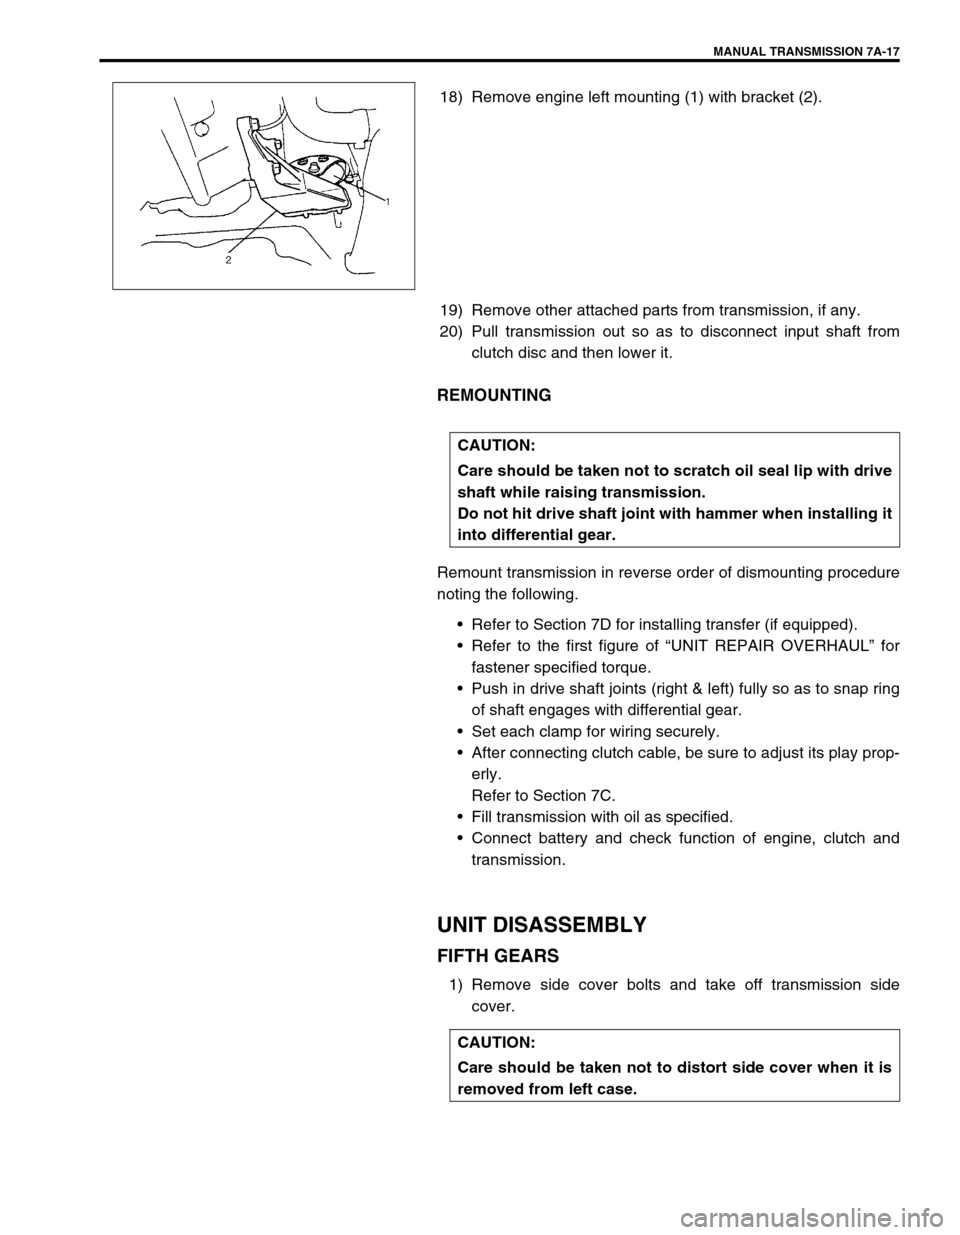
18) Remove engine left mounting (1) with bracket (2).
19) Remove other attached parts from transmission, if any.
20) Pull transmission out so as to disconnect input shaft from
clutch disc and then lower it.
REMOUNTING
Remount transmission in reverse order of dismounting procedure
noting the following.
Refer to Section 7D for installing transfer (if equipped).
Refer to the first figure of “UNIT REPAIR OVERHAUL” for
fastener specified torque.
Push in drive shaft joints (right & left) fully so as to snap ring
of shaft engages with differential gear.
Set each clamp for wiring securely.
After connecting clutch cable, be sure to adjust its play prop-
erly.
Refer to Section 7C.
Fill transmission with oil as specified.
Connect battery and check function of engine, clutch and
transmission.
UNIT DISASSEMBLY
FIFTH GEARS
1) Remove side cover bolts and take off transmission side
cover.
CAUTION:
Care should be taken not to scratch oil seal lip with drive
shaft while raising transmission.
Do not hit drive shaft joint with hammer when installing it
into differential gear.
CAUTION:
Care should be taken not to distort side cover when it is
removed from left case.
Page 18 of 447

7A-18 MANUAL TRANSMISSION
2) Using special tool, remove circlip (1) and then hub plate (2).
Special tool
(A) : 09900-06107
3) If equipped, remove shift fork plug (1) and guide ball (2).
4) Drive out spring pin (3) by using special tool and hammer.
Special tool
(B) : 09922-85811
5) If equipped, remove circlip (4) by using circlip plier.
6) Remove gear shift fork (2), sleeve & hub assembly (3), syn-
chronizer ring spring, synchronizer ring and 5th gear all
together.Use gear puller (1) for removal if spline fitting of hub
is tight.
7) Unfasten caulking of countershaft nut, install input shaft 5th
gear (1) and special tool to stop rotation of shafts, and then
remove countershaft nut (2).
Special tool
(C) : 09927-76010
8) Remove special tool, input shaft 5th gear, needle bearing of
separated steel cage type and then counter shaft 5th gear.
Gear puller (4) would be necessary if spline fitting of counter
shaft 5th gear (3) is tight.
9) Remove plate screws (1) and take off left case plate (2), and
then bearing set shim.
NOTE:
Use of magnet would facilitate removal of guide ball.
Page 19 of 447
MANUAL TRANSMISSION 7A-19
GEAR SHIFTER, INPUT SHAFT AND COUNTER
SHAFT
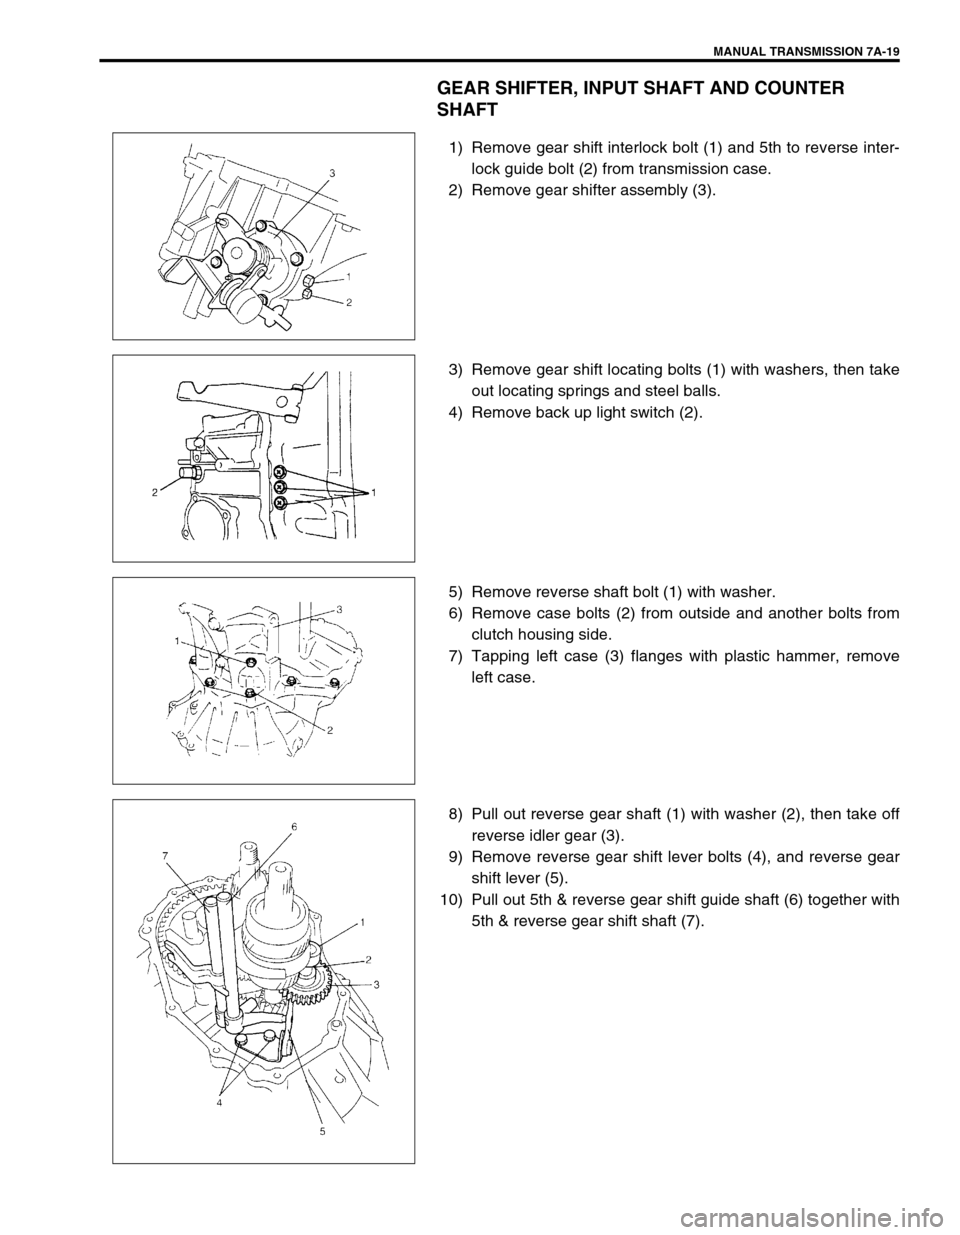
1) Remove gear shift interlock bolt (1) and 5th to reverse inter-
lock guide bolt (2) from transmission case.
2) Remove gear shifter assembly (3).
3) Remove gear shift locating bolts (1) with washers, then take
out locating springs and steel balls.
4) Remove back up light switch (2).
5) Remove reverse shaft bolt (1) with washer.
6) Remove case bolts (2) from outside and another bolts from
clutch housing side.
7) Tapping left case (3) flanges with plastic hammer, remove
left case.
8) Pull out reverse gear shaft (1) with washer (2), then take off
reverse idler gear (3).
9) Remove reverse gear shift lever bolts (4), and reverse gear
shift lever (5).
10) Pull out 5th & reverse gear shift guide shaft (6) together with
5th & reverse gear shift shaft (7).
Page 20 of 447

7A-20 MANUAL TRANSMISSION
11) Tapping input shaft end with plastic hammer, push it out as
assembly from case a little, then take out input shaft assem-
bly (1), counter shaft assembly (2), high speed gear shift
shaft (3) and low speed gear shift shaft (4) all at once.
12) Remove counter shaft left bearing cup from left case.
13) Remove differential side left oil seal also from left case.
RIGHT CASE
1) Remove differential gear assembly (1) from right case (2).
2) Remove bolt and then pull out VSS (3).
3) If input shaft right bearing has been left in right case, pull it
out by using special tools.
Remove input shaft oil seal (1) by using special tools.
Special tool
(A) : 09930-30104
(B) : 09923-74510
4) Also pull out countershaft right bearing cup (2) by using spe-
cial tools.
Special tool
09941-64511
09923-30104