TOYOTA AVENSIS 2005 Service Repair Manual
Manufacturer: TOYOTA, Model Year: 2005, Model line: AVENSIS, Model: TOYOTA AVENSIS 2005Pages: 5135, PDF Size: 95.28 MB
Page 4861 of 5135
D26388
Rear Clutch
Oil Seal
Ring Outer
D26389
D26472
SST
D26390
D26391
Brake Apply Tube
Clutch Apply Tube
− AUTOMATIC TRANSMISSION / TRANSAUTOMATIC TRANSAXLE ASSY (U151E/U151F)
40−31
U151E, U151F A/T REPAIR MANUAL (RM1021U)
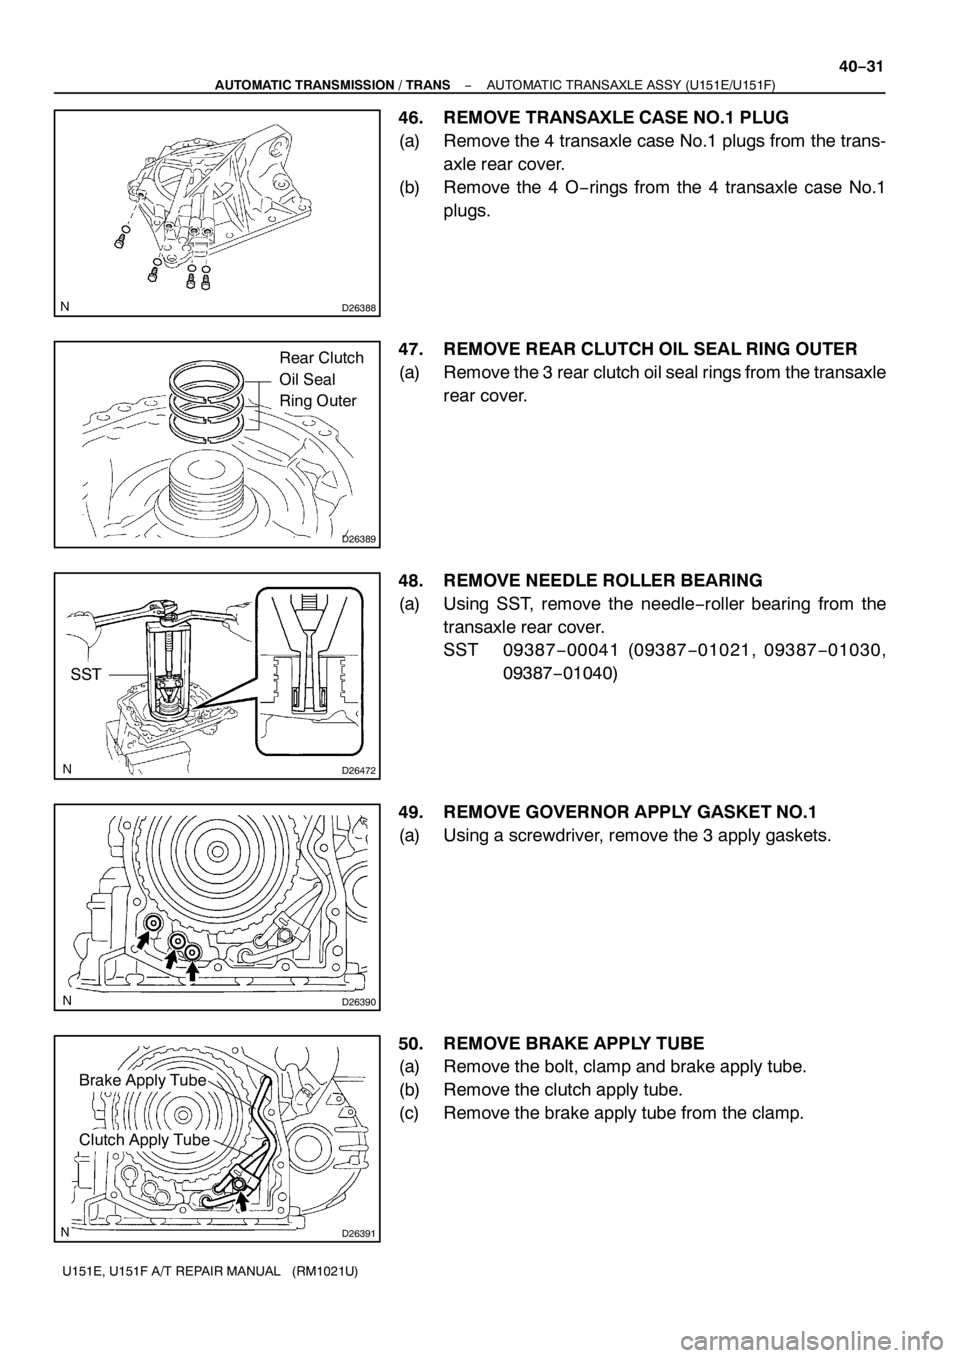
46. REMOVE TRANSAXLE CASE NO.1PLUG
(a) Remove the 4 transaxle case No.1 plugs from the trans-
axle rear cover.
(b) Remove the 4 O−rings from the 4 transaxle case No.1
plugs.
47. REMOVE REAR CLUTCH OIL SEAL RING OUTER
(a) Remove the 3 rear clutch oil seal rings from the transaxle
rear cover.
48. REMOVE NEEDLE ROLLER BEARING
(a) Using SST, remove the needle−roller bearing from the
transaxle rear cover.
SST 09387−00041 (09387−01021, 09387−01030,
09387−01040)
49. REMOVE GOVERNOR APPLY GASKET NO.1
(a) Using a screwdriver, remove the 3 apply gaskets.
50. REMOVE BRAKE APPLY TUBE
(a) Remove the bolt, clamp and brake apply tube.
(b) Remove the clutch apply tube.
(c) Remove the brake apply tube from the clamp.
Page 4862 of 5135
D26403
Thrust Bearing
Direct Clutch Assy
D26392
Thrust Bearing
Thrust Bearing Race
Overdrive Direct Clutch Hub
D03829
Overdrive
Direct Clutch
Drum Sub−assy
Dial Indicator
D26714Rear Planetary Sun Gear Assy
40−32
− AUTOMATIC TRANSMISSION / TRANSAUTOMATIC TRANSAXLE ASSY (U151E/U151F)
U151E, U151F A/T REPAIR MANUAL (RM1021U)
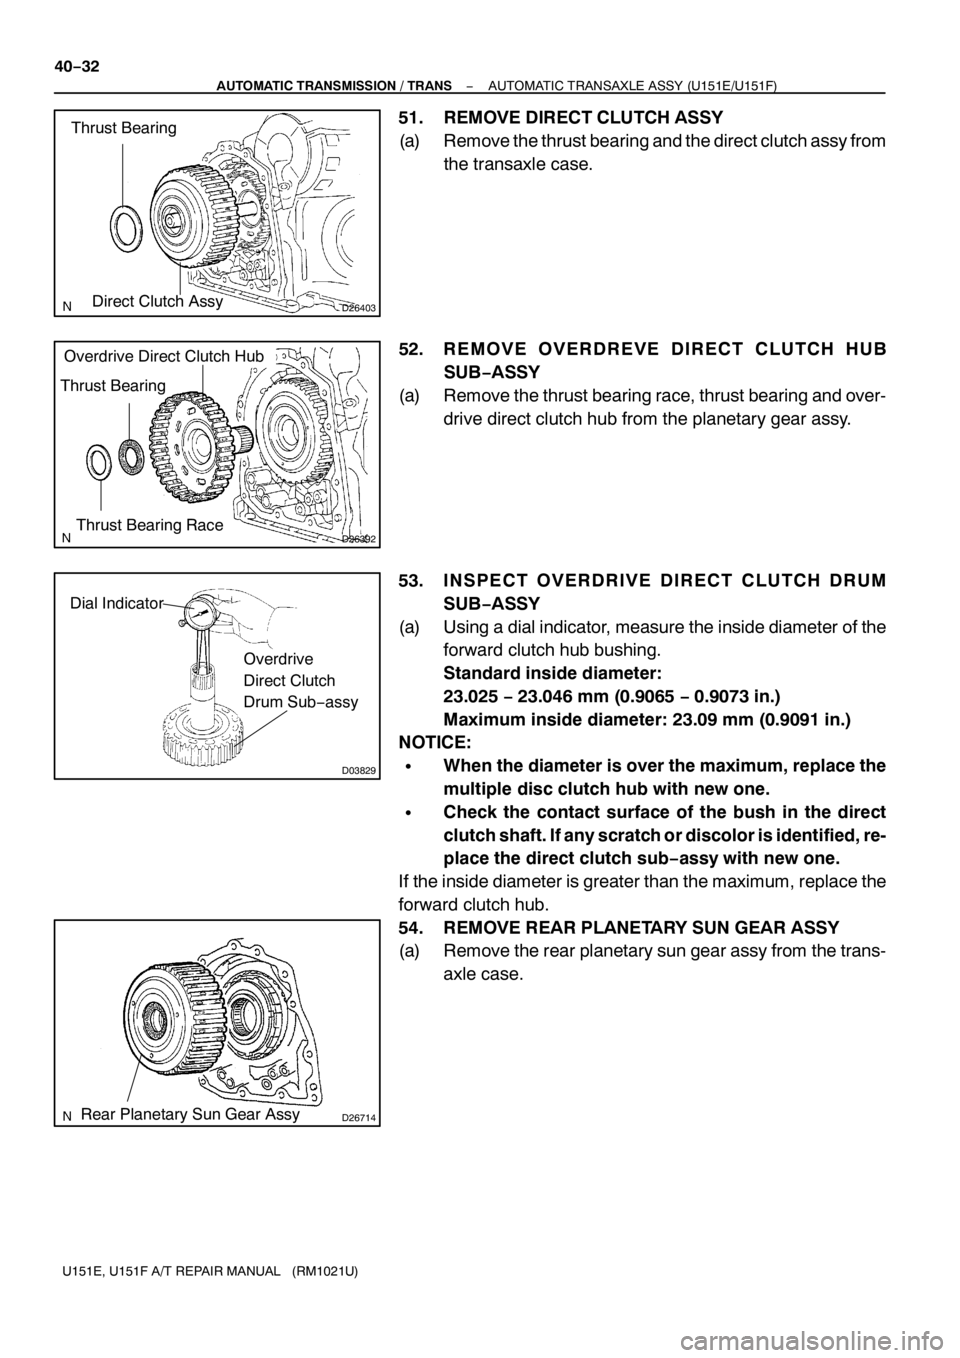
51. REMOVE DIRECT CLUTCH ASSY
(a) Remove the thrust bearing and the direct clutch assy from
the transaxle case.
52. REMOVE OVERDREVE DIRECT CLUTCH HUB
SUB−ASSY
(a) Remove the thrust bearing race, thrust bearing and over-
drive direct clutch hub from the planetary gear assy.
53. INSPECT OVERDRIVE DIRECT CLUTCH DRUM
SUB−ASSY
(a) Using a dial indicator, measure the inside diameter of the
forward clutch hub bushing.
Standard inside diameter:
23.025−23.046 mm (0.9065−0.9073 in.)
Maximum inside diameter: 23.09 mm (0.9091in.)
NOTICE:
SWhen the diameter is over the maximum, replace the
multiple disc clutch hub with new one.
SCheck the contact surface of the bush in the direct
clutch shaft. If any scratch or discolor is identified, re-
place the direct clutch sub−assy with new one.
If the inside diameter is greater than the maximum, replace the
forward clutch hub.
54. REMOVE REAR PLANETARY SUN GEAR ASSY
(a) Remove the rear planetary sun gear assy from the trans-
axle case.
Page 4863 of 5135

D26404
Thrust Needle Roller Bearing
Thrust Bearing Race
D26393
Planetary
Carrier
Thrust
Washer
No.2
Rear
Planetary
Sun Gear
D26598
Thrust Needle
Roller Bearing
1−Way Clutch Assy
D03909
1−Wa y
Clutch
Inner Race
D03589
1−Way Clutch
Sleeve Outer
− AUTOMATIC TRANSMISSION / TRANSAUTOMATIC TRANSAXLE ASSY (U151E/U151F)
40−33
U151E, U151F A/T REPAIR MANUAL (RM1021U)
(b) Remove the thrust needle roller bearing and thrust bear-
ing race from the rear planetary sun gear assy.
(c) Remove the planetary carrier thrust washer No.2 from the
rear planetary sun gear assy.
55. REMOVE1WAY CLUTCH ASSY
(a) Remove the 1−way clutch assy and the thrust needle roll-
er bearing from the transaxle case.
(b) Remove the 1−way clutch inner race from the 1−way
clutch assy.
56. REMOVE1WAY CLUTCH SLEEVE OUTER
(a) Remove the 1−way clutch sleeve outer from the transaxle
case.
Page 4864 of 5135
D26394
Planetary Carrier
Thrust Washer No.1
D26395
Snap Ring
D26717
D08058
Snap Ring
D26396
Second Brake
Piston Assy
40−34
− AUTOMATIC TRANSMISSION / TRANSAUTOMATIC TRANSAXLE ASSY (U151E/U151F)
U151E, U151F A/T REPAIR MANUAL (RM1021U)
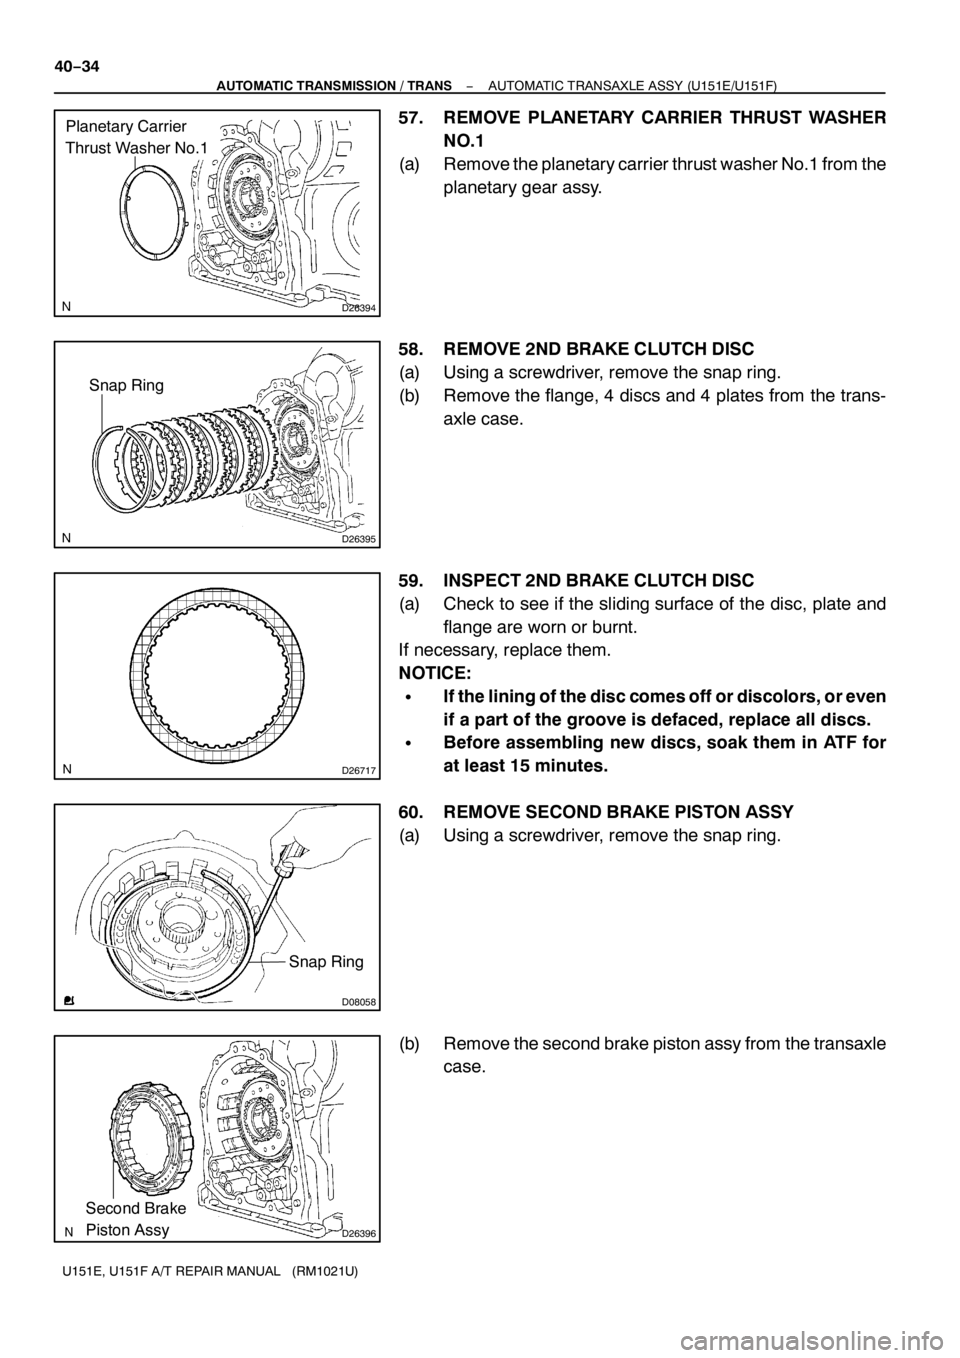
57. REMOVE PLANETARY CARRIER THRUST WASHER
NO.1
(a) Remove the planetary carrier thrust washer No.1 from the
planetary gear assy.
58. REMOVE 2ND BRAKE CLUTCH DISC
(a) Using a screwdriver, remove the snap ring.
(b) Remove the flange, 4 discs and 4 plates from the trans-
axle case.
59. INSPECT 2ND BRAKE CLUTCH DISC
(a) Check to see if the sliding surface of the disc, plate and
flange are worn or burnt.
If necessary, replace them.
NOTICE:
SIf the lining of the disc comes off or discolors, or even
if a part of the groove is defaced, replace all discs.
SBefore assembling new discs, soak them in ATF for
at least15 minutes.
60. REMOVE SECOND BRAKE PISTON ASSY
(a) Using a screwdriver, remove the snap ring.
(b) Remove the second brake piston assy from the transaxle
case.
Page 4865 of 5135

D03616
Snap Ring
D26591
Rear Planetary
Gear Assy
D03873
Thrust Bearing
Race No.2
Thrust Needle Roller BearingInput
Sun
Gear
D26397
D09189
− AUTOMATIC TRANSMISSION / TRANSAUTOMATIC TRANSAXLE ASSY (U151E/U151F)
40−35
U151E, U151F A/T REPAIR MANUAL (RM1021U)
61. REMOVE REAR PLANETARY GEAR ASSY
(a) Using a screwdriver, remove the snap ring.
(b) Remove the rear planetary gear assy from the transaxle
case.
62. REMOVE INPUT SUN GEAR
(a) Remove the 2 thrust needle roller bearings, thrust bearing
race No.2 and input sun gear from the transaxle case.
63. REMOVE1ST & REVERSE BRAKE CLUTCH DISC
(a) Remove the flange, 6 discs and 6 plates from the trans-
axle case.
64. INSPECT1ST & REVERSE BRAKE CLUTCH DISC
(a) Check to see if the sliding surface of the disc, plate and
flange are worn or burnt.
If necessary, replace them.
NOTICE:
SIf the lining of the disc comes off or discolors, or even
if a part of the groove is defaced, replace all discs.
SBefore assembling new discs, soak them in ATF for
at least15 minutes.
Page 4866 of 5135
D03595
Lock Washer
D03596
SST
D26398
SST
D26763
Front Planetary
Gear Assy
Brake Hub
D03615
Front Planetary Ring Gear
Brake Hub
Snap Ring
40−36
− AUTOMATIC TRANSMISSION / TRANSAUTOMATIC TRANSAXLE ASSY (U151E/U151F)
U151E, U151F A/T REPAIR MANUAL (RM1021U)
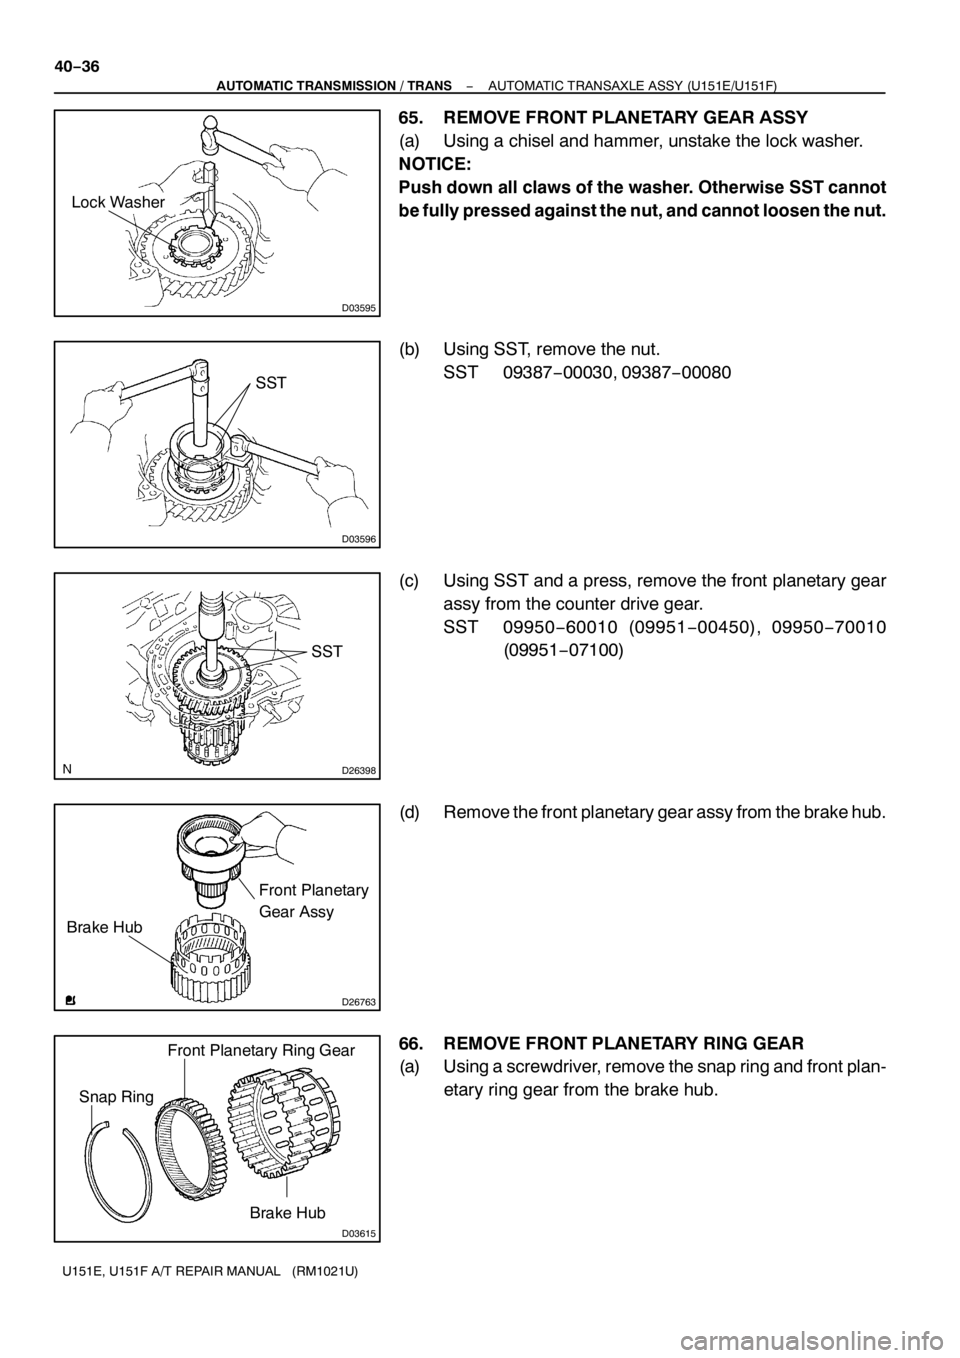
65. REMOVE FRONT PLANETARY GEAR ASSY
(a) Using a chisel and hammer, unstake the lock washer.
NOTICE:
Push down all claws of the washer. Otherwise SST cannot
be fully pressed against the nut, and cannot loosen the nut.
(b) Using SST, remove the nut.
SST 09387−00030, 09387−00080
(c) Using SST and a press, remove the front planetary gear
assy from the counter drive gear.
SST 09950−60010 (09951−00450), 09950−70010
(09951−07100)
(d) Remove the front planetary gear assy from the brake hub.
66. REMOVE FRONT PLANETARY RING GEAR
(a) Using a screwdriver, remove the snap ring and front plan-
etary ring gear from the brake hub.
Page 4867 of 5135

D03600
SST
C89128
D26405
1st & Reverse Brake Piston
D26713
O−ringO−ring
− AUTOMATIC TRANSMISSION / TRANSAUTOMATIC TRANSAXLE ASSY (U151E/U151F)
40−37
U151E, U151F A/T REPAIR MANUAL (RM1021U)
67. REMOVE1ST & REVERSE BRAKE RETURN SPRING
SUB−ASSY
(a) Place SST on the return spring, and compress the return
spring with a press.
SST 09387−00070
(b) Using a snap ring expander, remove the snap ring.
NOTICE:
SStop the press when the spring sheet is lowered1−
2 mm (0.039−0.078 in.) from the snap ring groove, to
prevent the spring sheet from deforming.
SDo not expand the snap ring excessively.
68. INSPECT1ST & REVERSE BRAKE RETURN SPRING
SUB−ASSY
(a) Using a vernier calipers, measure the free length of the
spring together with the spring seat.
Standard free length:17.61mm (0.6933 in.)
69. REMOVE1ST & REVERSE BRAKE PISTON
(a) Apply compressed air (392 kPa, 4.0 kgf/cm
2, 57 psi) to the
transaxle case to remove 1st & reverse brake piston.
NOTICE:
SBlowing off the air may cause the piston to jump−out.
When removing the piston, hold it by your hand using
a waste cloth.
STake care not to splash ATF when air−blowing.
(b) Remove the 2 O−rings from the 1st & reverse brake pis-
ton.
Page 4868 of 5135

C89120
SST
SST
D03602
D03603
SST
HoldTurn
D26467
Snap Ring
C89121
SST
40−38
− AUTOMATIC TRANSMISSION / TRANSAUTOMATIC TRANSAXLE ASSY (U151E/U151F)
U151E, U151F A/T REPAIR MANUAL (RM1021U)
70. REMOVE COUNTER DRIVE GEAR
(a) Using SST and a press, remove the counter drive gear
from the transaxle case.
SST 09950−60010 (09951−00590), 09950−70010
(09951−07100)
(b) As shown in the illustration, tighten 2 bolts evenly and
make clearance of approx. 20.0 mm (0.797 in.) between
the counter drive gear and the inner race.
(c) Using SST, remove the tapered roller bearing.
SST 09950−60010 (09951−00590), 09950−70010
(09951−07100), 09950−00020, 09950−00030,
09950−40011 (09957−04010)
71. REMOVE COUNTER DRIVE GEAR BEARING
(a) Using a snap ring expander, remove the snap ring.
(b) Using SST and a press, remove the bearing outer race.
SST 09950−60020 (09951−00910), 09950−70010
(09951−07100)
Page 4869 of 5135

D26407
SST
Snap Ring
D03806D30852
Underdrive
Brake Return
Spring
D26406
Underdrive Brake Piston
D03794
O−ringO−ring
− AUTOMATIC TRANSMISSION / TRANSAUTOMATIC TRANSAXLE ASSY (U151E/U151F)
40−39
U151E, U151F A/T REPAIR MANUAL (RM1021U)
72. REMOVE BREATHER PLUG NO.2 (ATM)
73. REMOVE UNDERDRIVE BRAKE RETURN SPRING
SUB−ASSY
(a) Place SST on the return spring, and compress the return
spring with a press.
SST 09387−00020
(b) Using a snap ring expander, remove the snap ring.
NOTICE:
SStop the press when the spring sheet is lowered1−
2 mm (0.039−0.078 in.) from the snap ring groove, to
prevent the spring sheet from deforming.
SDo not expand the snap ring excessively.
74. INSPECT UNDERDRIVE BRAKE RETURN SPRING
SUB−ASSY
(a) Using a vernier calipers, measure the free length of the
spring together with the spring seat.
Standard free length:13.24 mm (0.5213 in.)
75. REMOVE UNDERDRIVE BRAKE PISTON
(a) Apply compressed air (392 kPa, 4.0 kgf/cm
2, 57 psi) to the
transaxle case to remove the underdrive brake piston.
(b) Remove the 2 O−rings from the underdrive brake piston.
Page 4870 of 5135
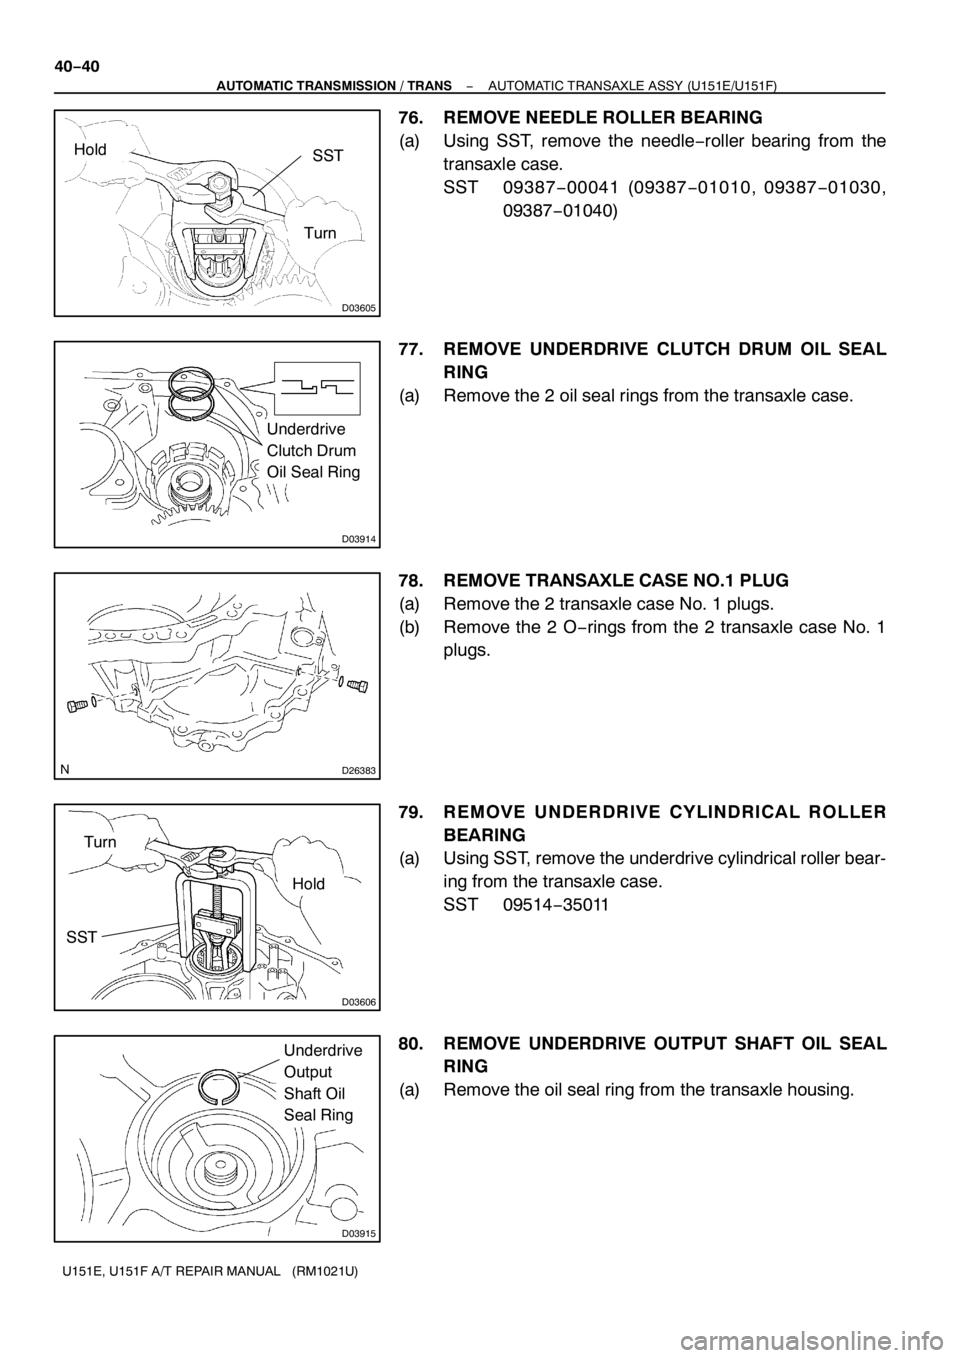
D03605
SSTHold
Turn
D03914
Underdrive
Clutch Drum
Oil Seal Ring
D26383
D03606
SST
Hold
Turn
D03915
Underdrive
Output
Shaft Oil
Seal Ring
40−40
− AUTOMATIC TRANSMISSION / TRANSAUTOMATIC TRANSAXLE ASSY (U151E/U151F)
U151E, U151F A/T REPAIR MANUAL (RM1021U)
76. REMOVE NEEDLE ROLLER BEARING
(a) Using SST, remove the needle−roller bearing from the
transaxle case.
SST 09387−00041 (09387−01010, 09387−01030,
09387−01040)
77. REMOVE UNDERDRIVE CLUTCH DRUM OIL SEAL
RING
(a) Remove the 2 oil seal rings from the transaxle case.
78. REMOVE TRANSAXLE CASE NO.1PLUG
(a) Remove the 2 transaxle case No. 1 plugs.
(b) Remove the 2 O−rings from the 2 transaxle case No. 1
plugs.
79. REMOVE UNDERDRIVE CYLINDRICAL ROLLER
BEARING
(a) Using SST, remove the underdrive cylindrical roller bear-
ing from the transaxle case.
SST 09514−35011
80. REMOVE UNDERDRIVE OUTPUT SHAFT OIL SEAL
RING
(a) Remove the oil seal ring from the transaxle housing.