ECO TOYOTA AYGO X 2022 (in English) Service Manual
[x] Cancel search | Manufacturer: TOYOTA, Model Year: 2022, Model line: AYGO X, Model: TOYOTA AYGO X 2022Pages: 494, PDF Size: 92.53 MB
Page 134 of 494
132
Owner's Manual_Europe_M99V08_en
4-2. Driving procedures
■Customization
If the smart entry & start system has been deactivated in a customized set-ting, refer to P.334.
Multidrive
1 Stop the vehicle completely.
2 Set the parking brake (P.141),
and shift the shift lever to P.
Check the parking brake indicator is
illuminated.
3 Press the engine switch.
The engine will stop, and the meter dis- play will be extinguished.
4 Release the brake pedal and
check that “ACCESSORY” or
“IGNITION ON” is not shown on
the multi-information display.
Manual transmission
1 Stop the vehicle completely.
2 If the parking brake is in manual
mode, set the parking brake.
( P.141)
Check the parking brake indicator is illuminated.
3 Shift the shift lever to N.
( P.139)
4 Press the engine switch.
The engine will stop, and the meter dis-
play will be extinguished.
5 Release the brake pedal and
check that “ACCESSORY” or
“IGNITION ON” is not shown on
the multi-information display.
WARNING
■When starting the engine
A lwa ys st a r t t h e e ng i ne whi l e s it t in g in the driver’s seat. Do not depress the
accelerator pedal while starting the engine under any circumstances.Doing so may cause an accident
resulting in death or serious injury.
■Caution while driving
If engine failure occurs while the vehi- cle is moving, do not lock or open the doors until the vehicle reaches a safe
and complete stop. Activation of the steering lock in this circumstance may lead to an accident, resulting in death
or serious injury.
NOTICE
■When starting the engine
●Do not race a cold engine.
●If the engine becomes difficult to start or stalls frequently, have your vehicle checked by any authorized
Toyota retailer or Toyota authorized repairer, or any reliable repairer immediately.
■Symptoms indicating a malfunc-tion with the engine switch
If the engine switch seems to be oper- ating somewhat differently than usual, such as the switch sticking slightly,
there may be a malfunction. Contact any authorized Toyota retailer or Toy-ota authorized repairer, or any reliable
repairer immediately.
Stopping the engine
Page 135 of 494
133
4
Owner's Manual_Europe_M99V08_en
4-2. Driving procedures
Driving
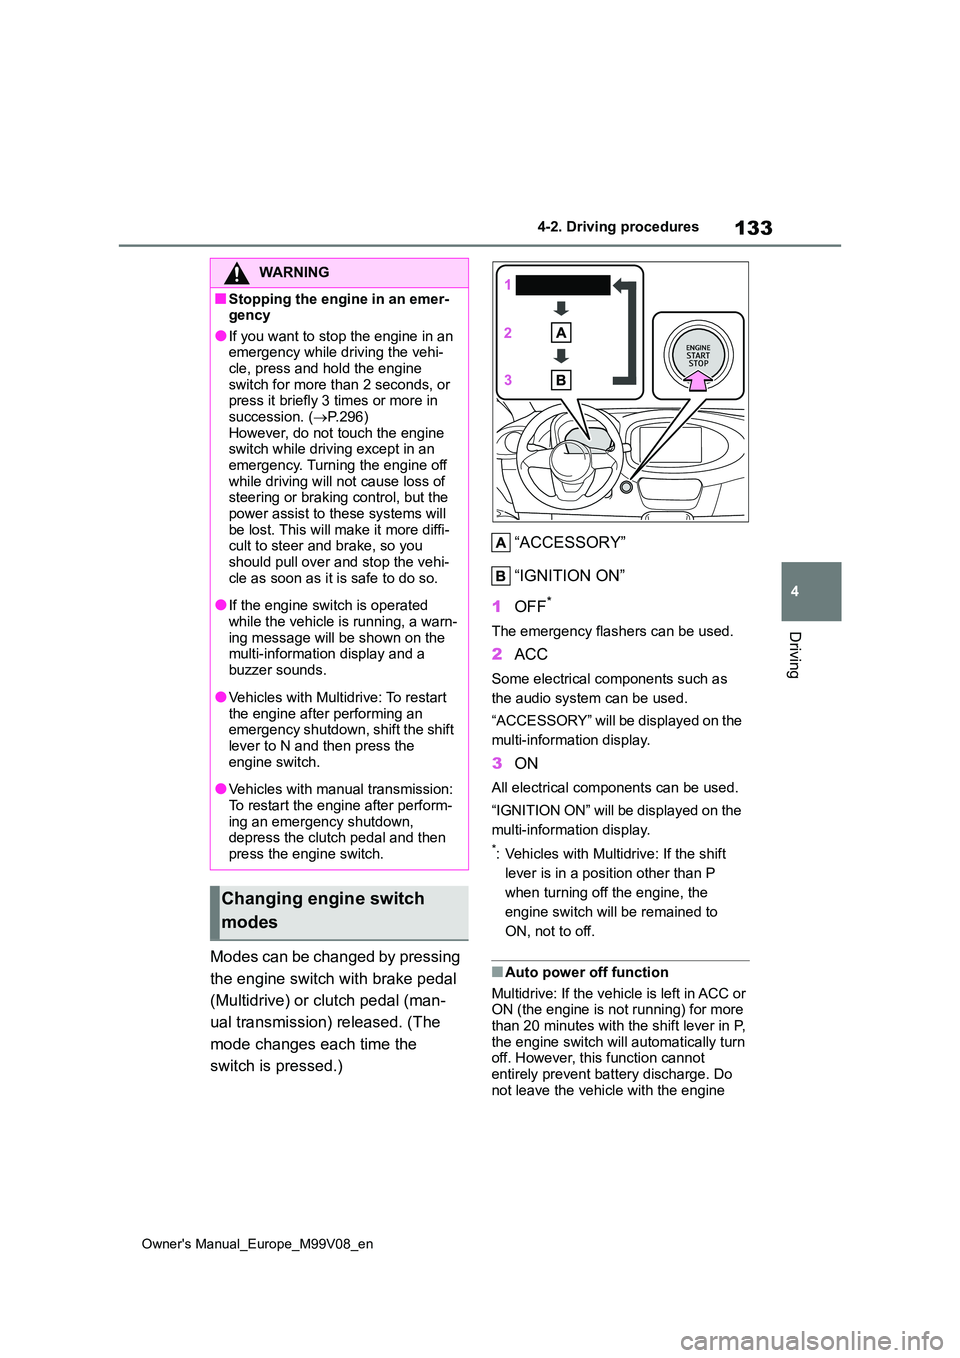
Modes can be changed by pressing
the engine switch with brake pedal
(Multidrive) or clutch pedal (man-
ual transmission) released. (The
mode changes each time the
switch is pressed.)
“ACCESSORY”
“IGNITION ON”
1 OFF*
The emergency flashers can be used.
2ACC
Some electrical components such as
the audio system can be used.
“ACCESSORY” will be displayed on the
multi-information display.
3 ON
All electrical components can be used.
“IGNITION ON” will be displayed on the
multi-information display.
*: Vehicles with Multidrive: If the shift
lever is in a position other than P
when turning off the engine, the
engine switch will be remained to
ON, not to off.
■Auto power off function
Multidrive: If the vehicle is left in ACC or ON (the engine is not running) for more than 20 minutes with the shift lever in P,
the engine switch will automatically turn off. However, this function cannot entirely prevent battery discharge. Do
not leave the vehicle with the engine
WARNING
■Stopping the engine in an emer- gency
●If you want to stop the engine in an emergency while driving the vehi-cle, press and hold the engine
switch for more than 2 seconds, or press it briefly 3 times or more in succession. ( P.296)
However, do not touch the engine switch while driving except in an emergency. Turning the engine off
while driving will not cause loss of steering or braking control, but the power assist to these systems will
be lost. This will make it more diffi- cult to steer and brake, so you should pull over and stop the vehi-
cle as soon as it is safe to do so.
●If the engine switch is operated
while the vehicle is running, a warn- ing message will be shown on the multi-information display and a
buzzer sounds.
●Vehicles with Multidrive: To restart
the engine after performing an emergency shutdown, shift the shift lever to N and then press the
engine switch.
●Vehicles with manual transmission:
To restart the engine after perform- ing an emergency shutdown, depress the clutch pedal and then
press the engine switch.
Changing engine switch
modes
Page 137 of 494
135
4
Owner's Manual_Europe_M99V08_en
4-2. Driving procedures
Driving
*: If equipped
*: To improve fuel efficiency and reduce
noise, shift the shift lever to D for nor-
mal driving.
■To protect the Multidrive
If the Multidrive fluid temperature is
high, “Transmission Oil Temp. High Stop in a safe place and See owner’s man-ual” will be displayed on the multi-infor-
mation display and the vehicle will go into transmission protection mode auto-matically. Have the vehicle inspected by
any authorized Toyota retailer or Toyota authorized repairer, or any reliable repairer.
■Multidrive fail-safe control
The system detects malfunctioning parts targeted (all of the solenoids that per-
form the shifting function) by the On-
Board Diagnostics, and performs fail- safe mechanisms, such as restricting the shifting function or transmission ratio
control. In this event, the malfunction indicator lamp turns on.
■When driving with dynamic radar cruise control activated (if
equipped)
Even when switching the driving mode to power mode with the intent of
enabling engine braking, engine braking will not occur because dynamic radar cruise control will not be canceled.
( P.181)
■Restraining sudden start (Drive- Start Control)
P. 1 2 6
■AI-SHIFT
AI-SHIFT automatically selects the suit- able gear step according to driver per-formance and driving conditions. AI-
SHIFT automatically operates when the shift lever in D. (Shifting the shift lever to M cancels the function.)
■After recharging/reconnecting the
battery
P. 3 3 7
Multidrive*
Select the shift position
depending on your purpose
and situation.
Shift position purpose and
functions
Shift posi-
tionObjective or function
PParking the vehicle/start-
ing the engine
RReversing
N
Neutral
(Condition in which the
power is not transmitted)
DNormal driving*
M
7-speed sport sequential
shiftmatic mode driving
( P.138)
WARNING
■When driving on slippery road
surfaces
Do not accelerate or shift the shift gears suddenly.
Sudden changes in engine braking may cause the vehicle to spin or skid, resulting in an accident.
Page 142 of 494
140
Owner's Manual_Europe_M99V08_en
4-2. Driving procedures
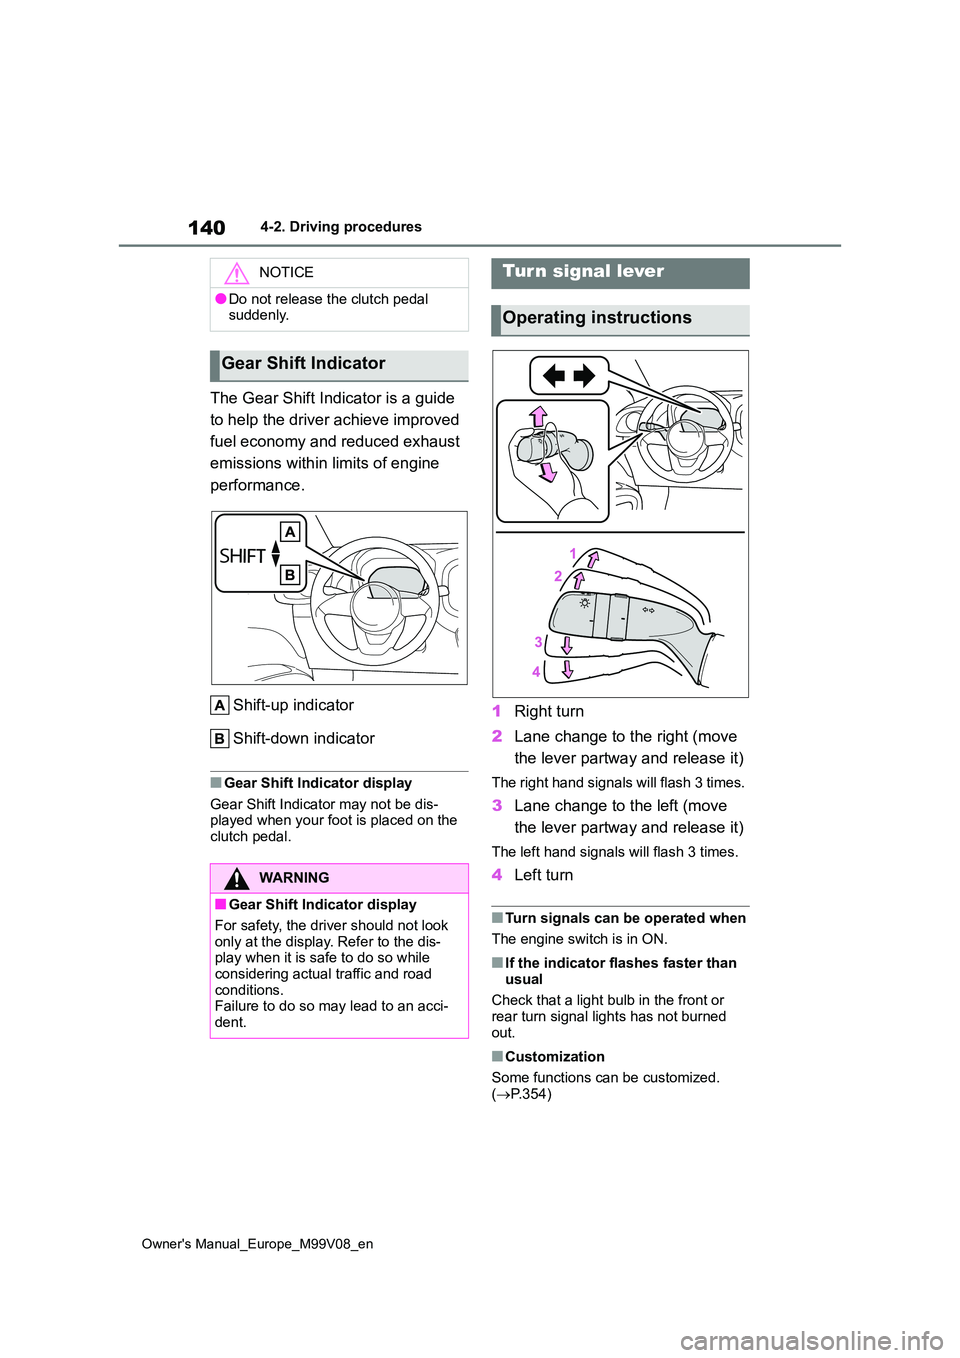
The Gear Shift Indicator is a guide
to help the driver achieve improved
fuel economy and reduced exhaust
emissions within limits of engine
performance.
Shift-up indicator
Shift-down indicator
■Gear Shift Indicator display
Gear Shift Indicator may not be dis- played when your foot is placed on the clutch pedal.
1 Right turn
2 Lane change to the right (move
the lever partway and release it)
The right hand signals will flash 3 times.
3 Lane change to the left (move
the lever partway and release it)
The left hand signals will flash 3 times.
4 Left turn
■Turn signals can be operated when
The engine switch is in ON.
■If the indicator flashes faster than
usual
Check that a light bulb in the front or rear turn signal lights has not burned
out.
■Customization
Some functions can be customized. ( P.354)
NOTICE
●Do not release the clutch pedal suddenly.
Gear Shift Indicator
WARNING
■Gear Shift Indicator display
For safety, the driver should not look
only at the display. Refer to the dis- play when it is safe to do so while considering actual traffic and road
conditions. Failure to do so may lead to an acci-dent.
Turn signal lever
Operating instructions
Page 145 of 494
143
4
Owner's Manual_Europe_M99V08_en
4-3. Operating the lights and wipers
Driving
or .
■Light reminder buzzer
A buzzer sounds when the engine switch is turned to OFF or ACC and the driver’s door is opened while the lights
are turned on.
■When unlock the doors (welcome lamp)
When the doors are unlocked using the
entry function or wireless remote con- trol, the front position lights and tail lights turn on automatically.
When the light switch is in the AUTO position and the surrounding area is dark, this function will operate.
■Battery-saving function
In order to prevent the battery of the
vehicle from discharging, if the light
switch is in the or position
when the engine switch is turned off the
battery saving function will operate and
automatically turn off all the lights after
approximately 20 minutes. When the
engine switch is turned to ON, the bat-
tery-saving function will be disabled.
When any of the following are per-
formed, the battery-saving function is
canceled once and then reactivated. All
the lights will turn off automatically 20
minutes after the battery-saving function
has been reactivated:
●When the headlight switch is operated
●When a door is opened or closed
■Customization
Some functions can be customized.
( P.354)
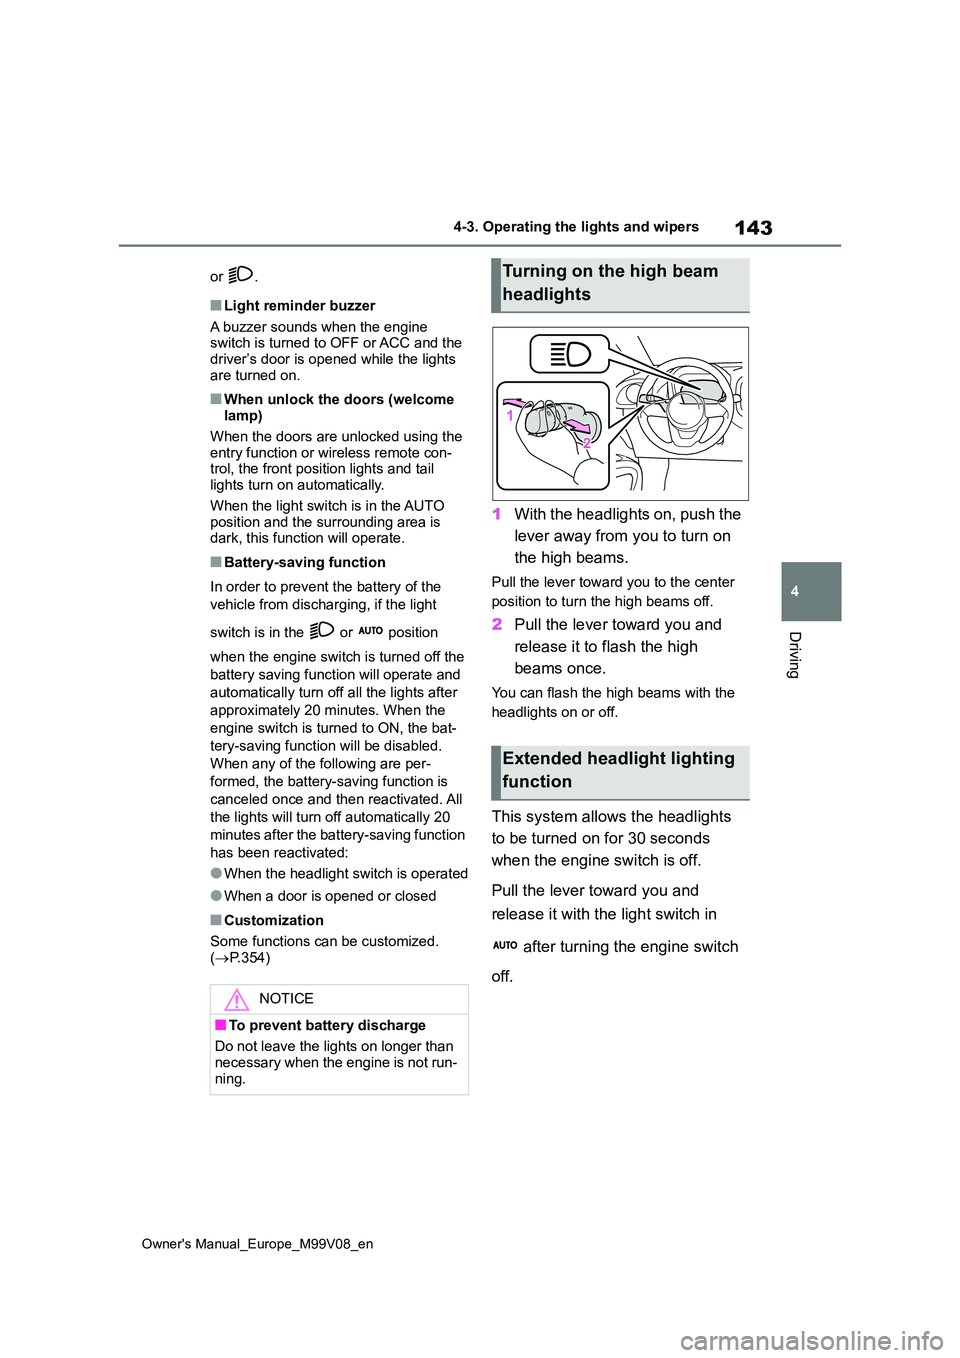
1With the headlights on, push the
lever away from you to turn on
the high beams.
Pull the lever toward you to the center
position to turn the high beams off.
2 Pull the lever toward you and
release it to flash the high
beams once.
You can flash the high beams with the
headlights on or off.
This system allows the headlights
to be turned on for 30 seconds
when the engine switch is off.
Pull the lever toward you and
release it with the light switch in
after turning the engine switch
off.
NOTICE
■To prevent battery discharge
Do not leave the lights on longer than
necessary when the engine is not run- ning.
Turning on the high beam
headlights
Extended headlight lighting
function
Page 147 of 494
145
4
Owner's Manual_Europe_M99V08_en
4-3. Operating the lights and wipers
Driving
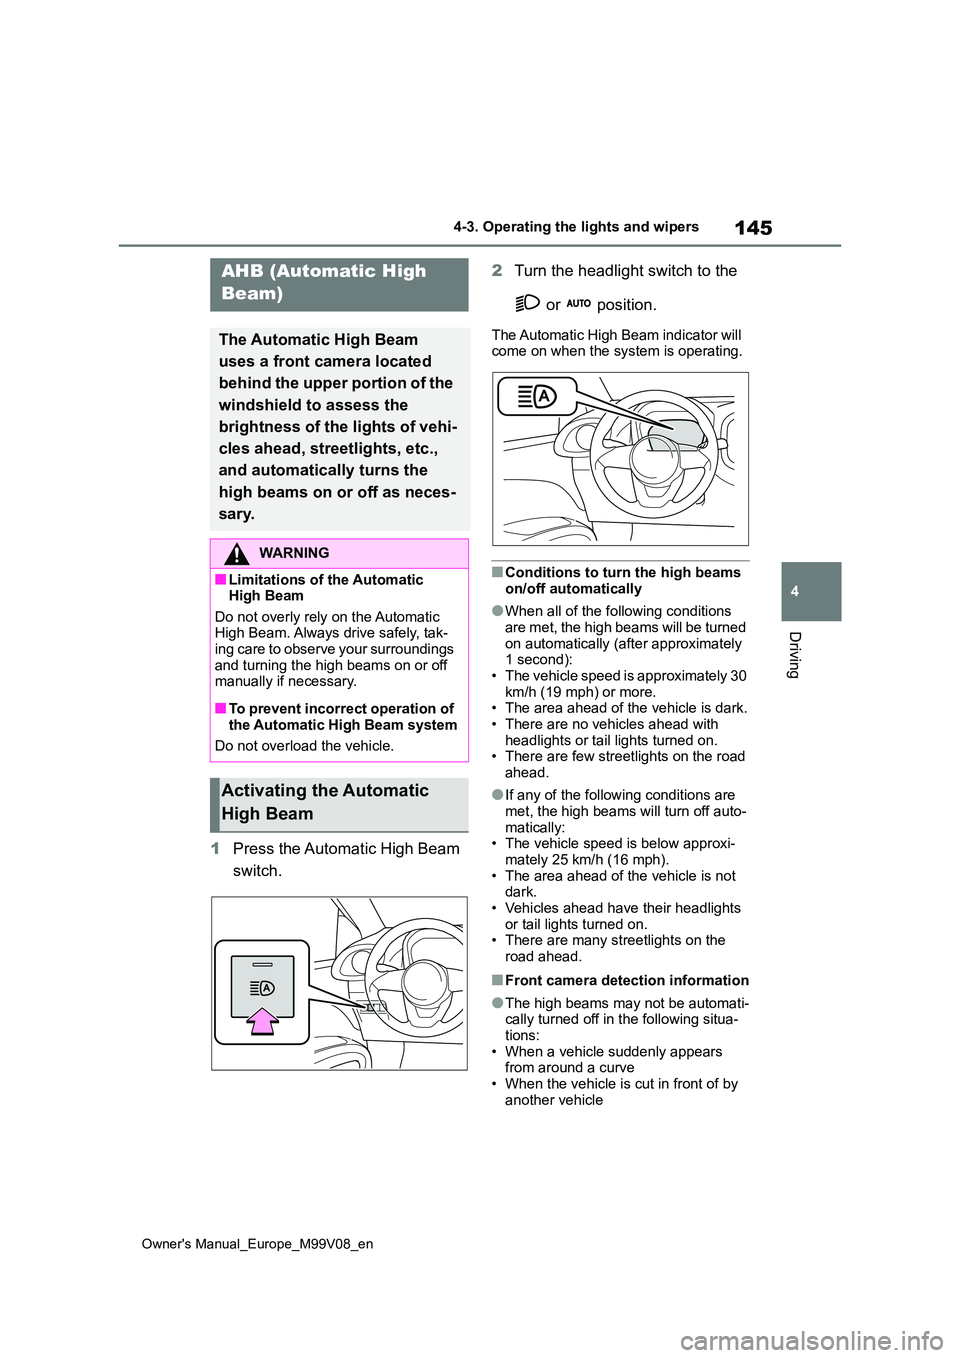
1Press the Automatic High Beam
switch.
2 Turn the headlight switch to the
or position.
The Automatic High Beam indicator will come on when the system is operating.
■Conditions to turn the high beams on/off automatically
●When all of the following conditions are met, the high beams will be turned
on automatically (after approximately 1 second):• The vehicle speed is approximately 30
km/h (19 mph) or more. • The area ahead of the vehicle is dark.• There are no vehicles ahead with
headlights or tail lights turned on. • There are few streetlights on the road ahead.
●If any of the following conditions are met, the high beams will turn off auto-
matically: • The vehicle speed is below approxi-mately 25 km/h (16 mph).
• The area ahead of the vehicle is not dark.• Vehicles ahead have their headlights
or tail lights turned on. • There are many streetlights on the road ahead.
■Front camera detection information
●The high beams may not be automati-cally turned off in the following situa-
tions: • When a vehicle suddenly appears from around a curve
• When the vehicle is cut in front of by another vehicle
AHB (Automatic High
Beam)
The Automatic High Beam
uses a front camera located
behind the upper portion of the
windshield to assess the
brightness of the lights of vehi-
cles ahead, streetlights, etc.,
and automatically turns the
high beams on or off as neces-
sary.
WARNING
■Limitations of the Automatic High Beam
Do not overly rely on the Automatic High Beam. Always drive safely, tak-ing care to observe your surroundings
and turning the high beams on or off manually if necessary.
■To prevent incorrect operation of the Automatic High Beam system
Do not overload the vehicle.
Activating the Automatic
High Beam
Page 149 of 494
147
4
Owner's Manual_Europe_M99V08_en
4-3. Operating the lights and wipers
Driving
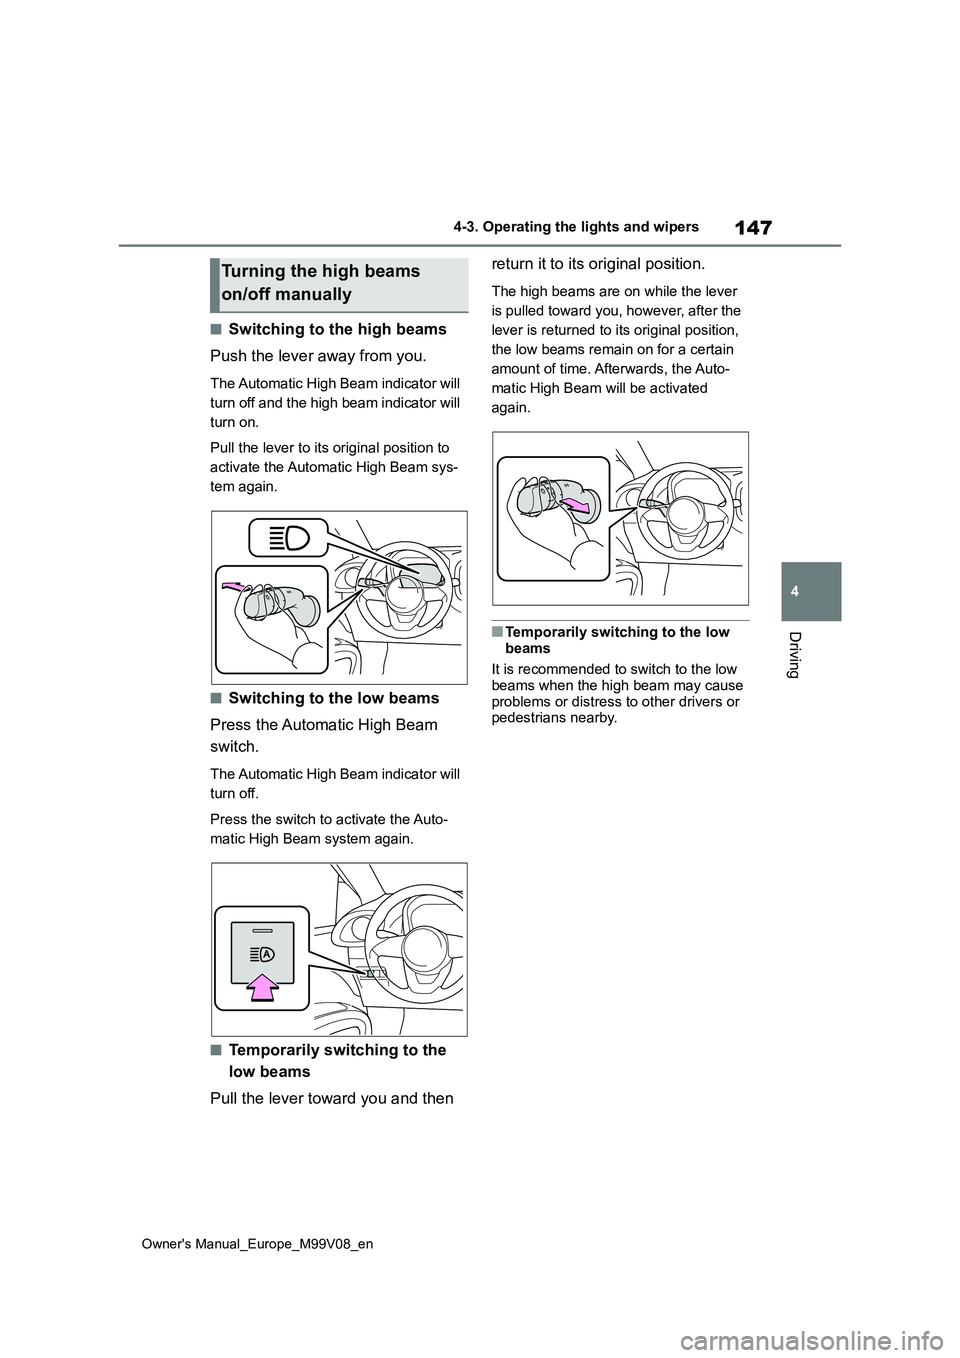
■Switching to the high beams
Push the lever away from you.
The Automatic High Beam indicator will
turn off and the high beam indicator will
turn on.
Pull the lever to its original position to
activate the Automatic High Beam sys-
tem again.
■Switching to the low beams
Press the Automatic High Beam
switch.
The Automatic High Beam indicator will
turn off.
Press the switch to activate the Auto-
matic High Beam system again.
■Temporarily switching to the
low beams
Pull the lever toward you and then
return it to its original position.
The high beams are on while the lever
is pulled toward you, however, after the
lever is returned to its original position,
the low beams remain on for a certain
amount of time. Afterwards, the Auto-
matic High Beam will be activated
again.
■Temporarily switching to the low
beams
It is recommended to switch to the low beams when the high beam may cause
problems or distress to other drivers or pedestrians nearby.
Turning the high beams
on/off manually
Page 153 of 494
151
4
Owner's Manual_Europe_M99V08_en
4-3. Operating the lights and wipers
Driving
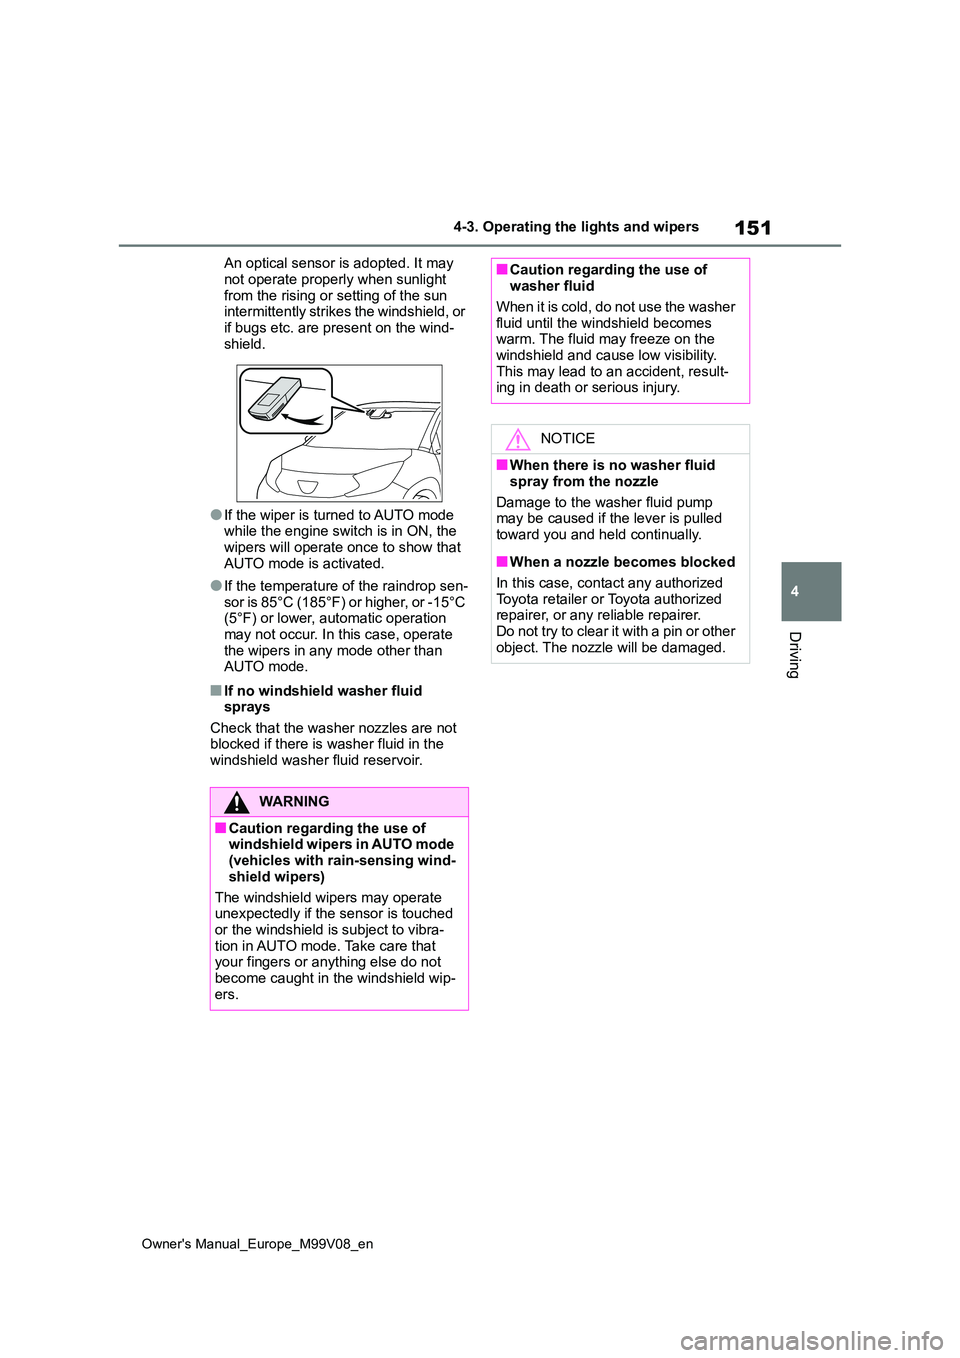
An optical sensor is adopted. It may
not operate properly when sunlight from the rising or setting of the sun intermittently strikes the windshield, or
if bugs etc. are present on the wind- shield.
●If the wiper is turned to AUTO mode while the engine switch is in ON, the wipers will operate once to show that
AUTO mode is activated.
●If the temperature of the raindrop sen-
sor is 85°C (185°F) or higher, or -15°C (5°F) or lower, automatic operation may not occur. In this case, operate
the wipers in any mode other than AUTO mode.
■If no windshield washer fluid sprays
Check that the washer nozzles are not blocked if there is washer fluid in the windshield washer fluid reservoir.
WARNING
■Caution regarding the use of windshield wipers in AUTO mode (vehicles with rain-sensing wind-
shield wipers)
The windshield wipers may operate unexpectedly if the sensor is touched
or the windshield is subject to vibra- tion in AUTO mode. Take care that your fingers or anything else do not
become caught in the windshield wip- ers.
■Caution regarding the use of washer fluid
When it is cold, do not use the washer
fluid until the windshield becomes warm. The fluid may freeze on the windshield and cause low visibility.
This may lead to an accident, result- ing in death or serious injury.
NOTICE
■When there is no washer fluid
spray from the nozzle
Damage to the washer fluid pump may be caused if the lever is pulled
toward you and held continually.
■When a nozzle becomes blocked
In this case, contact any authorized Toyota retailer or Toyota authorized repairer, or any reliable repairer.
Do not try to clear it with a pin or other object. The nozzle will be damaged.
Page 155 of 494
153
4
Owner's Manual_Europe_M99V08_en
4-3. Operating the lights and wipers
Driving
■Customization
Some functions can be customized. ( P.354)
NOTICE
■When the washer fluid tank is
empty
Do not operate the switch continually as the washer fluid pump may over-
heat.
■When a nozzle becomes blocked
In this case, contact any authorized Toyota retailer or Toyota authorized repairer, or any reliable repairer.
Do not try to clear it with a pin or other object. The nozzle will be damaged.
Page 161 of 494
159
4
Owner's Manual_Europe_M99V08_en
4-5. Using the driving support systems
Driving
■Certifications for the Toyota Safety Sense
P. 4 7 3
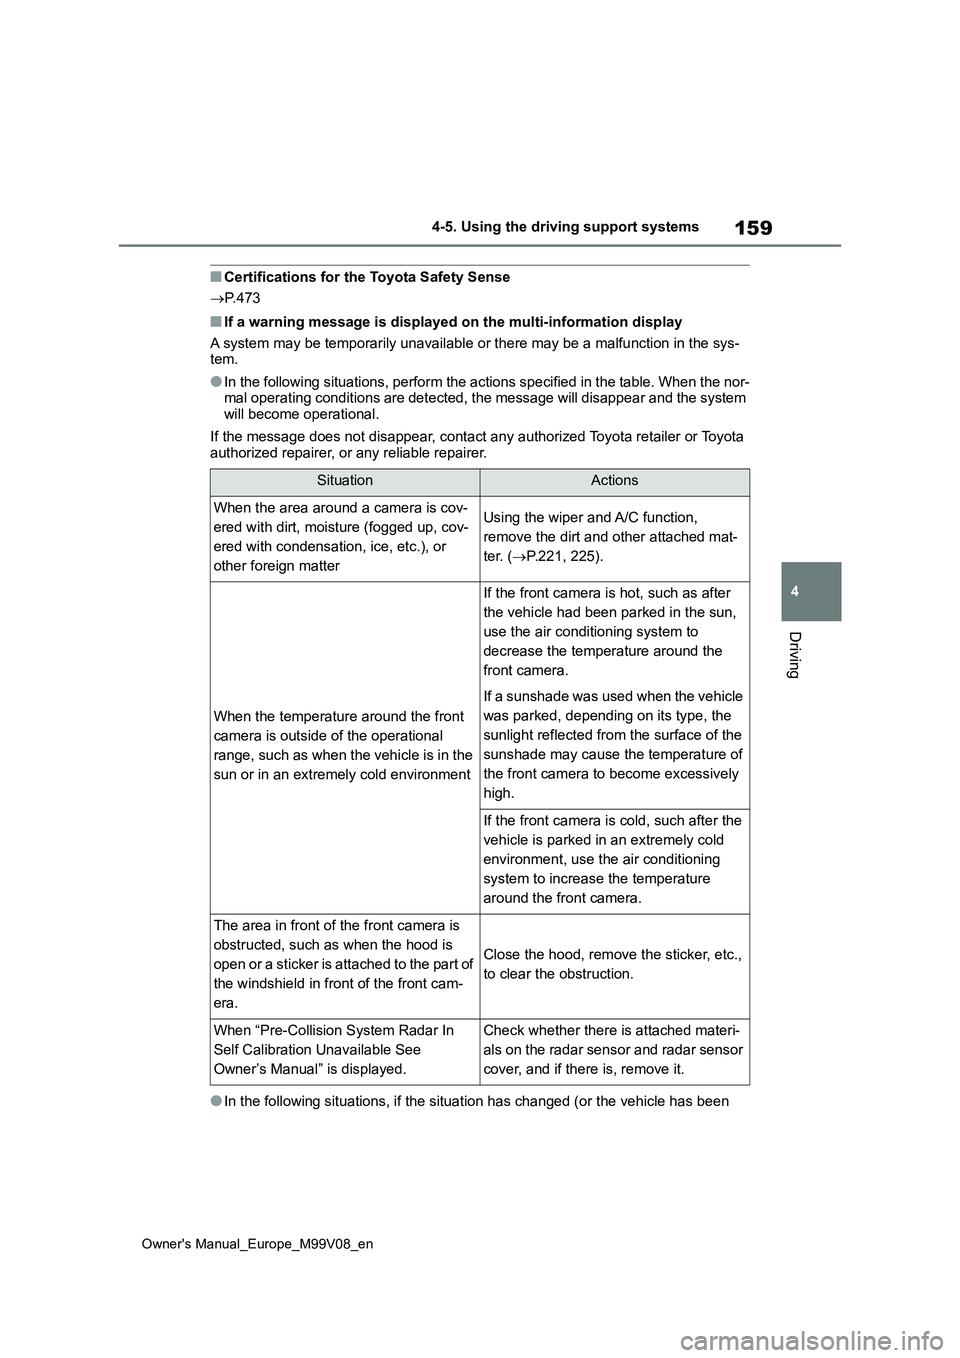
■If a warning message is displayed on the multi-information display
A system may be temporarily unavailable or there may be a malfu nction in the sys- tem.
●In the following situations, perform the actions specified in t he table. When the nor- mal operating conditions are detected, the message will disappe ar and the system will become operational.
If the message does not disappear, contact any authorized Toyot a retailer or Toyota authorized repairer, or any reliable repairer.
●In the following situations, if the situation has changed (or t he vehicle has been
SituationActions
When the area around a camera is cov-
ered with dirt, moisture (fogged up, cov-
ered with condensation, ice, etc.), or
other foreign matter
Using the wiper and A/C function,
remove the dirt and other attached mat-
ter. ( P.221, 225).
When the temperature around the front
camera is outside of the operational
range, such as when the vehicle is in the
sun or in an extremely cold environment
If the front camera is hot, such as after
the vehicle had been parked in the sun,
use the air conditioning system to
decrease the temperature around the
front camera.
If a sunshade was used when the vehicle
was parked, depending on its type, the
sunlight reflected from the surface of the
sunshade may cause the temperature of
the front camera to become excessively
high.
If the front camera is cold, such after the
vehicle is parked in an extremely cold
environment, use the air conditioning
system to increase the temperature
around the front camera.
The area in front of the front camera is
obstructed, such as when the hood is
open or a sticker is attached to the part of
the windshield in front of the front cam-
era.
Close the hood, remove the sticker, etc.,
to clear the obstruction.
When “Pre-Collision System Radar In
Self Calibration Unavailable See
Owner’s Manual” is displayed.
Check whether there is attached materi-
als on the radar sensor and radar sensor
cover, and if there is, remove it.