TOYOTA C-HR 2019 Accessories, Audio & Navigation (in English)
Manufacturer: TOYOTA, Model Year: 2019, Model line: C-HR, Model: TOYOTA C-HR 2019Pages: 292, PDF Size: 5.26 MB
Page 191 of 292
191
3. WHAT TO DO IF...
PHONE
7
C-HR_Navi_USA_OM10581U_17CY
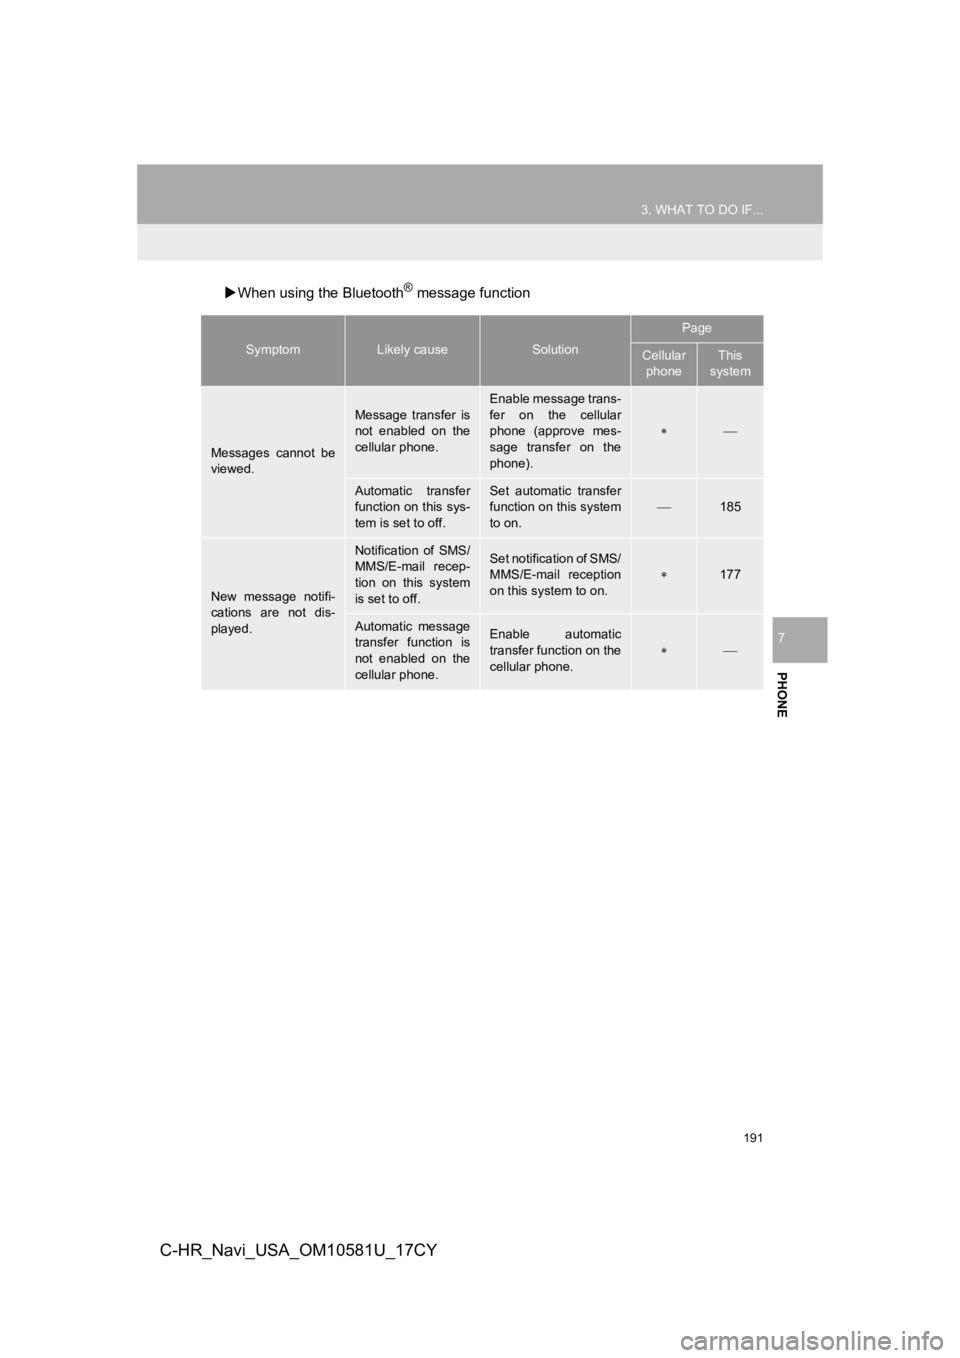
When using the Bluetooth® message function
SymptomLikely causeSolution
Page
Cellular
phoneThis
system
Messages cannot be
viewed.
Message transfer is
not enabled on the
cellular phone.
Enable message trans-
fer on the cellular
phone (approve mes-
sage transfer on the
phone).
Automatic transfer
function on this sys-
tem is set to off.Set automatic transfer
function on this system
to on.
185
New message notifi-
cations are not dis-
played.
Notification of SMS/
MMS/E-mail recep-
tion on this system
is set to off.Set notification of SMS/
MMS/E-mail reception
on this system to on.
177
Automatic message
transfer function is
not enabled on the
cellular phone.Enable automatic
transfer function on the
cellular phone.
Page 192 of 292
192
3. WHAT TO DO IF...
C-HR_Navi_USA_OM10581U_17CY
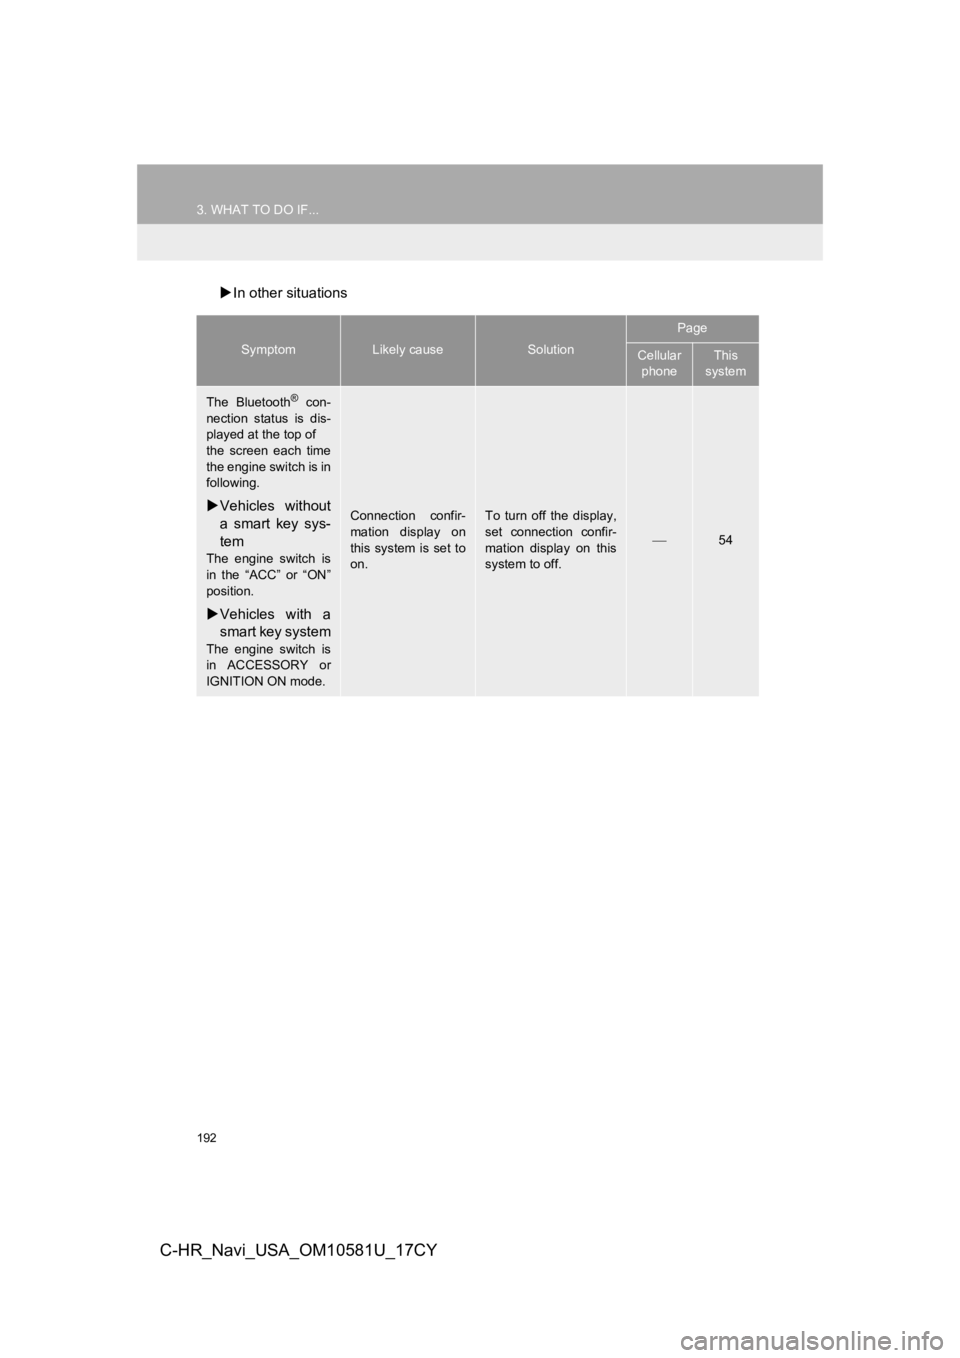
In other situations
SymptomLikely causeSolution
Page
Cellular
phoneThis
system
The Bluetooth® con-
nection status is dis-
played at the top of
the screen each time
the engine switch is in
following.
Vehicles without
a smart key sys-
tem
The engine switch is
in the “ACC” or “ON”
position.
Vehicles with a
smart key system
The engine switch is
in ACCESSORY or
IGNITION ON mode.
Connection confir-
mation display on
this system is set to
on.To turn off the display,
set connection confir-
mation display on this
system to off.
54
Page 193 of 292
193
3. WHAT TO DO IF...
PHONE
7
C-HR_Navi_USA_OM10581U_17CY
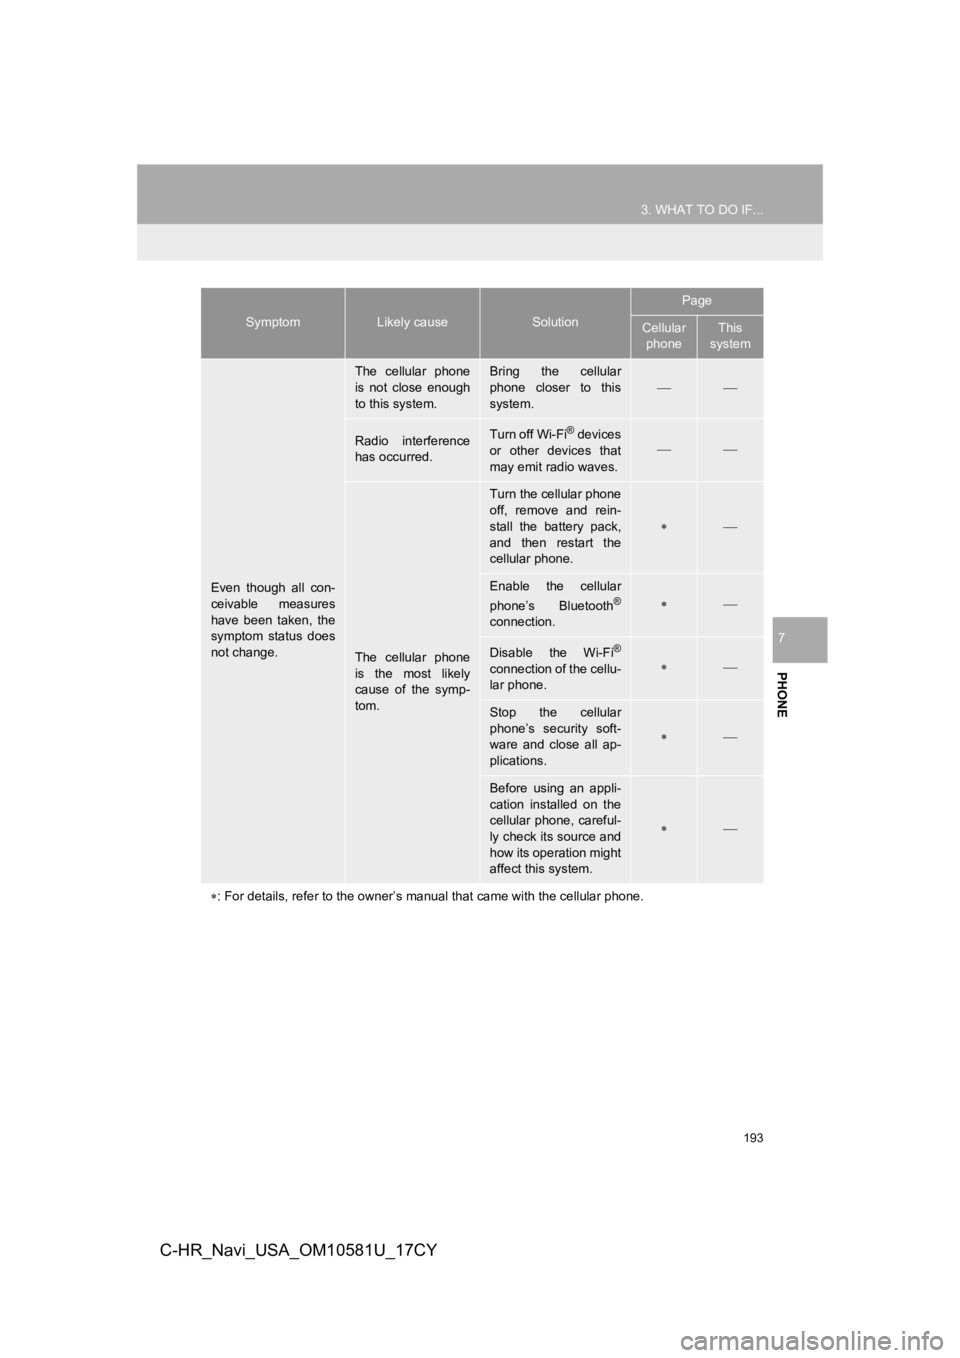
Even though all con-
ceivable measures
have been taken, the
symptom status does
not change.
The cellular phone
is not close enough
to this system.Bring the cellular
phone closer to this
system.
Radio interference
has occurred.Turn off Wi-Fi® devices
or other devices that
may emit radio waves.
The cellular phone
is the most likely
cause of the symp-
tom.
Turn the cellular phone
off, remove and rein-
stall the battery pack,
and then restart the
cellular phone.
Enable the cellular
phone’s Bluetooth®
connection.
Disable the Wi-Fi®
connection of the cellu-
lar phone.
Stop the cellular
phone’s security soft-
ware and close all ap-
plications.
Before using an appli-
cation installed on the
cellular phone, careful-
ly check its source and
how its operation might
affect this system.
: For details, refer to the owner’s manual that came with the ce llular phone.
SymptomLikely causeSolution
Page
Cellular
phoneThis
system
Page 194 of 292
194
C-HR_Navi_USA_OM10581U_17CY
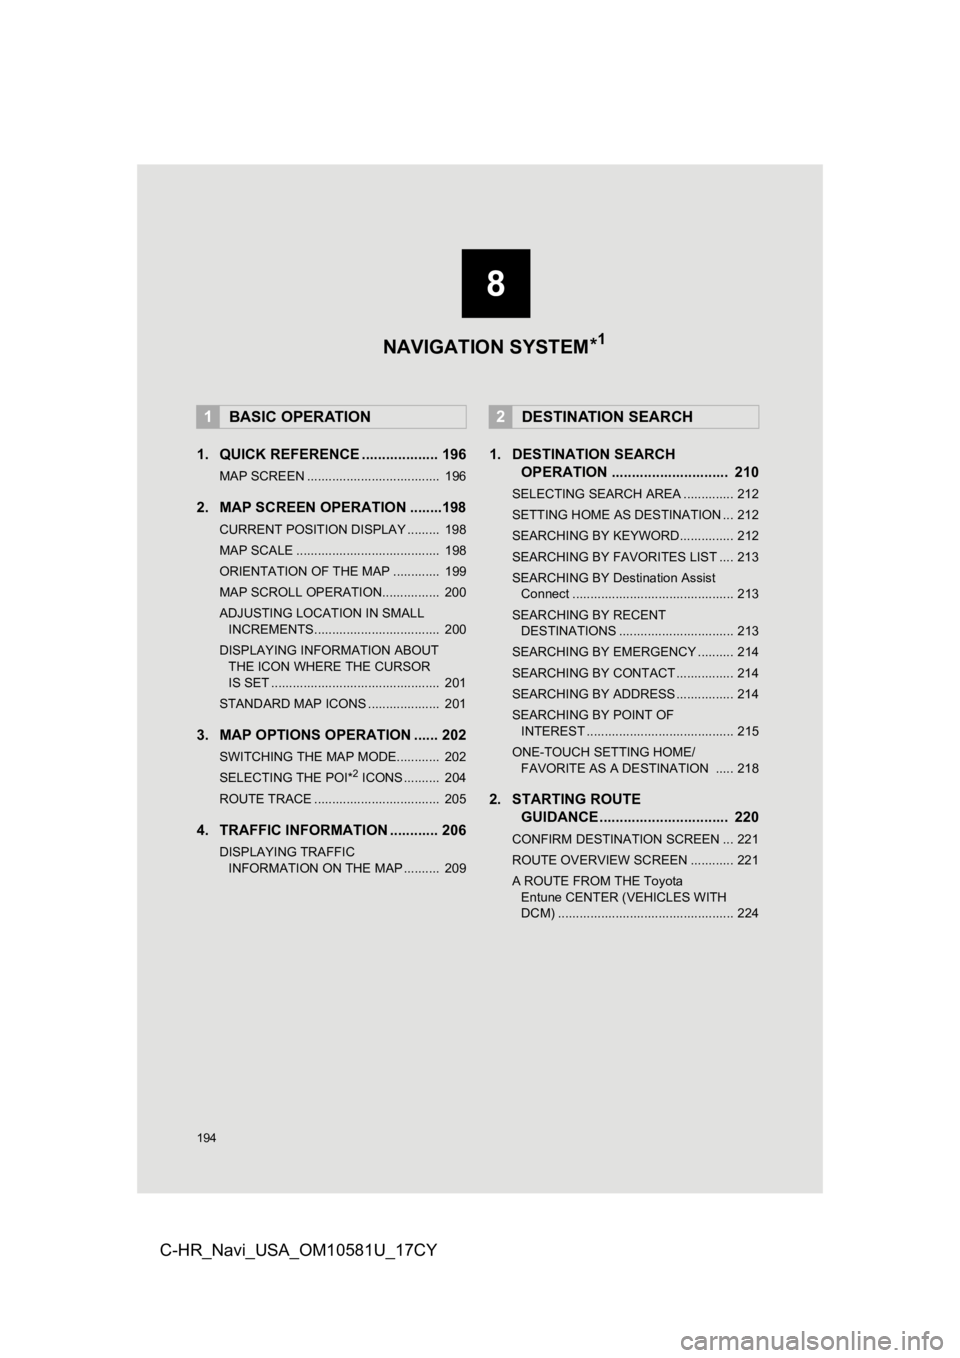
1. QUICK REFERENCE ................... 196
MAP SCREEN ..................................... 196
2. MAP SCREEN OPERATION ........198
CURRENT POSITION DISPLAY ......... 198
MAP SCALE ........................................ 198
ORIENTATION OF THE MAP ............. 199
MAP SCROLL OPERATION................ 200
ADJUSTING LOCATION IN SMALL INCREMENTS................................... 200
DISPLAYING INFORMATION ABOUT THE ICON WHERE THE CURSOR
IS SET ............................................... 201
STANDARD MAP ICONS .................... 201
3. MAP OPTIONS OPERATION ...... 202
SWITCHING THE MAP MODE............ 202
SELECTING THE POI*2 ICONS .......... 204
ROUTE TRACE ................................... 205
4. TRAFFIC INFORMATION ............ 206
DISPLAYING TRAFFIC INFORMATION ON THE MAP .......... 209
1. DESTINATION SEARCH OPERATION ............................. 210
SELECTING SEARCH AREA .............. 212
SETTING HOME AS DESTINATION ... 212
SEARCHING BY KEYWORD............... 212
SEARCHING BY FAVORITES LIST .... 213
SEARCHING BY Destination Assist
Connect ............................................. 213
SEARCHING BY RECENT DESTINATIONS ................................ 213
SEARCHING BY EMERGENCY .......... 214
SEARCHING BY CONTACT ................ 214
SEARCHING BY ADDRESS ................ 214
SEARCHING BY POINT OF INTEREST ......................................... 215
ONE-TOUCH SETTING HOME/ FAVORITE AS A DESTINATION ..... 218
2. STARTING ROUTE GUIDANCE ....... ....................... .. 220
CONFIRM DESTINATION SCREEN ... 221
ROUTE OVERVIEW SCREEN ............ 221
A ROUTE FROM THE Toyota
Entune CENTER (VEHICLES WITH
DCM) ................................................. 224
1BASIC OPERATION2DESTINATION SEARCH
8
NAVIGATION SYSTEM *1
Page 195 of 292
8
195
1
2
3
4
5
6
7
8
9
C-HR_Navi_USA_OM10581U_17CY
1. ROUTE GUIDANCE SCREEN ..... 225
SCREEN FOR ROUTE GUIDANCE ... 225
DURING FREEWAY DRIVING............ 227
WHEN APPROACHING AN INTERSECTION ............................... 229
TURN LIST SCREEN .......................... 229
TURN-BY-TURN ARROW SCREEN ... 230
2. TYPICAL VOICE GUIDANCE PROMPTS.................................. 231
3. ROUTE OPTIONS OPERATION .............................. 232
REORDERING DESTINATIONS ......... 232
SETTING ROUTE PREFERENCES ... 233
SELECTING ROUTE TYPE ................ 233
DETOUR SETTING ............................. 234
ADJACENT ROAD .............................. 235
1. MEMORY POINTS SETTINGS .... 236
SETTING UP HOME ........................... 237
SETTING UP FAVORITES LIST ......... 238
SETTING UP AREAS TO AVOID ........ 241
1. DETAILED NAVIGATIONSETTINGS ................................. 243
SCREENS FOR NAVIGATION
SETTINGS ........................................ 243
2. TRAFFIC SETTINGS................... 247
SCREEN FOR TRAFFIC SETTINGS ........................................ 247
AVOID TRAFFIC.................................. 248
MY TRAFFIC ROUTES ....................... 249
3. USE OF INFORMATION ACCUMULATED BY
NAVIGATION SYSTEM
(VEHICLES WITH DCM) ........... 252
1. GPS (GLOBAL POSITIONING SYSTEM) .................... ............... 253
LIMITATIONS OF THE NAVIGATION
SYSTEM ............................................ 253
2. MAP DATABASE VERSION AND COVERED AREA ...................... 255
MAP INFORMATION ........................... 255
TEMPORARY UPDATES OF THE
MAP (VEHICLES WITH DCM) .......... 255
3ROUTE GUIDANCE
4MEMORY POINTS
5SETUP
6TIPS FOR THE NAVIGATION
SYSTEM
*1: Entune Premium Audio only
*2: Point of Interest
NAVIGATION SYSTEM*1
Page 196 of 292
196
C-HR_Navi_USA_OM10581U_17CY
1. BASIC OPERATION
1. QUICK REFERENCE
MAP SCREEN
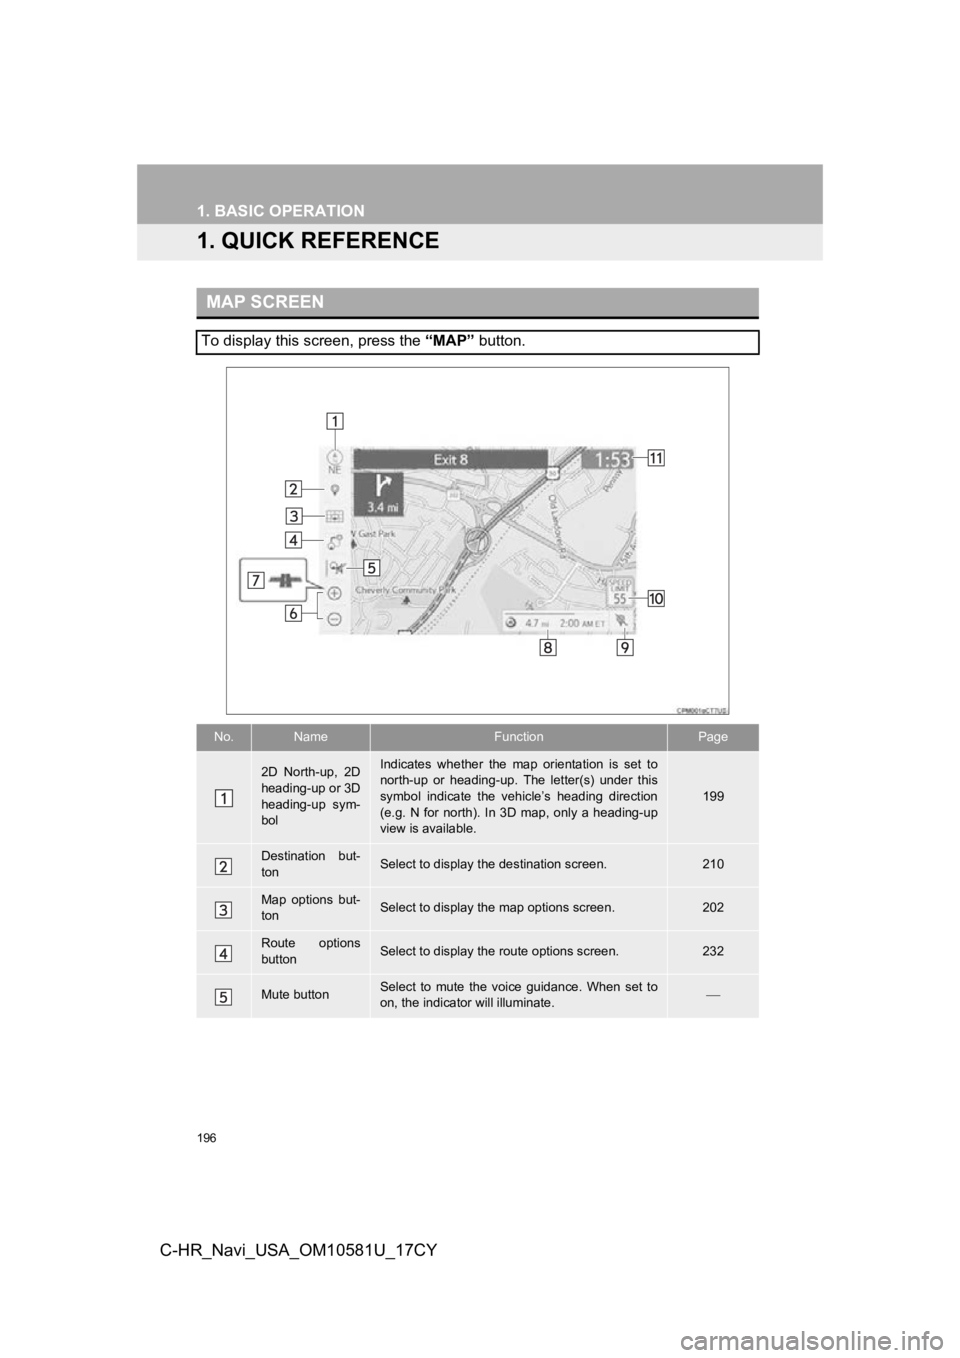
To display this screen, press the “MAP” button.
No.NameFunctionPage
2D North-up, 2D
heading-up or 3D
heading-up sym-
bolIndicates whether the map orientation is set to
north-up or heading-up. The letter(s) under this
symbol indicate the vehicle’s heading direction
(e.g. N for north). In 3D map, only a heading-up
view is available.
199
Destination but-
tonSelect to display the destination screen.210
Map options but-
tonSelect to display th e map options screen.202
Route options
buttonSelect to display the route options screen.232
Mute buttonSelect to mute the voice guidance. When set to
on, the indicator will illuminate.
Page 197 of 292
197
1. BASIC OPERATION
NAVIGATION SYSTEM
8
C-HR_Navi_USA_OM10581U_17CY
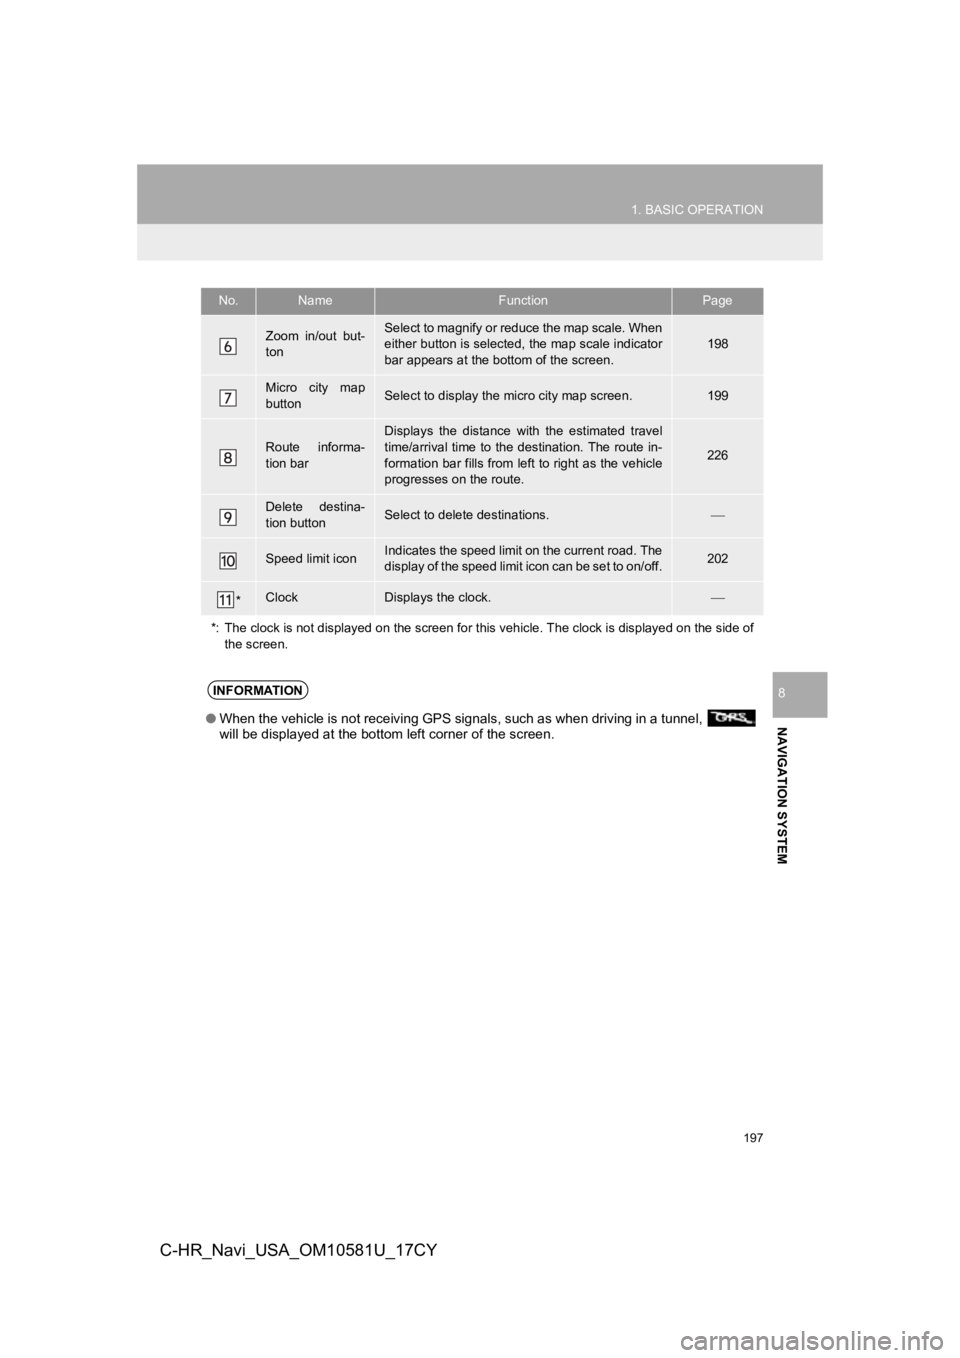
Zoom in/out but-
tonSelect to magnify or reduce the map scale. When
either button is selected, the map scale indicator
bar appears at the bottom of the screen.198
Micro city map
buttonSelect to display the micro city map screen.199
Route informa-
tion bar
Displays the distance with the estimated travel
time/arrival time to the destination. The route in-
formation bar fills from le ft to right as the vehicle
progresses on the route.
226
Delete destina-
tion buttonSelect to delete destinations.
Speed limit iconIndicates the speed limit on the current road. The
display of the speed limit icon can be set to on/off.202
*ClockDisplays the clock.
*: The clock is not displayed o n the screen for this vehicle. Th e clock is displayed on the side of
the screen.
No.NameFunctionPage
INFORMATION
● When the vehicle is not receiving GPS signals, such as when dri ving in a tunnel,
will be displayed at the bottom left corner of the screen.
Page 198 of 292
198
1. BASIC OPERATION
C-HR_Navi_USA_OM10581U_17CY
2. MAP SCREEN OPERATION
1Press the “MAP” button.
2Check that the current position map is
displayed.
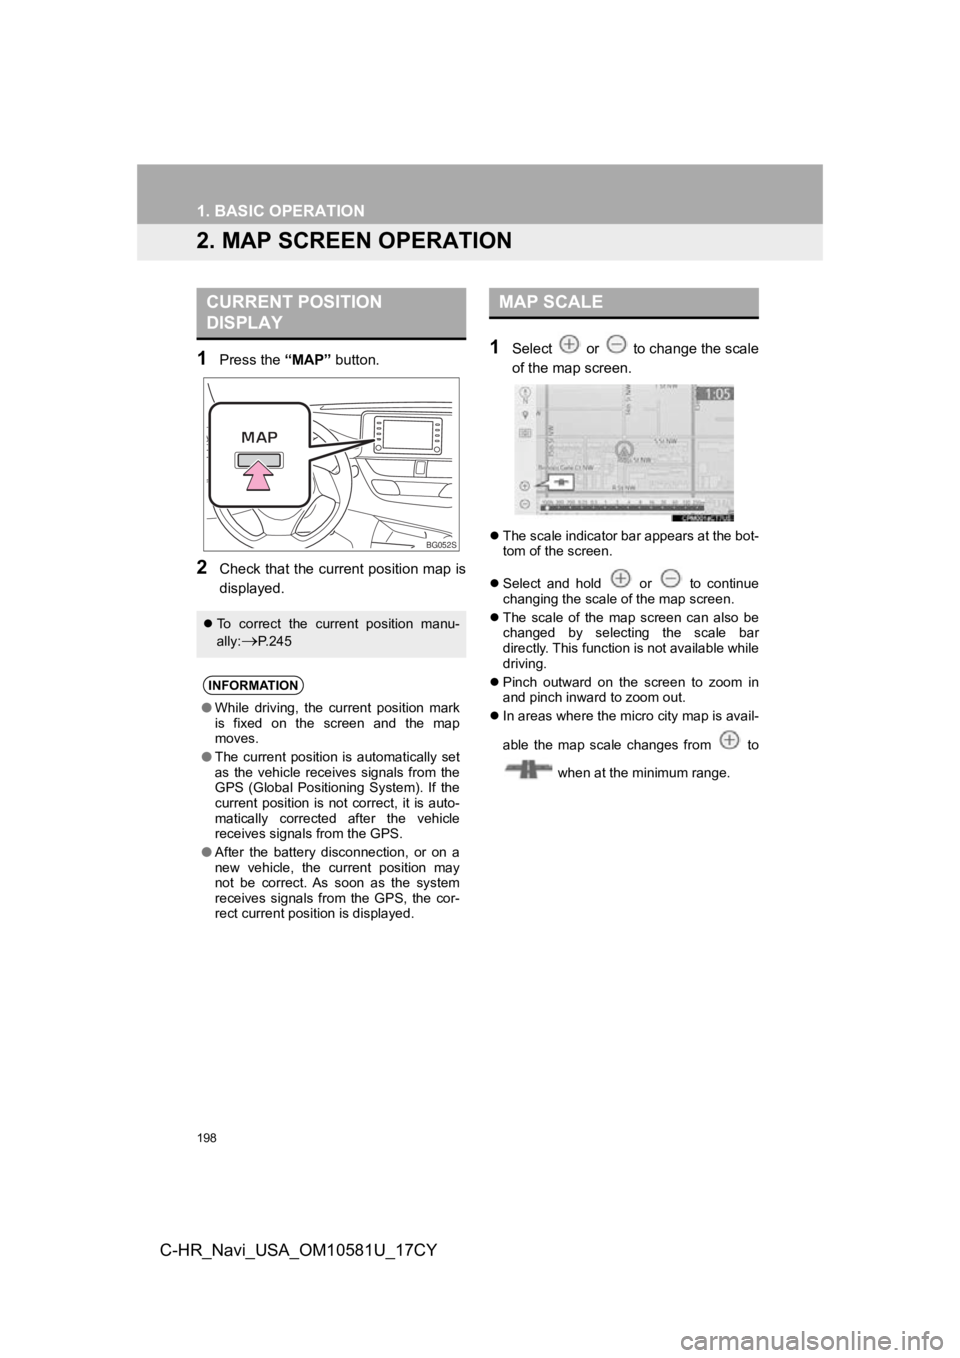
1Select or to change the scale
of the map screen.
The scale indicator bar appears at the bot-
tom of the screen.
Select and hold or to continue
changing the scale of the map screen.
The scale of the map screen can also be
changed by selecting the scale bar
directly. This function is not available while
driving.
Pinch outward on the screen to zoom in
and pinch inward to zoom out.
In areas where the micro city map is avail-
able the map scale changes from to
when at the minimum range.
CURRENT POSITION
DISPLAY
To correct the current position manu-
ally:
P.245
INFORMATION
●While driving, the current position mark
is fixed on the screen and the map
moves.
● The current position is automatically set
as the vehicle receives signals from the
GPS (Global Positioning System). If the
current position is not correct, it is auto-
matically corrected after the vehicle
receives signals from the GPS.
● After the battery disconnection, or on a
new vehicle, the current position may
not be correct. As soon as the system
receives signals from the GPS, the cor-
rect current position is displayed.
BG052S
MAP SCALE
Page 199 of 292
199
1. BASIC OPERATION
NAVIGATION SYSTEM
8
C-HR_Navi_USA_OM10581U_17CY
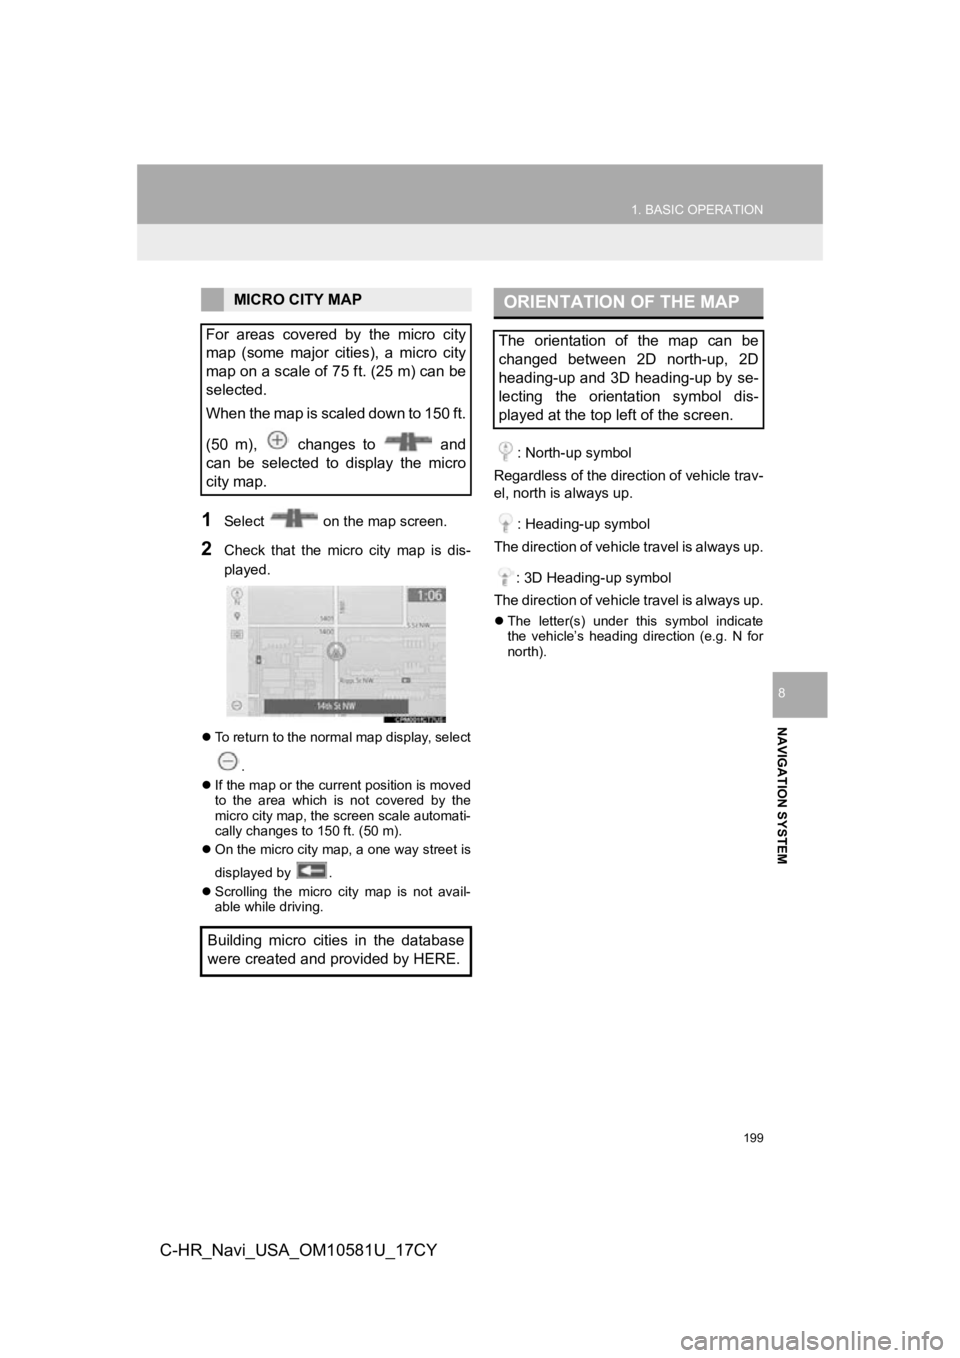
1Select on the map screen.
2Check that the micro city map is dis-
played.
To return to the normal map display, select
.
If the map or the current position is moved
to the area which is not covered by the
micro city map, the screen scale automati-
cally changes to 150 ft. (50 m).
On the micro city map, a one way street is
displayed by .
Scrolling the micro city map is not avail-
able while driving.
: North-up symbol
Regardless of the direction of vehicle trav-
el, north is always up.
: Heading-up symbol
The direction of vehicle travel is always up.
: 3D Heading-up symbol
The direction of vehicle travel is always up.
The letter(s) under this symbol indicate
the vehicle’s heading direction (e.g. N for
north).
MICRO CITY MAP
For areas covered by the micro city
map (some major cities), a micro city
map on a scale of 75 ft. (25 m) can be
selected.
When the map is scaled down to 150 ft.
(50 m), changes to and
can be selected to display the micro
city map.
Building micro cities in the database
were created and provided by HERE.ORIENTATION OF THE MAP
The orientation of the map can be
changed between 2D north-up, 2D
heading-up and 3D heading-up by se-
lecting the orientation symbol dis-
played at the top left of the screen.
Page 200 of 292
200
1. BASIC OPERATION
C-HR_Navi_USA_OM10581U_17CY
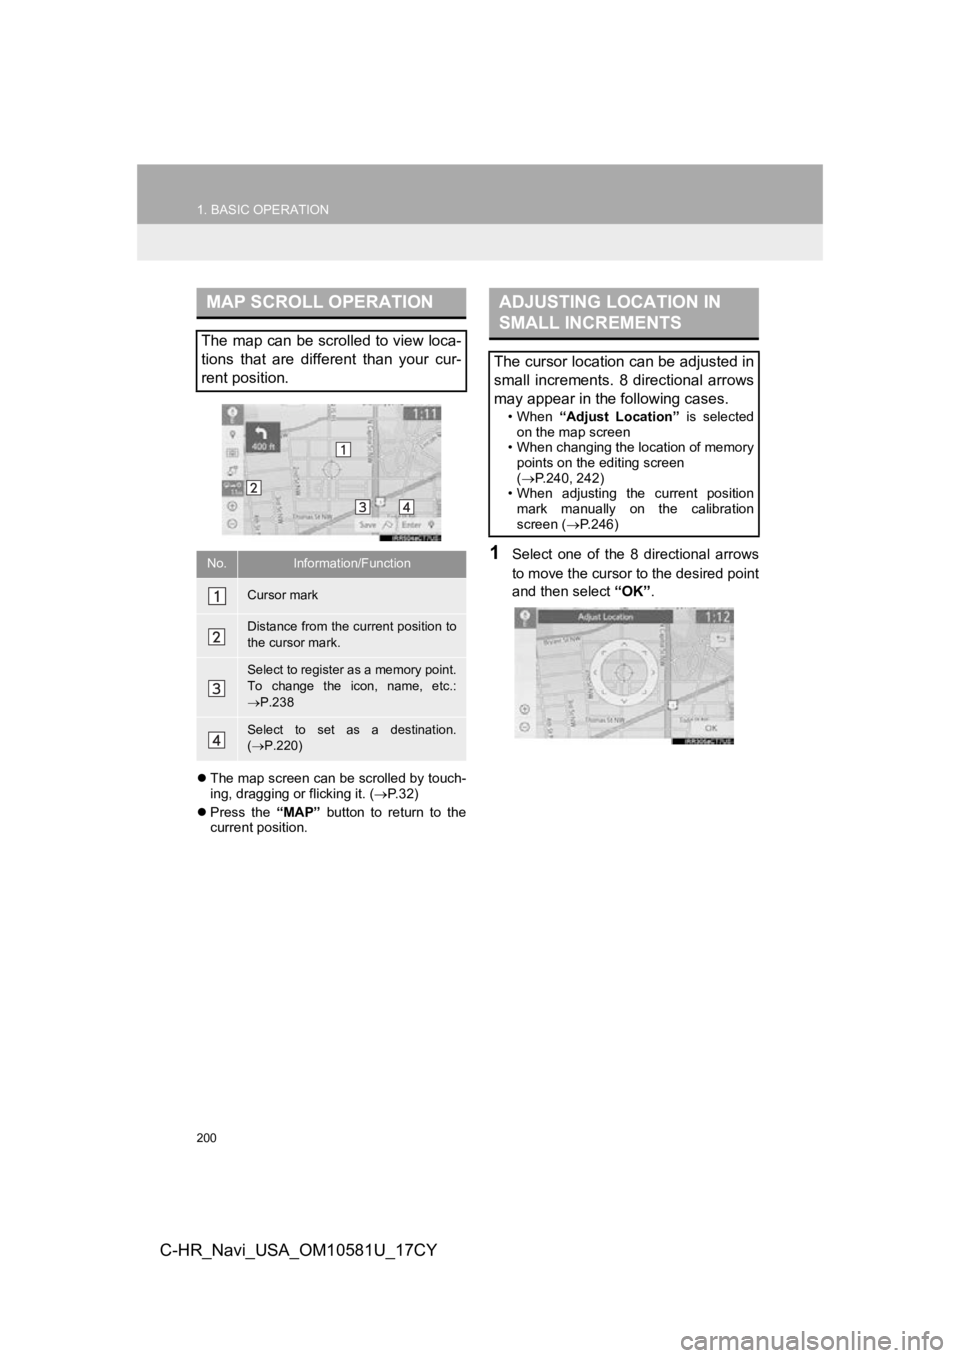
The map screen can be scrolled by touch-
ing, dragging or flicking it. ( P. 3 2 )
Press the “MAP” button to return to the
current position.
1Select one of the 8 directional arrows
to move the cursor to the desired point
and then select “OK”.
MAP SCROLL OPERATION
The map can be scrolled to view loca-
tions that are different than your cur-
rent position.
No.Information/Function
Cursor mark
Distance from the current position to
the cursor mark.
Select to register as a memory point.
To change the icon, name, etc.:
P.238
Select to set as a destination.
( P.220)
ADJUSTING LOCATION IN
SMALL INCREMENTS
The cursor location can be adjusted in
small increments. 8 directional arrows
may appear in the following cases.
• When “Adjust Location” is selected
on the map screen
• When changing the location of memory
points on the editing screen
( P.240, 242)
• When adjusting the current position mark manually on the calibration
screen ( P.246)