display TOYOTA C-HR 2019 Accessories, Audio & Navigation (in English)
[x] Cancel search | Manufacturer: TOYOTA, Model Year: 2019, Model line: C-HR, Model: TOYOTA C-HR 2019Pages: 292, PDF Size: 5.26 MB
Page 107 of 292
107
3. MEDIA OPERATION
AUDIO/VISUAL SYSTEM
3
C-HR_Navi_USA_OM10581U_17CY
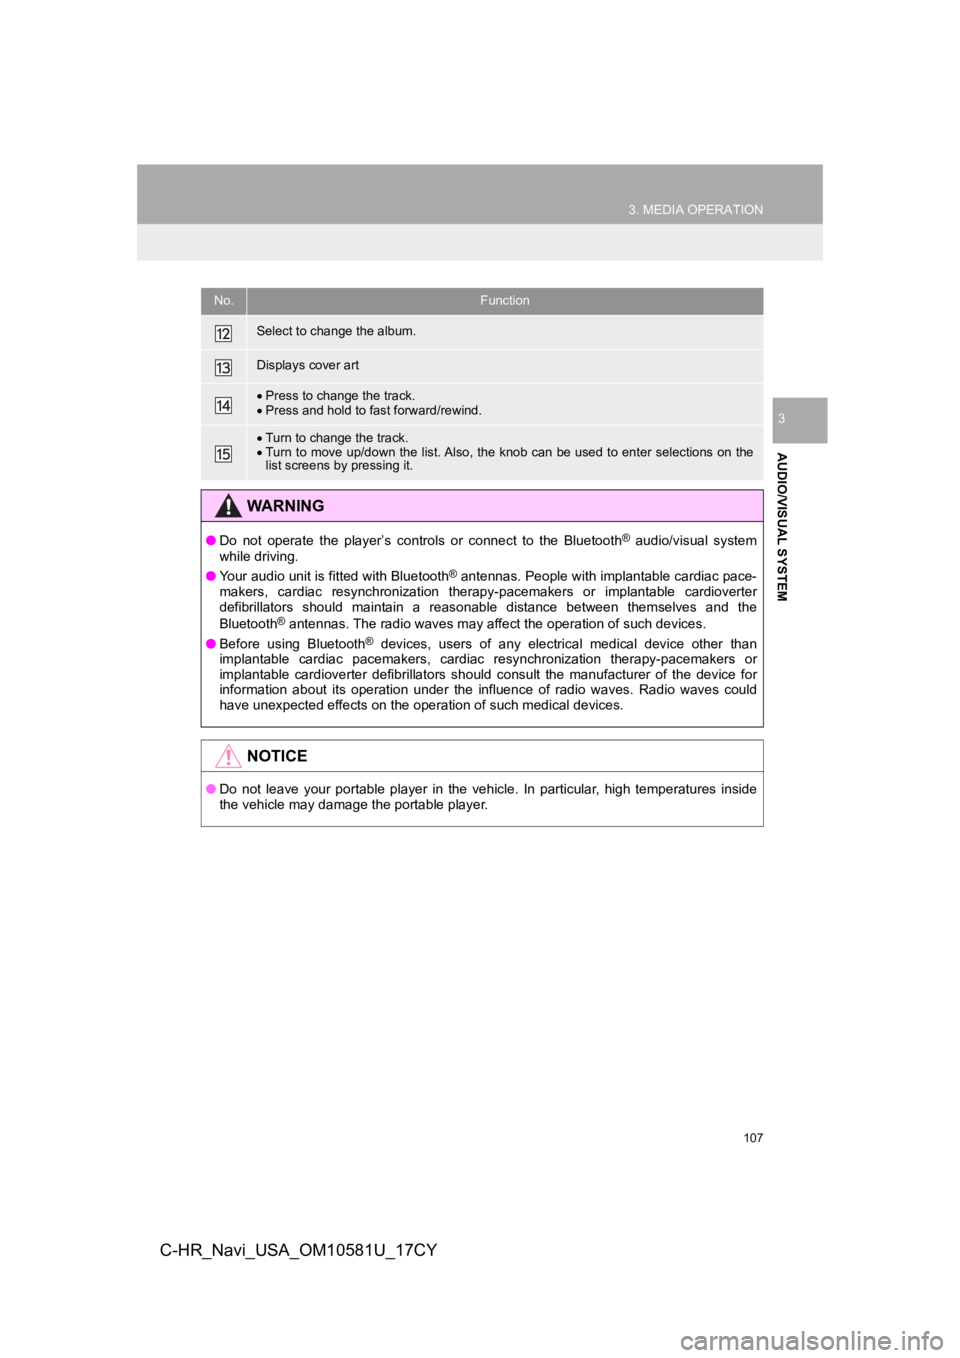
Select to change the album.
Displays cover art
Press to change the track.
Press and hold to fast forward/rewind.
Turn to change the track.
Turn to move up/down the list. Also, the knob can be used to en ter selections on the
list screens by pressing it.
WA R N I N G
● Do not operate the player’s controls or connect to the Bluetoot h® audio/visual system
while driving.
● Your audio unit is fitted with Bluetooth
® antennas. People with implantable cardiac pace-
makers, cardiac resynchronization therapy-pacemakers or implant able cardioverter
defibrillators should maintain a reasonable distance between themselves and the
Bluetooth
® antennas. The radio waves may affect the operation of such dev ices.
● Before using Bluetooth
® devices, users of any electrical medical device other than
implantable cardiac pacemakers, cardiac resynchronization thera py-pacemakers or
implantable cardioverter defibrillators should consult the manu facturer of the device for
information about its operation under the influence of radio wa ves. Radio waves could
have unexpected effects on the operation of such medical device s.
NOTICE
●Do not leave your portable player in the vehicle. In particular, high temperatures inside
the vehicle may damage the portable player.
No.Function
Page 109 of 292

109
3. MEDIA OPERATION
AUDIO/VISUAL SYSTEM
3
C-HR_Navi_USA_OM10581U_17CY
Registering an additional device
1Display the Bluetooth® audio control
screen. ( P.105)
2Select “Connect” .
3Select “Add Device” .
When another Bluetooth® device is con-
nected, a confirmation screen will be dis-
played. To disconnect the Bluetooth
®
device, select “Yes”.
4Follow the steps in “REGISTERING A
Bluetooth
® PHONE FOR THE FIRST
TIME” from “STEP 5”. ( P.43)
Selecting a registered device
1Display the Bluetooth® audio control
screen. ( P.105)
2Select “Connect” .
3Select the desired device to be con-
nected.
4Check that a confirmation screen is
displayed when the connection is com-
plete.
If an error message is displayed, follow
the guidance on the screen to try again.
REGISTERING/CONNECTING
A Bluetooth® DEVICE
To use the Bluetooth® audio system, it
is necessary to register a Bluetooth
®
device with the system.
Page 110 of 292
110
3. MEDIA OPERATION
C-HR_Navi_USA_OM10581U_17CY
4. AUX
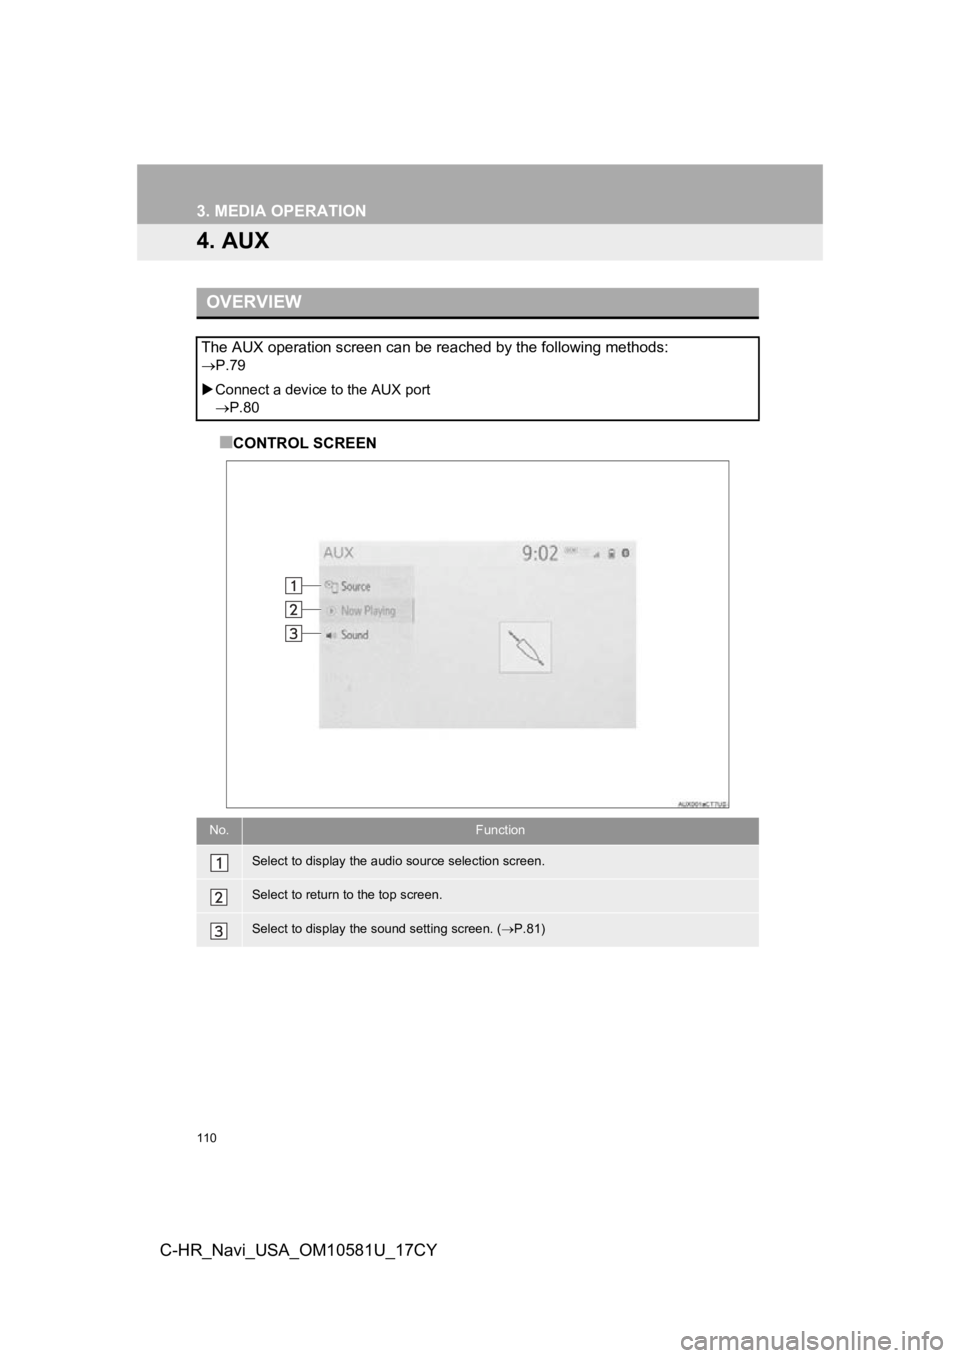
■CONTROL SCREEN
OVERVIEW
The AUX operation screen can be reached by the following methods:
P.79
Connect a device to the AUX port
P.80
No.Function
Select to display the audio source selection screen.
Select to return to the top screen.
Select to display the sound setting screen. ( P.81)
Page 114 of 292
114
C-HR_Navi_USA_OM10581U_17CY
5. SETUP
1. AUDIO SETTINGS
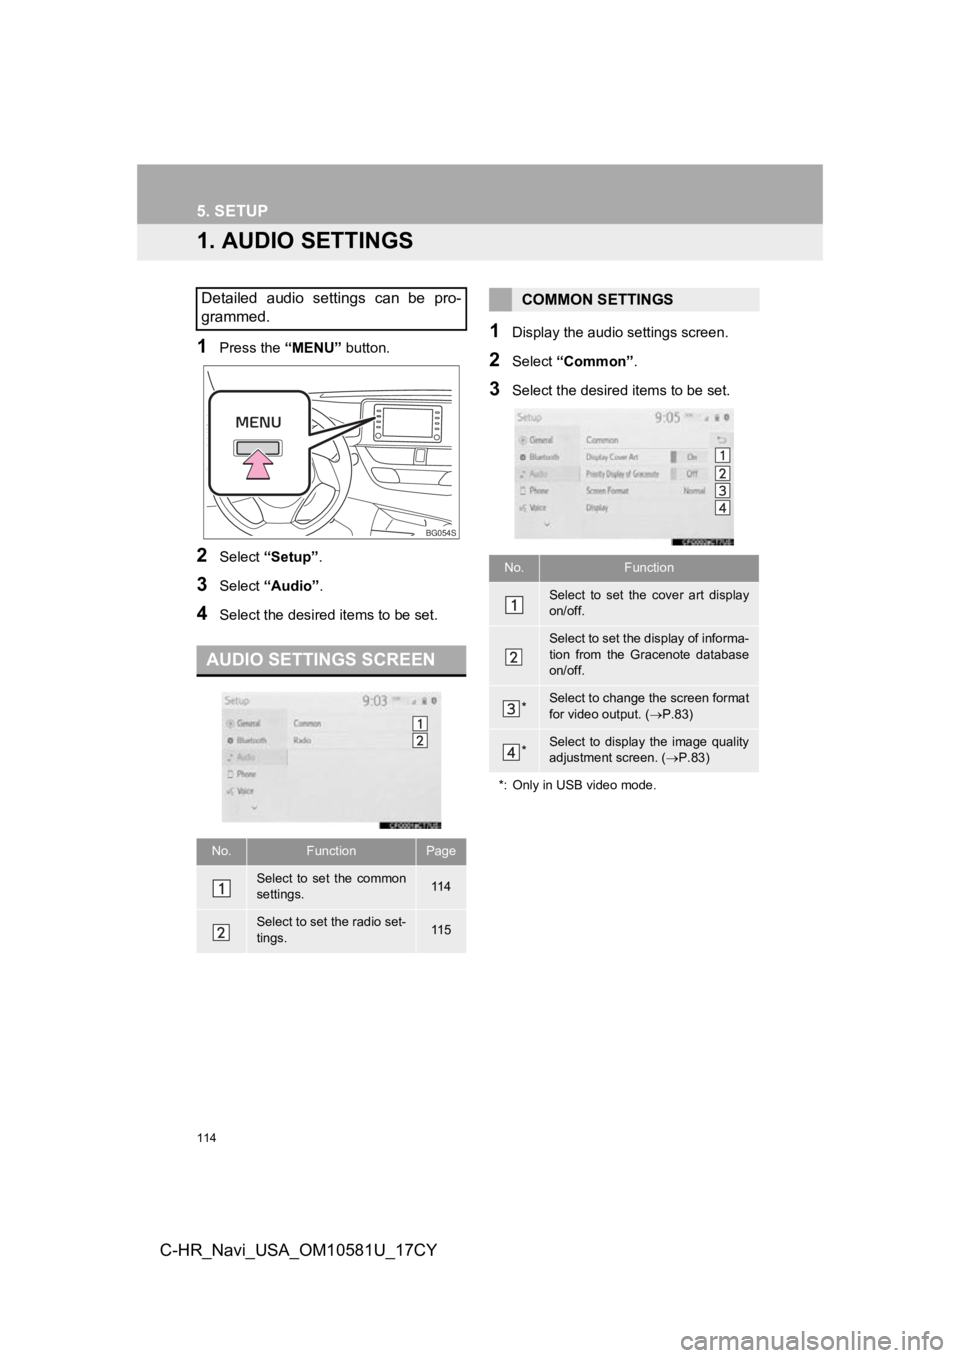
1Press the “MENU” button.
2Select “Setup” .
3Select “Audio” .
4Select the desired items to be set.
1Display the audio settings screen.
2Select “Common” .
3Select the desired items to be set.
Detailed audio settings can be pro-
grammed.
AUDIO SETTINGS SCREEN
No.FunctionPage
Select to set the common
settings.11 4
Select to set the radio set-
tings.11 5
BG054S
COMMON SETTINGS
No.Function
Select to set the cover art display
on/off.
Select to set the display of informa-
tion from the Gracenote database
on/off.
*Select to change the screen format
for video output. ( P.83)
*Select to display the image quality
adjustment screen. ( P.83)
*: Only in USB video mode.
Page 115 of 292
115
5. SETUP
AUDIO/VISUAL SYSTEM
3
C-HR_Navi_USA_OM10581U_17CY
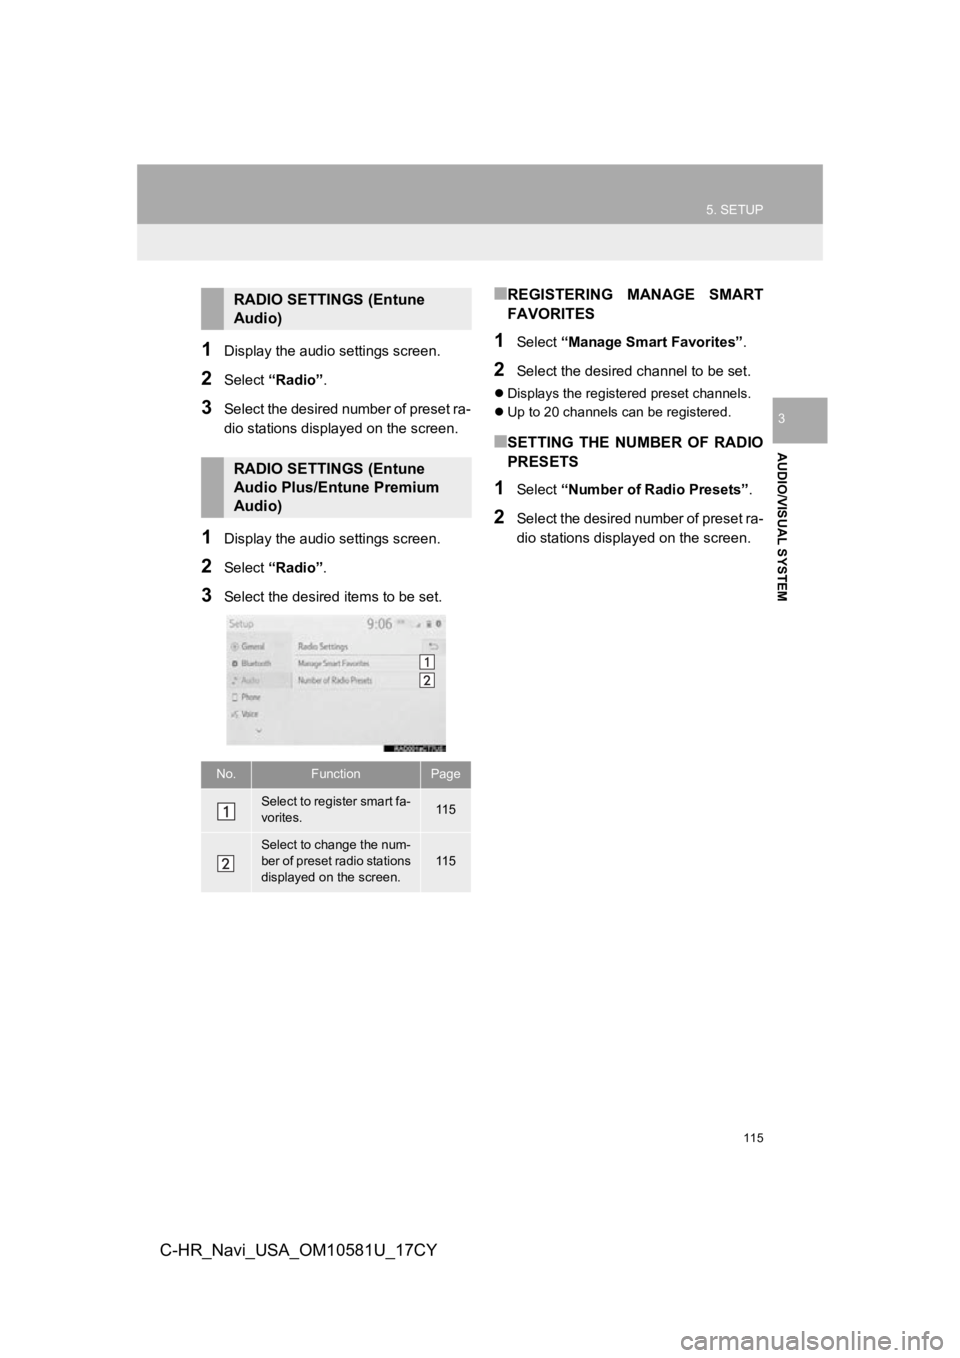
1Display the audio settings screen.
2Select “Radio” .
3Select the desired number of preset ra-
dio stations displ ayed on the screen.
1Display the audio settings screen.
2Select “Radio” .
3Select the desired items to be set.
■REGISTERING MANAGE SMART
FAVORITES
1Select “Manage Smart Favorites” .
2Select the desired channel to be set.
Displays the registered preset channels.
Up to 20 channels can be registered.
■SETTING THE NUMBER OF RADIO
PRESETS
1Select “Number of Radio Presets” .
2Select the desired number of preset ra-
dio stations displayed on the screen.
RADIO SETTINGS (Entune
Audio)
RADIO SETTINGS (Entune
Audio Plus/Entune Premium
Audio)
No.FunctionPage
Select to register smart fa-
vorites.11 5
Select to change the num-
ber of preset radio stations
displayed on the screen.
11 5
Page 121 of 292
121
6. TIPS FOR OPERATING THE AUDIO/VISUAL SYSTEM
AUDIO/VISUAL SYSTEM
3
C-HR_Navi_USA_OM10581U_17CY
MP3 files are compatible with the ID3 Tag
Ver. 1.0, Ver. 1.1, Ver. 2.2 and Ver. 2.3 for-
mats. This system cannot display album
title, track title and artist name in other for-
mats.
WMA/AAC files can contain a WMA/AAC
tag that is used in the same way as an ID3
tag. WMA/AAC tags carry information
such as track title and artist name.
The emphasis function is available only
when playing MP3 files.
This system can play back AAC files
encoded by iTunes.
The sound quality of MP3/WMA files gen-
erally improves with higher bit rates. In
order to achieve a reasonable level of
sound quality, files recorded with a bit rate
of at least 128 kbps are recommended.
m3u playlists are not compatible with the
audio player.
MP3i (MP3 interactive) and MP3PRO for-
mats are not compatible with the audio
player.
The player is compatible with VBR (Vari-
able Bit Rate).
When playing back files recorded as VBR
(Variable Bit Rate) files, the play time will
not be correctly displayed if the fast for-
ward or reverse operations are used.
It is not possible to check folders that do
not include MP3/WMA/AAC files.
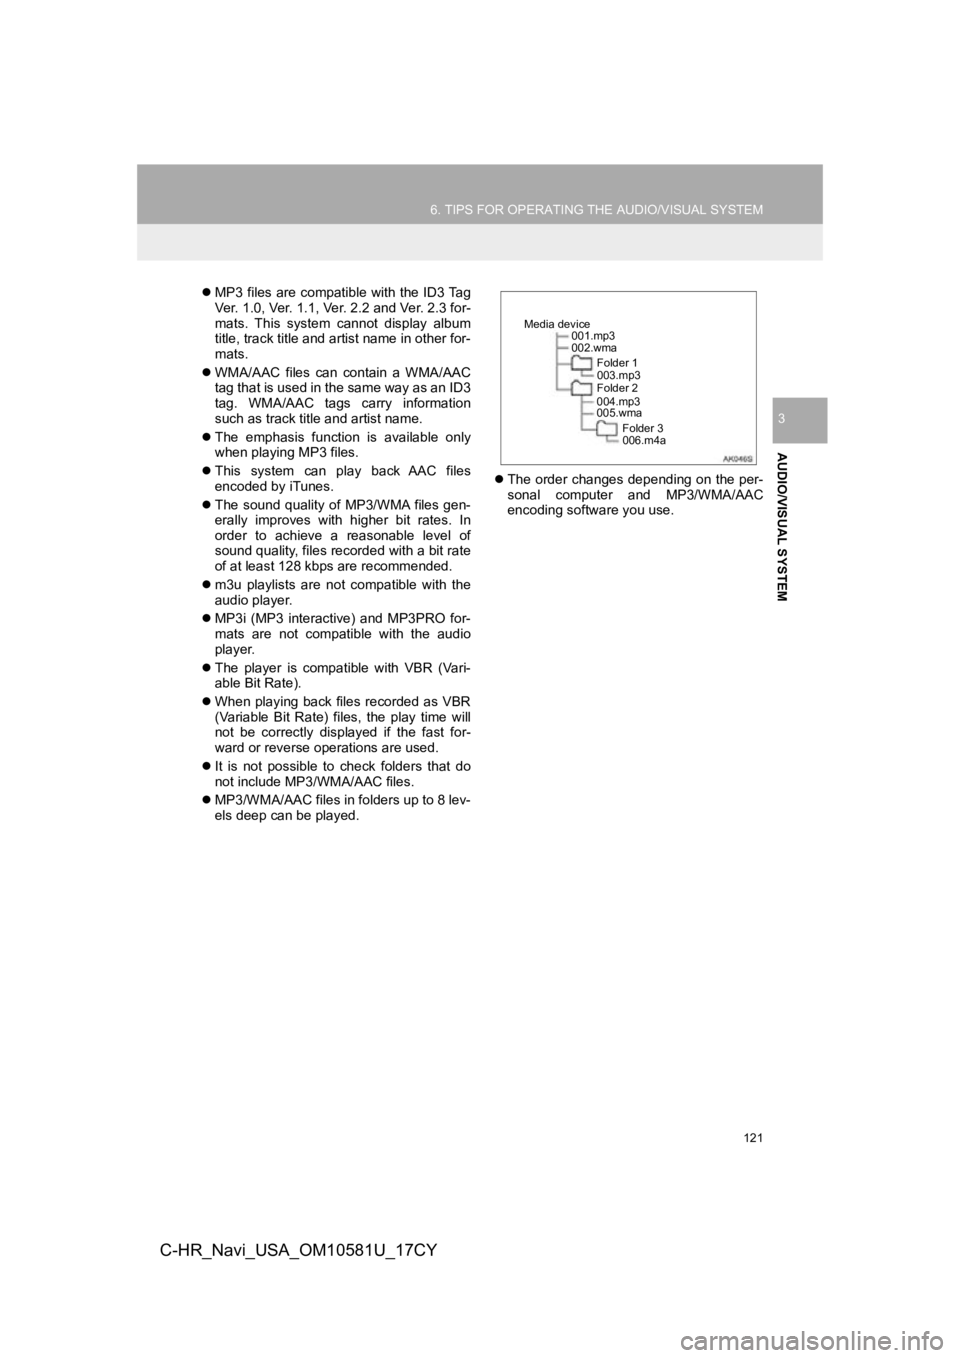
MP3/WMA/AAC files in folders up to 8 lev-
els deep can be played.
The order changes depending on the per-
sonal computer and MP3/WMA/AAC
encoding software you use.
001.mp3
002.wma
Folder 1
003.mp3
Folder 2
004.mp3
005.wma
Folder 3
006.m4a
Media device
Page 127 of 292
127
1. VOICE COMMAND SYSTEM OPERATION
VOICE COMMAND SYSTEM
4
C-HR_Navi_USA_OM10581U_17CY
1Press the talk switch.
Voice guidance for the voice command
system can be skipped by pressing the
talk switch.
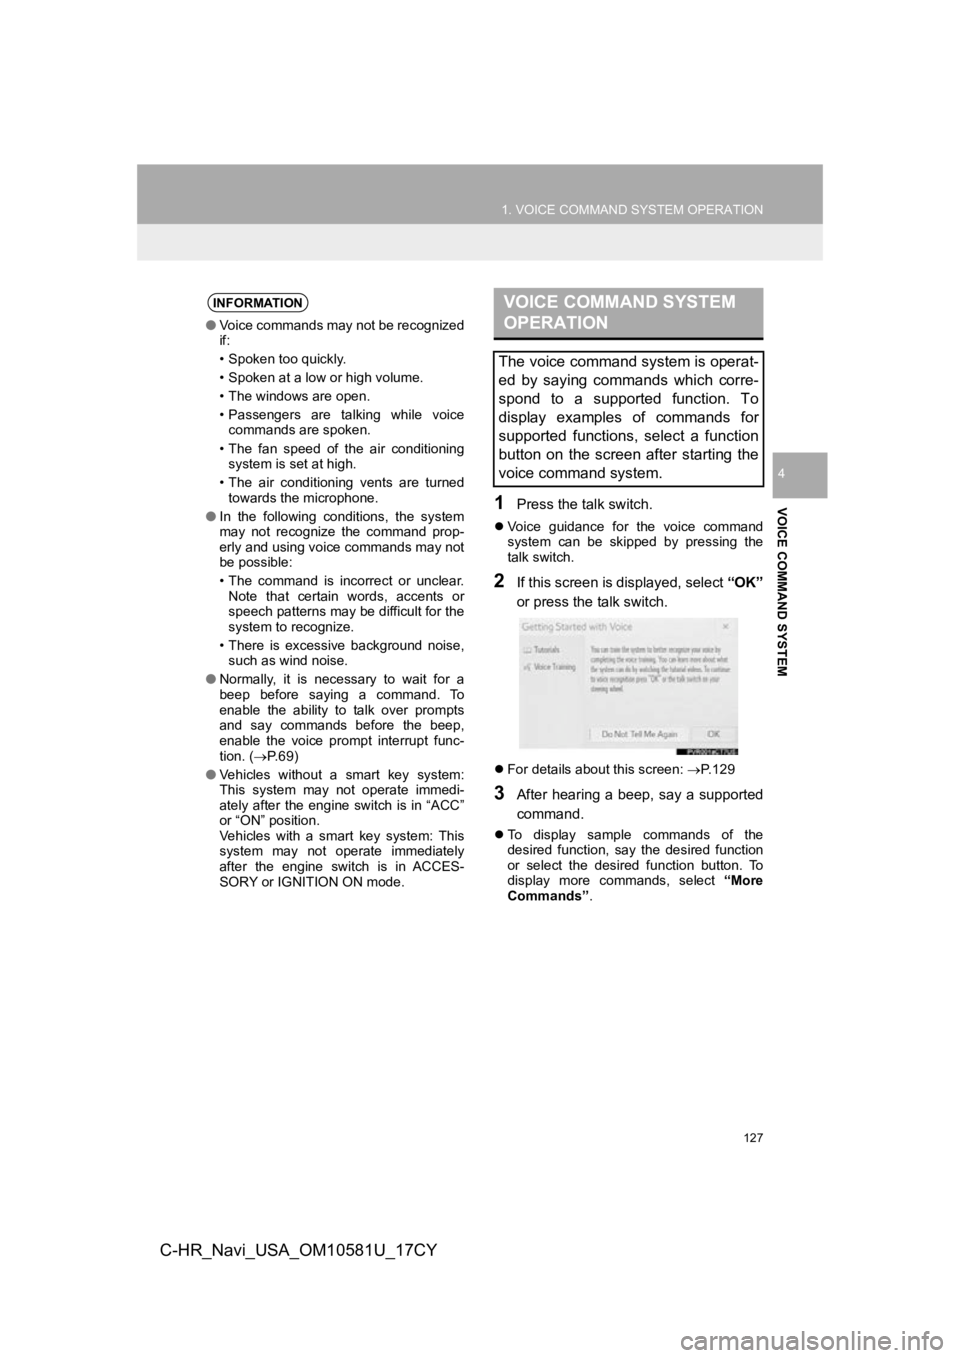
2If this screen is displayed, select “OK”
or press the talk switch.
For details about this screen: P.129
3After hearing a beep, say a supported
command.
To display sample commands of the
desired function, say the desired function
or select the desired function button. To
display more commands, select “More
Commands” .
INFORMATION
●Voice commands may not be recognized
if:
• Spoken too quickly.
• Spoken at a low or high volume.
• The windows are open.
• Passengers are talking while voice
commands are spoken.
• The fan speed of the air conditioning system is set at high.
• The air conditioning vents are turned towards the microphone.
● In the following conditions, the system
may not recognize the command prop-
erly and using voice commands may not
be possible:
• The command is incorrect or unclear.
Note that certain words, accents or
speech patterns may be difficult for the
system to recognize.
• There is excessive background noise, such as wind noise.
● Normally, it is necessary to wait for a
beep before saying a command. To
enable the ability to talk over prompts
and say commands before the beep,
enable the voice prompt interrupt func-
tion. ( P. 6 9 )
● Vehicles without a smart key system:
This system may not operate immedi-
ately after the engine switch is in “ACC”
or “ON” position.
Vehicles with a smart key system: This
system may not operate immediately
after the engine switch is in ACCES-
SORY or IGNITION ON mode.
VOICE COMMAND SYSTEM
OPERATION
The voice command system is operat-
ed by saying commands which corre-
spond to a supported function. To
display examples of commands for
supported functions, select a function
button on the screen after starting the
voice command system.
Page 129 of 292
129
1. VOICE COMMAND SYSTEM OPERATION
VOICE COMMAND SYSTEM
4
C-HR_Navi_USA_OM10581U_17CY
1Press the talk switch.
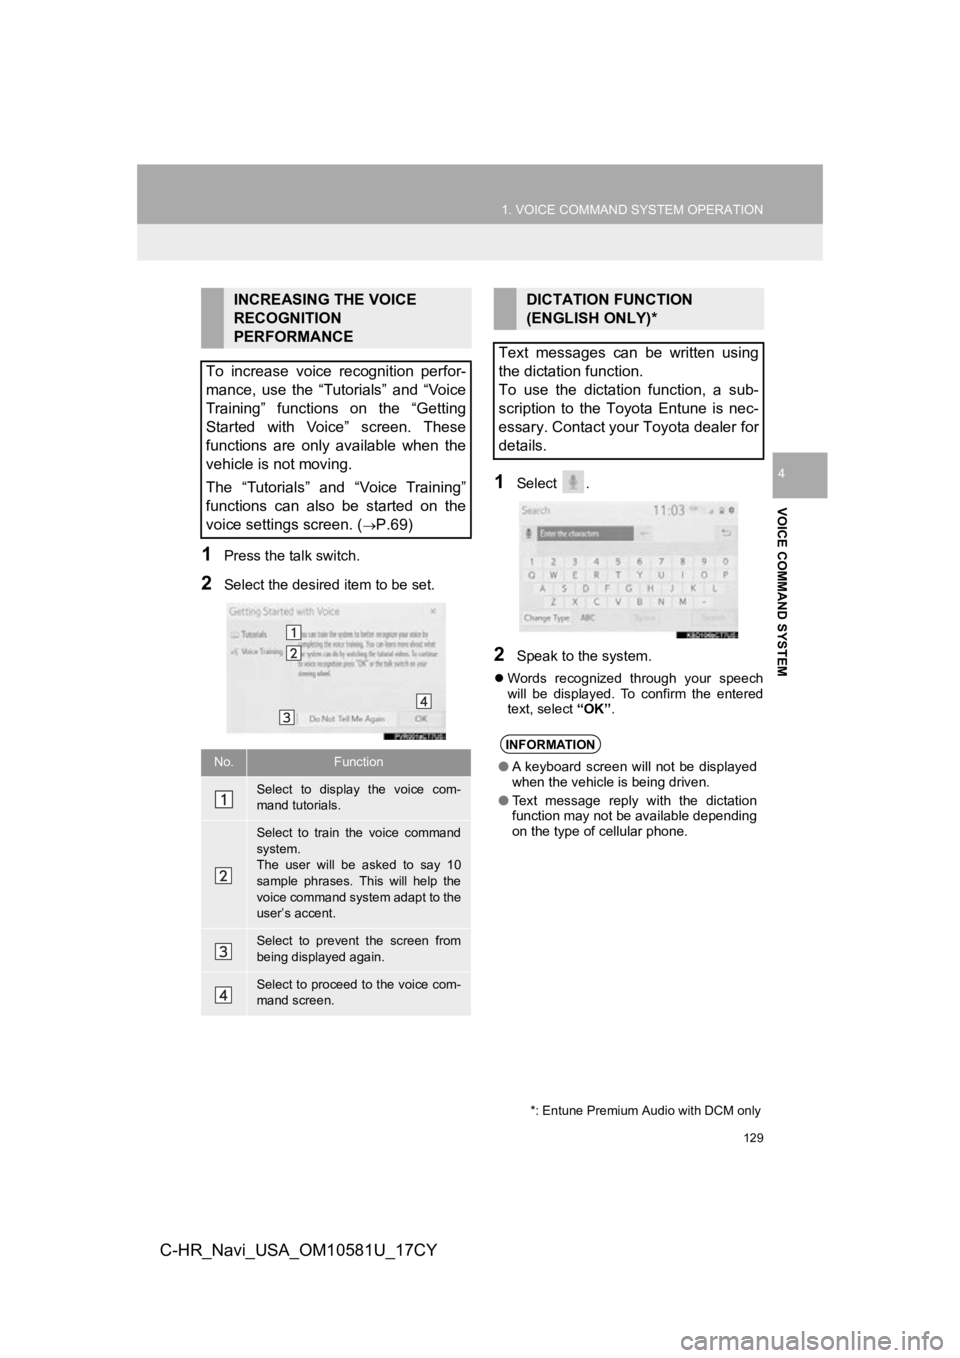
2Select the desired item to be set.
1Select .
2Speak to the system.
Words recognized through your speech
will be displayed. To confirm the entered
text, select “OK”.
INCREASING THE VOICE
RECOGNITION
PERFORMANCE
To increase voice recognition perfor-
mance, use the “Tutorials” and “Voice
Training” functions on the “Getting
Started with Voice” screen. These
functions are only available when the
vehicle is not moving.
The “Tutorials” and “Voice Training”
functions can also be started on the
voice settings screen. (
P.69)
No.Function
Select to display the voice com-
mand tutorials.
Select to train the voice command
system.
The user will be asked to say 10
sample phrases. This will help the
voice command system adapt to the
user’s accent.
Select to prevent the screen from
being displayed again.
Select to proceed to the voice com-
mand screen.
DICTATION FUNCTION
(ENGLISH ONLY)*
Text messages can be written using
the dictation function.
To use the dictation function, a sub-
scription to the Toyota Entune is nec-
essary. Contact your Toyota dealer for
details.
INFORMATION
● A keyboard screen will not be displayed
when the vehicle is being driven.
● Text message reply with the dictation
function may not be available depending
on the type of cellular phone.
*: Entune Premium Audio with DCM only
Page 130 of 292

130
1. VOICE COMMAND SYSTEM OPERATION
C-HR_Navi_USA_OM10581U_17CY
2. NATURAL LANGUAGE UNDERSTANDING*
Due to natural language speech recog-
nition technology, this system recog-
nizes commands when spoken
naturally. (If a Toyota Entune subscrip-
tion has been entered, the system will
be able to connect to the Toyota En-
tune center and the range of naturally
spoken English which can be recog-
nized will be increased.) However, the
system cannot recognize every varia-
tion of each command. In some situa-
tions, it is possible to omit the
command for the procedure and direct-
ly state the desired operation. Not all
voice commands are displayed in the
function menu.
To use this function, a subscription to
the Toyota Entune is necessary. Con-
tact your Toyota dealer for details.
*: Entune Premium Audio with DCM only
Page 131 of 292
131
1. VOICE COMMAND SYSTEM OPERATION
VOICE COMMAND SYSTEM
4
C-HR_Navi_USA_OM10581U_17CY
3. COMMAND LIST
Frequently used commands are listed in the following tables.
For devices that are not installed to the vehicle, commands rel ating to that device may
not be displayed on the screen. Also, depending on other condit ions, such as compat-
ibility, some commands may not be displayed on the screen.
The functions available may vary according to the system installed.
Common
Top menu
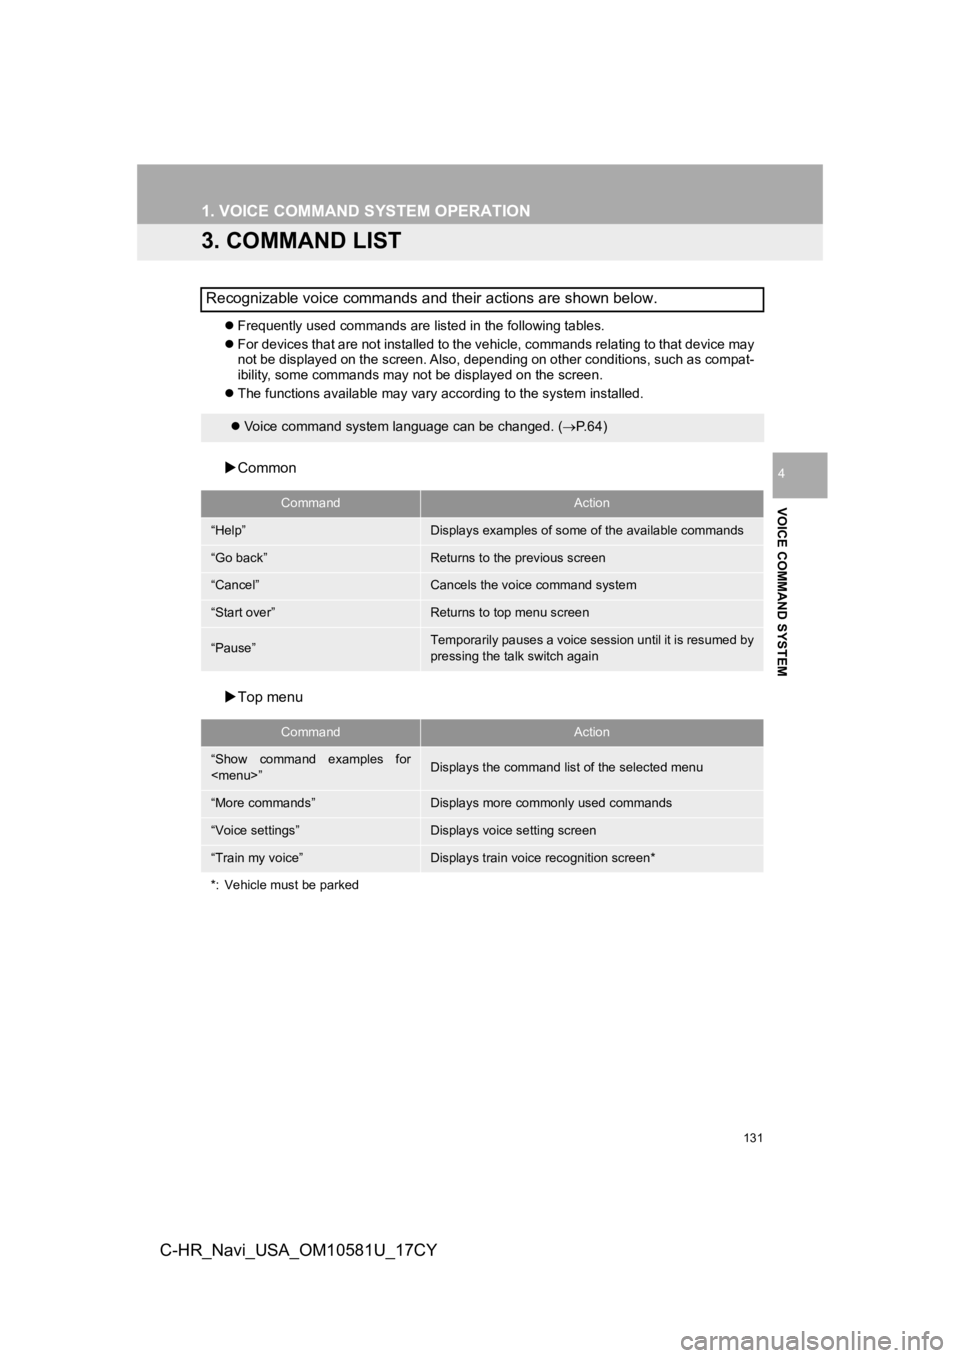
Recognizable voice commands and their actions are shown below.
Voice command system language can be changed. ( P.64)
CommandAction
“Help”Displays examples of some of the available commands
“Go back”Returns to the previous screen
“Cancel”Cancels the voice command system
“Start over”Returns to top menu screen
“Pause”Temporarily pauses a voice session until it is resumed by
pressing the talk switch again
CommandAction
“Show command examples for