TOYOTA C-HR 2019 Owners Manual (in English)
Manufacturer: TOYOTA, Model Year: 2019,
Model line: C-HR,
Model: TOYOTA C-HR 2019
Pages: 532, PDF Size: 10.35 MB
TOYOTA C-HR 2019 Owners Manual (in English)
C-HR 2019
TOYOTA
TOYOTA
https://www.carmanualsonline.info/img/14/42408/w960_42408-0.png
TOYOTA C-HR 2019 Owners Manual (in English)
Trending: wiring, seat memory, brake pads, sensor, hood open, weight, adding oil
Page 391 of 532
3916-3. Do-it-yourself maintenance
6
Maintenance and care
C-HR_OM_USA_OM10569U
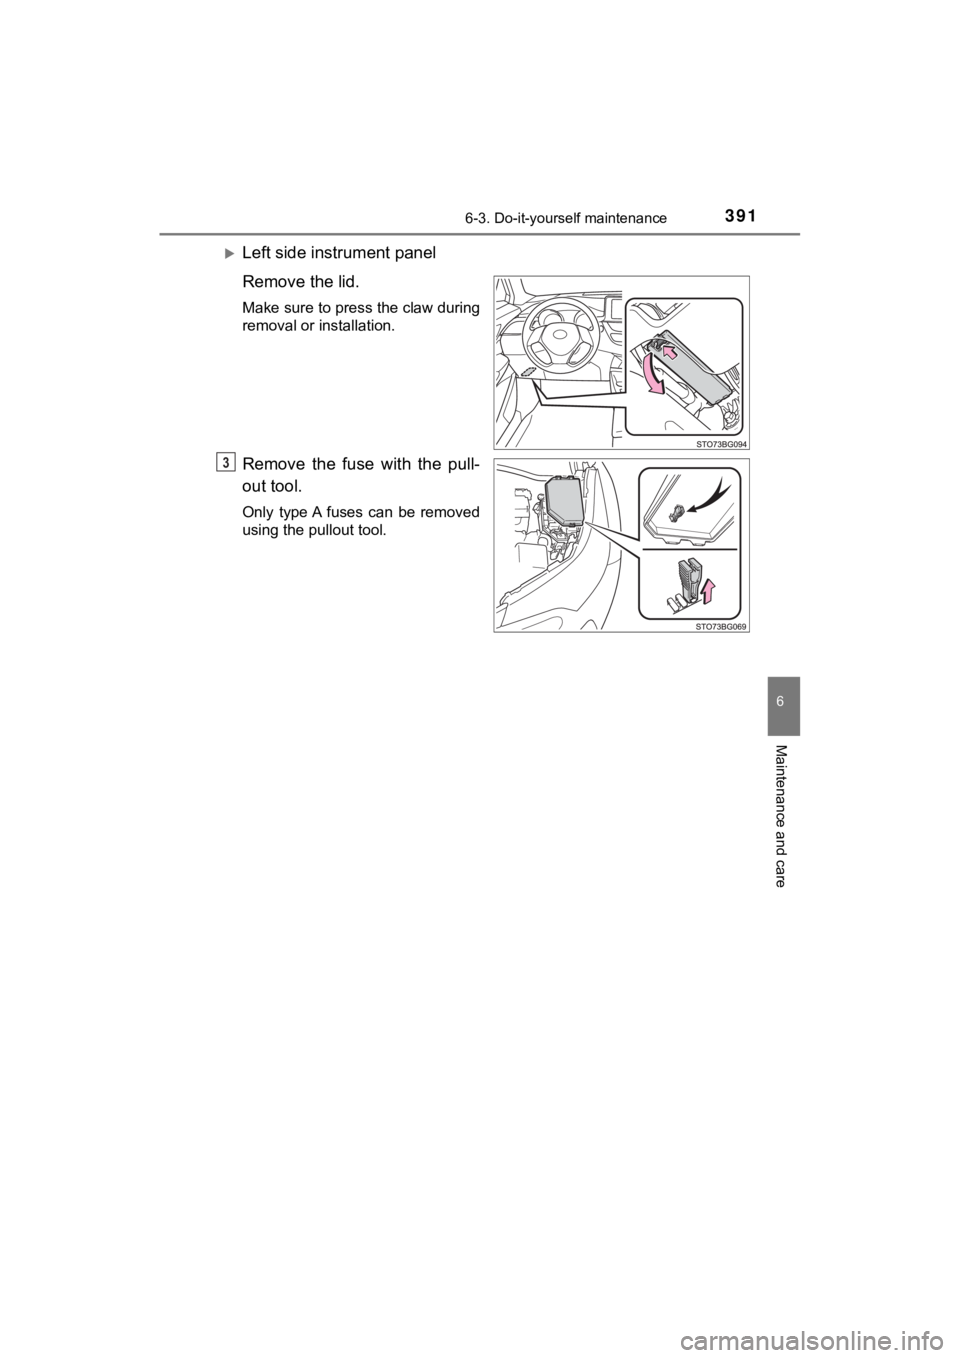
Left side instrument panel
Remove the lid.
Make sure to press the claw during
removal or installation.
Remove the fuse with the pull-
out tool.
Only type A fuses can be removed
using the pullout tool.
3
Page 392 of 532
3926-3. Do-it-yourself maintenance
C-HR_OM_USA_OM10569U
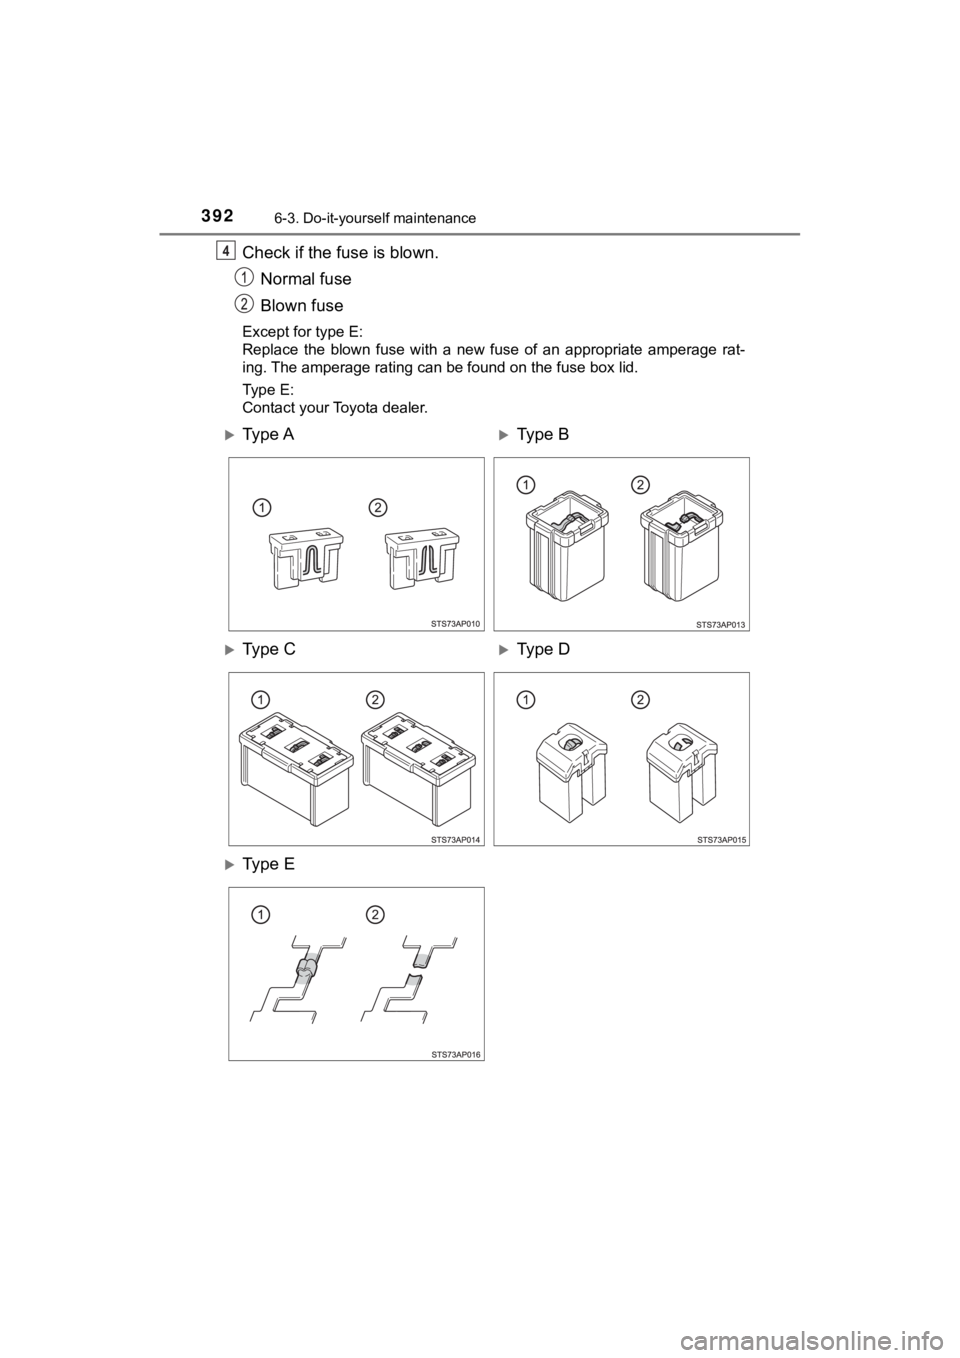
Check if the fuse is blown.Normal fuse
Blown fuse
Except for type E:
Replace the blown fuse with a new fuse of an appropriate ampera ge rat-
ing. The amperage rating can be found on the fuse box lid.
Type E:
Contact your Toyota dealer.
4
Ty p e AType B
Ty p e CType D
Ty p e E
Page 393 of 532
3936-3. Do-it-yourself maintenance
6
Maintenance and care
C-HR_OM_USA_OM10569U
■After a fuse is replaced
●If the lights do not turn on even after the fuse has been repla ced, a bulb may
need replacement. ( P. 394)
● If the replaced fuse blows again, have the vehicle inspected by your Toyota
dealer.
■ If there is an overload in a circuit
The fuses are designed to blow, protecting the wiring harness f rom damage.
■ When replacing light bulbs
Toyota recommends that you use genuine Toyota products designed for this
vehicle. Because certain bulbs are connected to circuits designed to prevent
overload, non-genuine parts or parts not designed for this vehicle may be
unusable.
WARNING
■ To prevent system breakdowns and vehicle fire
Observe the following precautions.
Failure to do so may cause damage to the vehicle, and possibly a fire or
injury.
● Never use a fuse of a higher amperage rating than that indicate d, or use
any other object in place of a fuse.
● Always use a genuine Toyota fuse or equivalent.
Never replace a fuse with a wire, even as a temporary fix.
● Do not modify the fuses or fuse boxes.
NOTICE
■Before replacing fuses
Have the cause of electrical overload determined and repaired b y your
Toyota dealer as soon as possible.
Page 394 of 532
3946-3. Do-it-yourself maintenance
C-HR_OM_USA_OM10569U
Light bulbs
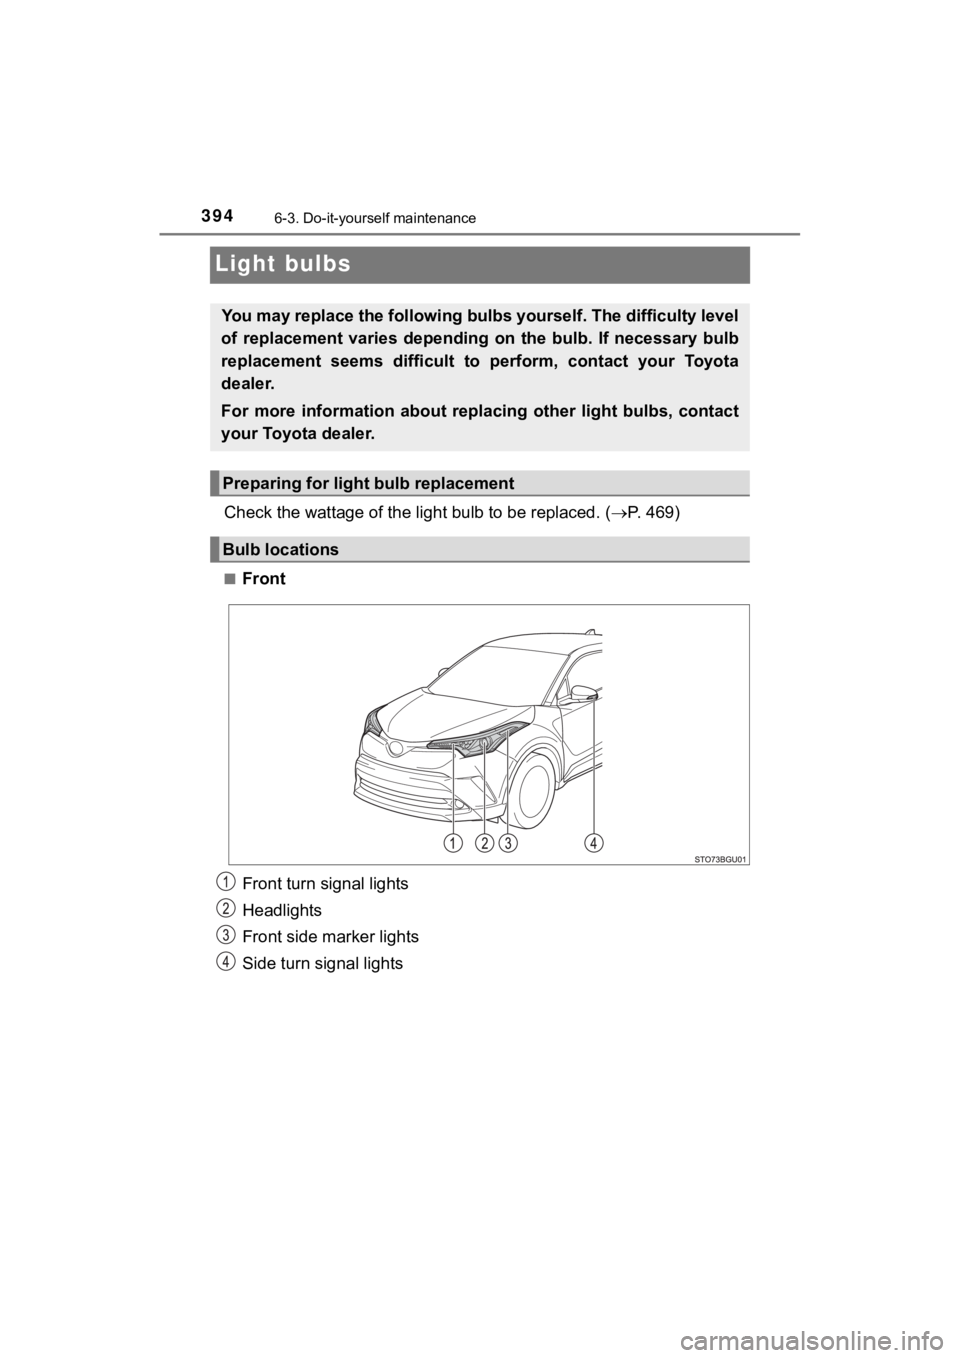
Check the wattage of the light bulb to be replaced. ( P. 469)
■Front
Front turn signal lights
Headlights
Front side marker lights
Side turn signal lights
You may replace the following bu lbs yourself. The difficulty level
of replacement varies depending on the bulb. If necessary bulb
replacement seems difficult to perform, contact your Toyota
dealer.
For more information about replacing other light bulbs, contact
your Toyota dealer.
Preparing for light bulb replacement
Bulb locations
Page 395 of 532
3956-3. Do-it-yourself maintenance
6
Maintenance and care
C-HR_OM_USA_OM10569U■
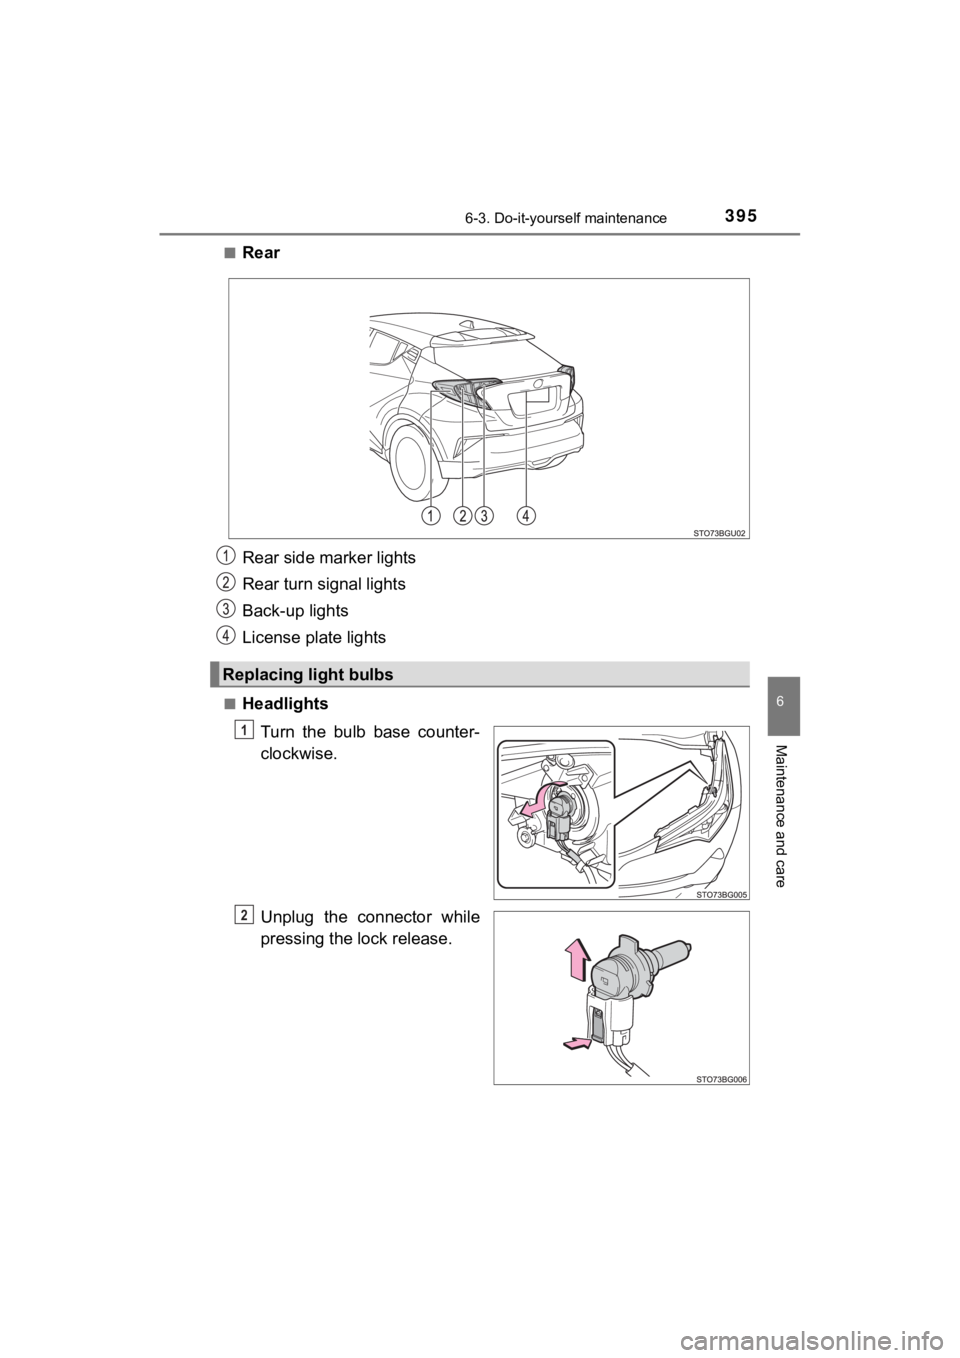
Rear
Rear side marker lights
Rear turn signal lights
Back-up lights
License plate lights
■Headlights
Turn the bulb base counter-
clockwise.
Unplug the connector while
pressing the lock release.
Replacing light bulbs
1
2
Page 396 of 532
3966-3. Do-it-yourself maintenance
C-HR_OM_USA_OM10569U
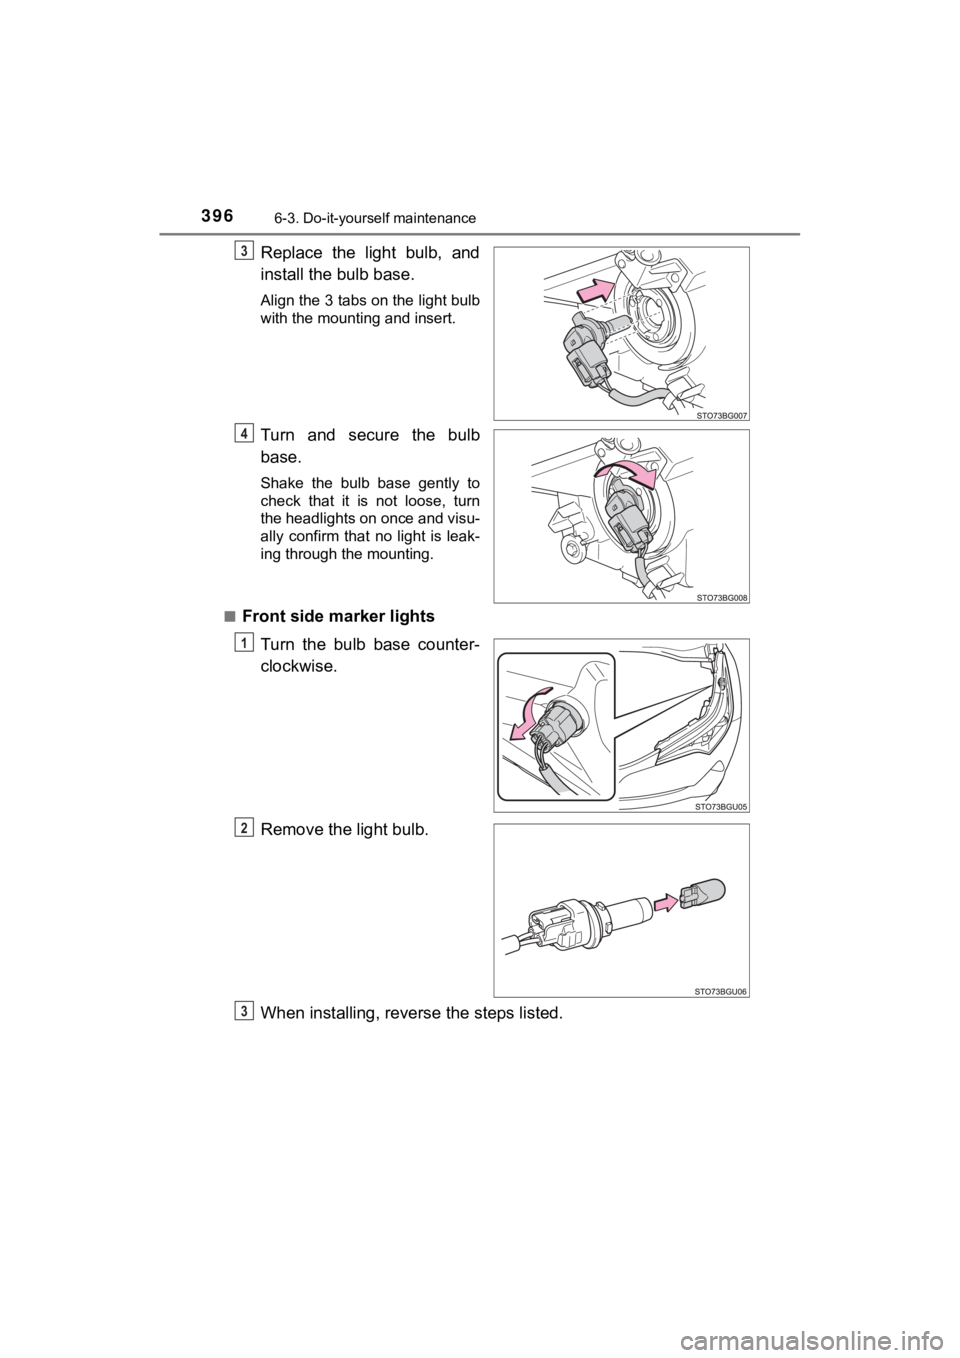
Replace the light bulb, and
install the bulb base.
Align the 3 tabs on the light bulb
with the mounting and insert.
Turn and secure the bulb
base.
Shake the bulb base gently to
check that it is not loose, turn
the headlights on once and visu-
ally confirm that no light is leak-
ing through the mounting.
■
Front side marker lights Turn the bulb base counter-
clockwise.
Remove the light bulb.
When installing, reverse the steps listed.
3
4
1
2
3
Page 397 of 532
3976-3. Do-it-yourself maintenance
6
Maintenance and care
C-HR_OM_USA_OM10569U■
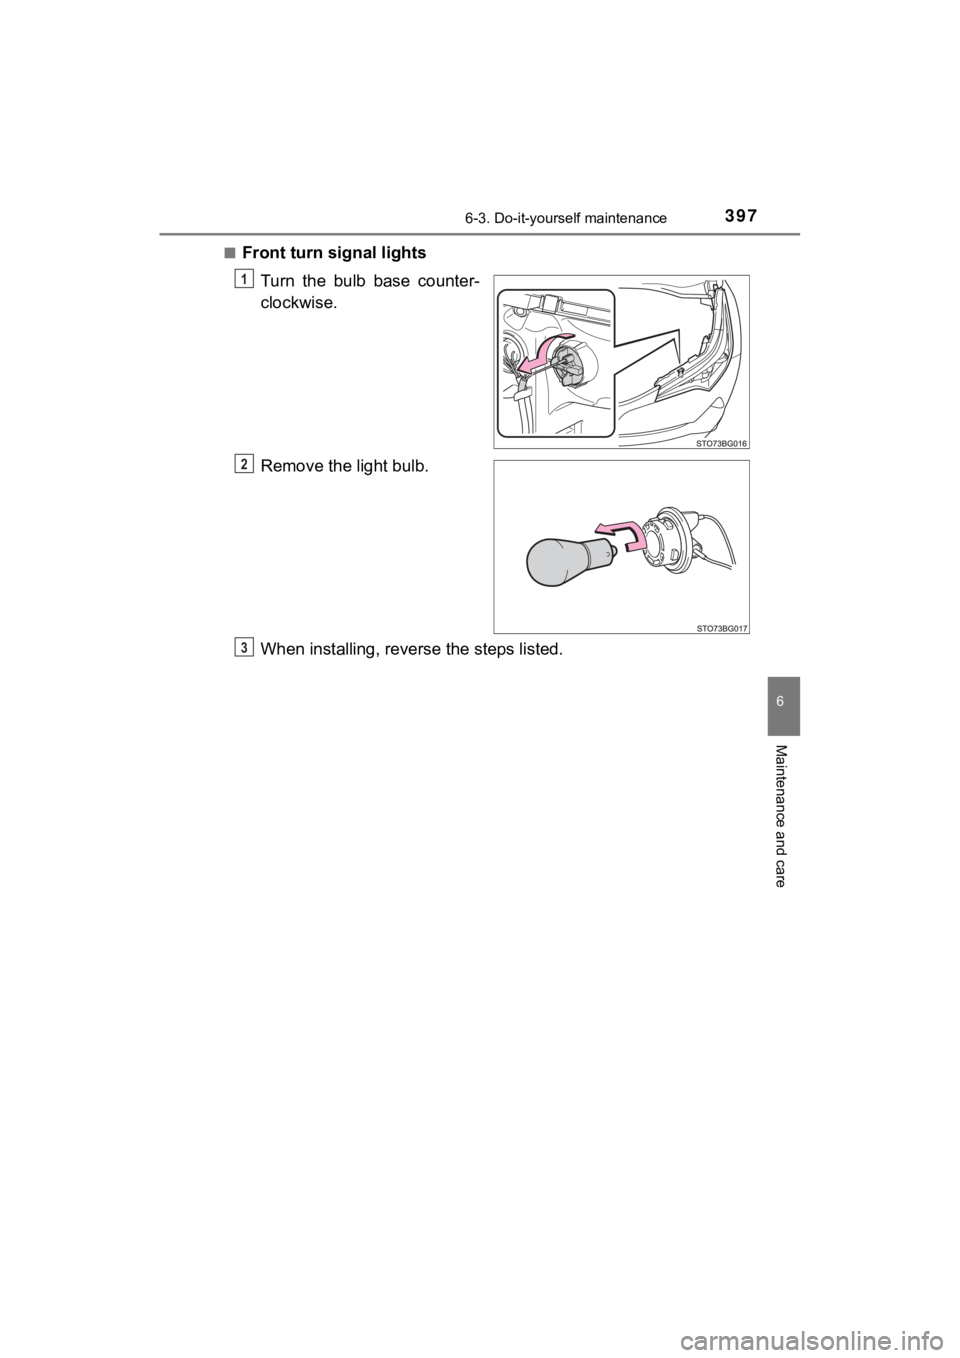
Front turn signal lights
Turn the bulb base counter-
clockwise.
Remove the light bulb.
When installing, reverse the steps listed.
1
2
3
Page 398 of 532
3986-3. Do-it-yourself maintenance
C-HR_OM_USA_OM10569U■
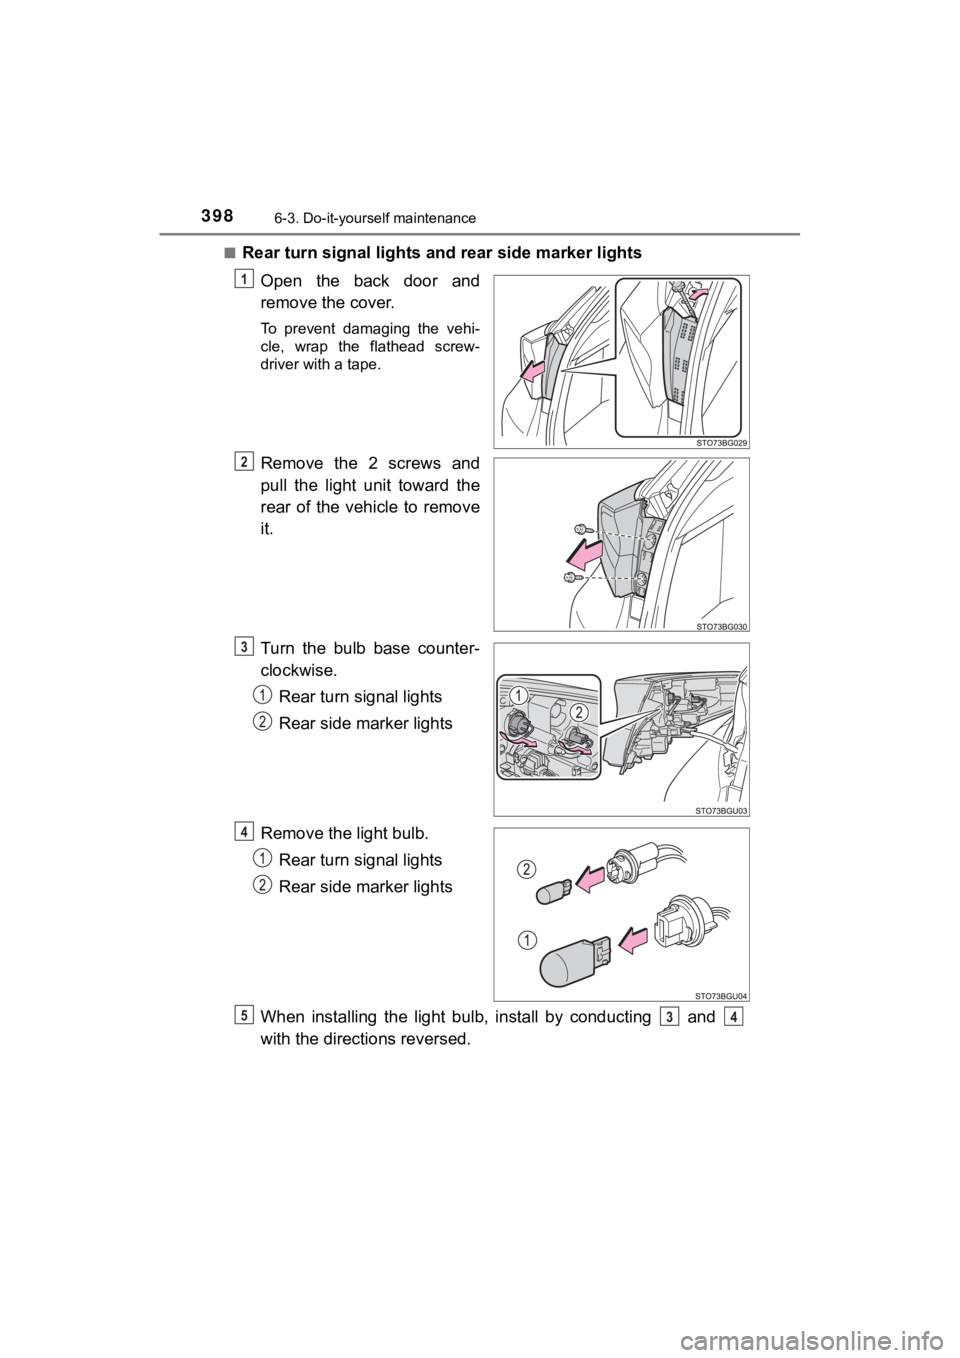
Rear turn signal lights and
rear side marker lights
Open the back door and
remove the cover.
To prevent damaging the vehi-
cle, wrap the flathead screw-
driver with a tape.
Remove the 2 screws and
pull the light unit toward the
rear of the vehicle to remove
it.
Turn the bulb base counter-
clockwise. Rear turn signal lights
Rear side marker lights
Remove the light bulb. Rear turn signal lights
Rear side marker lights
When installing the light bulb, install by conducting and
with the directions reversed.
1
2
3
4
534
Page 399 of 532
3996-3. Do-it-yourself maintenance
6
Maintenance and care
C-HR_OM_USA_OM10569U
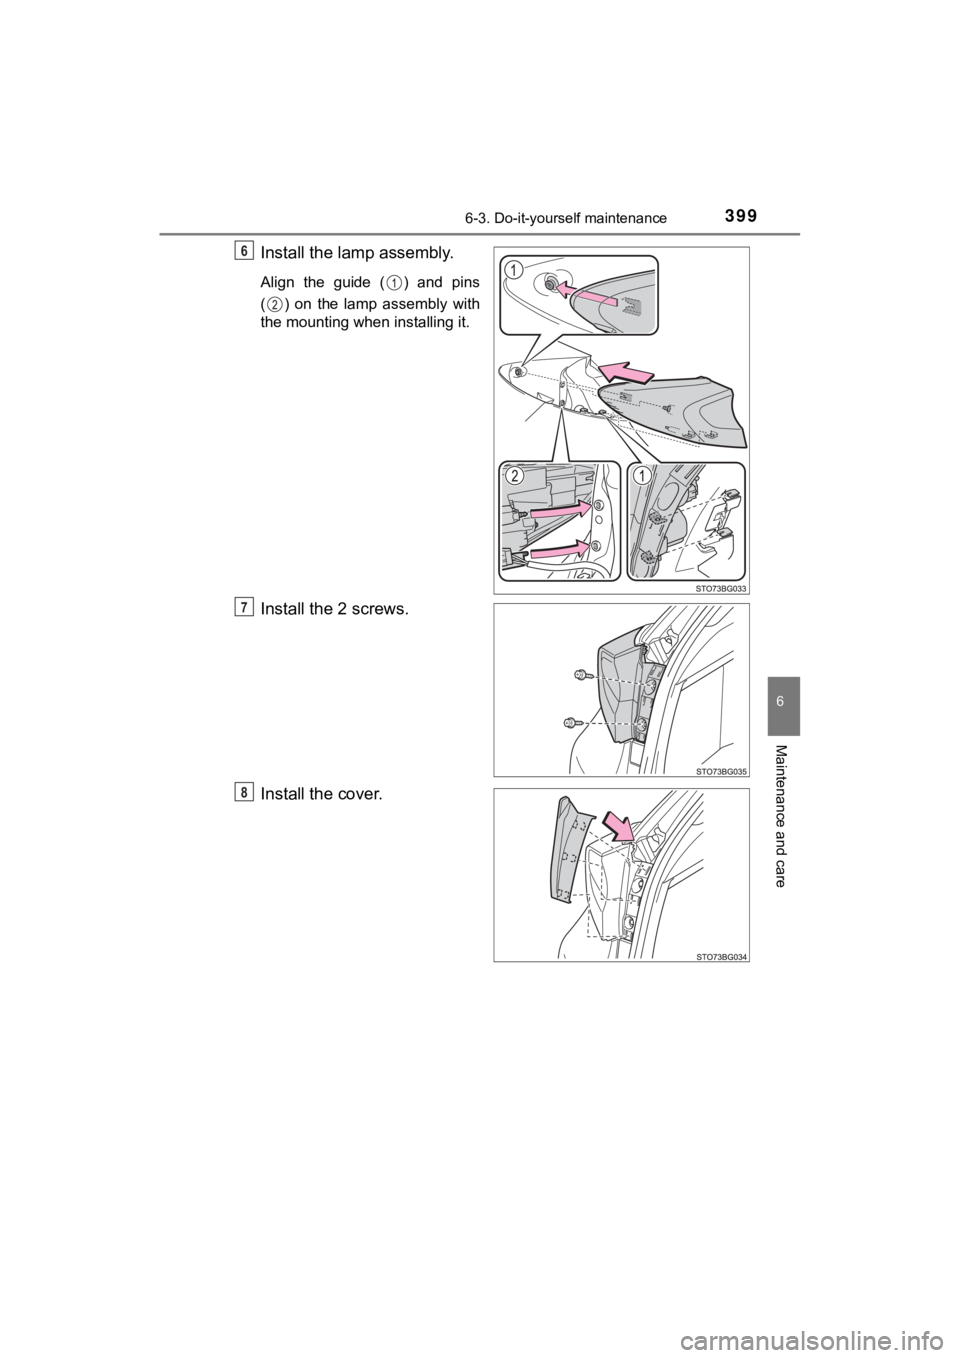
Install the lamp assembly.
Align the guide ( ) and pins
( ) on the lamp assembly with
the mounting when installing it.
Install the 2 screws.
Install the cover.
6
7
8
Page 400 of 532
4006-3. Do-it-yourself maintenance
C-HR_OM_USA_OM10569U■
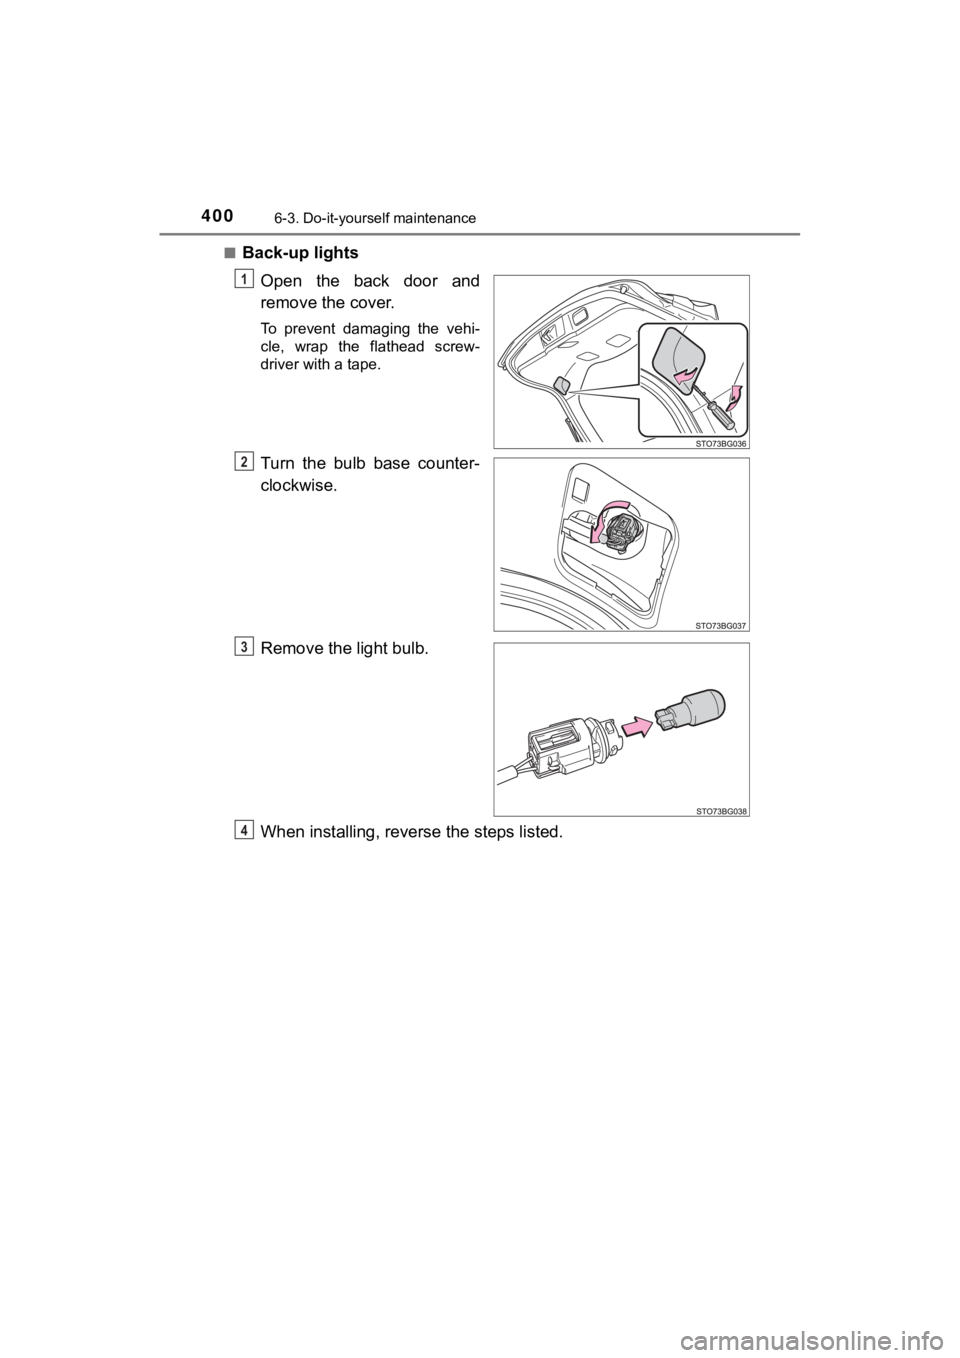
Back-up lights
Open the back door and
remove the cover.
To prevent damaging the vehi-
cle, wrap the flathead screw-
driver with a tape.
Turn the bulb base counter-
clockwise.
Remove the light bulb.
When installing, reverse the steps listed.
1
2
3
4
Trending: buttons, phone, headlights, high beam, instrument panel, maintenance, winter tires
