TOYOTA C-HR 2019 Owners Manual (in English)
Manufacturer: TOYOTA, Model Year: 2019,
Model line: C-HR,
Model: TOYOTA C-HR 2019
Pages: 532, PDF Size: 10.35 MB
TOYOTA C-HR 2019 Owners Manual (in English)
C-HR 2019
TOYOTA
TOYOTA
https://www.carmanualsonline.info/img/14/42408/w960_42408-0.png
TOYOTA C-HR 2019 Owners Manual (in English)
Trending: ignition, instrument panel, coolant temperature, cooling, fuel fill door release, interior lights, wiper size
Page 401 of 532
4016-3. Do-it-yourself maintenance
6
Maintenance and care
C-HR_OM_USA_OM10569U■
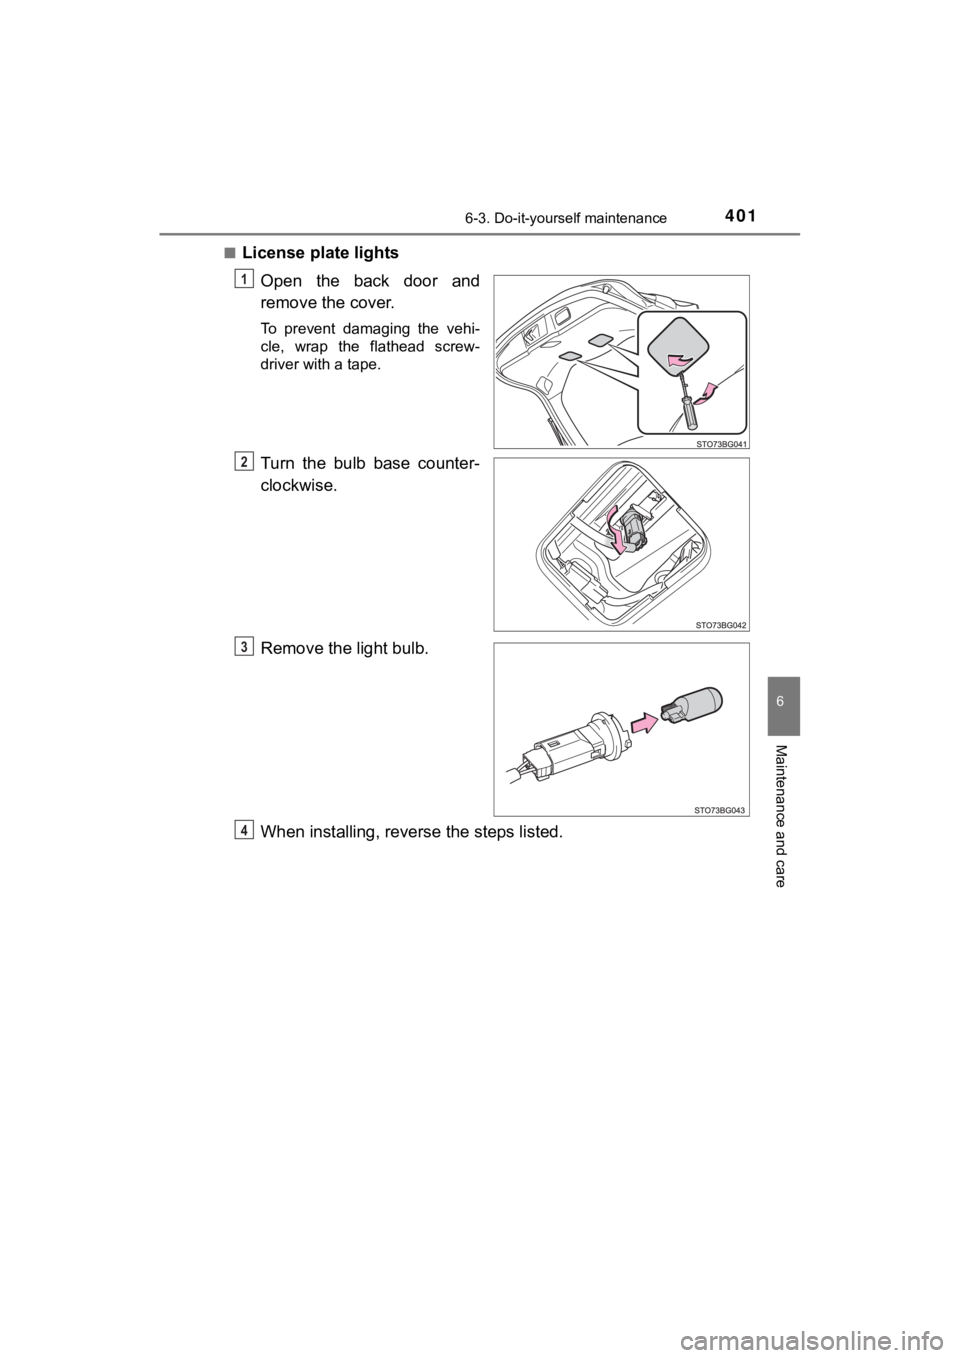
License plate lights
Open the back door and
remove the cover.
To prevent damaging the vehi-
cle, wrap the flathead screw-
driver with a tape.
Turn the bulb base counter-
clockwise.
Remove the light bulb.
When installing, reverse the steps listed.
1
2
3
4
Page 402 of 532
4026-3. Do-it-yourself maintenance
C-HR_OM_USA_OM10569U■
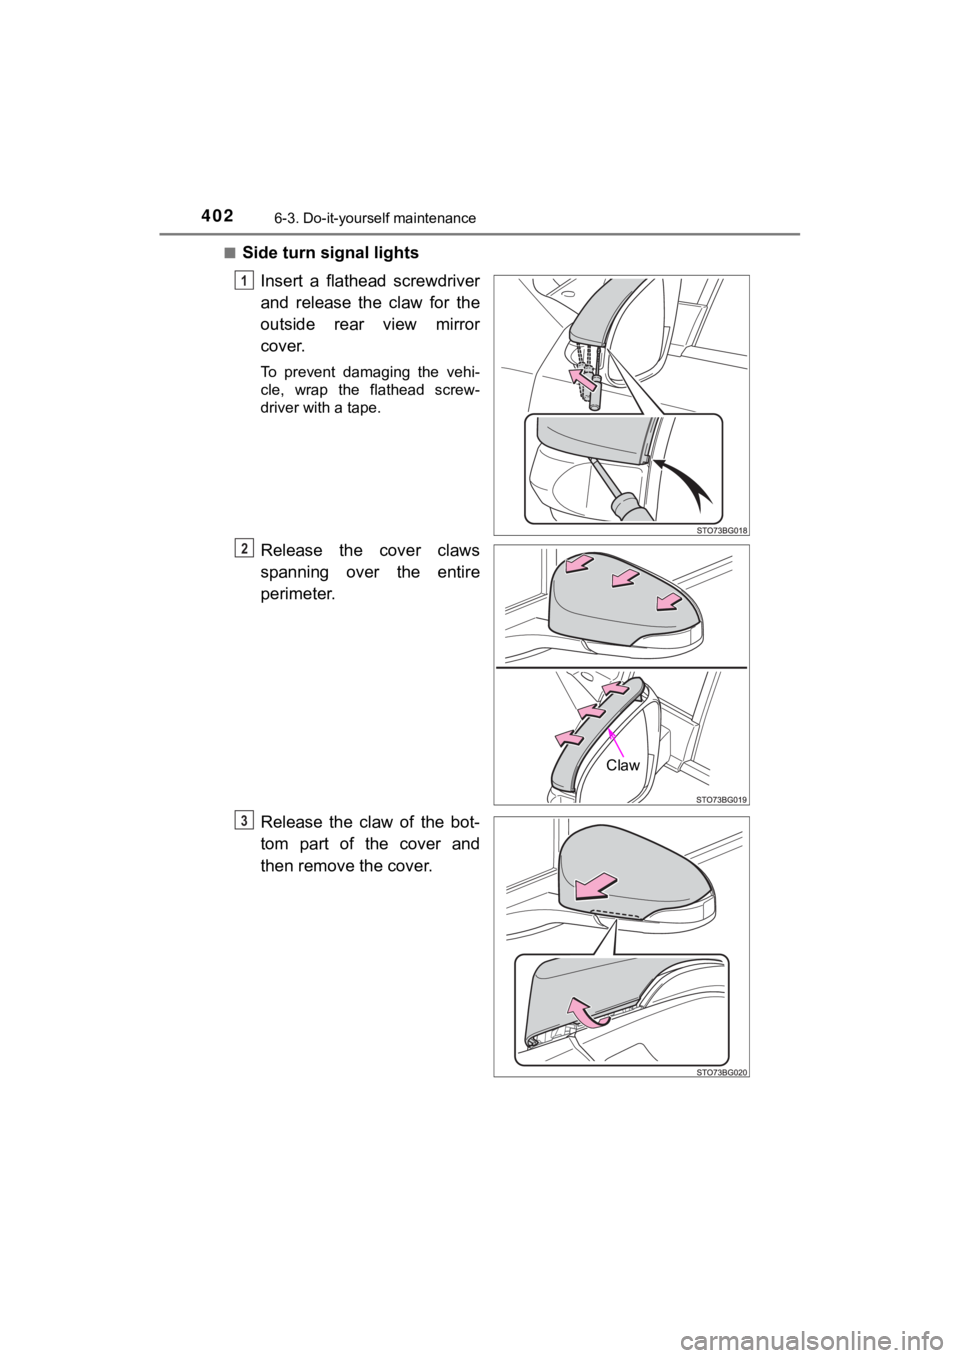
Side turn signal lights
Insert a flathead screwdriver
and release the claw for the
outside rear view mirror
cover.
To prevent damaging the vehi-
cle, wrap the flathead screw-
driver with a tape.
Release the cover claws
spanning over the entire
perimeter.
Release the claw of the bot-
tom part of the cover and
then remove the cover.
1
Claw
O
P
Page 403 of 532
4036-3. Do-it-yourself maintenance
6
Maintenance and care
C-HR_OM_USA_OM10569U
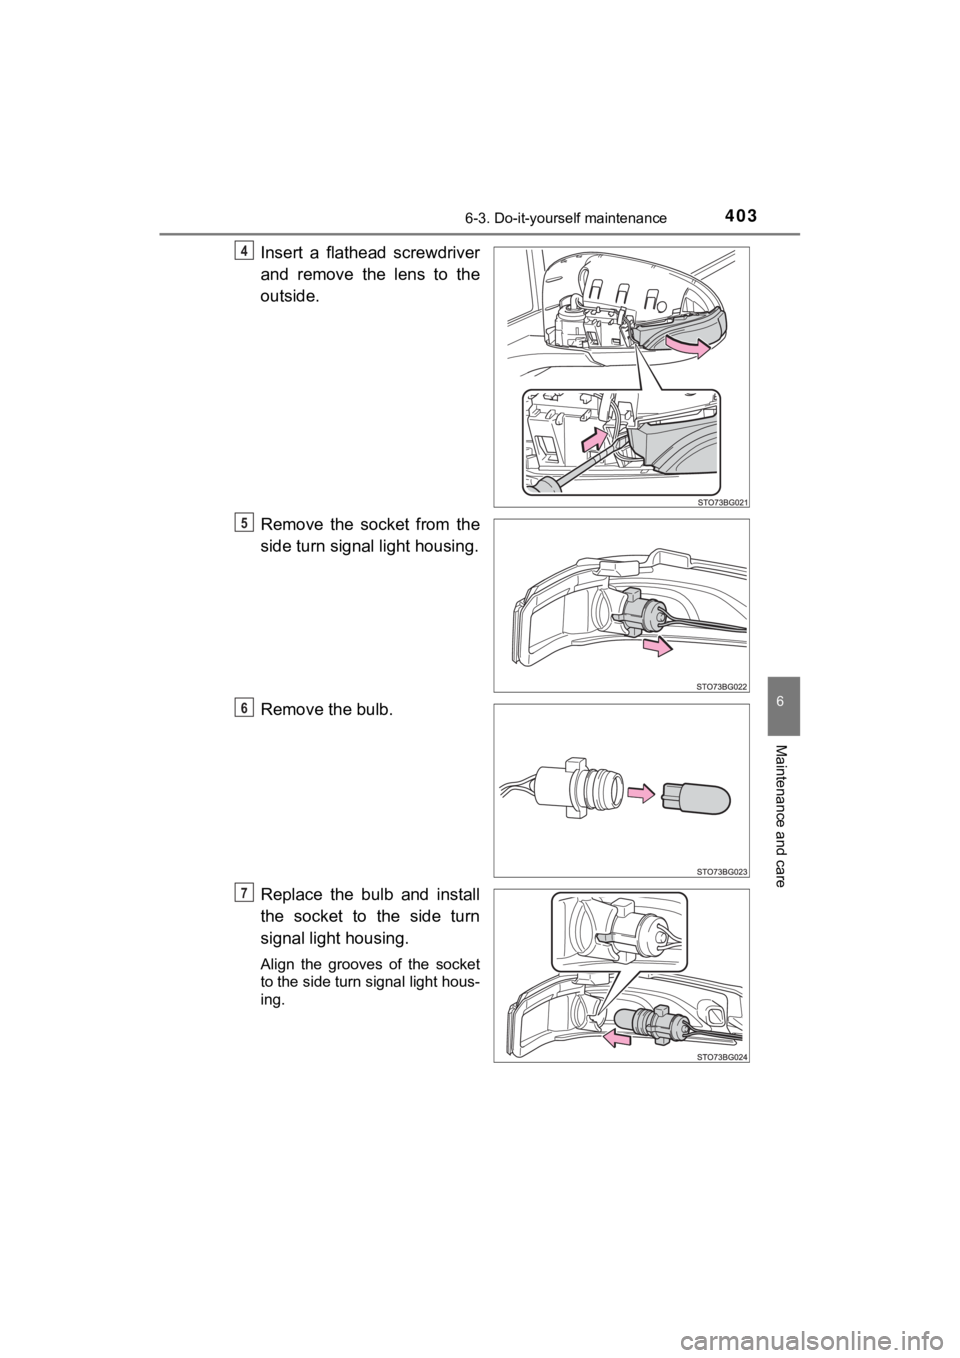
Insert a flathead screwdriver
and remove the lens to the
outside.
Remove the socket from the
side turn signal light housing.
Remove the bulb.
Replace the bulb and install
the socket to the side turn
signal light housing.
Align the grooves of the socket
to the side turn signal light hous-
ing.
4
5
6
7
Page 404 of 532
4046-3. Do-it-yourself maintenance
C-HR_OM_USA_OM10569U
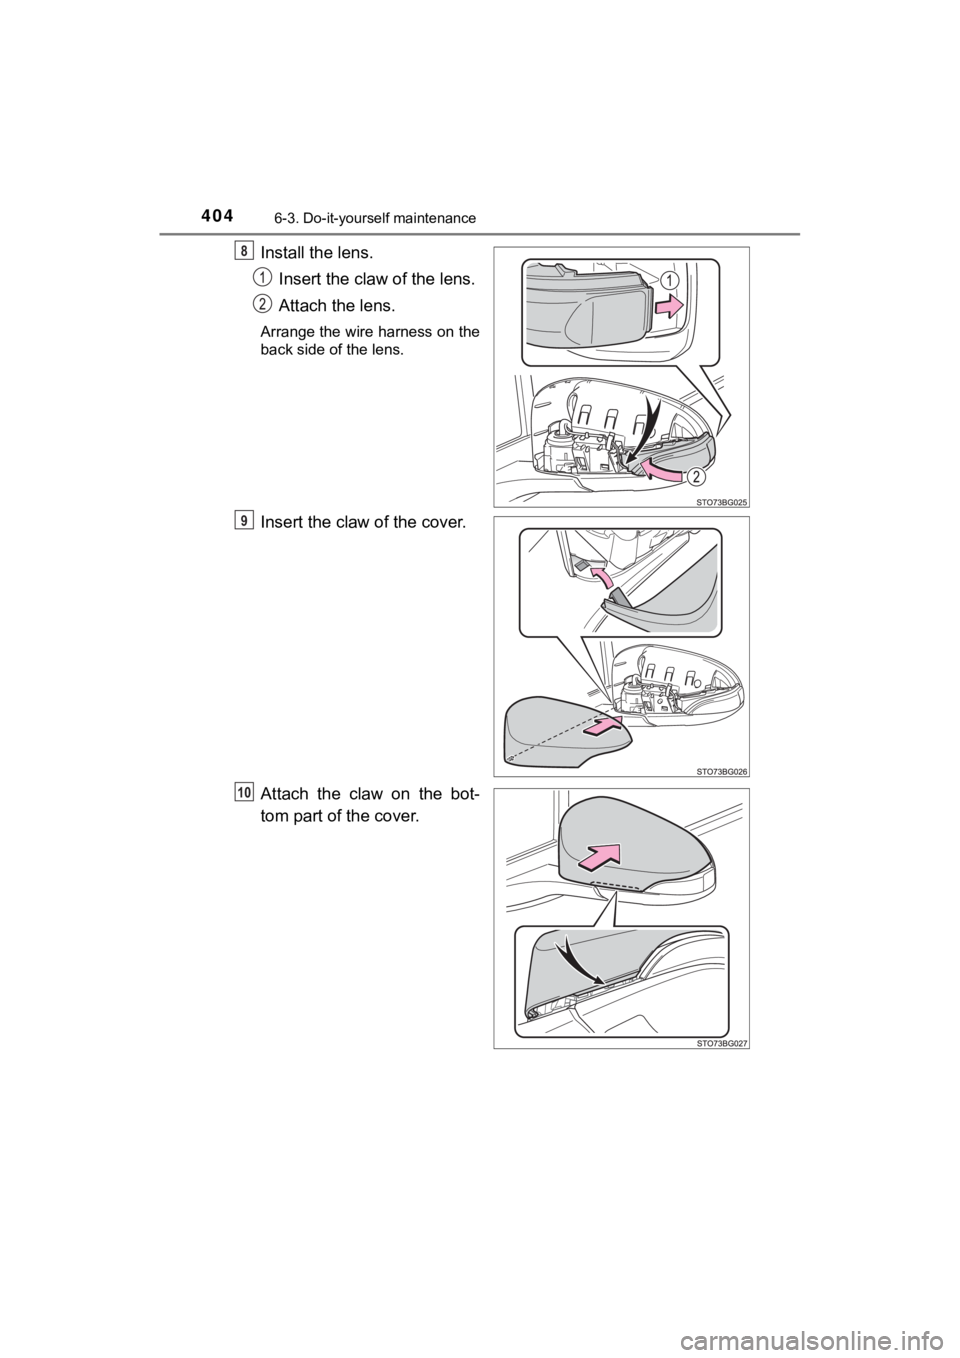
Install the lens.Insert the claw of the lens.
Attach the lens.
Arrange the wire harness on the
back side of the lens.
Insert the claw of the cover.
Attach the claw on the bot-
tom part of the cover.
8
9
10
Page 405 of 532
4056-3. Do-it-yourself maintenance
6
Maintenance and care
C-HR_OM_USA_OM10569U
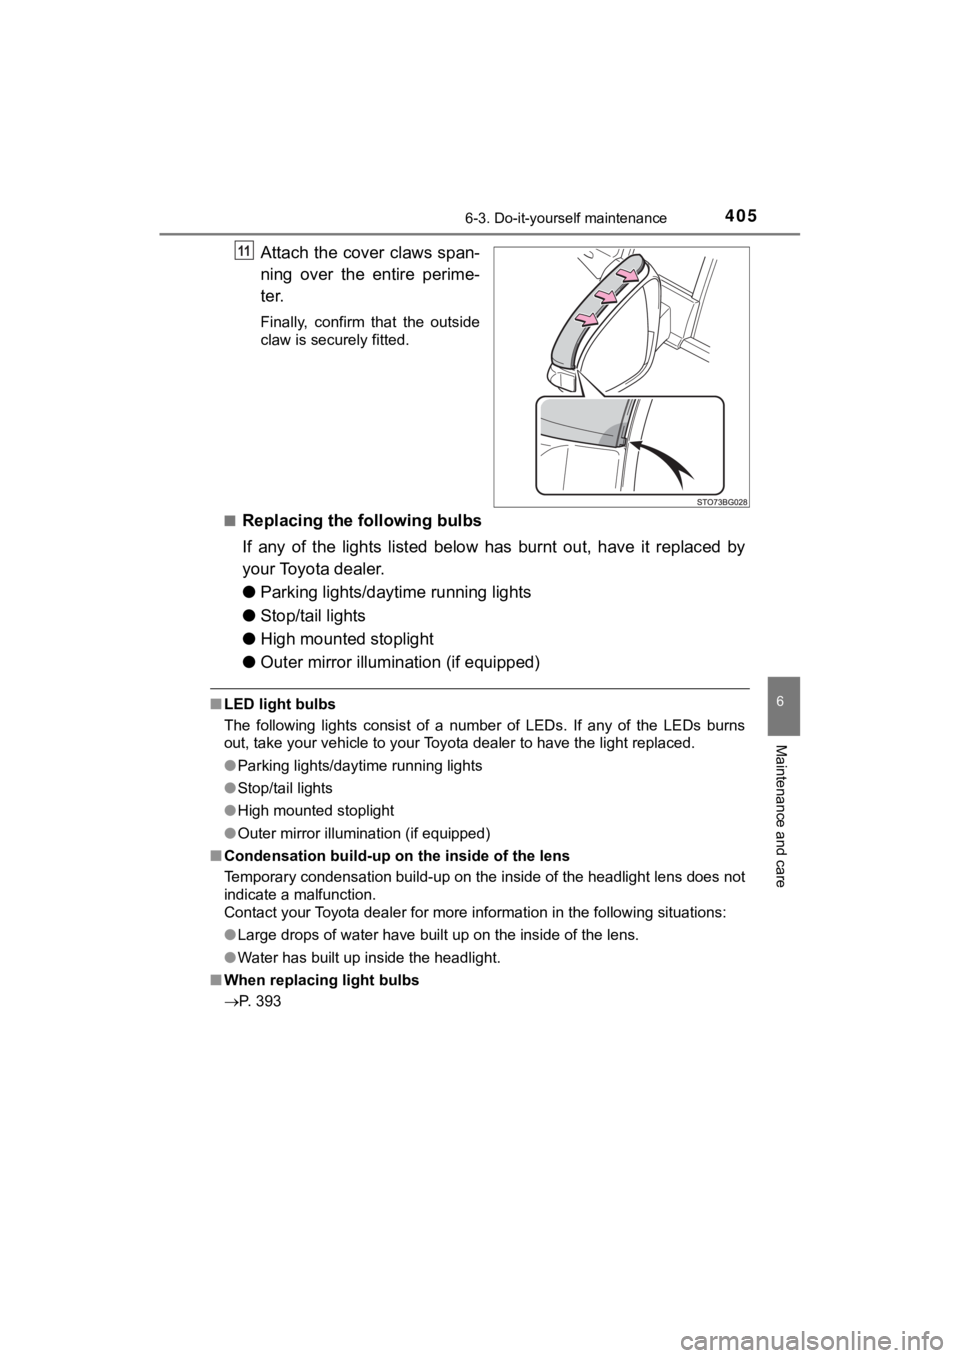
Attach the cover claws span-
ning over the entire perime-
ter.
Finally, confirm that the outside
claw is securely fitted.
■
Replacing the following bulbs
If any of the lights listed below has burnt out, have it replac ed by
your Toyota dealer.
● Parking lights/daytime running lights
● Stop/tail lights
● High mounted stoplight
● Outer mirror illumination (if equipped)
■LED light bulbs
The following lights consist of a number of LEDs. If any of the LEDs burns
out, take your vehicle to your Toyota dealer to have the light replaced.
● Parking lights/daytime running lights
● Stop/tail lights
● High mounted stoplight
● Outer mirror illumination (if equipped)
■ Condensation build-up on the inside of the lens
Temporary condensation build-up on the inside of the headlight lens does not
indicate a malfunction.
Contact your Toyota dealer for more information in the followin g situations:
● Large drops of water have built up on the inside of the lens.
● Water has built up inside the headlight.
■ When replacing light bulbs
P. 393
11
Page 406 of 532

4066-3. Do-it-yourself maintenance
C-HR_OM_USA_OM10569U
WARNING
■Replacing light bulbs
● Turn off the lights. Do not attempt to replace the bulb immedia tely after
turning off the lights.
The bulbs become very hot and may cause burns.
● Do not touch the glass portion of the light bulb with bare hand s. When it is
unavoidable to hold the glass portion, use and hold with a clea n dry cloth
to avoid getting moisture and oils on the bulb.
Also, if the bulb is scratched or dropped, it may blow out or crack.
● Fully install light bulbs and any parts used to secure them. Fa ilure to do so
may result in heat damage, fire, or water entering the headligh t unit. This
may damage the headlights or cause condensation to build up on the lens.
● Do not attempt to repair or disassemble light bulbs, connectors , electric
circuits or component parts.
Doing so may result in death or serious injury due to electric shock.
■ To prevent damage or fire
● Make sure bulbs are fully seated and locked.
● Check the wattage of the bulb before installing to prevent heat damage.
Page 407 of 532
407
7When trouble arises
C-HR_OM_USA_OM10569U7-1. Essential information
Emergency flashers .......... 408
If your vehicle has to be stopped in an
emergency ...................... 409 7-2. Steps to take in an
emergency
If your vehicle needs to be towed ......................... 411
If you think something is wrong .............................. 418
Fuel pump shut off system ............................ 419
If a warning light turns on or a warning buzzer
sounds ............................ 420
If a warning message is displayed......................... 430
If you have a flat tire.......... 435
If the engine will not start ................................. 446
If the electronic key does not operate
properly (vehicles with a
smart key system) ........... 448
If the vehicle battery is discharged ...................... 451
If your vehicle overheats ........................ 455
If the vehicle becomes stuck ............................... 458
Page 408 of 532
4087-1. Essential information
C-HR_OM_USA_OM10569U
Emergency flashers
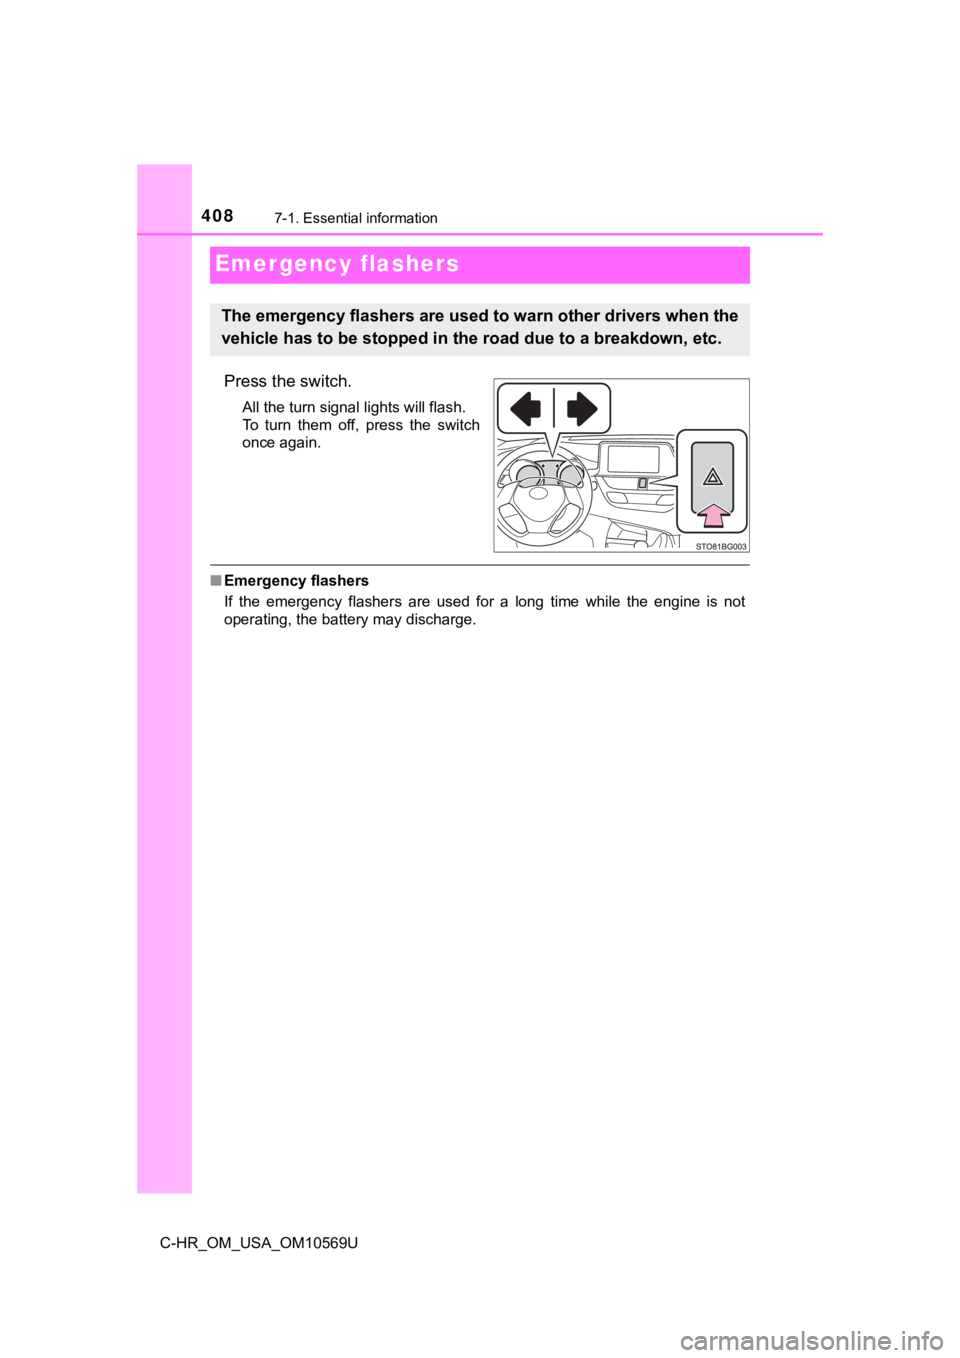
Press the switch.
All the turn signal lights will flash.
To turn them off, press the switch
once again.
■Emergency flashers
If the emergency flashers are used for a long time while the en gine is not
operating, the battery may discharge.
The emergency flashers are used to warn other drivers when the
vehicle has to be st opped in the road due to a breakdown, etc.
Page 409 of 532
4097-1. Essential information
C-HR_OM_USA_OM10569U
7
When trouble arises
If your vehicle has to be stopped in an
emergency
Steadily step on the brake pedal with both feet and firmly depress it.
Do not pump the brake pedal repeatedly as this will increase th e effort
required to slow the vehicle.
Shift the shift lever to N.
If the shift lever is shifted to N
After slowing down, stop the vehi cle in a safe place by the road.
Stop the engine.
If the shift lever cann ot be shifted to N
Keep depressing the brake pedal with both feet to reduce vehicl e
speed as much as possible.
Only in an emergency, such as if it becomes impossible to stop
the vehicle in the normal way, st op the vehicle using the follow-
ing procedure:
1
2
3
4
3
Page 410 of 532
4107-1. Essential information
C-HR_OM_USA_OM10569U
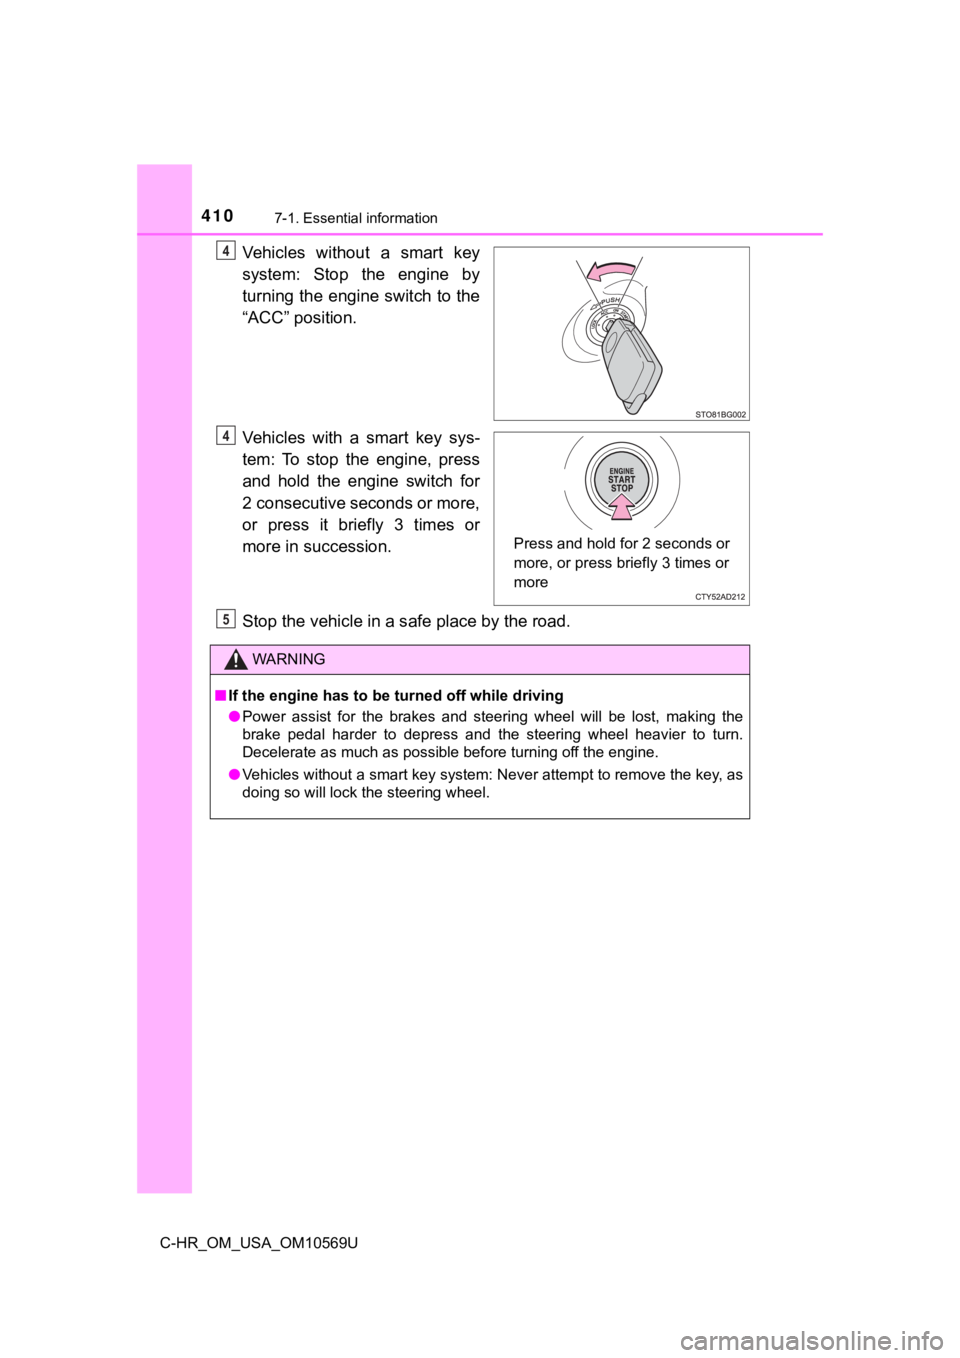
Vehicles without a smart key
system: Stop the engine by
turning the engine switch to the
“ACC” position.
Vehicles with a smart key sys-
tem: To stop the engine, press
and hold the engine switch for
2 consecutive seconds or more,
or press it briefly 3 times or
more in succession.
Stop the vehicle in a s afe place by the road.4
Press and hold for 2 seconds or
more, or press briefly 3 times or
more
Q
WARNING
■If the engine has to be tu rned off while driving
● Power assist for the brakes and steering wheel will be lost, ma king the
brake pedal harder to depress and the steering wheel heavier to turn.
Decelerate as much as possible before turning off the engine.
● Vehicles without a smart key system: Never attempt to remove the key, as
doing so will lock the steering wheel.
5
Trending: seat memory, oil filter, oil change, cruise control, sensor, tow bar, coolant capacity
