TOYOTA CAMRY V20 1986 Service Information
CAMRY V20 1986
TOYOTA
TOYOTA
https://www.carmanualsonline.info/img/14/57449/w960_57449-0.png
TOYOTA CAMRY V20 1986 Service Information
Trending: horn, automatic transmission, fuel cap, power steering, service schedule, buttons, odometer
Page 351 of 2389
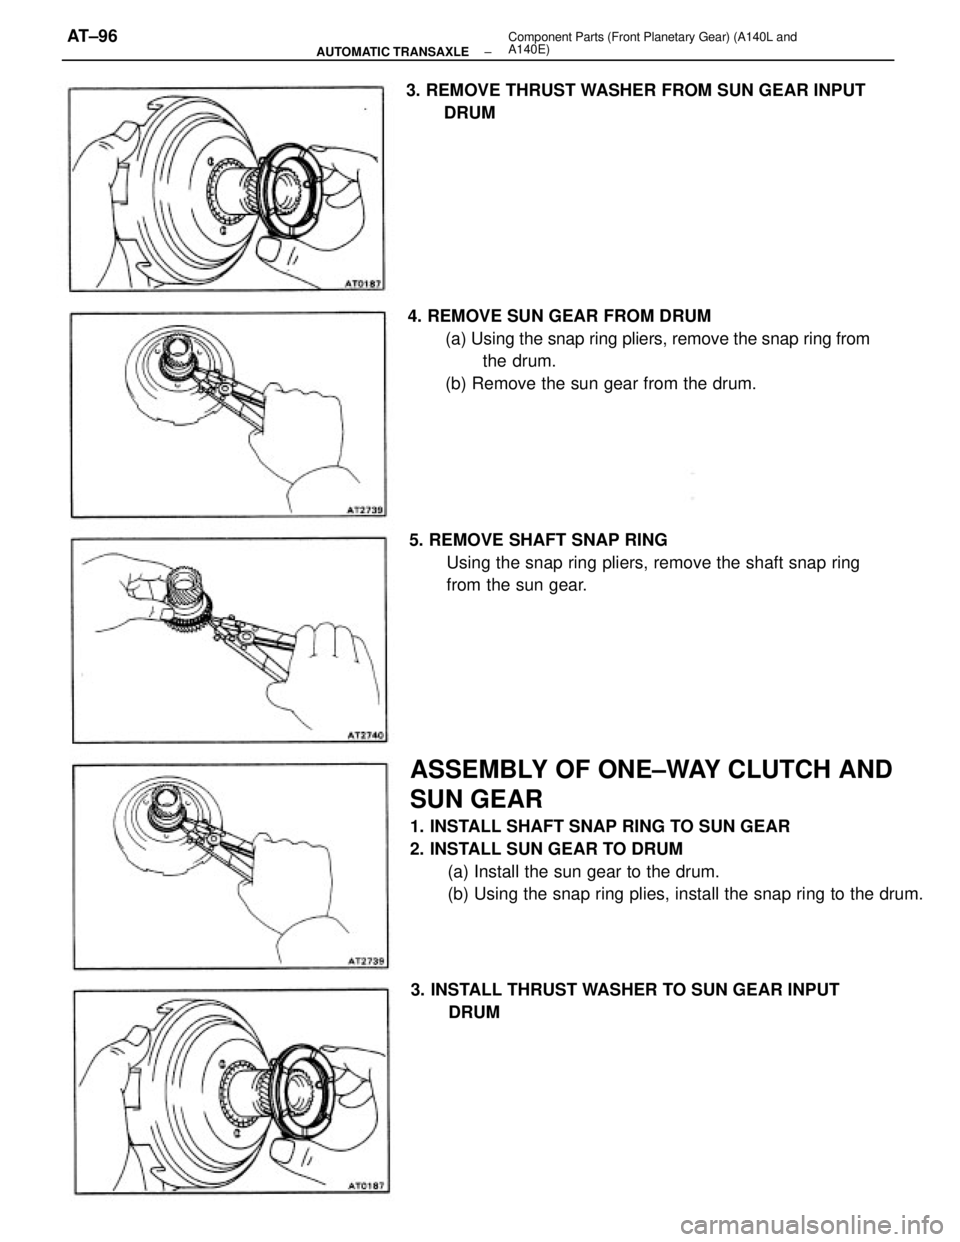
ASSEMBLY OF ONE±WAY CLUTCH AND
SUN GEAR
1. INSTALL SHAFT SNAP RING TO SUN GEAR
2. INSTALL SUN GEAR TO DRUM
(a) Install the sun gear to the drum.
(b) Using the snap ring plies, install the snap ring to the drum. 4. REMOVE SUN GEAR FROM DRUM
(a) Using the snap ring pliers, remove the snap ring from
the drum.
(b) Remove the sun gear from the drum.
5. REMOVE SHAFT SNAP RING
Using the snap ring pliers, remove the shaft snap ring
from the sun gear. 3. REMOVE THRUST WASHER FROM SUN GEAR INPUT
DRUM
3. INSTALL THRUST WASHER TO SUN GEAR INPUT
DRUM
± AUTOMATIC TRANSAXLEComponent Parts (Front Planetary Gear) (A140L and
A140E)AT±96
Page 352 of 2389
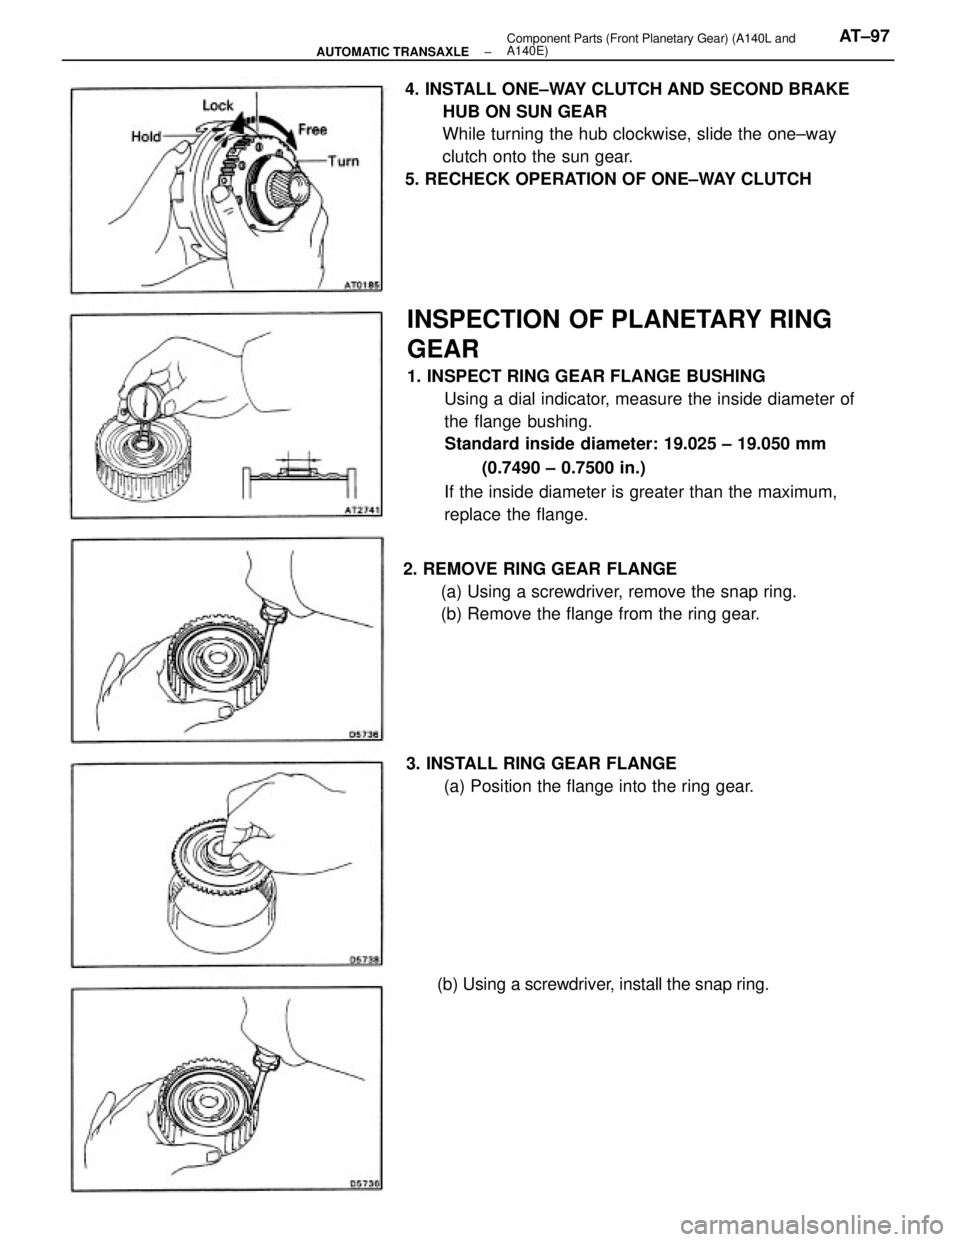
INSPECTION OF PLANETARY RING
GEAR
1. INSPECT RING GEAR FLANGE BUSHING
Using a dial indicator, measure the inside diameter of
the flange bushing.
Standard inside diameter: 19.025 ± 19.050 mm
(0.7490 ± 0.7500 in.)
If the inside diameter is greater than the maximum,
replace the flange. 4. INSTALL ONE±WAY CLUTCH AND SECOND BRAKE
HUB ON SUN GEAR
While turning the hub clockwise, slide the one±way
clutch onto the sun gear.
5. RECHECK OPERATION OF ONE±WAY CLUTCH
2. REMOVE RING GEAR FLANGE
(a) Using a screwdriver, remove the snap ring.
(b) Remove the flange from the ring gear.
3. INSTALL RING GEAR FLANGE
(a) Position the flange into the ring gear.
(b) Using a screwdriver, install the snap ring.
± AUTOMATIC TRANSAXLEComponent Parts (Front Planetary Gear) (A140L and
A140E)AT±97
Page 353 of 2389
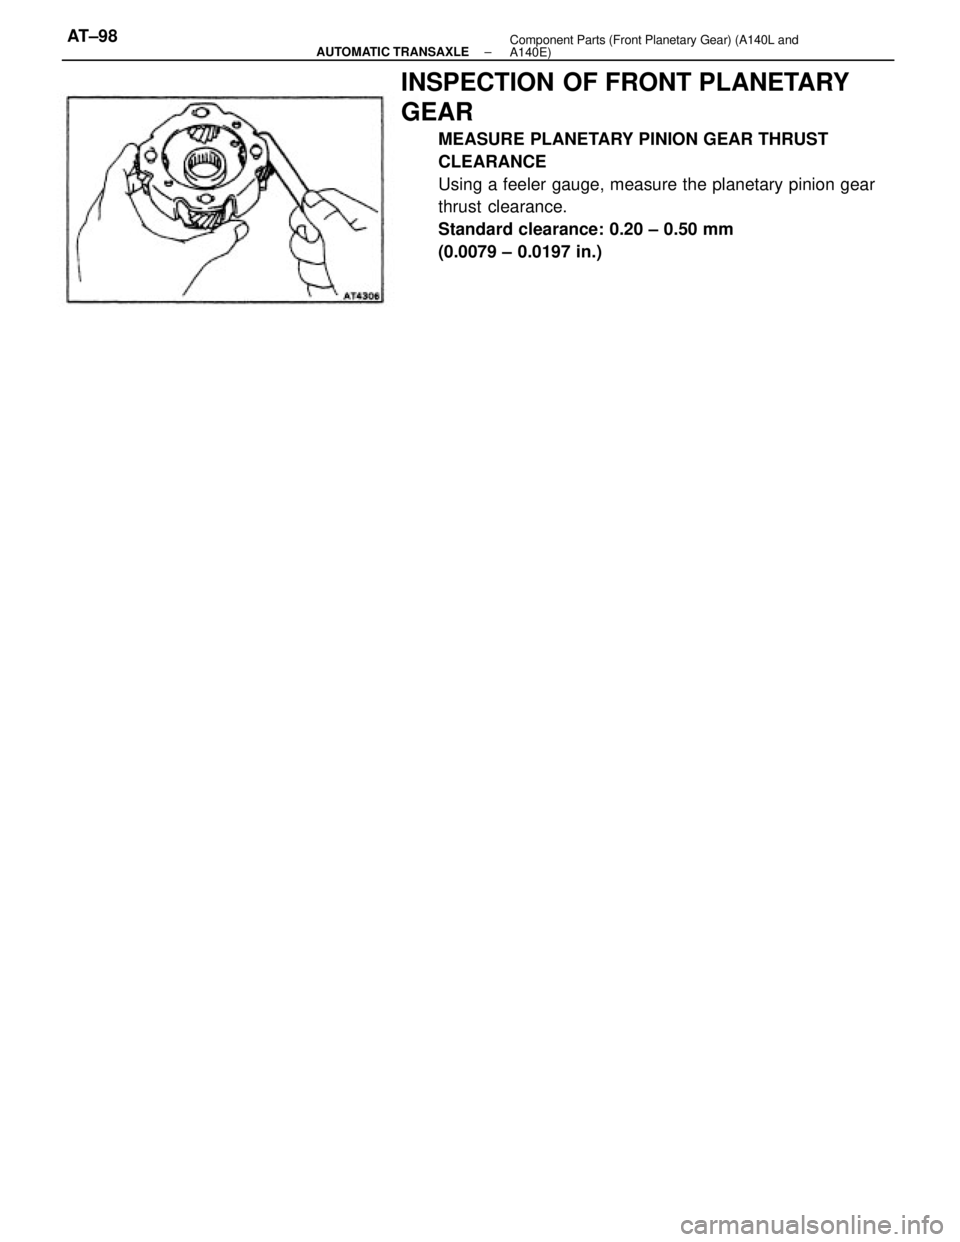
INSPECTION OF FRONT PLANETARY
GEAR
MEASURE PLANETARY PINION GEAR THRUST
CLEARANCE
Using a feeler gauge, measure the planetary pinion gear
thrust clearance.
Standard clearance: 0.20 ± 0.50 mm
(0.0079 ± 0.0197 in.)
± AUTOMATIC TRANSAXLEComponent Parts (Front Planetary Gear) (A140L and
A140E)AT±98
Page 354 of 2389
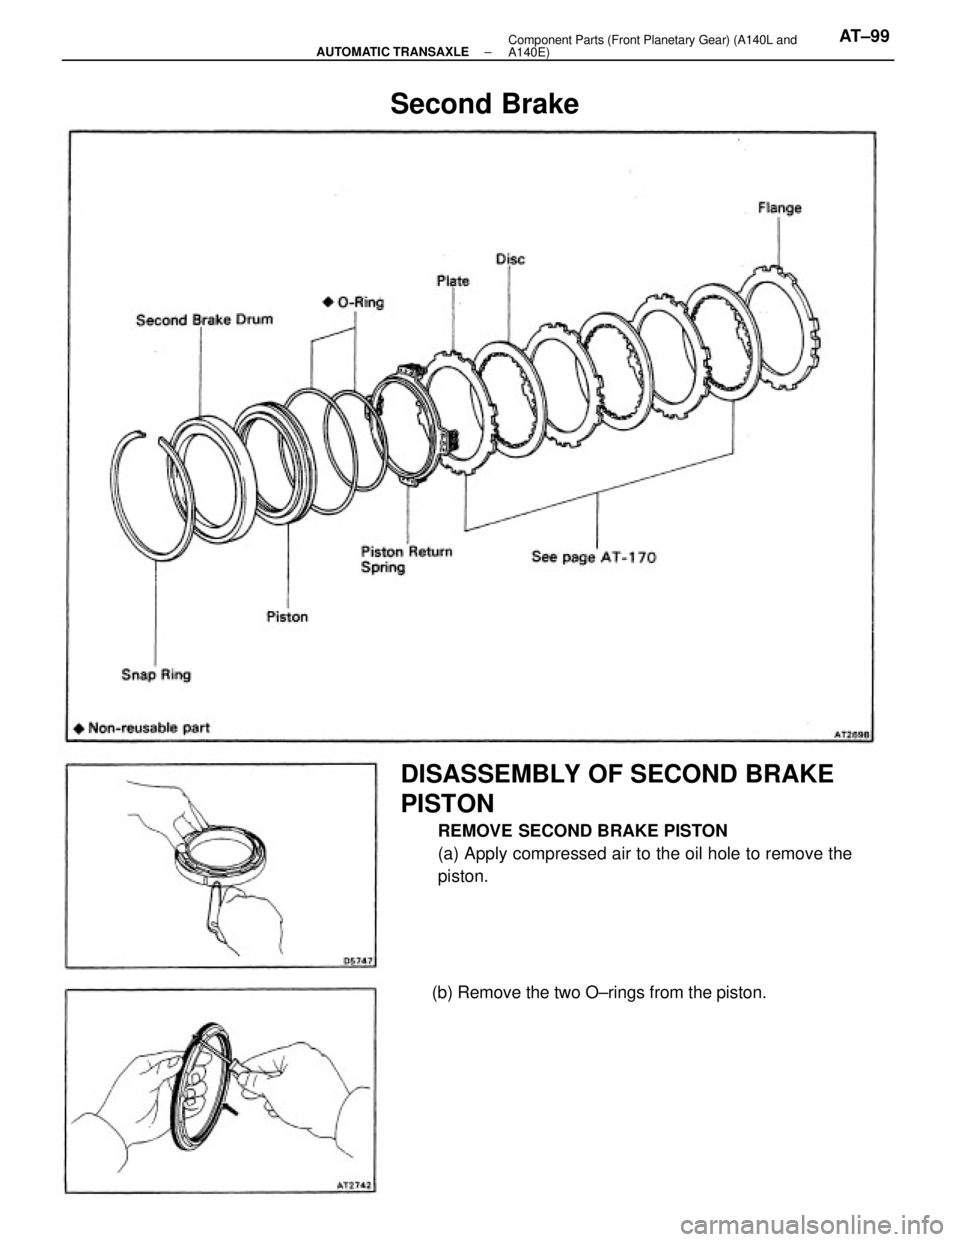
DISASSEMBLY OF SECOND BRAKE
PISTON
REMOVE SECOND BRAKE PISTON
(a) Apply compressed air to the oil hole to remove the
piston.
(b) Remove the two O±rings from the piston.
Second Brake
± AUTOMATIC TRANSAXLEComponent Parts (Front Planetary Gear) (A140L and
A140E)AT±99
Page 355 of 2389
INSPECTION OF SECOND BRAKE
COMPONENT
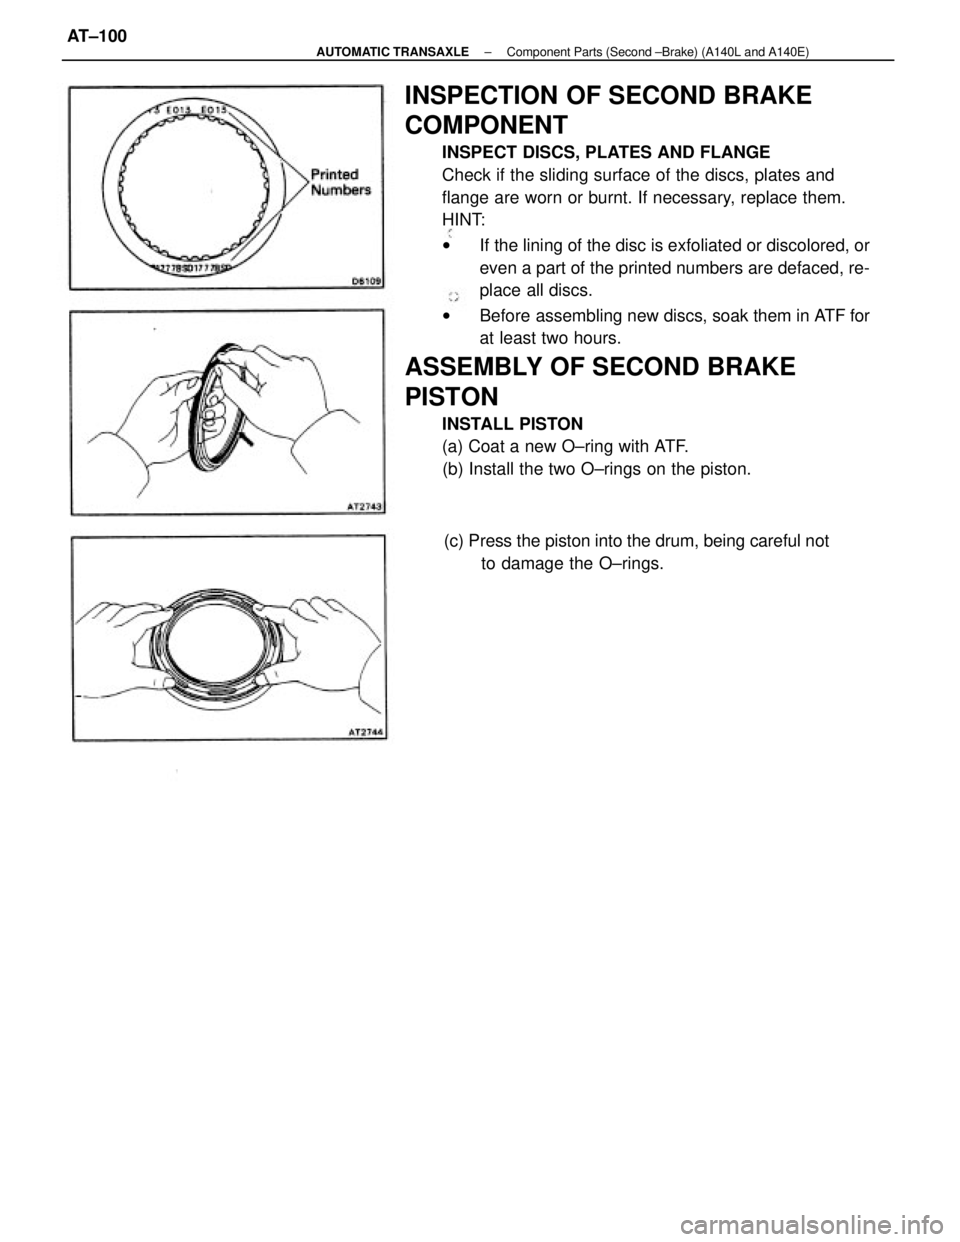
INSPECT DISCS, PLATES AND FLANGE
Check if the sliding surface of the discs, plates and
flange are worn or burnt. If necessary, replace them.
HINT:
wIf the lining of the disc is exfoliated or discolored, or
even a part of the printed numbers are defaced, re-
place all discs.
wBefore assembling new discs, soak them in ATF for
at least two hours.
ASSEMBLY OF SECOND BRAKE
PISTON
INSTALL PISTON
(a) Coat a new O±ring with ATF.
(b) Install the two O±rings on the piston.
(c) Press the piston into the drum, being careful not
to damage the O±rings.
± AUTOMATIC TRANSAXLEComponent Parts (Second ±Brake) (A140L and A140E)AT±100
Page 356 of 2389
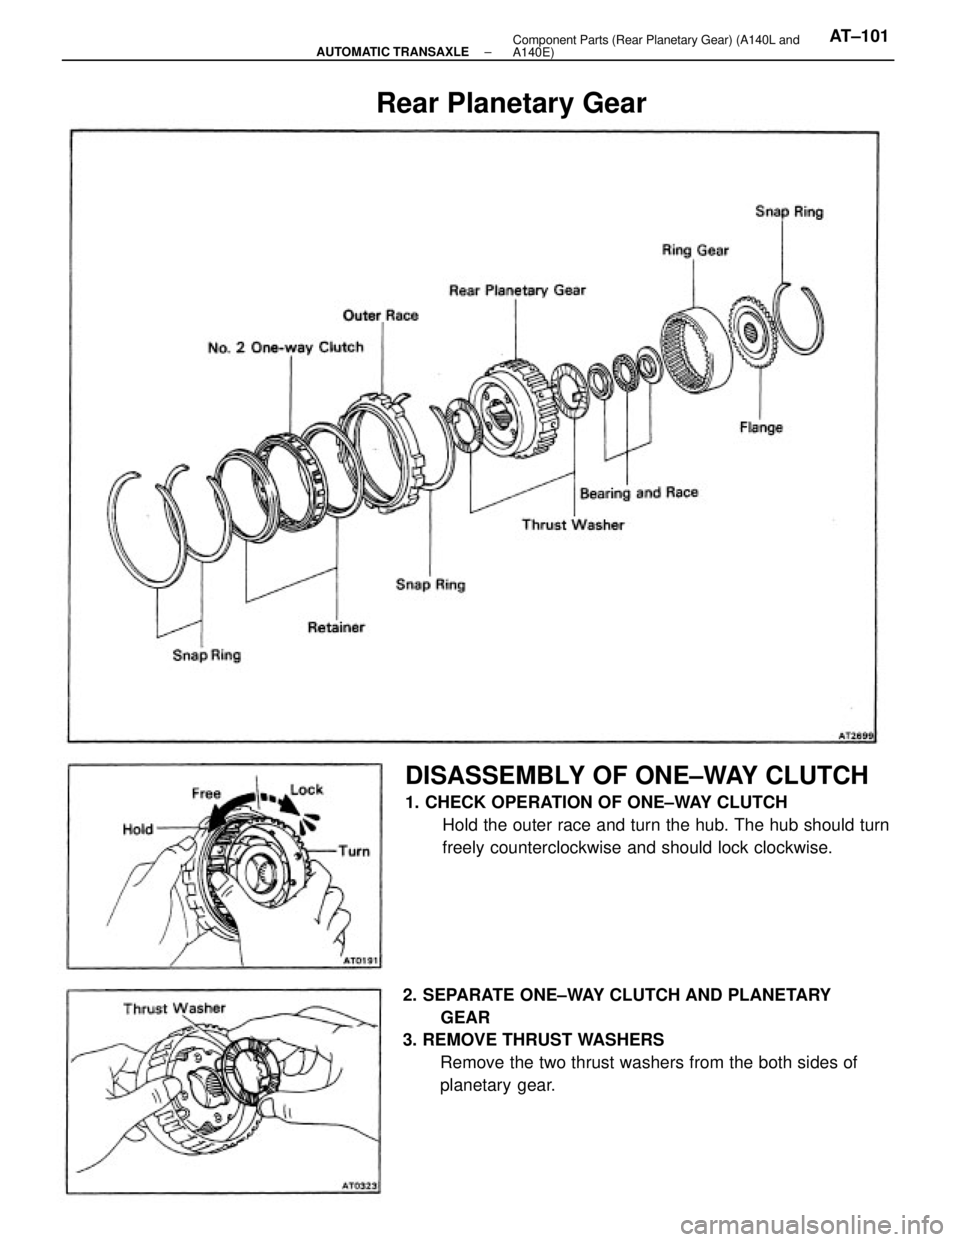
2. SEPARATE ONE±WAY CLUTCH AND PLANETARY
GEAR
3. REMOVE THRUST WASHERS
Remove the two thrust washers from the both sides of
planetary gear.
DISASSEMBLY OF ONE±WAY CLUTCH
1. CHECK OPERATION OF ONE±WAY CLUTCH
Hold the outer race and turn the hub. The hub should turn
freely counterclockwise and should lock clockwise.
Rear Planetary Gear
± AUTOMATIC TRANSAXLEComponent Parts (Rear Planetary Gear) (A140L and
A140E)AT±101
Page 357 of 2389
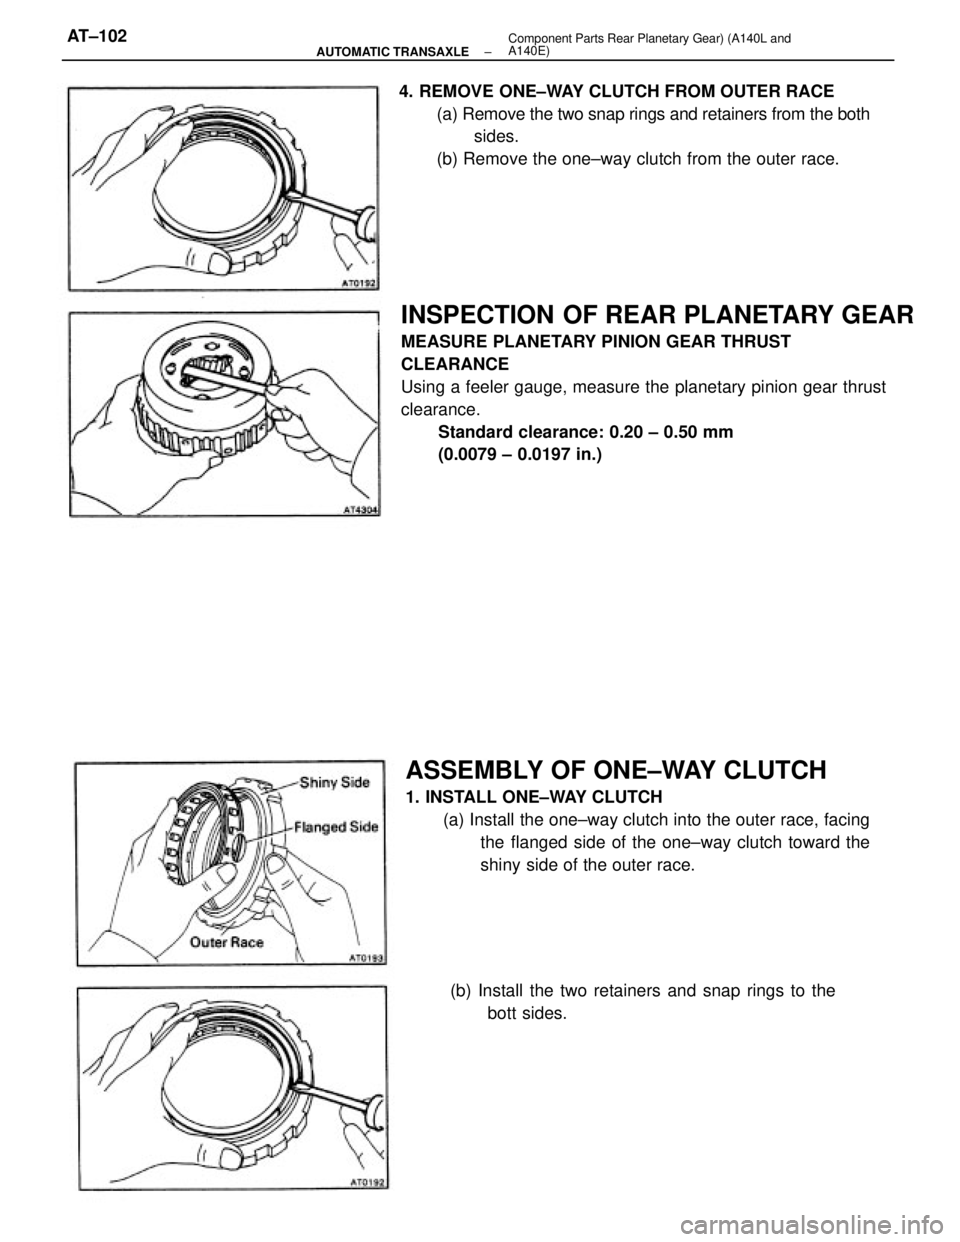
INSPECTION OF REAR PLANETARY GEAR
MEASURE PLANETARY PINION GEAR THRUST
CLEARANCE
Using a feeler gauge, measure the planetary pinion gear thrust
clearance.
Standard clearance: 0.20 ± 0.50 mm
(0.0079 ± 0.0197 in.) 4. REMOVE ONE±WAY CLUTCH FROM OUTER RACE
(a) Remove the two snap rings and retainers from the both
sides.
(b) Remove the one±way clutch from the outer race.
ASSEMBLY OF ONE±WAY CLUTCH
1. INSTALL ONE±WAY CLUTCH
(a) Install the one±way clutch into the outer race, facing
the flanged side of the one±way clutch toward the
shiny side of the outer race.
(b) Install the two retainers and snap rings to the
bott sides.
± AUTOMATIC TRANSAXLEComponent Parts Rear Planetary Gear) (A140L and
A140E)AT±102
Page 358 of 2389
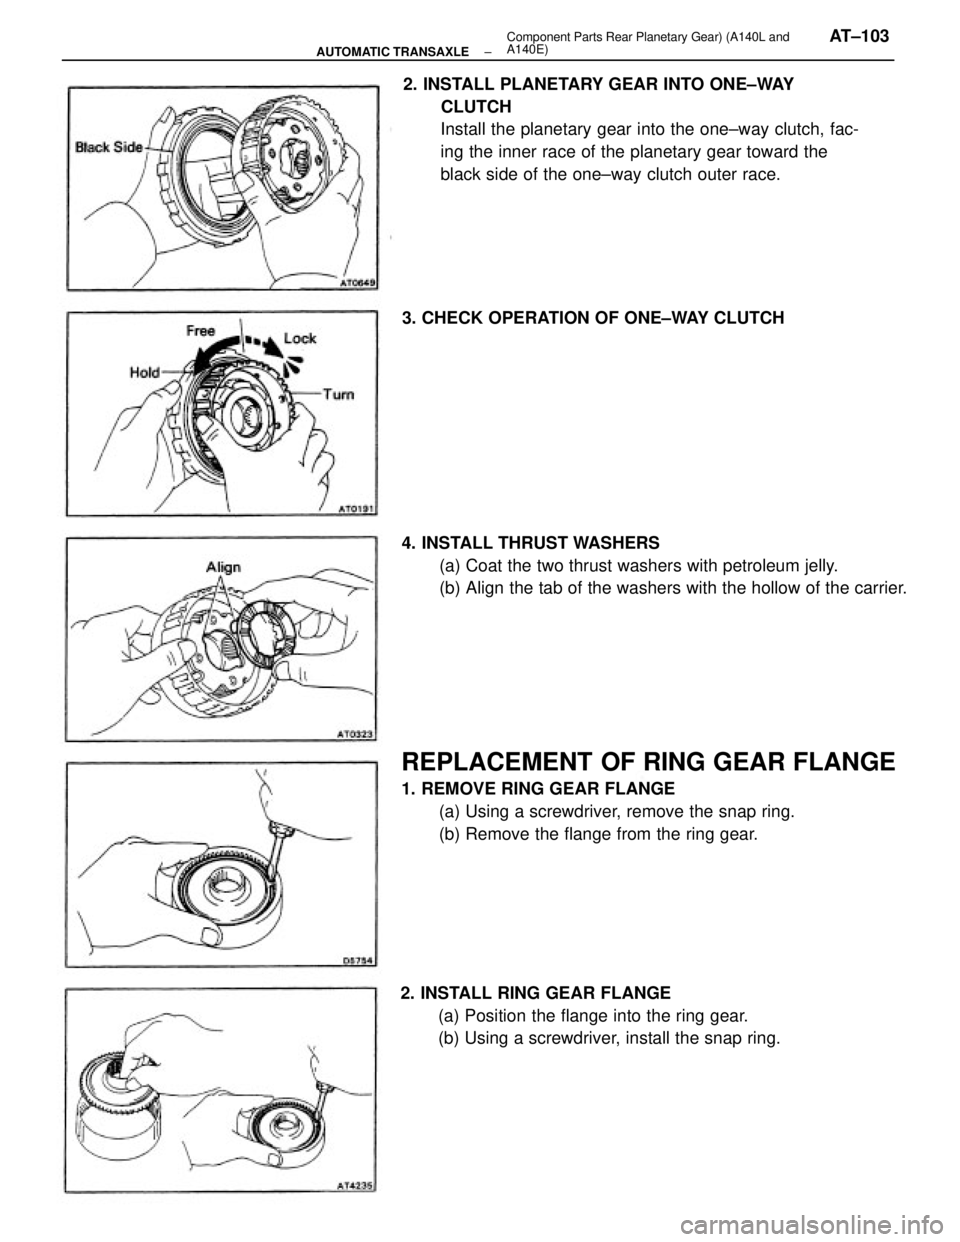
2. INSTALL PLANETARY GEAR INTO ONE±WAY
CLUTCH
Install the planetary gear into the one±way clutch, fac-
ing the inner race of the planetary gear toward the
black side of the one±way clutch outer race.
REPLACEMENT OF RING GEAR FLANGE
1. REMOVE RING GEAR FLANGE
(a) Using a screwdriver, remove the snap ring.
(b) Remove the flange from the ring gear. 4. INSTALL THRUST WASHERS
(a) Coat the two thrust washers with petroleum jelly.
(b) Align the tab of the washers with the hollow of the carrier.
2. INSTALL RING GEAR FLANGE
(a) Position the flange into the ring gear.
(b) Using a screwdriver, install the snap ring. 3. CHECK OPERATION OF ONE±WAY CLUTCH
± AUTOMATIC TRANSAXLEComponent Parts Rear Planetary Gear) (A140L and
A140E)AT±103
Page 359 of 2389
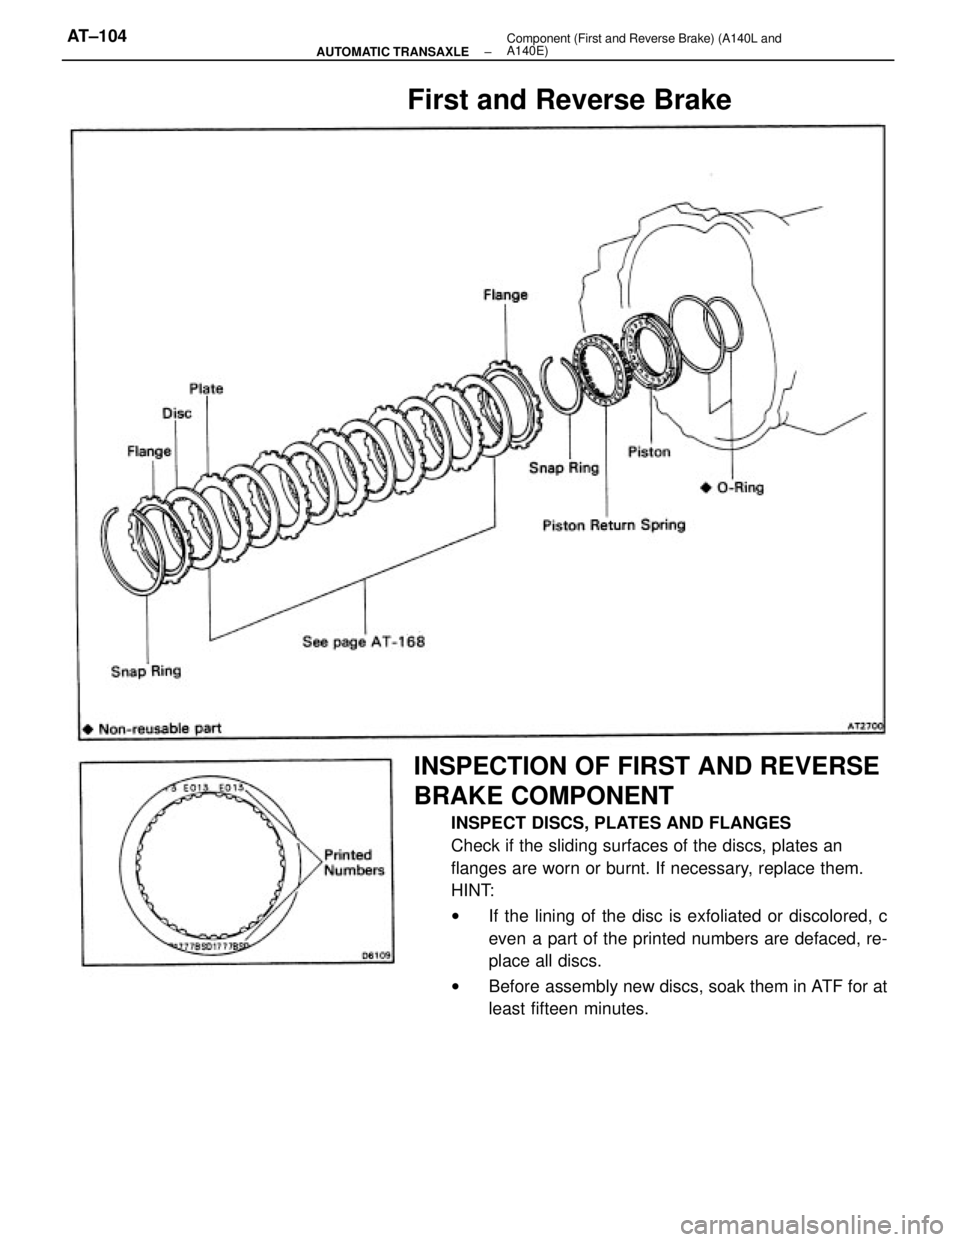
INSPECTION OF FIRST AND REVERSE
BRAKE COMPONENT
INSPECT DISCS, PLATES AND FLANGES
Check if the sliding surfaces of the discs, plates an
flanges are worn or burnt. If necessary, replace them.
HINT:
wIf the lining of the disc is exfoliated or discolored, c
even a part of the printed numbers are defaced, re-
place all discs.
wBefore assembly new discs, soak them in ATF for at
least fifteen minutes.
First and Reverse Brake
± AUTOMATIC TRANSAXLEComponent (First and Reverse Brake) (A140L and
A140E)AT±104
Page 360 of 2389
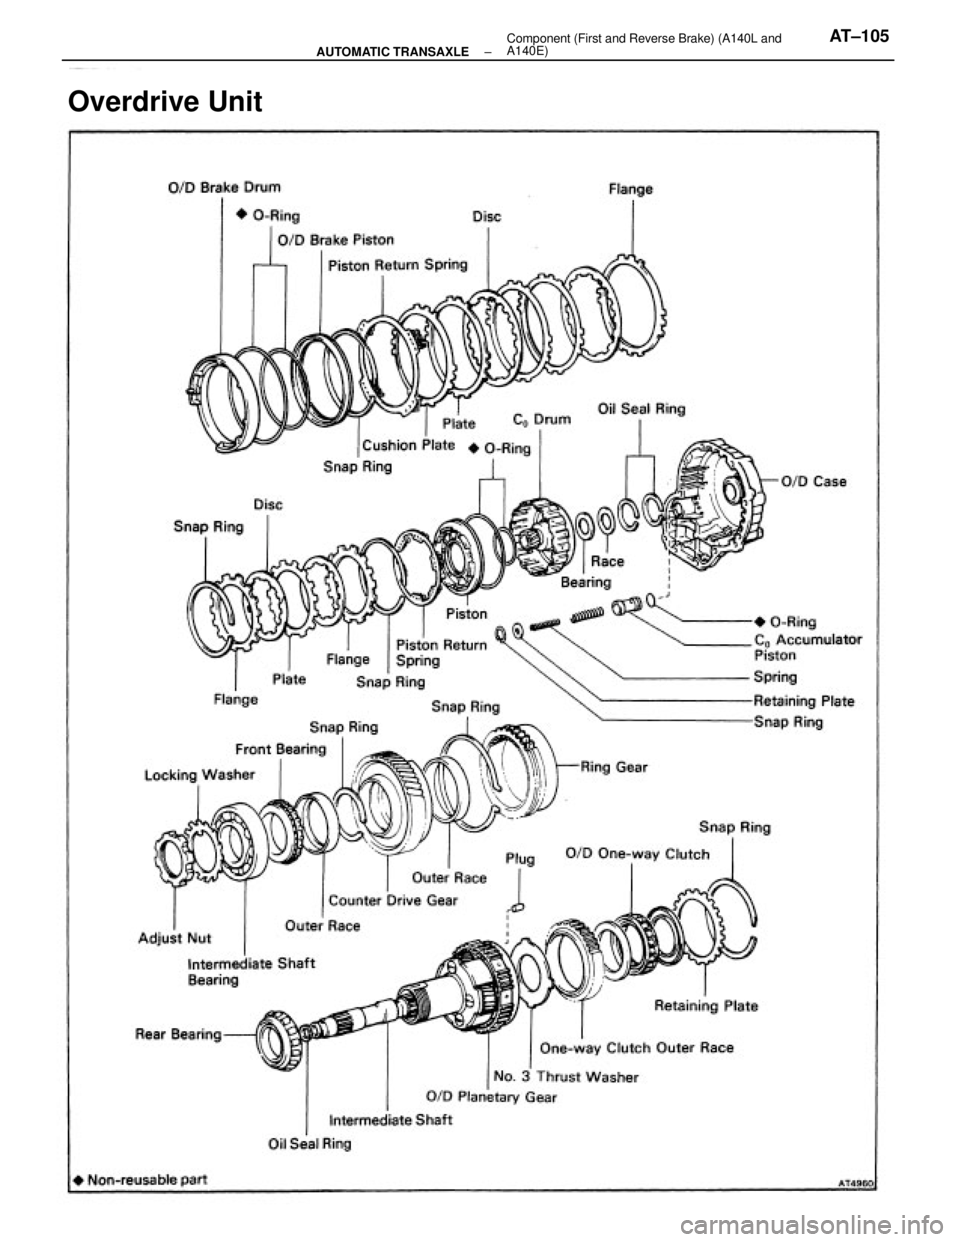
Overdrive Unit
± AUTOMATIC TRANSAXLEComponent (First and Reverse Brake) (A140L and
A140E)AT±105
Trending: oil temperature, trunk, alternator, ECU, weight, tires, window
