TOYOTA CAMRY V20 1986 Service Information
CAMRY V20 1986
TOYOTA
TOYOTA
https://www.carmanualsonline.info/img/14/57449/w960_57449-0.png
TOYOTA CAMRY V20 1986 Service Information
Trending: cruise control, wheel bolt torque, display, adding oil, turn signal bulb, airbag, wiper blades
Page 371 of 2389
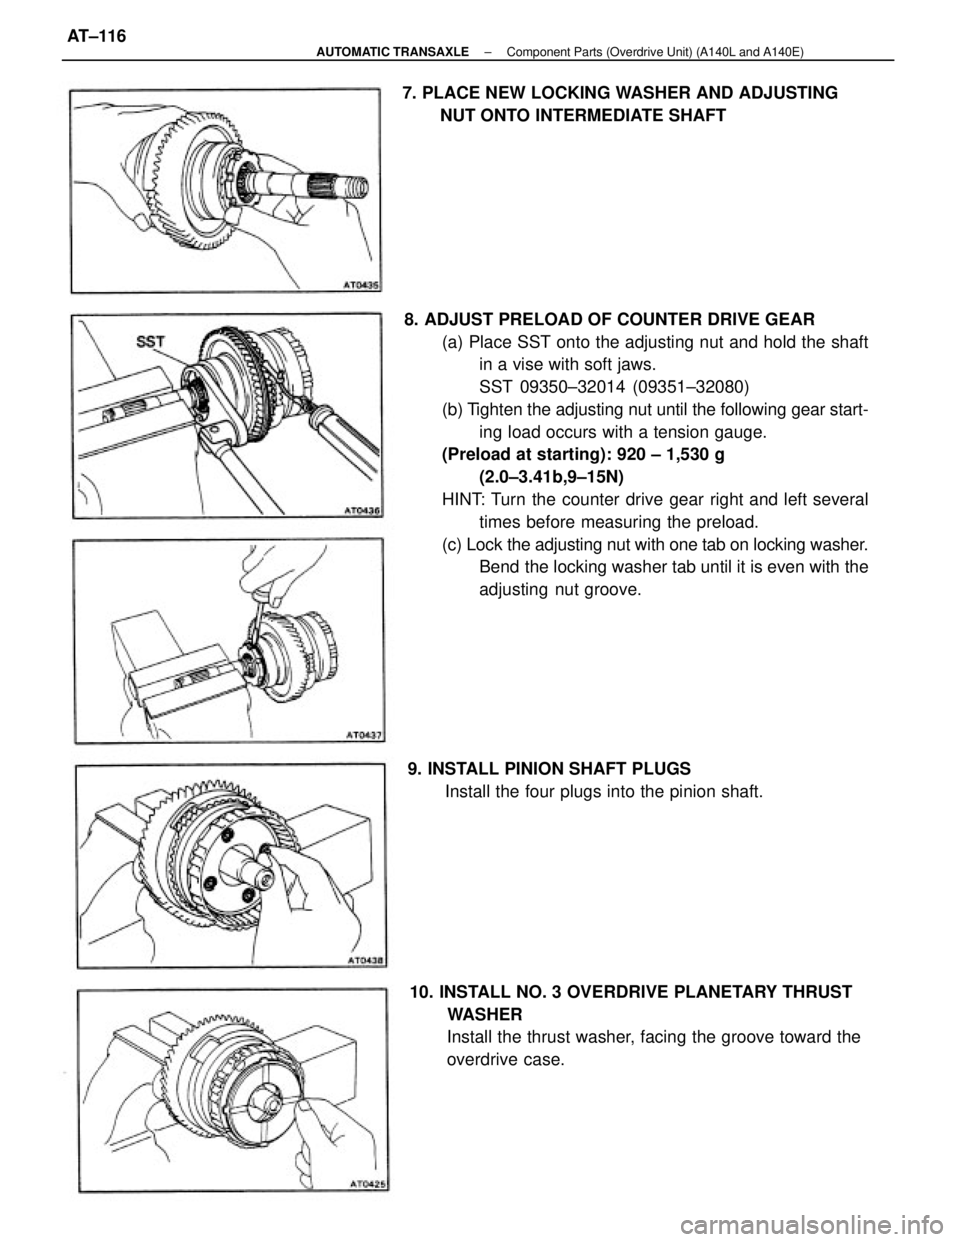
8. ADJUST PRELOAD OF COUNTER DRIVE GEAR
(a) Place SST onto the adjusting nut and hold the shaft
in a vise with soft jaws.
SST 09350±32014 (09351±32080)
(b) Tighten the adjusting nut until the following gear start-
ing load occurs with a tension gauge.
(Preload at starting): 920 ± 1,530 g
(2.0±3.41b,9±15N)
HINT: Turn the counter drive gear right and left several
times before measuring the preload.
(c) Lock the adjusting nut with one tab on locking washer.
Bend the locking washer tab until it is even with the
adjusting nut groove.
10. INSTALL NO. 3 OVERDRIVE PLANETARY THRUST
WASHER
Install the thrust washer, facing the groove toward the
overdrive case. 7. PLACE NEW LOCKING WASHER AND ADJUSTING
NUT ONTO INTERMEDIATE SHAFT
9. INSTALL PINION SHAFT PLUGS
Install the four plugs into the pinion shaft.
± AUTOMATIC TRANSAXLEComponent Parts (Overdrive Unit) (A140L and A140E)AT±116
Page 372 of 2389
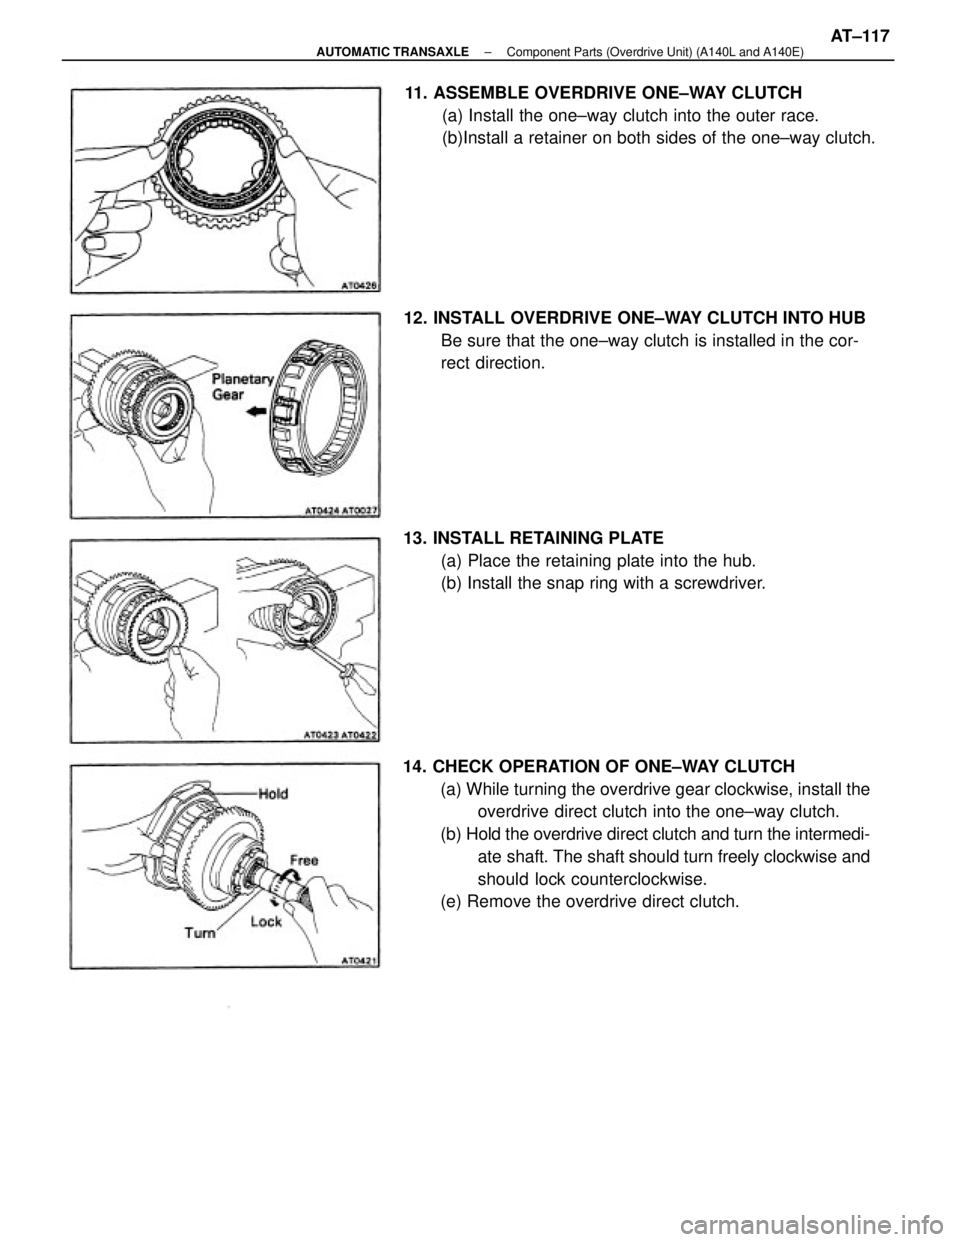
14. CHECK OPERATION OF ONE±WAY CLUTCH
(a) While turning the overdrive gear clockwise, install the
overdrive direct clutch into the one±way clutch.
(b) Hold the overdrive direct clutch and turn the intermedi-
ate shaft. The shaft should turn freely clockwise and
should lock counterclockwise.
(e) Remove the overdrive direct clutch. 11. ASSEMBLE OVERDRIVE ONE±WAY CLUTCH
(a) Install the one±way clutch into the outer race.
(b)Install a retainer on both sides of the one±way clutch.
12. INSTALL OVERDRIVE ONE±WAY CLUTCH INTO HUB
Be sure that the one±way clutch is installed in the cor-
rect direction.
13. INSTALL RETAINING PLATE
(a) Place the retaining plate into the hub.
(b) Install the snap ring with a screwdriver.
± AUTOMATIC TRANSAXLEComponent Parts (Overdrive Unit) (A140L and A140E)AT±117
Page 373 of 2389
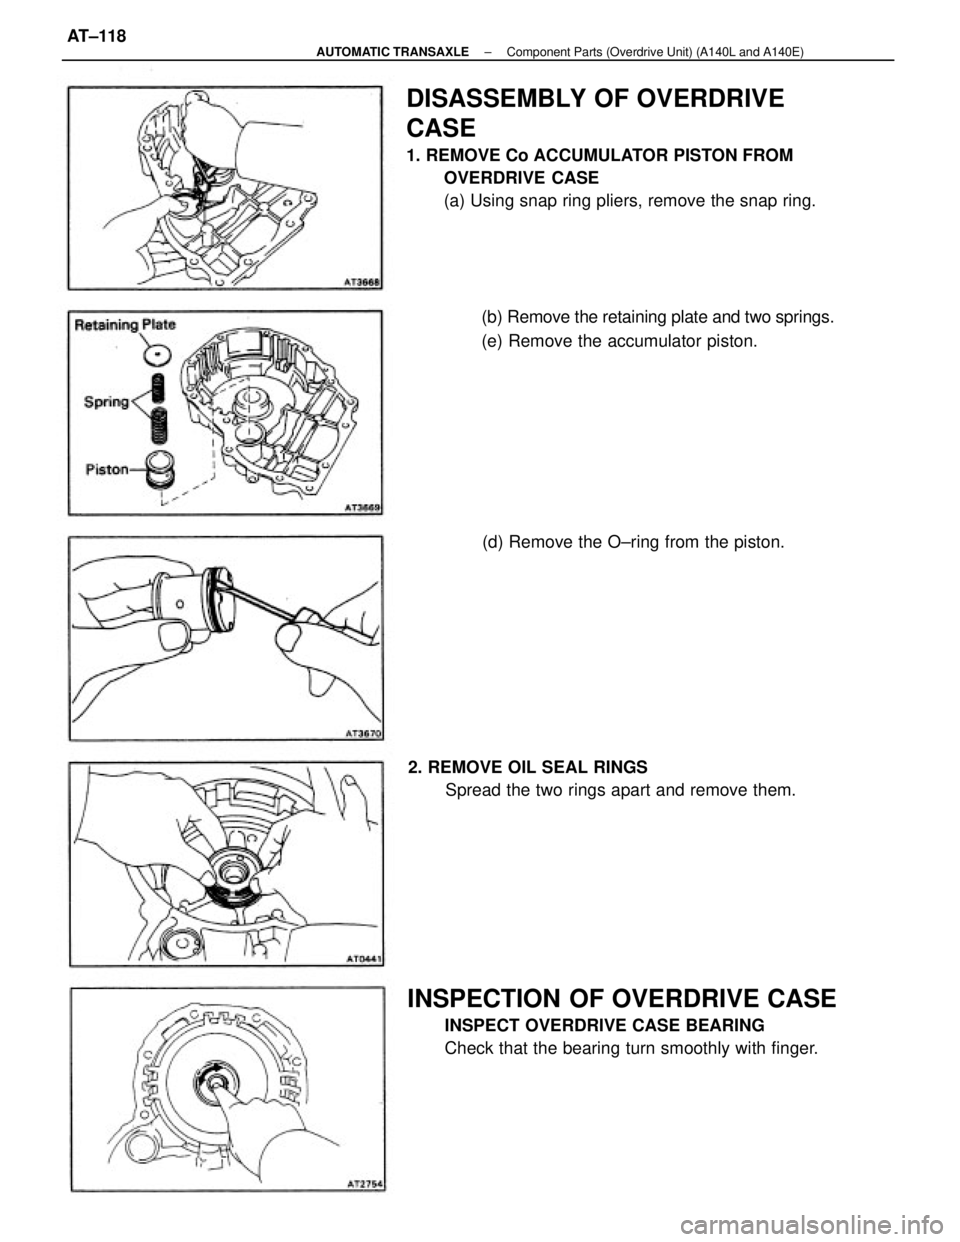
DISASSEMBLY OF OVERDRIVE
CASE
1. REMOVE Co ACCUMULATOR PISTON FROM
OVERDRIVE CASE
(a) Using snap ring pliers, remove the snap ring.
INSPECTION OF OVERDRIVE CASE
INSPECT OVERDRIVE CASE BEARING
Check that the bearing turn smoothly with finger. 2. REMOVE OIL SEAL RINGS
Spread the two rings apart and remove them.(b) Remove the retaining plate and two springs.
(e) Remove the accumulator piston.
(d) Remove the O±ring from the piston.
± AUTOMATIC TRANSAXLEComponent Parts (Overdrive Unit) (A140L and A140E)AT±118
Page 374 of 2389
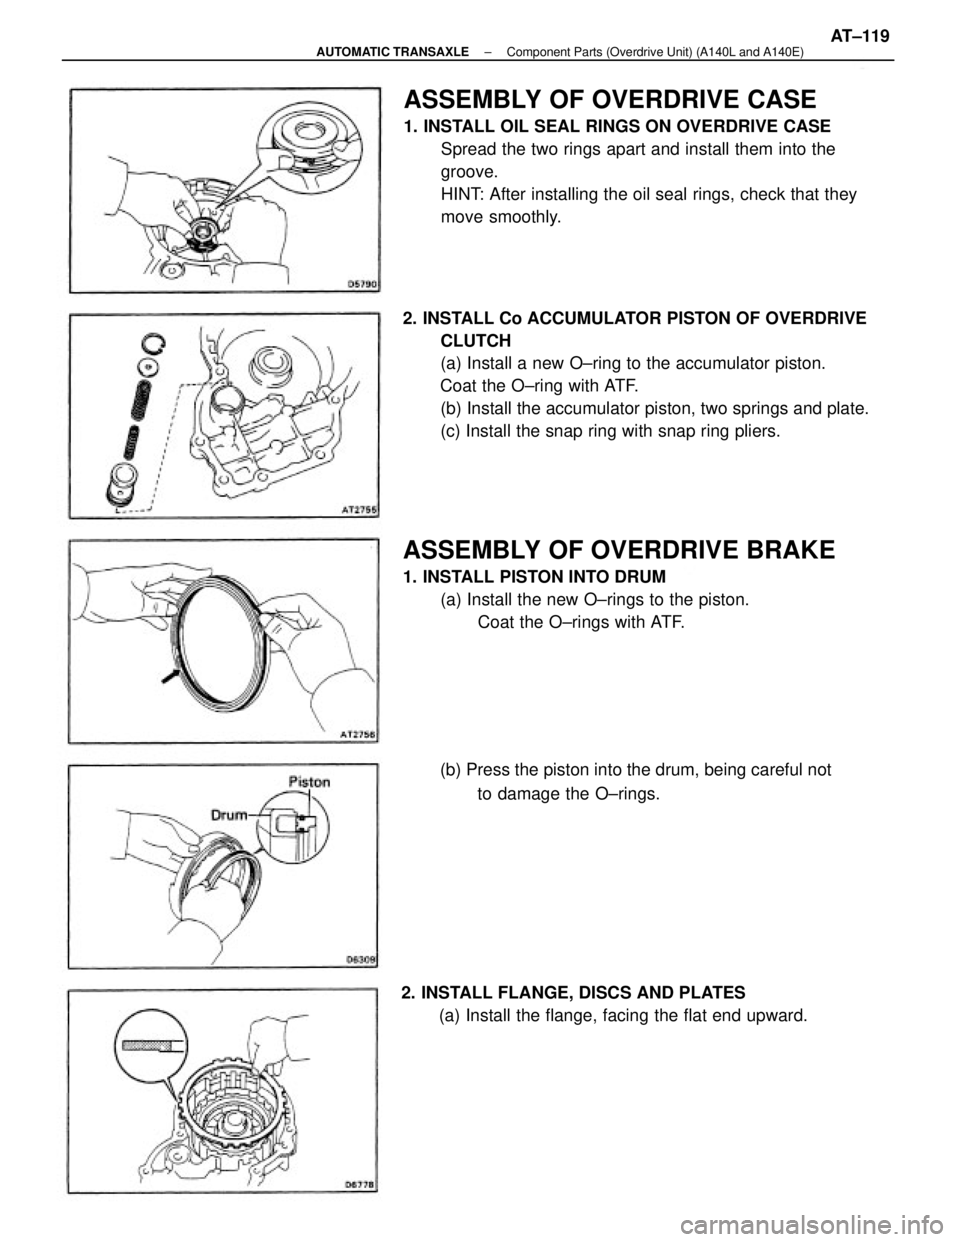
ASSEMBLY OF OVERDRIVE CASE
1. INSTALL OIL SEAL RINGS ON OVERDRIVE CASE
Spread the two rings apart and install them into the
groove.
HINT: After installing the oil seal rings, check that they
move smoothly.
2. INSTALL Co ACCUMULATOR PISTON OF OVERDRIVE
CLUTCH
(a) Install a new O±ring to the accumulator piston.
Coat the O±ring with ATF.
(b) Install the accumulator piston, two springs and plate.
(c) Install the snap ring with snap ring pliers.
ASSEMBLY OF OVERDRIVE BRAKE
1. INSTALL PISTON INTO DRUM
(a) Install the new O±rings to the piston.
Coat the O±rings with ATF.
2. INSTALL FLANGE, DISCS AND PLATES
(a) Install the flange, facing the flat end upward.(b) Press the piston into the drum, being careful not
to damage the O±rings.
± AUTOMATIC TRANSAXLEComponent Parts (Overdrive Unit) (A140L and A140E)AT±119
Page 375 of 2389
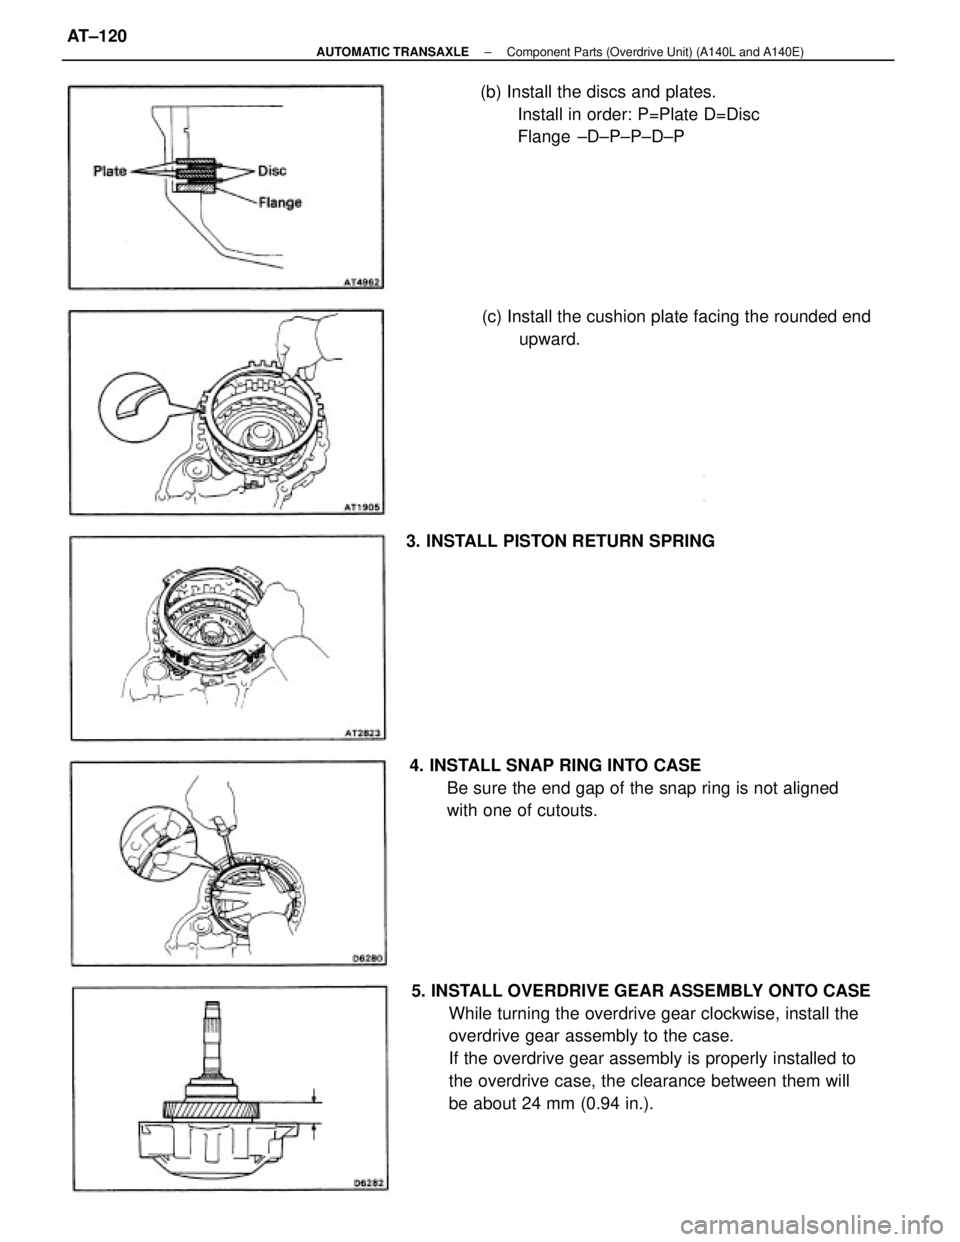
5. INSTALL OVERDRIVE GEAR ASSEMBLY ONTO CASE
While turning the overdrive gear clockwise, install the
overdrive gear assembly to the case.
If the overdrive gear assembly is properly installed to
the overdrive case, the clearance between them will
be about 24 mm (0.94 in.). 4. INSTALL SNAP RING INTO CASE
Be sure the end gap of the snap ring is not aligned
with one of cutouts.(b) Install the discs and plates.
Install in order: P=Plate D=Disc
Flange ±D±P±P±D±P
(c) Install the cushion plate facing the rounded end
upward.
3. INSTALL PISTON RETURN SPRING
± AUTOMATIC TRANSAXLEComponent Parts (Overdrive Unit) (A140L and A140E)AT±120
Page 376 of 2389
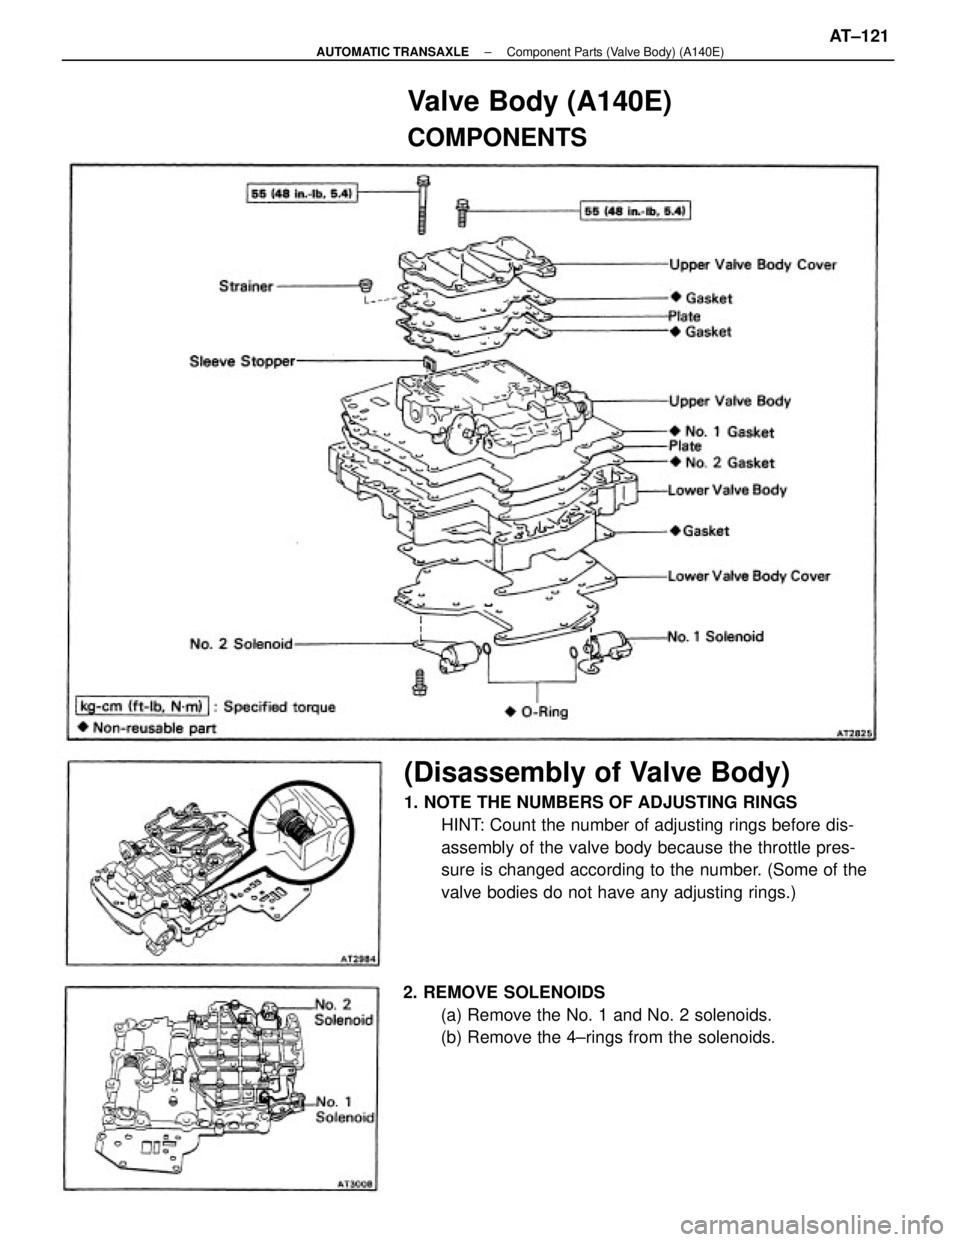
(Disassembly of Valve Body)
1. NOTE THE NUMBERS OF ADJUSTING RINGS
HINT: Count the number of adjusting rings before dis-
assembly of the valve body because the throttle pres-
sure is changed according to the number. (Some of the
valve bodies do not have any adjusting rings.)
2. REMOVE SOLENOIDS
(a) Remove the No. 1 and No. 2 solenoids.
(b) Remove the 4±rings from the solenoids.
Valve Body (A140E)
COMPONENTS
± AUTOMATIC TRANSAXLEComponent Parts (Valve Body) (A140E)AT±121
Page 377 of 2389
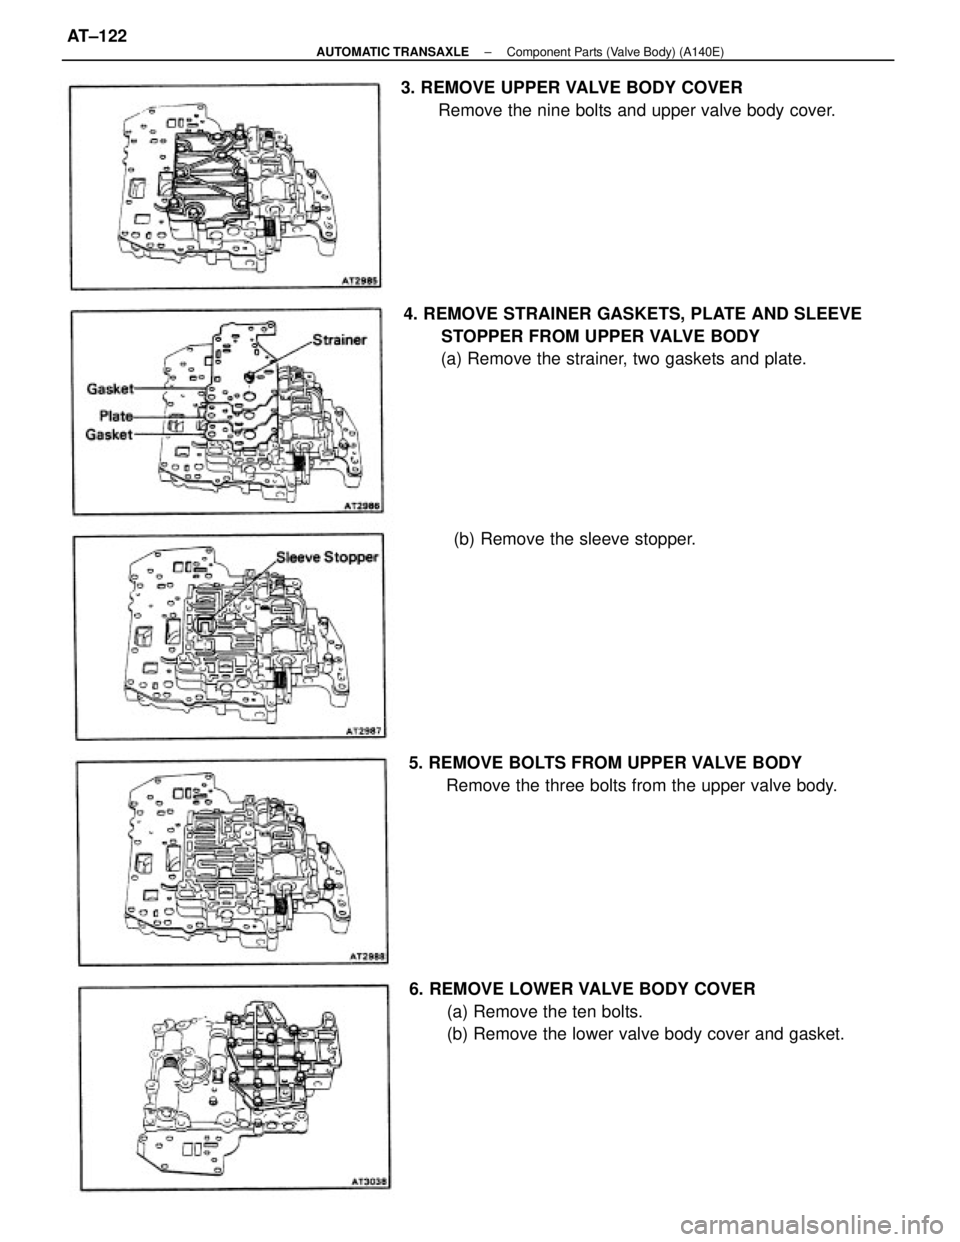
6. REMOVE LOWER VALVE BODY COVER
(a) Remove the ten bolts.
(b) Remove the lower valve body cover and gasket. 4. REMOVE STRAINER GASKETS, PLATE AND SLEEVE
STOPPER FROM UPPER VALVE BODY
(a) Remove the strainer, two gaskets and plate. 3. REMOVE UPPER VALVE BODY COVER
Remove the nine bolts and upper valve body cover.
5. REMOVE BOLTS FROM UPPER VALVE BODY
Remove the three bolts from the upper valve body.(b) Remove the sleeve stopper.
± AUTOMATIC TRANSAXLEComponent Parts (Valve Body) (A140E)AT±122
Page 378 of 2389
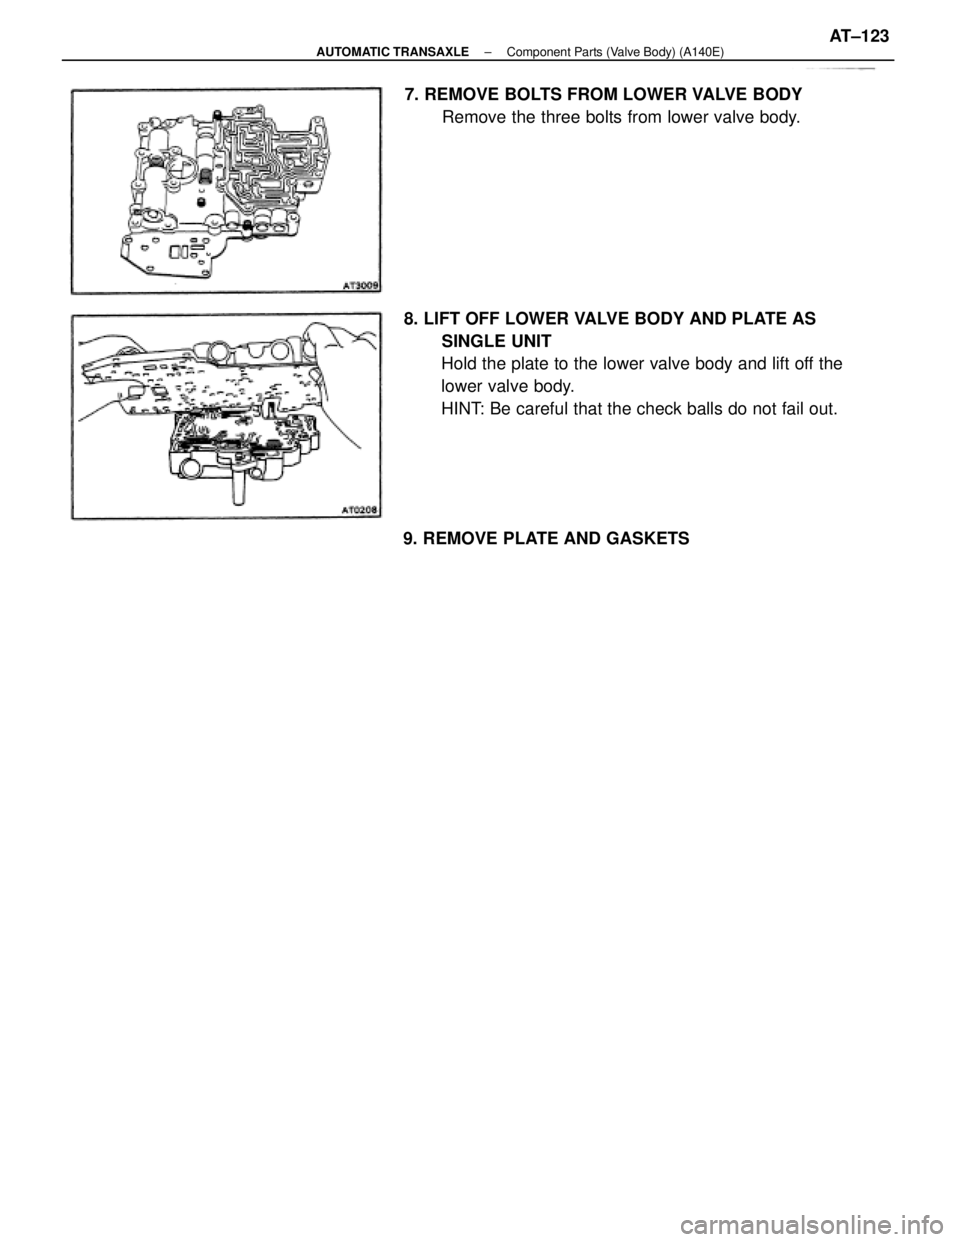
8. LIFT OFF LOWER VALVE BODY AND PLATE AS
SINGLE UNIT
Hold the plate to the lower valve body and lift off the
lower valve body.
HINT: Be careful that the check balls do not fail out. 7. REMOVE BOLTS FROM LOWER VALVE BODY
Remove the three bolts from lower valve body.
9. REMOVE PLATE AND GASKETS
± AUTOMATIC TRANSAXLEComponent Parts (Valve Body) (A140E)AT±123
Page 379 of 2389
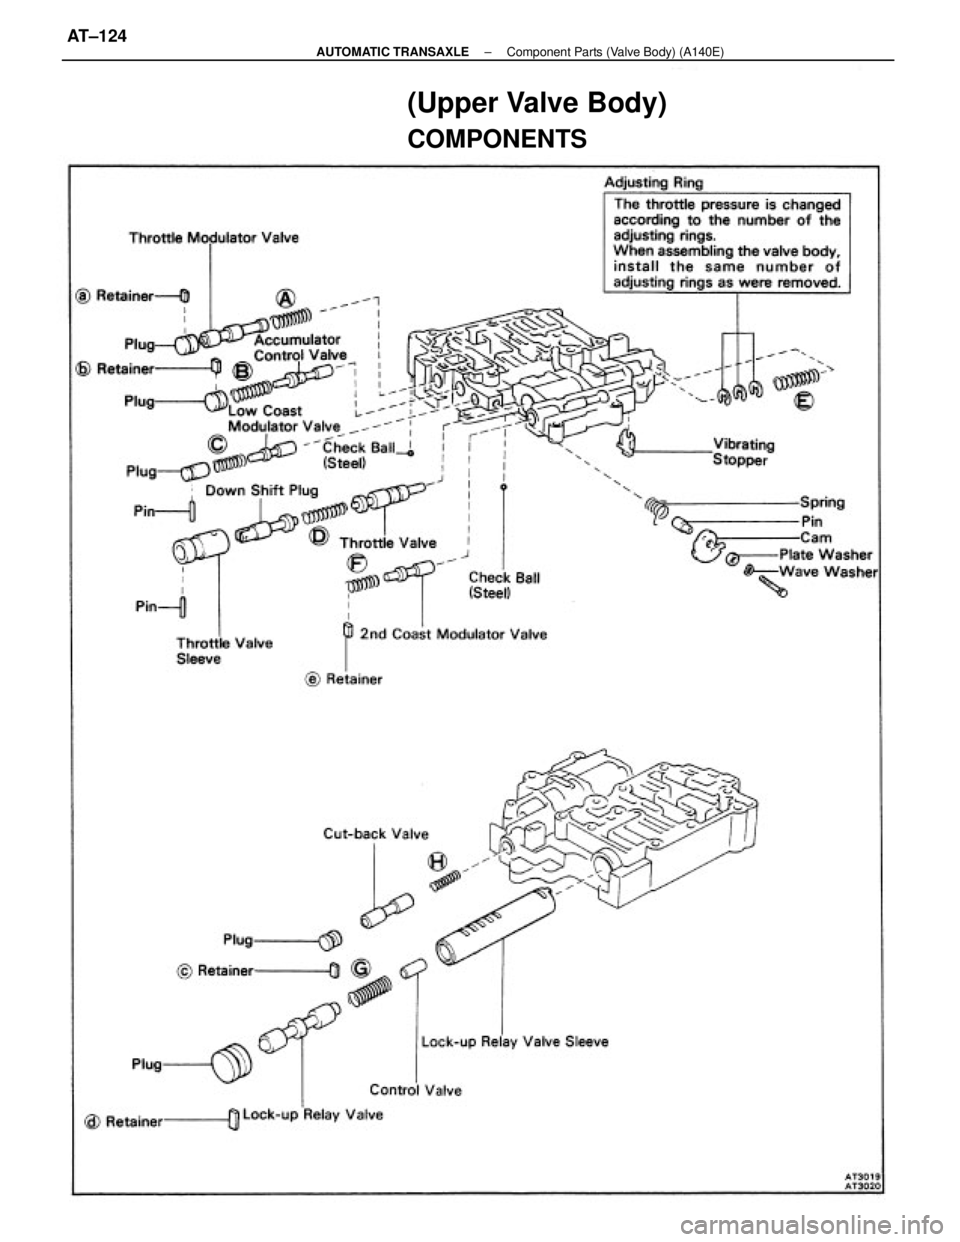
(Upper Valve Body)
COMPONENTS
± AUTOMATIC TRANSAXLEComponent Parts (Valve Body) (A140E)AT±124
Page 380 of 2389
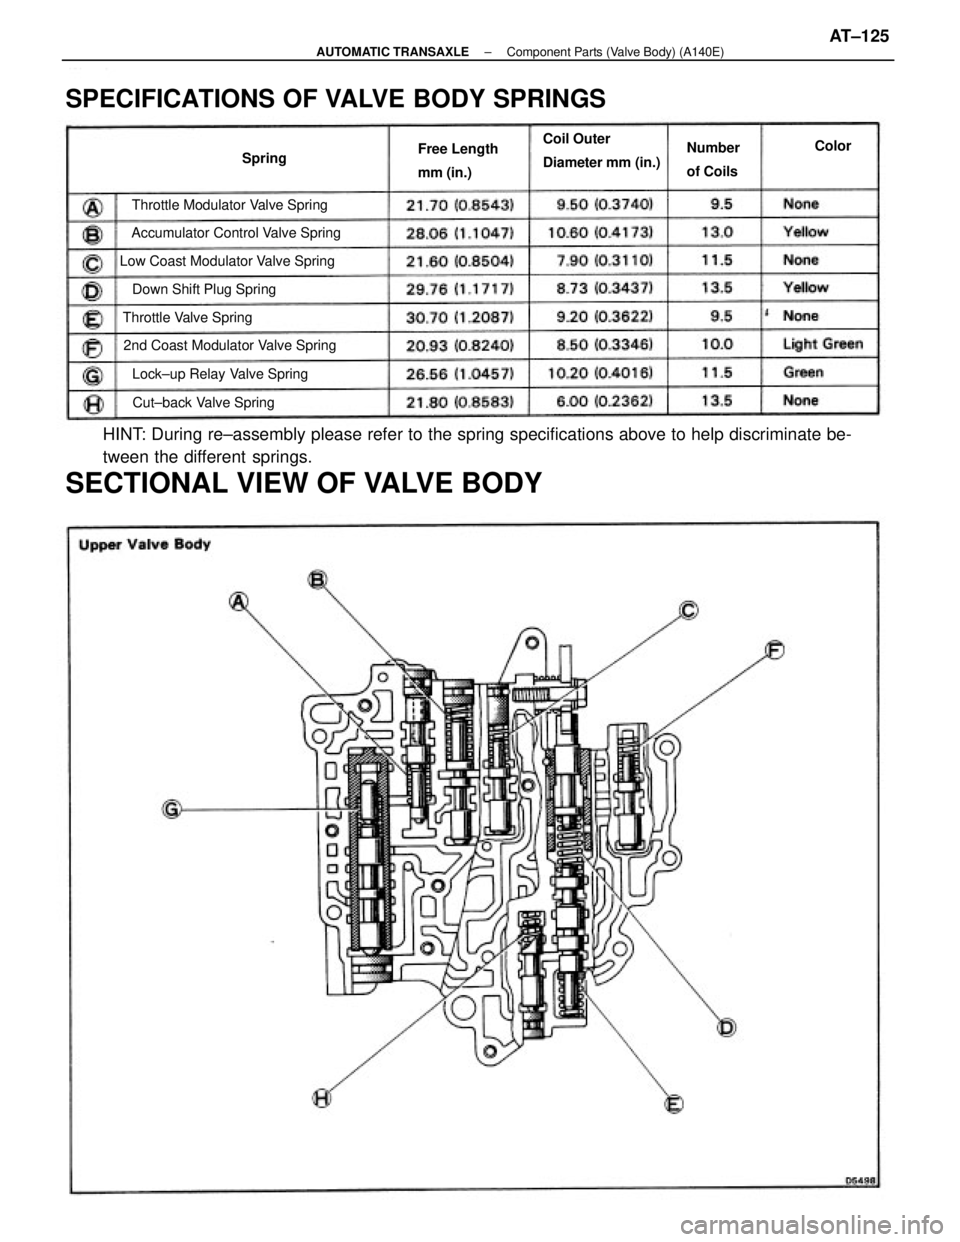
HINT: During re±assembly please refer to the spring specifications above to help discriminate be-
tween the different springs.
SECTIONAL VIEW OF VALVE BODY
SPECIFICATIONS OF VALVE BODY SPRINGS
Low Coast Modulator Valve Spring
2nd Coast Modulator Valve SpringAccumulator Control Valve SpringThrottle Modulator Valve Spring
Lock±up Relay Valve SpringCoil Outer
Diameter mm (in.)
Down Shift Plug Spring
Cut±back Valve Spring Throttle Valve SpringFree Length
mm (in.)Number
of Coils SpringColor
± AUTOMATIC TRANSAXLEComponent Parts (Valve Body) (A140E)AT±125
Trending: fold seats, lighting, brake fluid, open hood, park assist, clock setting, tow
