clock TOYOTA COROLLA 2021 Owners Manual (in English)
[x] Cancel search | Manufacturer: TOYOTA, Model Year: 2021, Model line: COROLLA, Model: TOYOTA COROLLA 2021Pages: 624, PDF Size: 20.3 MB
Page 91 of 624
912-1. Instrument cluster
2
Vehicle status information and indicators
COROLLA_U
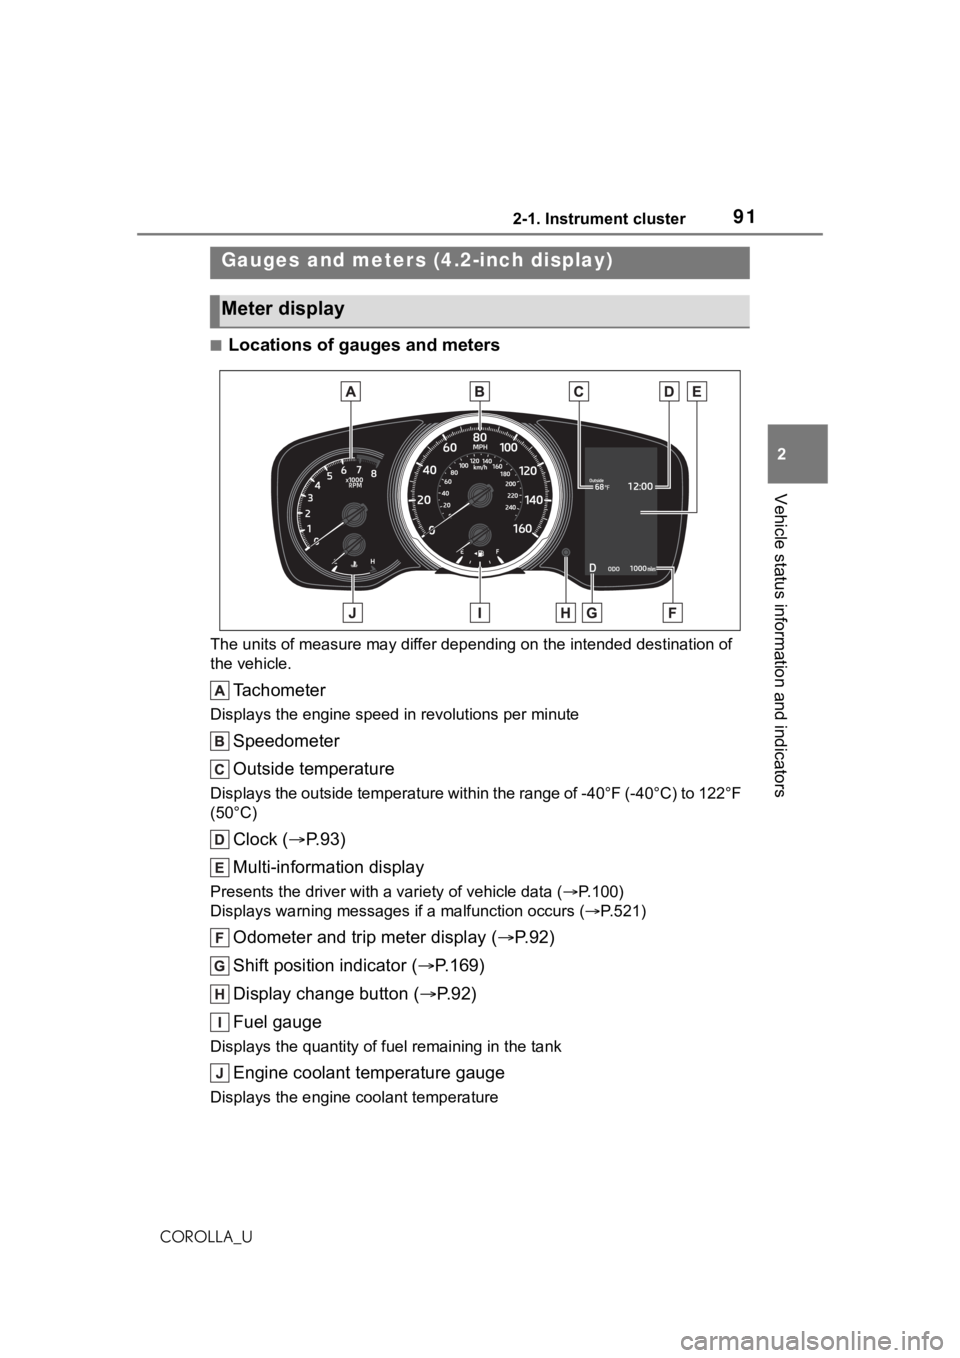
■Locations of gauges and meters
The units of measure may differ depending on the intended destination of
the vehicle.
Tachometer
Displays the engine speed in revolutions per minute
Speedometer
Outside temperature
Displays the outside temperature within the range of -40°F (-40 °C) to 122°F
(50°C)
Clock ( P. 9 3 )
Multi-information display
Presents the driver with a variety of vehicle data (P.100)
Displays warning messages if a malfunction occurs (P.521)
Odometer and trip meter display ( P.92)
Shift position indicator ( P.169)
Display change button ( P.92)
Fuel gauge
Displays the quantity of fu el remaining in the tank
Engine coolant temperature gauge
Displays the engine coolant temperature
Gauges and meters (4.2-inch display)
Meter display
Page 93 of 624
932-1. Instrument cluster
2
Vehicle status information and indicators
COROLLA_Udifferent distances independently.
To reset, display the desired trip
meter and press and hold the dis-
play change button.
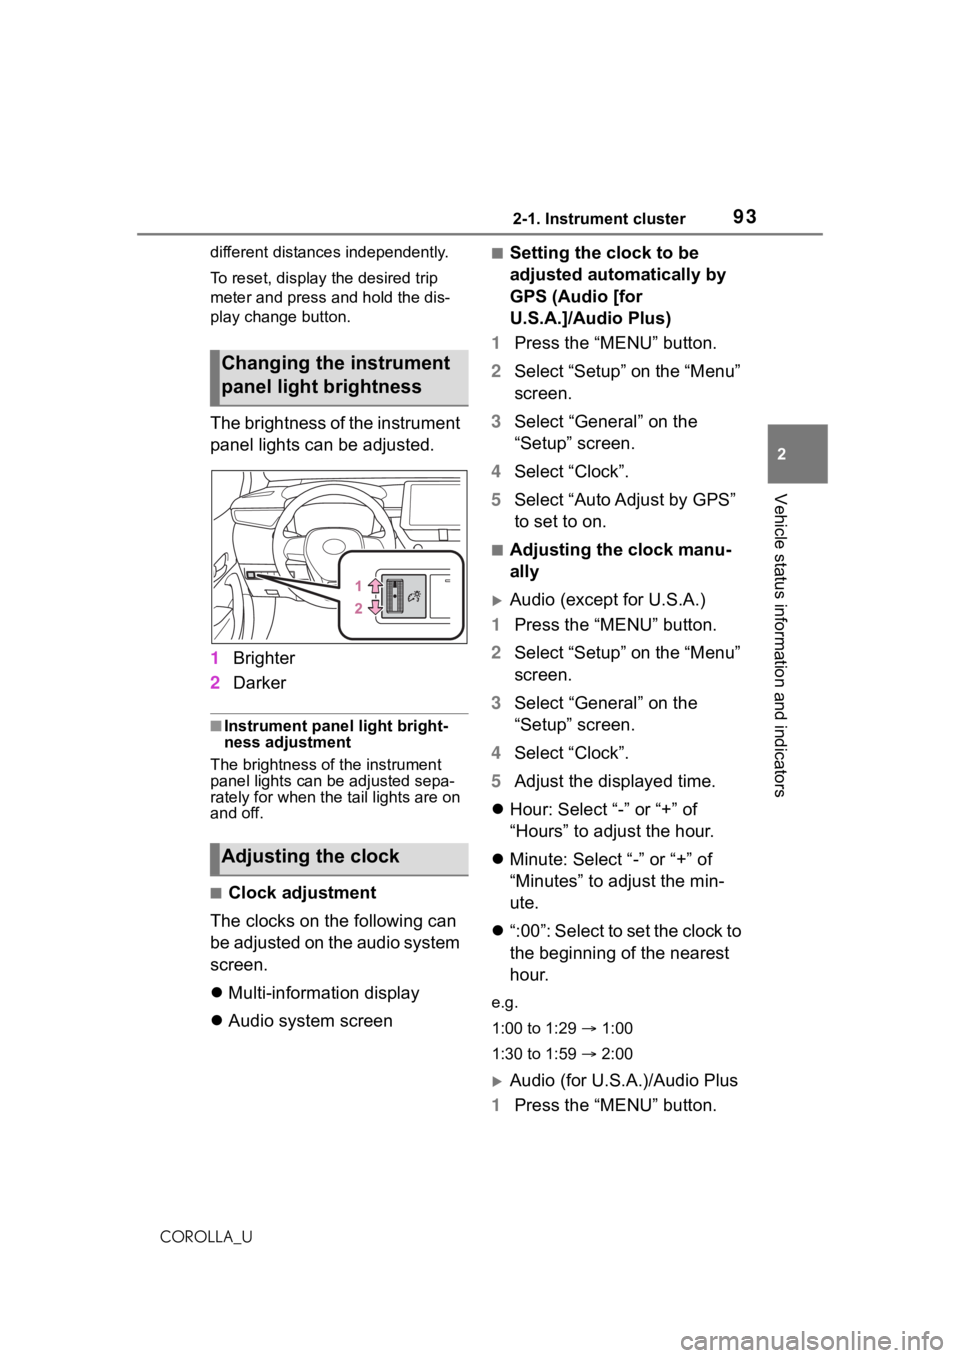
The brightness of the instrument
panel lights can be adjusted.
1
Brighter
2 Darker
■Instrument panel light bright-
ness adjustment
The brightness of the instrument
panel lights can be adjusted sepa-
rately for when the tail lights are on
and off.
■Clock adjustment
The clocks on the following can
be adjusted on the audio system
screen.
Multi-information display
Audio system screen
■Setting the clock to be
adjusted automatically by
GPS (Audio [for
U.S.A.]/Audio Plus)
1 Press the “MENU” button.
2 Select “Setup” on the “Menu”
screen.
3 Select “General” on the
“Setup” screen.
4 Select “Clock”.
5 Select “Auto Adjust by GPS”
to set to on.
■Adjusting the clock manu-
ally
Audio (except for U.S.A.)
1 Press the “MENU” button.
2 Select “Setup” on the “Menu”
screen.
3 Select “General” on the
“Setup” screen.
4 Select “Clock”.
5 Adjust the displayed time.
Hour: Select “-” or “+” of
“Hours” to adjust the hour.
Minute: Select “-” or “+” of
“Minutes” to adjust the min-
ute.
“:00”: Select to set the clock to
the beginning of the nearest
hour.
e.g.
1:00 to 1:29 1:00
1:30 to 1:59 2:00
Audio (for U.S.A.)/Audio Plus
1 Press the “MENU” button.
Changing the instrument
panel light brightness
Adjusting the clock
Page 94 of 624
942-1. Instrument cluster
COROLLA_U
2Select “Setup” on the “Menu”
screen.
3 Select “General” on the
“Setup” screen.
4 Select “Clock”.
5 Select “Auto Adjust by GPS”
to set to off.
6 Adjust the displayed time.
Hour: Select “-” or “+” of
“Hours” to adjust the hour.
Minute: Select “-” or “+” of
“Minutes” to adjust the min-
ute.
“:00”: Select to set the clock to
the beginning of the nearest
hour.
e.g.
1:00 to 1:29 1:00
1:30 to 1:59 2:00
■Setting the time zone
(Audio [for U.S.A.]/Audio
Plus)
1 Press the “MENU” button.
2 Select “Setup” on the “Menu”
screen.
3 Select “General” on the
“Setup” screen.
4 Select “Clock”.
5 Select “Time Zone”.
Select the desired time zone.
■Setting daylight saving time
(Audio [for U.S.A.]/Audio
Plus)
1 Press the “MENU” button. 2
Select “Setup” on the “Menu”
screen.
3 Select “General” on the
“Setup” screen.
4 Select “Clock”.
5 Select “Daylight Saving
Time” then on/off.
■Changing the clock
between 12-hour/24-hour
format
1 Press the “MENU” button.
2 Select “Setup” on the “Menu”
screen.
3 Select “General” on the
“Setup” screen.
4 Select “Clock”.
5 Select “24-Hour Time For-
mat” and then on/off.
When set to off, the clock is dis-
played in 12 hour time format.
■Clock settings screen (Audio
[for U.S.A.]/Audio Plus)
If “Clock : 00” is displayed when
is selected on the multi-information
display, the system may be malfunc-
tioning. Have the vehicle inspected
by your Toyota dealer.
Page 95 of 624
952-1. Instrument cluster
2
Vehicle status information and indicators
COROLLA_U
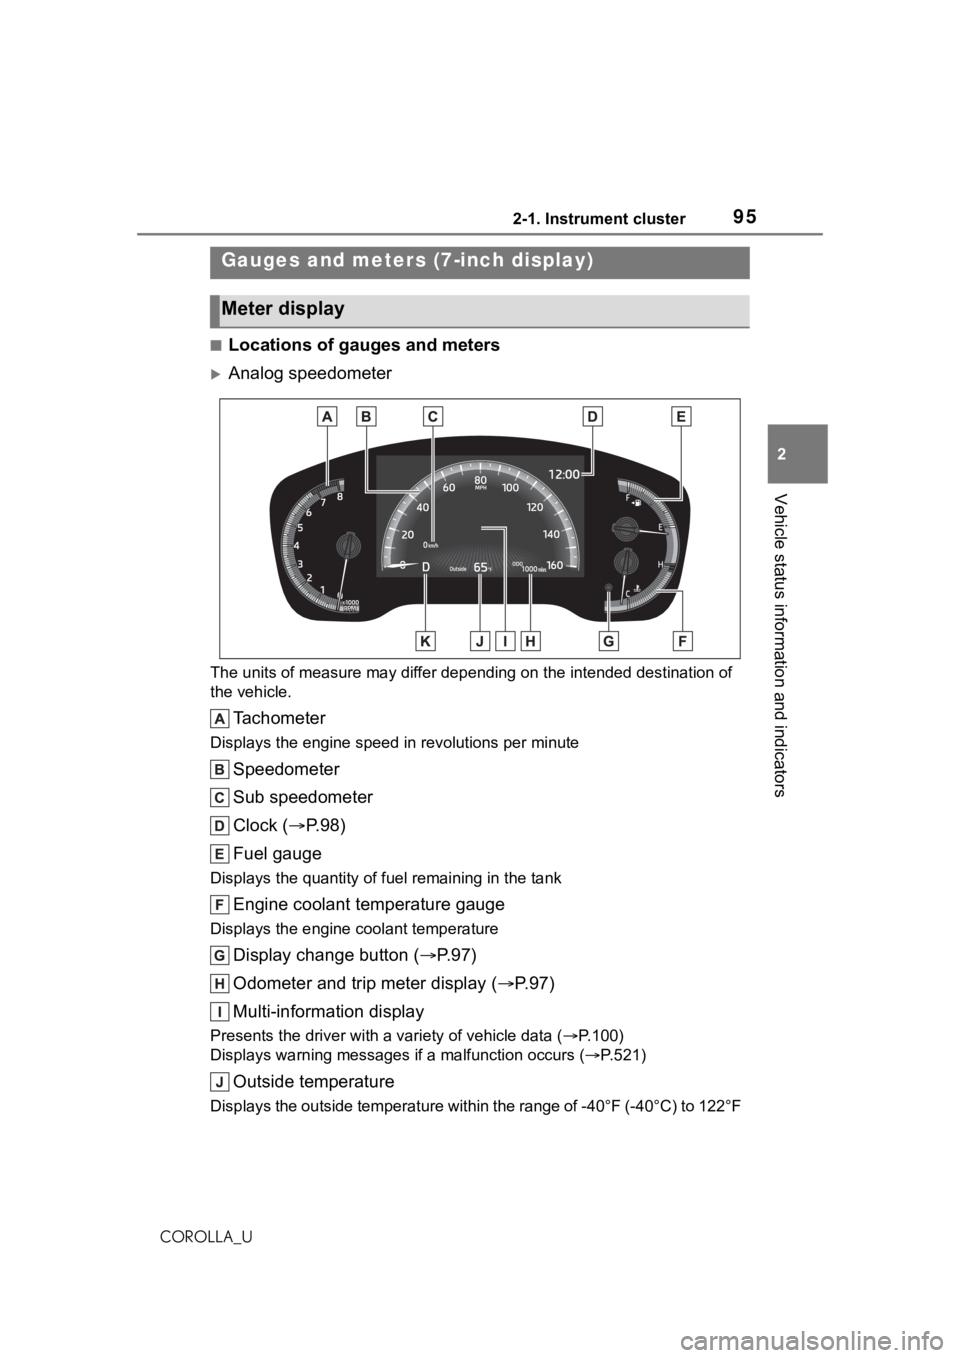
■Locations of gauges and meters
Analog speedometer
The units of measure may differ depending on the intended destination of
the vehicle.
Tachometer
Displays the engine speed in revolutions per minute
Speedometer
Sub speedometer
Clock ( P. 9 8 )
Fuel gauge
Displays the quantity of fu el remaining in the tank
Engine coolant temperature gauge
Displays the engine coolant temperature
Display change button ( P.97)
Odometer and trip meter display ( P.97)
Multi-information display
Presents the driver with a variety of vehicle data (P.100)
Displays warning messages if a malfunction occurs (P.521)
Outside temperature
Displays the outside temperature within the range of -40°F (-40 °C) to 122°F
Gauges and meters (7-inch display)
Meter display
Page 96 of 624
962-1. Instrument cluster
COROLLA_U(50°C)
Shift position indicator (
P.169)
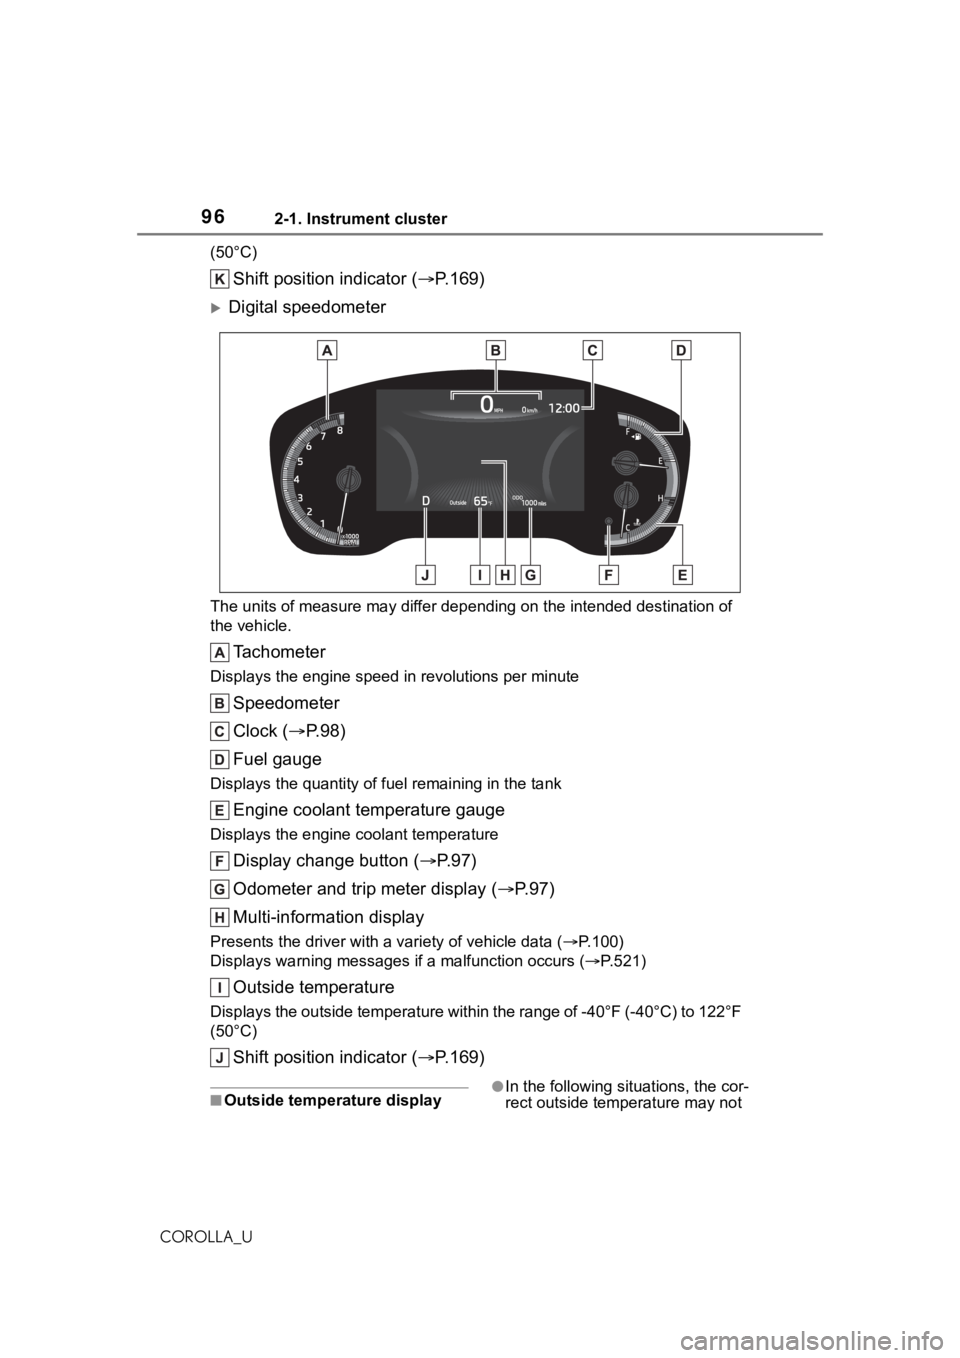
Digital speedometer
The units of measure may differ depending on the intended desti nation of
the vehicle.
Tachometer
Displays the engine speed in revolutions per minute
Speedometer
Clock ( P. 9 8 )
Fuel gauge
Displays the quantity of fu el remaining in the tank
Engine coolant temperature gauge
Displays the engine coolant temperature
Display change button ( P.97)
Odometer and trip meter display ( P.97)
Multi-information display
Presents the driver with a variety of vehicle data (P.100)
Displays warning messages if a malfunction occurs (P.521)
Outside temperature
Displays the outside temperature within the range of -40°F (-40 °C) to 122°F
(50°C)
Shift position indicator ( P.169)
■Outside temperature display●In the following situations, the cor-
rect outside temperature may not
Page 98 of 624
982-1. Instrument cluster
COROLLA_Udifferent distances independently.
To reset, display the desired trip
meter and press and hold the dis-
play change button.
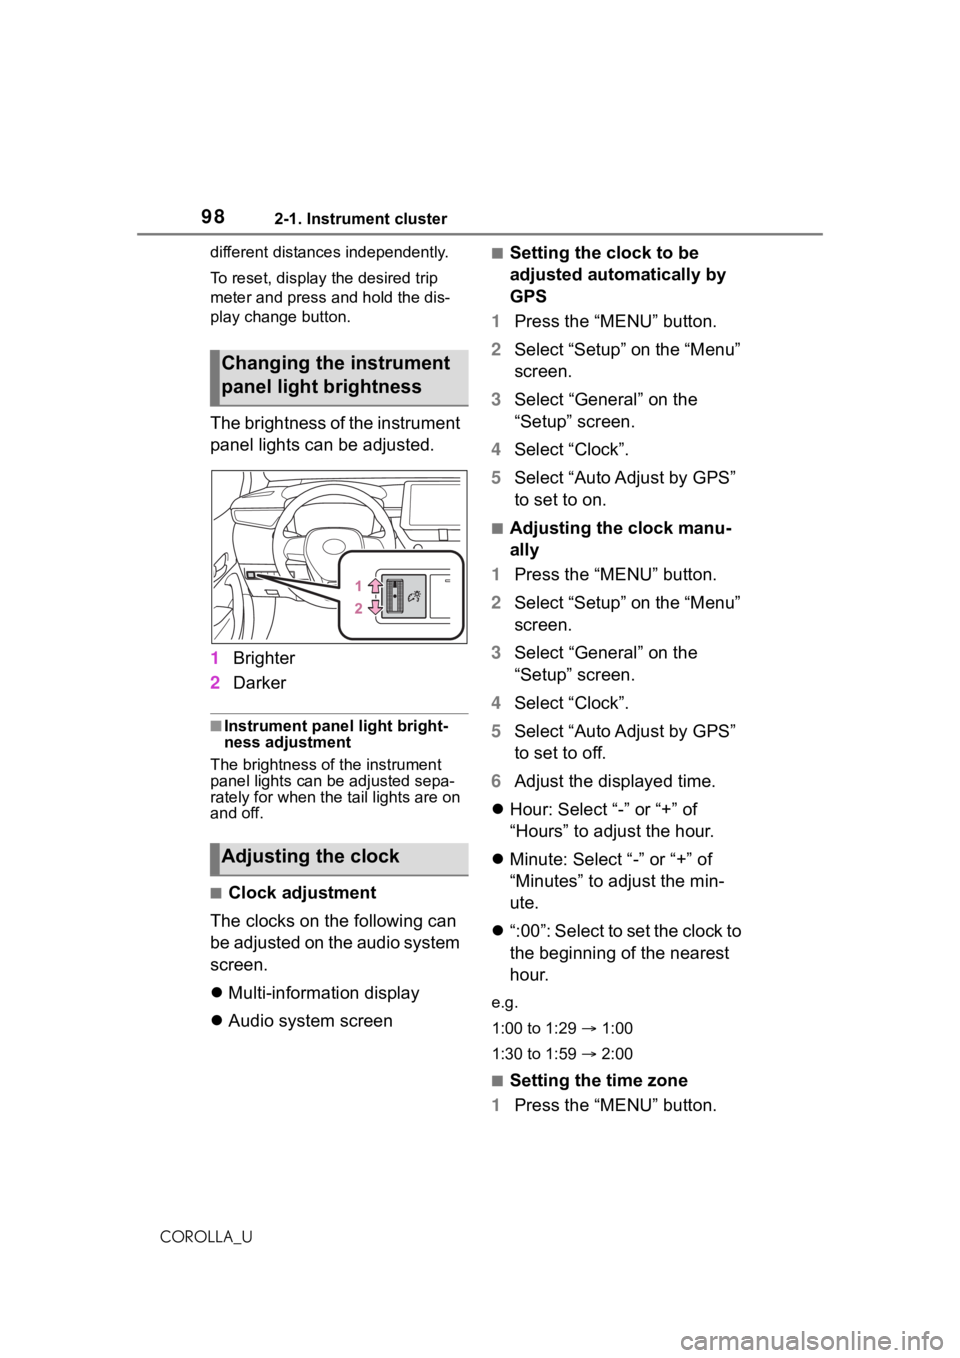
The brightness of the instrument
panel lights can be adjusted.
1
Brighter
2 Darker
■Instrument panel light bright-
ness adjustment
The brightness of the instrument
panel lights can be adjusted sepa-
rately for when the tail lights are on
and off.
■Clock adjustment
The clocks on the following can
be adjusted on the audio system
screen.
Multi-information display
Audio system screen
■Setting the clock to be
adjusted automatically by
GPS
1 Press the “MENU” button.
2 Select “Setup” on the “Menu”
screen.
3 Select “General” on the
“Setup” screen.
4 Select “Clock”.
5 Select “Auto Adjust by GPS”
to set to on.
■Adjusting the clock manu-
ally
1 Press the “MENU” button.
2 Select “Setup” on the “Menu”
screen.
3 Select “General” on the
“Setup” screen.
4 Select “Clock”.
5 Select “Auto Adjust by GPS”
to set to off.
6 Adjust the displayed time.
Hour: Select “-” or “+” of
“Hours” to adjust the hour.
Minute: Select “-” or “+” of
“Minutes” to adjust the min-
ute.
“:00”: Select to set the clock to
the beginning of the nearest
hour.
e.g.
1:00 to 1:29 1:00
1:30 to 1:59 2:00
■Setting the time zone
1 Press the “MENU” button.
Changing the instrument
panel light brightness
Adjusting the clock
Page 99 of 624
992-1. Instrument cluster
2
Vehicle status information and indicators
COROLLA_U
2Select “Setup” on the “Menu”
screen.
3 Select “General” on the
“Setup” screen.
4 Select “Clock”.
5 Select “Time Zone”.
Select the desired time zone.
Premium Audio only:
If “Auto” is selected, the time zone
is selected automatically by current
vehicle position.
■Setting daylight saving time
1 Press the “MENU” button.
2 Select “Setup” on the “Menu”
screen.
3 Select “General” on the
“Setup” screen.
4 Select “Clock”.
5 Select “Daylight Saving
Time” then on/off/auto
*.
*: Premium Audio only
■Changing the clock
between 12-hour/24-hour
format
1 Press the “MENU” button.
2 Select “Setup” on the “Menu”
screen.
3 Select “General” on the
“Setup” screen.
4 Select “Clock”.
5 Select “24-Hour Time For-
mat” and then on/off.
When set to off, the clock is dis-
played in 12 hour time format.
■Clock settings screen
If “Clock : 00” is displayed when
is selected on the multi-information
display, the system may be malfunc-
tioning. Have the vehicle inspected
by your Toyota dealer.
Page 124 of 624
1243-2. Opening, closing and locking the doors
COROLLA_U
using one of the following meth-
ods, the trunk can be opened
without the electronic key:
Entry function
Wireless remote control
Door lock switches
Automatic door unlocking sys-
tem
Mechanical key
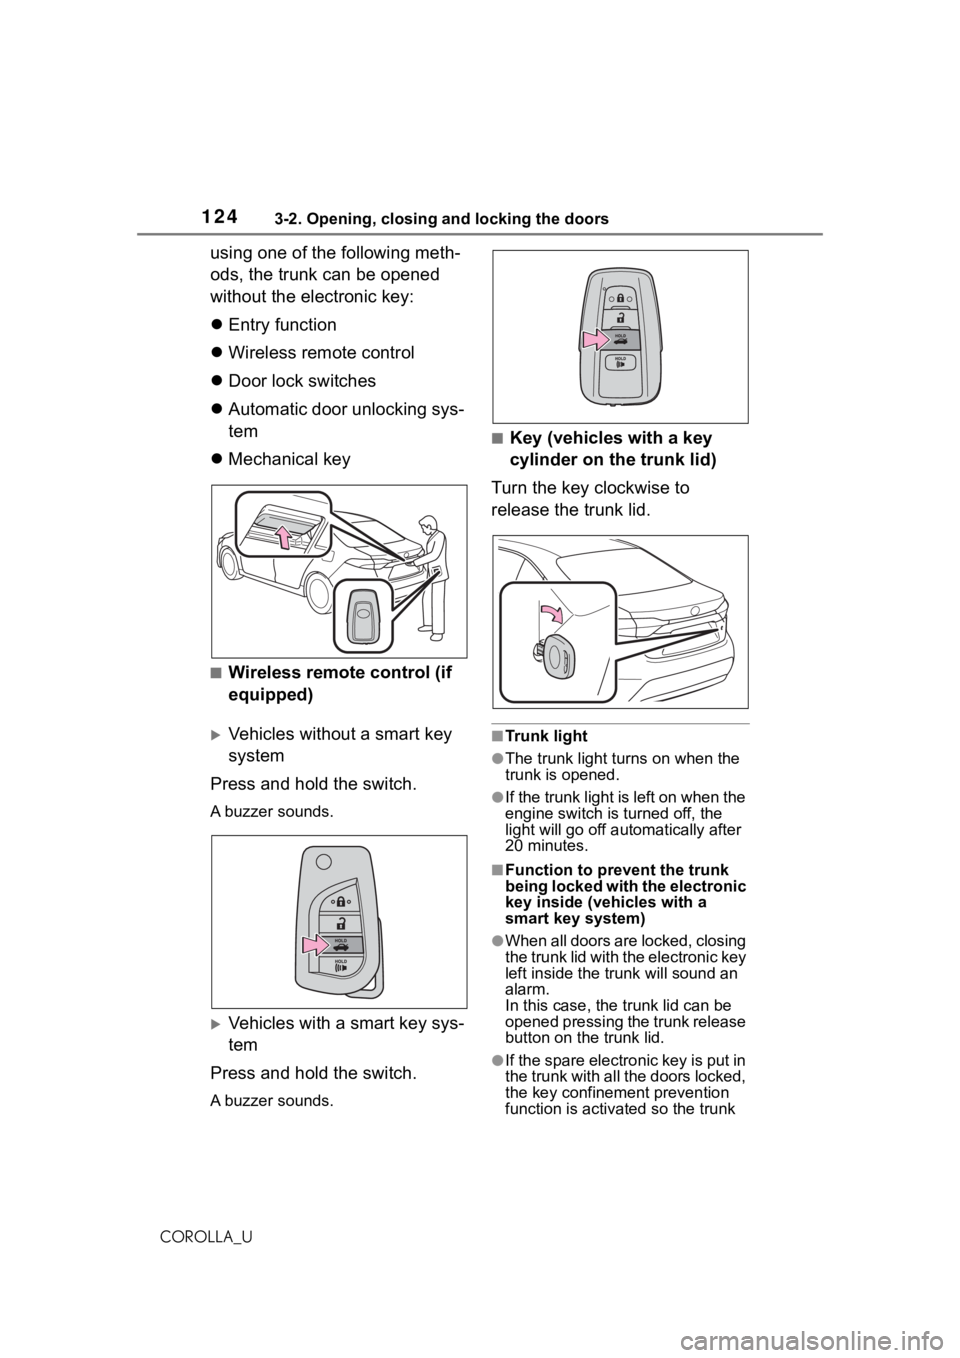
■Wireless remote control (if
equipped)
Vehicles without a smart key
system
Press and hold the switch.
A buzzer sounds.
Vehicles with a smart key sys-
tem
Press and hold the switch.
A buzzer sounds.
■Key (vehicles with a key
cylinder on the trunk lid)
Turn the key clockwise to
release the trunk lid.
■Trunk light
●The trunk light turns on when the
trunk is opened.
●If the trunk light is left on when the
engine switch is turned off, the
light will go off automatically after
20 minutes.
■Function to prevent the trunk
being locked with the electronic
key inside (vehicles with a
smart key system)
●When all doors are locked, closing
the trunk lid with the electronic key
left inside the trunk will sound an
alarm.
In this case, the trunk lid can be
opened pressing the trunk release
button on the trunk lid.
●If the spare electronic key is put in
the trunk with all the doors locked,
the key confinement prevention
function is activated so the trunk
Page 285 of 624
2855-1. Basic function
5
Audio
COROLLA_U
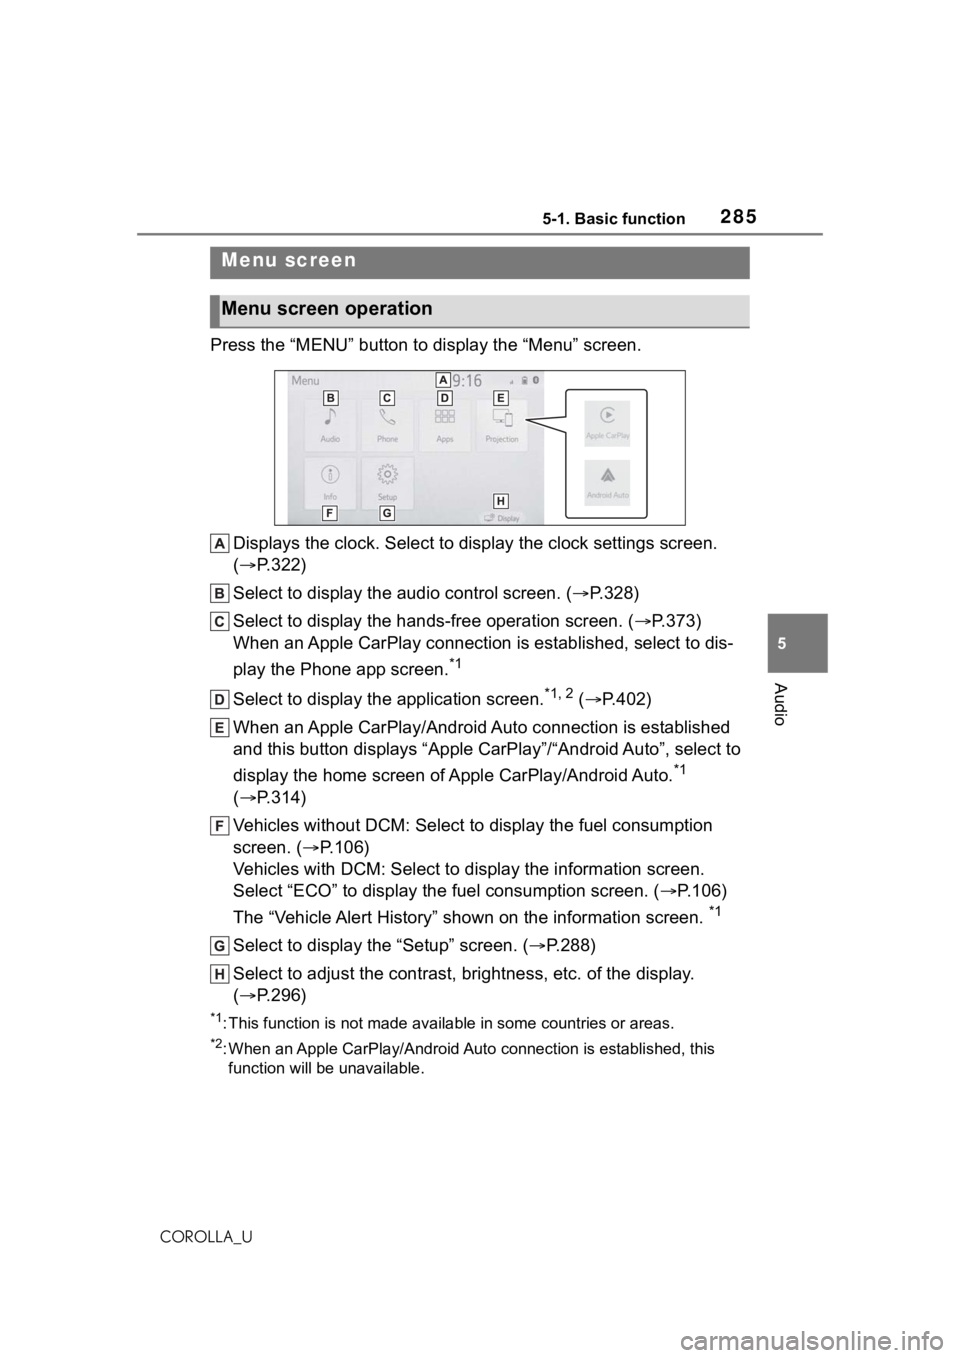
Press the “MENU” button to display the “Menu” screen.
Displays the clock. Select to display the clock settings screen.
( P.322)
Select to display the audio control screen. ( P.328)
Select to display the hands-free operation screen. ( P.373)
When an Apple CarPlay connection is established, select to dis-
play the Phone app screen.
*1
Select to display the application screen.*1, 2 ( P.402)
When an Apple CarPlay/Android Auto connection is established
and this button displays “Apple CarPlay”/“Android Auto”, select to
display the home screen of Apple CarPlay/Android Auto.
*1
( P.314)
Vehicles without DCM: Select to d isplay the fuel consumption
screen. ( P.106)
Vehicles with DCM: Select to display the information screen.
Select “ECO” to display the fuel consumption screen. ( P.106)
The “Vehicle Alert History” shown on the information screen.
*1
Select to display the “Setup” screen. ( P.288)
Select to adjust the contrast, brightness, etc. of the display.
( P.296)
*1: This function is not made available in some countries or areas .
*2: When an Apple CarPlay/Android Auto connection is established, this
function will be unavailable.
Menu screen
Menu screen operation
Page 292 of 624
2925-2. Basic information before operation
COROLLA_U
ACC or ON, or restart the sys-
tem by press and hold the
“POWER VOLUME” knob for
3 seconds or more.
Capacitive touch screen button sen-
sor sensitivity can be adjusted.
( P.321)
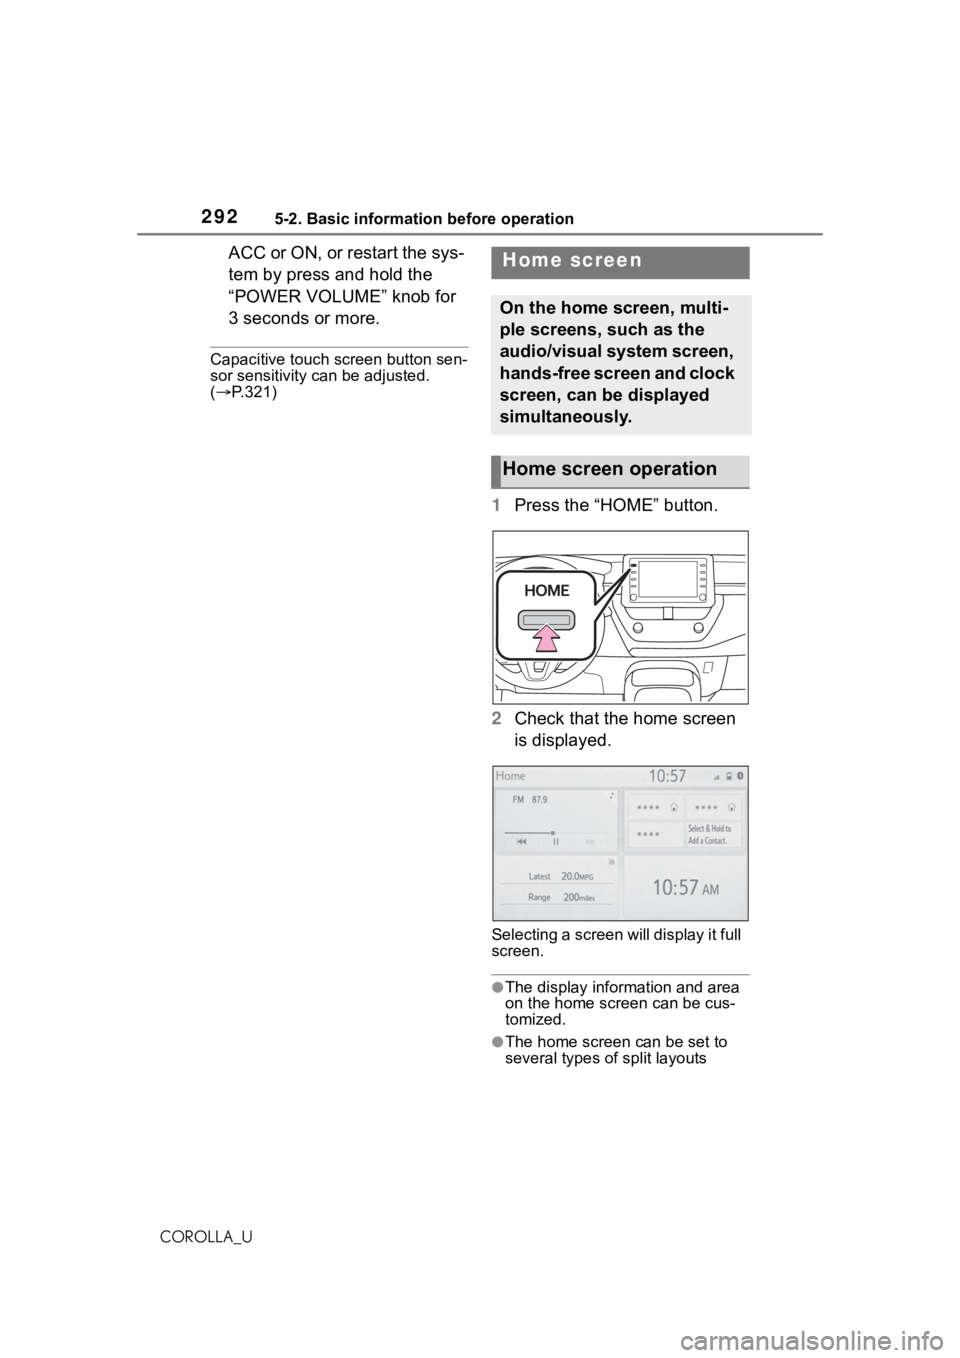
1 Press the “HOME” button.
2 Check that the home screen
is displayed.
Selecting a screen will display it full
screen.
●The display information and area
on the home screen can be cus-
tomized.
●The home screen can be set to
several types of split layouts
Home screen
On the home screen, multi-
ple screens, such as the
audio/visual system screen,
hands-free screen and clock
screen, can be displayed
simultaneously.
Home screen operation