navigation TOYOTA COROLLA iM 2018 Accessories, Audio & Navigation (in English)
[x] Cancel search | Manufacturer: TOYOTA, Model Year: 2018, Model line: COROLLA iM, Model: TOYOTA COROLLA iM 2018Pages: 164, PDF Size: 8.51 MB
Page 2 of 164
Introduction
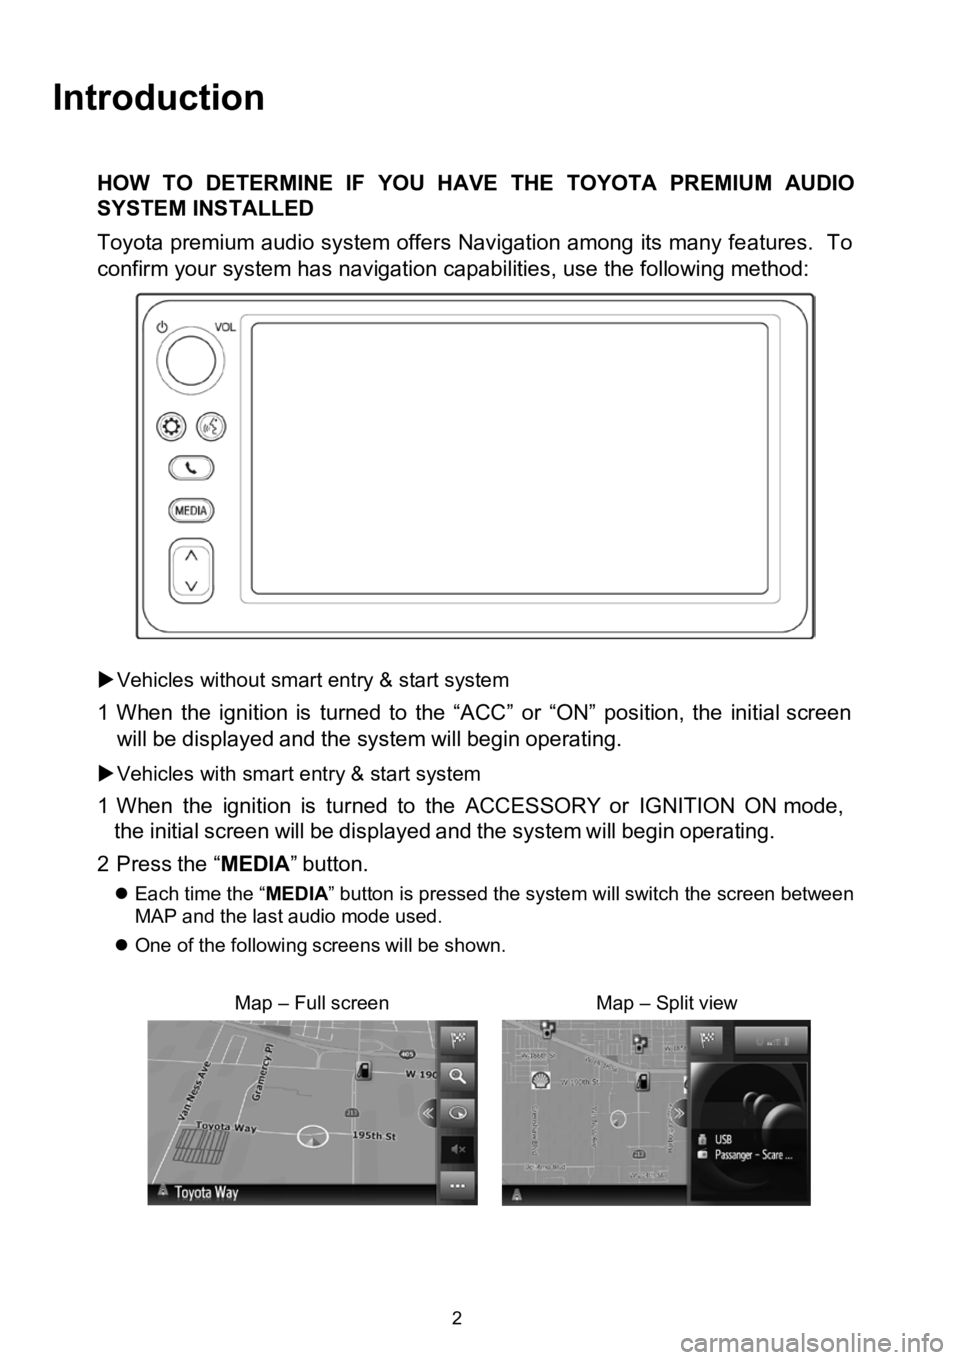
HOW TODETERMINE IF YOU HAVE THE TOYOTA PREMIUM AUDIO
SYSTEM INSTALLED
Toyota premium audio system offers Navigation among its many features. To
confirm your system has navigation capabilities, use the following method:
Vehicles without smart entry &start system
1 When the ignition is turned to the “ACC”or“ON” position, the initial screen
will bedisp layed and the systemwillbegin operating.
Vehicles with smart entry & startsystem
1 Wh en the ignition isturned to the ACCESSORY orIGNITI ONON mode,
the initial screen willbe displayed and the systemwillbegin
operating.
2 Press the“MEDIA ”button.
Each time the “ MEDIA” button is pressed the system will switch the screen between
MAP and the last audio mode used.
One of the followi ng scre enswillbe shown.
Map–Full screenMap –Split view
2
Page 4 of 164

PREMIUM AUDIO SYST EM OWN ER’S MANUAL
This manual explains the operation of the Premium Audio system. Please read
this manual carefully to ensure proper use.
The screen shots in this document and the actual screens of the Premium Audio
system may differ depending on whether the functions and/or a contract existed
and the map data available at the time of producing this document.
Please be aware that the content of th is manual may be different from the
navigation /multimedia system in some cases, such as wh en the sy stem’s
software is up dated.
N AVIG ATION SYSTEM
The Navigation System is o ne of the most technologically advanced vehi cle
ac ces sories ever develo ped. The system receives satellite sig nals from the
Global Positioning System (GPS) operated by the U.S. Department of Defense.
Using these signals and other vehicle sensors, the system indicates your
present position and assists in locating a desired destination.
The navigation system is designed to select efficient routes from your present
sta rting location to your destination. The system is also designed to direct you
to a destination that is unfamiliar to you in an efficient manne r. The system is
devel oped by “Harman International” us ing “HERE” maps. The calculated
routes may not be the sho rtest nor the least traffic congested. Your own
personal local knowledge or “short cut” may at times be faster than the
calculated routes.
The navigation system’s database i nc
ludes Point of Interest (POI) categories to
allow you to easily select destinations such as restaurants, hotels and others . If
a destination is not in the database, you can enter the street address or a
major intersection c lose to it and the sys tem will guide you there.
The system will provide both a visual map and audio instructions. The audio
in structions will announce the distance remaining and the direction to turn in
approaching an
intersection. These voice instructions will help you keep your
eyes on the road and are tim ed to provide enough time to allow you to
maneuver, ch ange lanes or slow down.
Please be aware th at all current vehicle navigation systems have certain
limit atio ns that may affect their ability to perform properly. The accuracy of the
vehi cle’s pos ition depends on the satellite condition, road co nfiguration,
vehicle condi tion or other circumstances. F or more information on the
limitations of the system, refer to page 156.
4
Page 9 of 164
1. QUICK GUIDE
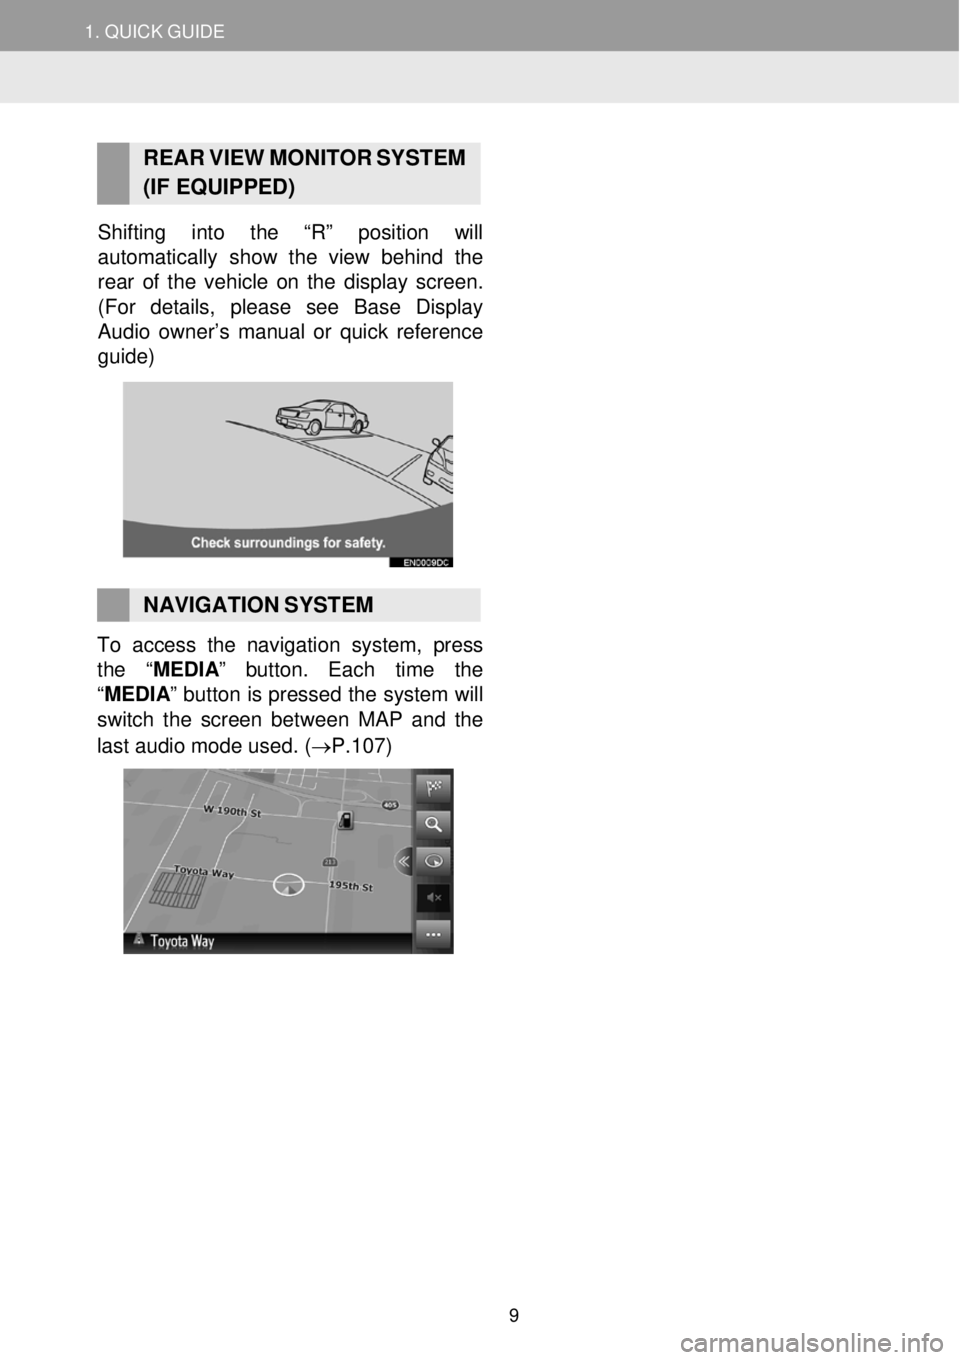
REAR V IEW MONI TOR SYST EM
(IF EQUIPPED)
Shifting into the “R” position will
automatically show the view behind the
rea r of the vehicle on the display screen.
(For details , please see Base Di splay
Audio owner’s manual or quick reference
guide)
NAVIGATION SYSTEM To access the navigation system, press
the “MEDIA ” button. Each time the
“MEDIA ” button is pressed the system will
switch the screen betw een MAP a nd the
last audio mo de used . (→P.1 07)
9
Page 73 of 164
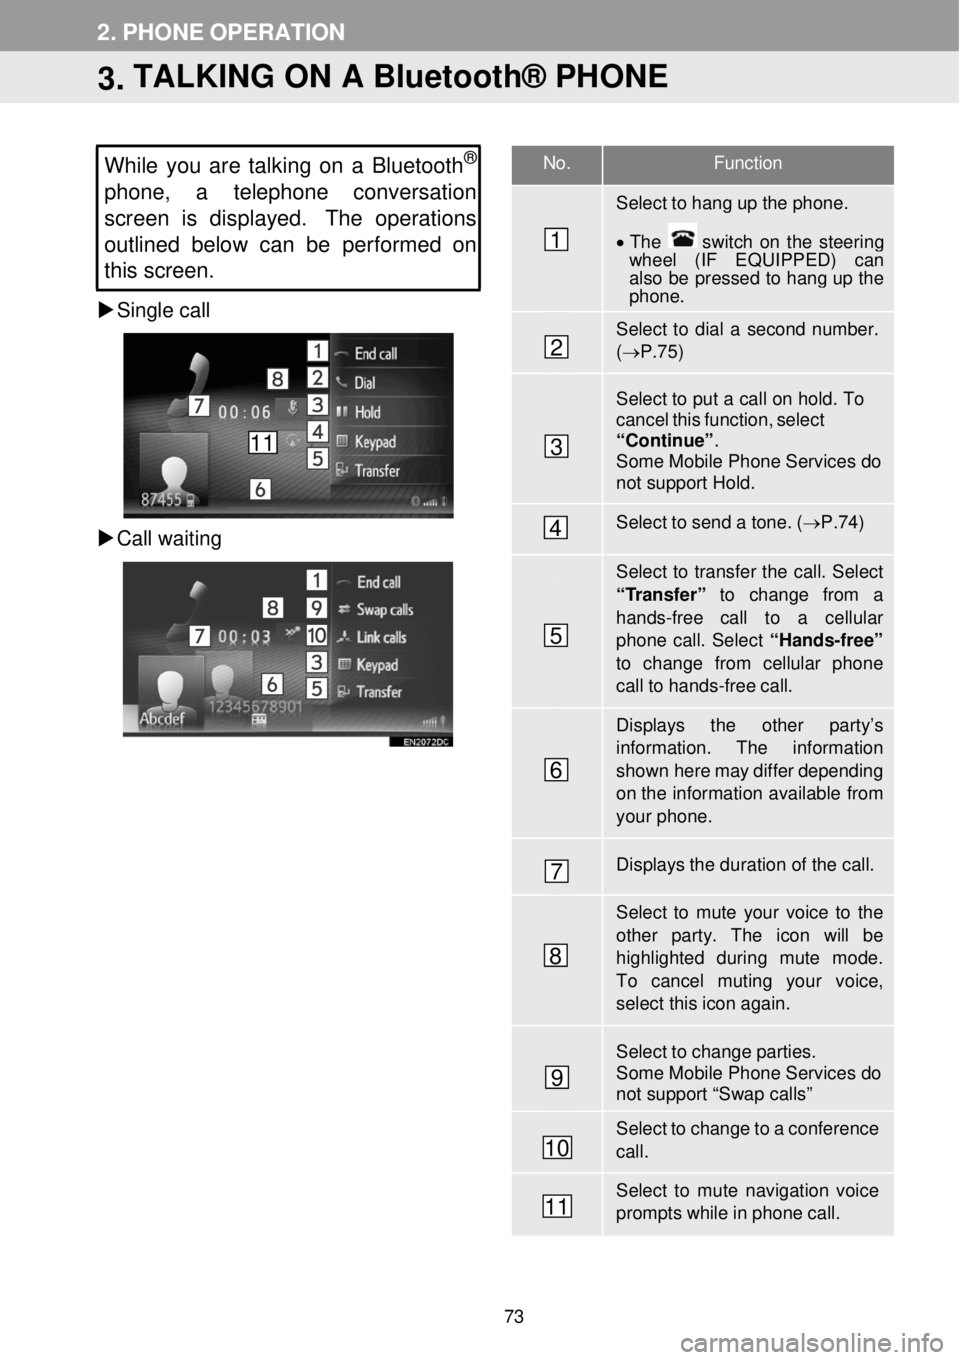
No. Function
Select to hang up the phone.
• The switch on the stee rin g wh eel (IF EQUIPPED) can also be pressed to hang up the phone.
Select to dial a second number. (→ P.75)
Select to put a ca ll on hold. To cancel this function, select “Continue” . Some Mobile Phone Services do not support Hold.
Select to send a tone. ( →P.74)
Select to transfer the call. Select
“Transfer” to change from a hands-free call to a cellular phone call. Select “Hands-free” to change from cellular phone call to hands-free ca ll.
Displays the other par ty’s information. The information
shown here may differ depending on th e infor mation available from your phone.
Displays the duration of the call.
Select to mute your voice to th e other par ty. The icon wi ll be highlighted d uring mute mode. To cancel muting your voice,
select this icon again.
Select to change parties. Some Mobile Phone Services do not support “Swap calls”
Select to change to a conference call.
Select to mute navigation voice prompts while in phone call.
2. PHONE OPERATION
3. TALKING ON A Bluetooth® PHONE
While you are talking on a Bluetooth®
phone, a telephon e conversation
s creen is displayed. The operations
outlined below can be performed on
this screen.
Single call
Ca ll waiting
1
2
3
4
5
6
7
8
9
10
11
11
73
Page 89 of 164
1.SETUPOPERATION
1.QUICKREFERENCE
1.SETUPOPERATION
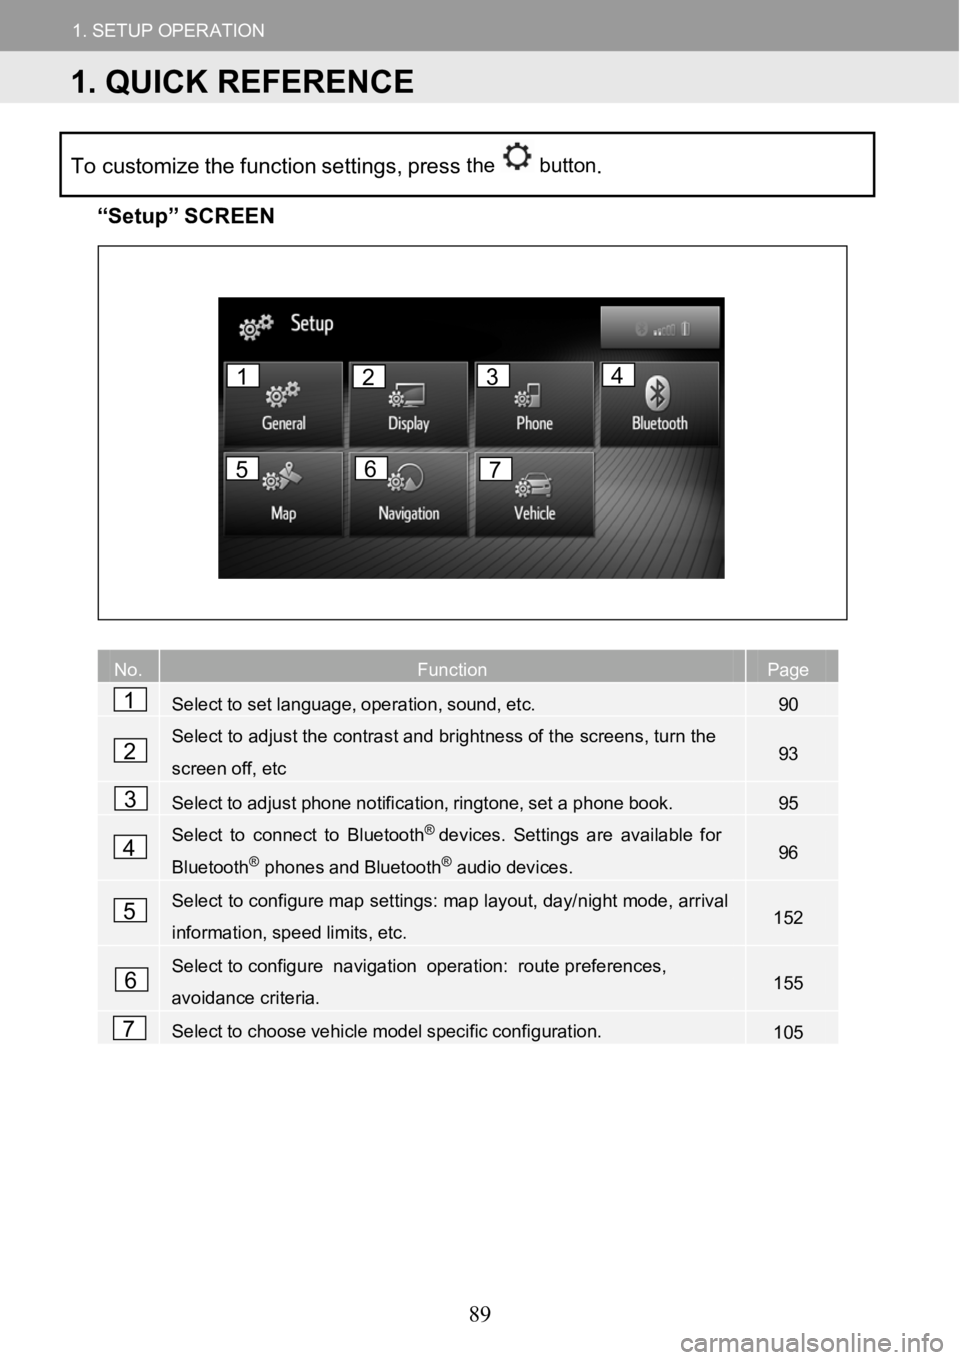
Tocustomize the function settings, pressthe button.
“Se tup” SCREEN
No.FunctionPage
Selecttosetlanguage,operation,sound,etc.90
Select to adjust the contrast and brightness of the screens, turn the
screen off,etc93
Selecttoadjustphonenotification,ringtone,setaphonebook.95
Select to connect to Bluetooth®devices. Settingsareavailable for
Bluetooth®phonesandBluetooth®audiodevices.96
Select to configure map settings: map layout, day/night mode, arrival
information,speedlimits,etc.152
Select to configu renavigation operation: route preferen ces,
avoidance criteria.155
Selecttochoosevehiclemodelspecificconfiguration.105
No. Fu
1
2
3
4
5
6
7
1234
567
1. QUICK REFERENCE
89
Page 91 of 164
1. SETUP OPERATION 1. SETUP OPERATION
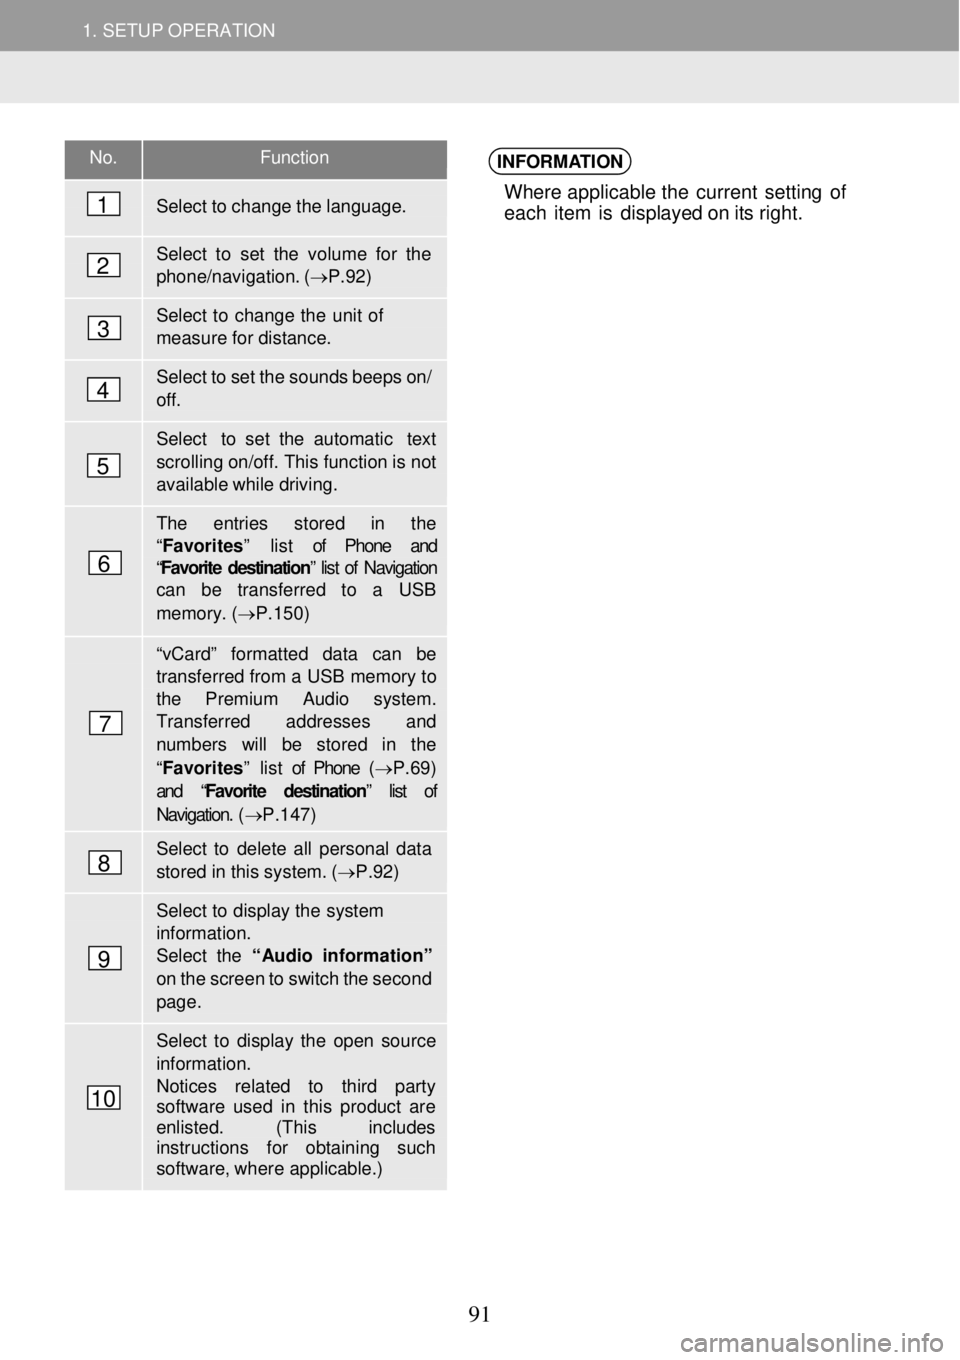
No. Functi on
Select to change the language.
Select to set the volu me for the phone/navigation. ( →P.92)
Select to change the unit of meas ure for distance.
Select to set the sounds beeps on/ off.
Select to set the automatic text
scrolling on/off. This function is not available while driving.
The entries s tored in the “ Favorites ” list of Phone and “Favorite destination” list of Navigation can be transferred to a USB
memory. (→P.150 )
“vCard” for matted data can be transferred from a USB memory to the Premium Audio syste m. Transfer red a ddresses and numbers will be stor ed in the
“Favorites ” list of Phone (→ P.69) and “ Favorite destination” list of
Navigation. ( →P.147)
Select to delete all personal data
stored in this system. ( →P.92)
Select to display the system
information. Select the “Audio in formati on”
on the screen to switch the second page.
Select to display the open source
information. Notices related to third party software used in this pr oduct are enlisted. ( This includes instr uctions for obtaining such softwa re, wher e applicable.)
INFORMATION
Where applicable t he curren t setting of
each item is d isplay ed o n its ri ght.
1
2
3
4
5
6
7
8
9
10
91
Page 92 of 164
1.SETUPOPERATION1.SETUPOPERATION
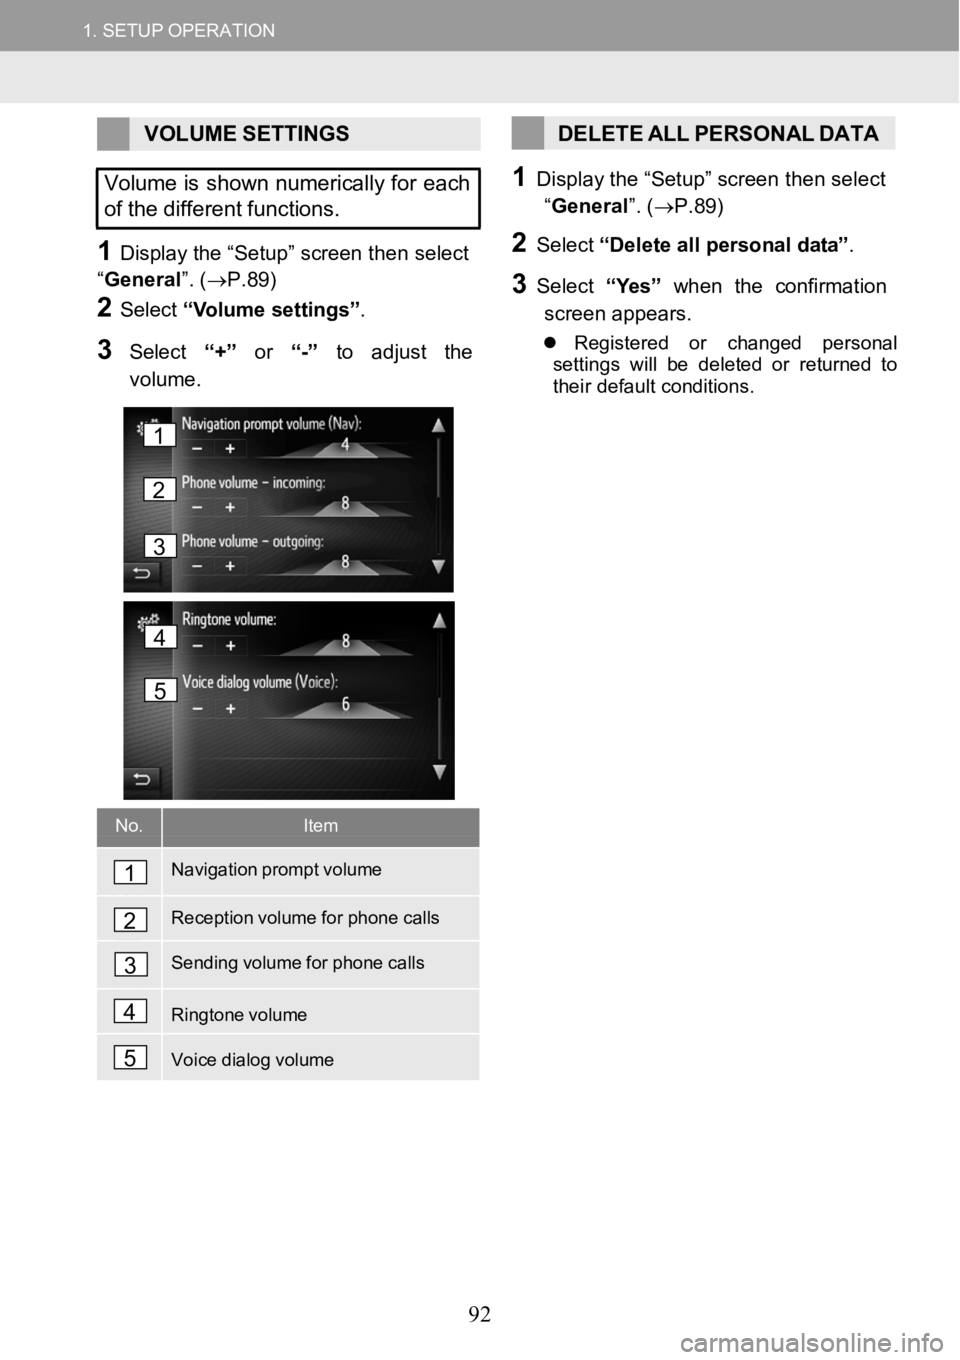
VOLUMESETTINGS
Volumeisshown numerically for each
of the different functions.
1Disp lay the “Setup ” screen then select
“ General ”. (→ P.89)
2Select “Volume settings ”.
3Select “+”or“-” toadjust the
volume.
DELETE ALL PERSONAL DATA
1Display the “Setup ” screen then select
“ General ”. (→ P.89)
2Select “Delete all perso nalda ta”.
3Select “Yes” when the confirmation
scree n appe ars.
Regist ered or ch angedpersonal
s et tings wi llbe deleted or returned to
th eir def ault conditi ons.
No.Item
Navigation prompt volume
Reception volume for phone calls
Sending volume for phonecalls
Ringtone volume
Voice dialog volume
1
2
3
4
5
4
5
1
2
3
92
Page 106 of 164
1.SETUP OPERATION
6
NAVIGATION
SYSTEM
1
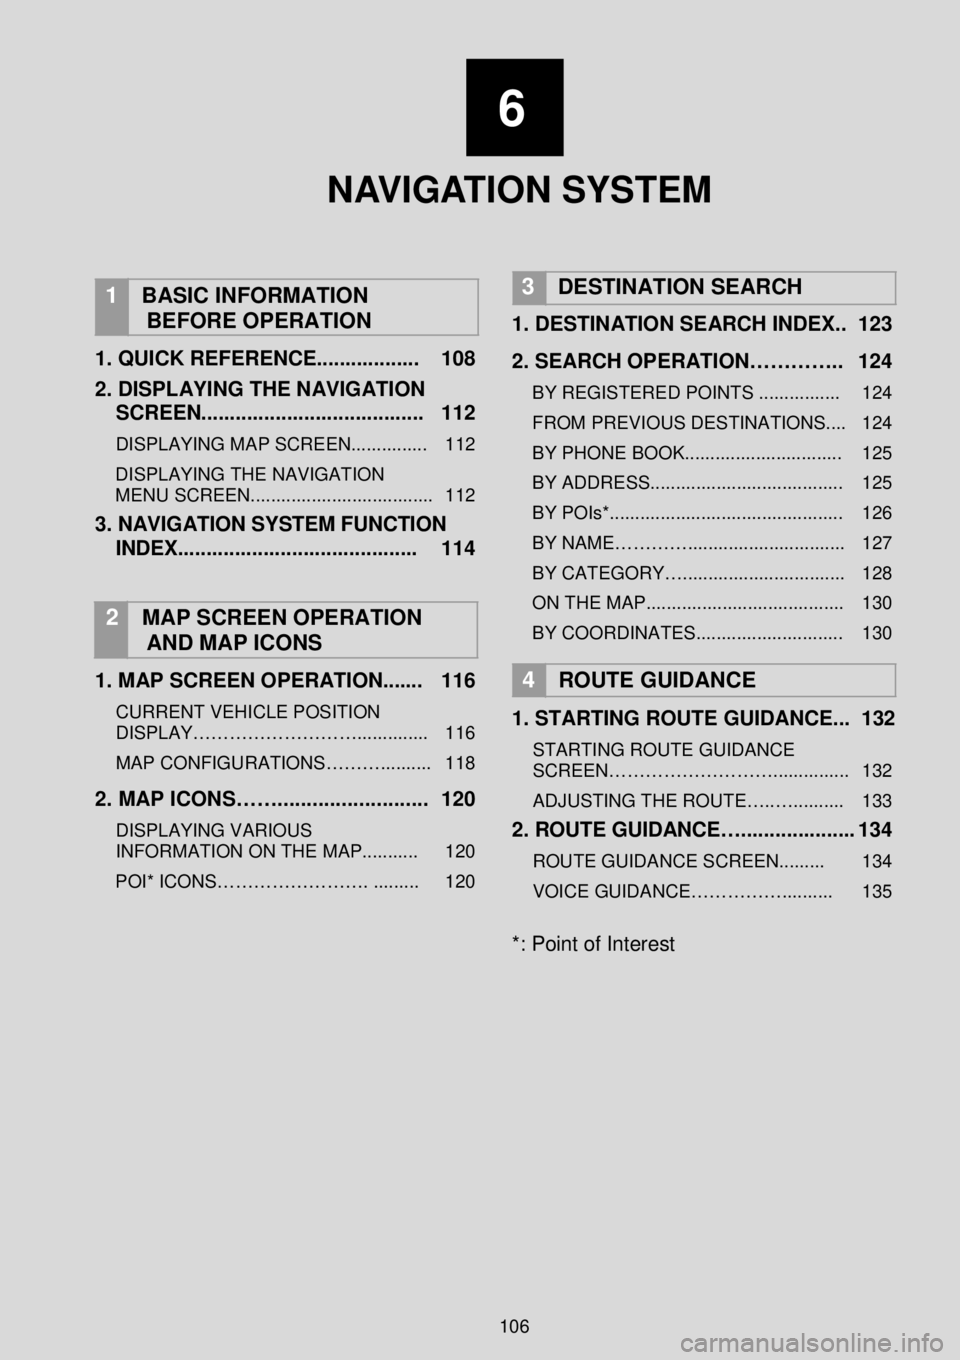
BASIC INFORMATION
BEFORE OPERATION
1. QUICK REFERENCE ...... ............ 108
2. DISPLAYING THE NA VIGATION
SCREEN.. ....... .............................. 112
DISPLAYING MAP SCREEN ............... 112
DISPLAYING THE NAVIGATION
MENU SCREEN.................................... 112
3. NAVIGATION SYSTEM FUNCTION
INDEX ...... .................................... 114
2 MAP SCREEN OPERATION
AND MAP ICONS
1 . MAP SCREEN OPERATION ...... . 116
CURRENT VEHICLE POSITION
DISPLAY……………………….............. 116
MAP CONFIGURATIONS……….......... 118
2. MAP ICONS……. ......................... 120
DISPLAYING VARIOUS
INFORMATION ON THE MAP........... 120
POI* ICONS……………………. ......... 120
3 DESTINATION SEARCH
1. DESTINATION SEARCH INDEX. . 123
2. SEARCH OPERATION………….. 124
BY REGISTERED POINTS ................ 124
FROM PREVIOUS DESTINATIONS.... 124
BY PHONE BOOK ............................... 125
BY ADDRESS...................................... 125
BY POIs*.............................................. 126
BY NAME…………............................... 127
BY CATEGORY…................................ 128
ON THE MAP....................................... 130
BY COORDINATES............................. 130
4
ROUTE GUIDANCE
1. STARTING ROUTE GUIDANCE ... 132
STARTING ROUTE GUIDANCE
SCREEN………………………............... 132
ADJUSTING THE ROUTE…..….......... 133
2. ROUTE GUID ANCE….................... 134
ROUTE GUIDANCE SCREEN......... 134
VOICE GUIDANCE…………….......... 135
*: Point of Interest
106
Page 107 of 164
6
NAVIGATION SYSTEM
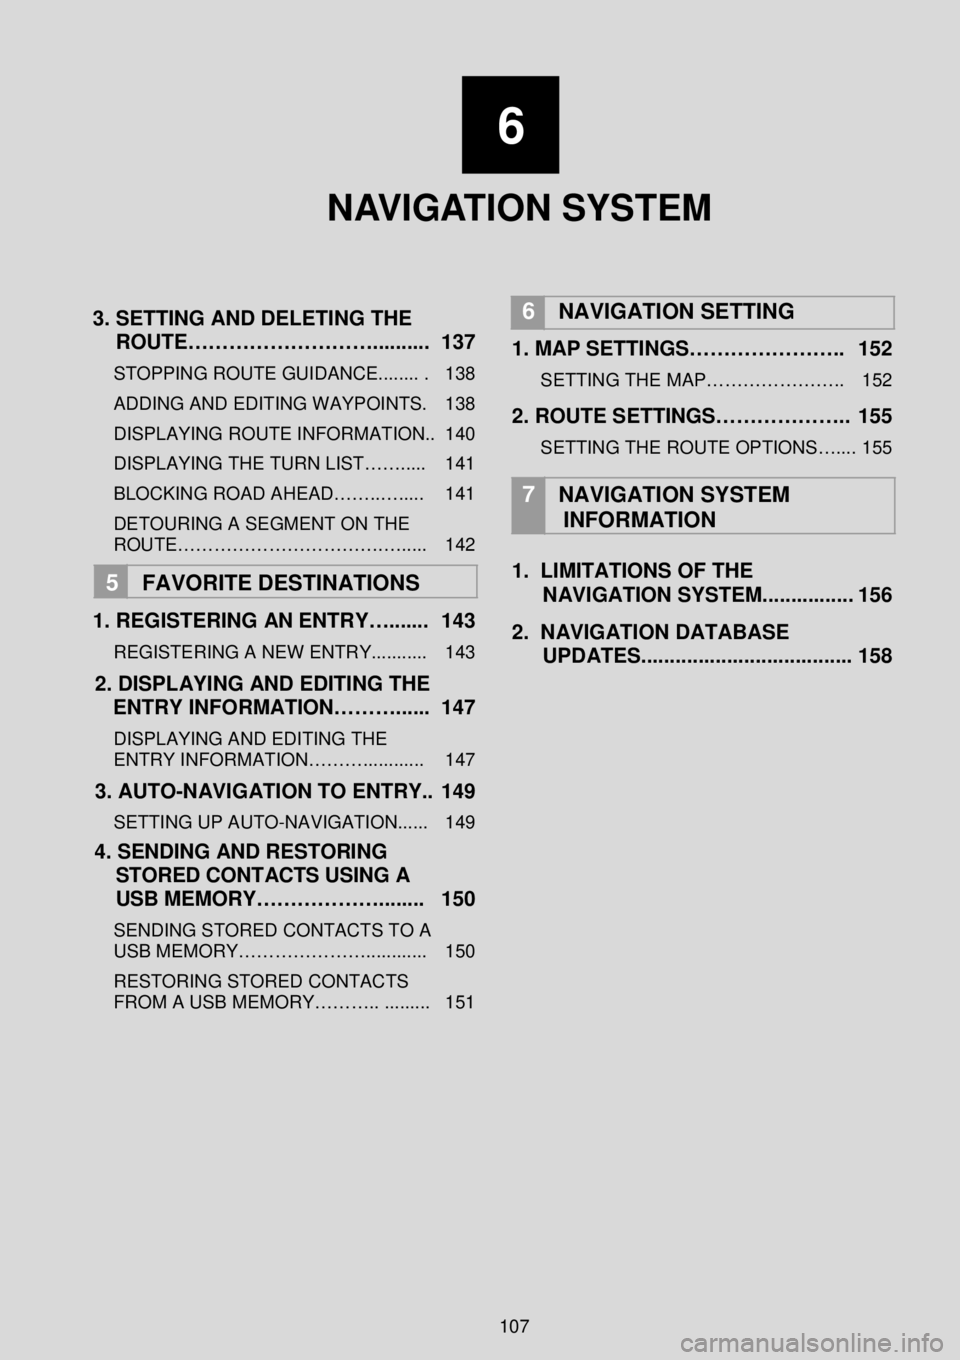
3 . SETTING AND DELETING THE
ROUTE……………………….... ...... 137
STOPPING ROUTE GUIDANCE........ . 138
ADDING AND EDITING WAY POINTS. 138
DISPLAYING ROUTE INFORMATION.. 140
DISPLAYING THE TURN LIST……..... 141
BLOCKING ROAD AHEAD……..…..... 141
DETOURING A SEGMENT O N THE
ROUTE…………………………….…..... 142
5 FAVORITE DESTINATION S
1 . REGISTERING AN ENTRY…....... 143
REGISTERING A NEW ENTRY........... 143
2. DISPLAYING AND EDITING THE
ENTRY INFORMATION………. ..... 1 47
DISPLAYING AND EDITING THE
ENTRY INFORMATION………............ 147
3. AUTO -NAVIGATION TO ENTRY.. 1 49
SETTING UP AUTO -NAVIGATION...... 149
4. SENDING AND RESTORING
STORED CONTACTS USING A
USB MEMORY……………….. ...... 150
SENDING STORED CONTACTS TO A
USB MEMORY…………………... ......... 150
RESTORING STORED CONTACTS
FROM A USB MEMORY……….. ......... 151
6
NAVIGATION SETTING
1. MAP SETTINGS………………….. 152
SETTING THE MAP………………….. 152
2. ROUTE SETTINGS……………….. 155
SETTING THE ROUTE OPTIONS….... 155
7
NAVIGATION SYSTEM
INFORMATION
1. LIMITATIONS OF THE
NAVIGATION SYSTEM. .... ........... 156
2. NAVIGATION DATABASE
UPDATES.. ................................... 158
107
Page 108 of 164
1. BASIC INFORMATION BEFORE OPERATION
1. QUICK REFERENCE
1. BASIC INFORMATION BEFORE OPERATION
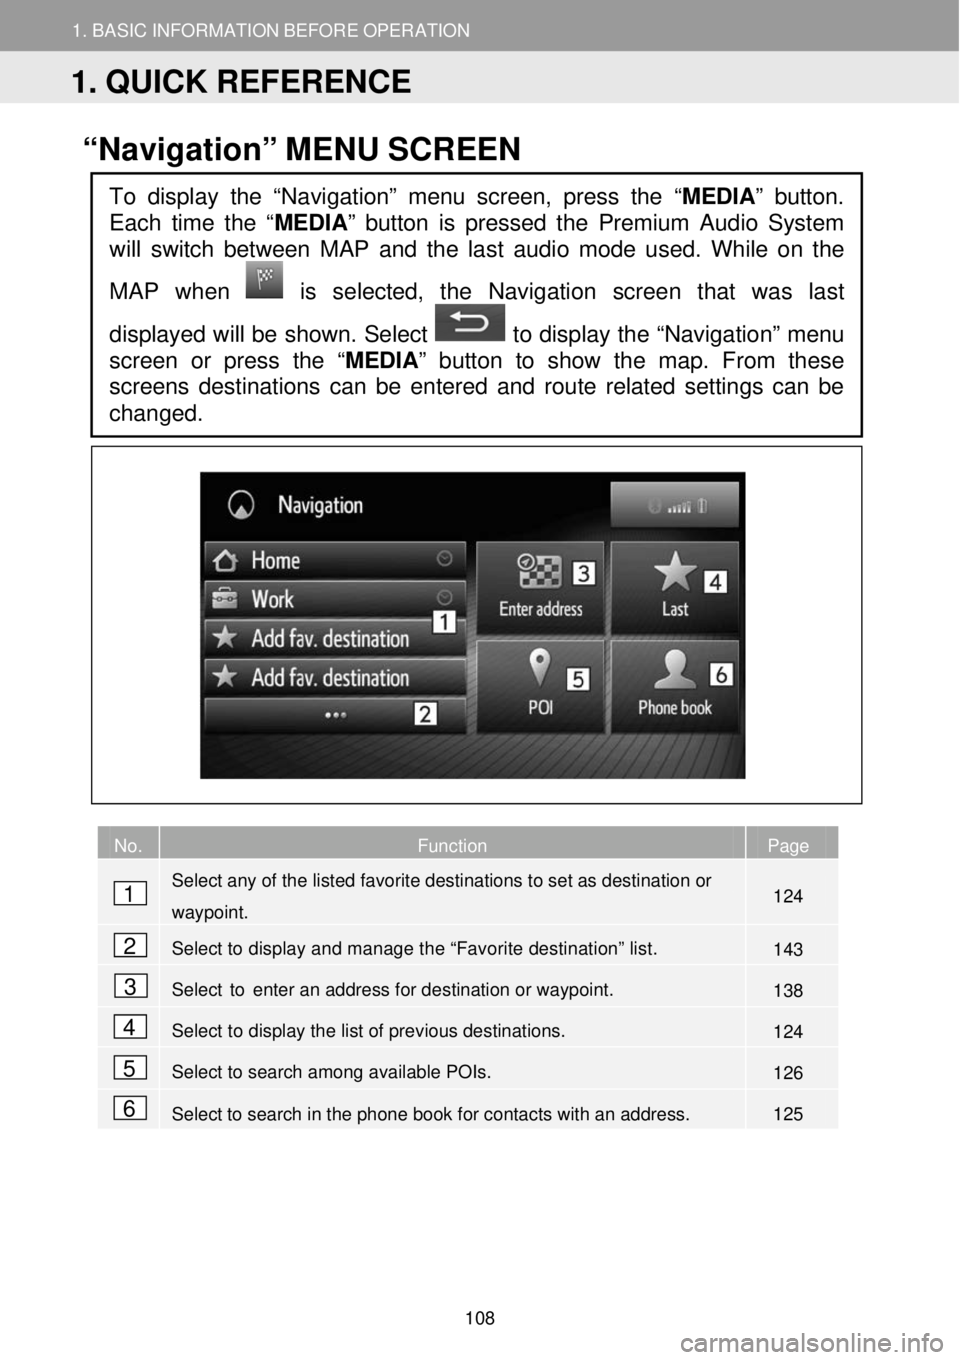
“Navigation” MENU SCREEN
No. Function Page
Select any of the listed favorite destinations to set as destination or
waypoint. 124
Select to display and manage the “Favorite destination” list. 143
Select to enter an address for destination or waypoint. 138
Select to display the list of previous destinations. 124
Select to search among available POIs. 126
Select to search in the phone book for contacts with an address. 125
To display the “Navigation” menu screen, press the “MEDIA” button.
Each time the “
MEDIA” button is pressed the Premium Audio System
will switch between MAP and the la st audio mode used. While on the
MAP when
is selected, the Navigation screen that was last
displayed will be shown. Select to display the “Navigation” menu
screen or press the “MEDIA ” button to show the map. From these
screens destinations can be entered and route related settings can be
changed.
1
2
3
4
5
6
1. QUICK REFERENCE
108