headlight bulb TOYOTA HILUX 2017 Owners Manual (in English)
[x] Cancel search | Manufacturer: TOYOTA, Model Year: 2017, Model line: HILUX, Model: TOYOTA HILUX 2017Pages: 720, PDF Size: 112.19 MB
Page 17 of 720
17Pictorial index
HILUX_OM_OM0K322E_(EE)
Windshield wipers . . . . . . . . . . . . . . . . . . . . . . . . . . . . . . . . . P. 302
Precautions against winter season . . . . . . . . . . . . . . . . . . . . . P. 402
To prevent freezing (windshield wiper de-icer)*1. . . . . . . . . . . P. 494
Fuel filler door*1 . . . . . . . . . . . . . . . . . . . . . . . . . . . . . . . . . . P. 304
Refueling method . . . . . . . . . . . . . . . . . . . . . . . . . . . . . . . . . . P. 304
Fuel type/fuel tank capacity . . . . . . . . . . . . . . . . . . . . . . . . . . . P. 670
Tires . . . . . . . . . . . . . . . . . . . . . . . . . . . . . . . . . . . . . . . . . . . . P. 566
Tire size/inflation pressure . . . . . . . . . . . . . . . . . . . . . . . . . . . . P. 689
Winter tires/tire chain . . . . . . . . . . . . . . . . . . . . . . . . . . . . . . . . P. 402
Checking/rotation. . . . . . . . . . . . . . . . . . . . . . . . . . . . . . . . . . . P. 567
Coping with flat tires . . . . . . . . . . . . . . . . . . . . . . . . . . . . . . . . P. 625
Hood . . . . . . . . . . . . . . . . . . . . . . . . . . . . . . . . . . . . . . . . . . . . P. 545
Opening . . . . . . . . . . . . . . . . . . . . . . . . . . . . . . . . . . . . . . . . . . P. 545
Engine oil . . . . . . . . . . . . . . . . . . . . . . . . . . . . . . . . . . . . . . . . . P. 671
Coping with overheat . . . . . . . . . . . . . . . . . . . . . . . . . . . . . . . . P. 654
Camera*1 . . . . . . . . . . . . . . . . . . . . . . . . . . . . . . . . . . . . . . . . P. 352
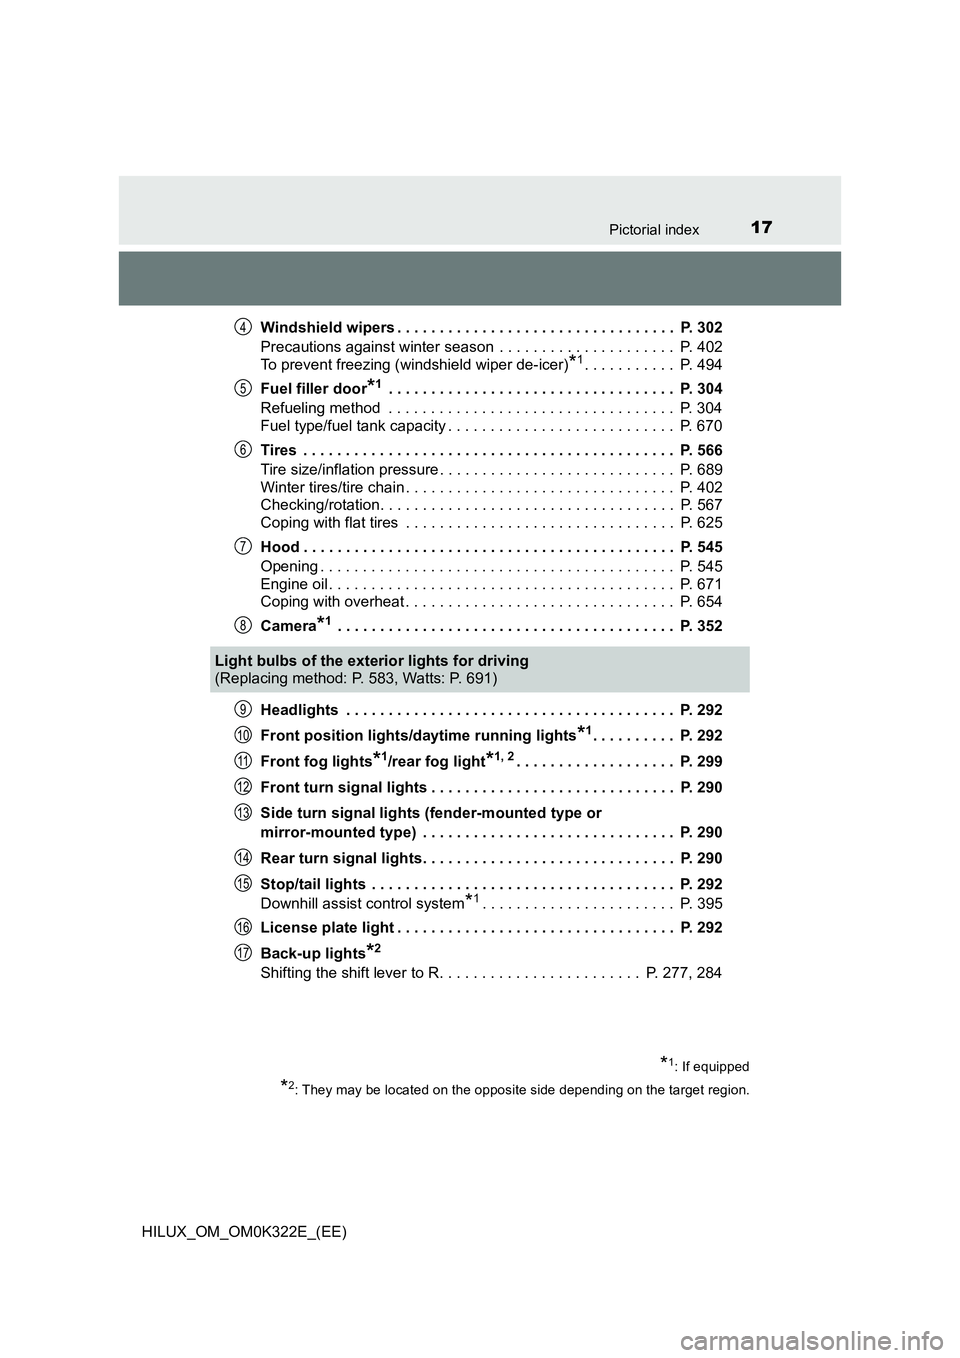
Headlights . . . . . . . . . . . . . . . . . . . . . . . . . . . . . . . . . . . . . . . P. 292
Front position lights/daytime running lights*1. . . . . . . . . . P. 292
Front fog lights*1/rear fog light*1, 2. . . . . . . . . . . . . . . . . . . P. 299
Front turn signal lights . . . . . . . . . . . . . . . . . . . . . . . . . . . . . P. 290
Side turn signal lights (fender-mounted type or
mirror-mounted type) . . . . . . . . . . . . . . . . . . . . . . . . . . . . . . P. 290
Rear turn signal lights. . . . . . . . . . . . . . . . . . . . . . . . . . . . . . P. 290
Stop/tail lights . . . . . . . . . . . . . . . . . . . . . . . . . . . . . . . . . . . . P. 292
Downhill assist control system*1. . . . . . . . . . . . . . . . . . . . . . . P. 395
License plate light . . . . . . . . . . . . . . . . . . . . . . . . . . . . . . . . . P. 292
Back-up lights*2
Shifting the shift lever to R. . . . . . . . . . . . . . . . . . . . . . . . P. 277, 284
4
5
6
7
8
Light bulbs of the exterior lights for driving
(Replacing method: P. 583, Watts: P. 691)
*1: If equipped
*2: They may be located on the opposite side depending on the target region.
9
10
11
12
13
14
15
16
17
Page 583 of 720
5837-3. Do-it-yourself maintenance
HILUX_OM_OM0K322E_(EE)
7
Maintenance and care
Light bulbs
Check the wattage of the light bulb to be replaced. (P. 691)
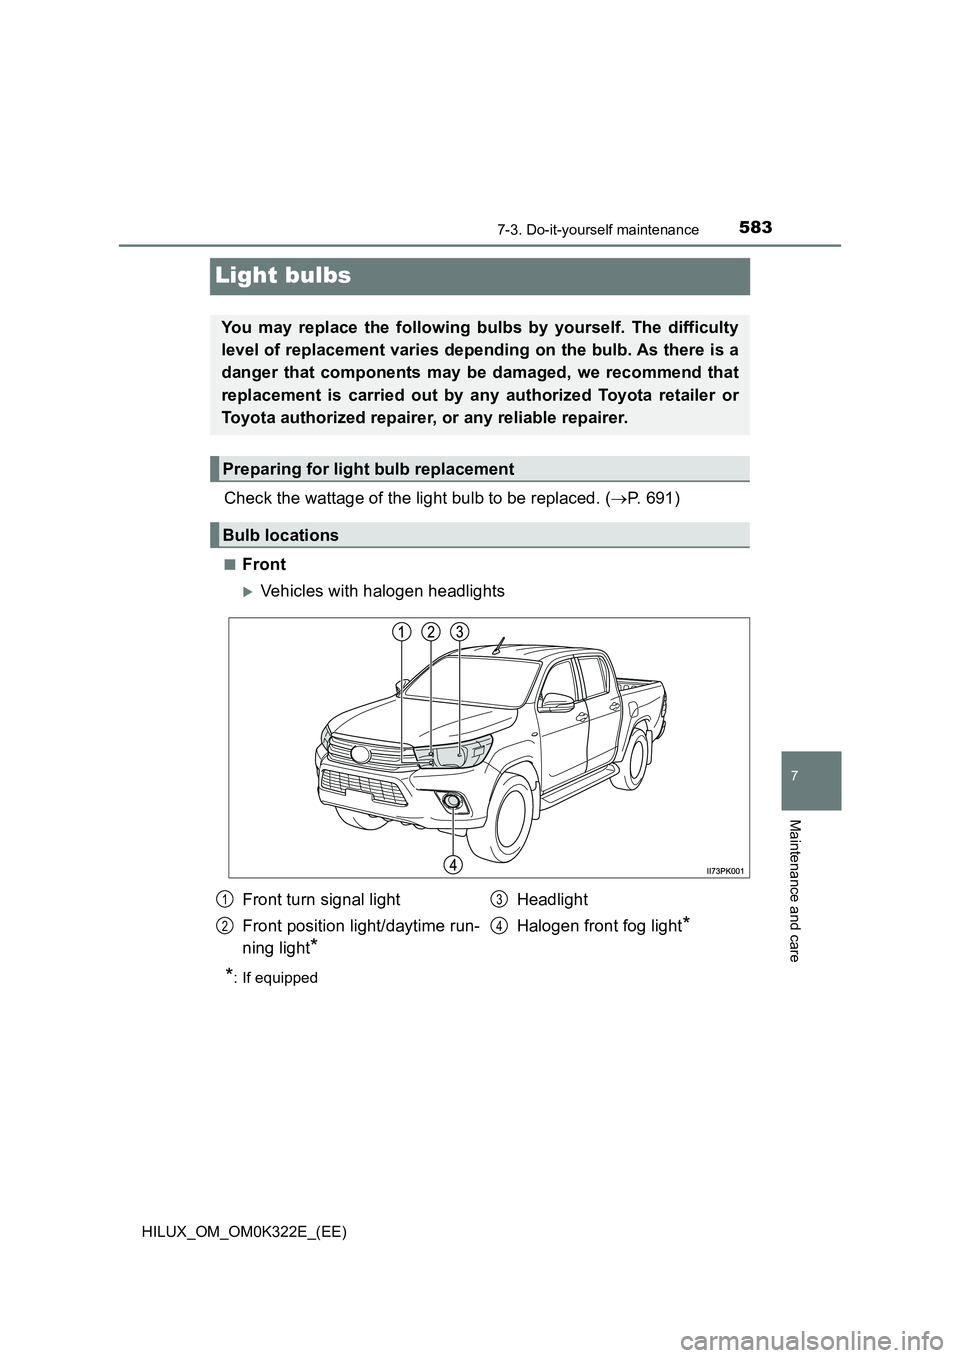
■Front
Vehicles with halogen headlights
*: If equipped
You may replace the following bulbs by yourself. The difficulty
level of replacement varies depending on the bulb. As there is a
danger that components may be damaged, we recommend that
replacement is carried out by any authorized Toyota retailer or
Toyota authorized repairer, or any reliable repairer.
Preparing for light bulb replacement
Bulb locations
Front turn signal light
Front position light/daytime run-
ning light*
Headlight
Halogen front fog light*
1
2
3
4
Page 585 of 720
5857-3. Do-it-yourself maintenance
HILUX_OM_OM0K322E_(EE)
7
Maintenance and care
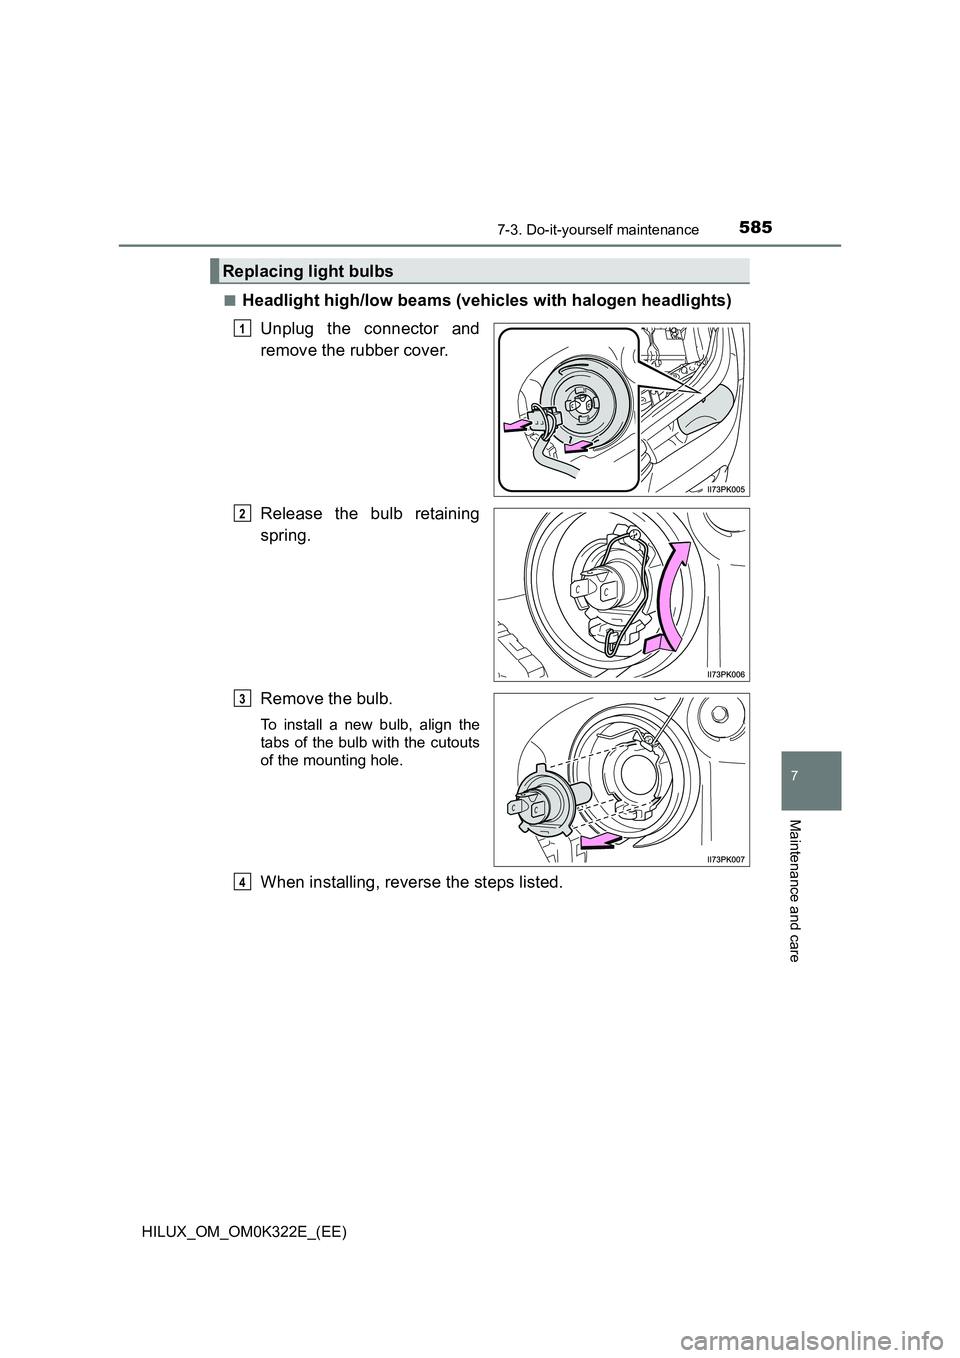
■Headlight high/low beams (vehicles with halogen headlights)
Unplug the connector and
remove the rubber cover.
Release the bulb retaining
spring.
Remove the bulb.
To install a new bulb, align the
tabs of the bulb with the cutouts
of the mounting hole.
When installing, reverse the steps listed.
Replacing light bulbs
1
2
3
4
Page 586 of 720
5867-3. Do-it-yourself maintenance
HILUX_OM_OM0K322E_(EE)
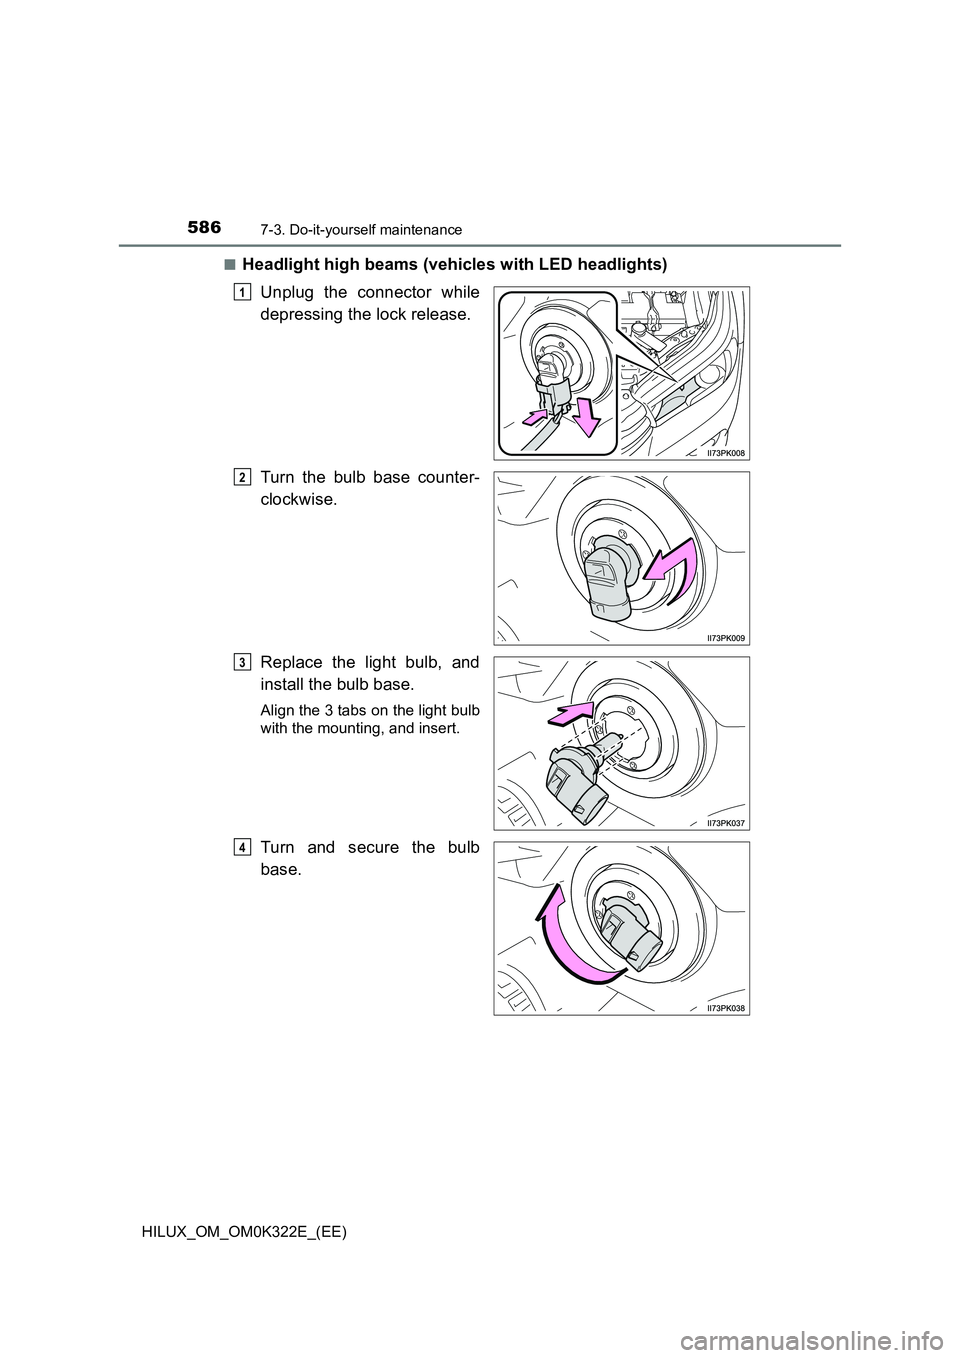
■Headlight high beams (vehicles with LED headlights)
Unplug the connector while
depressing the lock release.
Turn the bulb base counter-
clockwise.
Replace the light bulb, and
install the bulb base.
Align the 3 tabs on the light bulb
with the mounting, and insert.
Turn and secure the bulb
base.
1
2
3
4
Page 587 of 720
5877-3. Do-it-yourself maintenance
HILUX_OM_OM0K322E_(EE)
7
Maintenance and care
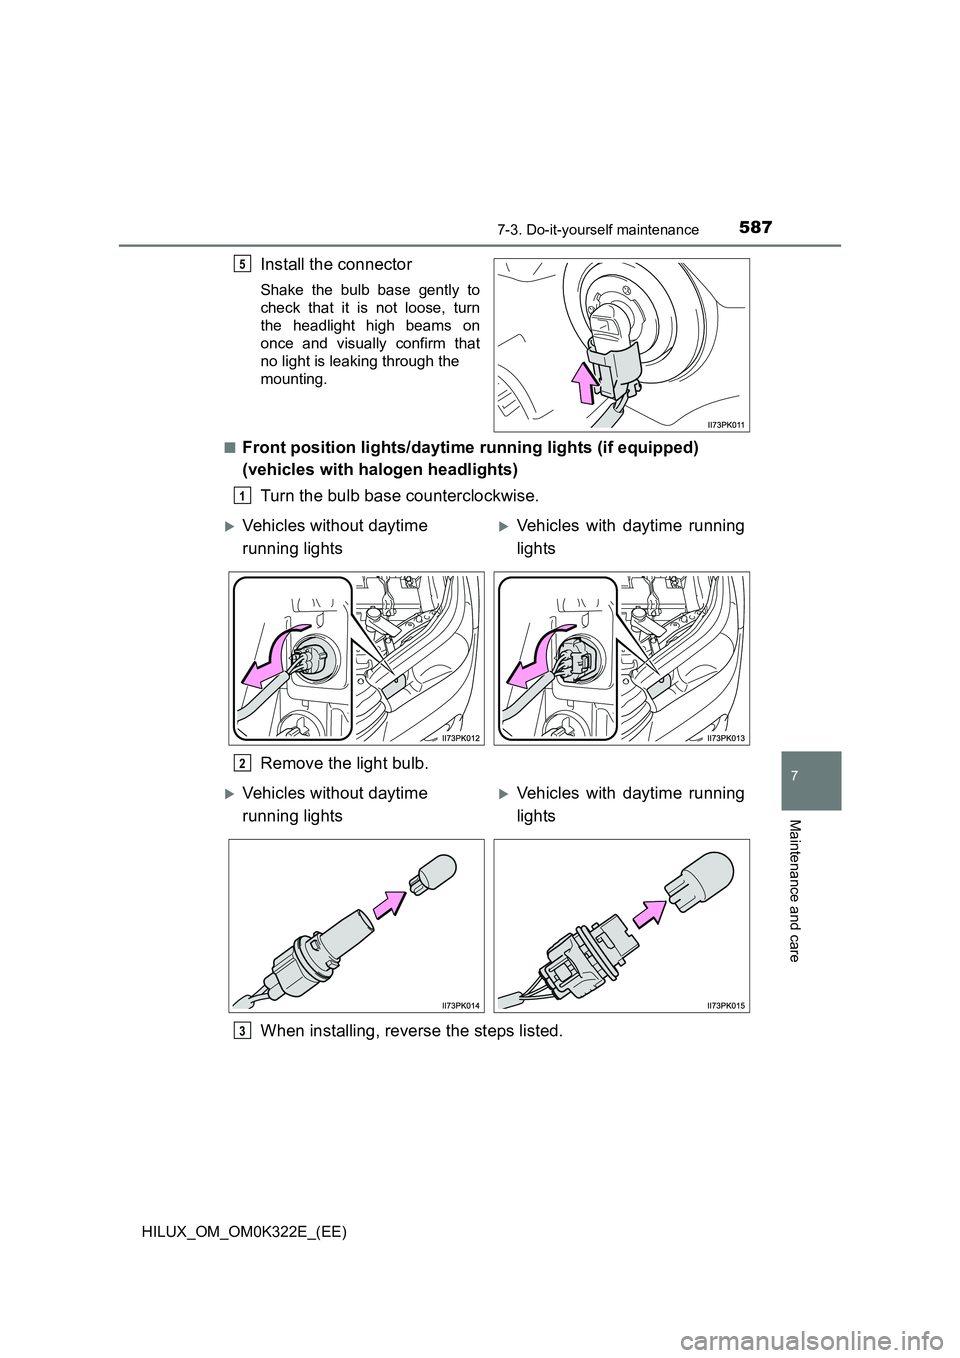
Install the connector
Shake the bulb base gently to
check that it is not loose, turn
the headlight high beams on
once and visually confirm that
no light is leaking through the
mounting.
■Front position lights/daytime running lights (if equipped)
(vehicles with halogen headlights)
Turn the bulb base counterclockwise.
Remove the light bulb.
When installing, reverse the steps listed.
5
1
Vehicles without daytime
running lights
Vehicles with daytime running
lights
2
Vehicles without daytime
running lights
Vehicles with daytime running
lights
3
Page 588 of 720
5887-3. Do-it-yourself maintenance
HILUX_OM_OM0K322E_(EE)
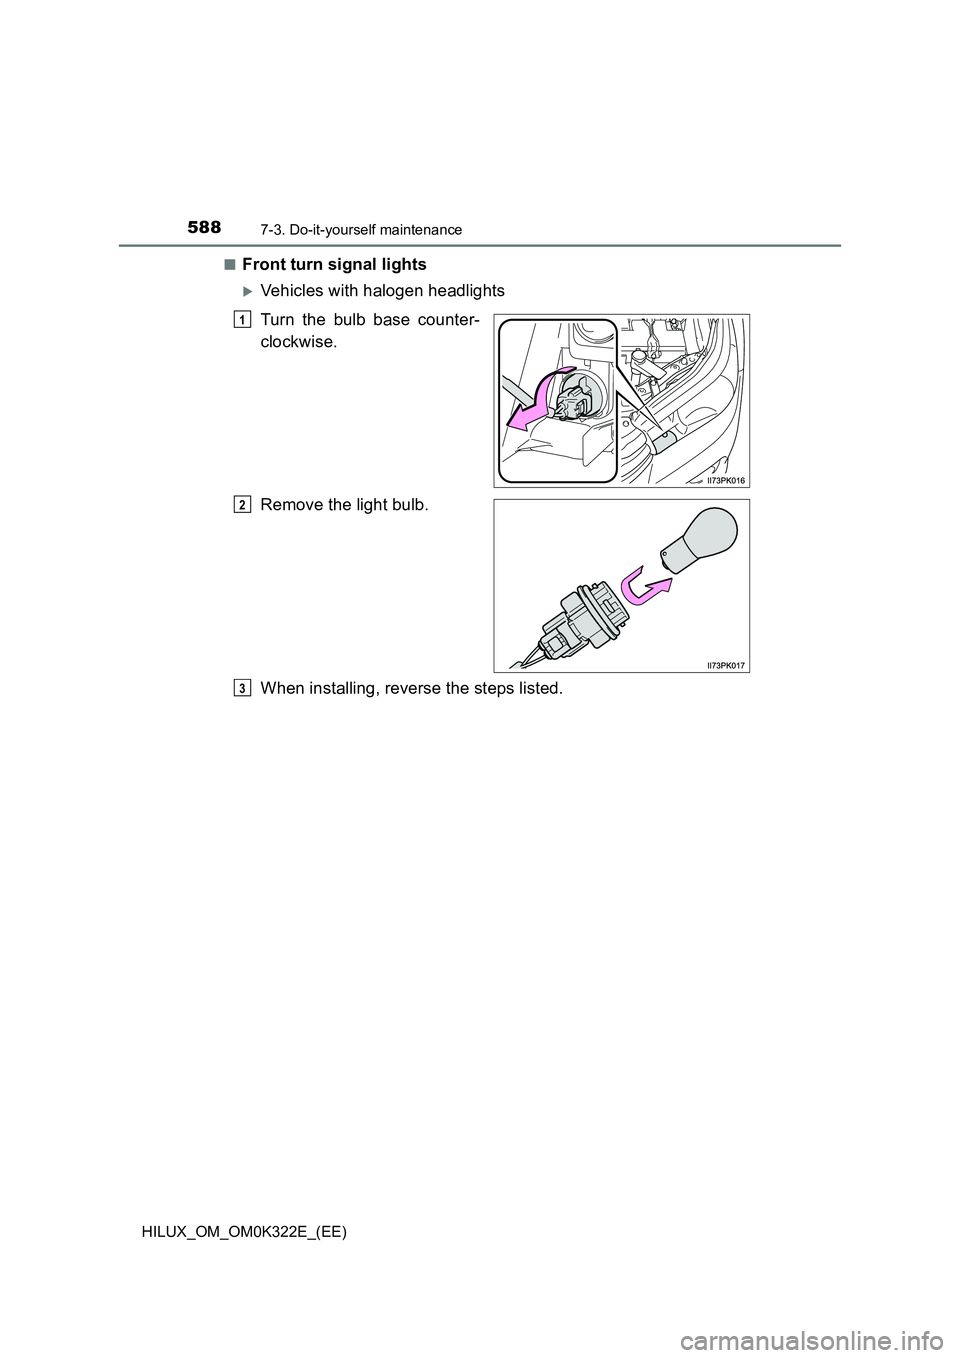
■Front turn signal lights
Vehicles with halogen headlights
Turn the bulb base counter-
clockwise.
Remove the light bulb.
When installing, reverse the steps listed.
1
2
3
Page 589 of 720
5897-3. Do-it-yourself maintenance
HILUX_OM_OM0K322E_(EE)
7
Maintenance and care
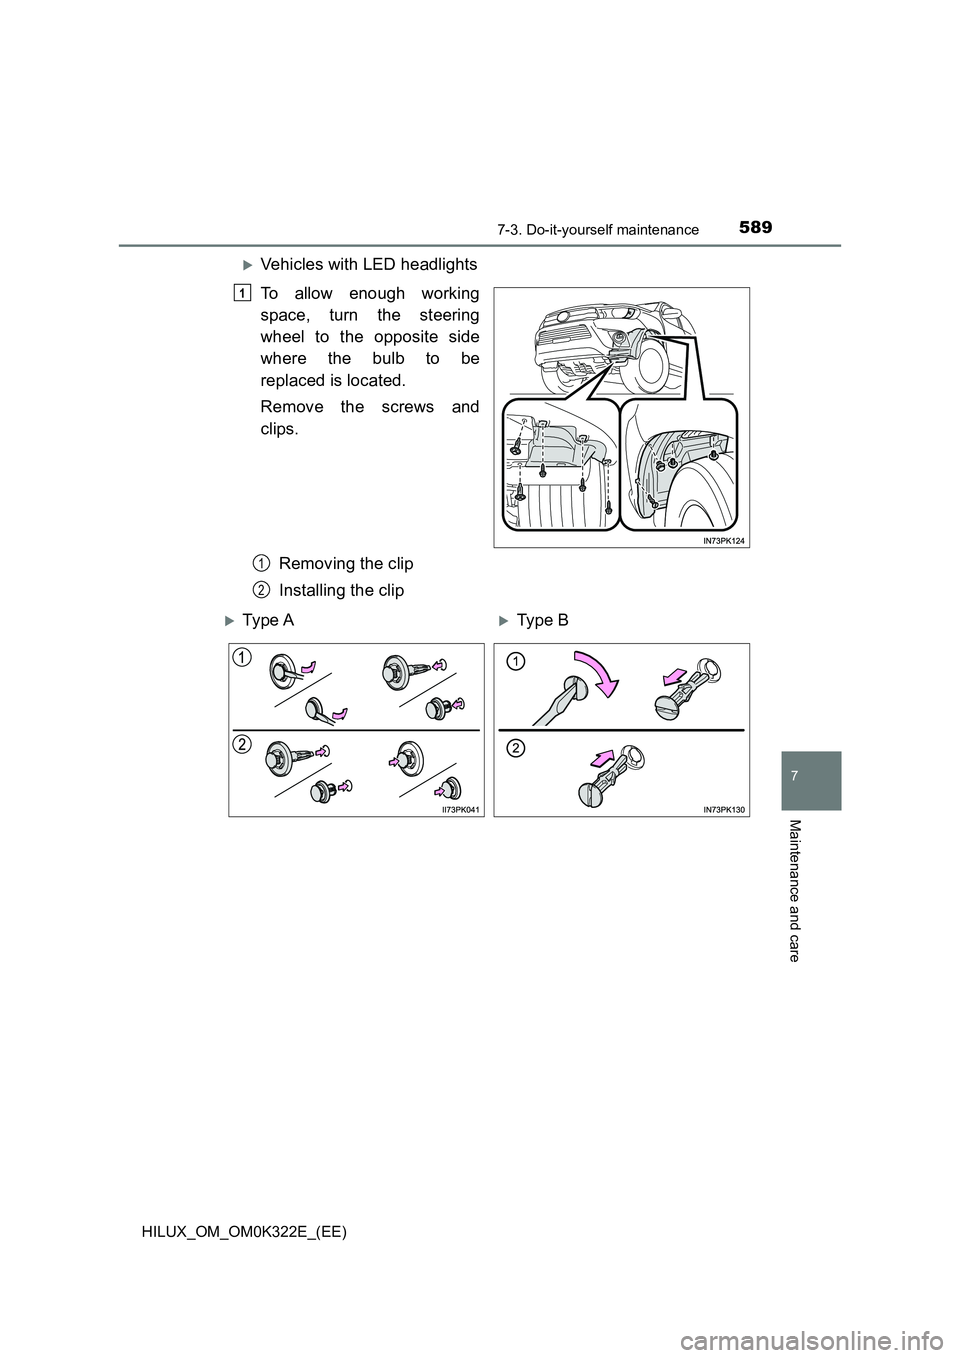
Vehicles with LED headlights
To allow enough working
space, turn the steering
wheel to the opposite side
where the bulb to be
replaced is located.
Remove the screws and
clips.
Removing the clip
Installing the clip
1
1
2
Ty pe AType B
Page 596 of 720
5967-3. Do-it-yourself maintenance
HILUX_OM_OM0K322E_(EE)
■Replacing the following bulbs
If any of the lights listed below has burnt out, have it replaced by
any authorized Toyota retailer or Toyota authorized repairer, or any
reliable repairer.
● Headlight low beams (vehicles with LED headlights)
● Front position lights/daytime running lights (vehicles with LED
headlights)
● Side turn signal lights
● LED front fog lights (if equipped)
● High mounted stoplight (if equipped)
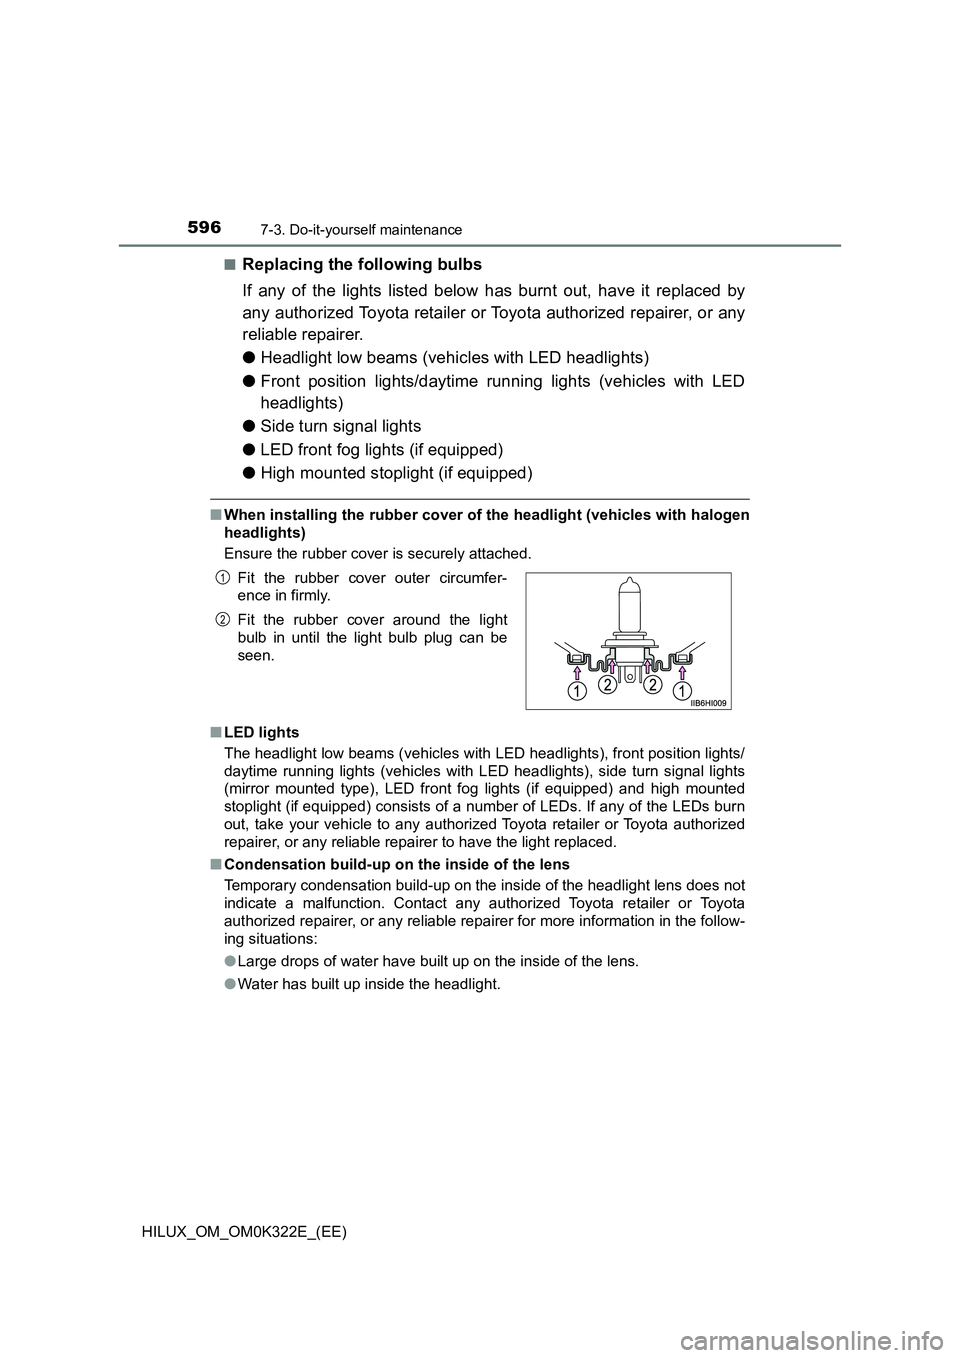
■When installing the rubber cover of the headlight (vehicles with halogen
headlights)
Ensure the rubber cover is securely attached.
■ LED lights
The headlight low beams (vehicles with LED headlights), front position lights/
daytime running lights (vehicles with LED headlights), side turn signal lights
(mirror mounted type), LED front fo g lights (if equipped) and high mounted
stoplight (if equipped) consists of a number of LEDs. If any of the LEDs burn
out, take your vehicle to any authorized Toyota retailer or Toyota authorized
repairer, or any reliable repairer to have the light replaced.
■ Condensation build-up on the inside of the lens
Temporary condensation build-up on the inside of the headlight lens does not
indicate a malfunction. Contact any authorized Toyota retailer or Toyota
authorized repairer, or any reliable repairer for more information in the follow-
ing situations:
● Large drops of water have built up on the inside of the lens.
● Water has built up inside the headlight.
Fit the rubber cover outer circumfer-
ence in firmly.
Fit the rubber cover around the light
bulb in until the light bulb plug can be
seen.
1
2
Page 597 of 720
5977-3. Do-it-yourself maintenance
HILUX_OM_OM0K322E_(EE)
7
Maintenance and care
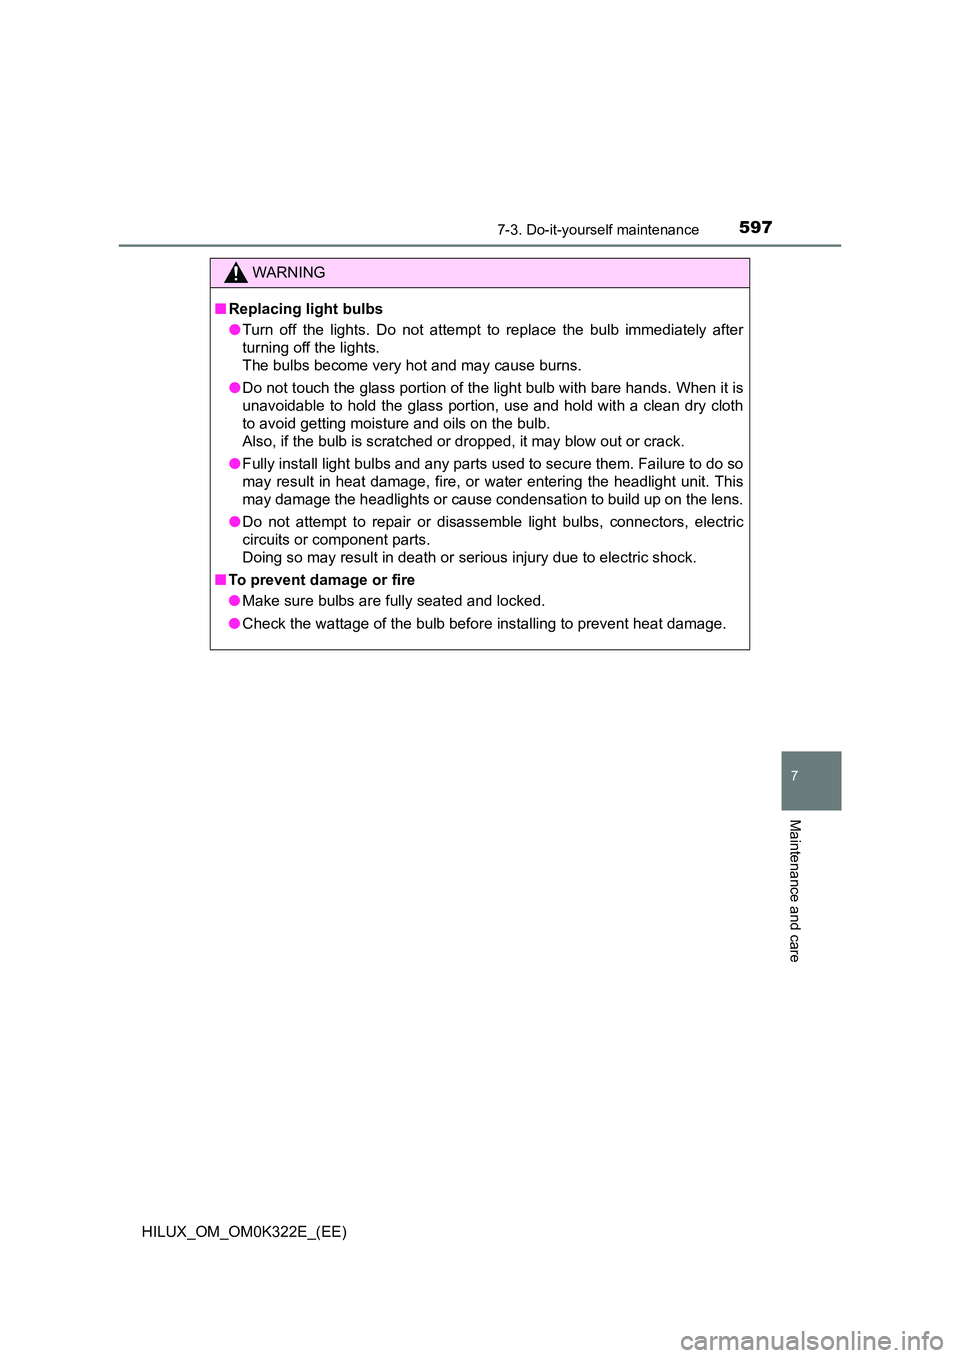
WARNING
■Replacing light bulbs
● Turn off the lights. Do not attempt to replace the bulb immediately after
turning off the lights.
The bulbs become very hot and may cause burns.
● Do not touch the glass portion of the light bulb with bare hands. When it is
unavoidable to hold the glass portion, use and hold with a clean dry cloth
to avoid getting moisture and oils on the bulb.
Also, if the bulb is scratched or dropped, it may blow out or crack.
● Fully install light bulbs and any parts used to secure them. Failure to do so
may result in heat damage, fire, or water entering the headlight unit. This
may damage the headlights or cause condensation to build up on the lens.
● Do not attempt to repair or disassemble light bulbs, connectors, electric
circuits or component parts.
Doing so may result in death or serious injury due to electric shock.
■ To prevent damage or fire
● Make sure bulbs are fully seated and locked.
● Check the wattage of the bulb before installing to prevent heat damage.
Page 691 of 720
691
9
9-1. Specifications
Vehicle specifications
HILUX_OM_OM0K322E_(EE)
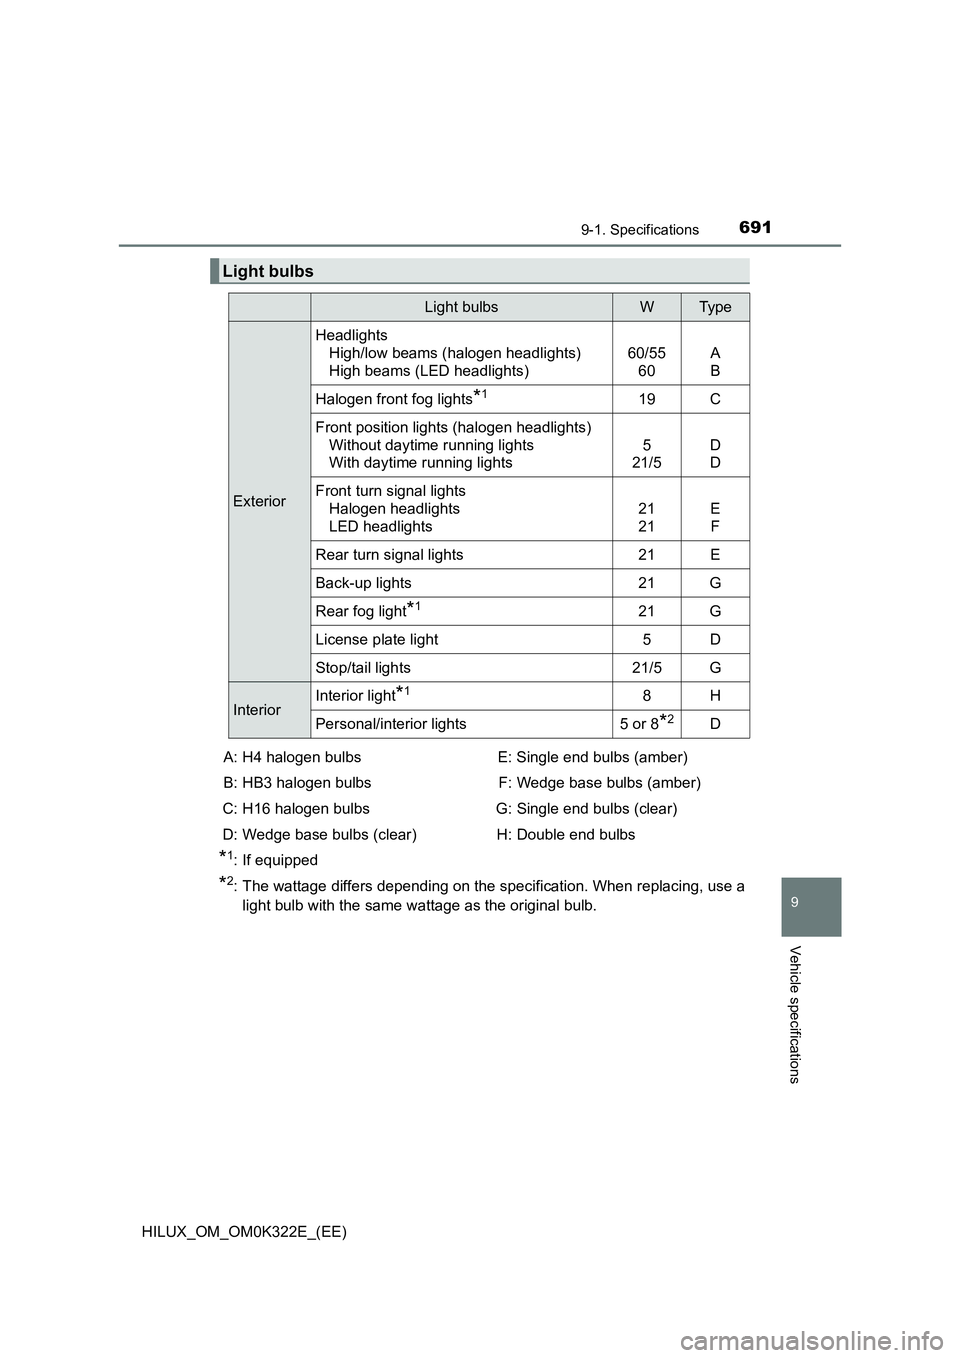
*1: If equipped
*2: The wattage differs depending on the specification. When replacing, use a
light bulb with the same wattage as the original bulb.
Light bulbs
Light bulbsWTyp e
Exterior
Headlights
High/low beams (halogen headlights)
High beams (LED headlights)
60/55
60
A
B
Halogen front fog lights*119 C
Front position lights (halogen headlights)
Without daytime running lights
With daytime running lights
5
21/5
D
D
Front turn signal lights
Halogen headlights
LED headlights
21
21
E
F
Rear turn signal lights 21 E
Back-up lights 21 G
Rear fog light*121 G
License plate light 5 D
Stop/tail lights 21/5 G
Interior Interior light*18H
Personal/interior lights 5 or 8*2D
A: H4 halogen bulbs
B: HB3 halogen bulbs
C: H16 halogen bulbs
D: Wedge base bulbs (clear)
E: Single end bulbs (amber)
F: Wedge base bulbs (amber)
G: Single end bulbs (clear)
H: Double end bulbs