TOYOTA MIRAI 2020 Accessories, Audio & Navigation (in English)
Manufacturer: TOYOTA, Model Year: 2020, Model line: MIRAI, Model: TOYOTA MIRAI 2020Pages: 288, PDF Size: 7.9 MB
Page 181 of 288

181
2. SETUP
PHONE
7
MIRAI_Navi_USA_OM62074U_20MY
■REGISTERING THE CONTACTS IN
THE FAVORITES LIST
1Select “Add Favorite” .
2Select the desired contact to add to the
favorites list.
Dimmed contacts are already stored as a
favorite.
When 15 contacts have already been reg-
istered to the favorites list, a registered
contact needs to be replaced.
Select “Yes” when the confirmation
screen appears and select the contact to
be replaced.
3Check that a confirmation screen is
displayed when the operation is com-
plete.
■REGISTERING CONTACTS IN THE
FAVORITES LIST IN A DIFFERENT
WAY (FROM THE CONTACT DE-
TAILS SCREEN)
1Display the phone top screen.
(P.154)
2Select “Contacts” and select the de-
sired contact.
3Select “Add Favorite” .
4Check that a confirmation screen is
displayed when the operation is com-
plete.
■DELETING THE CONTACTS IN THE
FAVORITES LIST
1Select “Remove Favorite” .
2Select the desired contacts and select
“Remove”.
3Select “Yes” when the confirmation
screen appears.
4Check that a confirmation screen is
displayed when the operation is com-
plete.
INFORMATION
● Multiple data can be selected and
deleted at the same time.
SETTING FAVORITES LIST
Up to 15 contacts (maximum of 4 num-
bers per contact) can be registered in
the favorites list.
Page 182 of 288
182
2. SETUP
MIRAI_Navi_USA_OM62074U_20MY
■DELETING CONTACTS IN THE FA-
VORITES LIST IN A DIFFERENT
WAY (FROM THE CONTACT DE-
TAILS SCREEN)
1Display the phone top screen.
(P.154)
2Select “Favorites” or “Contacts” and
select the desired contact to delete.
3Select “Remove Favorite” .
4Select “Yes” when the confirmation
screen appears.
5Check that a confirmation screen is
displayed when the operation is com-
plete.
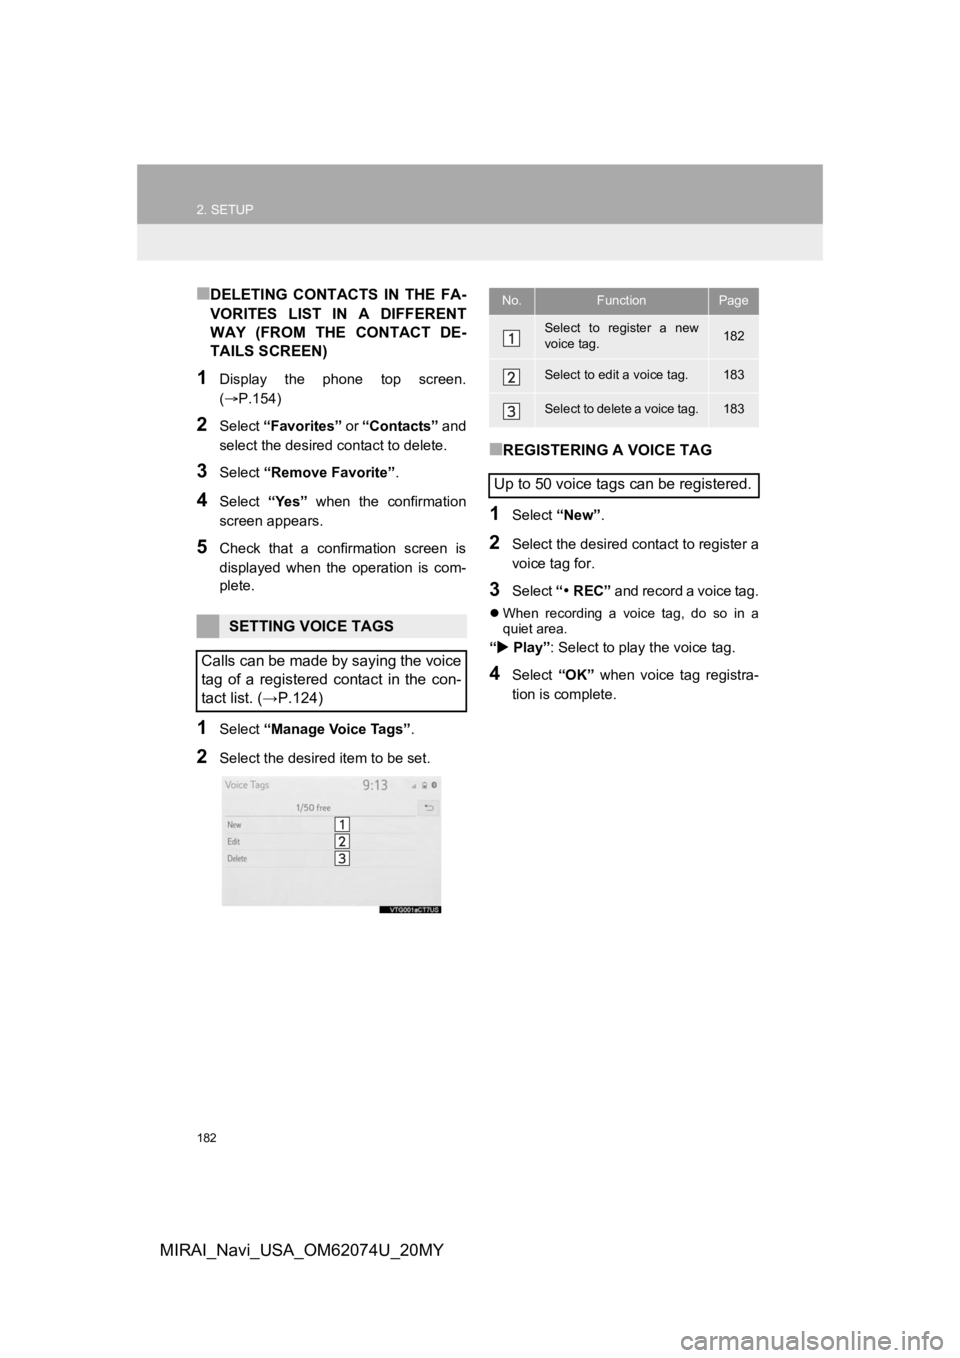
1Select “Manage Voice Tags” .
2Select the desired item to be set.
■REGISTERING A VOICE TAG
1Select “New”.
2Select the desired contact to register a
voice tag for.
3Select “ REC” and record a voice tag.
When recording a voice tag, do so in a
quiet area.
“ Play” : Select to play the voice tag.
4Select “OK” when voice tag registra-
tion is complete.
SETTING VOICE TAGS
Calls can be made by saying the voice
tag of a registered contact in the con-
tact list. (→P.124)
No.FunctionPage
Select to register a new
voice tag.182
Select to edit a voice tag.183
Select to delete a voice tag.183
Up to 50 voice tags can be registered.
Page 183 of 288
183
2. SETUP
PHONE
7
MIRAI_Navi_USA_OM62074U_20MY
■EDITING A VOICE TAG
1Select “Edit”.
2Select the desired contact to edit.
3Follow the steps in “REGISTERING A
VOICE TAG” from “STEP 3”. ( P.182)
■DELETING THE VOICE TAG
1Select “Delete” .
2Select the desired contact and select
“Delete”.
3Select “Yes” when the confirmation
screen appears.
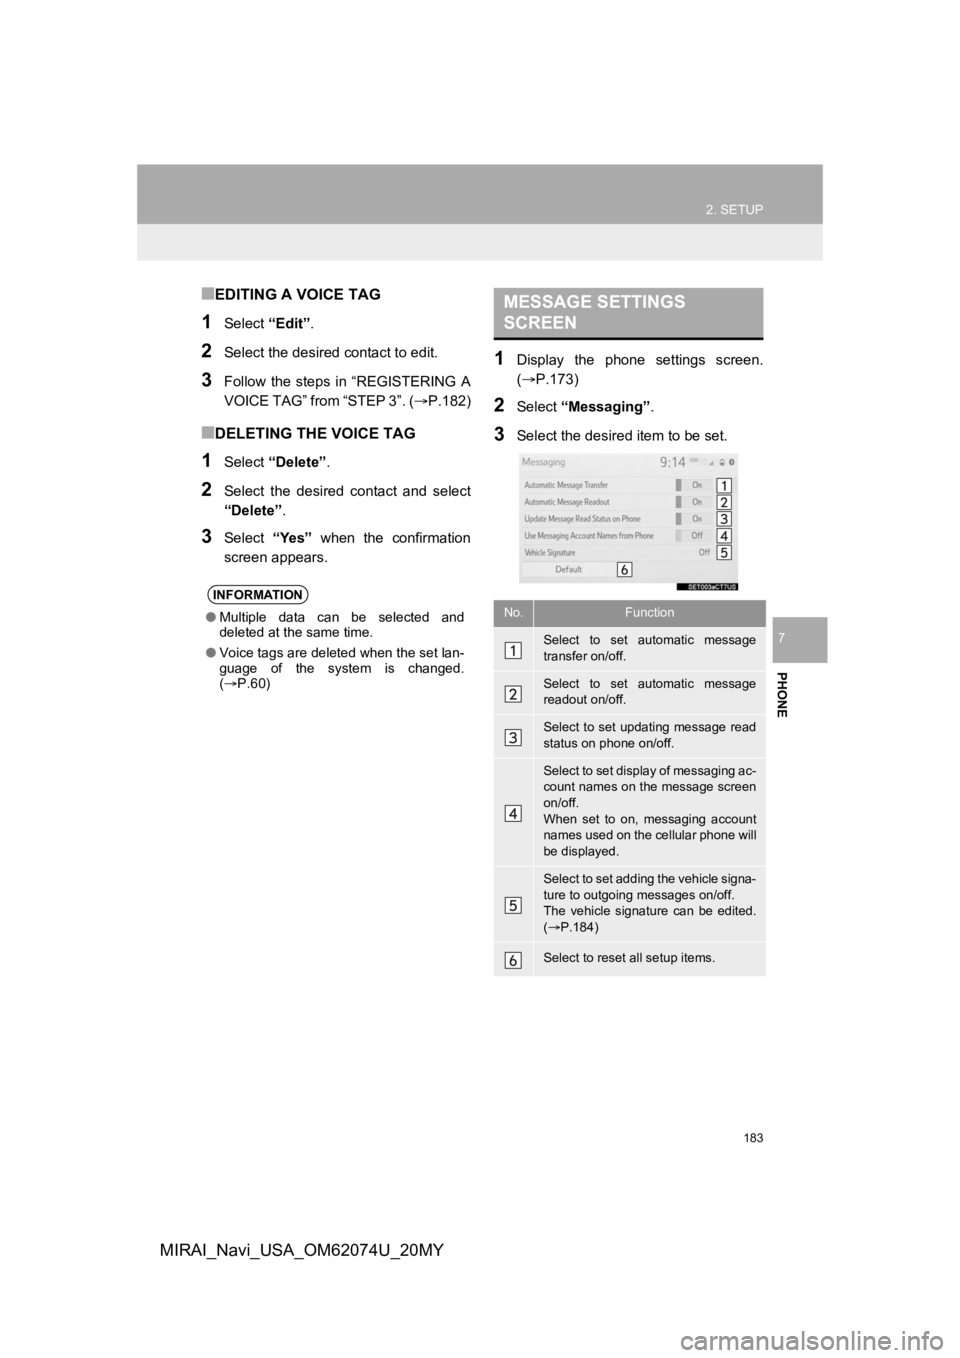
1Display the phone settings screen.
(P.173)
2Select “Messaging” .
3Select the desired item to be set.
INFORMATION
●Multiple data can be selected and
deleted at the same time.
● Voice tags are deleted when the set lan-
guage of the system is changed.
( P.60)
MESSAGE SETTINGS
SCREEN
No.Function
Select to set automatic message
transfer on/off.
Select to set automatic message
readout on/off.
Select to set updating message read
status on phone on/off.
Select to set display of messaging ac-
count names on the message screen
on/off.
When set to on, messaging account
names used on the cellular phone will
be displayed.
Select to set adding the vehicle signa-
ture to outgoing messages on/off.
The vehicle signature can be edited.
( P.184)
Select to reset all setup items.
Page 184 of 288

184
2. SETUP
MIRAI_Navi_USA_OM62074U_20MY
1Select “Vehicle Signature” .
2Select “Edit Vehicle Signature” .
3Enter desired signature and select
“OK”.
4Select “OK” on the preview screen.
“Edit Again” : Select to edit the signature
again.
INFORMATION
● Depending on the phone, these func-
tions may not be available.
EDITING VEHICLE SIGNATURE
Page 185 of 288
185
PHONE
7
MIRAI_Navi_USA_OM62074U_20MY
3. WHAT TO DO IF...
1. TROUBLESHOOTING
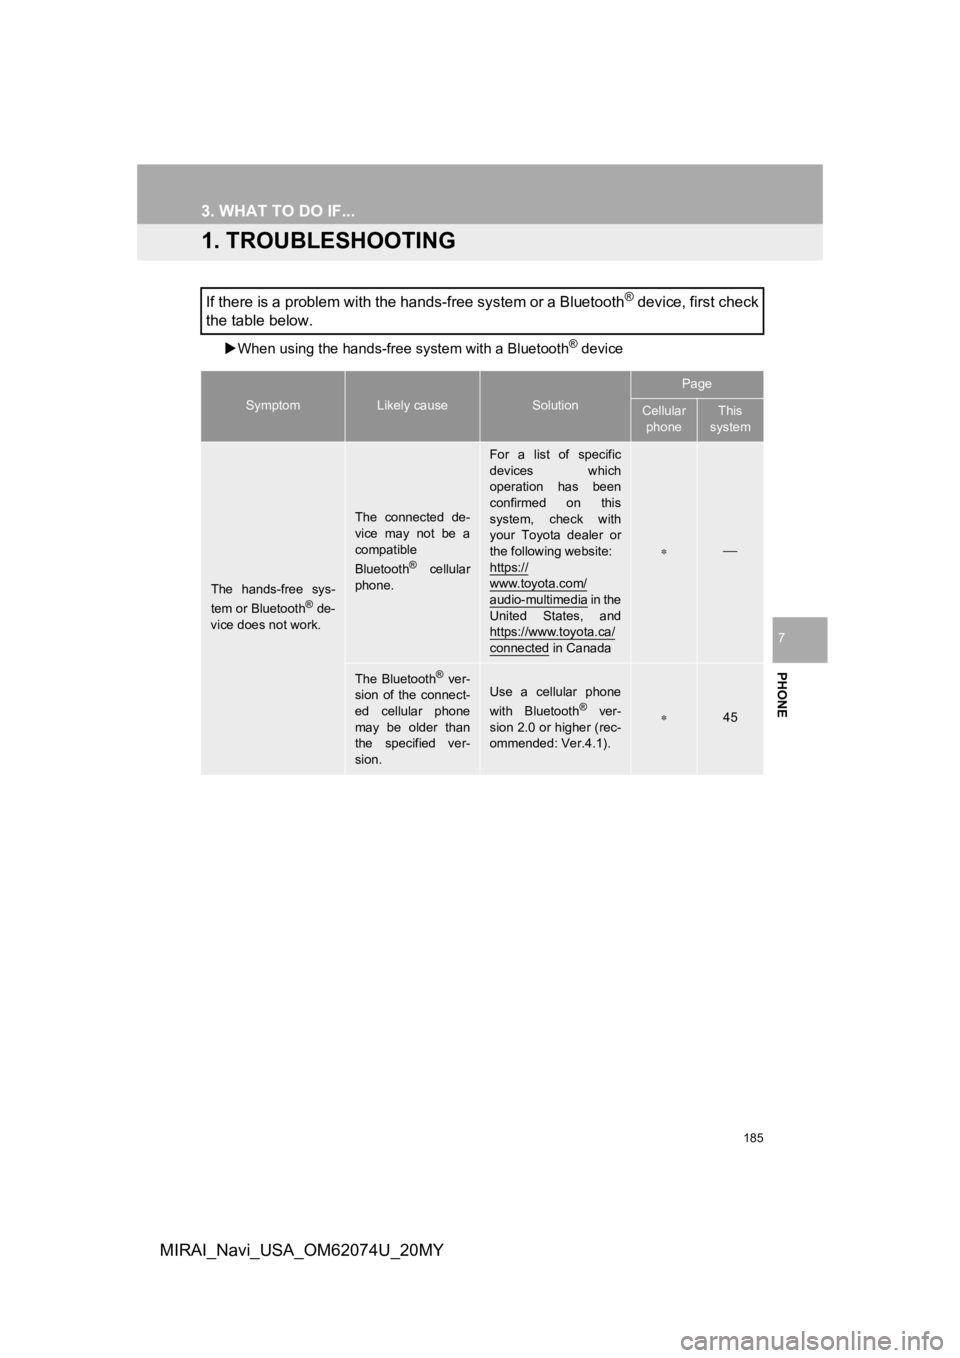
When using the hands-free system with a Bluetooth® device
If there is a problem with the hands-free system or a Bluetooth® device, first check
the table below.
SymptomLikely causeSolution
Page
Cellular
phoneThis
system
The hands-free sys-
tem or Bluetooth® de-
vice does not work.
The connected de-
vice may not be a
compatible
Bluetooth
® cellular
phone.
For a list of specific
devices which
operation has been
confirmed on this
system, check with
your Toyota dealer or
the following website:
https://
www.toyota.com/
audio-multimedia i n t h e
United States, and
https://www.toyota.ca/
connected in Canada
The Bluetooth® ver-
sion of the connect-
ed cellular phone
may be older than
the specified ver-
sion.Use a cellular phone
with Bluetooth® ver-
sion 2.0 or higher (rec-
ommended: Ver.4.1).45
Page 186 of 288
186
3. WHAT TO DO IF...
MIRAI_Navi_USA_OM62074U_20MY
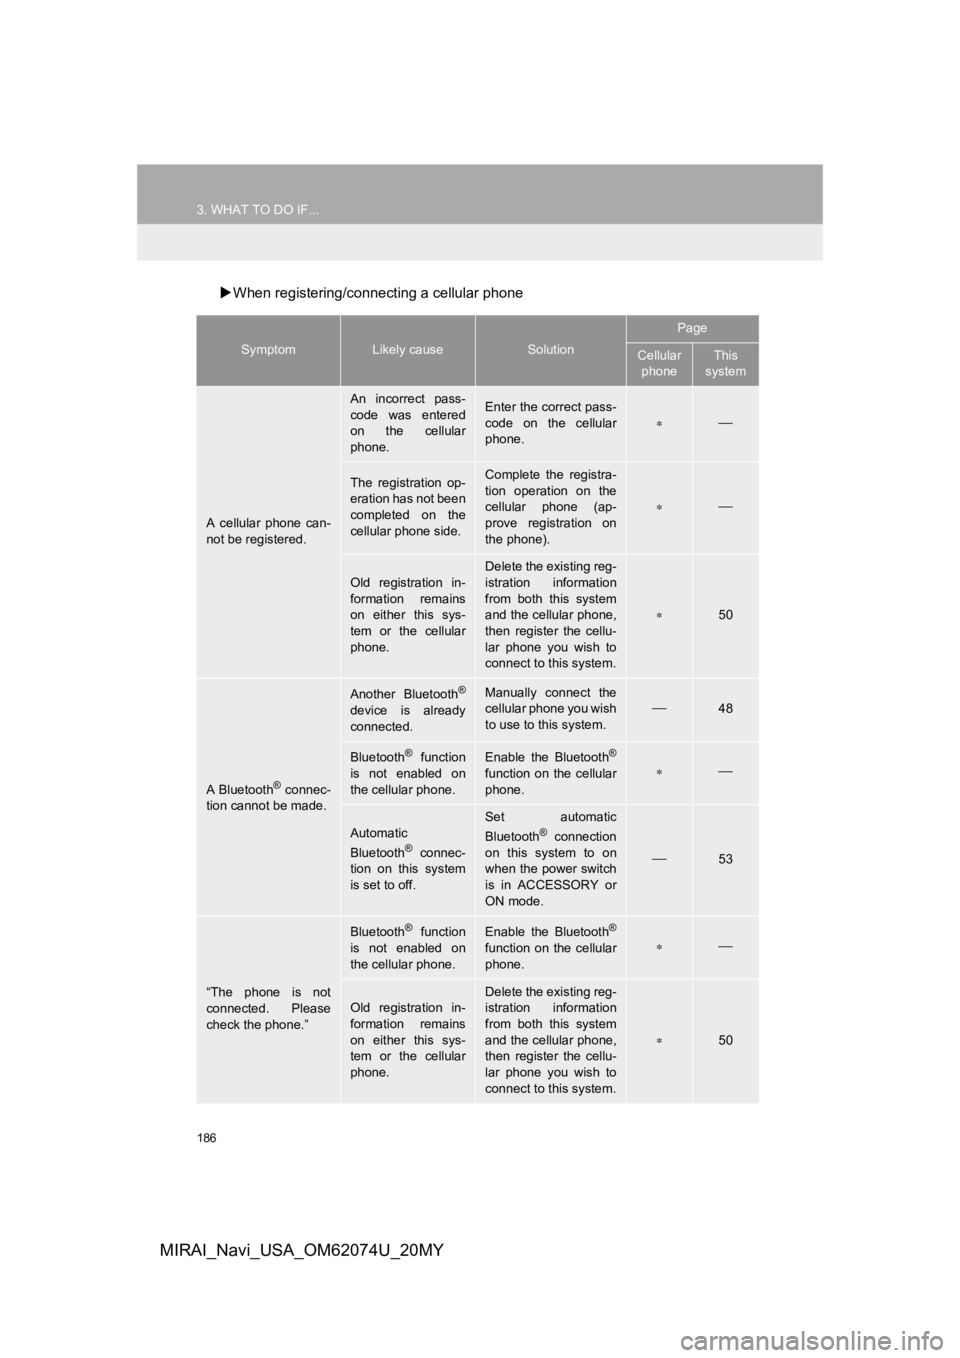
When registering/connecting a cellular phone
SymptomLikely causeSolution
Page
Cellular
phoneThis
system
A cellular phone can-
not be registered.
An incorrect pass-
code was entered
on the cellular
phone.Enter the correct pass-
code on the cellular
phone.
The registration op-
eration has not been
completed on the
cellular phone side.Complete the registra-
tion operation on the
cellular phone (ap-
prove registration on
the phone).
Old registration in-
formation remains
on either this sys-
tem or the cellular
phone.
Delete the existing reg-
istration information
from both this system
and the cellular phone,
then register the cellu-
lar phone you wish to
connect to this system.
50
A Bluetooth® connec-
tion cannot be made.
Another Bluetooth®
device is already
connected.
Manually connect the
cellular phone you wish
to use to this system.
48
Bluetooth® function
is not enabled on
the cellular phone.Enable the Bluetooth®
function on the cellular
phone.
Automatic
Bluetooth® connec-
tion on this system
is set to off.
Set automatic
Bluetooth® connection
on this system to on
when the power switch
is in ACCESSORY or
ON mode.
53
“The phone is not
connected. Please
check the phone.”
Bluetooth® function
is not enabled on
the cellular phone.Enable the Bluetooth®
function on the cellular
phone.
Old registration in-
formation remains
on either this sys-
tem or the cellular
phone.Delete the existing reg-
istration information
from both this system
and the cellular phone,
then register the cellu-
lar phone you wish to
connect to this system.
50
Page 187 of 288
187
3. WHAT TO DO IF...
PHONE
7
MIRAI_Navi_USA_OM62074U_20MY
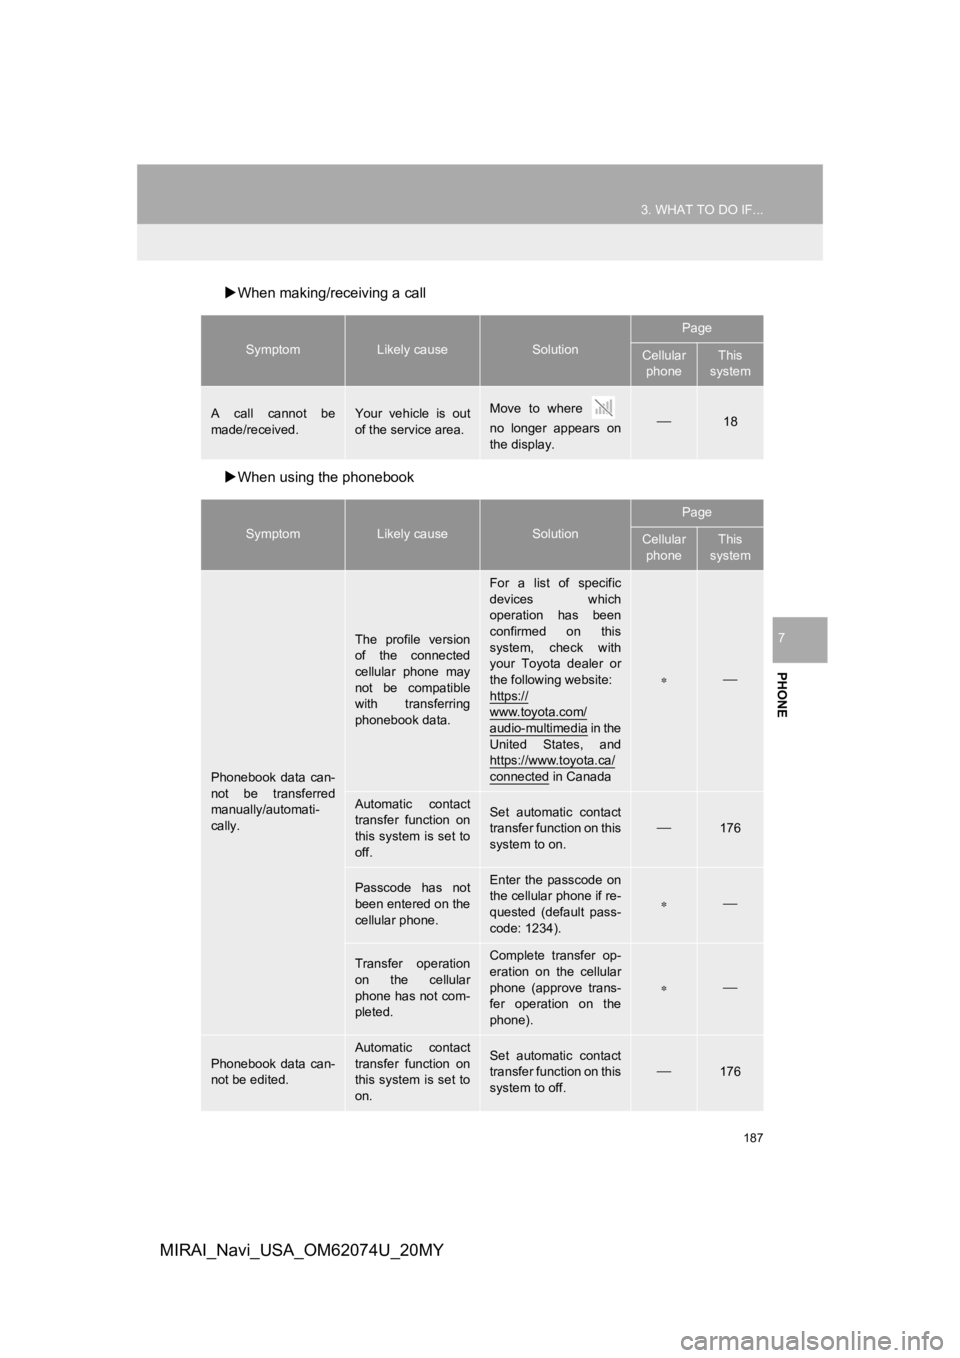
When making/receiving a call
When using the phonebook
SymptomLikely causeSolution
Page
Cellular
phoneThis
system
A call cannot be
made/received.Your vehicle is out
of the service area.Move to where
no longer appears on
the display.18
SymptomLikely causeSolution
Page
Cellular phoneThis
system
Phonebook data can-
not be transferred
manually/automati-
cally.
The profile version
of the connected
cellular phone may
not be compatible
with transferring
phonebook data.
For a list of specific
devices which
operation has been
confirmed on this
system, check with
your Toyota dealer or
the following website:
https://
www.toyota.com/audio-multimedia i n t h e
United States, and
https://www.toyota.ca/
connected in Canada
Automatic contact
transfer function on
this system is set to
off.Set automatic contact
transfer function on this
system to on.
176
Passcode has not
been entered on the
cellular phone.Enter the passcode on
the cellular phone if re-
quested (default pass-
code: 1234).
Transfer operation
on the cellular
phone has not com-
pleted.Complete transfer op-
eration on the cellular
phone (approve trans-
fer operation on the
phone).
Phonebook data can-
not be edited.
Automatic contact
transfer function on
this system is set to
on.Set automatic contact
transfer function on this
system to off.176
Page 188 of 288
188
3. WHAT TO DO IF...
MIRAI_Navi_USA_OM62074U_20MY
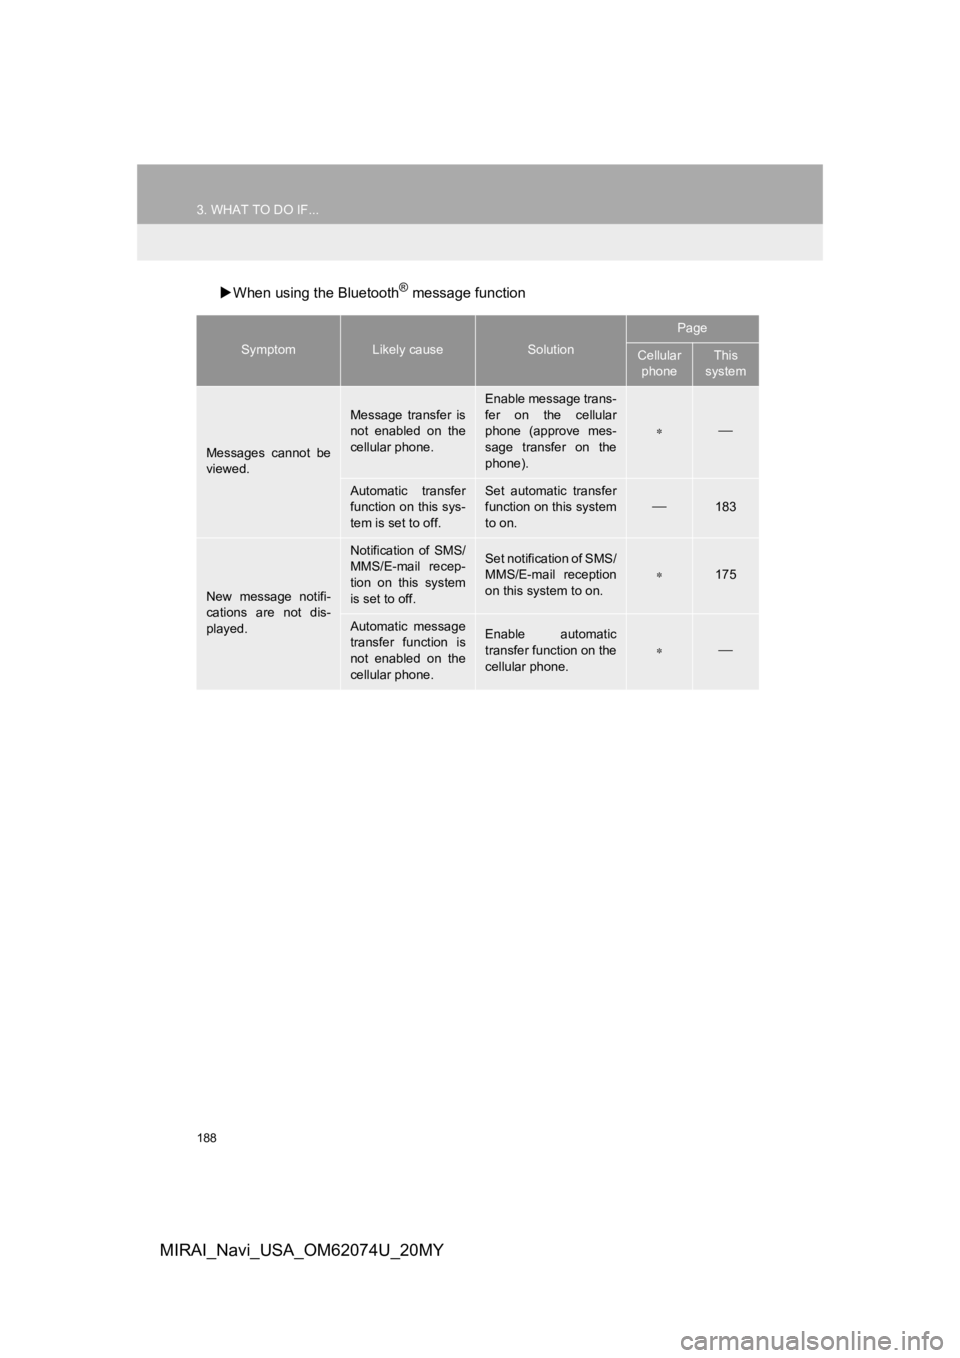
When using the Bluetooth® message function
SymptomLikely causeSolution
Page
Cellular
phoneThis
system
Messages cannot be
viewed.
Message transfer is
not enabled on the
cellular phone.
Enable message trans-
fer on the cellular
phone (approve mes-
sage transfer on the
phone).
Automatic transfer
function on this sys-
tem is set to off.Set automatic transfer
function on this system
to on.
183
New message notifi-
cations are not dis-
played.
Notification of SMS/
MMS/E-mail recep-
tion on this system
is set to off.Set notification of SMS/
MMS/E-mail reception
on this system to on.
175
Automatic message
transfer function is
not enabled on the
cellular phone.Enable automatic
transfer function on the
cellular phone.
Page 189 of 288
189
3. WHAT TO DO IF...
PHONE
7
MIRAI_Navi_USA_OM62074U_20MY
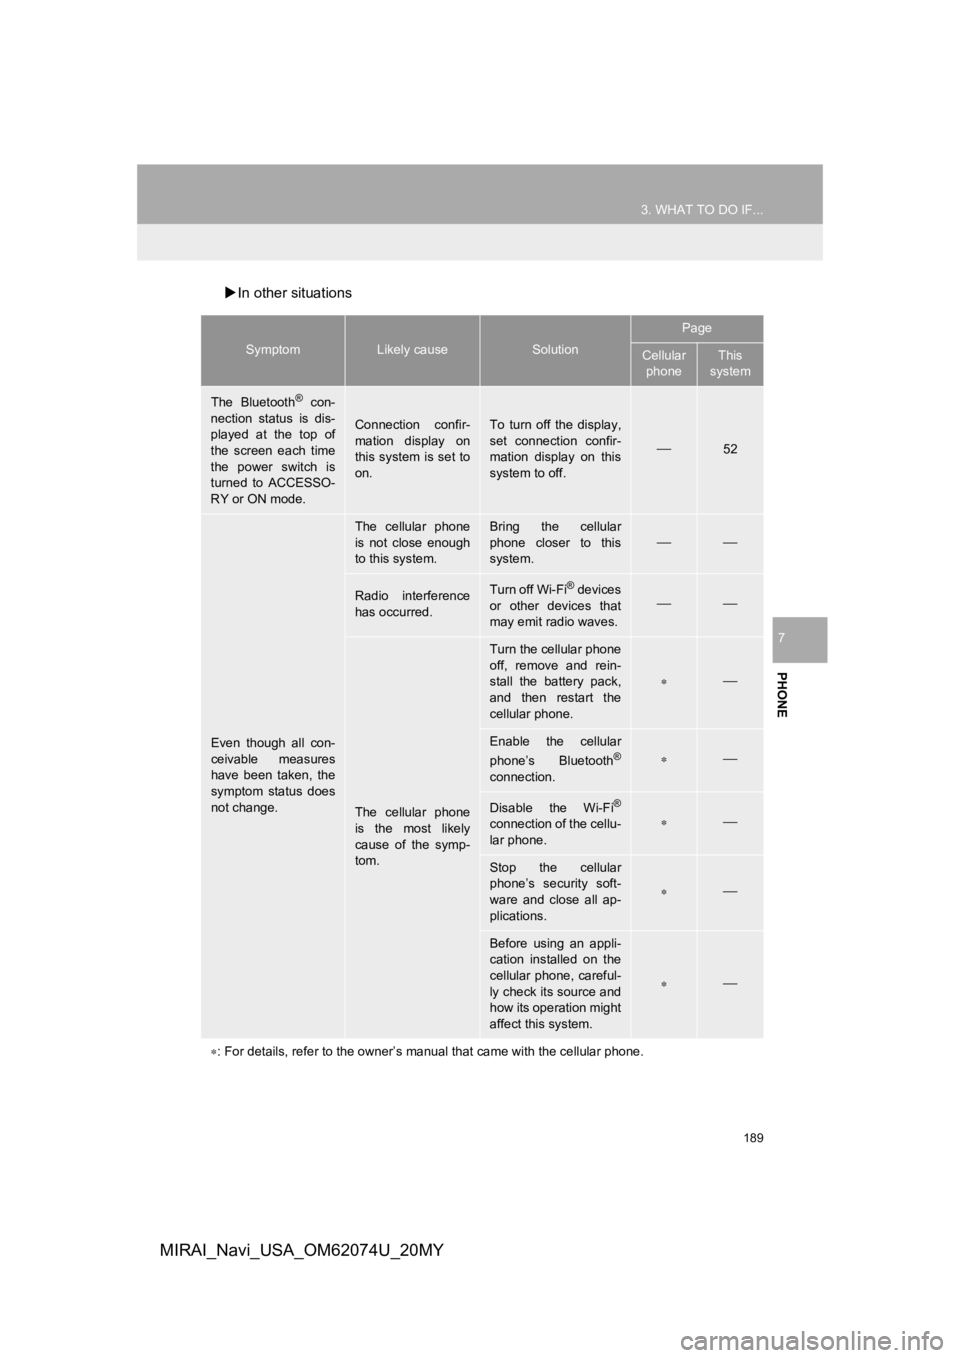
In other situations
SymptomLikely causeSolution
Page
Cellular
phoneThis
system
The Bluetooth® con-
nection status is dis-
played at the top of
the screen each time
the power switch is
turned to ACCESSO-
RY or ON mode.
Connection confir-
mation display on
this system is set to
on.To turn off the display,
set connection confir-
mation display on this
system to off.
52
Even though all con-
ceivable measures
have been taken, the
symptom status does
not change.
The cellular phone
is not close enough
to this system.Bring the cellular
phone closer to this
system.
Radio interference
has occurred.Turn off Wi-Fi® devices
or other devices that
may emit radio waves.
The cellular phone
is the most likely
cause of the symp-
tom.
Turn the cellular phone
off, remove and rein-
stall the battery pack,
and then restart the
cellular phone.
Enable the cellular
phone’s Bluetooth®
connection.
Disable the Wi-Fi®
connection of the cellu-
lar phone.
Stop the cellular
phone’s security soft-
ware and close all ap-
plications.
Before using an appli-
cation installed on the
cellular phone, careful-
ly check its source and
how its operation might
affect this system.
: For details, refer to the owner’s manual that came with the ce llular phone.
Page 190 of 288
190
MIRAI_Navi_USA_OM62074U_20MY
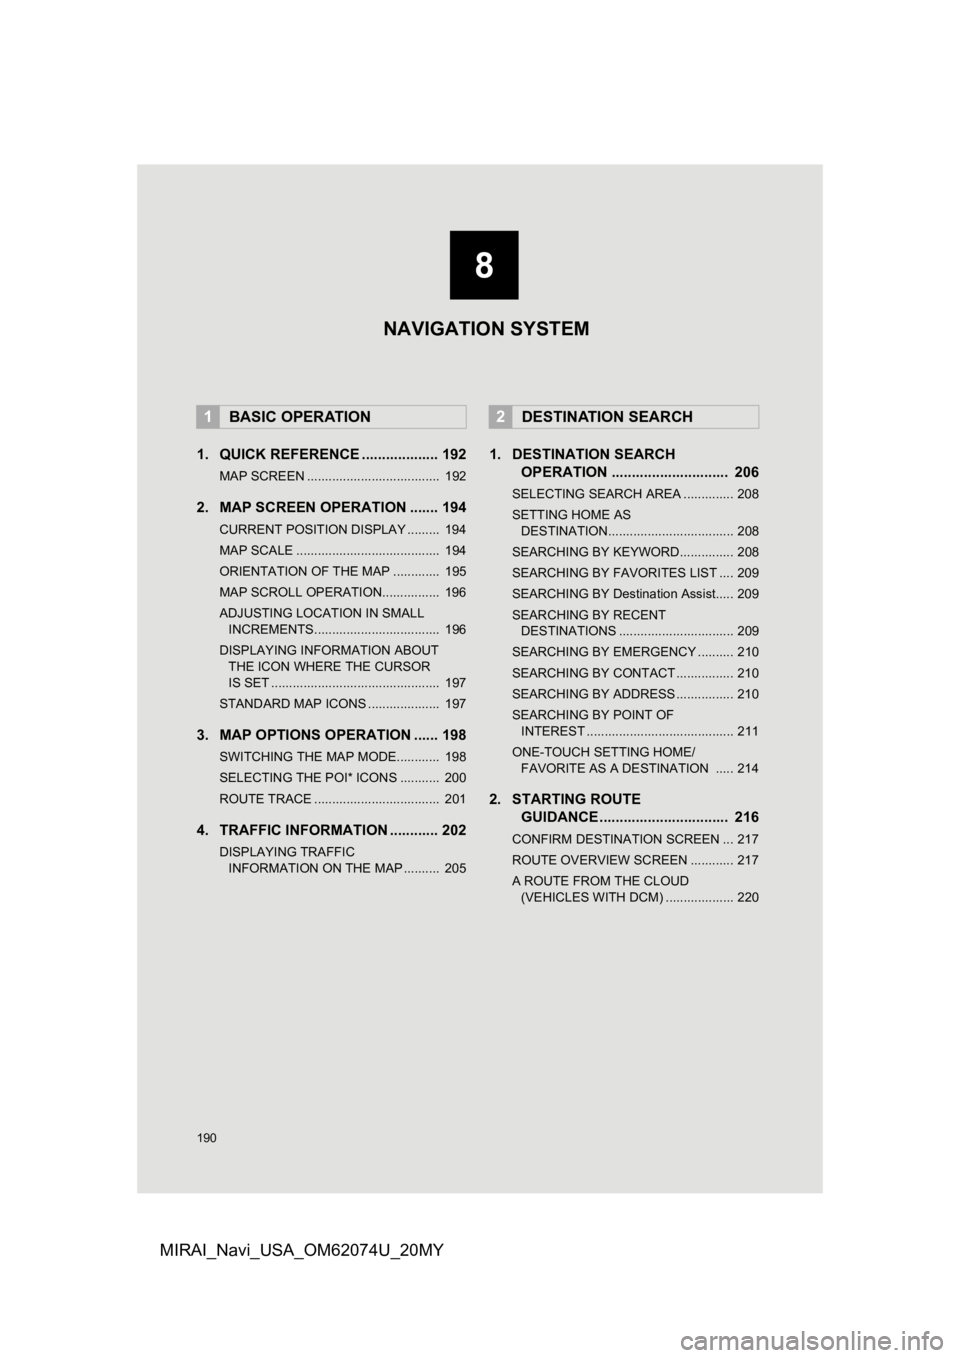
1. QUICK REFERENCE ................... 192
MAP SCREEN ..................................... 192
2. MAP SCREEN OPERATION ....... 194
CURRENT POSITION DISPLAY ......... 194
MAP SCALE ........................................ 194
ORIENTATION OF THE MAP ............. 195
MAP SCROLL OPERATION................ 196
ADJUSTING LOCATION IN SMALL INCREMENTS................................... 196
DISPLAYING INFORMATION ABOUT THE ICON WHERE THE CURSOR
IS SET ............................................... 197
STANDARD MAP ICONS .................... 197
3. MAP OPTIONS OPERATION ...... 198
SWITCHING THE MAP MODE............ 198
SELECTING THE POI* ICONS ........... 200
ROUTE TRACE ................................... 201
4. TRAFFIC INFORMATION ............ 202
DISPLAYING TRAFFIC INFORMATION ON THE MAP .......... 205
1. DESTINATION SEARCH OPERATION ............................. 206
SELECTING SEARCH AREA .............. 208
SETTING HOME AS
DESTINATION................................... 208
SEARCHING BY KEYWORD............... 208
SEARCHING BY FAVORITES LIST .... 209
SEARCHING BY Destination Assist..... 209
SEARCHING BY RECENT DESTINATIONS ................................ 209
SEARCHING BY EMERGENCY .......... 210
SEARCHING BY CONTACT ................ 210
SEARCHING BY ADDRESS ................ 210
SEARCHING BY POINT OF INTEREST ......................................... 211
ONE-TOUCH SETTING HOME/ FAVORITE AS A DESTINATION ..... 214
2. STARTING ROUTE GUIDANCE ....... ....................... .. 216
CONFIRM DESTINATION SCREEN ... 217
ROUTE OVERVIEW SCREEN ............ 217
A ROUTE FROM THE CLOUD
(VEHICLES WITH DCM) ................... 220
1BASIC OPERATION2DESTINATION SEARCH
8
NAVIGATION SYSTEM