display TOYOTA PRIUS V 2012 Accessories, Audio & Navigation (in English)
[x] Cancel search | Manufacturer: TOYOTA, Model Year: 2012, Model line: PRIUS V, Model: TOYOTA PRIUS V 2012Pages: 228, PDF Size: 3.73 MB
Page 179 of 228
179
5
Bluetooth
® HANDS-FREE SYSTEM
3. SHORT MESSAGE FUNCTION
1. SHORT MESSAGE FUNCTION
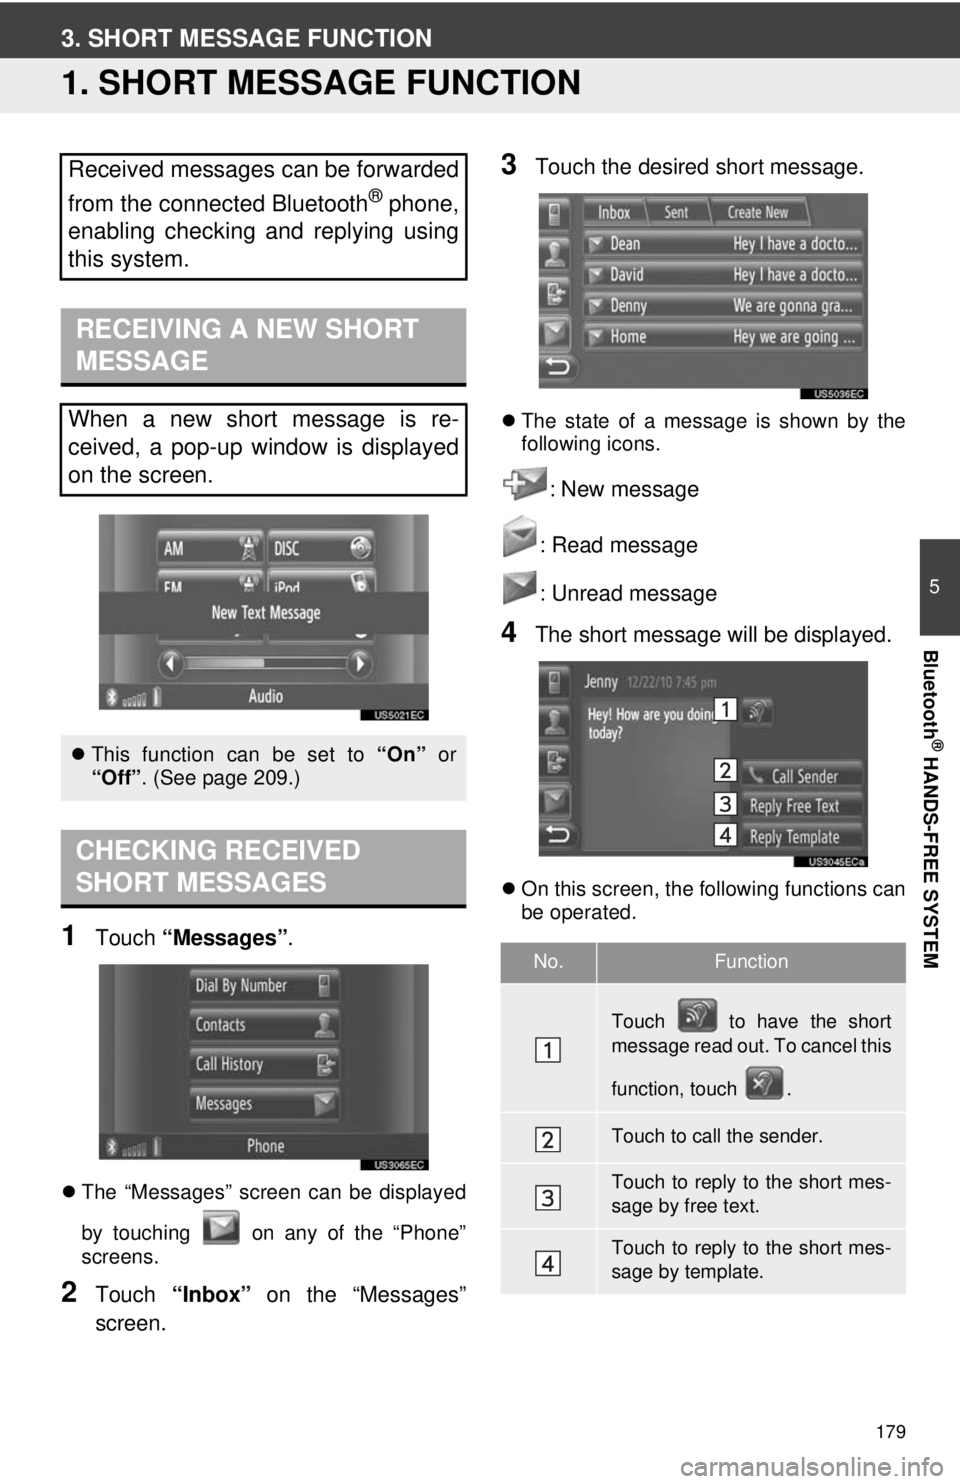
1Touch “Messages” .
The “Messages” screen can be displayed
by touching on any of the “Phone”
screens.
2Touch “Inbox” on the “Messages”
screen.
3Touch the desired short message.
The state of a message is shown by the
following icons.
: New message
: Read message
: Unread message
4The short message will be displayed.
On this screen, the following functions can
be operated.
Received messages can be forwarded
from the connected Bluetooth
® phone,
enabling checking and replying using
this system.
RECEIVING A NEW SHORT
MESSAGE
When a new short message is re-
ceived, a pop-up window is displayed
on the screen.
This function can be set to “On” or
“Off”. (See page 209.)
CHECKING RECEIVED
SHORT MESSAGES
No.Function
Touch to have the short
message read out. To cancel this
function, touch .
Touch to call the sender.
Touch to reply to the short mes-
sage by free text.
Touch to reply to the short mes-
sage by template.
Page 180 of 228
180
3. SHORT MESSAGE FUNCTION
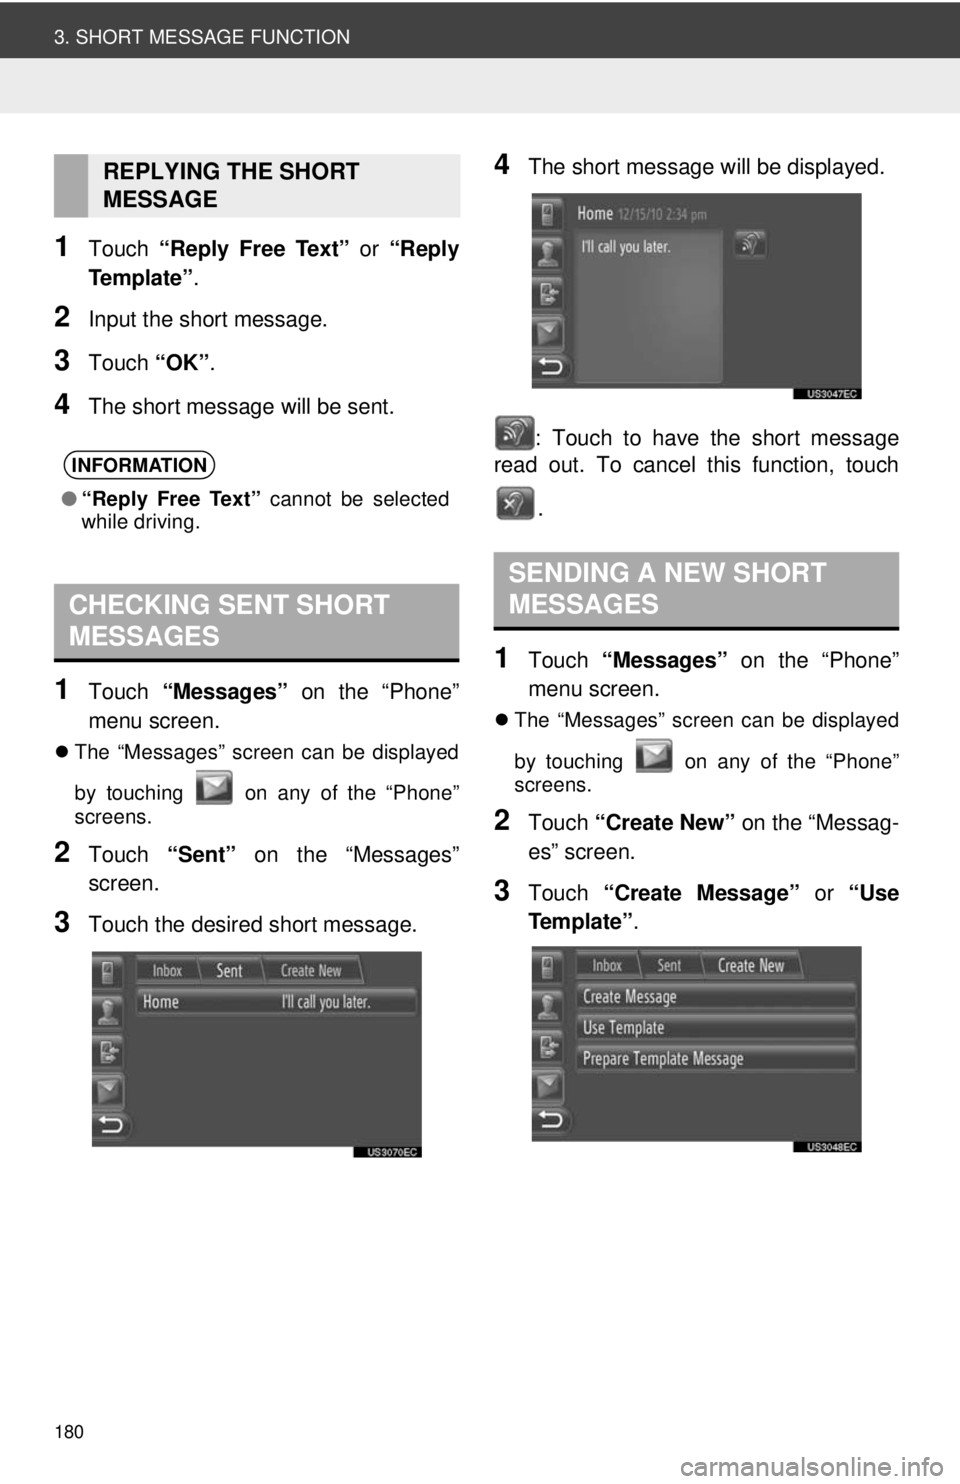
1Touch “Reply Free Text” or “Reply
Te m p l a t e ” .
2Input the short message.
3Touch “OK”.
4The short message will be sent.
1Touch “Messages” on the “Phone”
menu screen.
The “Messages” screen can be displayed
by touching on any of the “Phone”
screens.
2Touch “Sent” on the “Messages”
screen.
3Touch the desired short message.
4The short message will be displayed.
: Touch to have the short message
read out. To cancel this function, touch
.
1Touch “Messages” on the “Phone”
menu screen.
The “Messages” screen can be displayed
by touching on any of the “Phone”
screens.
2Touch “Create New” on the “Messag-
es” screen.
3Touch “Create Message” or “Use
Te m p l a t e ” .
REPLYING THE SHORT
MESSAGE
INFORMATION
●“Reply Free Text” cannot be selected
while driving.
CHECKING SENT SHORT
MESSAGES
SENDING A NEW SHORT
MESSAGES
Page 181 of 228
181
3. SHORT MESSAGE FUNCTION
5
Bluetooth
® HANDS-FREE SYSTEM
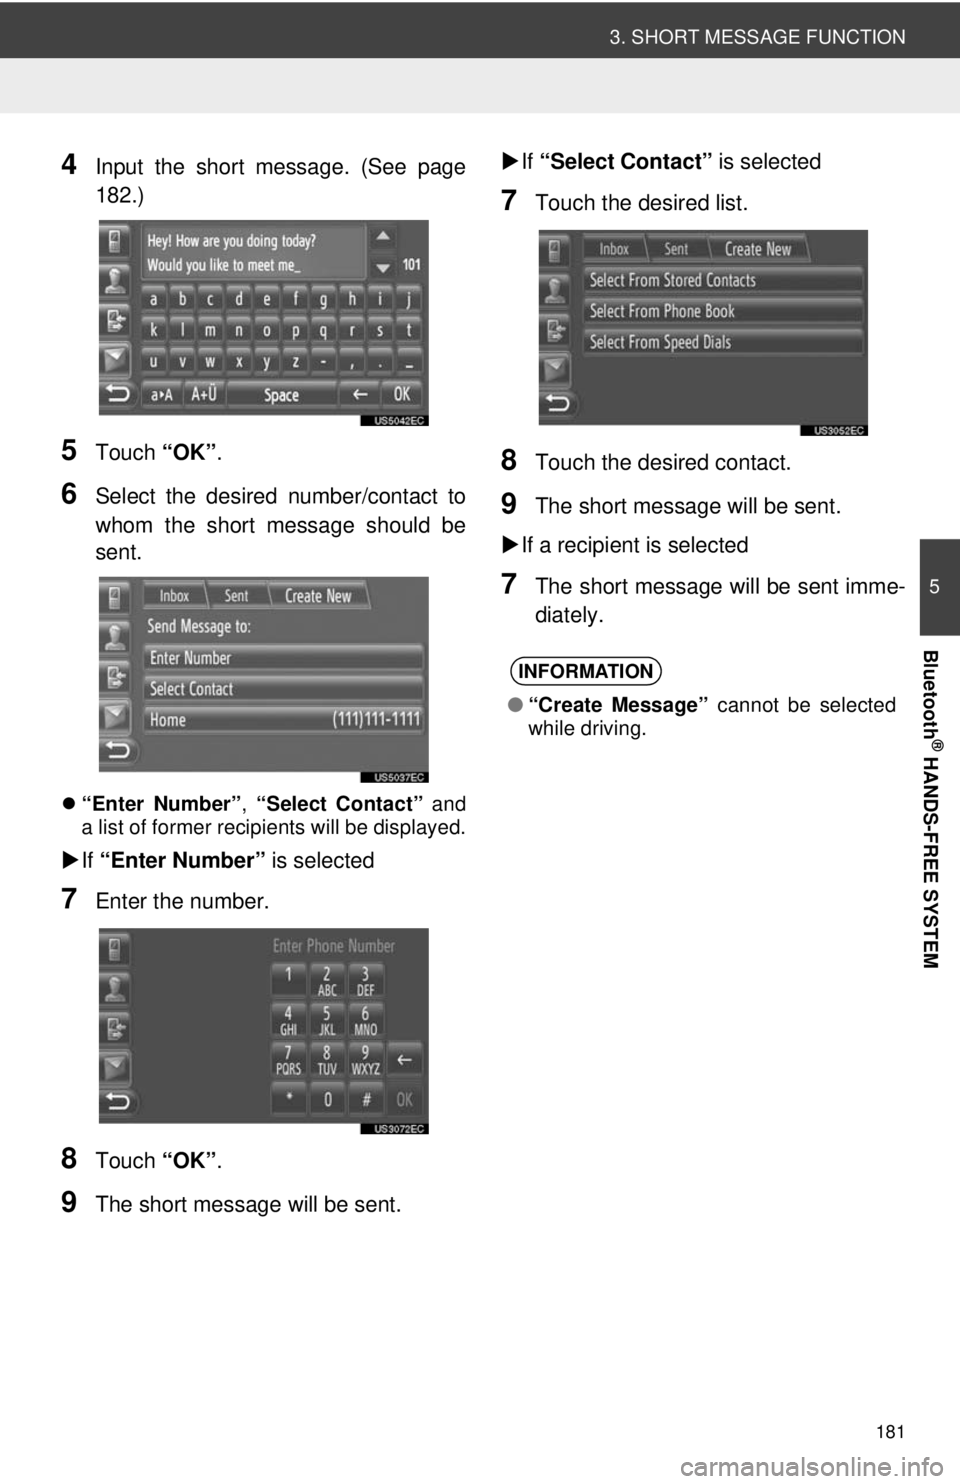
4Input the short message. (See page
182.)
5Touch “OK”.
6Select the desired number/contact to
whom the short message should be
sent.
“Enter Number” , “Select Contact” and
a list of former recipients will be displayed.
If “Enter Number” is selected
7Enter the number.
8Touch “OK”.
9The short message will be sent.
If “Select Contact” is selected
7Touch the desired list.
8Touch the desired contact.
9The short message will be sent.
If a recipient is selected
7The short message will be sent imme-
diately.
INFORMATION
● “Create Message” cannot be selected
while driving.
Page 182 of 228
182
3. SHORT MESSAGE FUNCTION
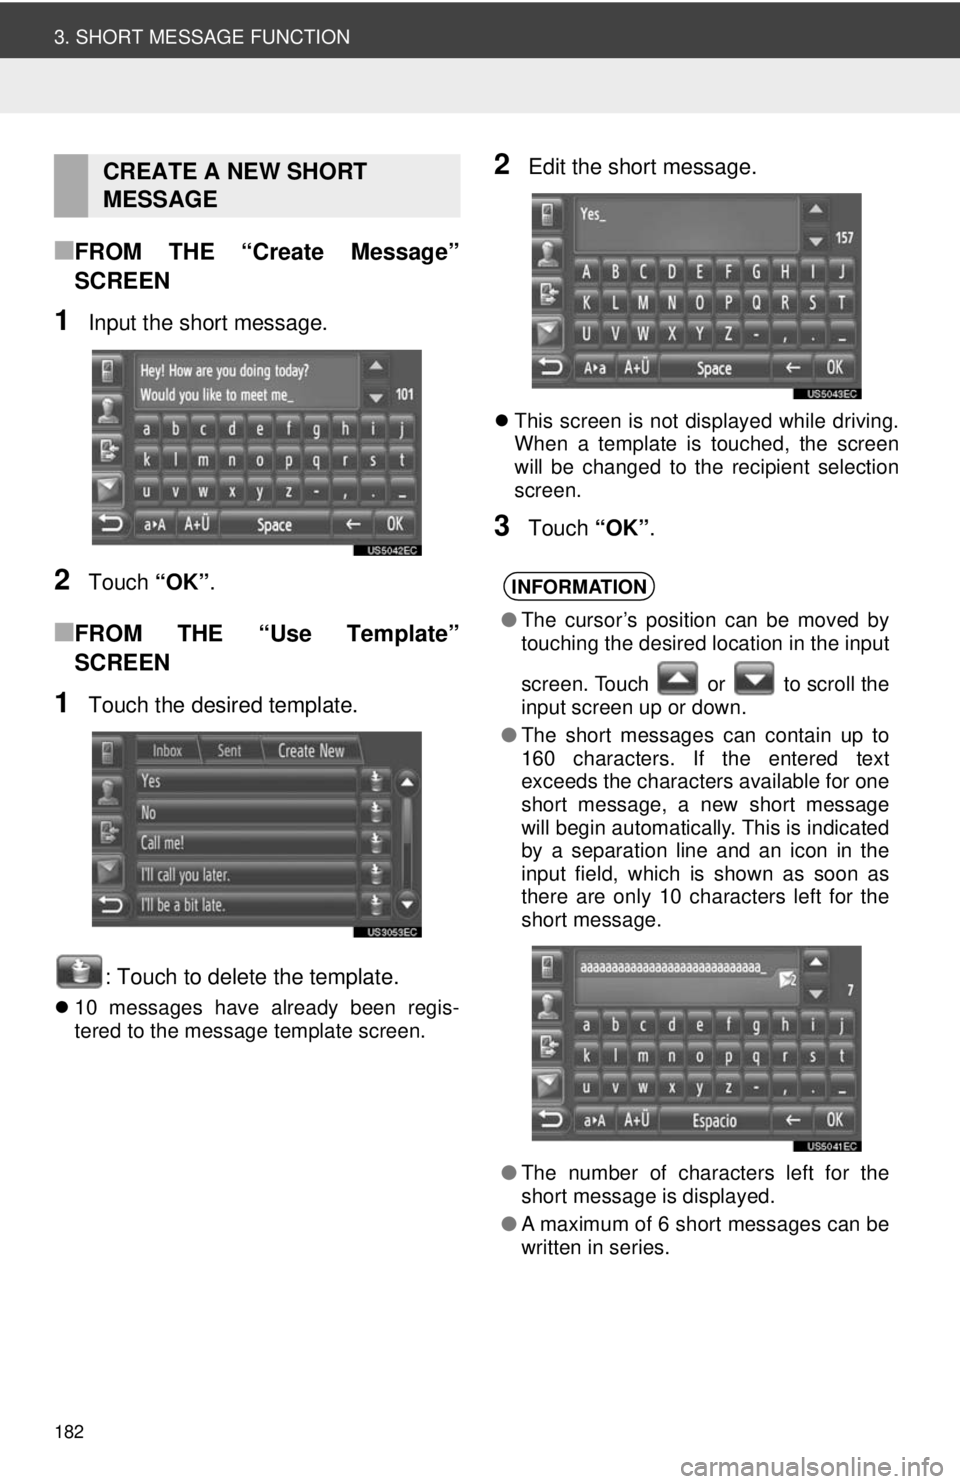
■FROM THE “Create Message”
SCREEN
1Input the short message.
2Touch “OK”.
■FROM THE “Use Template”
SCREEN
1Touch the desired template.
: Touch to delete the template.
10 messages have already been regis-
tered to the message template screen.
2Edit the short message.
This screen is not displayed while driving.
When a template is touched, the screen
will be changed to the recipient selection
screen.
3Touch “OK”.
CREATE A NEW SHORT
MESSAGE
INFORMATION
●The cursor’s position can be moved by
touching the desired location in the input
screen. Touch or to scroll the
input screen up or down.
● The short messages can contain up to
160 characters. If the entered text
exceeds the characters available for one
short message, a new short message
will begin automatically. This is indicated
by a separation line and an icon in the
input field, which is shown as soon as
there are only 10 characters left for the
short message.
● The number of characters left for the
short message is displayed.
● A maximum of 6 short messages can be
written in series.
Page 187 of 228
187
1. VOICE COMMAND SYSTEM OPERATION
6
VOICE COMMAND SYSTEM
1Press the talk switch.
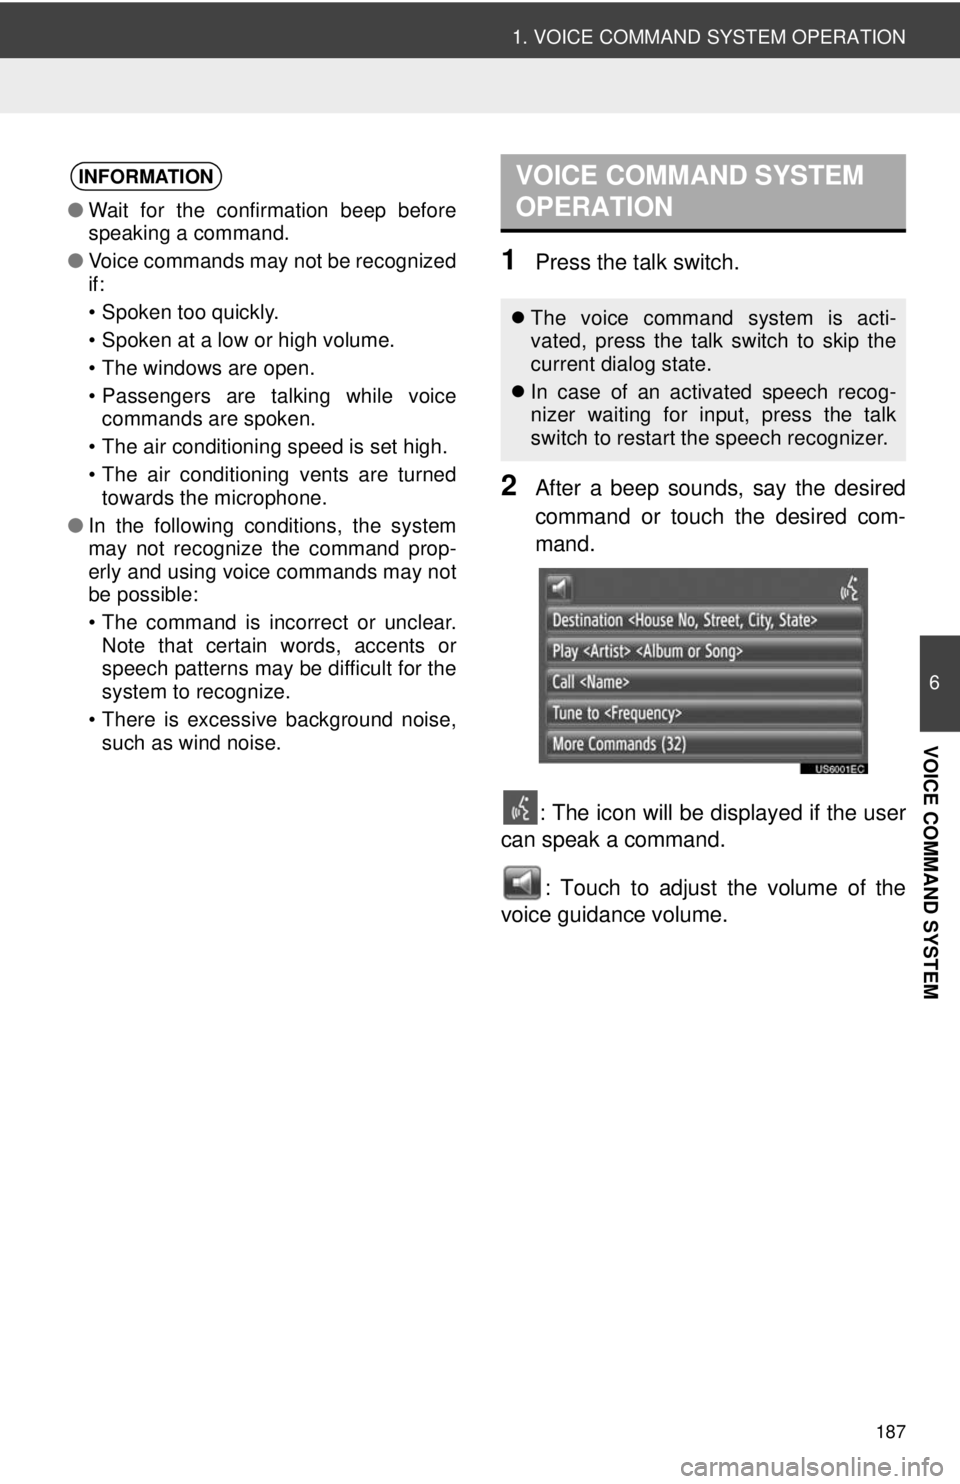
2After a beep sounds, say the desired
command or touch the desired com-
mand.: The icon will be displayed if the user
can speak a command.
: Touch to adjust the volume of the
voice guidance volume.
INFORMATION
● Wait for the confirmation beep before
speaking a command.
● Voice commands may not be recognized
if:
• Spoken too quickly.
• Spoken at a low or high volume.
• The windows are open.
• Passengers are talking while voice
commands are spoken.
• The air conditioning speed is set high.
• The air conditioning vents are turned towards the microphone.
● In the following conditions, the system
may not recognize the command prop-
erly and using voice commands may not
be possible:
• The command is incorrect or unclear.
Note that certain words, accents or
speech patterns may be difficult for the
system to recognize.
• There is excessive background noise, such as wind noise.
VOICE COMMAND SYSTEM
OPERATION
The voice command system is acti-
vated, press the talk switch to skip the
current dialog state.
In case of an activated speech recog-
nizer waiting for input, press the talk
switch to restart the speech recognizer.
Page 188 of 228
188
1. VOICE COMMAND SYSTEM OPERATION
■DISPLAYING THE COMMAND LIST
SCREEN
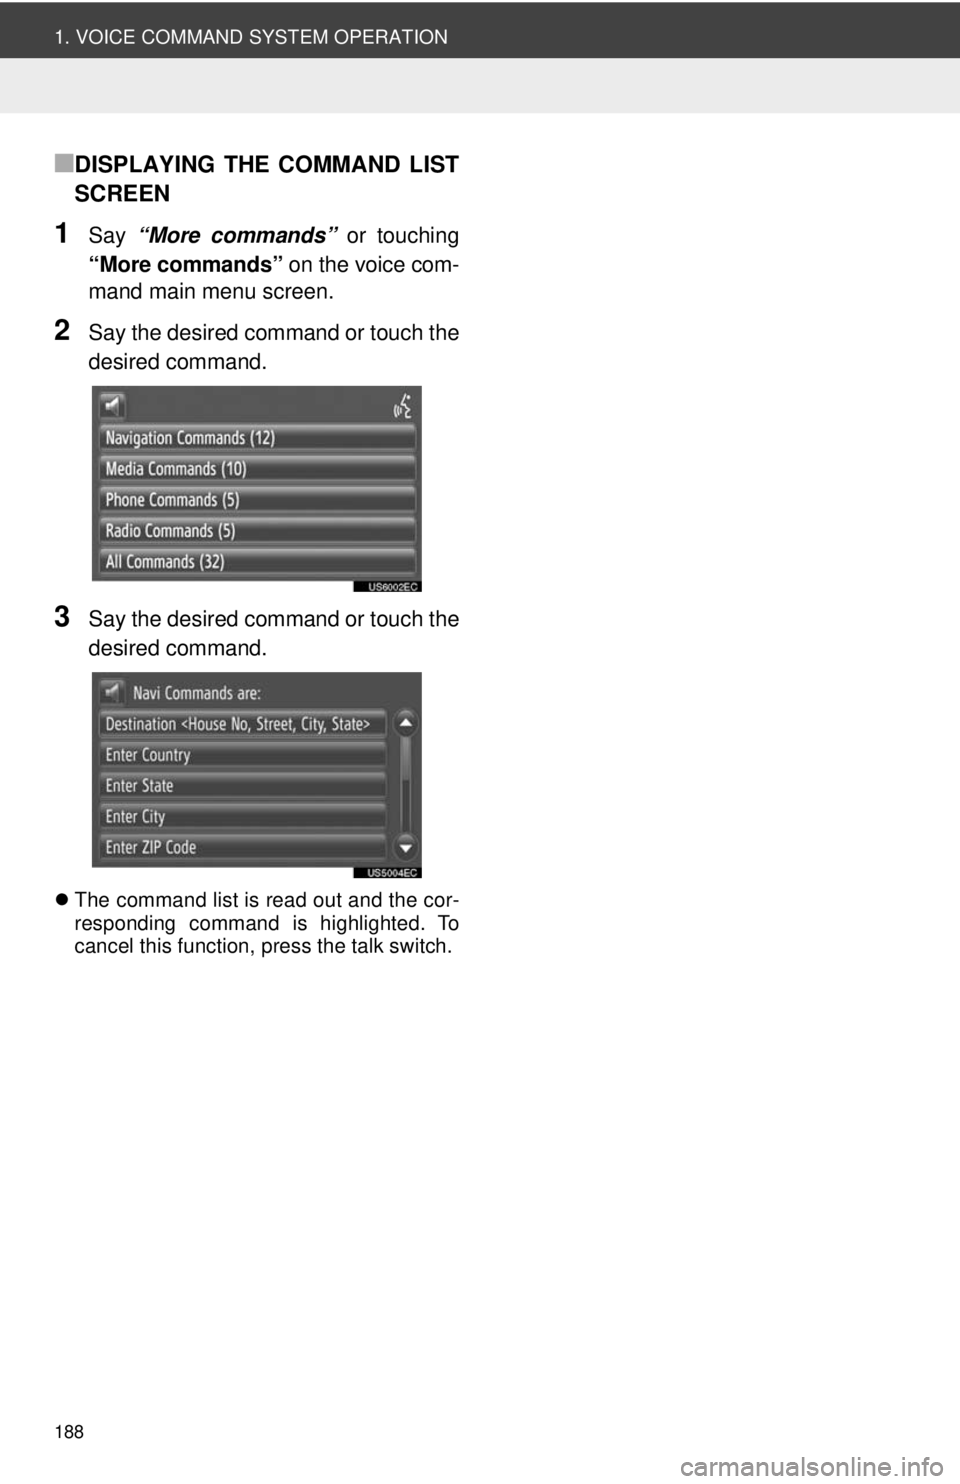
1Say “More commands” or touching
“More commands” on the voice com-
mand main menu screen.
2Say the desired command or touch the
desired command.
3Say the desired command or touch the
desired command.
The command list is read out and the cor-
responding command is highlighted. To
cancel this function, press the talk switch.
Page 190 of 228
190
1. VEHICLE INFORMATION
1. QUICK REFERENCE
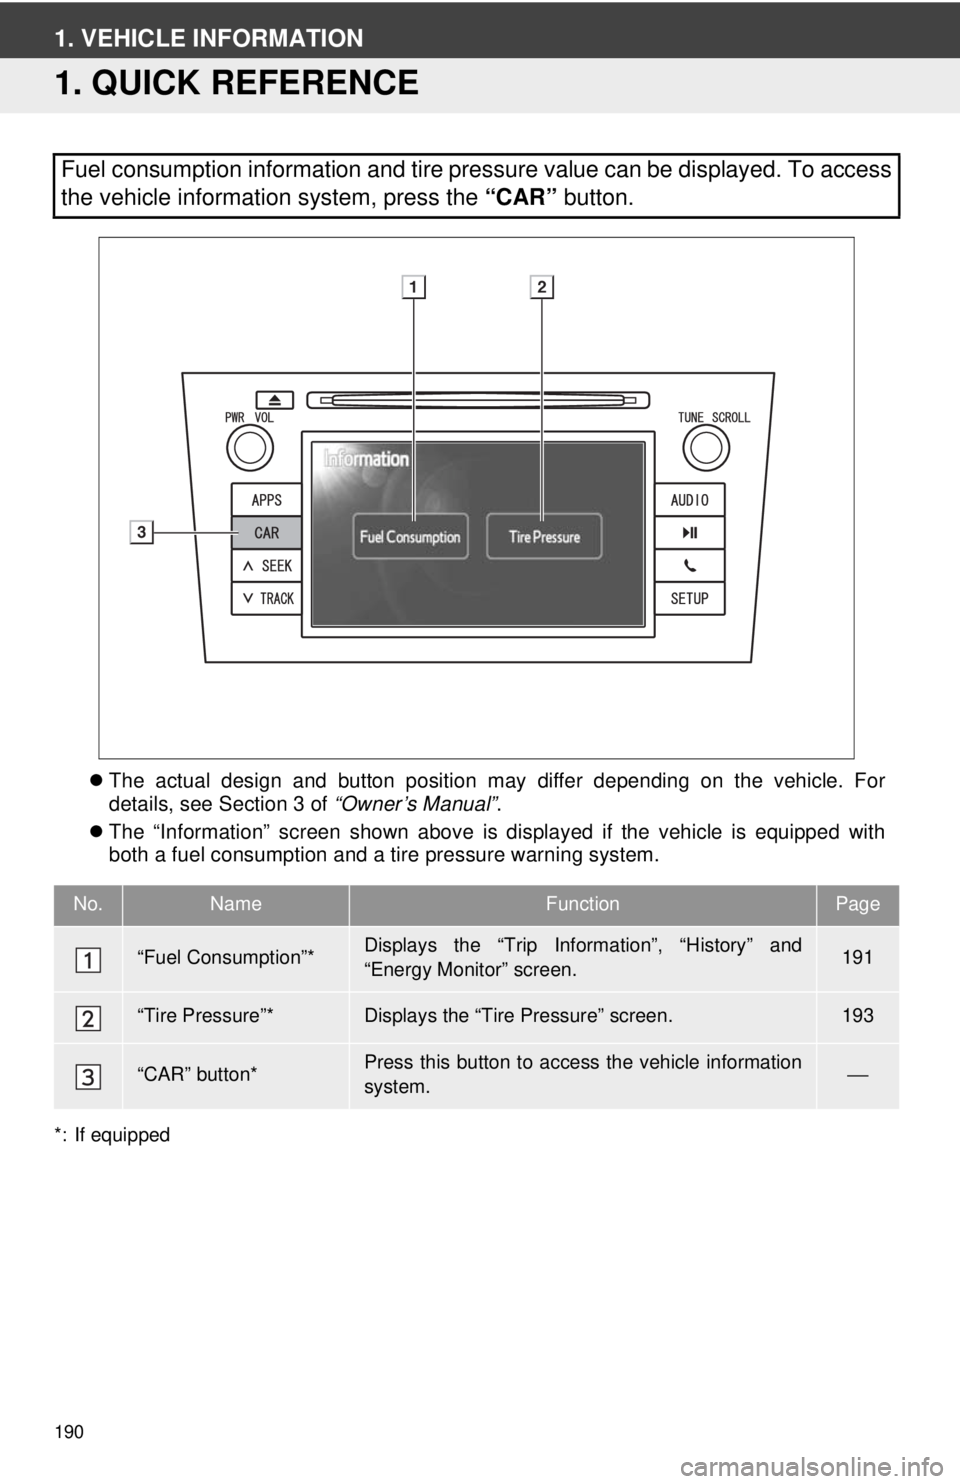
The actual design and button position may differ depending on the vehicle. For
details, see Section 3 of “Owner’s Manual”.
The “Information” screen shown above is displayed if the vehicle is equipped with
both a fuel consumption and a tire pressure warning system.
*: If equipped
Fuel consumption information and tire pressure value can be displayed. To access
the vehicle information system, press the “CAR” button.
No.NameFunctionPage
“Fuel Consumption”*Displays the “Trip Information”, “History” and
“Energy Monitor” screen.191
“Tire Pressure”*Displays the “Tire Pressure” screen.193
“CAR” button*Press this button to access the vehicle information
system.⎯
Page 191 of 228
191
7
VEHICLE INFORMATION
1. VEHICLE INFORMATION
2. FUEL CONSUMPTION∗
Energy monitor
Trip consumption
History
1Press the “CAR” button.
2Touch “Fuel Consumption” .
“Trip Information” or “History” screen will
be displayed.
The “Information” screen is not displayed
if the vehicles not equipped with a tire
pressure warning system.
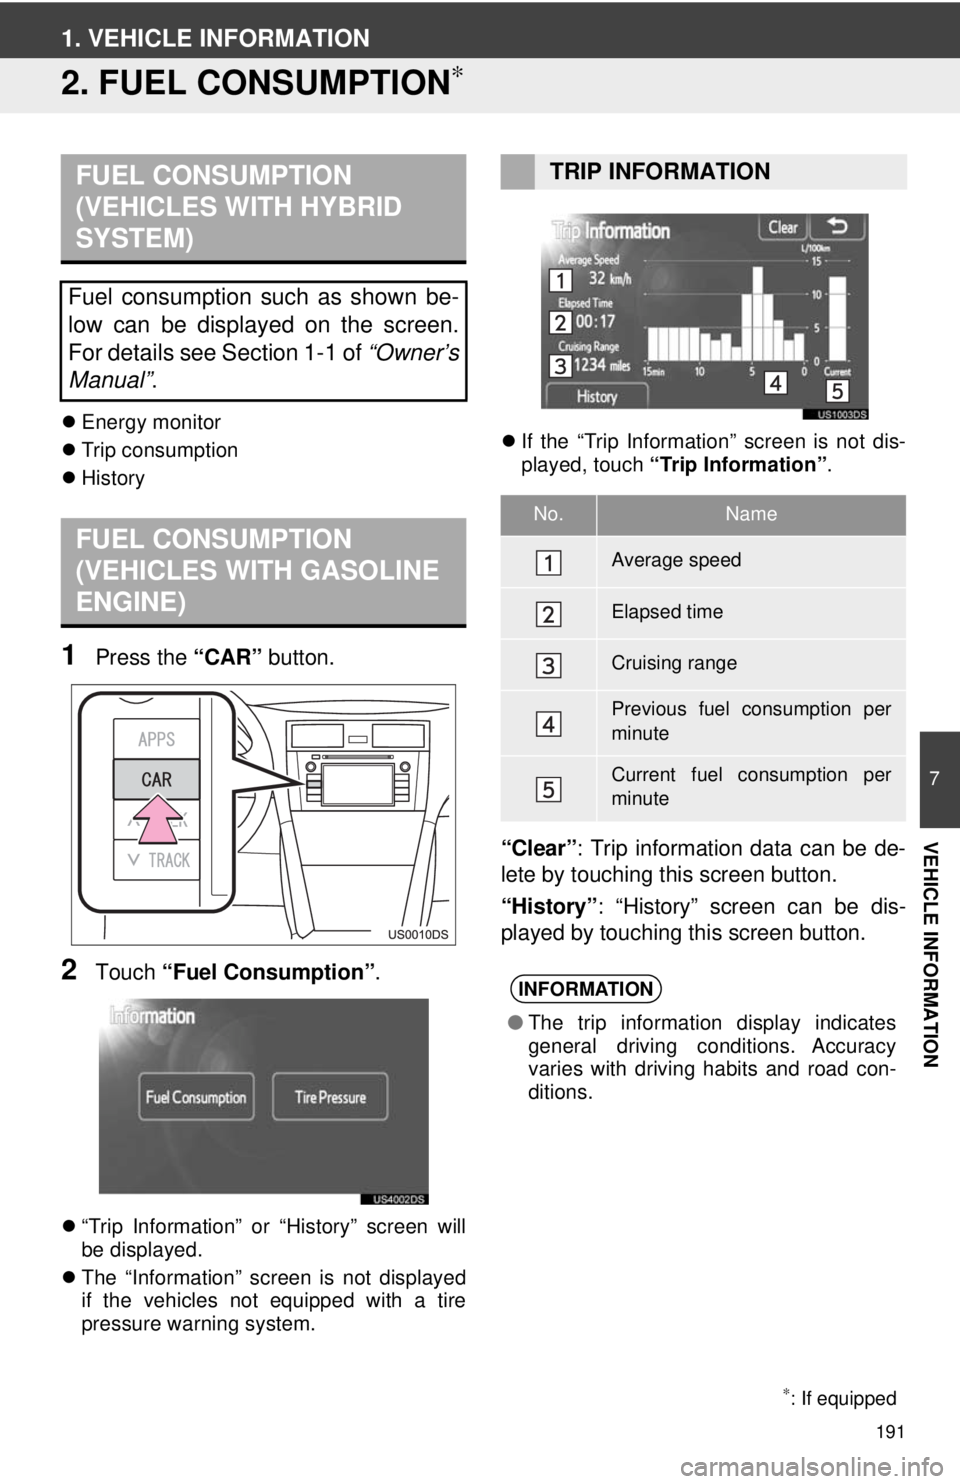
If the “Trip Information” screen is not dis-
played, touch “Trip Information” .
“Clear”: Trip information data can be de-
lete by touching this screen button.
“History” : “History” screen can be dis-
played by touching this screen button.
FUEL CONSUMPTION
(VEHICLES WITH HYBRID
SYSTEM)
Fuel consumption such as shown be-
low can be displayed on the screen.
For details see Section 1-1 of “Owner’s
Manual” .
FUEL CONSUMPTION
(VEHICLES WITH GASOLINE
ENGINE)
∗: If equipped
TRIP INFORMATION
No.Name
Average speed
Elapsed time
Cruising range
Previous fuel consumption per
minute
Current fuel consumption per
minute
INFORMATION
●The trip information display indicates
general driving conditions. Accuracy
varies with driving habits and road con-
ditions.
Page 192 of 228
192
1. VEHICLE INFORMATION
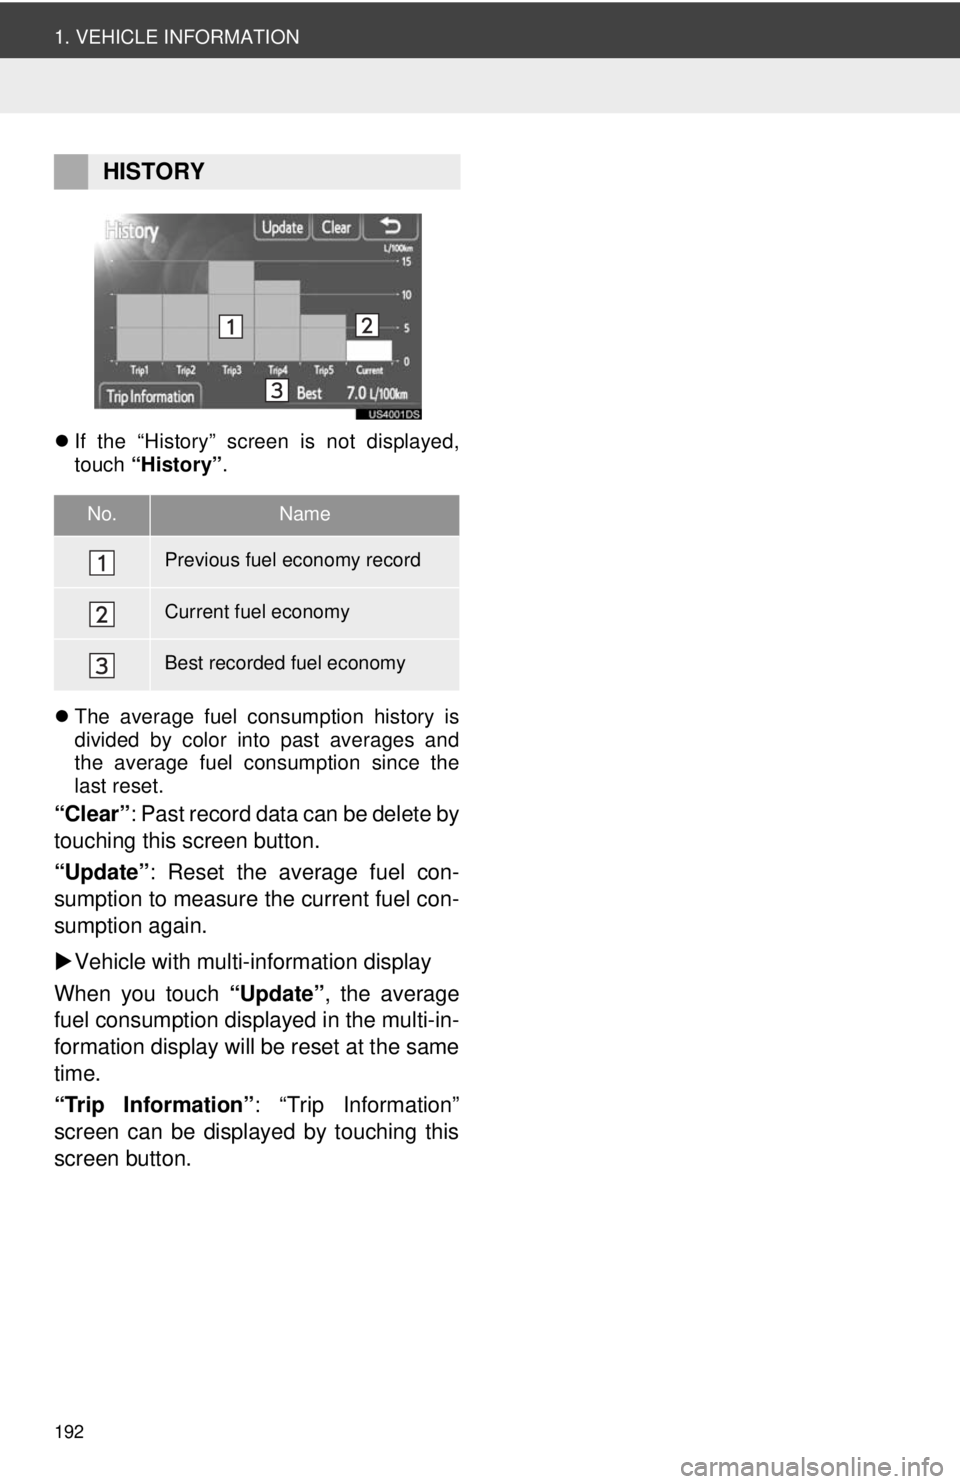
If the “History” screen is not displayed,
touch “History” .
The average fuel consumption history is
divided by color into past averages and
the average fuel consumption since the
last reset.
“Clear” : Past record data can be delete by
touching this screen button.
“Update” : Reset the average fuel con-
sumption to measure the current fuel con-
sumption again.
Vehicle with multi-information display
When you touch “Update”, the average
fuel consumption displa yed in the multi-in-
formation display will be reset at the same
time.
“Trip Information” : “Trip Information”
screen can be displayed by touching this
screen button.
HISTORY
No.Name
Previous fuel economy record
Current fuel economy
Best recorded fuel economy
Page 193 of 228
193
7
VEHICLE INFORMATION
1. VEHICLE INFORMATION
3. TIRE PRESSURE WARNING SYSTEM∗
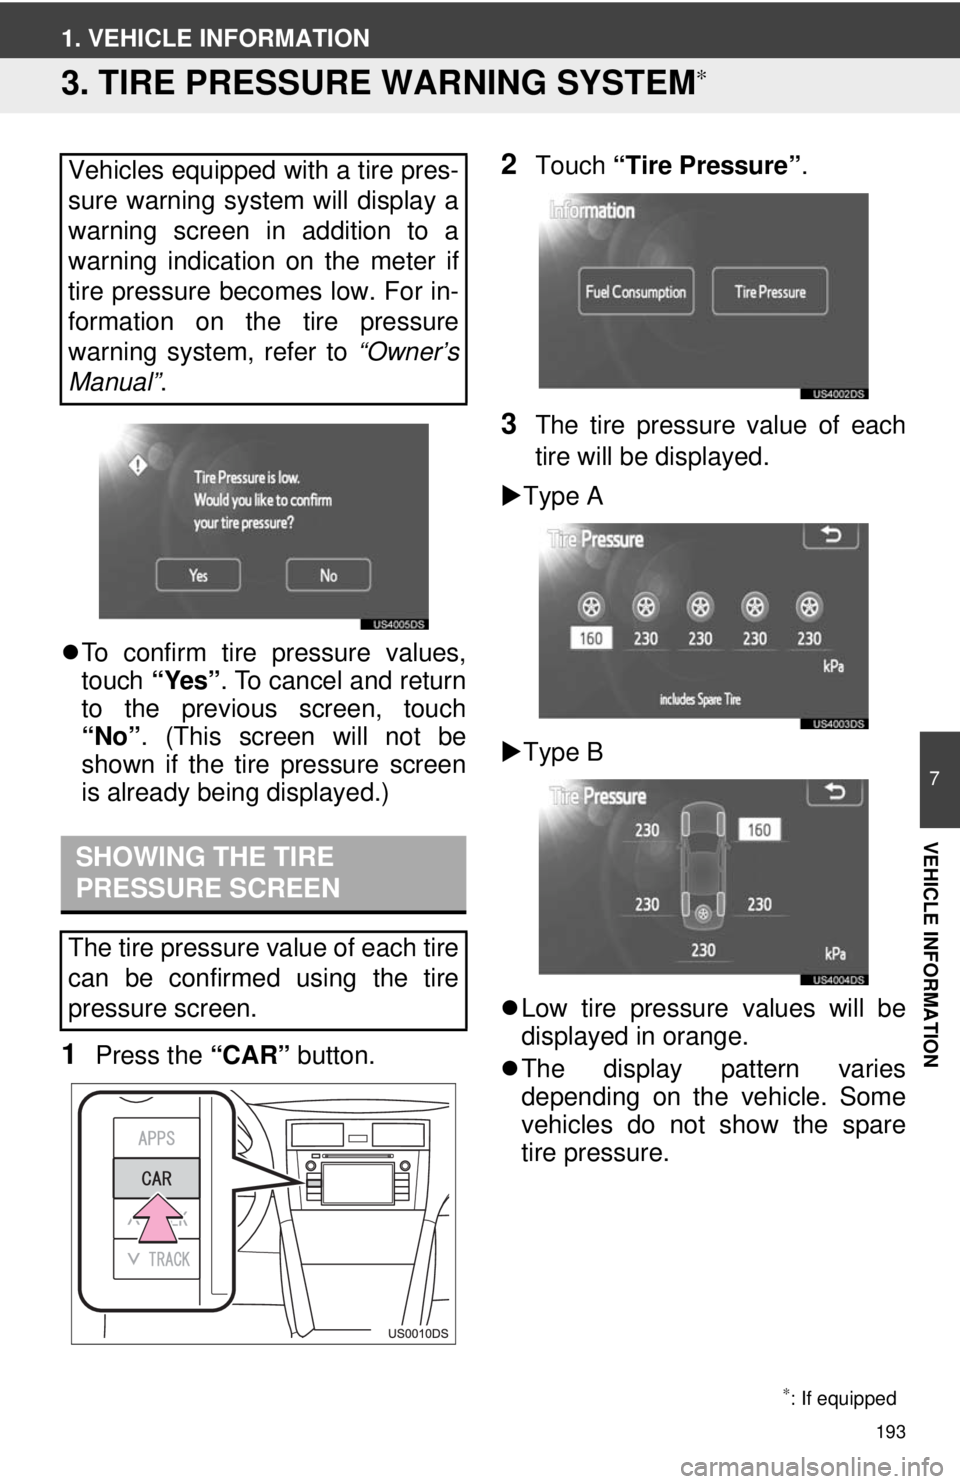
To confirm tire pressure values,
touch “Yes”. To cancel and return
to the previous screen, touch
“No” . (This screen will not be
shown if the tire pressure screen
is already being displayed.)
1Press the “CAR” button.
2Touch “Tire Pressure”.
3The tire pressure value of each
tire will be displayed.
Type A
Type B
Low tire pressure values will be
displayed in orange.
The display pattern varies
depending on the vehicle. Some
vehicles do not show the spare
tire pressure.
Vehicles equipped with a tire pres-
sure warning system will display a
warning screen in addition to a
warning indication on the meter if
tire pressure becomes low. For in-
formation on the tire pressure
warning system, refer to
“Owner’s
Manual” .
SHOWING THE TIRE
PRESSURE SCREEN
The tire pressure value of each tire
can be confirmed using the tire
pressure screen.
∗: If equipped