display TOYOTA PRIUS V 2012 Accessories, Audio & Navigation (in English)
[x] Cancel search | Manufacturer: TOYOTA, Model Year: 2012, Model line: PRIUS V, Model: TOYOTA PRIUS V 2012Pages: 228, PDF Size: 3.73 MB
Page 148 of 228
148
1. AUDIO SYSTEM OPERATION
MP3 (MPEG Audio Layer 3) and WMA
(Windows Media Audio) are audio com-
pression standards.
The MP3/WMA player can play MP3 and
WMA files on CD-ROM, CD-R and CD-
RW discs.
The unit can play disc recordings compati-
ble with ISO 9660 level 1,2 (Romeo Joliet)
and UDF (2.01 or lower) file system.
When naming an MP3 or WMA file, add
the appropriate file extension (.mp3 or
.wma).
The MP3/WMA player plays back files
with .mp3 or .wma file extensions as MP3
or WMA files. To prevent noise and play-
back errors, use the appropriate file exten-
sions.
The player can play only the first session
using multi-session compatible CDs.
MP3 files are compatible with the ID3 Tag
Ver. 1.0, Ver. 1.1, Ver. 2.2, and Ver. 2.3
formats. The unit cannot display disc title,
track title and artist name in other formats.
USB memory: MP3 files are compatible
with the ID3 Tag Ver. 1.0, Ver. 1.1, Ver.
2.2, Ver. 2.3 and Ver. 2.4 formats. The unit
cannot display track title and artist name
in other formats.
WMA files can contain a WMA tag that is
used in the same way as an ID3 tag. WMA
tags carry information such as track title,
artist name.
The sound quality of MP3/WMA files gen-
erally improves with higher bit rates. In
order to achieve a reasonable level of
sound quality, files recorded with a bit rate
of at least 128 kbps are recommended.MP3 files:
MPEG 1 AUDIO LAYER 3
⎯ 32, 44.1, 48
kHz
MPEG2 AUDIO LAYER3
⎯ 16, 22.05, 24
kHz
WMA files for WMA player:
Ver. 7, 8, 9 CBR
⎯ 32, 44.1, 48 kHz
WMA files for USB memory:
Ver. 7, 8, 9 ⎯ HIGH PROFILE 32, 44.1, 48
kHz
MP3 files for MP3 player:
MPEG1 LAYER3 ⎯ 32 to 320 kbps
MPEG2 LSF LAYER3 ⎯ 8 to 160 kbps
MP3 files for USB memory:
MPEG 1 AUDIO LAYER 2, 3 ⎯ 32 to 320
kbps
MPEG 2 AUDIO LAYER 2, 3 ⎯ 8 to 160
kbps
WMA files for WMA player:
Ver. 7, 8 CBR ⎯ 48 to 192 kbps
Ver. 9 CBR ⎯ 48 to 320 kbps
WMA files for USB memory:
Ver. 7, 8, 9 CBR ⎯ 48 to 320 kbps
M3u playlists are not compatible with the
audio player.
MP3i (MP3 interactive) and MP3PRO for-
mats are not compatible with the audio
player.
The player is compatible with VBR (Vari-
able Bit Rate).
When playing back files recorded as VBR
(Variable Bit Rate) files, the play time will
not be correctly displayed if fast-forward or
reverse operations are used.
It is not possible to check folders that do
not include MP3/WMA files.
MP3/WMA FILESSAMPLING FREQUENCY
PLAYABLE BIT RATES
Page 153 of 228
5
153
1
2
3
4
5
6
7
8
9
1. QUICK REFERENCE ................... 154
2. HANDS-FREE SYSTEM .............. 157
USING THE PHONE SWITCH ............ 158
ABOUT THE PHONE BOOK IN THIS SYSTEM ........................................... 159
WHEN YOU RELEASE YOUR CAR ... 159
3. CONNECTING A Bluetooth® PHONE................... 161
CONNECTING A
Bluetooth® PHONE ........................... 161
4. REGISTERING A ENTRY ............ 165
REGISTERING A NEW ENTRY .......... 165
REGISTERING A ENTRY AS “Speed Dials” .................................... 167
DISPLAYING AND EDITING THE ENTRY INFORMATION .................... 168
SENDING STORED CONTACTS TO A USB MEMORY ........................ 169
1. CALLING ON A Bluetooth® PHONE................... 170
BY DIAL ............................................... 170
BY “Stored” LIST ON THE
“Contacts” SCREEN.......................... 170
BY PHONE BOOK............................... 171 BY SPEED DIALS................................ 172
BY CALL HISTORY ............................. 173
CALLING USING A SHORT
MESSAGE ......................................... 173
BY POI* CALL...................................... 174
2. RECEIVING CALLS ON A Bluetooth® PHONE .................. 175
3. TALKING ON A Bluetooth
® PHONE .................. 176
ADJUSTING THE RECEIVER
VOLUME ........................................... 177
SENDING TONES ............................... 177
DIALING A SECOND NUMBER .......... 177
1. SHORT MESSAGE FUNCTION ...... ....................... ... 179
RECEIVING A NEW SHORT
MESSAGE ......................................... 179
CHECKING RECEIVED SHORT MESSAGES ...................................... 179
CHECKING SENT SHORT MESSAGES ...................................... 180
SENDING A NEW SHORT MESSAGES ...................................... 180
1BASIC INFORMATION BEFORE
OPERATION
2TELEPHONE OPERATION
3SHORT MESSAGE FUNCTION
Bluetooth® HANDS-FREE SYSTEM
*: Point of Interest
Page 154 of 228
154
1. BASIC INFORMATION BEFORE OPERATION
1. QUICK REFERENCE
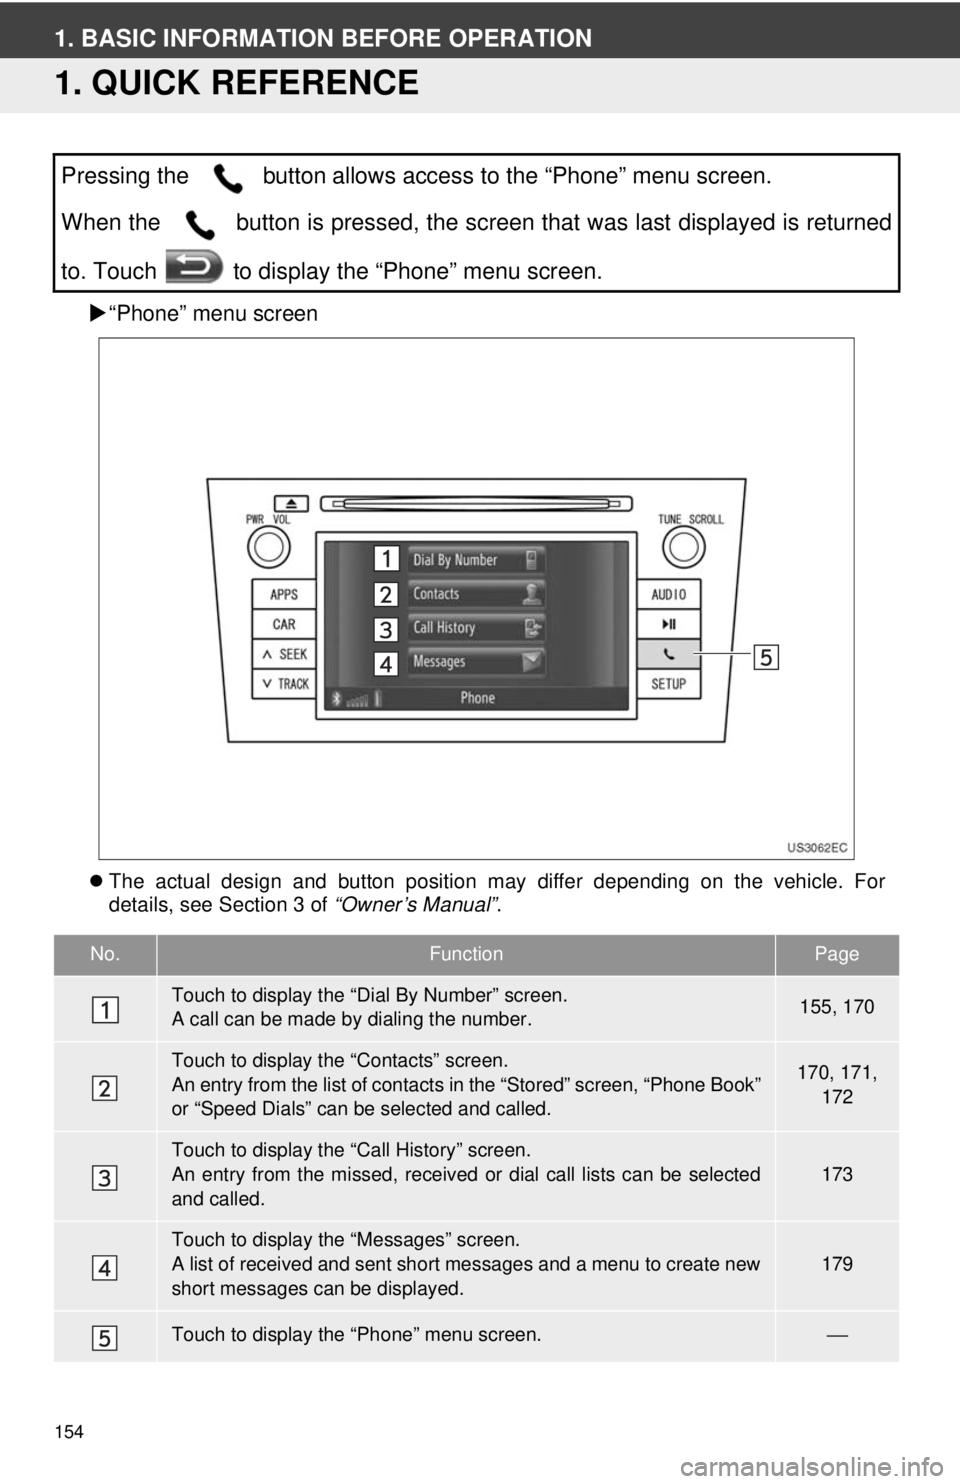
“Phone” menu screen
The actual design and button position may differ depending on the vehicle. For
details, see Section 3 of “Owner’s Manual”.
Pressing the button allows access to the “Phone” menu screen.
When the button is pressed, the screen that was last displayed is returned
to. Touch to display the “Phone” menu screen.
No.FunctionPage
Touch to display the “Dial By Number” screen.
A call can be made by dialing the number.155, 170
Touch to display the “Contacts” screen.
An entry from the list of contacts in the “Stored” screen, “Phone Book”
or “Speed Dials” can be selected and called.170, 171,
172
Touch to display the “Call History” screen.
An entry from the missed, received or dial call lists can be selected
and called.173
Touch to display the “Messages” screen.
A list of received and sent short messages and a menu to create new
short messages can be displayed.
179
Touch to display the “Phone” menu screen.⎯
Page 155 of 228
155
1. BASIC INFORMATION BEFORE OPERATION
5
Bluetooth
® HANDS-FREE SYSTEM
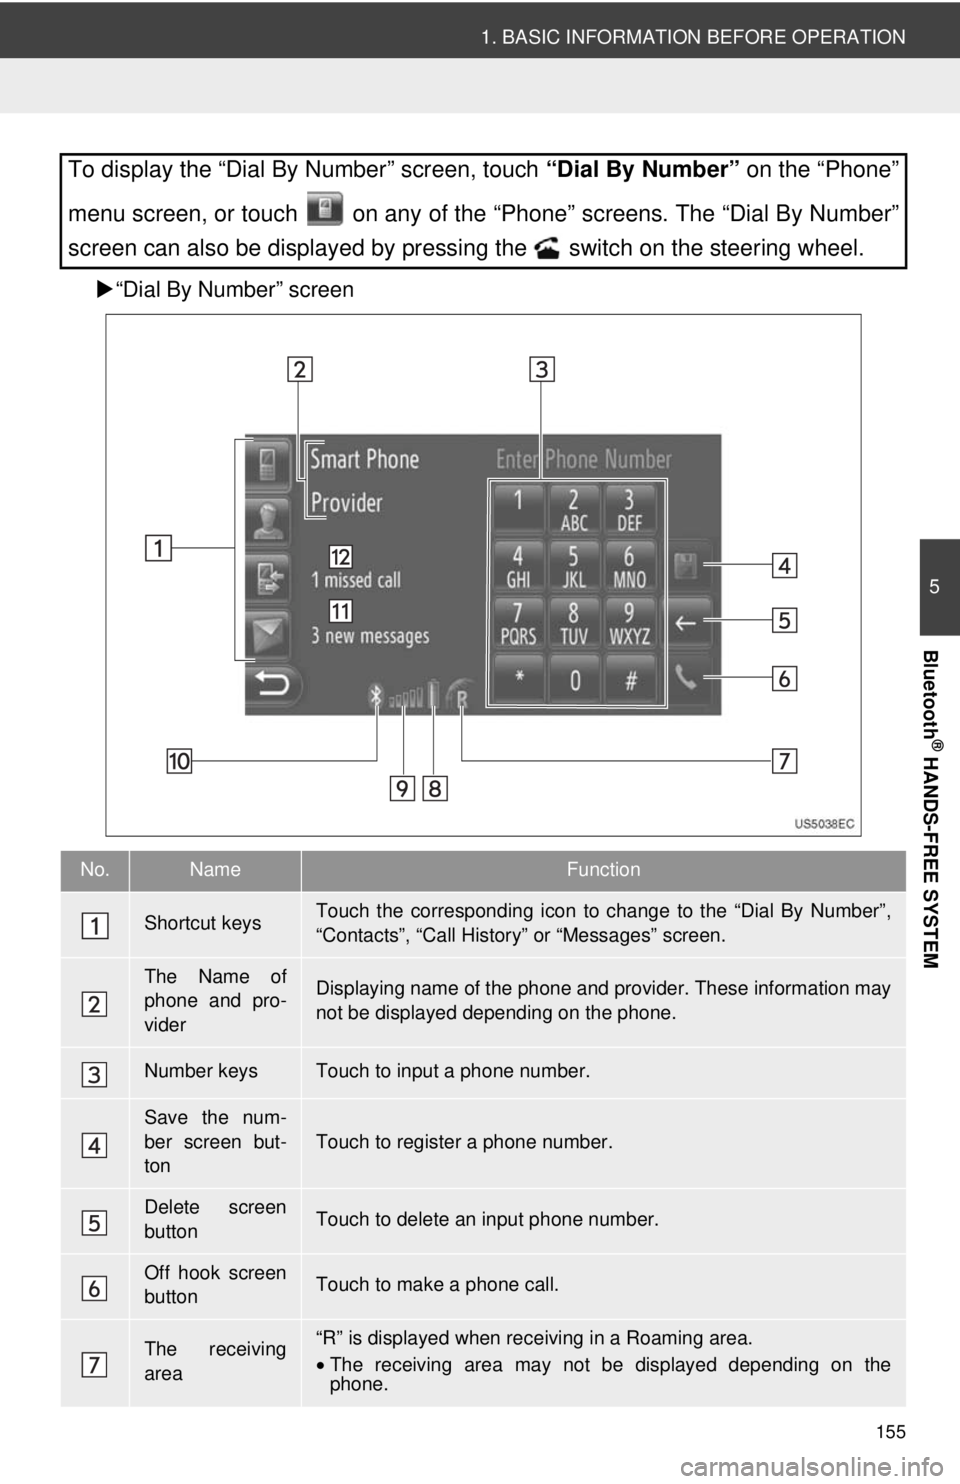
“Dial By Number” screen
To display the “Dial By Number” screen, touch “Dial By Number” on the “Phone”
menu screen, or touch on any of the “Phone” screens. The “Dial By Number”
screen can also be displayed by pressing the switch on the steering wheel.
No.NameFunction
Shortcut keysTouch the corresponding icon to change to the “Dial By Number”,
“Contacts”, “Call Histor y” or “Messages” screen.
The Name of
phone and pro-
viderDisplaying name of the phone and provider. These information may
not be displayed depending on the phone.
Number keysTouch to input a phone number.
Save the num-
ber screen but-
ton
Touch to register a phone number.
Delete screen
buttonTouch to delete an input phone number.
Off hook screen
buttonTouch to make a phone call.
The receiving
area“R” is displayed when rece iving in a Roaming area.
• The receiving area may not be displayed depending on the
phone.
Page 156 of 228
156
1. BASIC INFORMATION BEFORE OPERATION
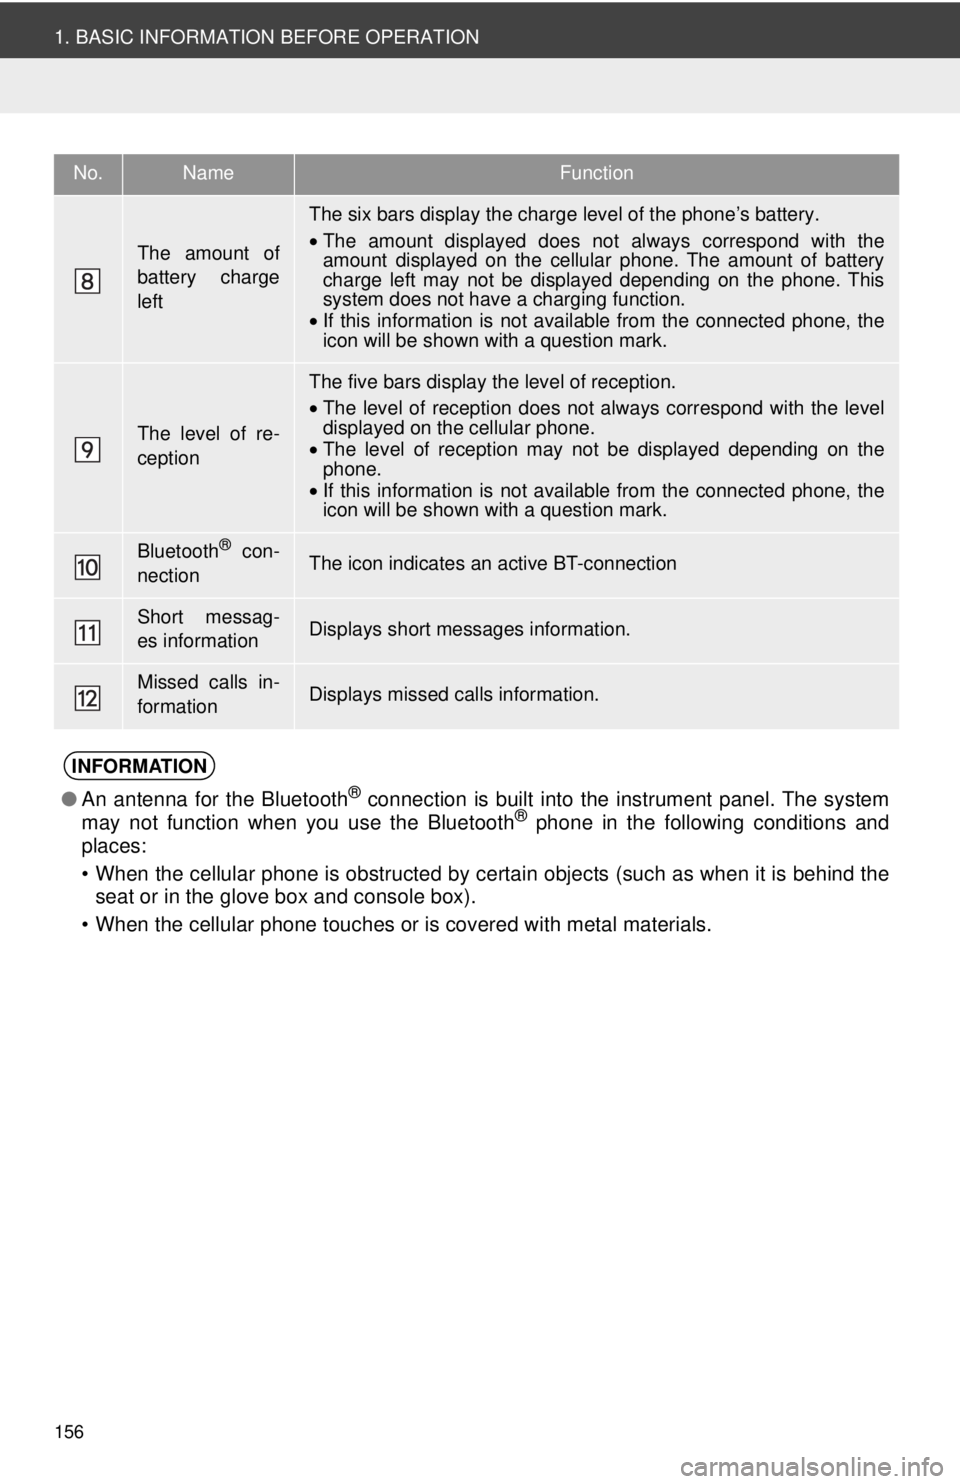
The amount of
battery charge
left
The six bars display the charge level of the phone’s battery.
•The amount displayed does not always correspond with the
amount displayed on the cellular phone. The amount of battery
charge left may not be displayed depending on the phone. This
system does not have a charging function.
• If this information is not available from the connected phone, the
icon will be shown with a question mark.
The level of re-
ception
The five bars display the level of reception.
•The level of reception does not always correspond with the level
displayed on the cellular phone.
• The level of reception may not be displayed depending on the
phone.
• If this information is not available from the connected phone, the
icon will be shown with a question mark.
Bluetooth® con-
nectionThe icon indicates an active BT-connection
Short messag-
es informationDisplays short messages information.
Missed calls in-
formationDisplays missed calls information.
INFORMATION
● An antenna for the Bluetooth® connection is built into the instrument panel. The system
may not function when you use the Bluetooth® phone in the following conditions and
places:
• When the cellular phone is obstructed by certain objects (such as when it is behind the seat or in the glove box and console box).
• When the cellular phone touches or is covered with metal materials.
No.NameFunction
Page 161 of 228
161
5
Bluetooth
® HANDS-FREE SYSTEM
1. BASIC INFORMATION BEFORE OPERATION
3. CONNECTING A Bluetooth® PHONE
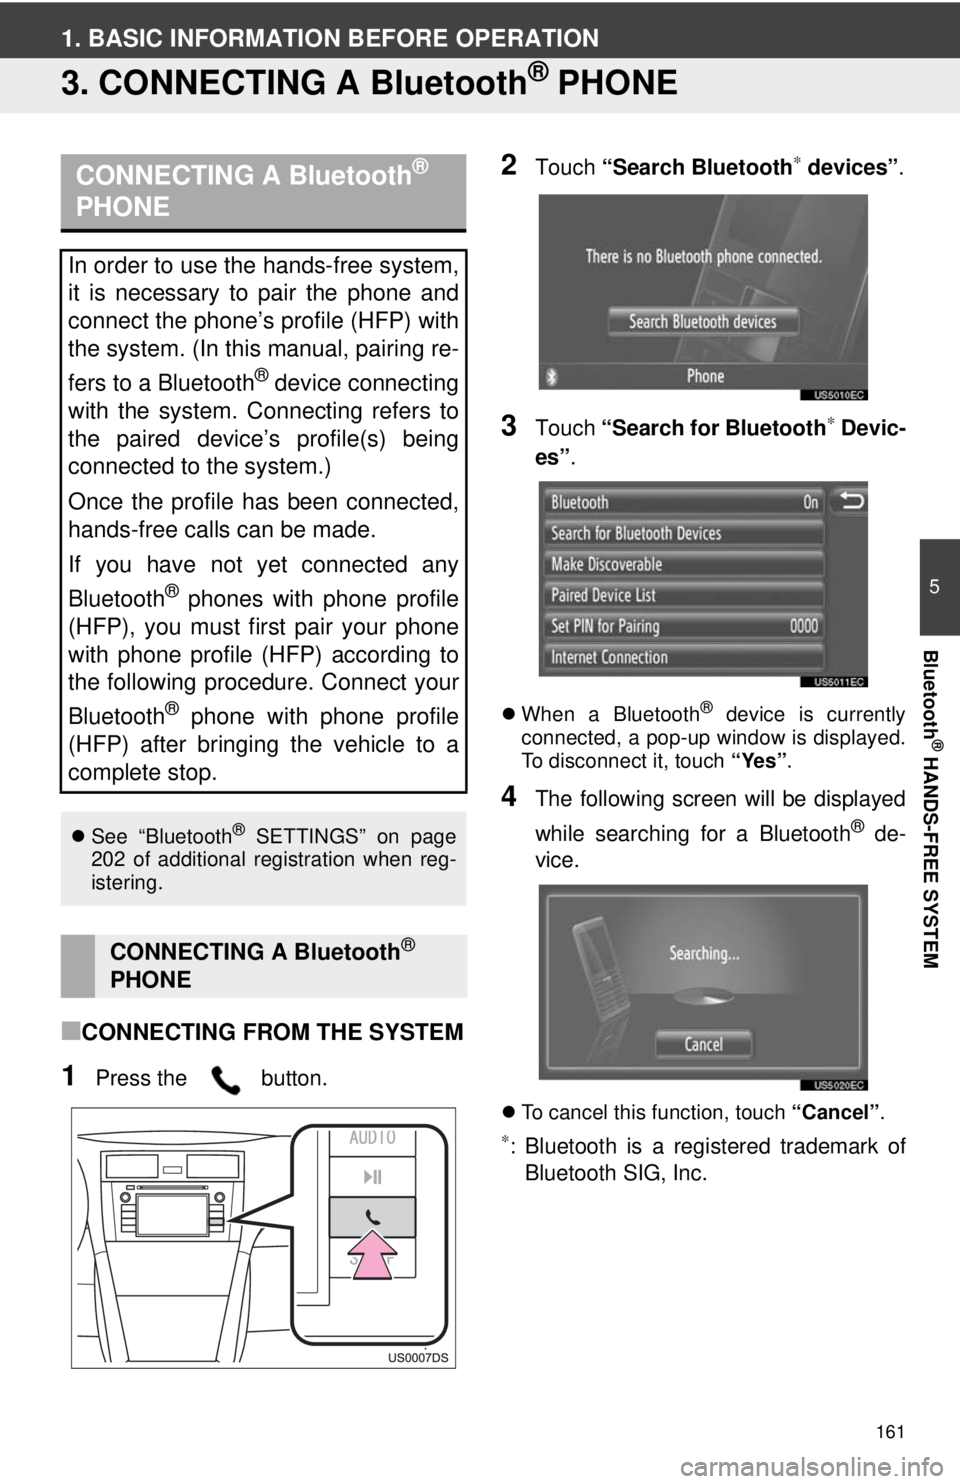
■CONNECTING FROM THE SYSTEM
1Press the button.
2Touch “Search Bluetooth∗ devices” .
3Touch “Search for Bluetooth∗ Devic-
es” .
When a Bluetooth® device is currently
connected, a pop-up window is displayed.
To disconnect it, touch “Yes”.
4The following screen will be displayed
while searching for a Bluetooth
® de-
vice.
To cancel this function, touch “Cancel”.
∗: Bluetooth is a registered trademark of
Bluetooth SIG, Inc.
CONNECTING A Bluetooth®
PHONE
In order to use the hands-free system,
it is necessary to pair the phone and
connect the phone’s profile (HFP) with
the system. (In this manual, pairing re-
fers to a Bluetooth
® device connecting
with the system. Connecting refers to
the paired device’s profile(s) being
connected to the system.)
Once the profile has been connected,
hands-free calls can be made.
If you have not yet connected any
Bluetooth
® phones with phone profile
(HFP), you must first pair your phone
with phone profile (HFP) according to
the following procedure. Connect your
Bluetooth
® phone with phone profile
(HFP) after bringing the vehicle to a
complete stop.
See “Bluetooth® SETTINGS” on page
202 of additional registration when reg-
istering.
CONNECTING A Bluetooth®
PHONE
Page 162 of 228
162
1. BASIC INFORMATION BEFORE OPERATION
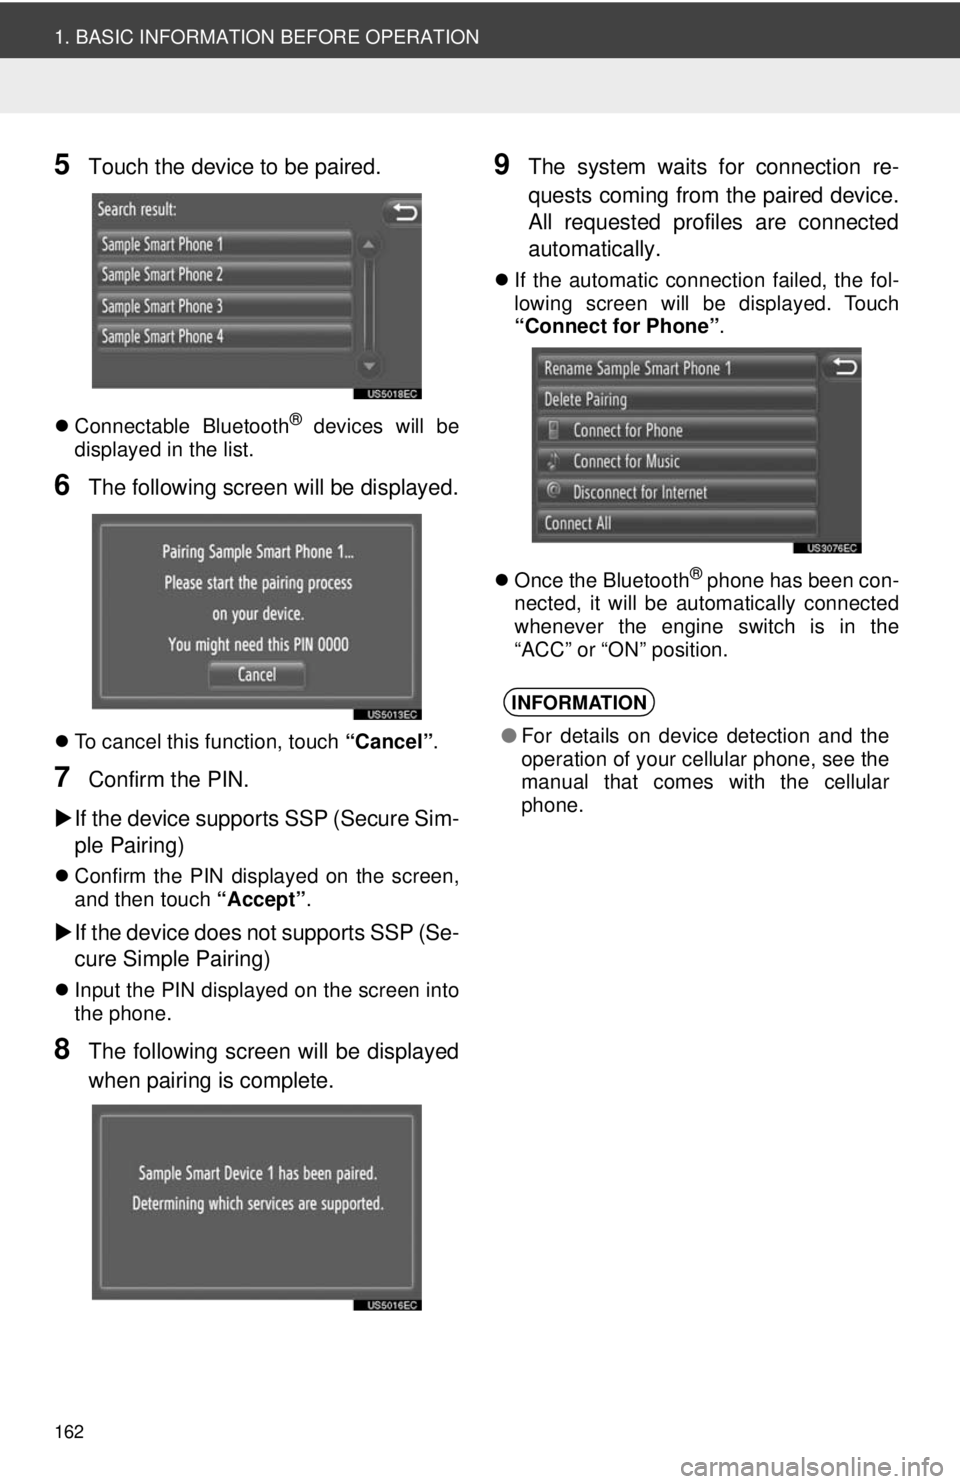
5Touch the device to be paired.
Connectable Bluetooth® devices will be
displayed in the list.
6The following screen will be displayed.
To cancel this function, touch “Cancel”.
7Confirm the PIN.
If the device supports SSP (Secure Sim-
ple Pairing)
Confirm the PIN displayed on the screen,
and then touch “Accept”.
If the device does not supports SSP (Se-
cure Simple Pairing)
Input the PIN displayed on the screen into
the phone.
8The following screen will be displayed
when pairing is complete.
9The system waits for connection re-
quests coming from the paired device.
All requested profiles are connected
automatically.
If the automatic connection failed, the fol-
lowing screen will be displayed. Touch
“Connect for Phone” .
Once the Bluetooth
® phone has been con-
nected, it will be automatically connected
whenever the engine switch is in the
“ACC” or “ON” position.
INFORMATION
● For details on device detection and the
operation of your cellular phone, see the
manual that comes with the cellular
phone.
Page 163 of 228
163
1. BASIC INFORMATION BEFORE OPERATION
5
Bluetooth
® HANDS-FREE SYSTEM
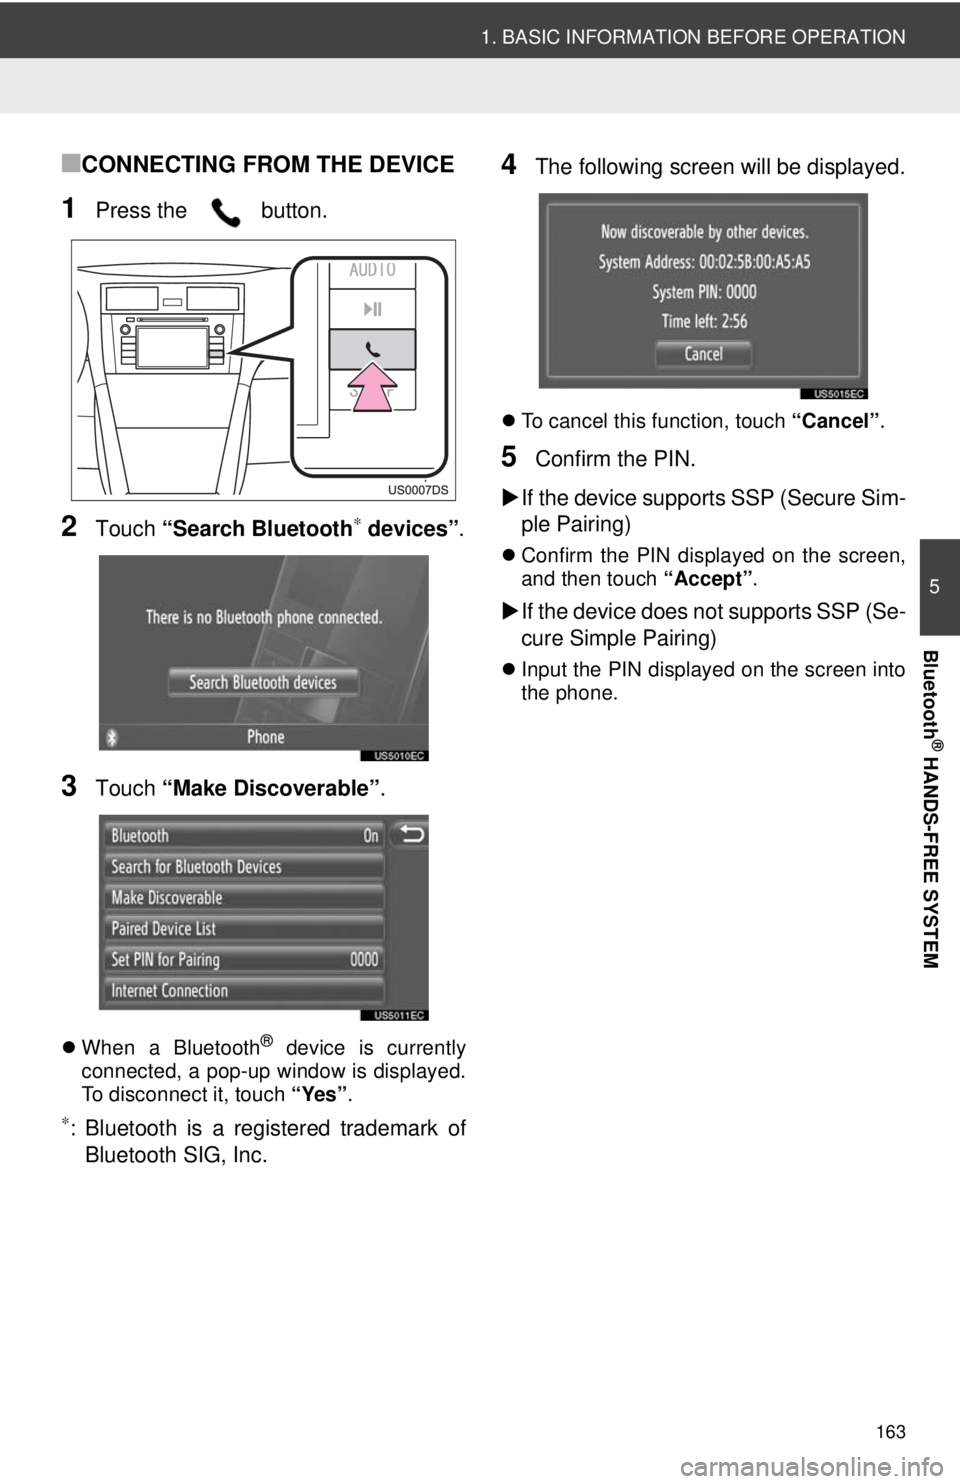
■CONNECTING FROM THE DEVICE
1Press the button.
2Touch “Search Bluetooth∗ devices” .
3Touch “Make Discoverable” .
When a Bluetooth® device is currently
connected, a pop-up window is displayed.
To disconnect it, touch “Yes”.
∗: Bluetooth is a registered trademark of
Bluetooth SIG, Inc.
4The following screen will be displayed.
To cancel this function, touch “Cancel”.
5Confirm the PIN.
If the device supports SSP (Secure Sim-
ple Pairing)
Confirm the PIN displayed on the screen,
and then touch “Accept”.
If the device does not supports SSP (Se-
cure Simple Pairing)
Input the PIN displayed on the screen into
the phone.
Page 165 of 228
165
5
Bluetooth
® HANDS-FREE SYSTEM
1. BASIC INFORMATION BEFORE OPERATION
4. REGISTERING A ENTRY
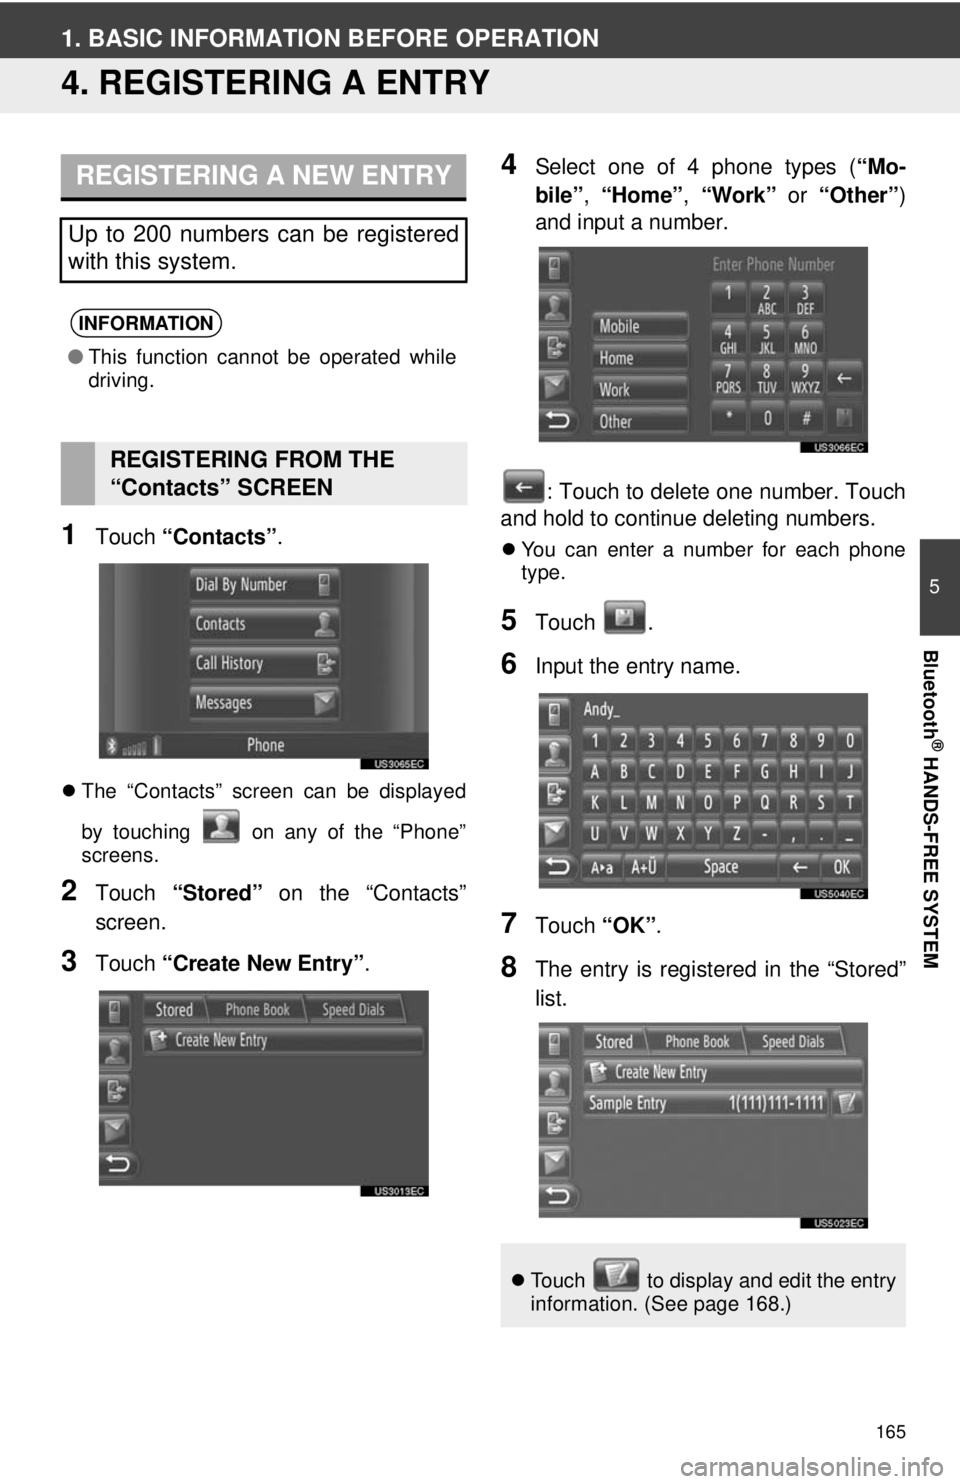
1Touch “Contacts” .
The “Contacts” screen can be displayed
by touching on any of the “Phone”
screens.
2Touch “Stored” on the “Contacts”
screen.
3Touch “Create New Entry” .
4Select one of 4 phone types ( “Mo-
bile” , “Home” , “Work” or “Other” )
and input a number.
: Touch to delete one number. Touch
and hold to continue deleting numbers.
You can enter a number for each phone
type.
5Touch .
6Input the entry name.
7Touch “OK”.
8The entry is registered in the “Stored”
list.
REGISTERING A NEW ENTRY
Up to 200 numbers can be registered
with this system.
INFORMATION
●This function cannot be operated while
driving.
REGISTERING FROM THE
“Contacts” SCREEN
Touch to display and edit the entry
information. (See page 168.)
Page 166 of 228
166
1. BASIC INFORMATION BEFORE OPERATION
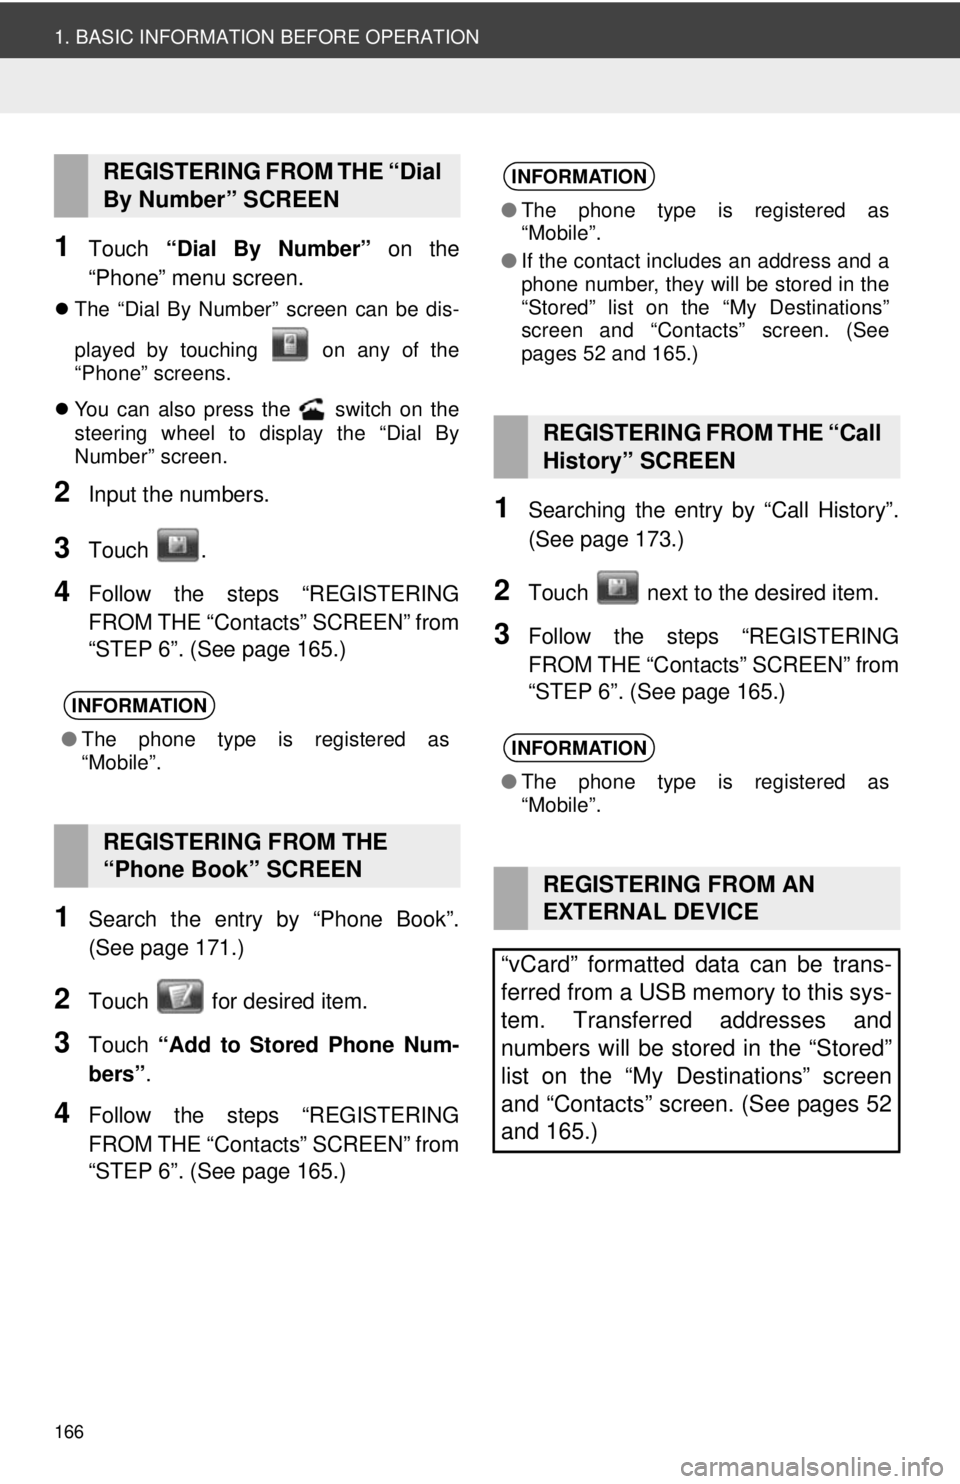
1Touch “Dial By Number” on the
“Phone” menu screen.
The “Dial By Number” screen can be dis-
played by touching on any of the
“Phone” screens.
You can also press the switch on the
steering wheel to display the “Dial By
Number” screen.
2Input the numbers.
3Touch .
4Follow the steps “REGISTERING
FROM THE “Contacts” SCREEN” from
“STEP 6”. (See page 165.)
1Search the entry by “Phone Book”.
(See page 171.)
2Touch for desired item.
3Touch “Add to Stored Phone Num-
bers” .
4Follow the steps “REGISTERING
FROM THE “Contacts” SCREEN” from
“STEP 6”. (See page 165.)
1Searching the entry by “Call History”.
(See page 173.)
2Touch next to the desired item.
3Follow the steps “REGISTERING
FROM THE “Contacts” SCREEN” from
“STEP 6”. (See page 165.)
REGISTERING FROM THE “Dial
By Number” SCREEN
INFORMATION
●The phone type is registered as
“Mobile”.
REGISTERING FROM THE
“Phone Book” SCREEN
INFORMATION
●The phone type is registered as
“Mobile”.
● If the contact includes an address and a
phone number, they will be stored in the
“Stored” list on the “My Destinations”
screen and “Contacts” screen. (See
pages 52 and 165.)
REGISTERING FROM THE “Call
History” SCREEN
INFORMATION
●The phone type is registered as
“Mobile”.
REGISTERING FROM AN
EXTERNAL DEVICE
“vCard” formatted data can be trans-
ferred from a USB memory to this sys-
tem. Transferred addresses and
numbers will be stored in the “Stored”
list on the “My Destinations” screen
and “Contacts” screen. (See pages 52
and 165.)