TOYOTA RAV4 1996 Service Repair Manual
Manufacturer: TOYOTA, Model Year: 1996,
Model line: RAV4,
Model: TOYOTA RAV4 1996
Pages: 1354, PDF Size: 30.43 MB
TOYOTA RAV4 1996 Service Repair Manual
RAV4 1996
TOYOTA
TOYOTA
https://www.carmanualsonline.info/img/14/57462/w960_57462-0.png
TOYOTA RAV4 1996 Service Repair Manual
Trending: gas type, key battery, TIMING, Electrical body, cruise control, diagram, injector
Page 231 of 1354
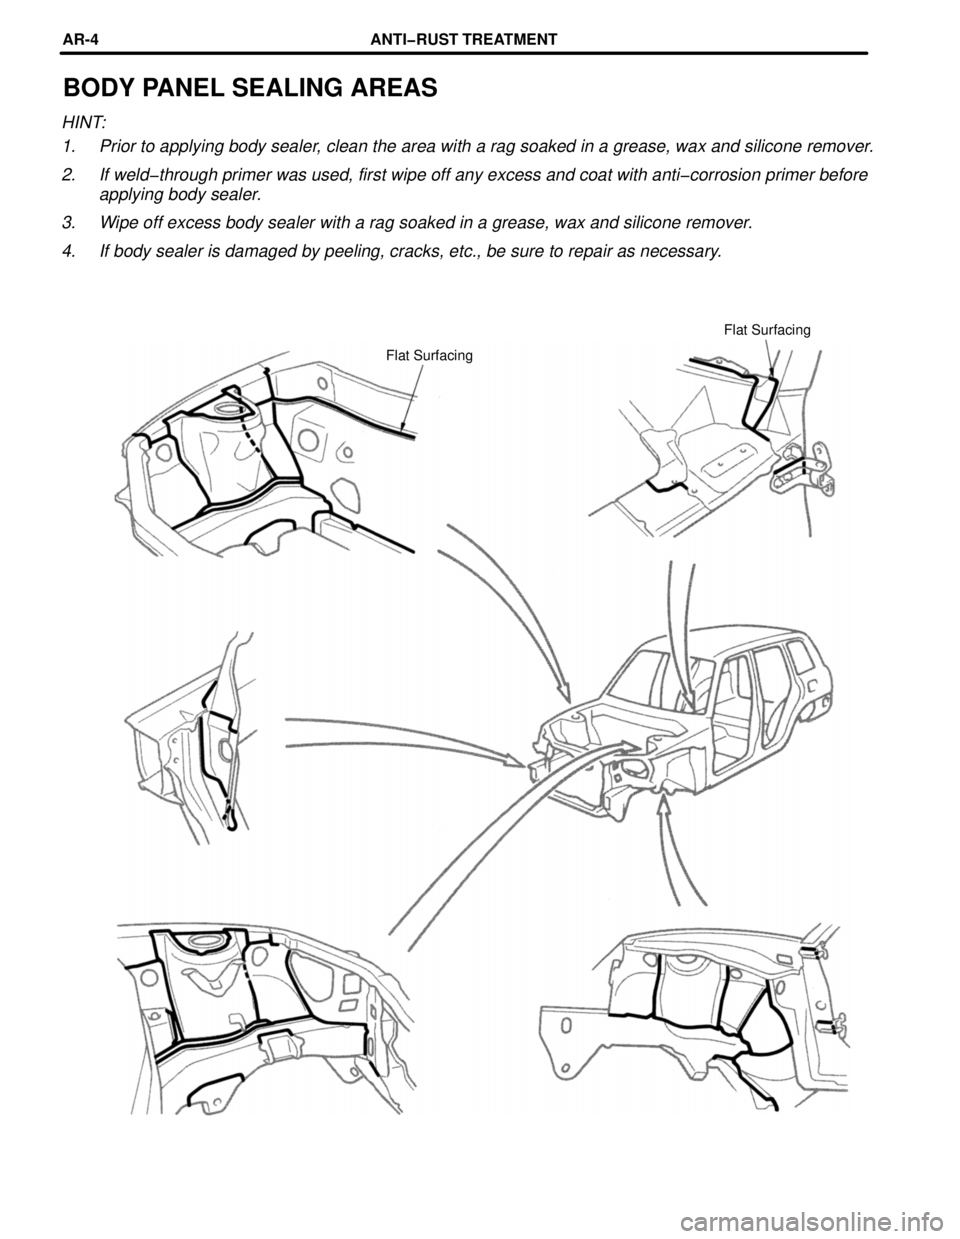
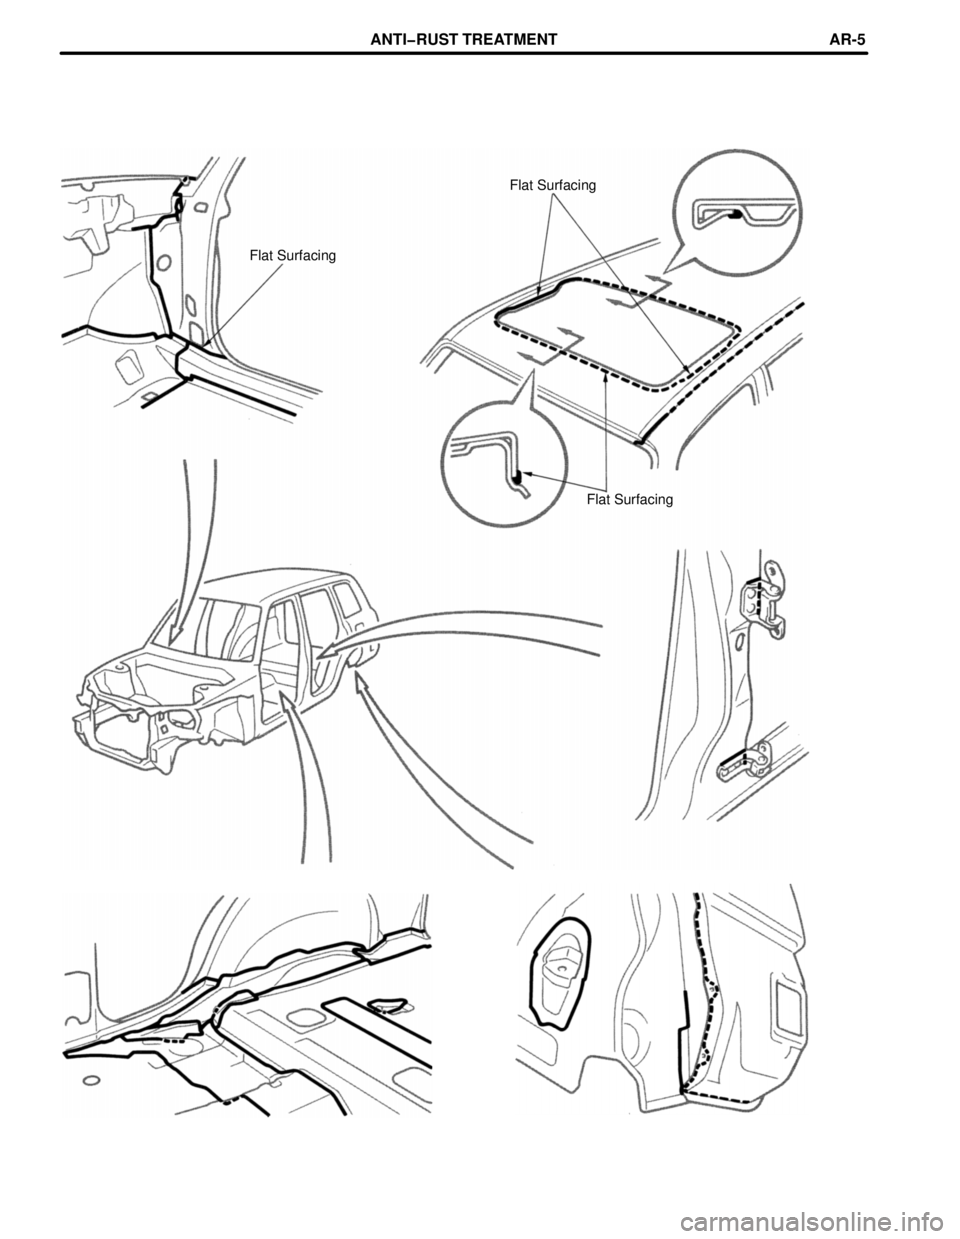
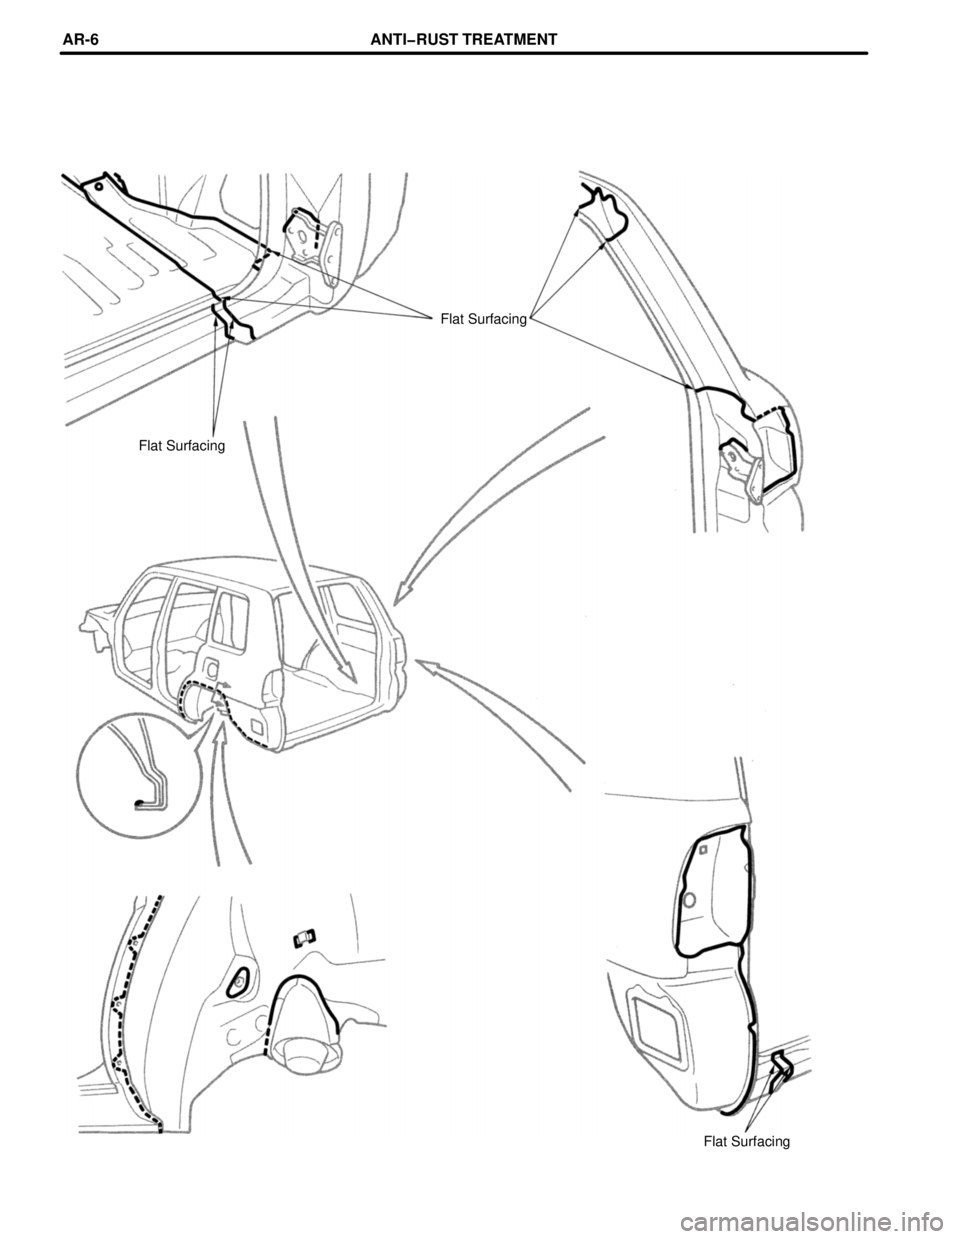
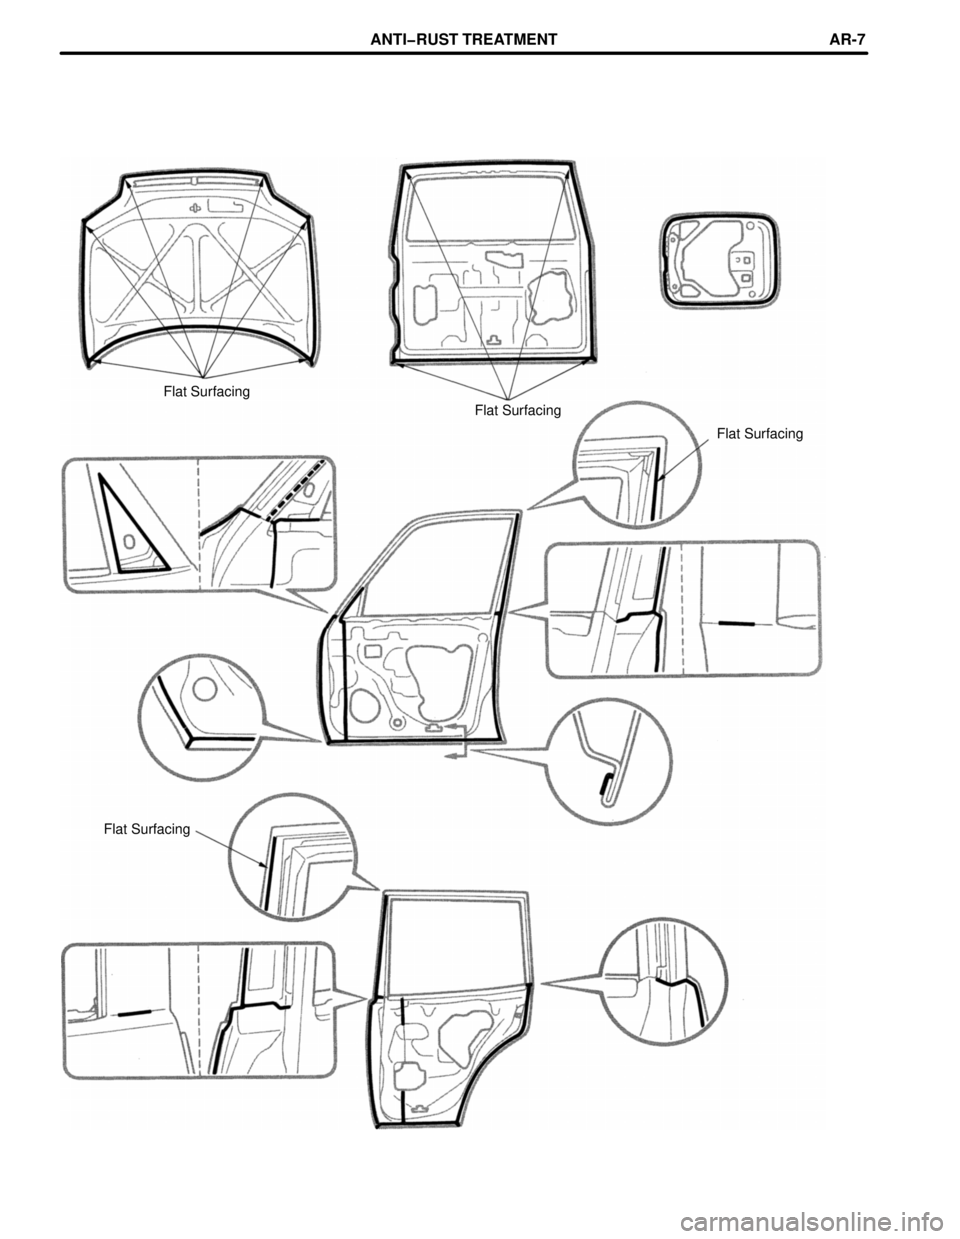
BODY PANEL SEALING AREAS
HINT:
1. Prior to applying body sealer, clean the area with a rag soaked in a grease, wax and silicone remover.
2. If weld-through primer was used, first wipe off any excess and coat with anti-corrosion primer before
applying body sealer.
3. Wipe off excess body sealer with a rag soaked in a grease, wax and silicone remover.
4. If body sealer is damaged by peeling, cracks, etc., be sure to repair as necessary.
Flat Surfacing
Flat Surfacing
ANTI-RUST TREATMENTARœ4
Page 232 of 1354
Flat Surfacing
Flat Surfacing
Flat Surfacing
ANTI-RUST TREATMENTARœ5
Page 233 of 1354
Flat Surfacing
Flat Surfacing
Flat Surfacing
ANTI-RUST TREATMENTARœ6
Page 234 of 1354
Flat Surfacing
Flat Surfacing
Flat Surfacing
Flat Surfacing
ANTI-RUST TREATMENTARœ7
Page 235 of 1354
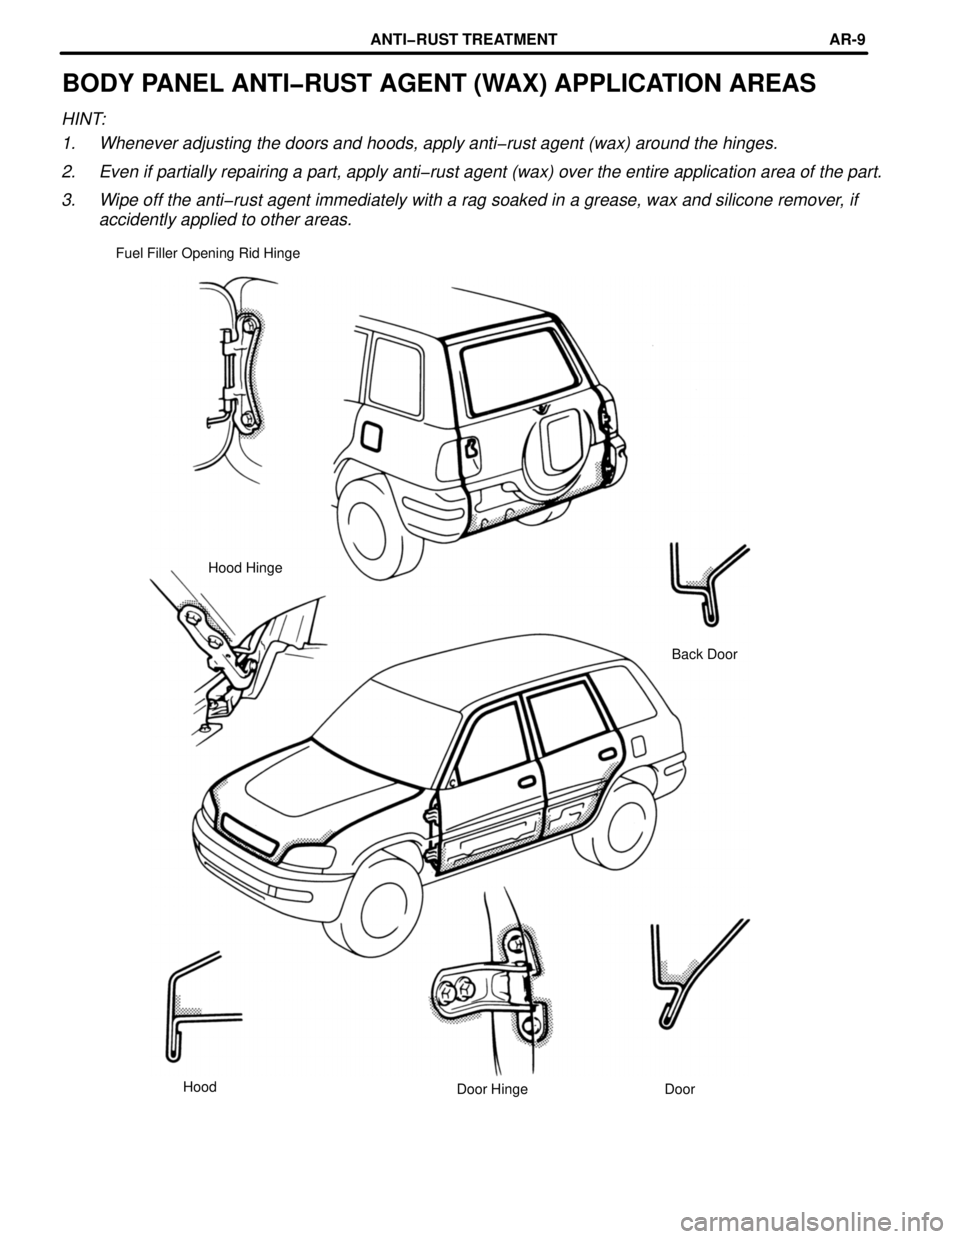
BODY PANEL ANTI-RUST AGENT (WAX) APPLICATION AREAS
HINT:
1. Whenever adjusting the doors and hoods, apply anti-rust agent (wax) around the hinges.
2. Even if partially repairing a part, apply anti-rust agent (wax) over the entire application area of the part.
3. Wipe off the anti-rust agent immediately with a rag soaked in a grease, wax and silicone remover, if
accidently applied to other areas.
Fuel Filler Opening Rid Hinge
Hood Hinge
Back Door
Hood
Door Door Hinge
ANTI-RUST TREATMENTARœ9
Page 236 of 1354
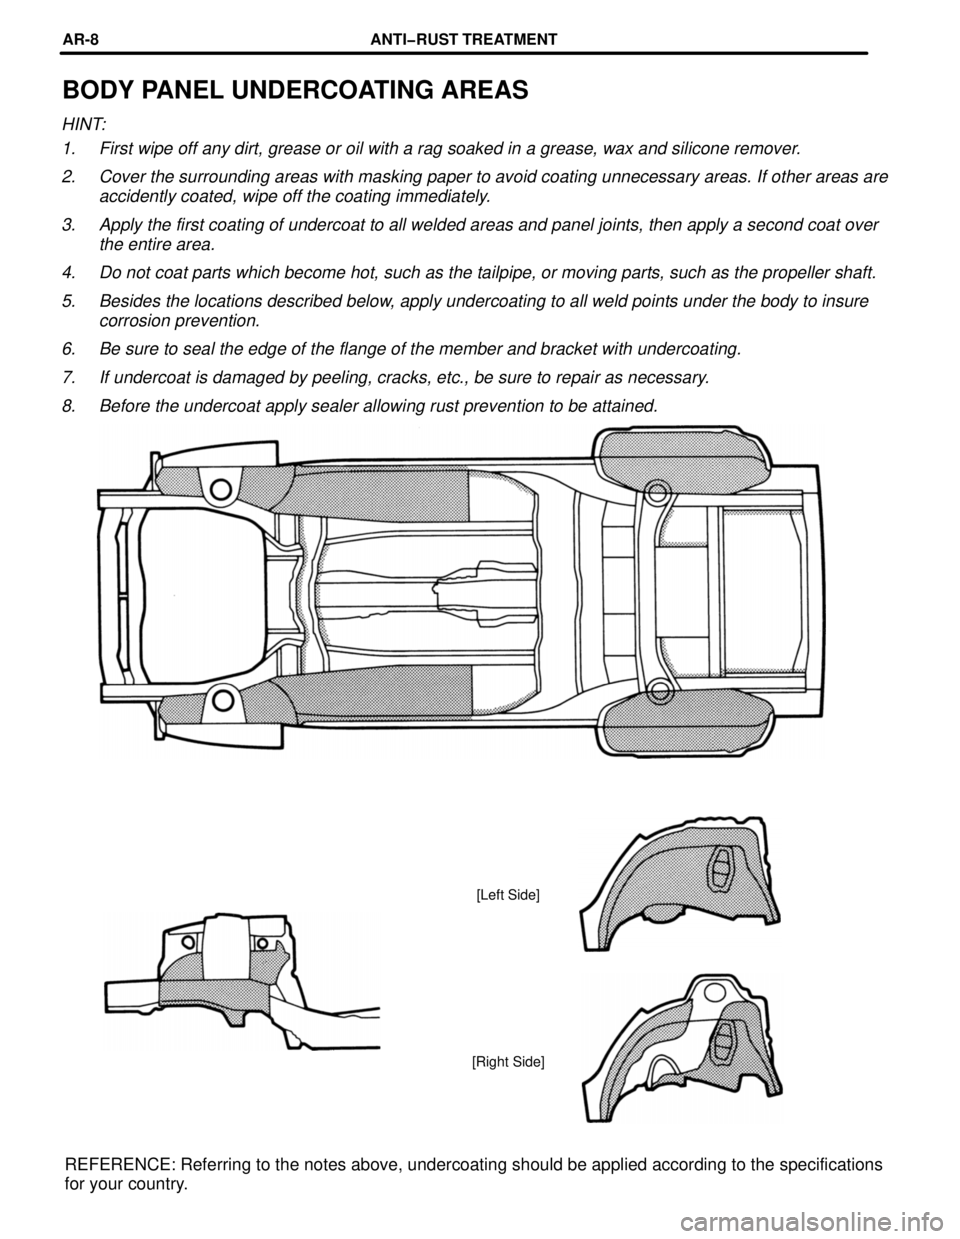
BODY PANEL UNDERCOATING AREAS
HINT:
1. First wipe off any dirt, grease or oil with a rag soaked in a grease, wax and silicone remover.
2. Cover the surrounding areas with masking paper to avoid coating unnecessary areas. If other areas are
accidently coated, wipe off the coating immediately.
3. Apply the first coating of undercoat to all welded areas and panel joints, then apply a second coat over
the entire area.
4. Do not coat parts which become hot, such as the tailpipe, or moving parts, such as the propeller shaft.
5. Besides the locations described below, apply undercoating to all weld points under the body to insure
corrosion prevention.
6. Be sure to seal the edge of the flange of the member and bracket with undercoating.
7. If undercoat is damaged by peeling, cracks, etc., be sure to repair as necessary.
8. Before the undercoat apply sealer allowing rust prevention to be attained.
[Left Side]
[Right Side]
REFERENCE: Referring to the notes above, undercoating should be applied according to the specifications
for your country.
ANTI-RUST TREATMENTARœ8
Page 237 of 1354
mm in.
1.1
4.2
5.3
5.5
6.3
6.4
7.2
7.90.043
0.165
0.209
0.213
0.248
0.252
0.283
0.311
5.5 mm
5.3 mm
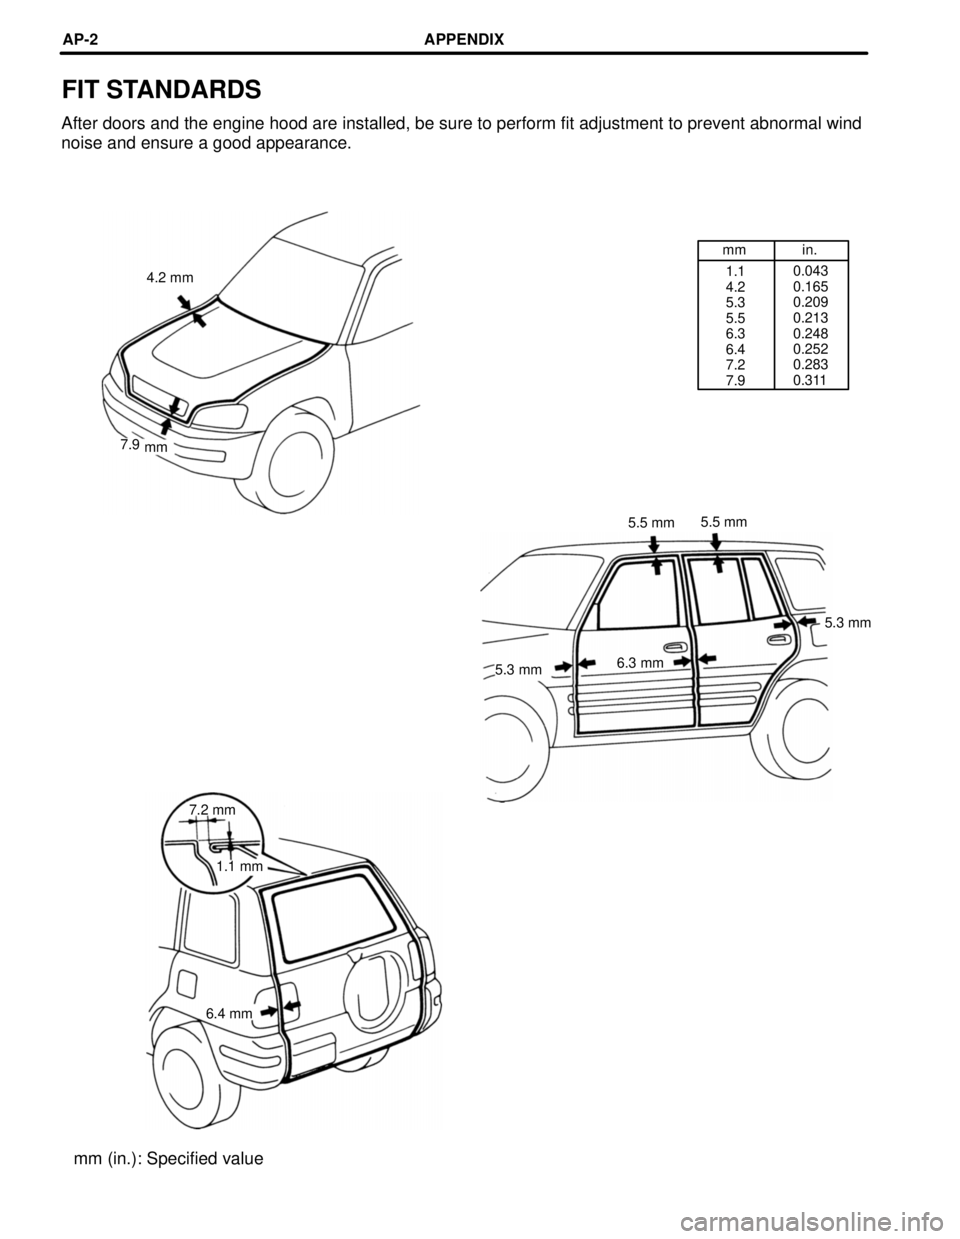
FIT STANDARDS
After doors and the engine hood are installed, be sure to perform fit adjustment to prevent abnormal wind
noise and ensure a good appearance.
4.2 mm
7.9
mm
5.5 mm
5.3 mm
6.3 mm
7.2 mm
1.1 mm
6.4 mm
mm (in.): Specified value
APPENDIXAPœ2
Page 238 of 1354
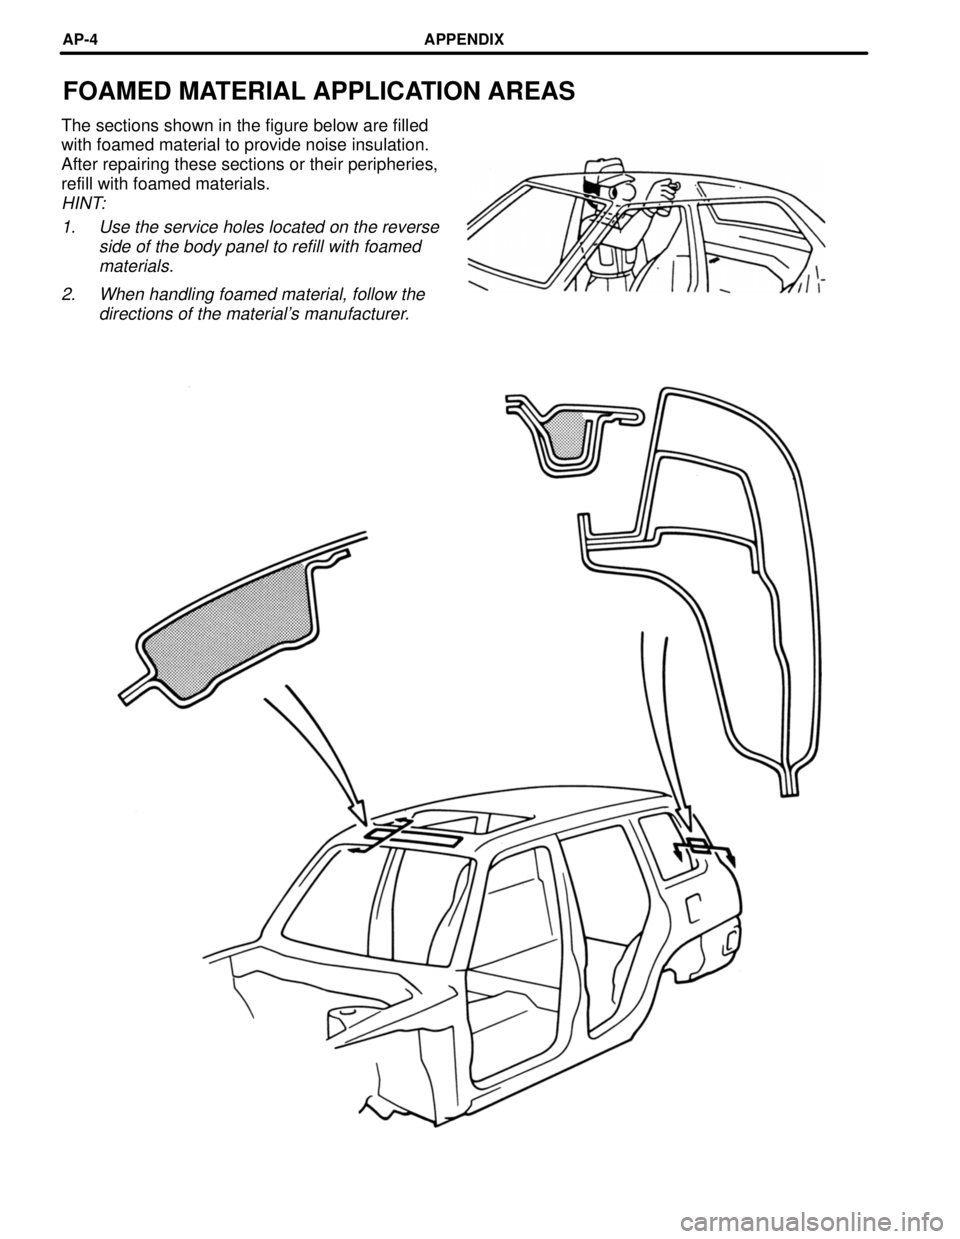
FOAMED MATERIAL APPLICATION AREAS
The sections shown in the figure below are filled
with foamed material to provide noise insulation.
After repairing these sections or their peripheries,
refill with foamed materials.
HINT:
1. Use the service holes located on the reverse
side of the body panel to refill with foamed
materials.
2. When handling foamed material, follow the
directions of the material's manufacturer.
APPENDIXAPœ4
Page 239 of 1354
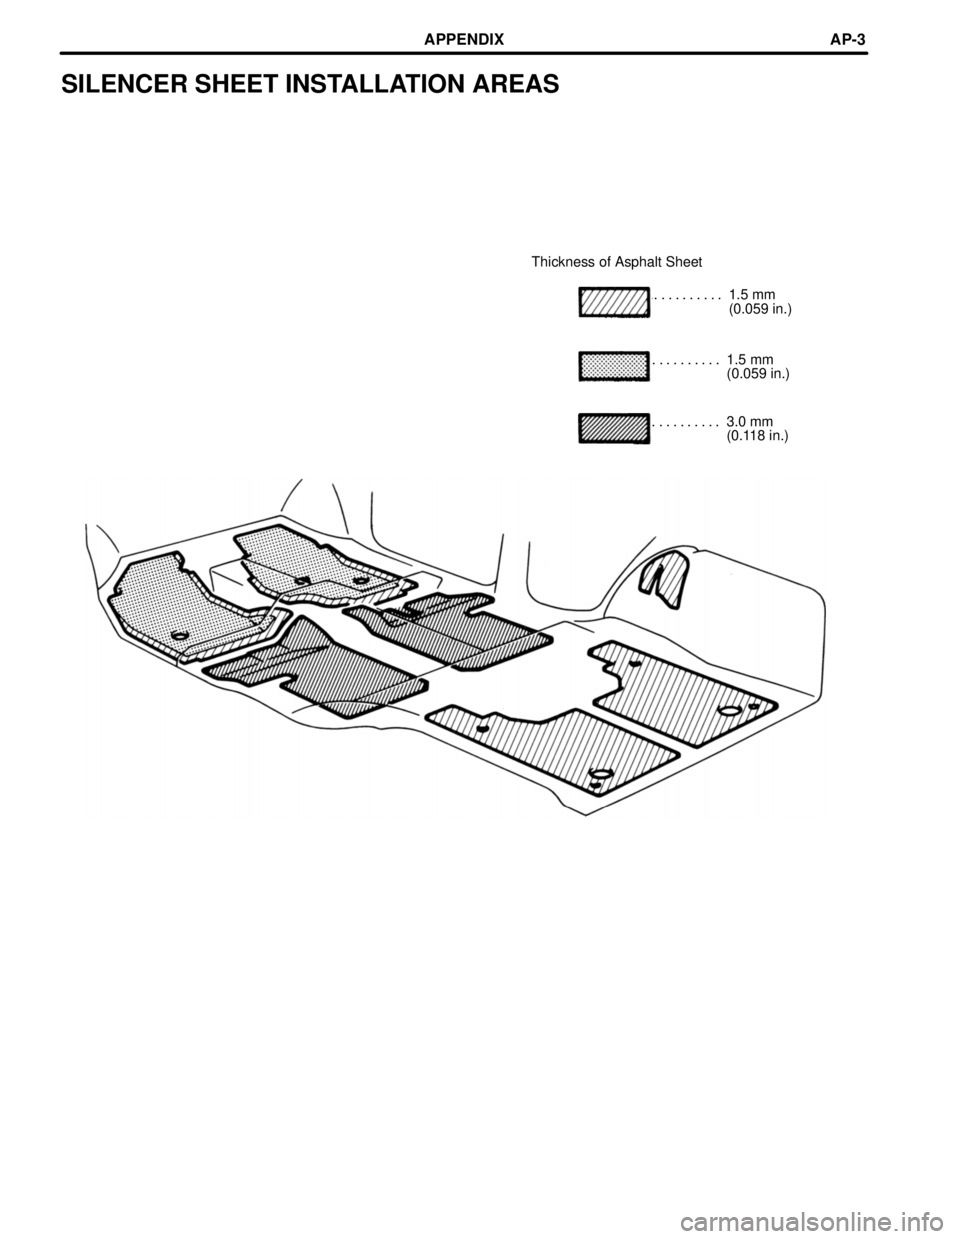
SILENCER SHEET INSTALLATION AREAS
Thickness of Asphalt Sheet
1.5 mm . . . . . . . . . .
(0.059 in.)
1.5 mm . . . . . . . . . .
(0.059 in.)
3.0 mm . . . . . . . . . .
(0.118 in.)
APPENDIXAPœ3
Page 240 of 1354
mm in
30
801.18
3.15
CENTER BODY PILLAR (CUT)
REMOVAL
Cut and Join Location
(Cut Location for Supply Parts)
[Cut and Join Location]
80 mm
30 mm
30 mm
Cut and Join Location
Cut and Join Location
Cut and Join Location
(Cut Location for Supply Parts)
[Cut and Join Location]
1. Cut and join the parts at the locations shown
above.
BODY PANEL REPLACEMENTREœ2
Trending: page 1237, air conditioning, throttle body, Sensors, engine removal, coolant reservoir, shift cable

![TOYOTA RAV4 1996 Service Repair Manual mm in
30
801.18
3.15
CENTER BODY PILLAR (CUT)
REMOVAL
Cut and Join Location
(Cut Location for Supply Parts)
[Cut and Join Location]
80 mm
30 mm
30 mm
Cut and Join Location
Cut and Join Location
Cut an TOYOTA RAV4 1996 Service Repair Manual mm in
30
801.18
3.15
CENTER BODY PILLAR (CUT)
REMOVAL
Cut and Join Location
(Cut Location for Supply Parts)
[Cut and Join Location]
80 mm
30 mm
30 mm
Cut and Join Location
Cut and Join Location
Cut an](/img/14/57462/w960_57462-239.png)