TOYOTA RAV4 1996 Service Repair Manual
Manufacturer: TOYOTA, Model Year: 1996,
Model line: RAV4,
Model: TOYOTA RAV4 1996
Pages: 1354, PDF Size: 30.43 MB
TOYOTA RAV4 1996 Service Repair Manual
RAV4 1996
TOYOTA
TOYOTA
https://www.carmanualsonline.info/img/14/57462/w960_57462-0.png
TOYOTA RAV4 1996 Service Repair Manual
Trending: resistor, OBD port, automatic transmission fluid, Heating system, wiper fluid, page 1237, Sensor on engine head
Page 241 of 1354
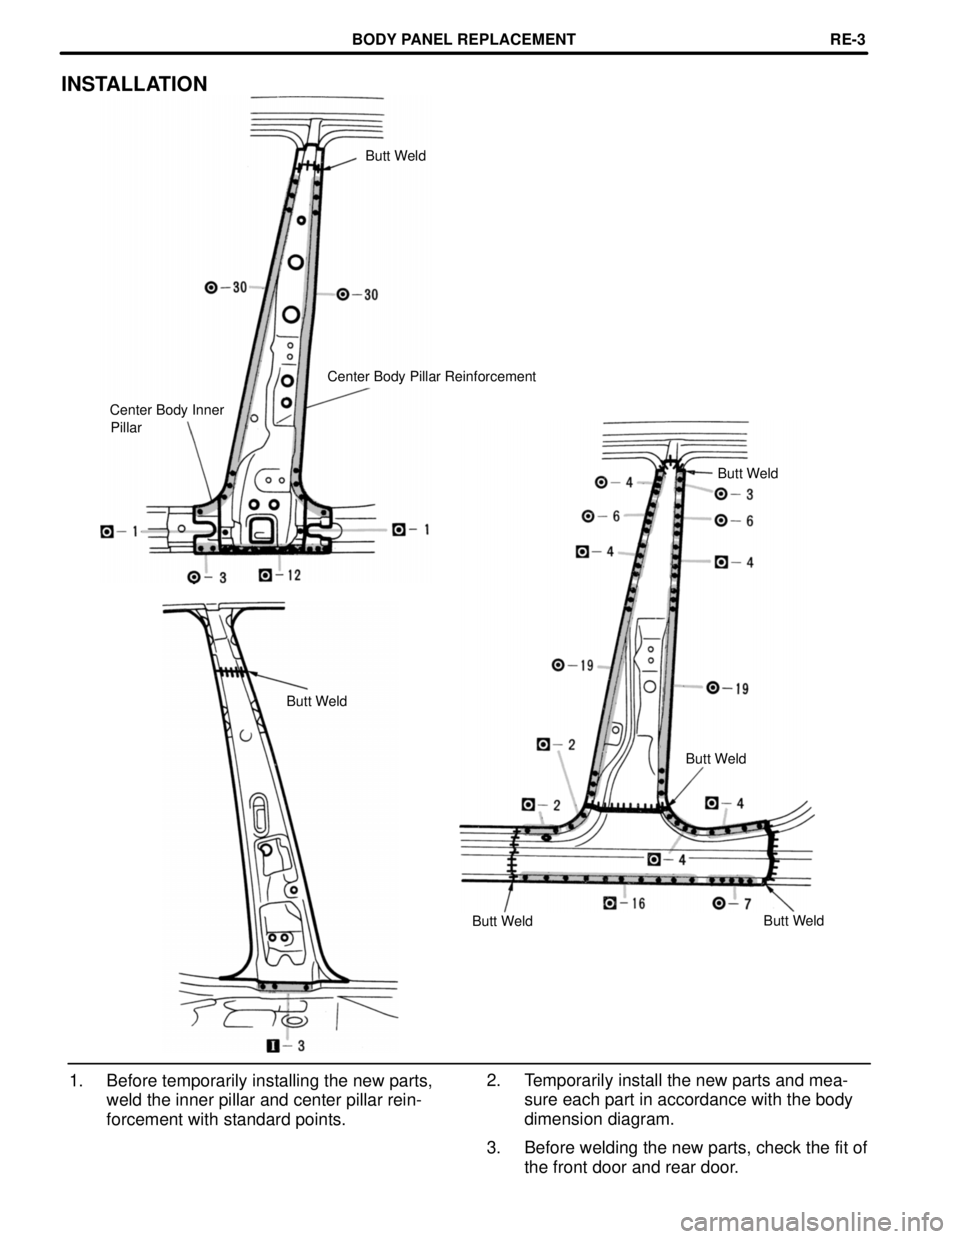
INSTALLATION
Butt Weld
Center Body Pillar Reinforcement
Center Body Inner
Pillar
Butt Weld
Butt Weld
Butt Weld
Butt WeldButt Weld
2. Temporarily install the new parts and meaœ
sure each part in accordance with the body
dimension diagram.
3. Before welding the new parts, check the fit of
the front door and rear door. 1. Before temporarily installing the new parts,
weld the inner pillar and center pillar reinœ
forcement with standard points.
BODY PANEL REPLACEMENTREœ3
Page 242 of 1354
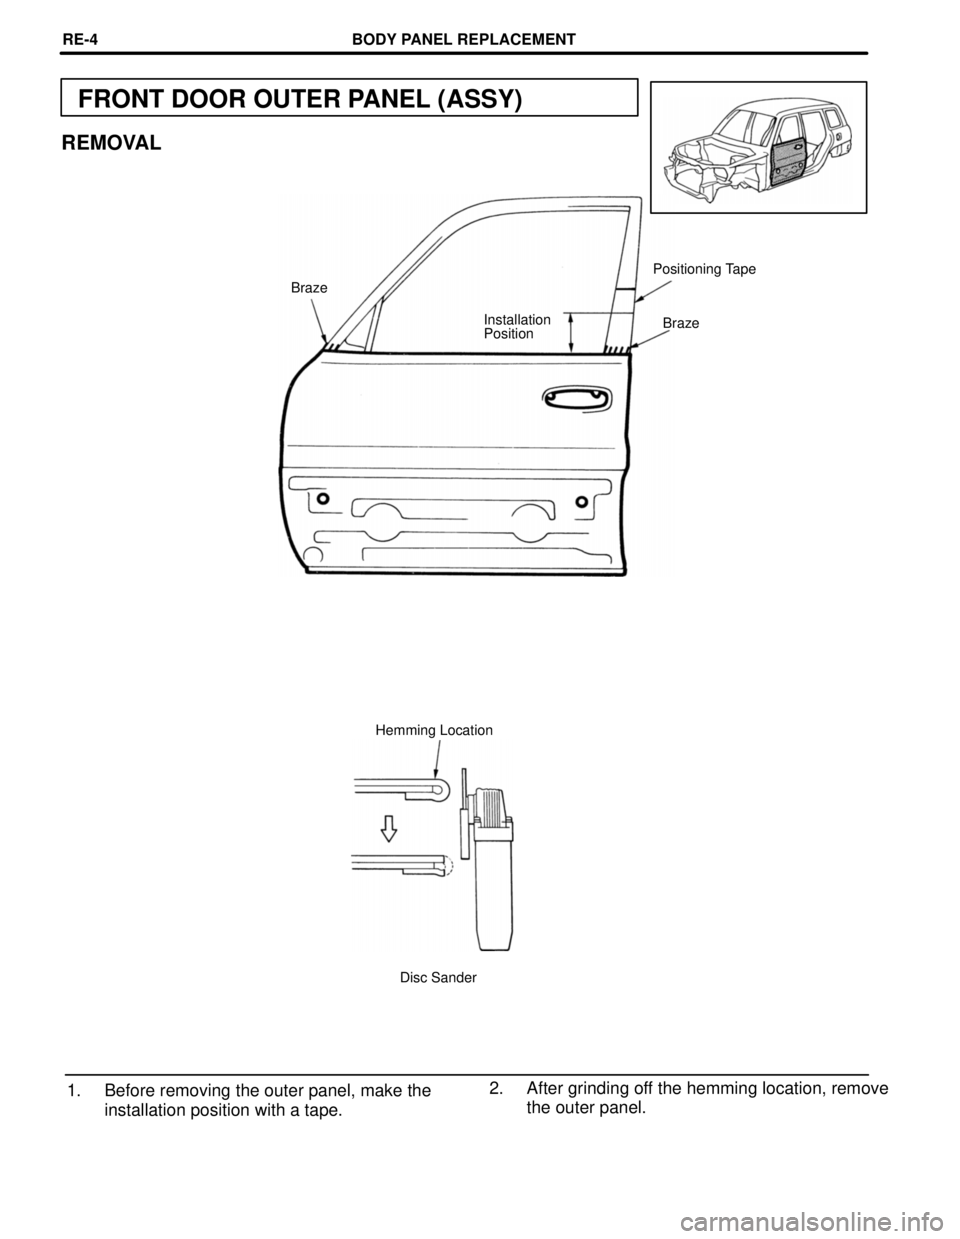
FRONT DOOR OUTER PANEL (ASSY)
REMOVAL
Positioning Tape
Braze
Braze Installation
Position
Hemming Location
Disc Sander
2. After grinding off the hemming location, remove
the outer panel. 1. Before removing the outer panel, make the
installation position with a tape.
BODY PANEL REPLACEMENTREœ4
Page 243 of 1354
mmin.
10
0.39
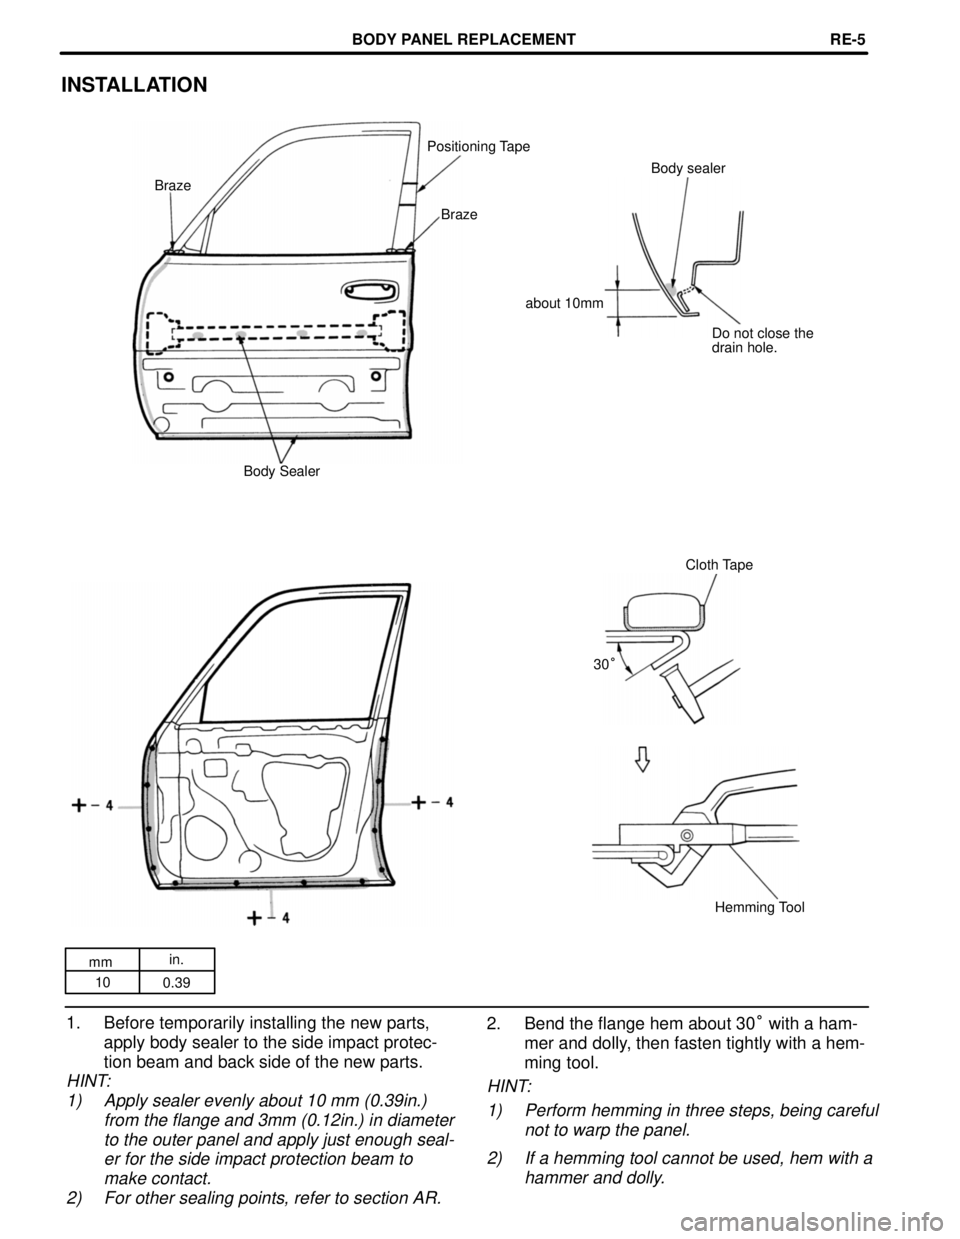
INSTALLATION
Positioning Tape
Body sealer
Braze
Braze
about 10mm
Do not close the
drain hole.
Body Sealer
Cloth Tape
30°
Hemming Tool
1. Before temporarily installing the new parts,
apply body sealer to the side impact protecœ
tion beam and back side of the new parts.
HINT:
1) Apply sealer evenly about 10 mm (0.39in.)
from the flange and 3mm (0.12in.) in diameter
to the outer panel and apply just enough sealœ
er for the side impact protection beam to
make contact.
2) For other sealing points, refer to section AR.
2. Bend the flange hem about 30° with a hamœ
mer and dolly, then fasten tightly with a hemœ
ming tool.
HINT:
1) Perform hemming in three steps, being careful
not to warp the panel.
2) If a hemming tool cannot be used, hem with a
hammer and dolly.
BODY PANEL REPLACEMENTREœ5
Page 244 of 1354
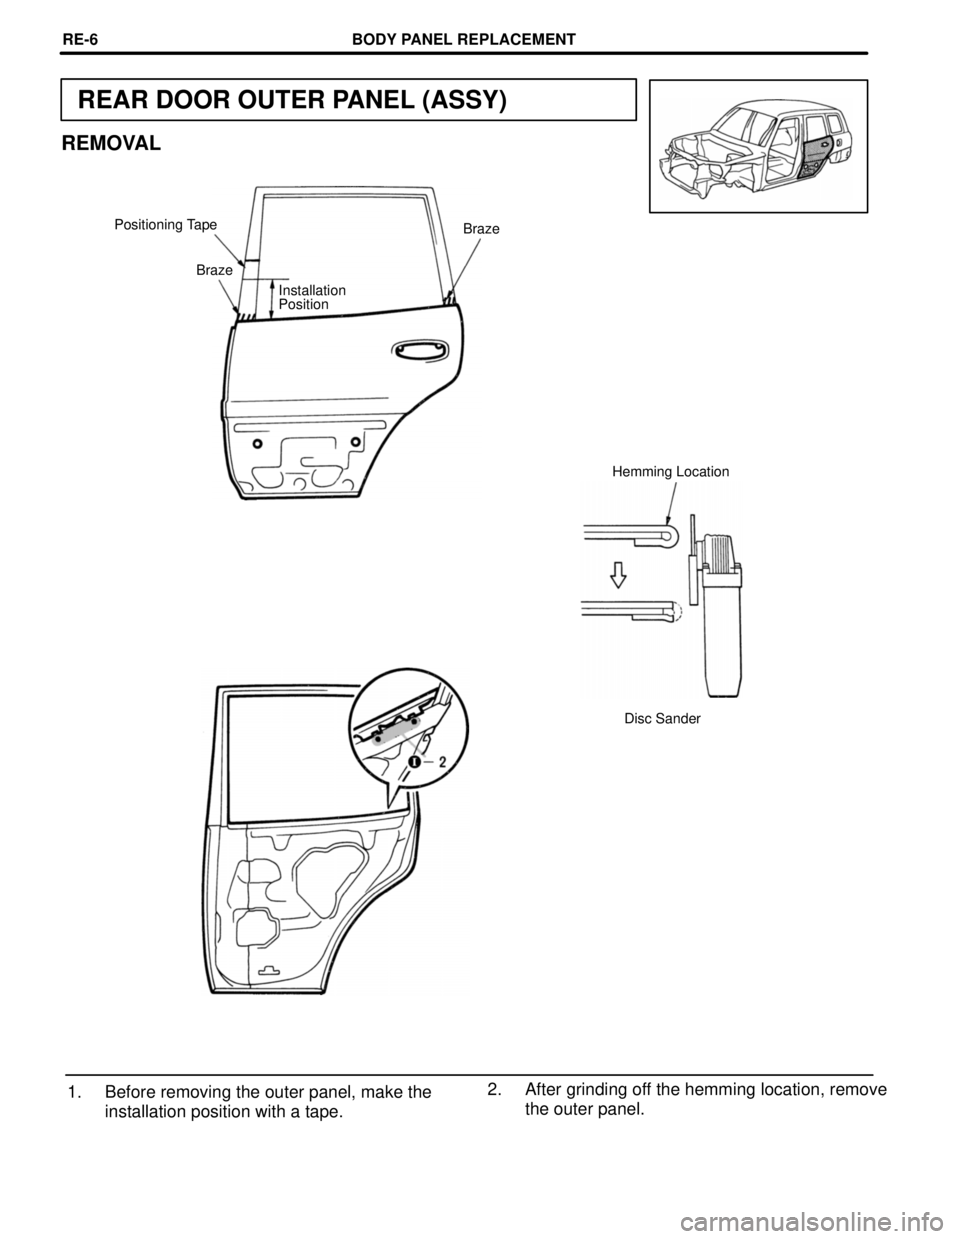
REAR DOOR OUTER PANEL (ASSY)
REMOVAL
Positioning Tape
Braze
Braze
Installation
Position
Hemming Location
Disc Sander
2. After grinding off the hemming location, remove
the outer panel. 1. Before removing the outer panel, make the
installation position with a tape.
BODY PANEL REPLACEMENTREœ6
Page 245 of 1354
mm in.
10 0.39
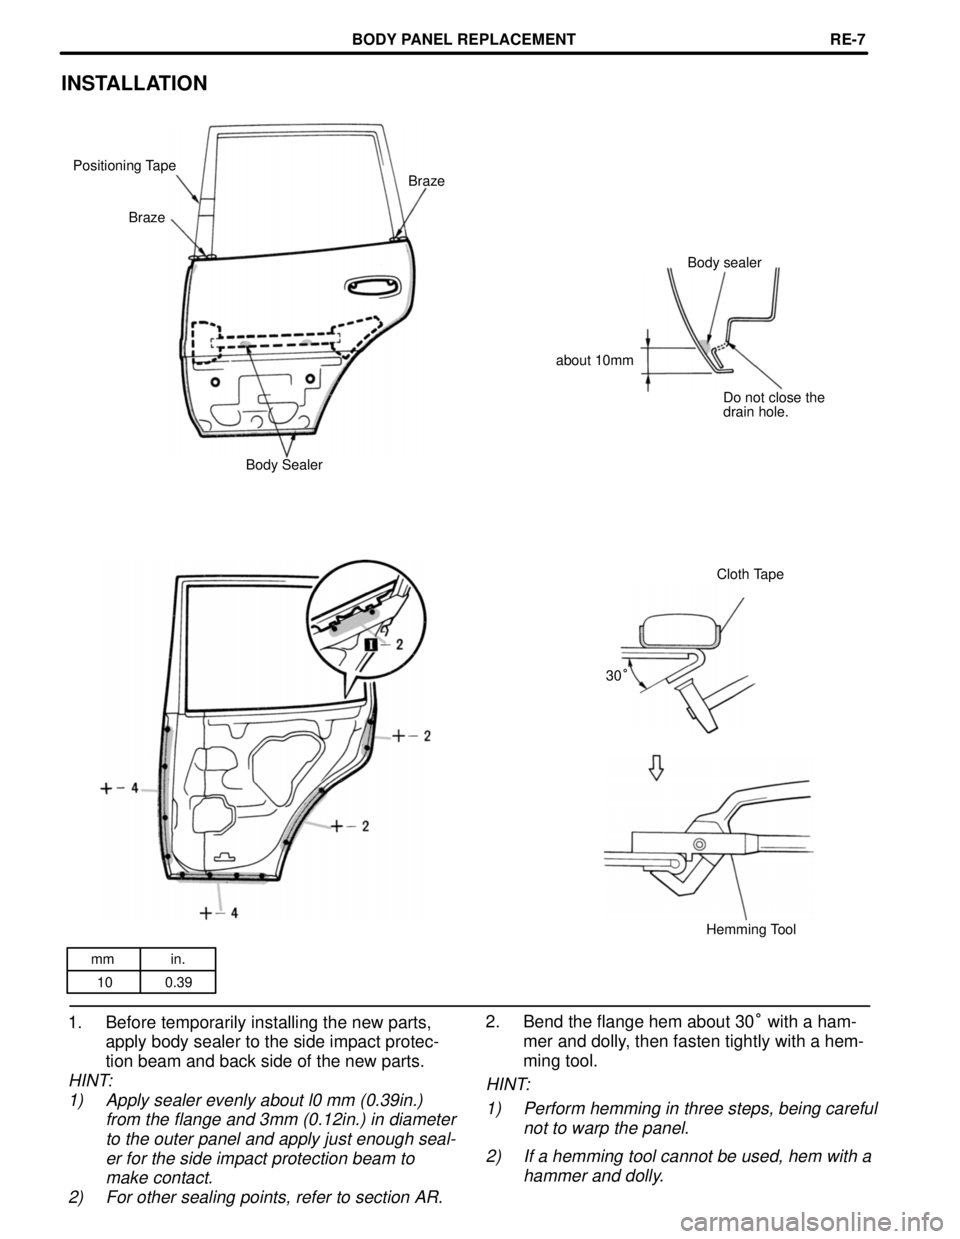
INSTALLATION
Positioning Tape
Braze
Braze
Body sealer
about 10mm
Do not close the
drain hole.
Body Sealer
Cloth Tape
30°
Hemming Tool
1. Before temporarily installing the new parts,
apply body sealer to the side impact protecœ
tion beam and back side of the new parts.
HINT:
1) Apply sealer evenly about l0 mm (0.39in.)
from the flange and 3mm (0.12in.) in diameter
to the outer panel and apply just enough sealœ
er for the side impact protection beam to
make contact.
2) For other sealing points, refer to section AR.
2. Bend the flange hem about 30° with a hamœ
mer and dolly, then fasten tightly with a hemœ
ming tool.
HINT:
1) Perform hemming in three steps, being careful
not to warp the panel.
2) If a hemming tool cannot be used, hem with a
hammer and dolly.
BODY PANEL REPLACEMENTREœ7
Page 246 of 1354
ROCKER OUTER PANEL (CUT)
REMOVAL
[Cut and Join Location]
Cut and Join Location
(Cut Location for Supply Parts)
Cut and Join Location
(Cut Location for Supply Parts)
Cut and Join Location
(Cut Location for Supply Parts)
[Cut and Join Location]
[Cut and Join Location]
1. Cut and join the new parts at the location shown
above.
HINT: Take care not to damage the internal reinforceœ
ment of the center body pillar.
BODY PANEL REPLACEMENTREœ8
Page 247 of 1354
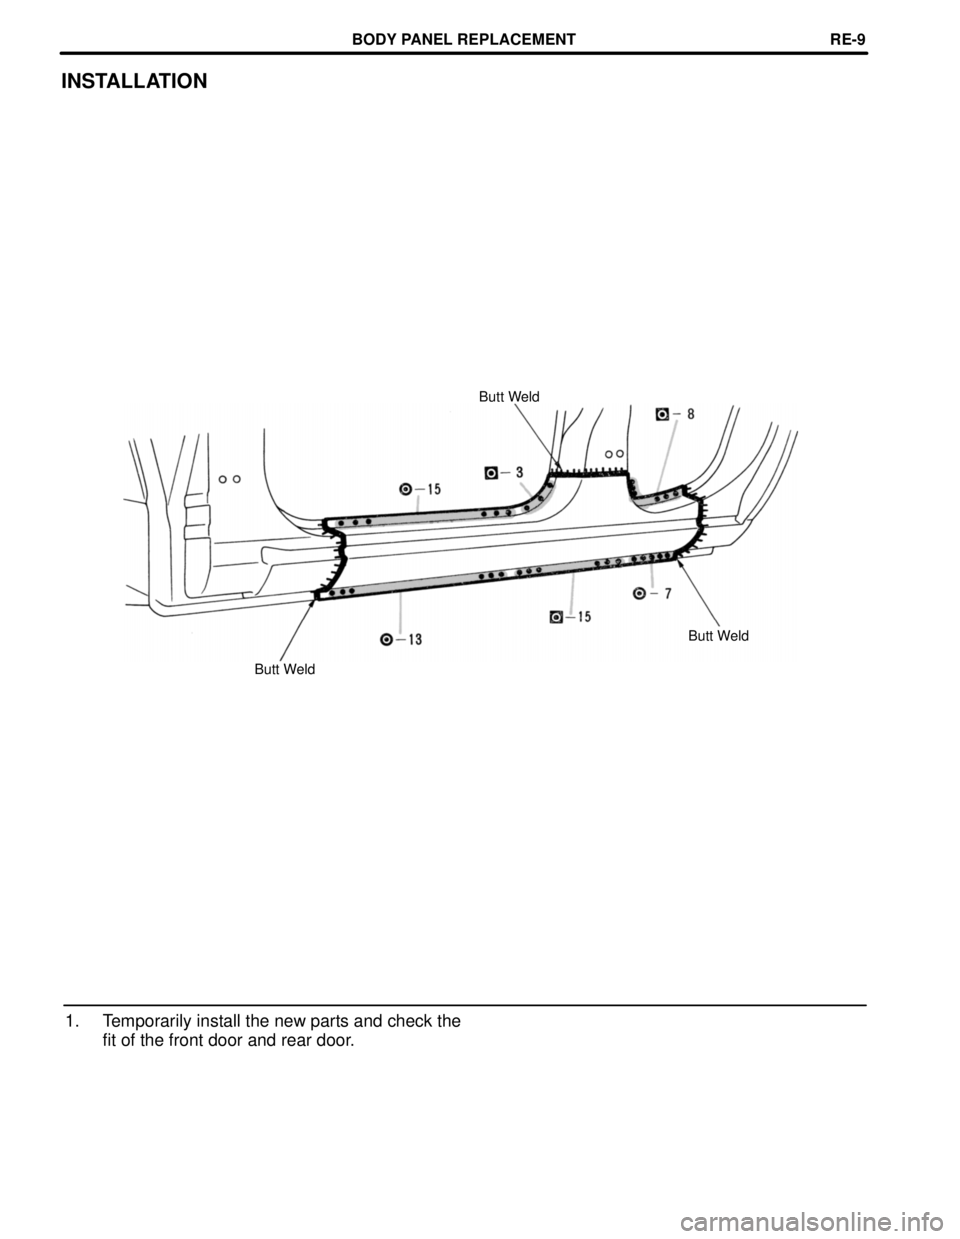
INSTALLATION
Butt Weld
Butt Weld
Butt Weld
1. Temporarily install the new parts and check the
fit of the front door and rear door.
BODY PANEL REPLACEMENTREœ9
Page 248 of 1354
mm in.
150
2505.91
9.84
QUARTER PANEL (CUT)
REMOVAL
[Cut and Join Location]
250 mm
Cut and Join Location
Cut and Join Location
[Cut Location for
supply parts]
RH:
LH:
Cut and Join Location
150 mm
[Cut and Join Location]
Braze
RH:
LH:
1. Cut and join the parts at the location shown
above.
BODY PANEL REPLACEMENTREœ10
Page 249 of 1354
mm in.
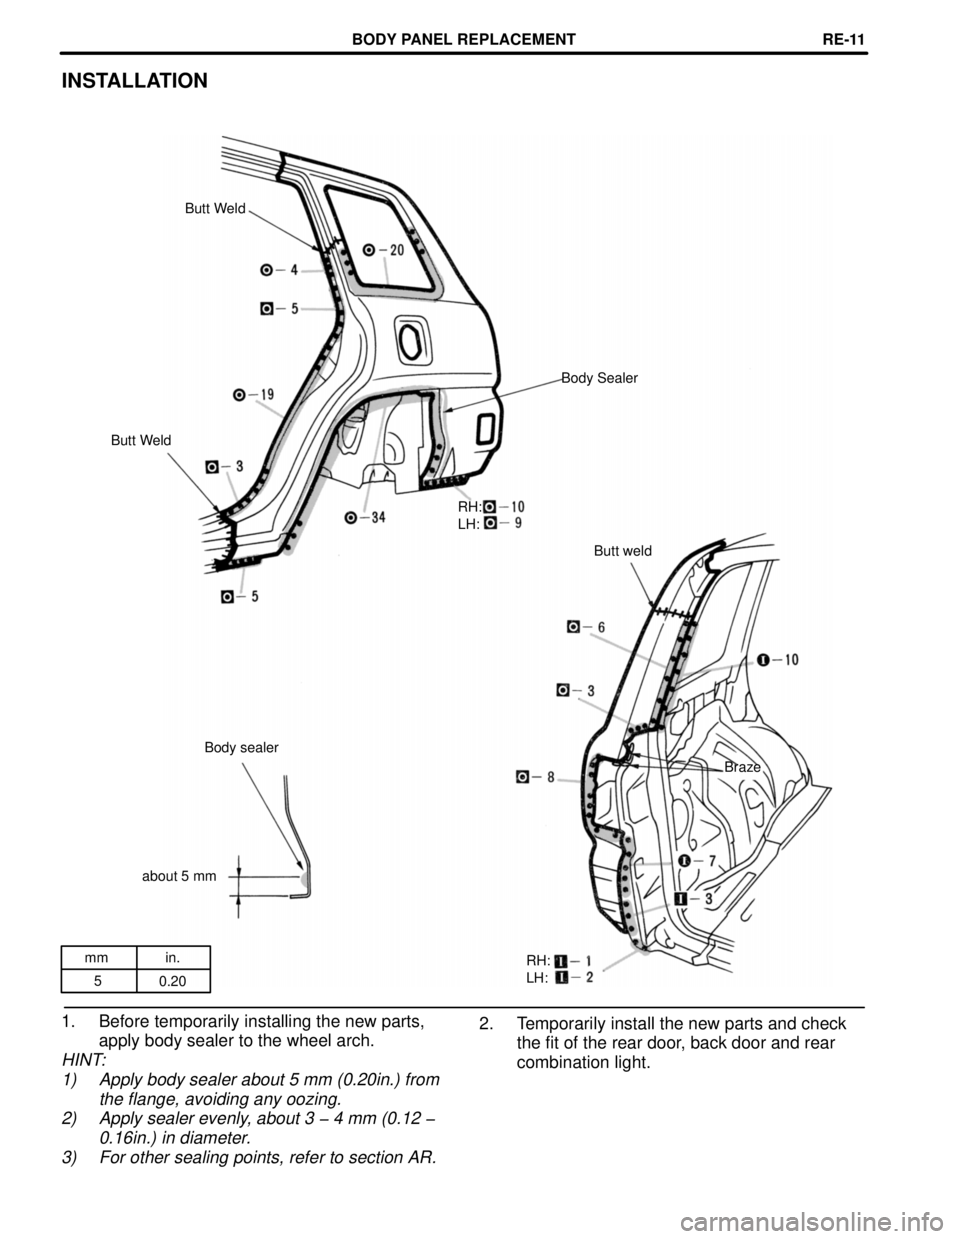
5
0.20
INSTALLATION
Butt Weld
Body Sealer
Butt Weld
RH:
LH:
Butt weld
Body sealer
Braze
about 5 mm
RH:
LH:
2. Temporarily install the new parts and check
the fit of the rear door, back door and rear
combination light. 1. Before temporarily installing the new parts,
apply body sealer to the wheel arch.
HINT:
1) Apply body sealer about 5 mm (0.20in.) from
the flange, avoiding any oozing.
2) Apply sealer evenly, about 3 - 4 mm (0.12 -
0.16in.) in diameter.
3) For other sealing points, refer to section AR.
BODY PANEL REPLACEMENTREœ11
Page 250 of 1354
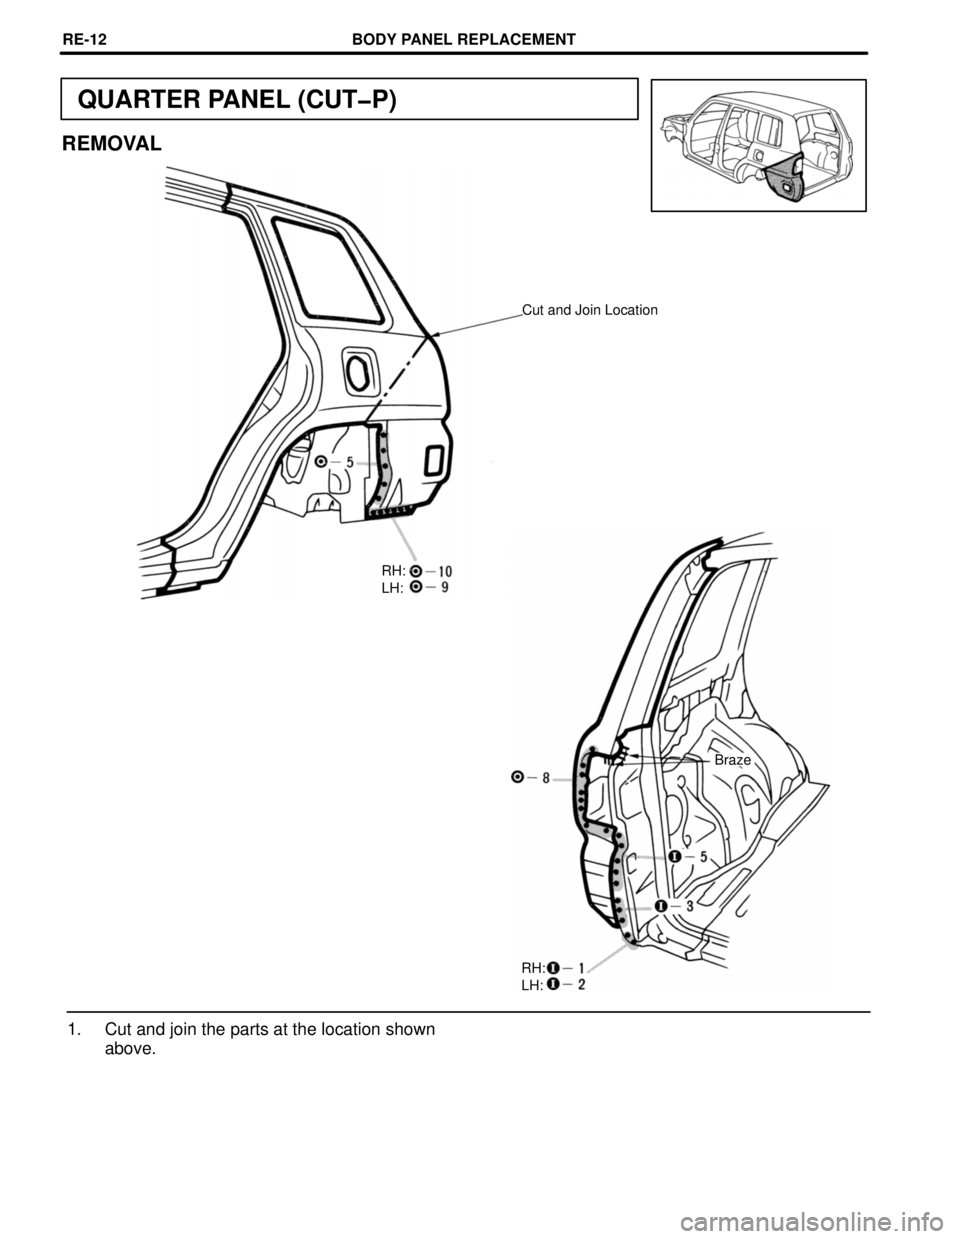
QUARTER PANEL (CUT-P)
REMOVAL
Cut and Join Location
RH:
LH:
Braze
RH:
LH:
1. Cut and join the parts at the location shown
above.
BODY PANEL REPLACEMENTREœ12
Trending: low oil pressure, Connector on side of engine head, airbag, gas type, steering wheel, change wheel, fuse
![TOYOTA RAV4 1996 Service Repair Manual ROCKER OUTER PANEL (CUT)
REMOVAL
[Cut and Join Location]
Cut and Join Location
(Cut Location for Supply Parts)
Cut and Join Location
(Cut Location for Supply Parts)
Cut and Join Location
(Cut Location TOYOTA RAV4 1996 Service Repair Manual ROCKER OUTER PANEL (CUT)
REMOVAL
[Cut and Join Location]
Cut and Join Location
(Cut Location for Supply Parts)
Cut and Join Location
(Cut Location for Supply Parts)
Cut and Join Location
(Cut Location](/img/14/57462/w960_57462-245.png)
![TOYOTA RAV4 1996 Service Repair Manual mm in.
150
2505.91
9.84
QUARTER PANEL (CUT)
REMOVAL
[Cut and Join Location]
250 mm
Cut and Join Location
Cut and Join Location
[Cut Location for
supply parts]
RH:
LH:
Cut and Join Location
150 mm
[Cut TOYOTA RAV4 1996 Service Repair Manual mm in.
150
2505.91
9.84
QUARTER PANEL (CUT)
REMOVAL
[Cut and Join Location]
250 mm
Cut and Join Location
Cut and Join Location
[Cut Location for
supply parts]
RH:
LH:
Cut and Join Location
150 mm
[Cut](/img/14/57462/w960_57462-247.png)
