TOYOTA RAV4 HYBRID 2020 Owners Manual (in English)
Manufacturer: TOYOTA, Model Year: 2020, Model line: RAV4 HYBRID, Model: TOYOTA RAV4 HYBRID 2020Pages: 744, PDF Size: 31.43 MB
Page 221 of 744
2214-2. Driving procedures
4
Driving
the shift release button is pushed
first, the shift lock will not be
released.
■Shift lock system
The shift lock system is a system to
prevent accidental operation of the
shift lever in starting.
The shift lever can be shifted from P
only when the pow er switch is in
ON, the brake pedal is depressed
and the shift release button is
pushed.
■If the shift lever cannot be
shifted from P
First, check whether the brake pedal
is being depressed.
If the shift lever cannot be shifted
even though the brake pedal is
depressed and the shift release but-
ton is pushed, there may be a prob-
lem with the shift lock system. Have
the vehicle inspected by your Toyota
dealer immediately.
The following steps may be used as
an emergency measure to ensure
that the shift lev er can be shifted.
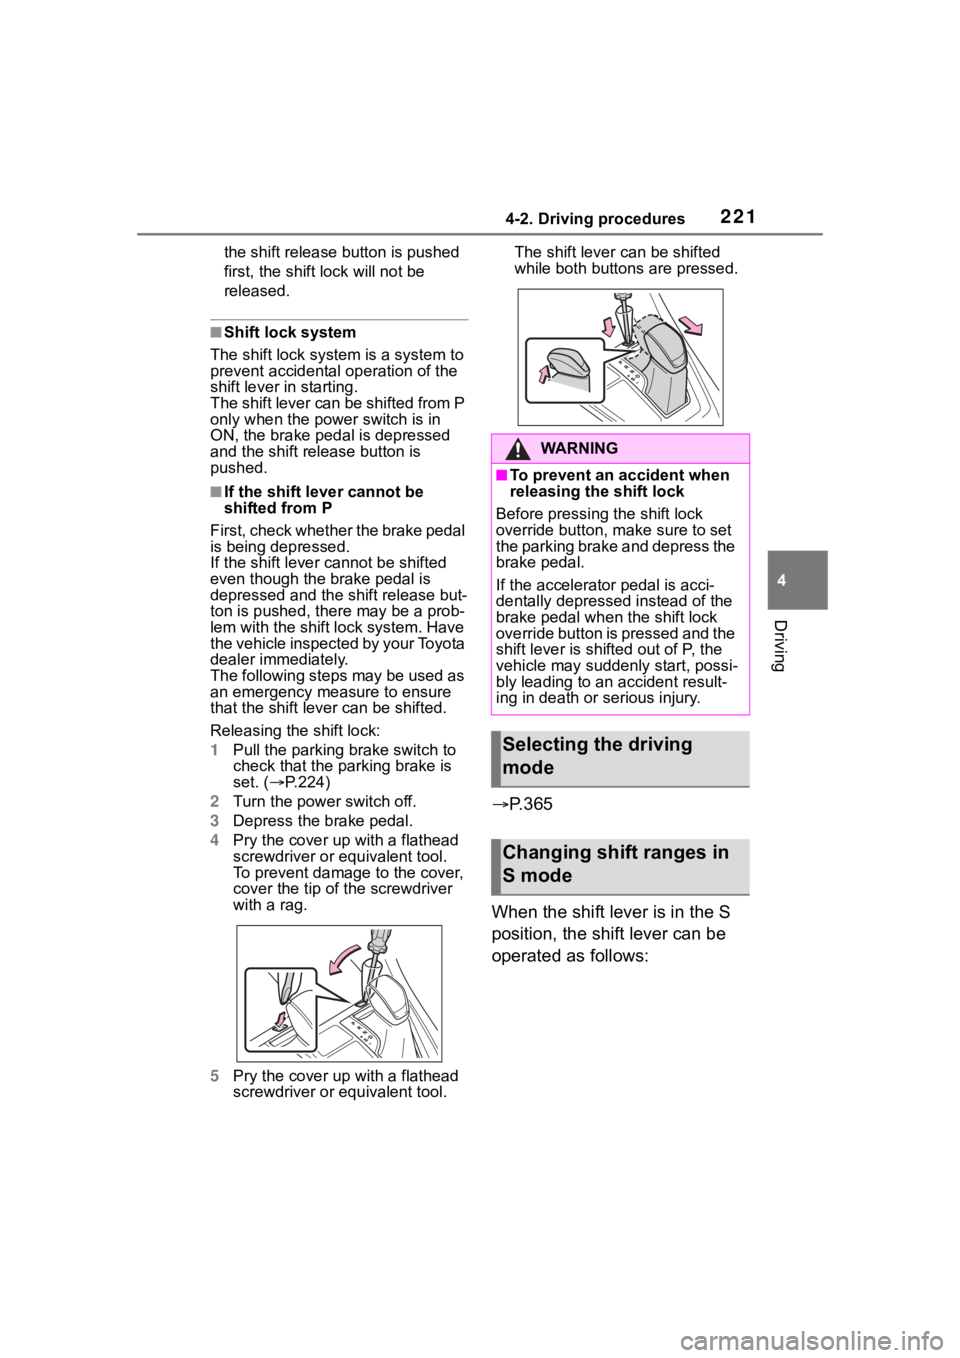
Releasing the shift lock:
1 Pull the parking brake switch to
check that the parking brake is
set. ( P.224)
2 Turn the power switch off.
3 Depress the brake pedal.
4 Pry the cover up with a flathead
screwdriver or equivalent tool.
To prevent damage to the cover,
cover the tip of the screwdriver
with a rag.
5 Pry the cover up with a flathead
screwdriver or equivalent tool. The shift lever can be shifted
while both buttons
are pressed.
P.365
When the shift lever is in the S
position, the shift lever can be
operated as follows:
WA R N I N G
■To prevent an accident when
releasing the shift lock
Before pressing the shift lock
override button, m ake sure to set
the parking brake and depress the
brake pedal.
If the accelerator pedal is acci-
dentally depressed instead of the
brake pedal when the shift lock
override button is pressed and the
shift lever is shifted out of P, the
vehicle may suddenly start, possi-
bly leading to an accident result-
ing in death or serious injury.
Selecting the driving
mode
Changing shift ranges in
S mode
Page 222 of 744
2224-2. Driving procedures
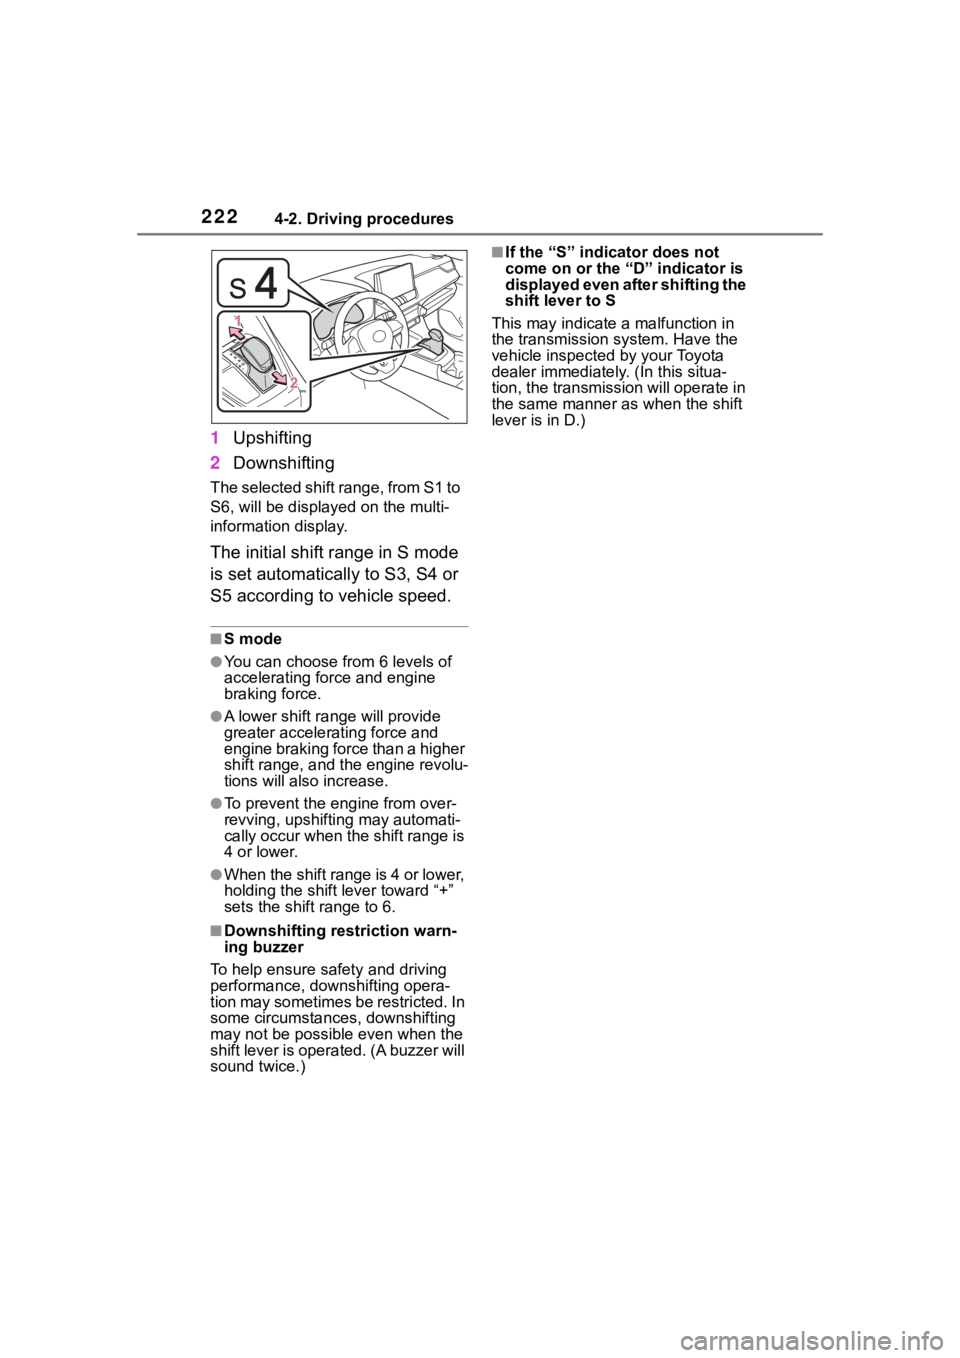
1Upshifting
2 Downshifting
The selected shift range, from S1 to
S6, will be displayed on the multi-
information display.
The initial shift range in S mode
is set automatically to S3, S4 or
S5 according to vehicle speed.
■S mode
●You can choose from 6 levels of
accelerating force and engine
braking force.
●A lower shift ra nge will provide
greater accelerating force and
engine braking force than a higher
shift range, and t he engine revolu-
tions will also increase.
●To prevent the e ngine from over-
revving, upshifti ng may automati-
cally occur when the shift range is
4 or lower.
●When the shift range is 4 or lower,
holding the shift lever toward “+”
sets the shift range to 6.
■Downshifting restriction warn-
ing buzzer
To help ensure safety and driving
performance, downshifting opera-
tion may sometimes b e restricted. In
some circumstances, downshifting
may not be possible even when the
shift lever is opera ted. (A buzzer will
sound twice.)
■If the “S” indi cator does not
come on or the “D” indicator is
displayed even after shifting the
shift lever to S
This may indicate a malfunction in
the transmission system. Have the
vehicle inspected by your Toyota
dealer immediately. (In this situa-
tion, the transmission will operate in
the same manner as when the shift
lever is in D.)
Page 223 of 744
2234-2. Driving procedures
4
Driving
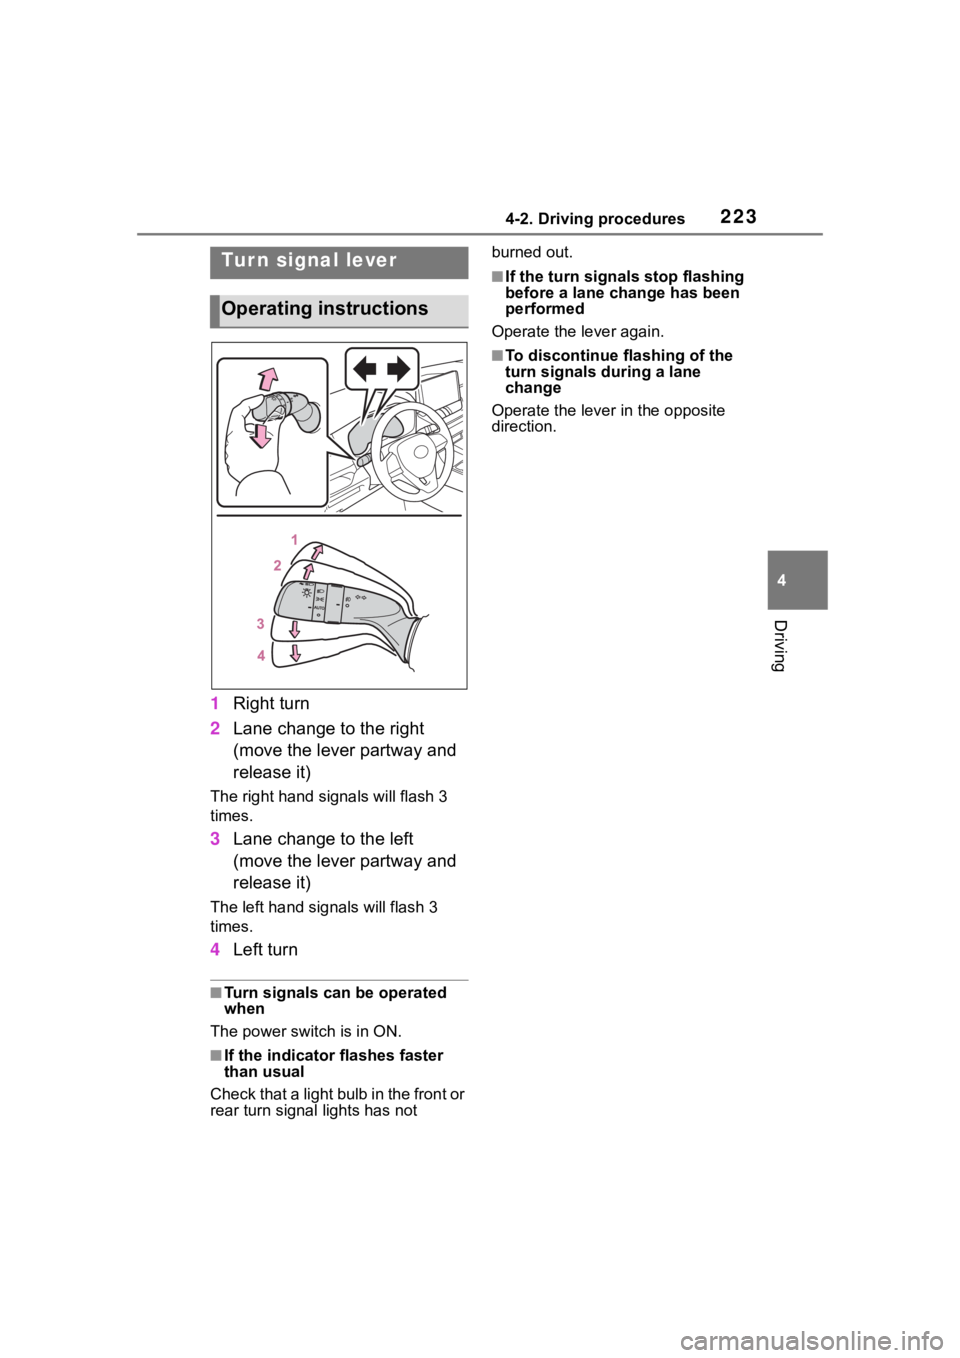
1Right turn
2 Lane change to the right
(move the lever partway and
release it)
The right hand signals will flash 3
times.
3Lane change to the left
(move the lever partway and
release it)
The left hand signals will flash 3
times.
4Left turn
■Turn signals can be operated
when
The power swit ch is in ON.
■If the indicator flashes faster
than usual
Check that a light bulb in the front or
rear turn signal lights has not burned out.
■If the turn signals stop flashing
before a lane change has been
performed
Operate the lever again.
■To discontinue flashing of the
turn signals during a lane
change
Operate the lever in the opposite
direction.
Tur n signal lever
Operating instructions
Page 224 of 744
2244-2. Driving procedures
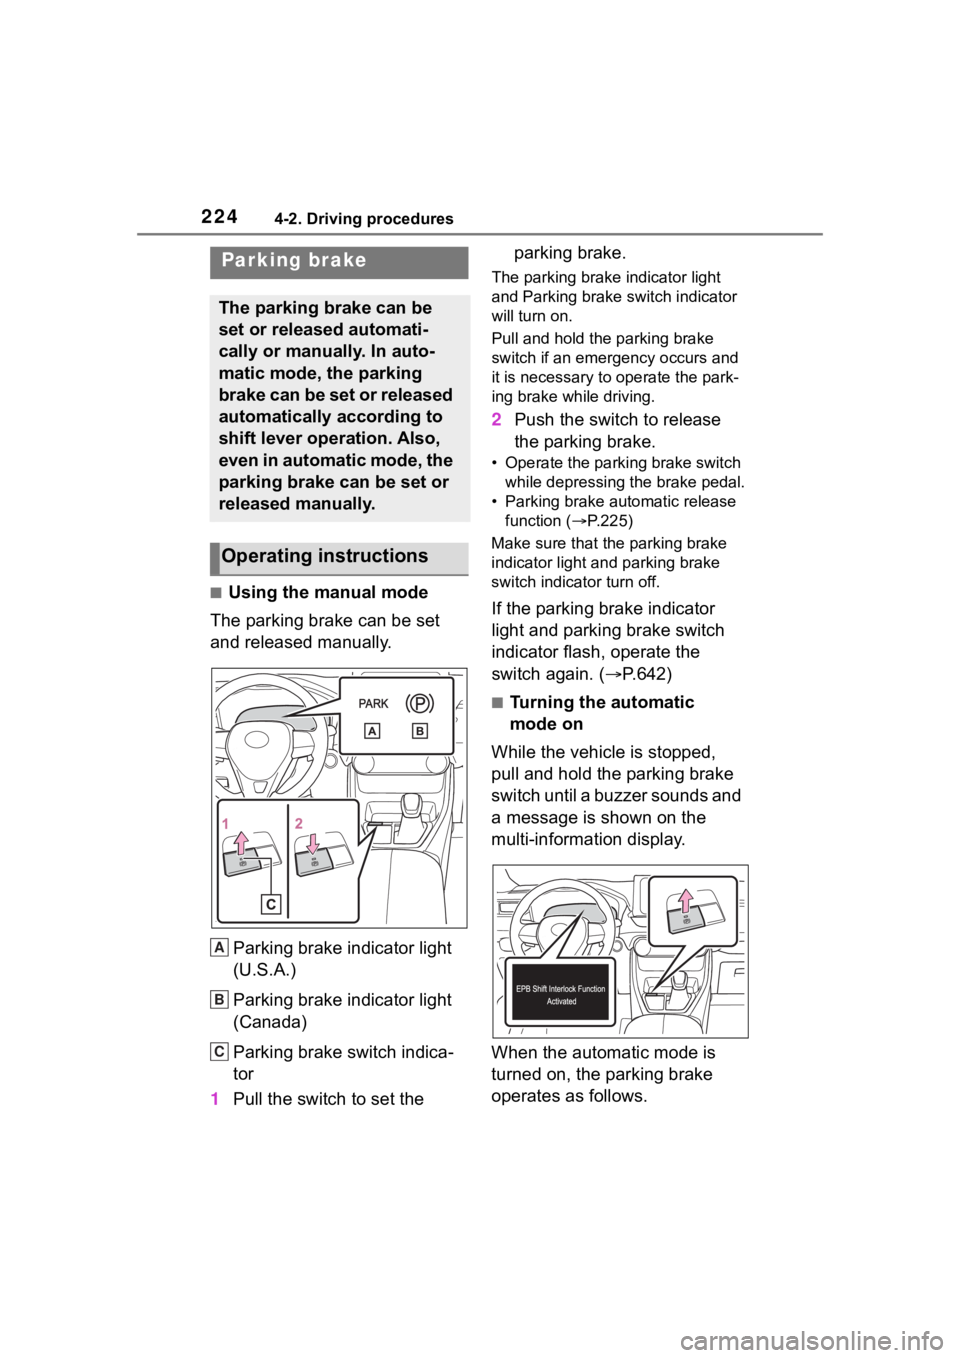
■Using the manual mode
The parking brake can be set
and released manually.
Parking brake indicator light
(U.S.A.)
Parking brake indicator light
(Canada)
Parking brake switch indica-
tor
1 Pull the switch to set the parking brake.
The parking brake indicator light
and Parking brake switch indicator
will turn on.
Pull and hold the parking brake
switch if an emergency occurs and
it is necessary to
operate the park-
ing brake while driving.
2 Push the switch to release
the parking brake.
• Operate the parking brake switch
while depressing the brake pedal.
• Parking brake automatic release function ( P.225)
Make sure that the parking brake
indicator light and parking brake
switch indicator turn off.
If the parking brake indicator
light and parking brake switch
indicator flash, operate the
switch again. ( P.642)
■Turning the automatic
mode on
While the vehicle is stopped,
pull and hold the parking brake
switch until a buzzer sounds and
a message is shown on the
multi-information display.
When the automatic mode is
turned on, the parking brake
operates as follows.
Parking brake
The parking brake can be
set or released automati-
cally or manually. In auto-
matic mode, the parking
brake can be set or released
automatically according to
shift lever operation. Also,
even in automatic mode, the
parking brake can be set or
released manually.
Operating instructions
A
B
C
Page 225 of 744
2254-2. Driving procedures
4
Driving
When the shift position is
shifted from P, the parking
brake will be released, and
the parking brake indicator
light and parking brake switch
indicator will turn off.
When the shift position is
shifted to P, the parking brake
will be set, and the parking
brake indicator light and park-
ing brake switch indicator will
turn on.
Operate the shift lever with the
vehicle stopped and the brake
pedal depressed.
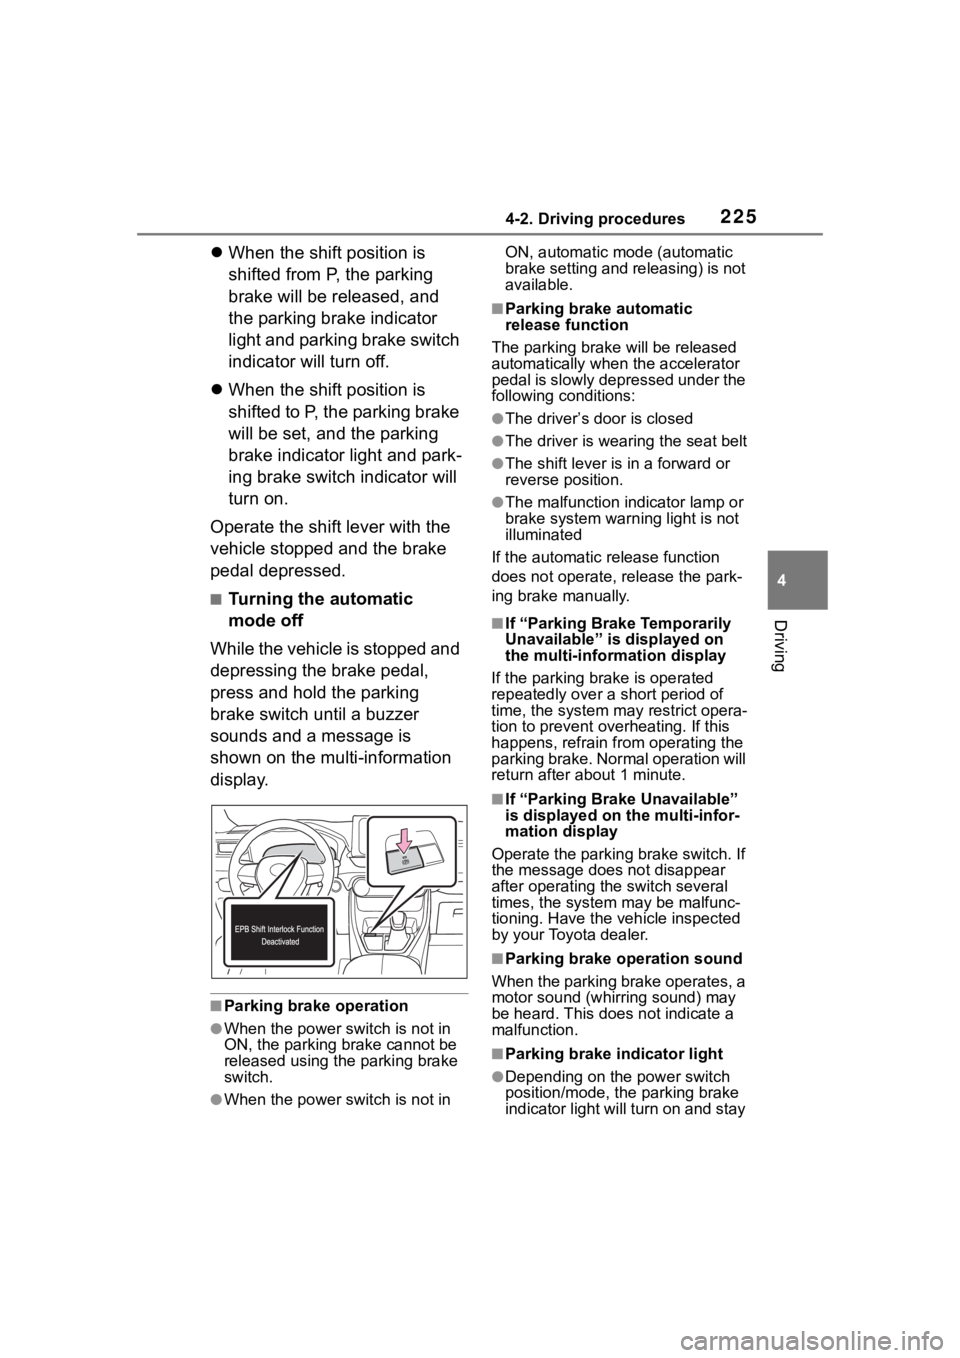
■Turning the automatic
mode off
While the vehicle is stopped and
depressing the brake pedal,
press and hold the parking
brake switch until a buzzer
sounds and a message is
shown on the multi-information
display.
■Parking brake operation
●When the power s witch is not in
ON, the parking brake cannot be
released using the parking brake
switch.
●When the power s witch is not in ON, automatic mode (automatic
brake setting and releasing) is not
available.
■Parking brake automatic
release function
The parking brake will be released
automatically when the accelerator
pedal is slowly depressed under the
following conditions:
●The driver’s door is closed
●The driver is wearing the seat belt
●The shift lever is in a forward or
reverse position.
●The malfunction in dicator lamp or
brake system warning light is not
illuminated
If the automatic release function
does not operate, release the park-
ing brake manually.
■If “Parking Brake Temporarily
Unavailable” is displayed on
the multi-info rmation display
If the parking brake is operated
repeatedly over a short period of
time, the system may restrict opera-
tion to prevent ove rheating. If this
happens, refrain from operating the
parking brake. Normal operation will
return after about 1 minute.
■If “Parking Brake Unavailable”
is displayed on the multi-infor-
mation display
Operate the parking brake switch. If
the message does not disappear
after operating the switch several
times, the system may be malfunc-
tioning. Have the vehicle inspected
by your Toyota dealer.
■Parking brake operation sound
When the parking brake operates, a
motor sound (whirr ing sound) may
be heard. This does not indicate a
malfunction.
■Parking brake indicator light
●Depending on the power switch
position/mode, the parking brake
indicator light will turn on and stay
Page 226 of 744
2264-2. Driving procedures
on as described below:
ON: Comes on until the parking
brake is released.
Not in ON: Stays on for approxi-
mately 15 seconds.
●When the power switch is turned
off with the parking brake set, the
parking brake indicator light will
stay on for about 15 seconds. This
does not indicate a malfunction.
■When the parking brake switch
malfunctions
Automatic mode (automatic brake
setting and releas ing) will be turned
on automatically.
■Parking the vehicle
P. 1 8 9
■Parking brake engaged warning
buzzer
A buzzer will sound if the vehicle is
driven with the parking brake
engaged. “Parking Brake ON” is dis-
played on the multi-information dis-
play (with the v ehicle reaching a
speed of 5 km/h [3 mph]).
■If the brake system warning
light comes on
P. 6 3 6
■Usage in winter time
P. 3 7 8
WA R N I N G
■When parking the vehicle
Do not leave a child in the vehicle
alone. The parking brake may be
released unintentionally by a child
and there is the danger of the
vehicle moving that may lead to
an accident resulting in death or
serious injury.
■Parking brake switch
Do not set any o bjects near the
parking brake switch. Objects
may interfere with the switch and
may lead the parking brake to
unexpectedly operate.
NOTICE
■When parking the vehicle
Before you leave the vehicle, shift
the shift position to P, set the park-
ing brake and make sure that the
vehicle does not move.
■When the system malfunc-
tions
Stop the vehicle in a safe place
and check the warning messages.
■When the parking brake can-
not be released due to a mal-
function
Driving the vehicle with the park-
ing brake set will lead to brake
components overheating, which
may affect braking performance
and increase brake wear. Have
the vehicle inspected by your Toy-
ota dealer immediately if this
occurs.
Page 227 of 744
2274-2. Driving procedures
4
Driving
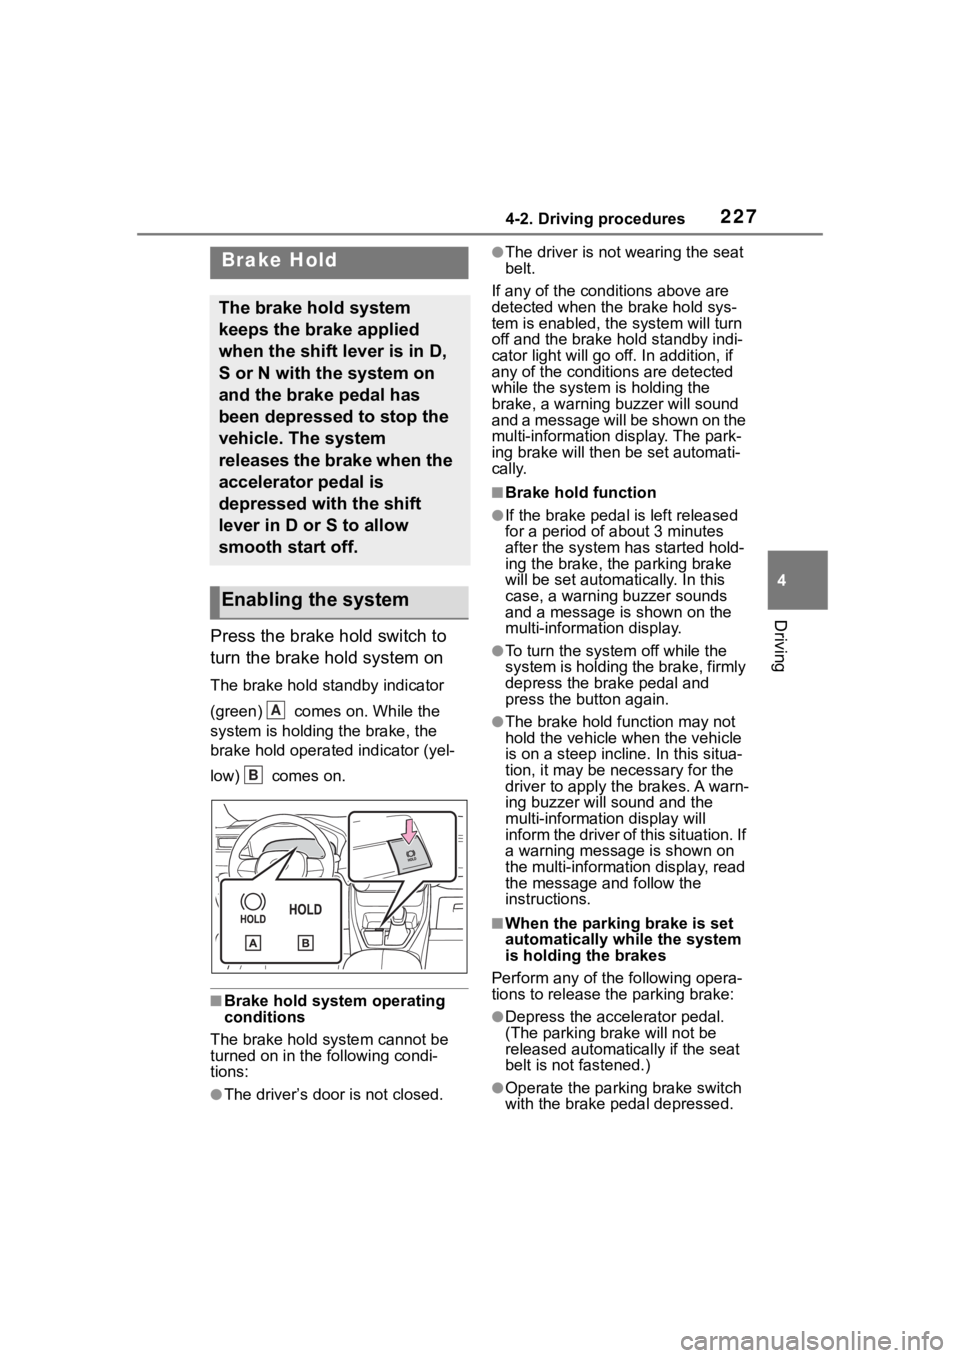
Press the brake hold switch to
turn the brake hold system on
The brake hold standby indicator
(green) comes on. While the
system is holding the brake, the
brake hold operated indicator (yel-
low) comes on.
■Brake hold system operating
conditions
The brake hold system cannot be
turned on in the following condi-
tions:
●The driver’s doo r is not closed.
●The driver is not wearing the seat
belt.
If any of the cond itions above are
detected when the brake hold sys-
tem is enabled, the system will turn
off and the brake hold standby indi-
cator light will go off. In addition, if
any of the conditions are detected
while the system is holding the
brake, a warning buzzer will sound
and a message will be shown on the
multi-information display. The park-
ing brake will then be set automati-
cally.
■Brake hold function
●If the brake pedal is left released
for a period of about 3 minutes
after the system has started hold-
ing the brake, the parking brake
will be set automatically. In this
case, a warning buzzer sounds
and a message is shown on the
multi-information display.
●To turn the system off while the
system is holding the brake, firmly
depress the brake pedal and
press the button again.
●The brake hold function may not
hold the vehicle when the vehicle
is on a steep incline. In this situa-
tion, it may be ne cessary for the
driver to apply the brakes. A warn-
ing buzzer will sound and the
multi-information display will
inform the driver of this situation. If
a warning message is shown on
the multi-information display, read
the message and follow the
instructions.
■When the parking brake is set
automatically while the system
is holding the brakes
Perform any of the following opera-
tions to release the parking brake:
●Depress the accelerator pedal.
(The parking brake will not be
released automatically if the seat
belt is not fastened.)
●Operate the parkin g brake switch
with the brake pedal depressed.
Brake Hold
The brake hold system
keeps the brake applied
when the shift lever is in D,
S or N with the system on
and the brake pedal has
been depressed to stop the
vehicle. The system
releases the brake when the
accelerator pedal is
depressed with the shift
lever in D or S to allow
smooth start off.
Enabling the system
A
B
Page 228 of 744
2284-2. Driving procedures
Make sure that the parking brake
indicator light goes off. ( P.224)
■When an inspection at your
Toyota dealer is necessary
When the brake hold standby indi-
cator (green ) does not illuminate
even when the brake hold switch is
pressed with the brake hold system
operating conditions met, the sys-
tem may be malfunctioning. Have
the vehicle inspected at your Toyota
dealer.
■If “Brake Hold Malfunction
Press Brake to Deactivate Visit
Your Dealer” or “Brake Hold
Malfunction Visit Your Dealer”
is displayed on the multi-infor-
mation display
The system may be malfunctioning.
Have the vehicle inspected by your
Toyota dealer.
■Warning messages and buzzers
Warning messages and buzzers are
used to indicate a system malfunc-
tion or to inform the driver of the
need for caution. If a warning mes-
sage is shown on th e multi-informa-
tion display, read the message and
follow the instructions.
■If the brake hold operated indi-
cator flashes
P. 6 4 1
WA R N I N G
■When the vehicle is on a
steep incline
When using the brake hold sys-
tem on a steep in cline, exercise
caution. The brake hold function
may not hold the vehicle in such a
situation.
■When stopped on a slippery
road
The system cannot stop the vehi-
cle when the gripping ability of the
tires has been exceeded. Do not
use the system w hen stopped on
a slippery road.
NOTICE
■When parking the vehicle
The brake hold system is not
designed for use when parking
the vehicle for a long period of
time. Turning the power switch off
while the system is holding the
brake may release the brake,
which would cause the vehicle to
move. When operating the power
switch, depress the brake pedal,
shift the shift lever to P and set
the parking brake.
Page 229 of 744
2294-3. Operating the lights and wipers
4
Driving
4-3.Operating the lights and wipers
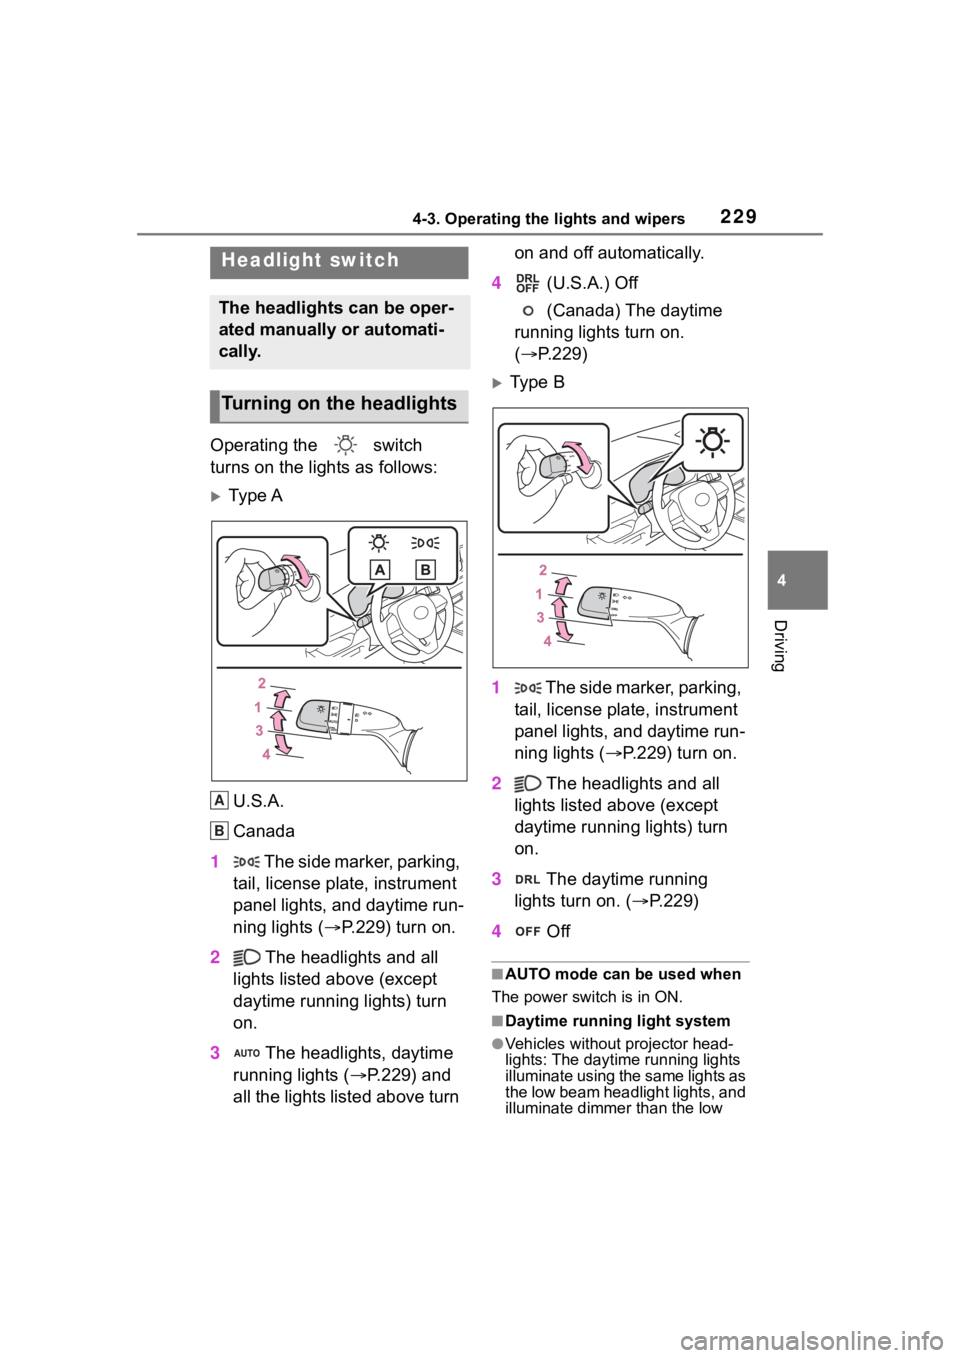
Operating the switch
turns on the lights as follows:
Ty p e A
U.S.A.
Canada
1 The side marker, parking,
tail, license plate, instrument
panel lights, and daytime run-
ning lights ( P.229) turn on.
2 The headlights and all
lights listed above (except
daytime running lights) turn
on.
3 The headlights, daytime
running lights ( P.229) and
all the lights listed above turn on and off automatically.
4 (U.S.A.) Off
(Canada) The daytime
running lights turn on.
( P.229)
Type B
1 The side marker, parking,
tail, license plate, instrument
panel lights, and daytime run-
ning lights ( P.229) turn on.
2 The headlights and all
lights listed above (except
daytime running lights) turn
on.
3 The daytime running
lights turn on. ( P.229)
4 Off
■AUTO mode can be used when
The power switch is in ON.
■Daytime running light system
●Vehicles without projector head-
lights: The daytime running lights
illuminate using the same lights as
the low beam headlight lights, and
illuminate dimmer than the low
Headlight switch
The headlights can be oper-
ated manually or automati-
cally.
Turning on the headlights
A
B
Page 230 of 744
2304-3. Operating the lights and wipers
beam headlight lights.
●Vehicles with projector head-
lights: The daytime running lights
illuminate using the same lights as
the parking lights and illuminate
brighter than the parking lights.
●To make your vehicle more visible
to other drivers during daytime
driving, the daytime running lights
turn on automatically when all of
the following condi tions are met.
(The daytime running lights are
not designed for use at night.)
• The hybrid system is operating
• The parking brake is released
• The headlight s witch is in the
(Canada only), , or
*
position
*: When the surroundings are bright
The daytime running lights remain
on after they illumi nate, even if the
parking brake is set again.
●For the U.S.A.: Daytime running
lights can be turned off by operat-
ing the switch.
●Compared to turning on the head-
lights, the daytime running light
system offers gr eater durability
and consumes less electricity, so
it can help improve fuel economy.
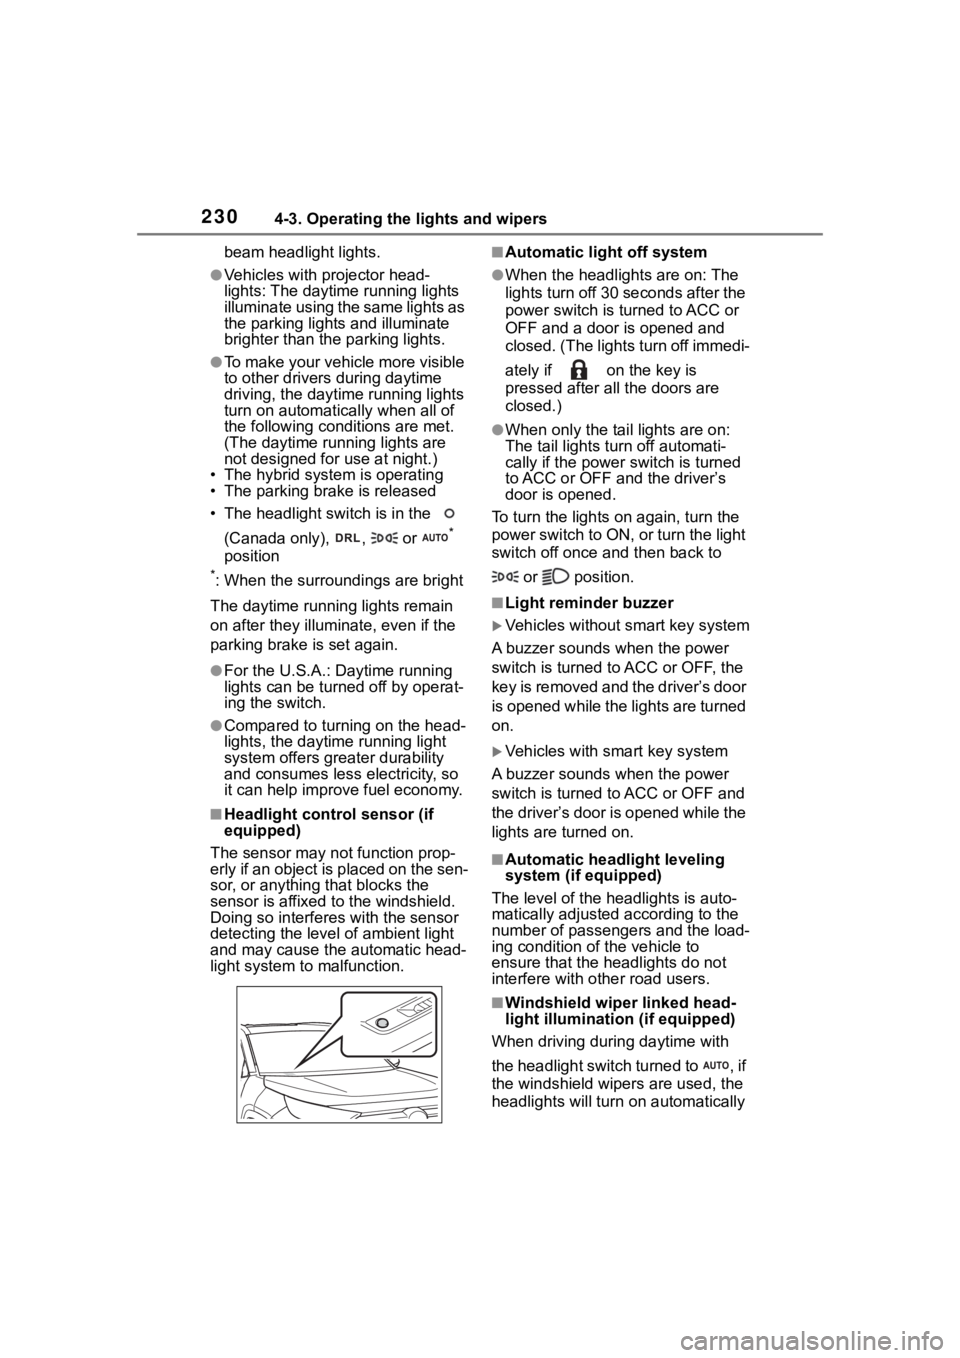
■Headlight control sensor (if
equipped)
The sensor may not function prop-
erly if an object is placed on the sen-
sor, or anything that blocks the
sensor is affixed to the windshield.
Doing so interfere s with the sensor
detecting the level of ambient light
and may cause the automatic head-
light system to malfunction.
■Automatic light off system
●When the headlights are on: The
lights turn off 30 seconds after the
power switch is turned to ACC or
OFF and a door is opened and
closed. (The lights turn off immedi-
ately if on the key is
pressed after all the doors are
closed.)
●When only the tail lights are on:
The tail lights turn off automati-
cally if the power switch is turned
to ACC or OFF and the driver’s
door is opened.
To turn the lights on again, turn the
power switch to ON, or turn the light
switch off once and then back to
or position.
■Light reminder buzzer
Vehicles without smart key system
A buzzer sounds when the power
switch is turned to ACC or OFF, the
key is removed and the driver’s door
is opened while the lights are turned
on.
Vehicles with smart key system
A buzzer sounds when the power
switch is turned to ACC or OFF and
the driver’s door is opened while the
lights are turned on.
■Automatic headlight leveling
system (if equipped)
The level of the headlights is auto-
matically adjusted according to the
number of passengers and the load-
ing condition of the vehicle to
ensure that the headlights do not
interfere with o ther road users.
■Windshield wiper linked head-
light illumination (if equipped)
When driving during daytime with
the headlight switch turned to , if
the windshield wipers are used, the
headlights will turn o n automatically