ECU TOYOTA RAV4 HYBRID 2020 (in English) Manual Online
[x] Cancel search | Manufacturer: TOYOTA, Model Year: 2020, Model line: RAV4 HYBRID, Model: TOYOTA RAV4 HYBRID 2020Pages: 744, PDF Size: 31.43 MB
Page 614 of 744
6147-3. Do-it-yourself maintenance
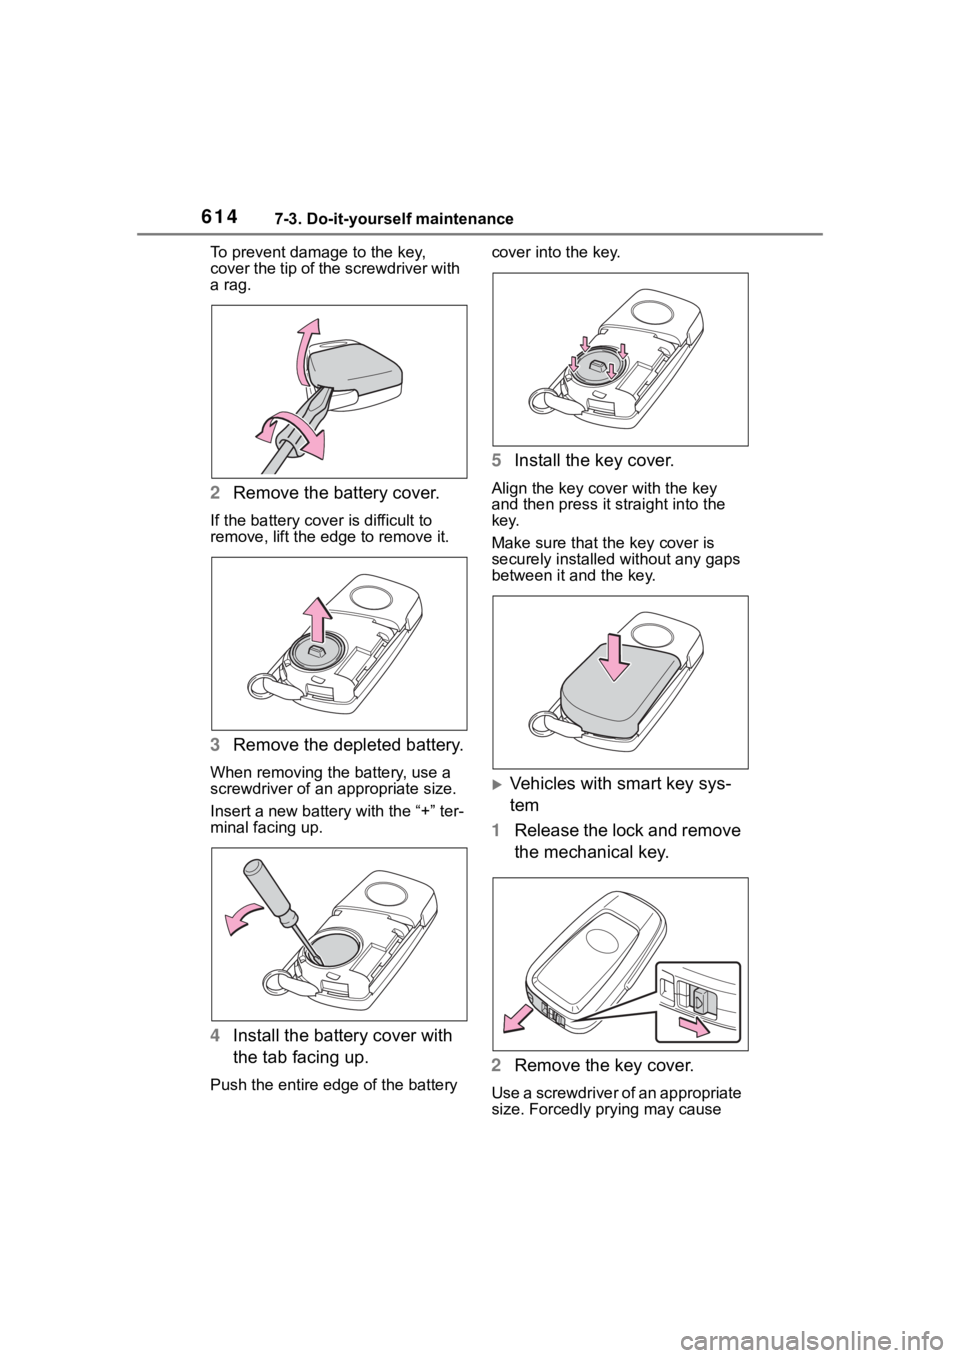
To prevent damage to the key,
cover the tip of the screwdriver with
a rag.
2Remove the battery cover.
If the battery cover is difficult to
remove, lift the ed ge to remove it.
3Remove the depleted battery.
When removing the battery, use a
screwdriver of an appropriate size.
Insert a new battery with the “+” ter-
minal facing up.
4Install the battery cover with
the tab facing up.
Push the entire edge of the battery cover into the key.
5
Install the key cover.
Align the key co ver with the key
and then press it straight into the
key.
Make sure that the key cover is
securely installed without any gaps
between it and the key.
Vehicles with smart key sys-
tem
1 Release the lock and remove
the mechanical key.
2 Remove the key cover.
Use a screwdriver of an appropriate
size. Forcedly prying may cause
Page 617 of 744
6177-3. Do-it-yourself maintenance
7
Maintenance and care
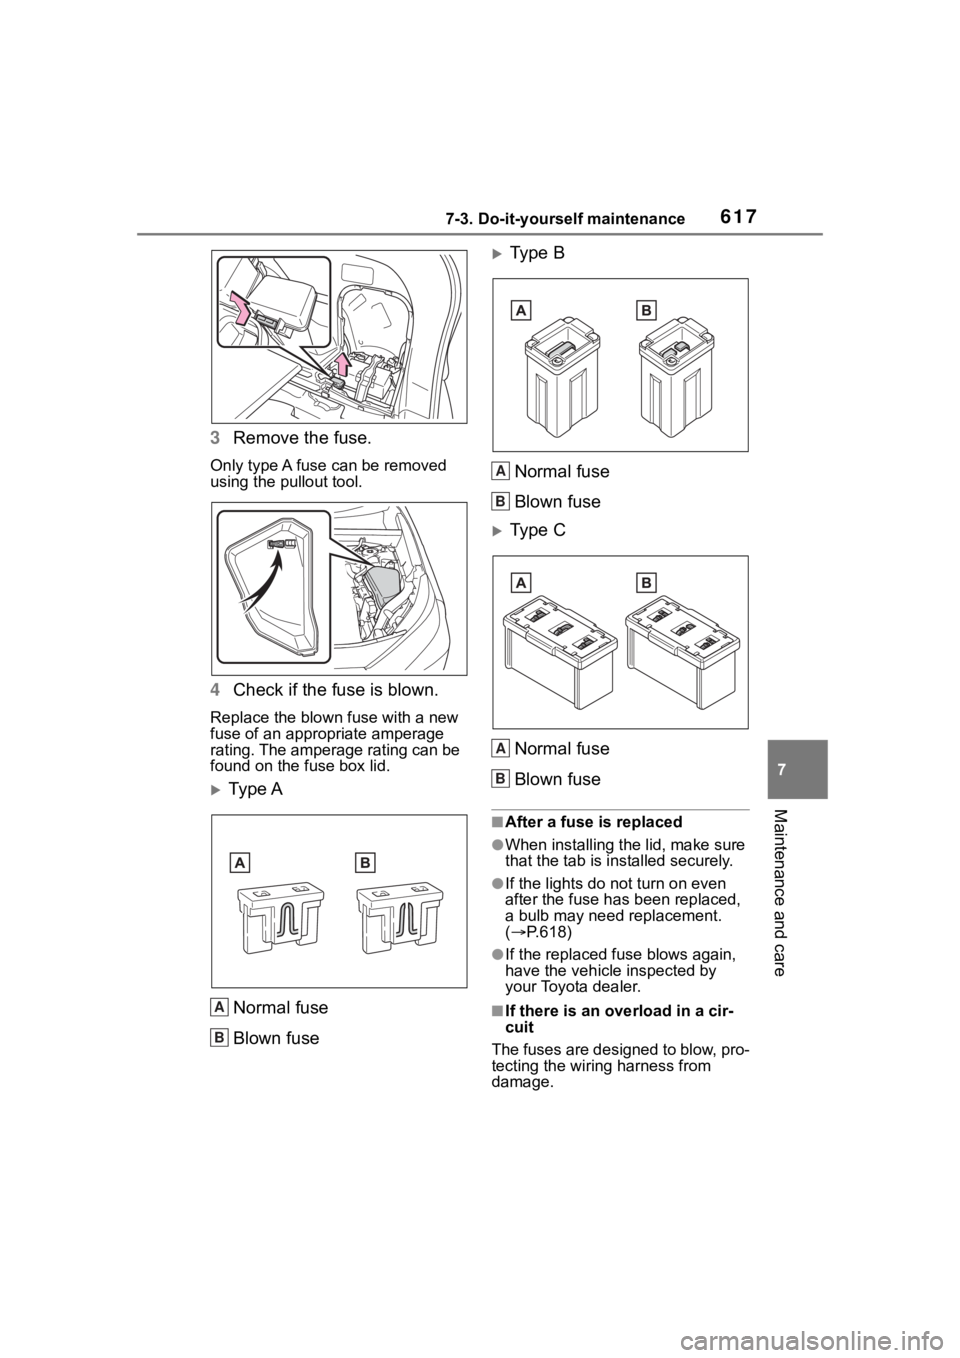
3Remove the fuse.
Only type A fuse can be removed
using the pullout tool.
4Check if the fuse is blown.
Replace the blown fuse with a new
fuse of an appropriate amperage
rating. The amperage rating can be
found on the fuse box lid.
Ty p e A
Normal fuse
Blown fuse
Type BNormal fuse
Blown fuse
Type CNormal fuse
Blown fuse
■After a fuse is replaced
●When installing the lid, make sure
that the tab is ins talled securely.
●If the lights do not turn on even
after the fuse has been replaced,
a bulb may need replacement.
( P.618)
●If the replaced fuse blows again,
have the vehicle inspected by
your Toyota dealer.
■If there is an ove rload in a cir-
cuit
The fuses are designed to blow, pro-
tecting the wiring harness from
damage.A
B
A
B
A
B
Page 624 of 744
6247-3. Do-it-yourself maintenance
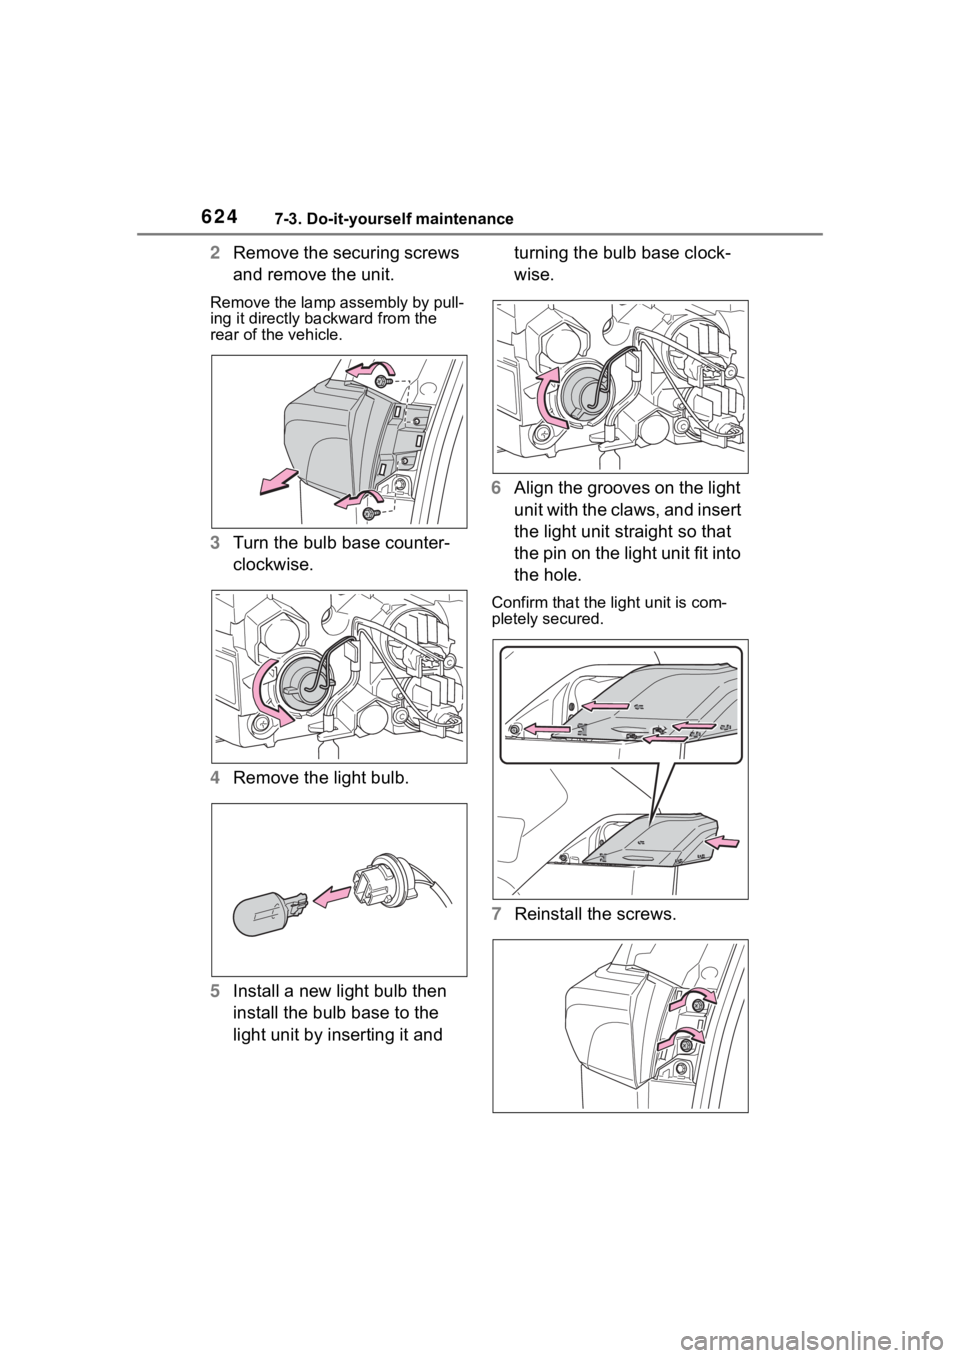
2Remove the securing screws
and remove the unit.
Remove the lamp assembly by pull-
ing it directly backward from the
rear of the vehicle.
3Turn the bulb base counter-
clockwise.
4 Remove the light bulb.
5 Install a new light bulb then
install the bulb base to the
light unit by inserting it and turning the bulb base clock-
wise.
6 Align the grooves on the light
unit with the claws, and insert
the light unit straight so that
the pin on the light unit fit into
the hole.
Confirm that the light unit is com-
pletely secured.
7Reinstall the screws.
Page 625 of 744
6257-3. Do-it-yourself maintenance
7
Maintenance and care
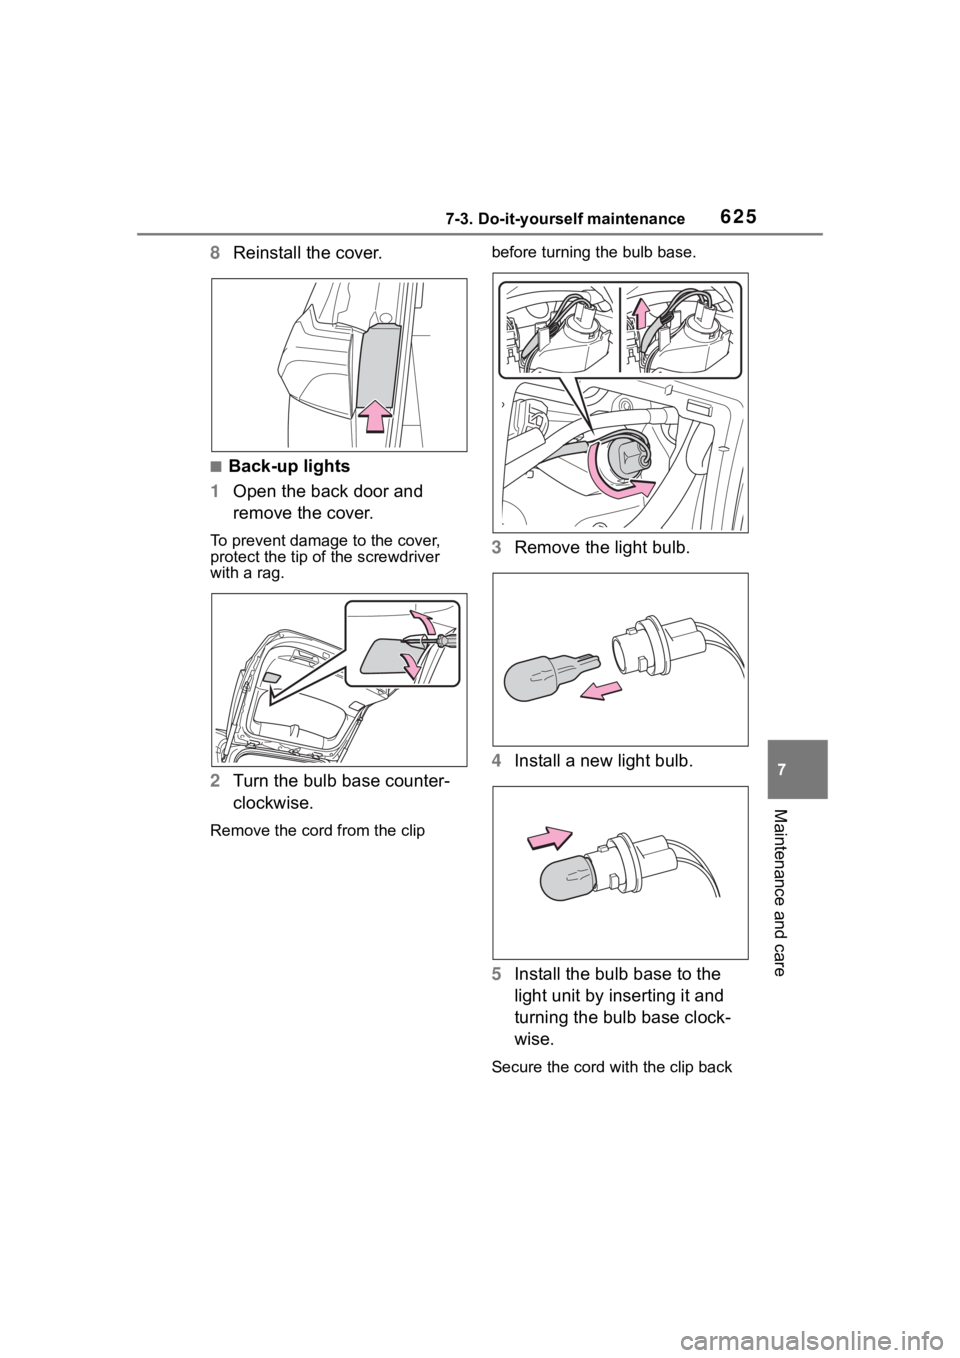
8Reinstall the cover.
■Back-up lights
1 Open the back door and
remove the cover.
To prevent damage to the cover,
protect the tip of the screwdriver
with a rag.
2Turn the bulb base counter-
clockwise.
Remove the cord from the clip before turning the bulb base.
3
Remove the light bulb.
4 Install a new light bulb.
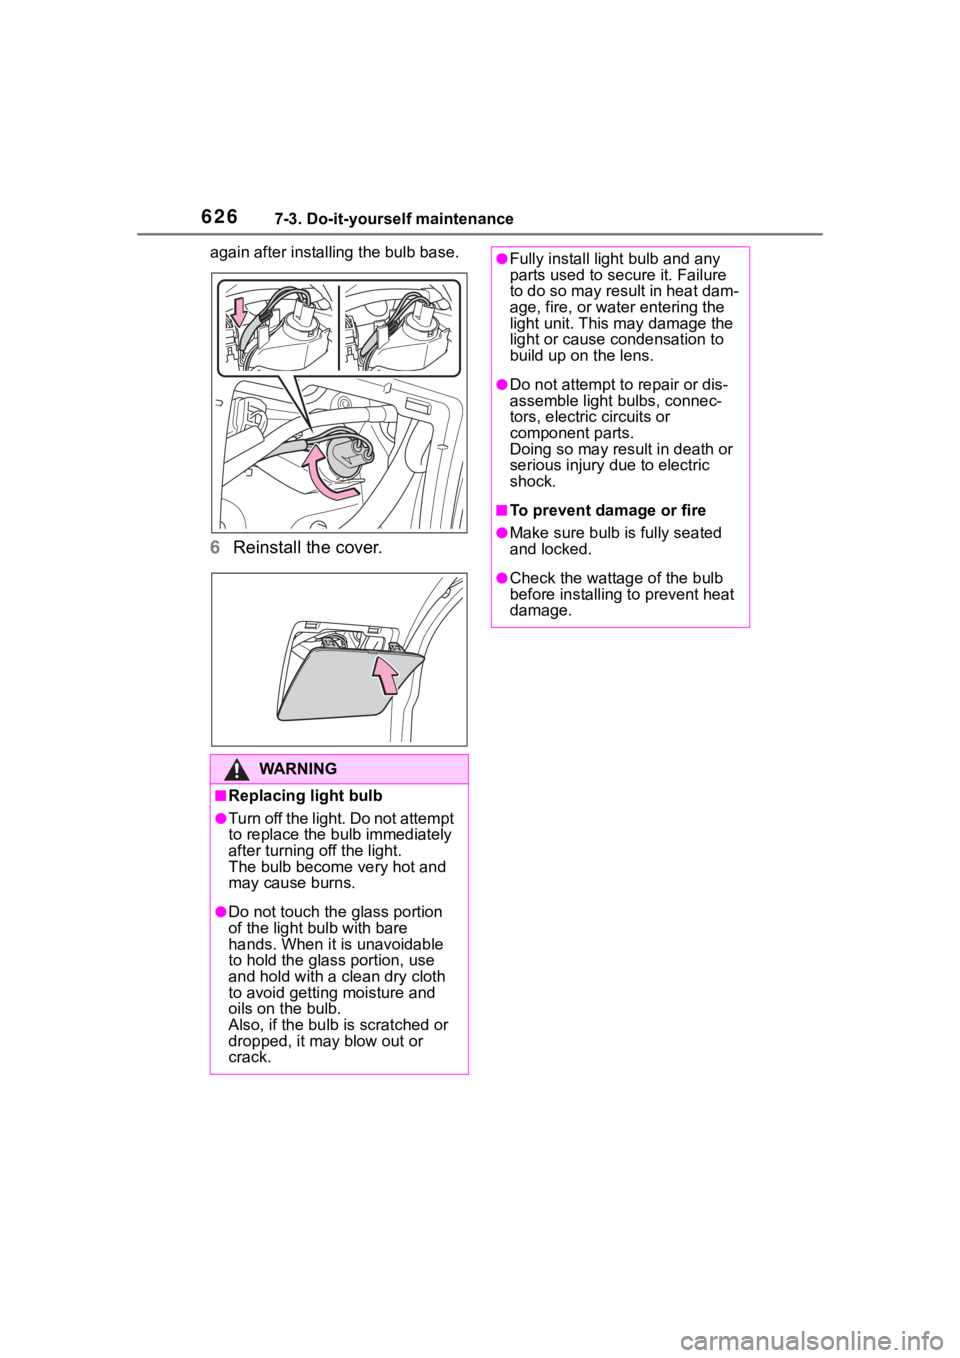
5 Install the bulb base to the
light unit by inserting it and
turning the bulb base clock-
wise.
Secure the cord wit h the clip back
Page 626 of 744
6267-3. Do-it-yourself maintenance
again after installin g the bulb base.
6Reinstall the cover.
WA R N I N G
■Replacing light bulb
●Tu rn o ff t he ligh t. D o n ot a tte m pt
to replace the bulb immediately
after turning off the light.
The bulb become very hot and
may cause burns.
●Do not touch the glass portion
of the light bulb with bare
hands. When it is unavoidable
to hold the glass portion, use
and hold with a clean dry cloth
to avoid getting moisture and
oils on the bulb.
Also, if the bulb is scratched or
dropped, it may blow out or
crack.
●Fully install light bulb and any
parts used to secure it. Failure
to do so may result in heat dam-
age, fire, or water entering the
light unit. This may damage the
light or cause condensation to
build up on the lens.
●Do not attempt to repair or dis-
assemble light bulbs, connec-
tors, electric circuits or
component parts.
Doing so may res ult in death or
serious injury due to electric
shock.
■To prevent damage or fire
●Make sure bulb is fully seated
and locked.
●Check the wattage of the bulb
before installing to prevent heat
damage.
Page 629 of 744
6298-1. Essential information
8
When trouble arises
1Steadily step on the brake
pedal with both feet and
firmly depress it.
Do not pump the brake pedal
repeatedly as this will increase the
effort required to slow the vehicle.
2Shift the shift lever to N.
If the shift lever is shifted to N
3 After slowing down, stop the
vehicle in a safe place by the
road.
4 Stop the hybrid system.
If the shift lever cannot be
shifted to N
3 Keep depressing the brake
pedal with both feet to reduce
vehicle speed as much as
possible.
4 Perform the following proce-
dure to stop the hybrid sys-
tem:
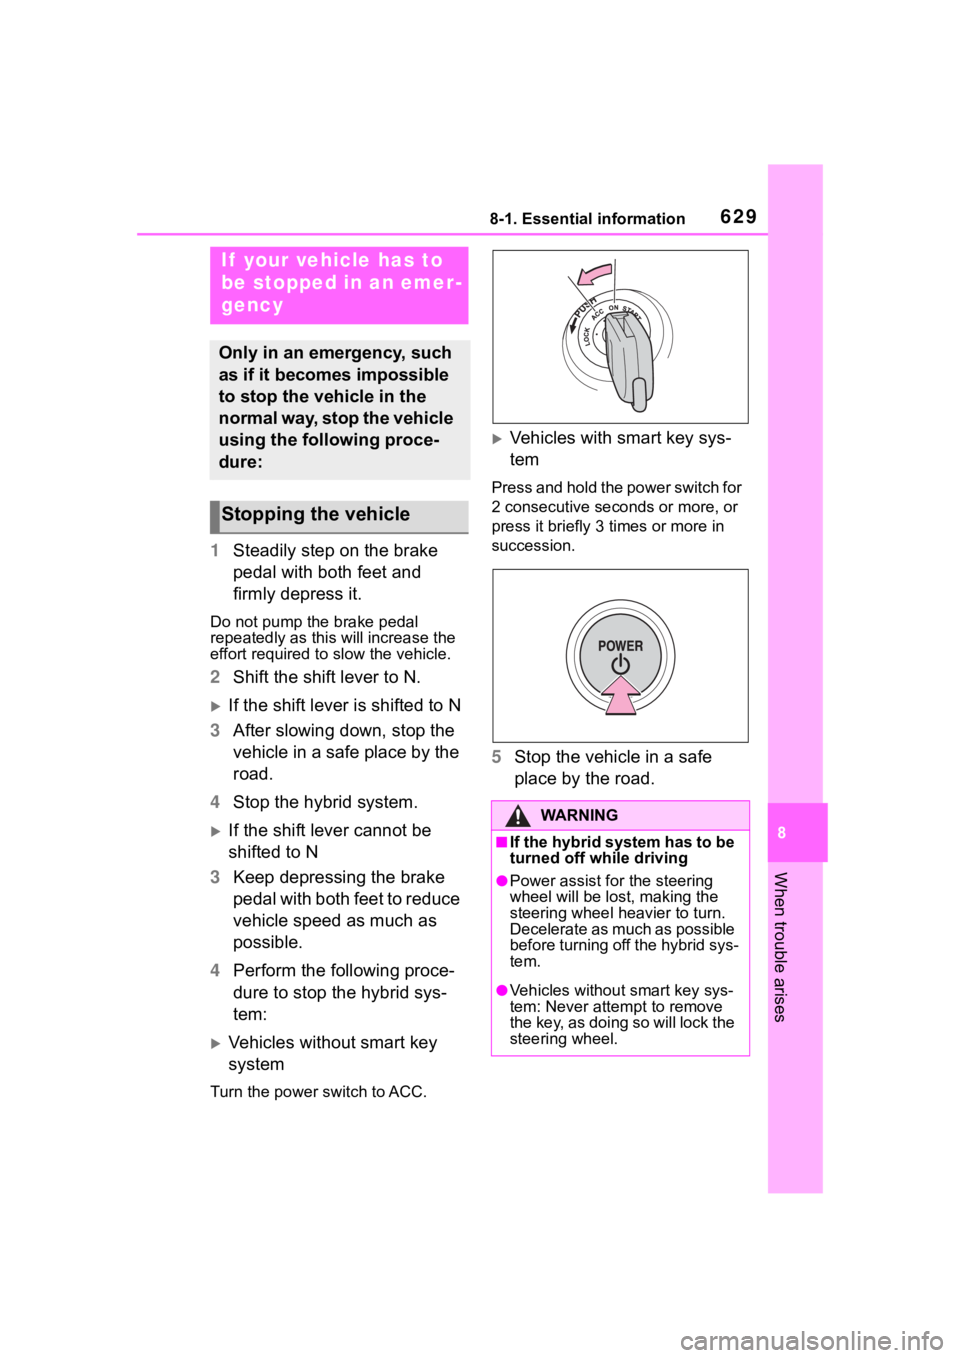
Vehicles without smart key
system
Turn the power switch to ACC.
Vehicles with smart key sys-
tem
Press and hold the power switch for
2 consecutive seconds or more, or
press it briefly 3 times or more in
succession.
5Stop the vehicle in a safe
place by the road.
If your vehicle has to
be stopped in an emer-
gency
Only in an emergency, such
as if it becomes impossible
to stop the vehicle in the
normal way, stop the vehicle
using the following proce-
dure:
Stopping the vehicle
WA R N I N G
■If the hybrid system has to be
turned off while driving
●Power assist for the steering
wheel will be lost, making the
steering wheel heavier to turn.
Decelerate as much as possible
before turning off the hybrid sys-
tem.
●Vehicles without smart key sys-
tem: Never atte mpt to remove
the key, as doing so will lock the
steering wheel.
Page 632 of 744
6328-2. Steps to take in an emergency
The following may indicate a
problem with your transmission.
Contact your Toyota dealer or
commercial towing service
before towing.
The hybrid system warning
message is shown on the
multi-information display and
the vehicle does not move.
The vehicle makes an abnor-
mal sound.
From the front
Use a towing dolly under the
rear wheels.
WA R N I N G
■Installing towing eyelet to the
vehicle (vehicl es with towing
eyelet)
Make sure that towing eyelet is
installed securely.
If not securely installed, towing
eyelet may come loose during
towing.
NOTICE
■To prevent damage to the
vehicle when towing using a
wheel-lift type truck
●Do not tow the vehicle from the
rear when the power switch is in
OFF. The steering lock mecha-
nism is not strong enough to
hold the front wheels straight.
●When raising the vehicle,
ensure adequate ground clear-
ance for towing at the opposite
end of the raised vehicle. With-
out adequate clearance, the
vehicle could be damaged while
being towed.
■To prevent damage to the
vehicle when towing with a
sling-type truck
Do not tow with a sling-type truck,
either from the front or rear.
■To prevent damage to the
vehicle during emergency
towing (vehicles with towing
eyelet)
Do not secure cables or chains to
the suspension components.
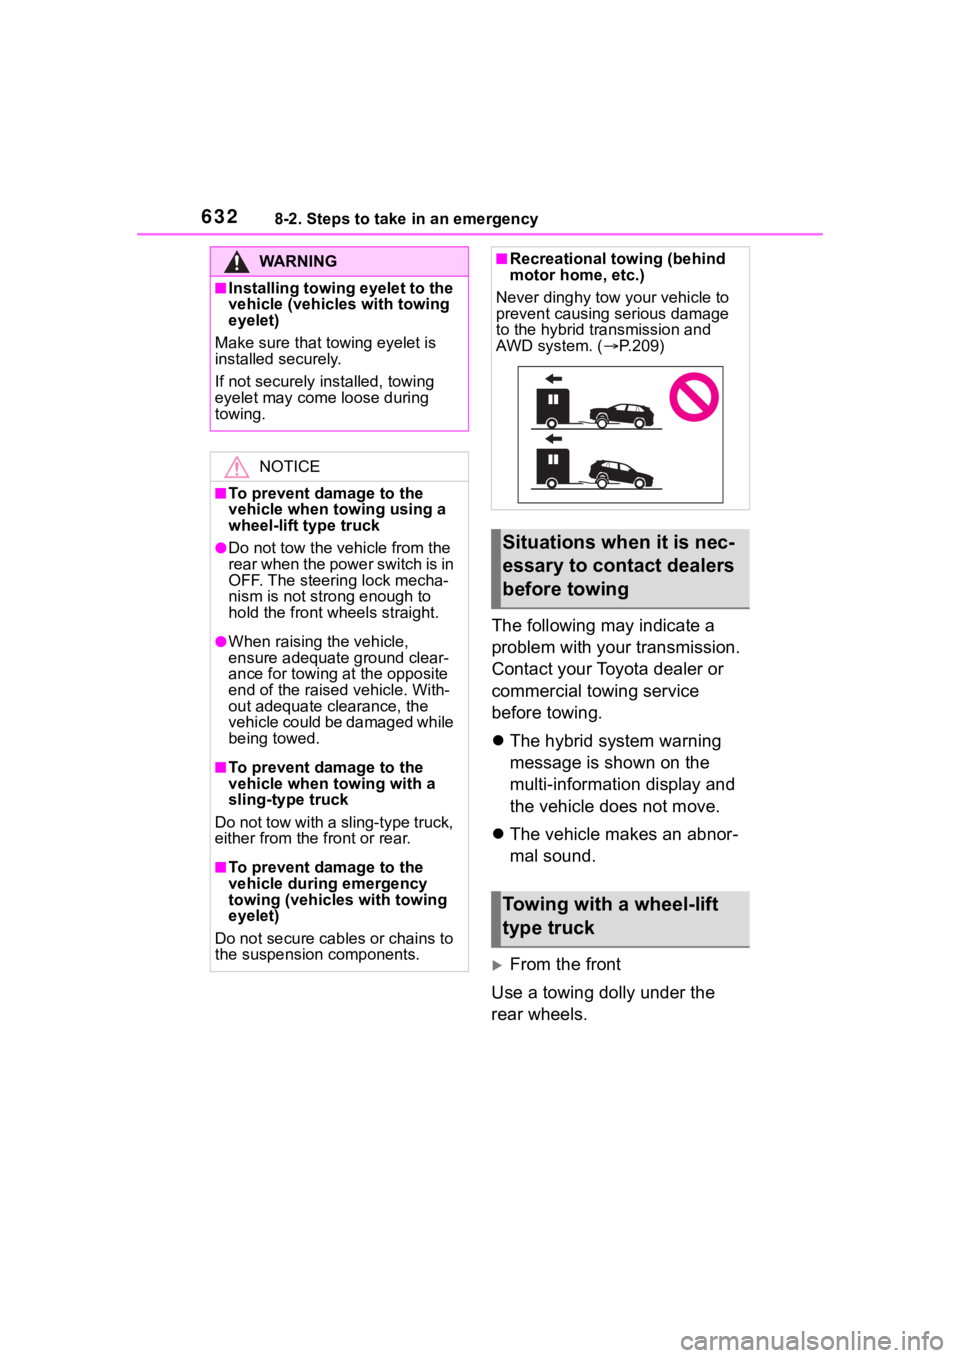
■Recreational towing (behind
motor home, etc.)
Never dinghy tow your vehicle to
prevent causing serious damage
to the hybrid transmission and
AWD system. ( P.209)
Situations when it is nec-
essary to contact dealers
before towing
Towing with a wheel-lift
type truck
Page 633 of 744
6338-2. Steps to take in an emergency
8
When trouble arises
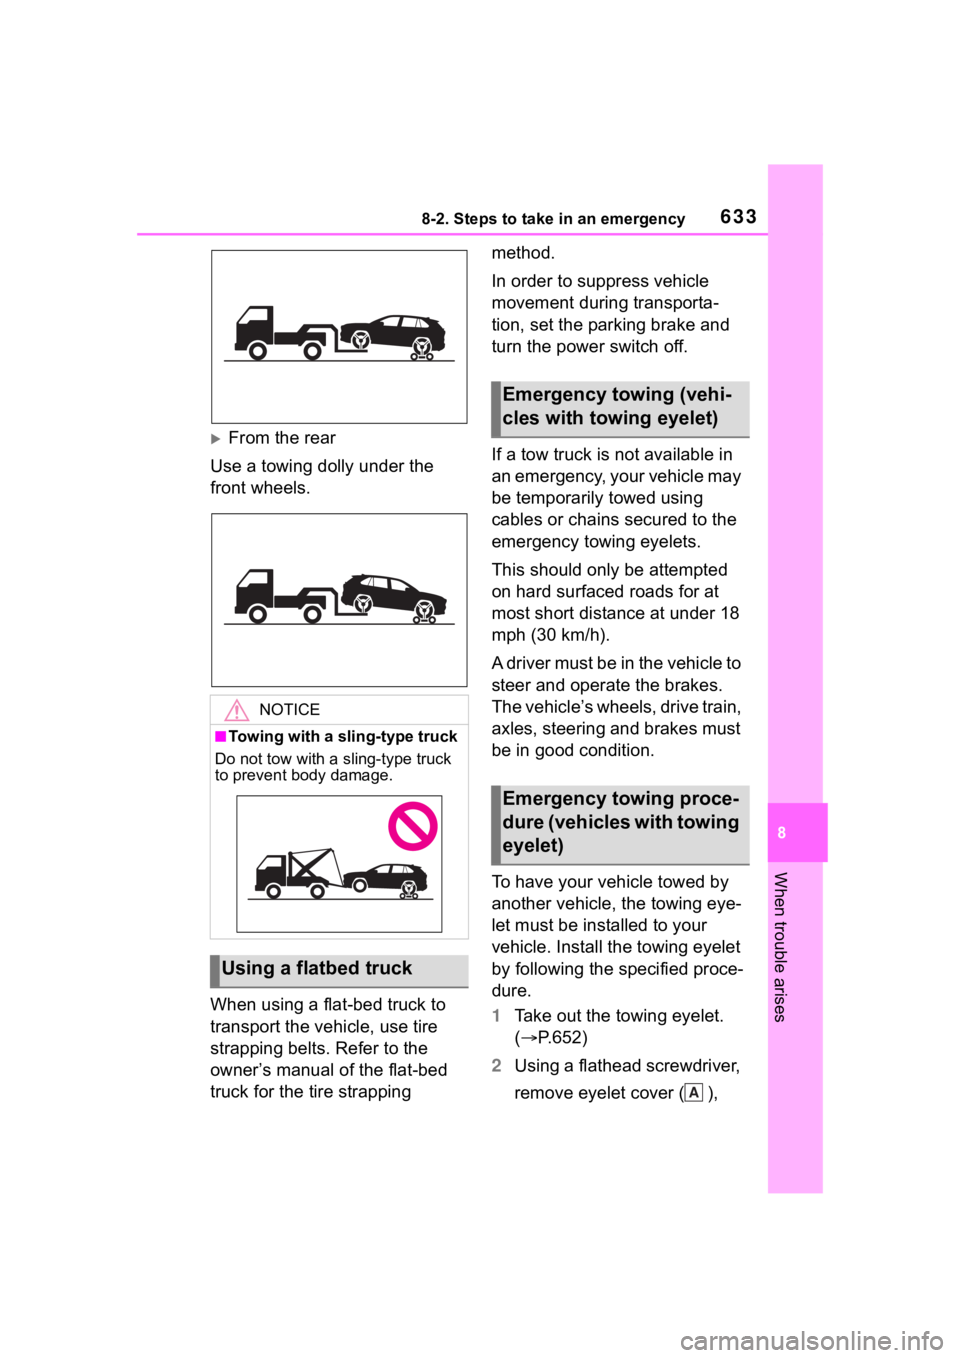
From the rear
Use a towing dolly under the
front wheels.
When using a flat-bed truck to
transport the vehicle, use tire
strapping belts. Refer to the
owner’s manual of the flat-bed
truck for the tire strapping method.
In order to suppress vehicle
movement during transporta-
tion, set the parking brake and
turn the power switch off.
If a tow truck is not available in
an emergency, your vehicle may
be temporarily towed using
cables or chains secured to the
emergency towing eyelets.
This should only be attempted
on hard surfaced roads for at
most short distance at under 18
mph (30 km/h).
A driver must be in the vehicle to
steer and operate the brakes.
The vehicle’s wheels, drive train,
axles, steering and brakes must
be in good condition.
To have your vehicle towed by
another vehicle, the towing eye-
let must be installed to your
vehicle. Install the towing eyelet
by following the specified proce-
dure.
1
Take out the towing eyelet.
( P.652)
2 Using a flathead screwdriver,
remove eyelet cover ( ),
NOTICE
■Towing with a sling-type truck
Do not tow with a sling-type truck
to prevent body damage.
Using a flatbed truck
Emergency towing (vehi-
cles with towing eyelet)
Emergency towing proce-
dure (vehicles with towing
eyelet)
A
Page 634 of 744
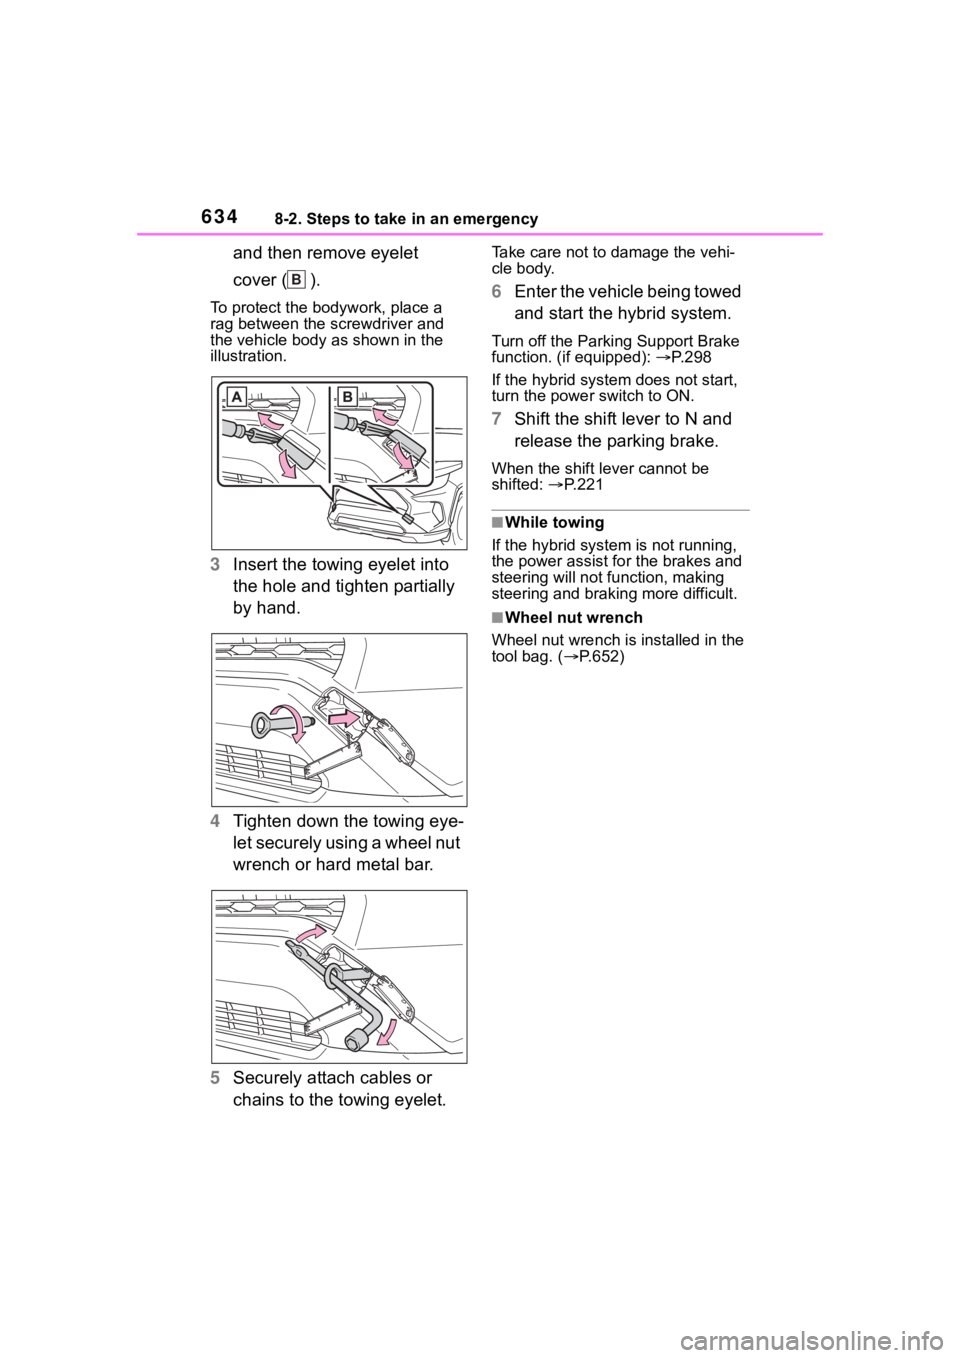
6348-2. Steps to take in an emergency
and then remove eyelet
cover ( ).
To protect the bodywork, place a
rag between the screwdriver and
the vehicle body as shown in the
illustration.
3 Insert the towing eyelet into
the hole and tighten partially
by hand.
4 Tighten down the towing eye-
let securely using a wheel nut
wrench or hard metal bar.
5 Securely attach cables or
chains to the towing eyelet.
Take care not to damage the vehi-
cle body.
6Enter the vehicle being towed
and start the hybrid system.
Turn off the Parking Support Brake
function. (if equipped): P. 2 9 8
If the hybrid system does not start,
turn the power switch to ON.
7 Shift the shift lever to N and
release the parking brake.
When the shift lever cannot be
shifted: P. 2 2 1
■While towing
If the hybrid system is not running,
the power assist for the brakes and
steering will not function, making
steering and braking more difficult.
■Wheel nut wrench
Wheel nut wrench is installed in the
tool bag. ( P.652)
B
Page 644 of 744

6448-2. Steps to take in an emergency
seat.
●If a cushion is placed on the seat,
the sensor may not detect a pas-
senger, and the warning light may
not operate properly.
■SRS warning light
This warning light system monitors
the airbag sensor assembly, front
impact sensors, side impact sensors
(front door), side impact sensors
(front), side impact sensors (rear),
driver’s seat position sensor,
driver’s seat belt buckle switch, front
passenger occupant classification
system (ECU and sensors), “AIR
BAG ON” indicator light, “AIR BAG
OFF” indicator light, front passen-
ger’s seat belt buc kle switch, seat
belt pretensioners and force limiters,
airbags, interconnecting wiring and
power sources. ( P. 3 6 )
■If the malfunction indicator
lamp comes on while driving
First check the following:
●Is the fuel t ank empty?
If it is, fill the fu el tank immediately.
●Is the fuel tank cap loose?
If it is, tighten it securely.
The light will go o ff after several
driving trips.
If the light does not go off even after
several trips, contact your Toyota
dealer as soon as possible.
■Electric power steering system
warning light (warning buzzer)
When the 12-volt battery charge
becomes insufficien t or the voltage
temporarily drops, the electric power
steering system warning light may
come on and the warning buzzer
may sound.
■When the tire pressure warning
light comes on (vehicles with
tire pressure warning system)
Inspect the tires to check if a tire is
punctured.
If a tire is punctured: P.651 If none of the tires are punctured:
Turn the power switch to OFF then
turn it to ON.
Check if the tire pressure warning
light comes on or blinks.
If the tire pressur
e warning light
blinks for approximately 1 minute
then stays on
There may be a malfunction in the
tire pressure warning system. Have
the vehicle inspected by your Toyota
dealer immediately.
If the tire pressur e warning light
comes on
1 After the temperature of the tires
has lowered sufficiently, check
the inflation pressure of each tire
and adjust them to the specified
level.
2 If the warning light does not turn
off even after several minutes
have elapsed, check that the
inflation pressure of each tire is
at the specified level and perform
initialization. ( P.595)
■The tire pressure warning light
may come on due to natural
causes (vehicles with tire pres-
sure warning system)
The tire pressure warning light may
come on due to natural causes such
as natural air leaks and tire inflation
pressure changes caused by tem-
perature. In this ca se, adjusting the
tire inflation pressure will turn off the
warning ligh t (after a few minutes).
■When a tire is replaced with a
compact spare tire (vehicles
with tire pressure warning sys-
tem)
The compact spare tire is not
equipped with a tire pressure warn-
ing valve and tran smitter. If a tire
goes flat, the tire pressure warning
light will not turn off even though the
flat tire has been replaced with the
spare tire. Replac e the spare tire
with the standard tire and adjust the
tire inflation pressure. The tire pres-