TOYOTA RAV4 PLUG-IN HYBRID 2022 Owners Manual
Manufacturer: TOYOTA, Model Year: 2022, Model line: RAV4 PLUG-IN HYBRID, Model: TOYOTA RAV4 PLUG-IN HYBRID 2022Pages: 662, PDF Size: 163.06 MB
Page 151 of 662
149
2 2-2. Charging
Plug-in hybrid system
played.
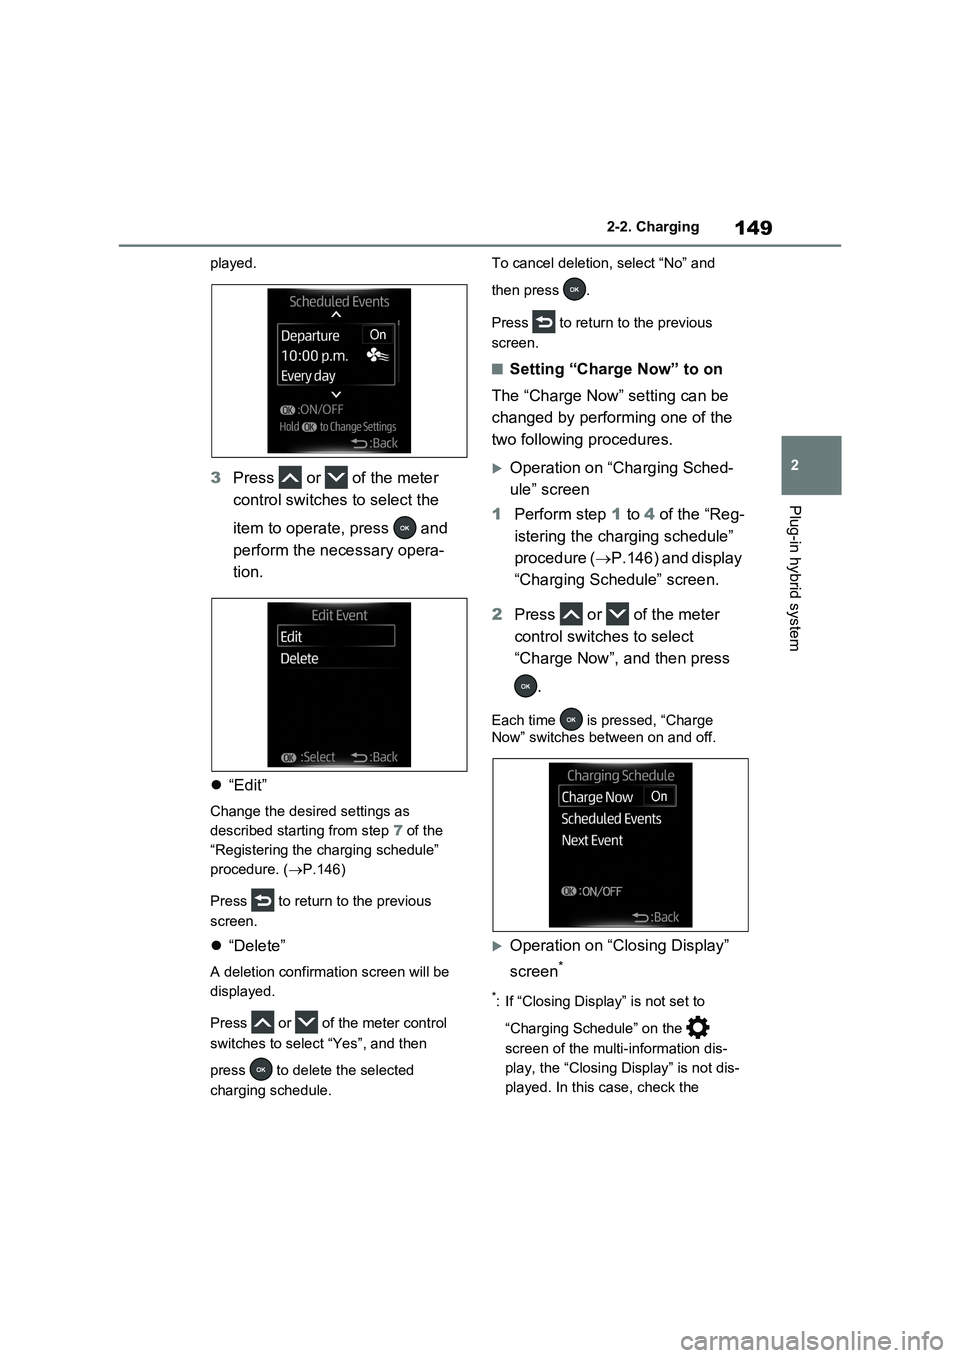
3Press or of the meter
control switches to select the
item to operate, press and
perform the necessary opera-
tion.
“Edit”
Change the desired settings as
described starting from step 7 of the
“Registering the charging schedule”
procedure. (P.146)
Press to return to the previous
screen.
“Delete”
A deletion confirmation screen will be
displayed.
Press or of the meter control
switches to select “Yes”, and then
press to delete the selected
charging schedule.To cancel deletion, select “No” and
then press .
Press to return to the previous
screen.
�QSetting “Charge Now” to on
The “Charge Now” setting can be
changed by performing one of the
two following procedures.
Operation on “Charging Sched-
ule” screen
1Perform step 1 to 4 of the “Reg-
istering the charging schedule”
procedure (P.146) and display
“Charging Schedule” screen.
2Press or of the meter
control switches to select
“Charge Now”, and then press
.
Each time is pressed, “Charge
Now” switches between on and off.
Operation on “Closing Display”
screen
*
*: If “Closing Display” is not set to
“Charging Schedule” on the
screen of the multi-information dis-
play, the “Closing Display” is not dis-
played. In this case, check the
Page 152 of 662
1502-2. Charging
settings on the multi-information dis-
play.
1Turn the power switch off.
The “Closing Display” screen is dis-
played on the multi-information display.
(P.151)
2Press to set “Charge Now”
to on.
Each time is pressed, “Charge
Now” switches between on and off.
After setting operations are com-
plete, charging starts when the AC
charging cable is connected.
(P.134)
�QChanging “Next Event”*
*: When “Charge Now” is set to on or
when using “My Room Mode”
(P.152) etc., it is not possible to
change the registered “Next Event”.
1Perform step 1 to 4 of the “Reg-
istering the charging schedule”
procedure (P.146) and display
“Charging Schedule” screen.
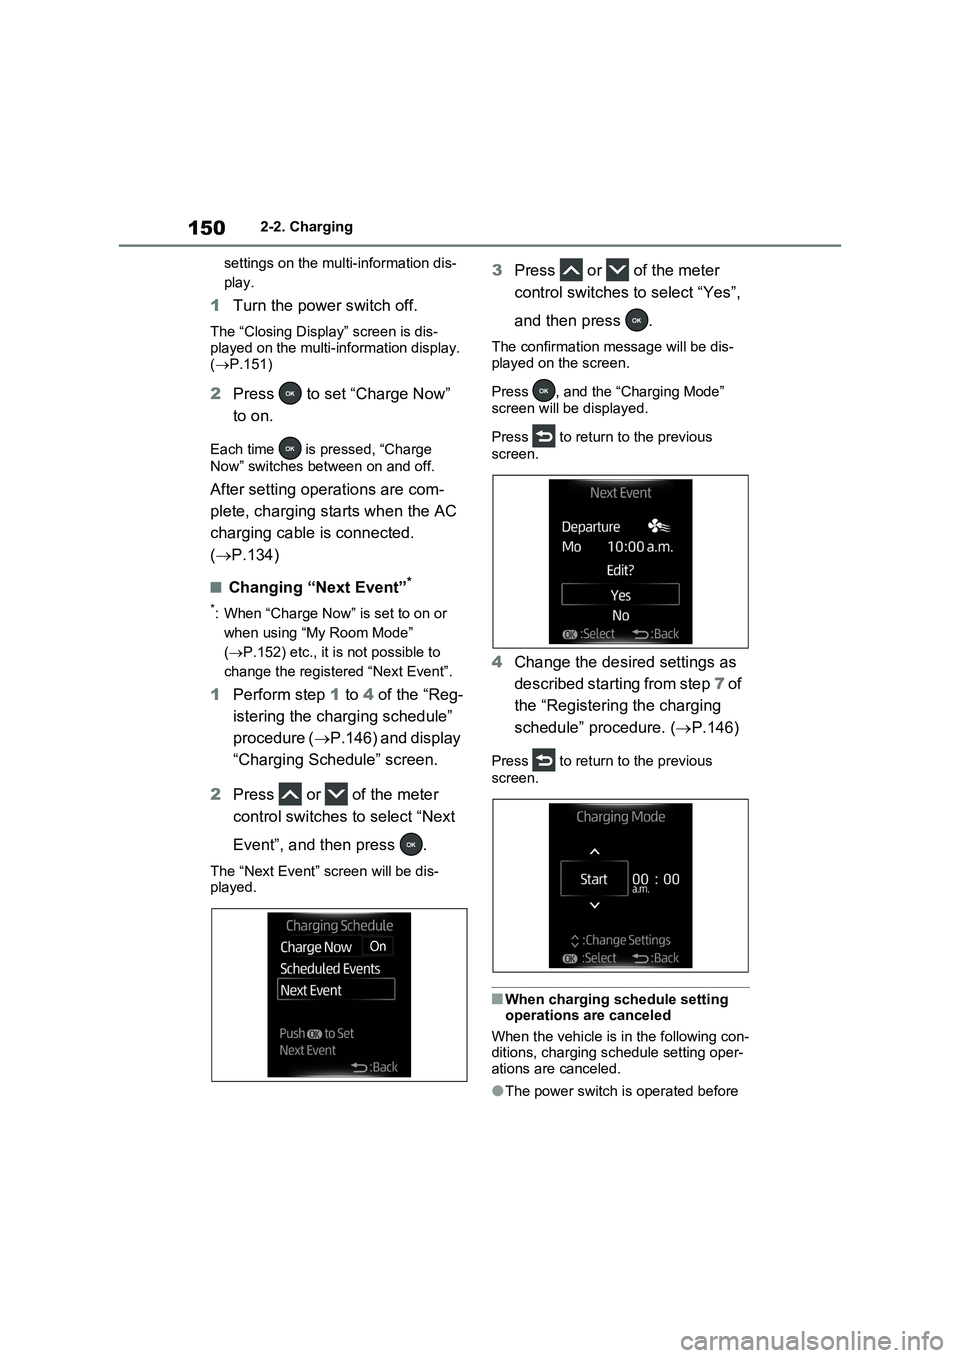
2Press or of the meter
control switches to select “Next
Event”, and then press .
The “Next Event” screen will be dis-
played.
3Press or of the meter
control switches to select “Yes”,
and then press .
The confirmation message will be dis-
played on the screen.
Press , and the “Charging Mode”
screen will be displayed.
Press to return to the previous
screen.
4Change the desired settings as
described starting from step 7 of
the “Registering the charging
schedule” procedure. (P.146)
Press to return to the previous
screen.
�QWhen charging schedule setting
operations are canceled
When the vehicle is in the following con-
ditions, charging schedule setting oper-
ations are canceled.
�OThe power switch is operated before
Page 153 of 662
151
2
2-2. Charging
Plug-in hybrid system
the settings are confirmed
�OThe vehicle starts off
�OA display with a higher priority than that of the charging schedule setting is shown
�Q“Next Event”
After charging completes, the “Next Event” displayed on the multi-informa-tion display will not change until the AC
charging cable is removed, even after charging is performed according to the “Next Event” schedule.
�QTo return to original setting after
changing “Next Event” setting
Turning the setting of “Charge Now” on and then off can return the setting of
“Next Event” to its original setting.
�QWhen “Next Event” is changed while charging
�OWhen the charging mode is “Depar-ture”, the current charging is inter-rupted or continued depending on the
remaining time until the charging is completed.
�OWhen the charging mode is “Start”, the current charging is interrupted, the next charging will start at the set time.
�QWhen the power switch is turned
off
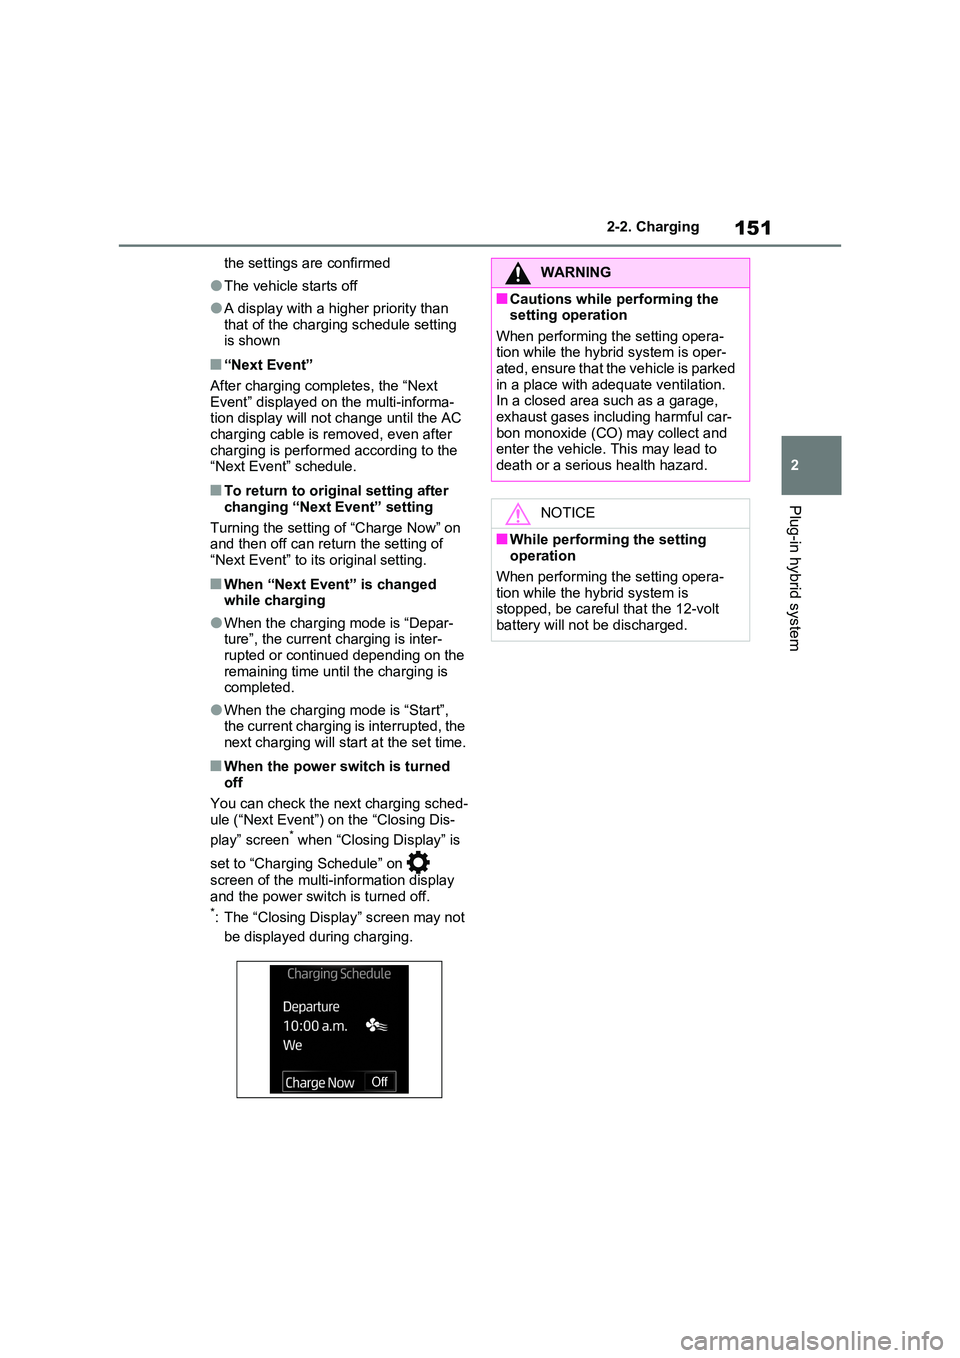
You can check the next charging sched- ule (“Next Event”) on the “Closing Dis-
play” screen* when “Closing Display” is
set to “Charging Schedule” on
screen of the multi-information display
and the power switch is turned off.*: The “Closing Display” screen may not
be displayed during charging.
WARNING
�QCautions while performing the setting operation
When performing the setting opera- tion while the hybrid system is oper-ated, ensure that the vehicle is parked
in a place with adequate ventilation. In a closed area such as a garage, exhaust gases including harmful car-
bon monoxide (CO) may collect and enter the vehicle. This may lead to death or a serious health hazard.
NOTICE
�QWhile performing the setting operation
When performing the setting opera- tion while the hybrid system is stopped, be careful that the 12-volt
battery will not be discharged.
Page 154 of 662
1522-2. Charging
1Connect the AC charging cable
to the vehicle and start charging
2Turn the power switch on during
charging
The setting screen of “My Room Mode”
is displayed automatically on the multi-
information display.
3Press or of the meter
control switches, select “Yes”,
and then press .
“My Room Mode” starts and systems
such as the air conditioning system and
audio system can be used inside the
vehicle.
When not using “My Room Mode”,
select “No”, and then press .
To stop “My Room Mode”, turn the power switch off.
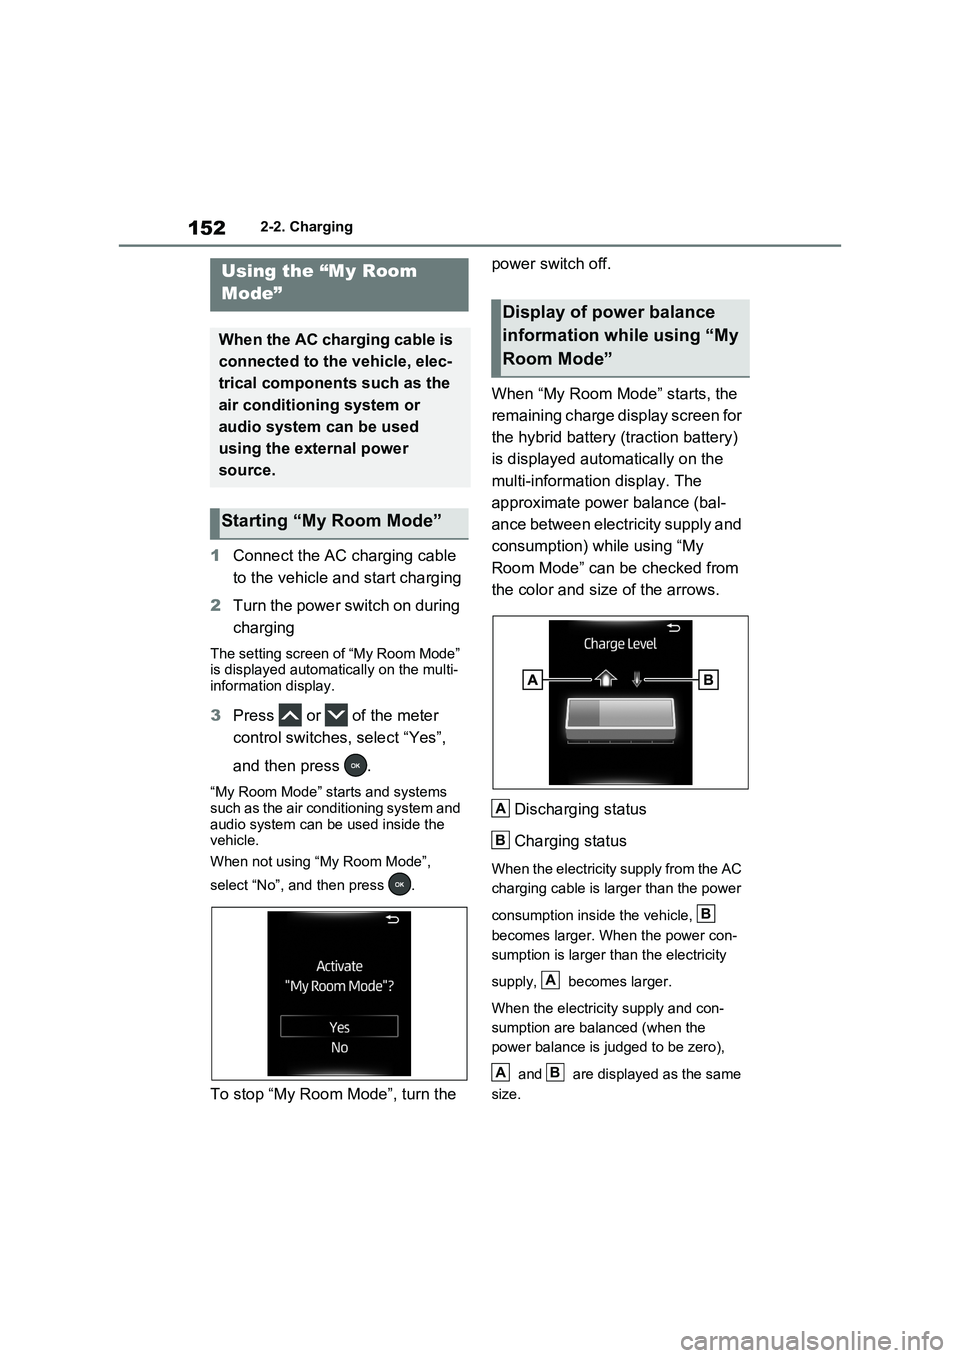
When “My Room Mode” starts, the
remaining charge display screen for
the hybrid battery (traction battery)
is displayed automatically on the
multi-information display. The
approximate power balance (bal-
ance between electricity supply and
consumption) while using “My
Room Mode” can be checked from
the color and size of the arrows.
Discharging status
Charging status
When the electricity supply from the AC
charging cable is larger than the power
consumption inside the vehicle,
becomes larger. When the power con-
sumption is larger than the electricity
supply, becomes larger.
When the electricity supply and con-
sumption are balanced (when the
power balance is judged to be zero),
and are displayed as the same
size.
Using the “My Room
Mode”
When the AC charging cable is
connected to the vehicle, elec-
trical components such as the
air conditioning system or
audio system can be used
using the external power
source.
Starting “My Room Mode”
Display of power balance
information while using “My
Room Mode”
A
B
B
A
AB
Page 155 of 662
153
2 2-2. Charging
Plug-in hybrid system
�QWhen a door is unlocked while
using “My Room Mode”
The charging connector unlocks,
charging stops and “My Room Mode”
stops. In order to use “My Room Mode”
again, reconnect the AC charging cable
and start “My Room Mode” (P.152).
When using “My Room Mode” with pub-
lic charging station, operation to start
charging using the charger may be
required again before starting “My Room
Mode”.
�QMeter display during charging
If “My Room Mode” is not turned on for
approximately 100 seconds after the
power switch is turned on during
charging, the power switch will automat-
ically turn off.
�QWhile using “My Room Mode”
Any of the following may occur.
�OWhen the remaining charge of the
hybrid battery (traction battery)
reaches the lower limit, the air condi-
tioning system automatically turns off.
In this situation, the air conditioning
system cannot be used until the
remaining charge of the hybrid battery
(traction battery) increases. Turn the
power switch off and use “My Room
Mode” after the remaining charge of
the hybrid battery (traction battery) is
restored.
�OWhen the outside temperature is low,
the heater output may be limited due
to the air conditioning system opera-
tion being restricted.
�OWarning lights and indicators such as
electric power steering system warn-
ing light (yellow) and malfunction indi-
cator lamp may turn on, but this is not
a malfunction.
Also, when the surrounding area is
dark, the headlights are turned on.
(P.288)
�QWhen a charging schedule is regis-
tered
When “My Room Mode” starts while the
charging schedule is on standby, charging schedules are ignored and
charging starts.
�QWhen “My Room Mode” is used
while the hybrid battery (traction
battery) is fully charged
When the power switch is turned on
while the hybrid battery (traction battery)
is fully charged and the charging con-
nector that supplies power is connected,
“Charging Port Lid is Open” is displayed
on the multi-information display. In this
case, press of the meter control
switches to display the setting screen of
“My Room Mode”, and then select “My
Room Mode”.
When “My Room Mode” is used while
the hybrid battery (traction battery) is
fully charged, the electric power of the
hybrid battery (traction battery) may be
consumed. In this case, charging may
be performed again.
�QWhen a message related to “My
Room Mode” is displayed
When a message is displayed on the
multi-information display while using or
attempting to start “My Room Mode”,
take the following correction proce-
dures.
�O“Traction battery is too low for “My
Room Mode””
There is insufficient remaining charge in
the hybrid battery (traction battery) for
starting “My Room Mode”.
Wait until the charge of the hybrid bat-
tery (traction battery) increases, then
start “My Room Mode”.
�O““My Room Mode” has stopped due to
low traction battery”
The remaining charge in the hybrid bat-
tery (traction battery) is insufficient.
Stop using “My Room Mode” and
charge the hybrid battery (traction bat-
tery).
�O““My Room Mode” will stop when trac-
tion battery is too low Reduce power
usage to continue using “My Room
Page 156 of 662
1542-2. Charging
Mode””
The power consumption inside the vehi-
cle is greater than the power being
charged to the hybrid battery (traction
battery), and the remaining charge of
the hybrid battery (traction battery) is
low.*
• “My Room Mode” will end unless the power consumption inside the vehicle is improved.
• To continue using “My Room Mode”, turn off the power of systems such as the air conditioning system and audio
system to increase the remaining charge of the hybrid battery (traction battery).*: The power balance status during “My
Room Mode” can be checked from the
remaining charge display screen for
the hybrid battery (traction battery)
displayed on the multi-information dis-
play.
WARNING
�QCautions for using “My Room Mode”
Make sure to observe the following
precautions.
Failure to do so may result in serious health problems or even death.
�ODo not leave children, people who need assistance, or pets inside the
vehicle. The system may turn off automatically and the interior tem-perature may become high or low,
resulting in heat stroke, dehydration or hypothermia. Devices such as the wipers can also be used, which
may lead to mistaken operation and an accident.
�OCheck the safety around the vehicle carefully before use.
Page 157 of 662
155
2 2-2. Charging
Plug-in hybrid system
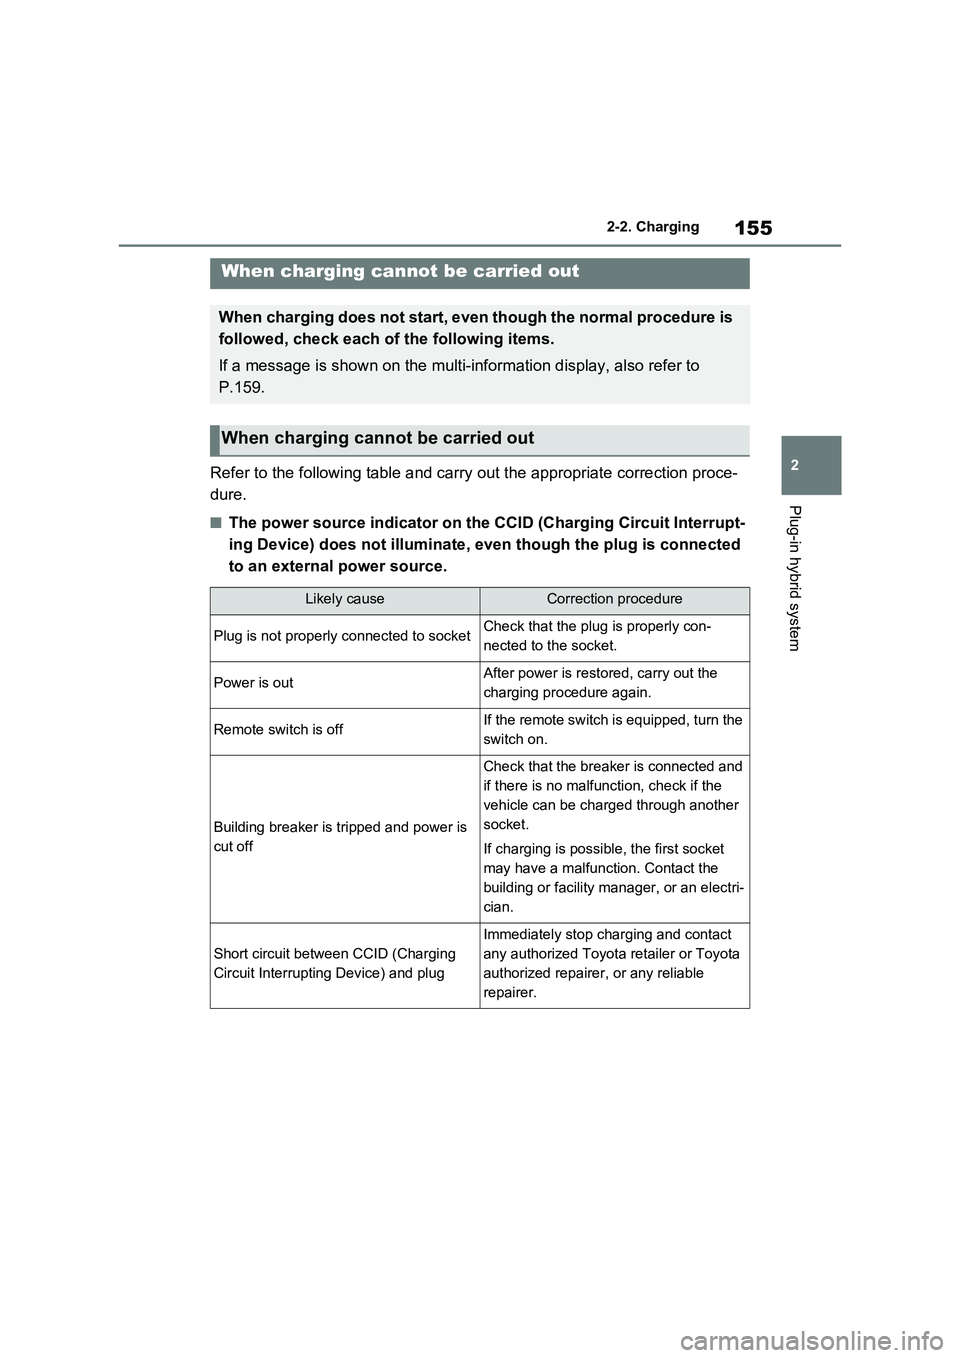
Refer to the following table and carry out the appropriate correction proce-
dure.
�QThe power source indicator on the CCID (Charging Circuit Interrupt-
ing Device) does not illuminate, even though the plug is connected
to an external power source.
When charging cannot be carried out
When charging does not start, even though the normal procedure is
followed, check each of the following items.
If a message is shown on the multi-information display, also refer to
P.159.
When charging cannot be carried out
Likely causeCorrection procedure
Plug is not properly connected to socketCheck that the plug is properly con-
nected to the socket.
Power is outAfter power is restored, carry out the
charging procedure again.
Remote switch is offIf the remote switch is equipped, turn the
switch on.
Building breaker is tripped and power is
cut off
Check that the breaker is connected and
if there is no malfunction, check if the
vehicle can be charged through another
socket.
If charging is possible, the first socket
may have a malfunction. Contact the
building or facility manager, or an electri-
cian.
Short circuit between CCID (Charging
Circuit Interrupting Device) and plug
Immediately stop charging and contact
any authorized Toyota retailer or Toyota
authorized repairer, or any reliable
repairer.
Page 158 of 662
1562-2. Charging
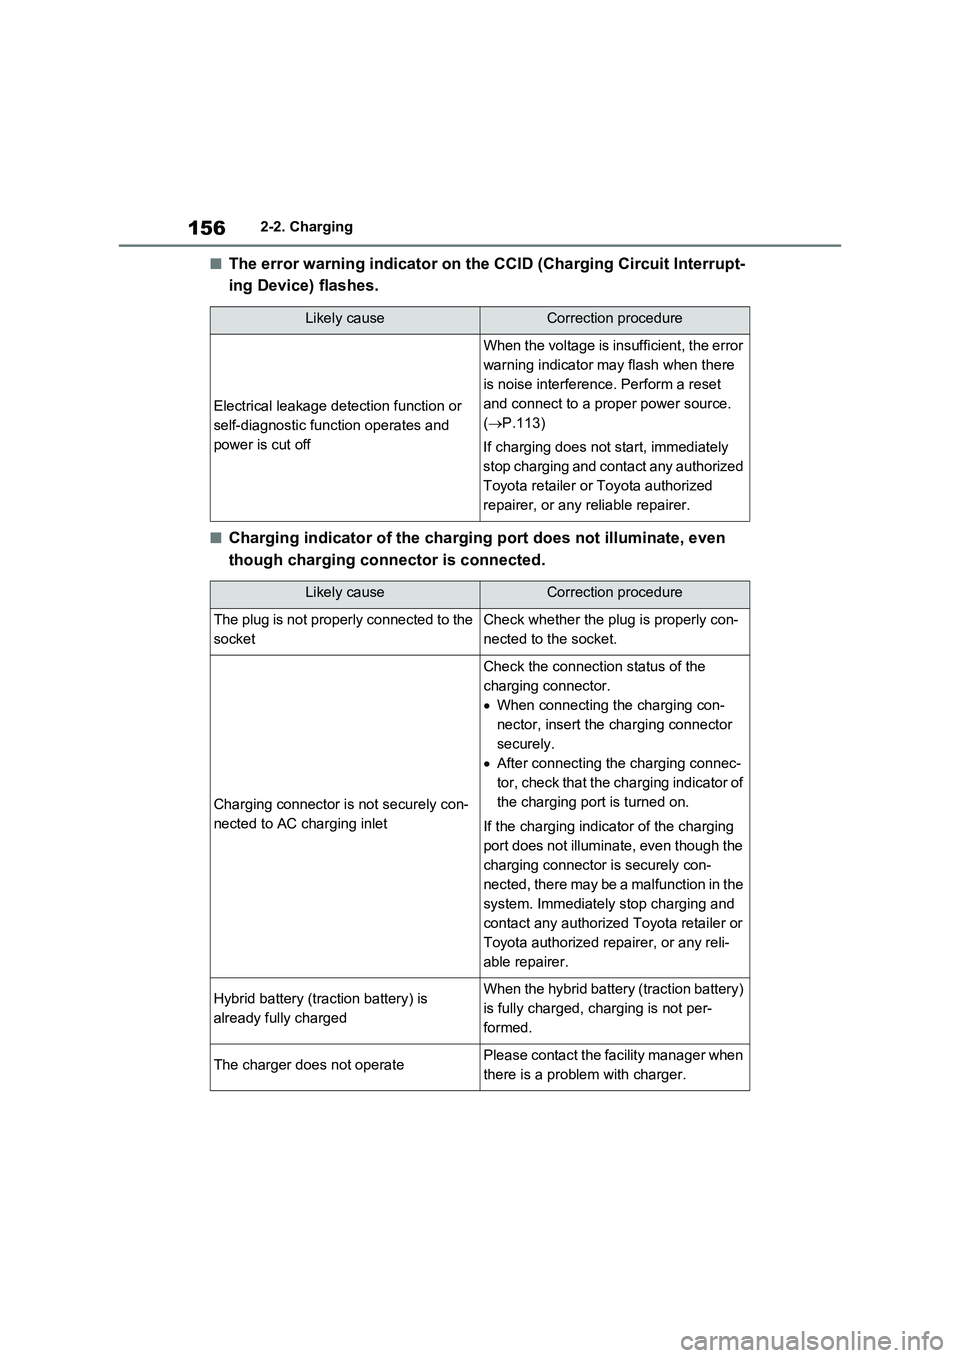
�QThe error warning indicator on the CCID (Charging Circuit Interrupt-
ing Device) flashes.
�QCharging indicator of the charging port does not illuminate, even
though charging connector is connected.
Likely causeCorrection procedure
Electrical leakage detection function or
self-diagnostic function operates and
power is cut off
When the voltage is insufficient, the error
warning indicator may flash when there
is noise interference. Perform a reset
and connect to a proper power source.
(P.113)
If charging does not start, immediately
stop charging and contact any authorized
Toyota retailer or Toyota authorized
repairer, or any reliable repairer.
Likely causeCorrection procedure
The plug is not properly connected to the
socketCheck whether the plug is properly con-
nected to the socket.
Charging connector is not securely con-
nected to AC charging inlet
Check the connection status of the
charging connector.
When connecting the charging con-
nector, insert the charging connector
securely.
After connecting the charging connec-
tor, check that the charging indicator of
the charging port is turned on.
If the charging indicator of the charging
port does not illuminate, even though the
charging connector is securely con-
nected, there may be a malfunction in the
system. Immediately stop charging and
contact any authorized Toyota retailer or
Toyota authorized repairer, or any reli-
able repairer.
Hybrid battery (traction battery) is
already fully chargedWhen the hybrid battery (traction battery)
is fully charged, charging is not per-
formed.
The charger does not operatePlease contact the facility manager when
there is a problem with charger.
Page 159 of 662
157
2 2-2. Charging
Plug-in hybrid system
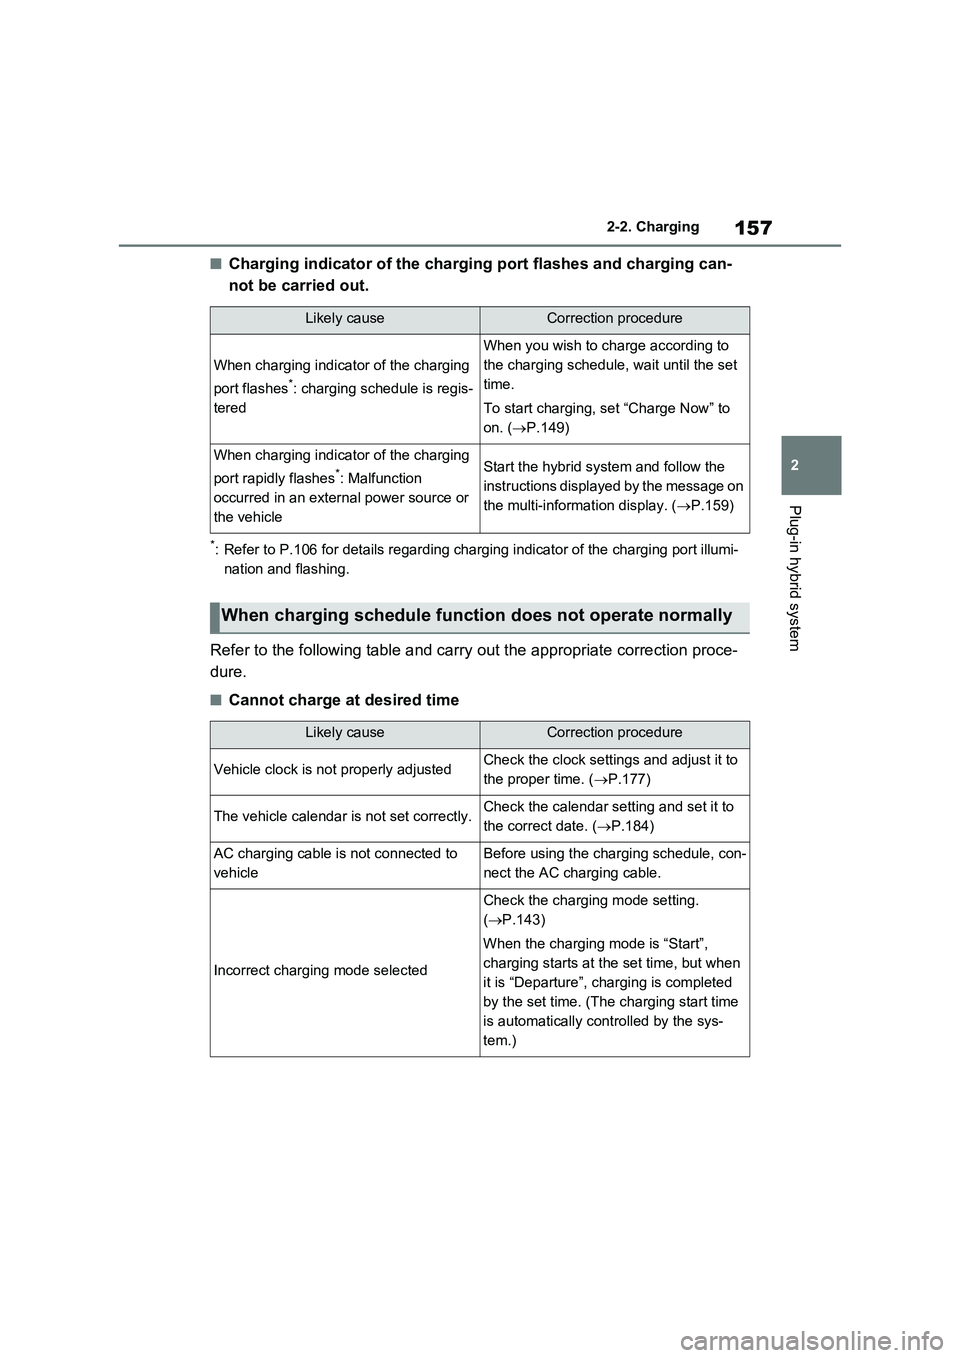
�QCharging indicator of the charging port flashes and charging can-
not be carried out.
*: Refer to P.106 for details regarding charging indicator of the charging port illumi-
nation and flashing.
Refer to the following table and carry out the appropriate correction proce-
dure.
�QCannot charge at desired time
Likely causeCorrection procedure
When charging indicator of the charging
port flashes
*: charging schedule is regis-
tered
When you wish to charge according to
the charging schedule, wait until the set
time.
To start charging, set “Charge Now” to
on. (P.149)
When charging indicator of the charging
port rapidly flashes
*: Malfunction
occurred in an external power source or
the vehicleStart the hybrid system and follow the
instructions displayed by the message on
the multi-information display. (P.159)
When charging schedule function does not operate normally
Likely causeCorrection procedure
Vehicle clock is not properly adjustedCheck the clock settings and adjust it to
the proper time. (P.177)
The vehicle calendar is not set correctly.Check the calendar setting and set it to
the correct date. (P.184)
AC charging cable is not connected to
vehicleBefore using the charging schedule, con-
nect the AC charging cable.
Incorrect charging mode selected
Check the charging mode setting.
(P.143)
When the charging mode is “Start”,
charging starts at the set time, but when
it is “Departure”, charging is completed
by the set time. (The charging start time
is automatically controlled by the sys-
tem.)
Page 160 of 662
1582-2. Charging
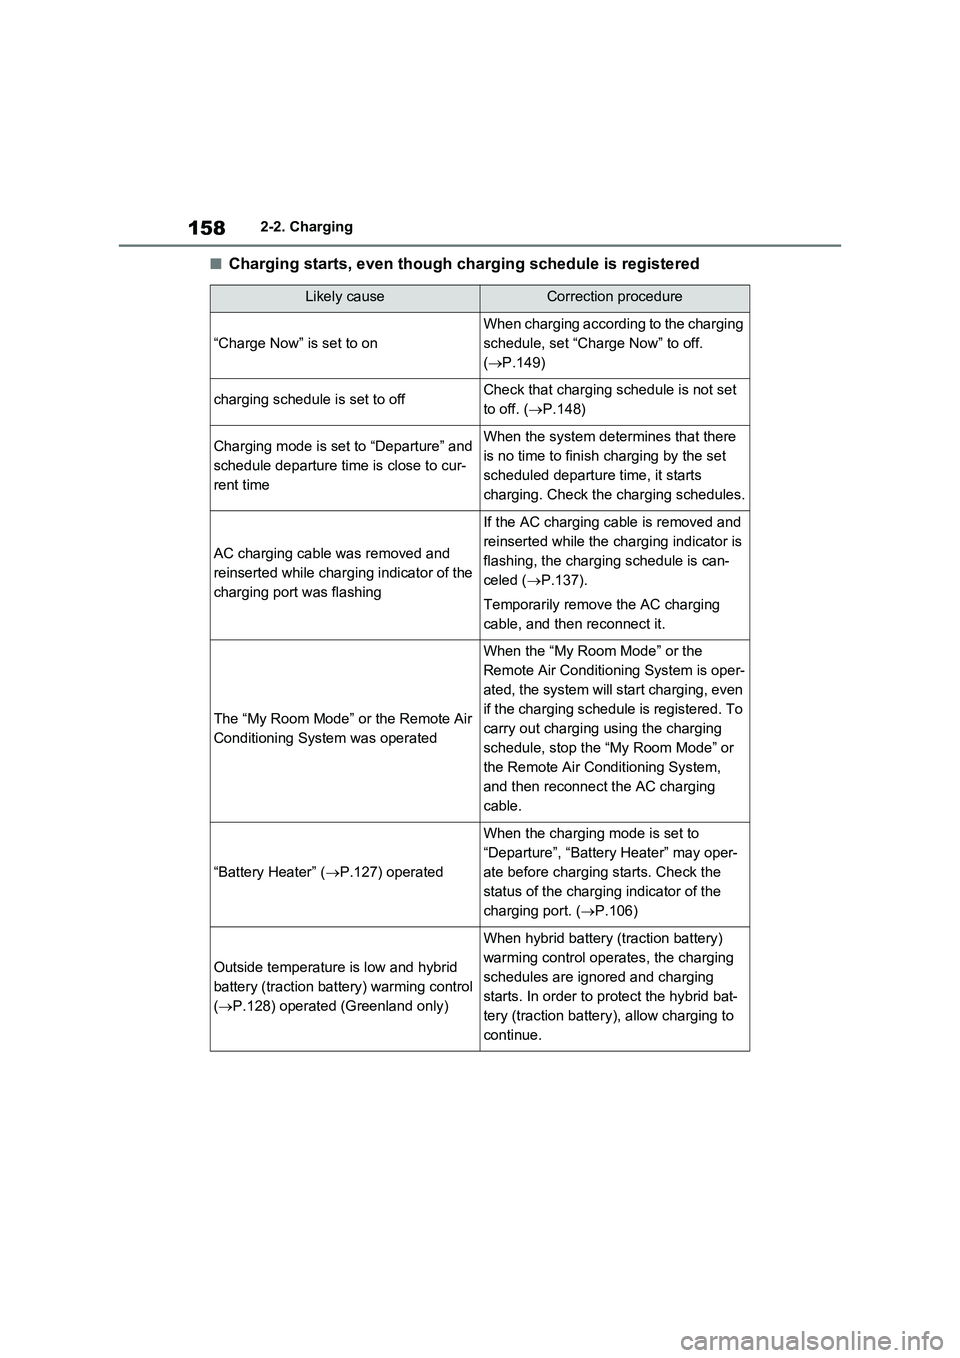
�QCharging starts, even though charging schedule is registered
Likely causeCorrection procedure
“Charge Now” is set to on
When charging according to the charging
schedule, set “Charge Now” to off.
(P.149)
charging schedule is set to offCheck that charging schedule is not set
to off. (P.148)
Charging mode is set to “Departure” and
schedule departure time is close to cur-
rent timeWhen the system determines that there
is no time to finish charging by the set
scheduled departure time, it starts
charging. Check the charging schedules.
AC charging cable was removed and
reinserted while charging indicator of the
charging port was flashing
If the AC charging cable is removed and
reinserted while the charging indicator is
flashing, the charging schedule is can-
celed (P.137).
Temporarily remove the AC charging
cable, and then reconnect it.
The “My Room Mode” or the Remote Air
Conditioning System was operated
When the “My Room Mode” or the
Remote Air Conditioning System is oper-
ated, the system will start charging, even
if the charging schedule is registered. To
carry out charging using the charging
schedule, stop the “My Room Mode” or
the Remote Air Conditioning System,
and then reconnect the AC charging
cable.
“Battery Heater” (P.127) operated
When the charging mode is set to
“Departure”, “Battery Heater” may oper-
ate before charging starts. Check the
status of the charging indicator of the
charging port. (P.106)
Outside temperature is low and hybrid
battery (traction battery) warming control
(P.128) operated (Greenland only)
When hybrid battery (traction battery)
warming control operates, the charging
schedules are ignored and charging
starts. In order to protect the hybrid bat-
tery (traction battery), allow charging to
continue.