change wheel TOYOTA RAV4 PLUG-IN HYBRID 2023 Owners Manual
[x] Cancel search | Manufacturer: TOYOTA, Model Year: 2023, Model line: RAV4 PLUG-IN HYBRID, Model: TOYOTA RAV4 PLUG-IN HYBRID 2023Pages: 718, PDF Size: 167.55 MB
Page 46 of 718
441-1. For safe use
WARNING
■SRS airbag precautions
Observe the following precautions
regarding the SRS airbags. Failure to do so may cause death or serious injury.
●The driver and all passengers in the vehicle must wear their seat belts properly.
The SRS airbags are supplemental devices to be used with the seat belts.
●The SRS driver airbag deploys with considerable force, and can cause
death or serious injury especially if the driver is very close to the air-bag.
Since the risk zone for the driver’s air-
bag is the first 50 - 75 mm (2 - 3 in.) of
inflation, placing yourself 250 mm (10
in.) from your driver airbag provides
you with a clear margin of safety. This
distance is measured from the center
of the steering wheel to your breast-
bone. If you sit less than 250 mm (10
in.) away now, you can change your
driving position in several ways:
• Move your seat to the rear as far as
you can while still reaching the ped- als comfortably.
• Slightly recline the back of the seat. Although vehicle designs vary, many drivers can achieve the 250
mm (10 in.) distance, even with the driver seat all the way forward, sim-ply by reclining the back of the seat
somewhat. If reclining the back of your seat makes it hard to see the road, raise yourself by using a firm,
non-slippery cushion, or raise the seat if your vehicle has that feature.
• If your steering wheel is adjustable, tilt it downward. This points the air-bag toward your chest instead of
your head and neck.
The seat should be adjusted as rec- ommended above, while still main-
taining control of the foot pedals, steering wheel, and your view of the instrument panel controls.
●The SRS front passenger airbag also deploys with considerable
force, and can cause death or seri- ous injury especially if the front pas-senger is very close to the airbag.
The front passenger seat should be as far from the airbag as possible with the seatback adjusted, so the
front passenger sits upright.
●Improperly seated and/or restrained
infants and children can be killed or seriously injured by a deploying air-bag. An infant or child who is too
small to use a seat belt should be properly secured using a child restraint system. Toyota strongly
recommends that all infants and children be placed in the rear seats of the vehicle and properly
restrained. The rear seats are safer for infants and children than the front passenger seat. ( P.50)
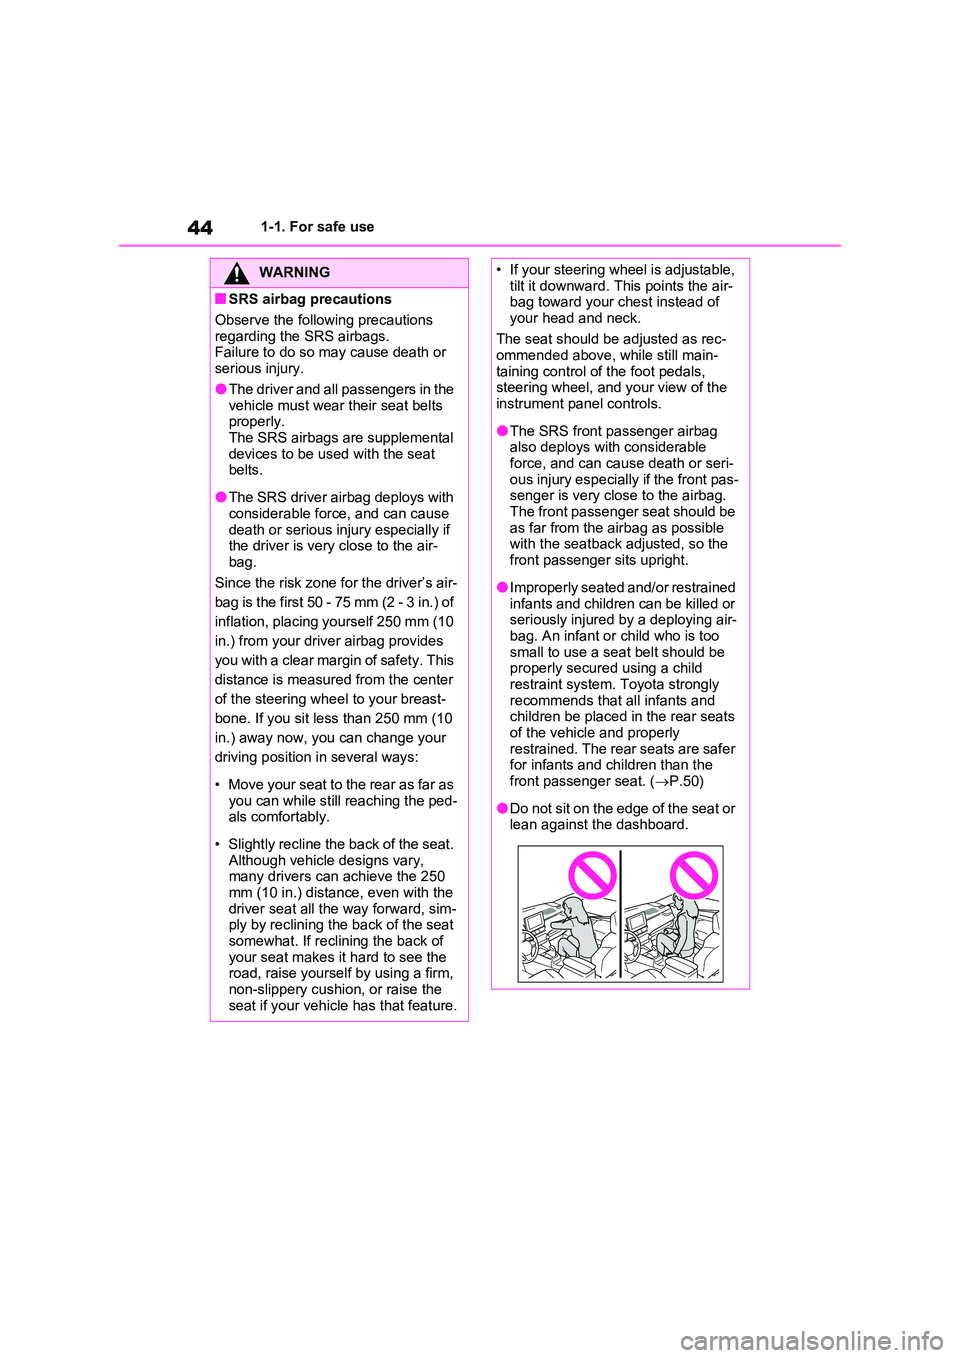
●Do not sit on the edge of the seat or lean against the dashboard.
Page 202 of 718
2003-1. Instrument cluster
Information display area
A variety of information can be dis-
played by selecting a menu icon.
Additionally, warning or sugges-
tion/advice pop-up displays will be dis-
played in some situations.
Menu icons ( P.200)
■The multi-information display is
displayed when
The power switch is in ON.
■When changing driving mode
●Background color of the multi-informa- tion display is changed following the selected driving mode. ( P.411)
●Background color of the multi-informa- tion display is changed following the
selected driving mode or when Trail Mode is turned on. ( P.411, 413)
■Liquid crystal display
Small spots or light spots may appear
on the display. This phenomenon is characteristic of liquid crystal displays, and there is no problem continuing to
use the display.
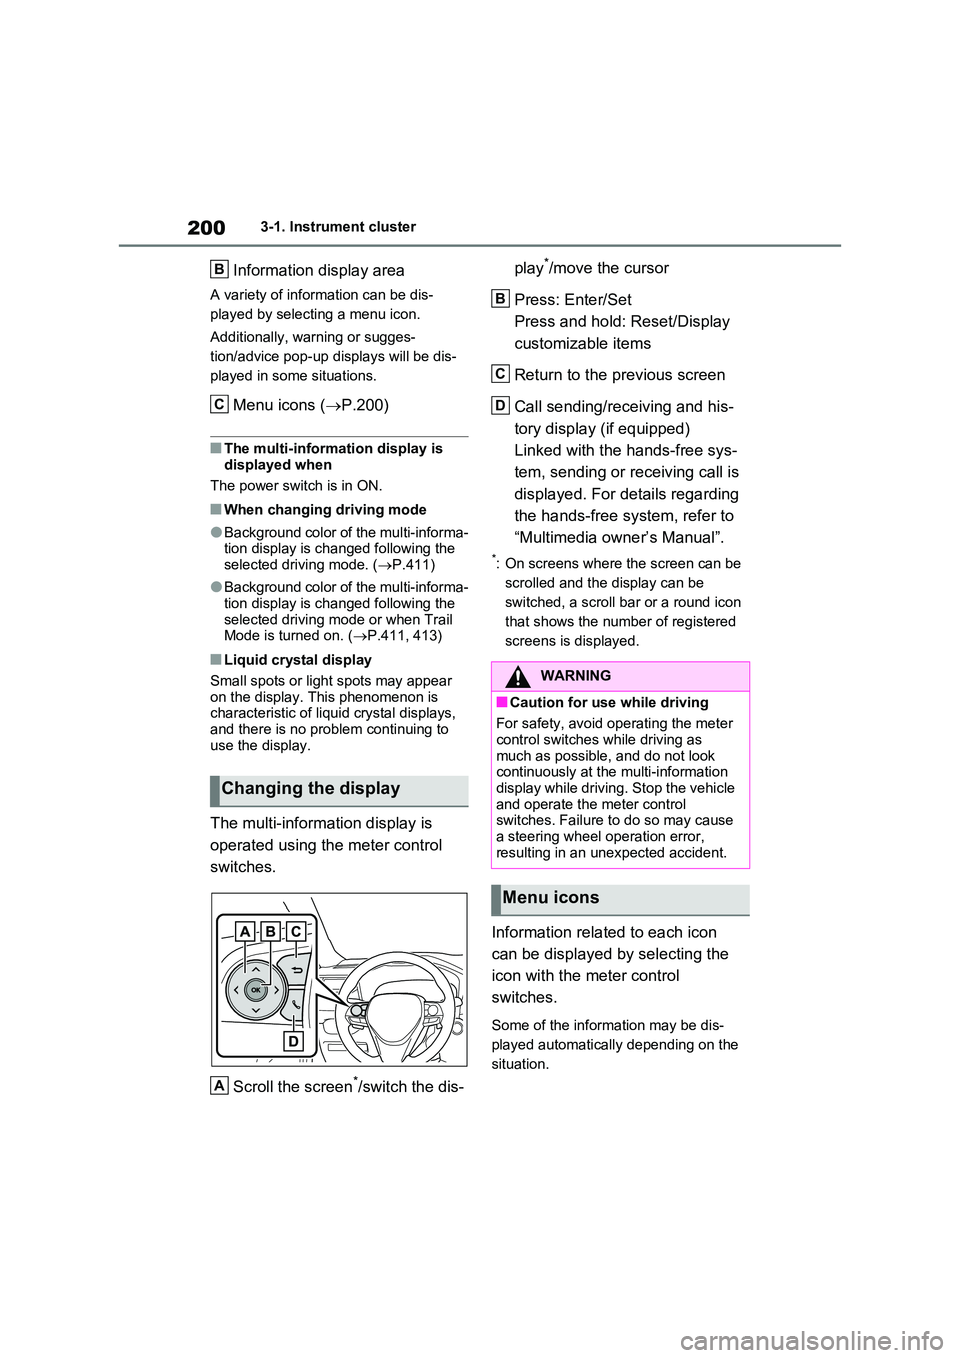
The multi-information display is
operated using the meter control
switches.
Scroll the screen*/switch the dis-
play*/move the cursor
Press: Enter/Set
Press and hold: Reset/Display
customizable items
Return to the previous screen
Call sending/receiving and his-
tory display (if equipped)
Linked with the hands-free sys-
tem, sending or receiving call is
displayed. For details regarding
the hands-free system, refer to
“Multimedia owner’s Manual”.
*: On screens where the screen can be
scrolled and the display can be
switched, a scroll bar or a round icon
that shows the number of registered
screens is displayed.
Information related to each icon
can be displayed by selecting the
icon with the meter control
switches.
Some of the information may be dis-
played automatically depending on the
situation.
Changing the display
B
C
A
WARNING
■Caution for use while driving
For safety, avoid operating the meter
control switches while driving as much as possible, and do not look continuously at the multi-information
display while driving. Stop the vehicle and operate the meter control switches. Failure to do so may cause
a steering wheel operation error, resulting in an unexpected accident.
Menu icons
B
C
D
Page 207 of 718
205
3 3-1. Instrument cluster
Vehicle status information and indicators
setting (since the system was
started or between resets).
(P.206)
Use the displayed information as a ref-
erence only.
Following items will be displayed.
“Trip”
• “Average Speed”: Displays the aver-
age vehicle speed since hybrid sys-
tem start
*
• “Distance”: Displays the distance
driven since hybrid system start*
• “Total Time”: Displays the elapsed
time since hybrid system start*
*
: These items are reset each time the
hybrid system stops.
“Total”
• “Average Speed”: Displays the aver-
age vehicle speed since the display
was reset
*
• “Distance”: Displays the distance
driven since the display was reset*
• “Total Time”: Displays the elapsed
time since the display was reset*
*
: To reset, display the desired item and
press and hold .
■Energy monitor
P.226
■Tire pressure
P.488
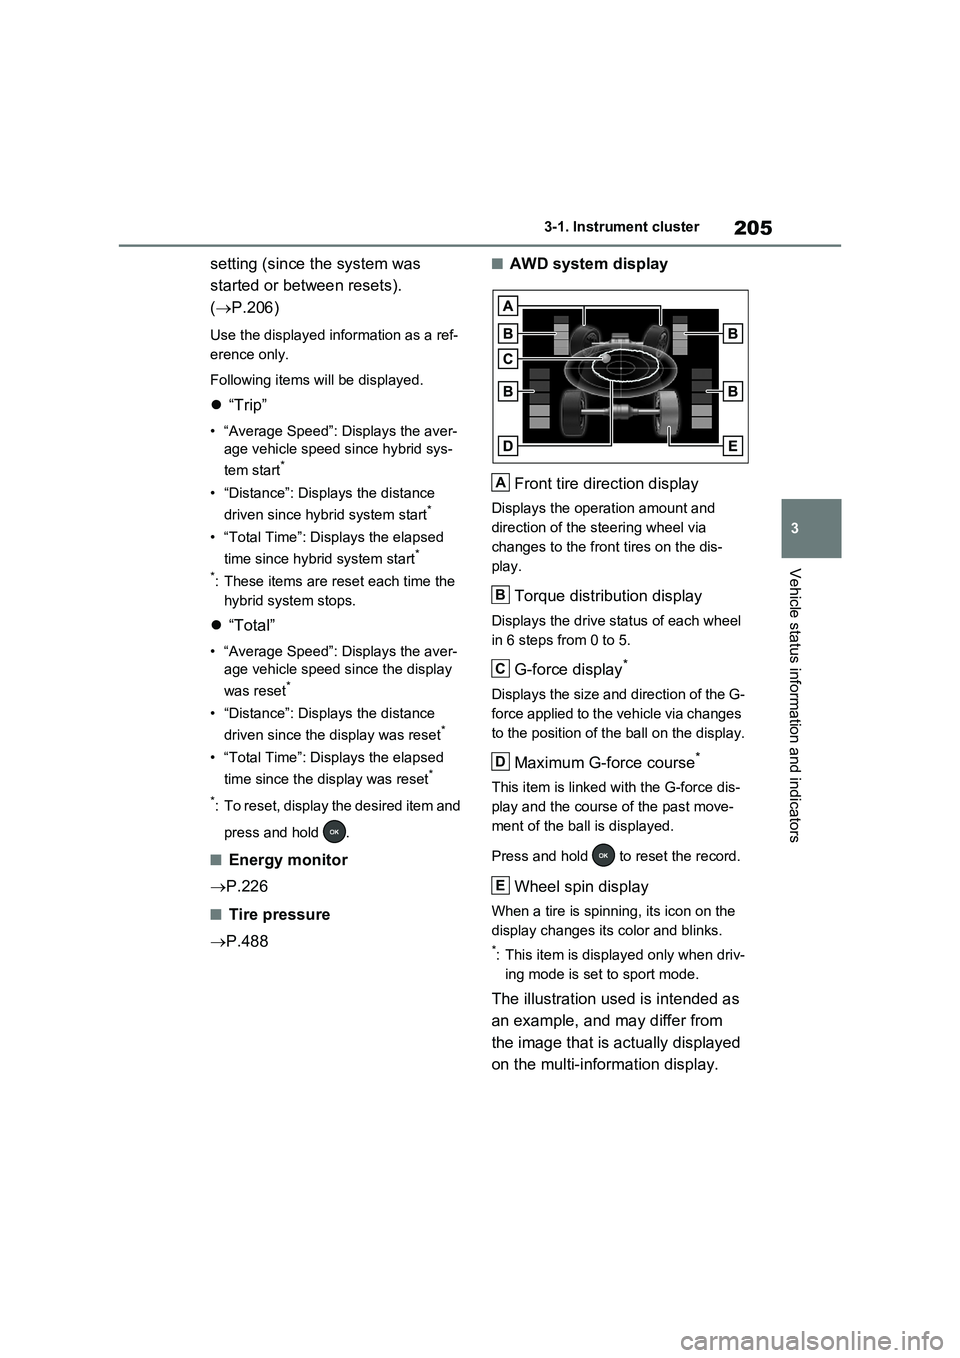
■AWD system display
Front tire direction display
Displays the operation amount and
direction of the steering wheel via
changes to the front tires on the dis-
play.
Torque distribution display
Displays the drive status of each wheel
in 6 steps from 0 to 5.
G-force display*
Displays the size and direction of the G-
force applied to the vehicle via changes
to the position of the ball on the display.
Maximum G-force course*
This item is linked with the G-force dis-
play and the course of the past move-
ment of the ball is displayed.
Press and hold to reset the record.
Wheel spin display
When a tire is spinning, its icon on the
display changes its color and blinks.
*: This item is displayed only when driv-
ing mode is set to sport mode.
The illustration used is intended as
an example, and may differ from
the image that is actually displayed
on the multi-information display.
A
B
C
D
E
Page 210 of 718
2083-1. Instrument cluster
Select to enable/disable the battery
cooler. (P.128)
PBD (Power Back Door) (if
equipped) (P.243)
Select to set up the following items.
•System settings
Select to enable/disable the power
back door system.
•“Hands Free”
*
Select to enable/disable the Hands
Free Power Back Door.
• “Opening Adjustment”
Select the open position when power
back door is fully open.
•“Volume”
Select to set the volume of the buzzer
which sounds when the power back
door system operates.
*: Vehicles with Hands Free Power
Back Door
“TPWS” (Tire Pressure Warning
System) (P.488)
• “Setting Pressure”
Select to initialize the tire pressure
warning system.
• “Identifying Each Wheel & Position”
Select to register the ID codes of the
tire pressure sensors to the tire pres-
sure warning system.
•“Setting Unit”
Select to change the units of measure
displayed.
“Rear Seat Reminder” (P.237)
Select to enable/disable the rear seat
reminder.
■ Settings
“Language”
Select to change the language on the
multi-information display.
“Units”
Select to change the units of measure
displayed.
“Meter Type”
Select to change the speedometer dis-
play.
(EV indicator) (P.90)
Select to enable/disable the EV indica-
tor.
(Driving information display
settings)
Select to set up the following items.
•“Hybrid System”
Select to enable/disable the ECO
Accelerator Guidance (P.202).
• “Fuel Economy”
Select to change the display on Fuel
Economy (P.201).
• “Power Consumption”
Select to change the display on Power
Consumption (P.201).
(Audio settings)
Select to enable/disable screen.
(Vehicle information dis-
play settings)
• “Display Contents”
Select to set up the following items.
“Energy monitor”:
Select to enable/disable the Energy
monitor (P.226)
AWD:
Select to enable/disable the AWD sys-
tem display (P.205).
Page 219 of 718
217
3 3-1. Instrument cluster
Vehicle status information and indicators
display was reset*
• “Distance”: Displays the distance
driven since the display was
reset
*
• “Total Time”: Displays the
elapsed time since the display
was reset
*
*: To reset, display the desired item and
press and hold .
P.226
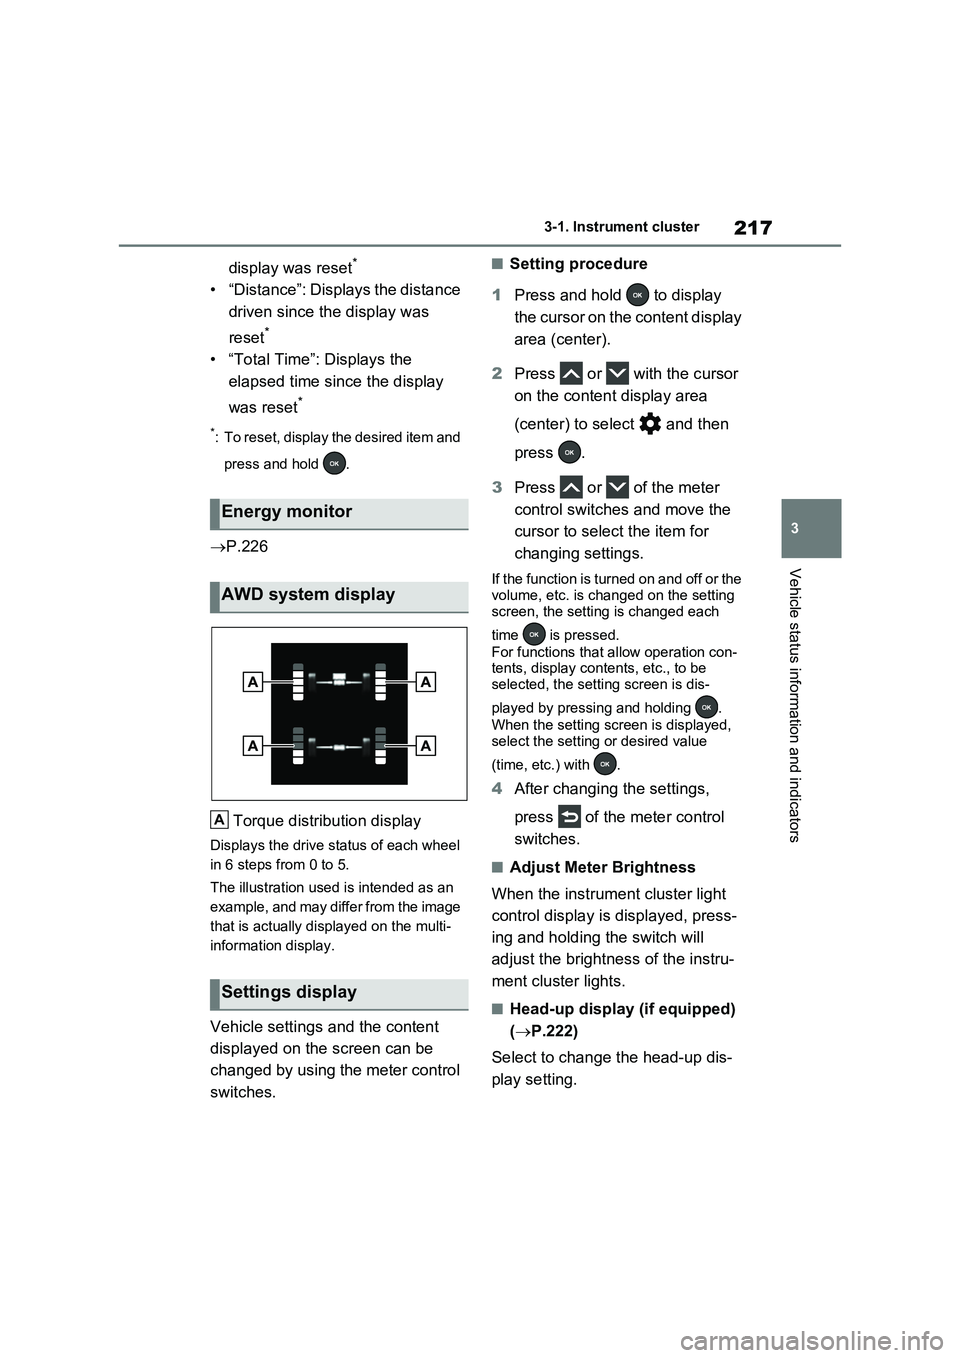
Torque distribution display
Displays the drive status of each wheel
in 6 steps from 0 to 5.
The illustration used is intended as an
example, and may differ from the image
that is actually displayed on the multi-
information display.
Vehicle settings and the content
displayed on the screen can be
changed by using the meter control
switches.
■Setting procedure
1Press and hold to display
the cursor on the content display
area (center).
2Press or with the cursor
on the content display area
(center) to select and then
press .
3Press or of the meter
control switches and move the
cursor to select the item for
changing settings.
If the function is turned on and off or the
volume, etc. is changed on the setting
screen, the setting is changed each
time is pressed.
For functions that allow operation con-
tents, display contents, etc., to be
selected, the setting screen is dis-
played by pressing and holding .
When the setting screen is displayed,
select the setting or desired value
(time, etc.) with .
4After changing the settings,
press of the meter control
switches.
■Adjust Meter Brightness
When the instrument cluster light
control display is displayed, press-
ing and holding the switch will
adjust the brightness of the instru-
ment cluster lights.
■Head-up display (if equipped)
(P.222)
Select to change the head-up dis-
play setting.
Energy monitor
AWD system display
Settings display
A
Page 221 of 718
219
3 3-1. Instrument cluster
Vehicle status information and indicators
■ RSA (Road Sign Assist)
(if equipped) (P.364)
Select to set up the following items.
Road Sign Assist on/off
Select to enable/disable the RSA sys-
tem.
“Notification Method”
Select to change each notification
method used to notify the driver when
the system detects driving conditions
that are prohibited by signs.
“Notification Level”
Select to change each notification level
used to notify the driver when the sys-
tem recognizes a speed limit sign.
■ Vehicle Settings
“Charging Settings”
Select to set up the following items.
• “Charging Schedule”
Select to register or change the
charging schedule. (P.144)
• “Charging Current”
Select to change the charging current.
(P.125)
• “Battery Cooler”
Select to enable/disable the battery
cooler. (P.128)
• “Battery Heater”
Select to enable/disable the battery
heater. (P.128)
DRCC
• “Curve Speed Reduction”
Select to change the curve speed
reduction function setting.
• DRCC (RSA)
Select to enable/disable the Dynamic Radar Cruise Control with Road Sign
Assist.
PBD (Power Back Door) (if
equipped) (P.243)
Select to set up the following items.
• System settings
Select to enable/disable the power
back door system.
• “Hands Free”
Select to enable/disable the Hands
Free Power Back Door.
• “Opening Adjustment”
Select the open position when power
back door is fully open.
•“Volume”
Select to set the volume of the buzzer
which sounds when the power back
door system operates.
“TPWS” (Tire Pressure Warning
System) (P.488)
• “Setting Pressure”
Select to initialize the tire pressure
warning system.
• “Identifying Each Wheel & Position”
Select to change the tire pressure
warning system sensor ID code set. To
enable this function, a second set of tire
pressure warning system sensor ID
codes must be registered by a Toyota
dealer. For information regarding
changing the registered ID code set,
contact your Toyota dealer.
• “Pressure unit setting”
Select to change the units of measure
displayed.
“Rear Seat Reminder” (P.237)
Select to enable/disable the rear seat
reminder.
Page 227 of 718
225
3 3-1. Instrument cluster
Vehicle status information and indicators
Brake Override System
(P.289)
Drive-Start Control (P.289)
Parking Support Brake function
(static objects) (if equipped)
(P.407)
Displayed content is the same as that
displayed on the multi-information dis-
play. For details, refer to the explana-
tions of each system.
■ / icons
Displays the following multi-infor-
mation display linked icons:
: Master warning icon
Displayed when a warning message is
displayed on the multi-information dis-
play.
: Information icon
Displayed when a suggestion/advice
pop-up display is displayed on the
multi-information display.
■Warning message
Some warning messages are dis-
played when necessary, according
to certain conditions.
Displayed content is the same as that
displayed on the multi-information dis-
play. For details, refer to the explana-
tions of each system.
■Audio system operation status
Displayed when an audio remote
control switch on the steering wheel
is operated.
■Hands-free system status (if
equipped)
Displayed when the hands-free system is operated.
■Outside temperature display
Displayed when the power switch is
turned to ON or when the low out-
side temperature indicator is flash-
ing.
■When a pop-up display is displayed
When a pop-up display is displayed, a
current display may no longer be dis-
played. In this case, the display will
return after the pop-up display disap-
pears.
■Outside temperature display
●When the ambient temperature is
approximately 3°C (37°F) or lower,
will flash for approximately 10
seconds and the outside temperature
display will turn off.
●In the following situations, the correct
outside temperature may not be dis-
played, or the display may take longer
than normal to change:
• When stopped (including when using
“My Room Mode”), or driving at low
speeds (less than 20 km/h [12 mph])
• When the outside temperature has
changed suddenly (at the
entrance/exit of a garage, tunnel, etc.)
●When “--” or “E” is displayed, the sys-
tem may be malfunctioning.
Take your vehicle to any authorized
Toyota retailer or Toyota authorized
repairer, or any reliable repairer.
Display content selected by “HUD
Driving Support” on the screen
is displayed. (P.223)
Hybrid System Indica-
tor/Tachometer
Page 270 of 718
2684-4. Adjusting the steering wheel and mirrors
*: If equipped
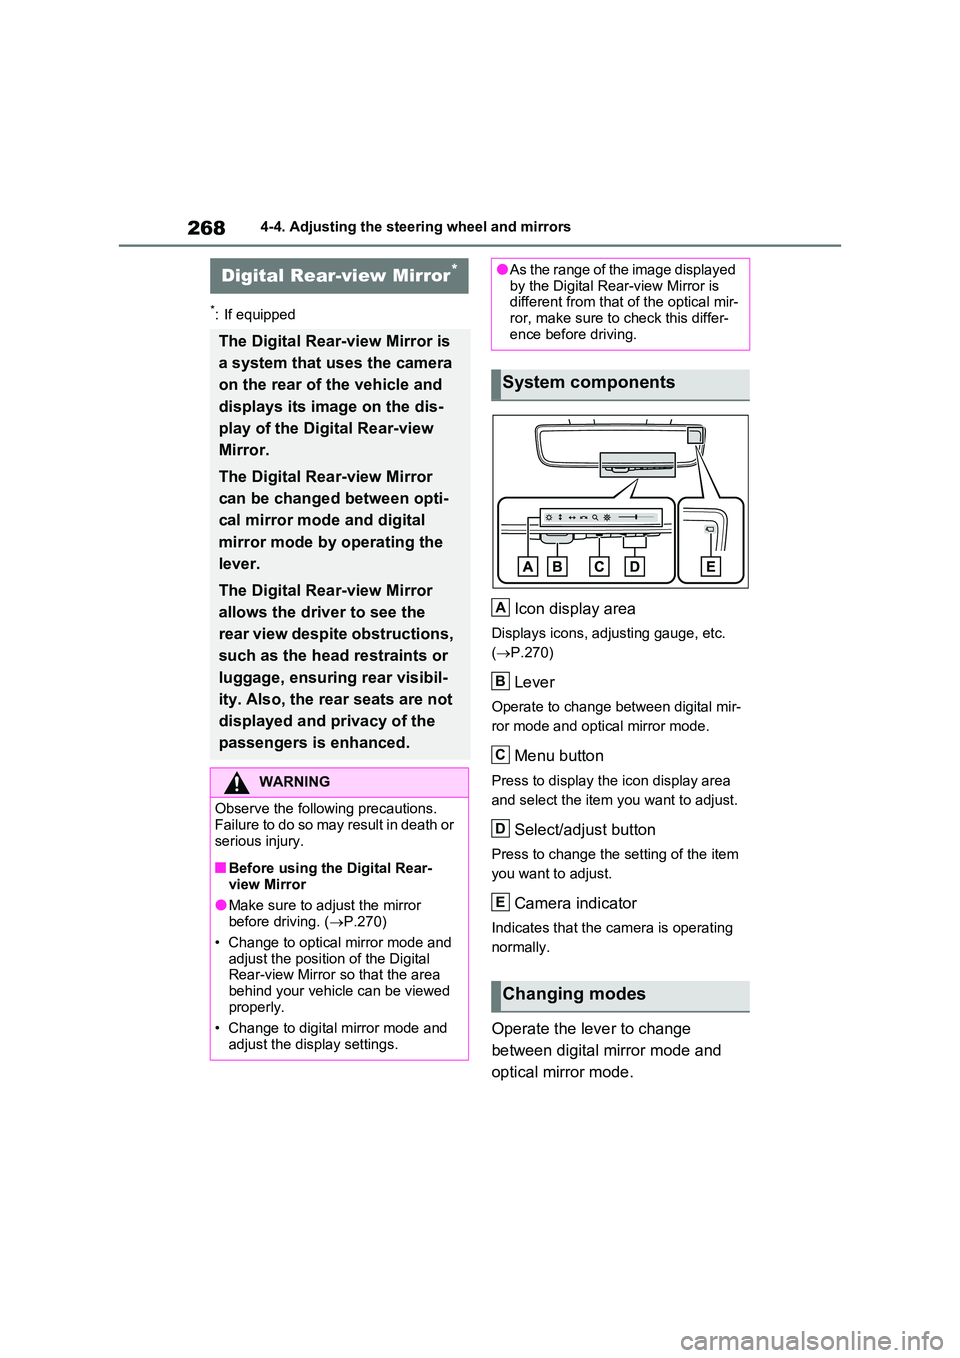
Icon display area
Displays icons, adjusting gauge, etc.
( P.270)
Lever
Operate to change between digital mir-
ror mode and optical mirror mode.
Menu button
Press to display the icon display area
and select the item you want to adjust.
Select/adjust button
Press to change the setting of the item
you want to adjust.
Camera indicator
Indicates that the camera is operating
normally.
Operate the lever to change
between digital mirror mode and
optical mirror mode.
Digital Rear-view Mirror*
The Digital Rear-view Mirror is
a system that uses the camera
on the rear of the vehicle and
displays its image on the dis-
play of the Digital Rear-view
Mirror.
The Digital Rear-view Mirror
can be changed between opti-
cal mirror mode and digital
mirror mode by operating the
lever.
The Digital Rear-view Mirror
allows the driver to see the
rear view despite obstructions,
such as the head restraints or
luggage, ensuring rear visibil-
ity. Also, the rear seats are not
displayed and privacy of the
passengers is enhanced.
WARNING
Observe the following precautions. Failure to do so may result in death or
serious injury.
■Before using the Digital Rear-
view Mirror
●Make sure to adjust the mirror before driving. ( P.270)
• Change to optical mirror mode and adjust the position of the Digital Rear-view Mirror so that the area
behind your vehicle can be viewed properly.
• Change to digital mirror mode and
adjust the display settings.
●As the range of the image displayed by the Digital Rear-view Mirror is different from that of the optical mir-
ror, make sure to check this differ- ence before driving.
System components
Changing modes
A
B
C
D
E
Page 271 of 718
269
4
4-4. Adjusting the steering wheel and mirrors
Before driving
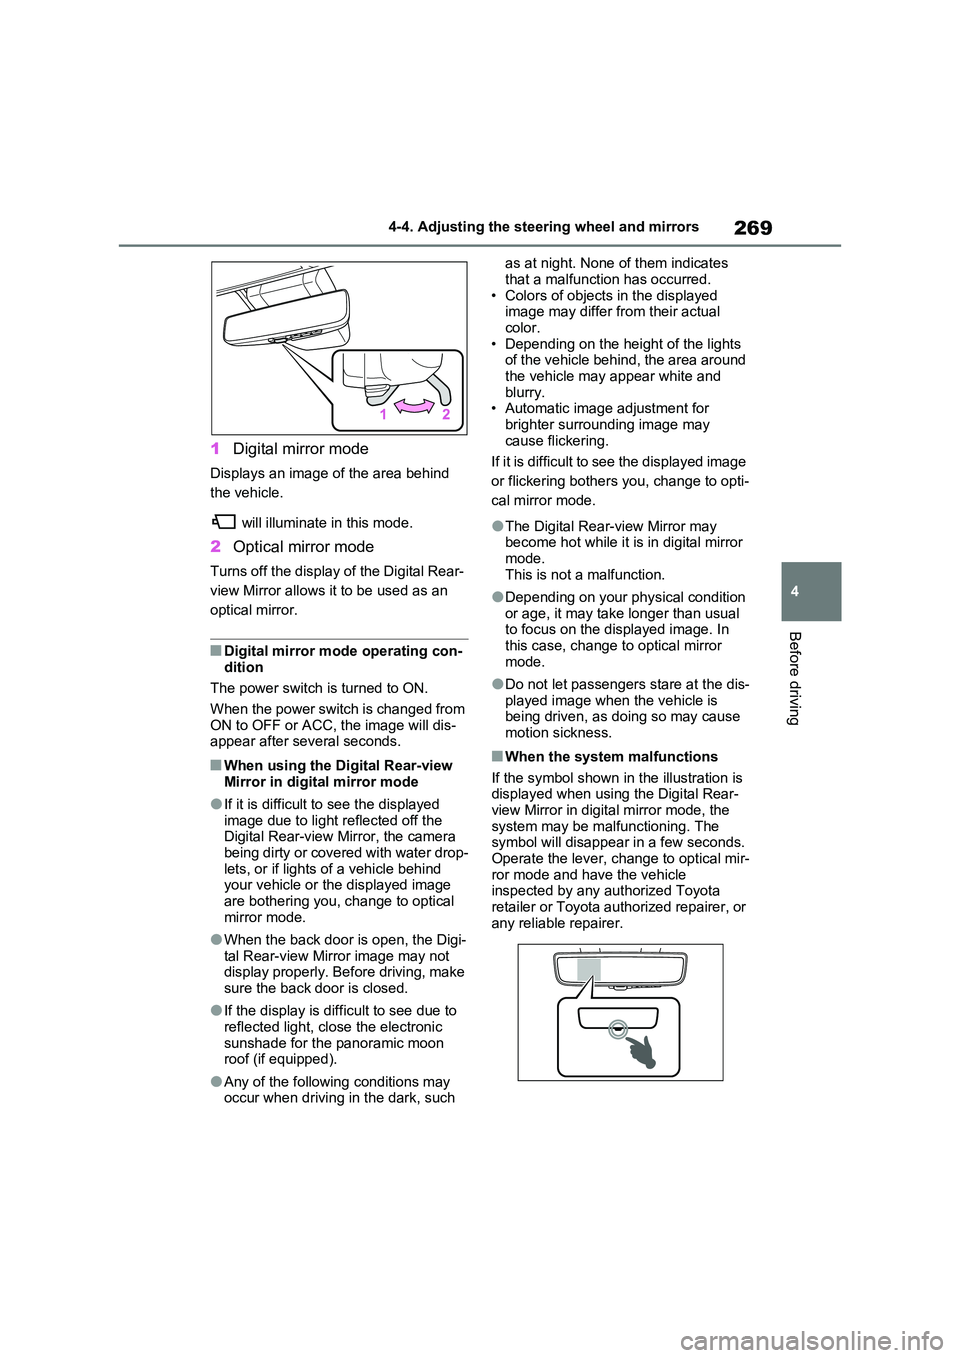
1 Digital mirror mode
Displays an image of the area behind
the vehicle.
will illuminate in this mode.
2 Optical mirror mode
Turns off the display of the Digital Rear-
view Mirror allows it to be used as an
optical mirror.
■Digital mirror mode operating con- dition
The power switch is turned to ON.
When the power switch is changed from ON to OFF or ACC, the image will dis-appear after several seconds.
■When using the Digital Rear-view
Mirror in digital mirror mode
●If it is difficult to see the displayed
image due to light reflected off the Digital Rear-view Mirror, the camera being dirty or covered with water drop-
lets, or if lights of a vehicle behind your vehicle or the displayed image are bothering you, change to optical
mirror mode.
●When the back door is open, the Digi-
tal Rear-view Mirror image may not display properly. Before driving, make sure the back door is closed.
●If the display is difficult to see due to reflected light, close the electronic
sunshade for the panoramic moon roof (if equipped).
●Any of the following conditions may occur when driving in the dark, such
as at night. None of them indicates
that a malfunction has occurred. • Colors of objects in the displayed image may differ from their actual
color. • Depending on the height of the lights of the vehicle behind, the area around
the vehicle may appear white and blurry.• Automatic image adjustment for
brighter surrounding image may cause flickering.
If it is difficult to see the displayed image
or flickering bothers you, change to opti-
cal mirror mode.
●The Digital Rear-view Mirror may become hot while it is in digital mirror mode.
This is not a malfunction.
●Depending on your physical condition
or age, it may take longer than usual to focus on the displayed image. In this case, change to optical mirror
mode.
●Do not let passengers stare at the dis-
played image when the vehicle is being driven, as doing so may cause motion sickness.
■When the system malfunctions
If the symbol shown in the illustration is displayed when using the Digital Rear-view Mirror in digital mirror mode, the
system may be malfunctioning. The symbol will disappear in a few seconds. Operate the lever, change to optical mir-
ror mode and have the vehicle inspected by any authorized Toyota retailer or Toyota authorized repairer, or
any reliable repairer.
Page 272 of 718
2704-4. Adjusting the steering wheel and mirrors
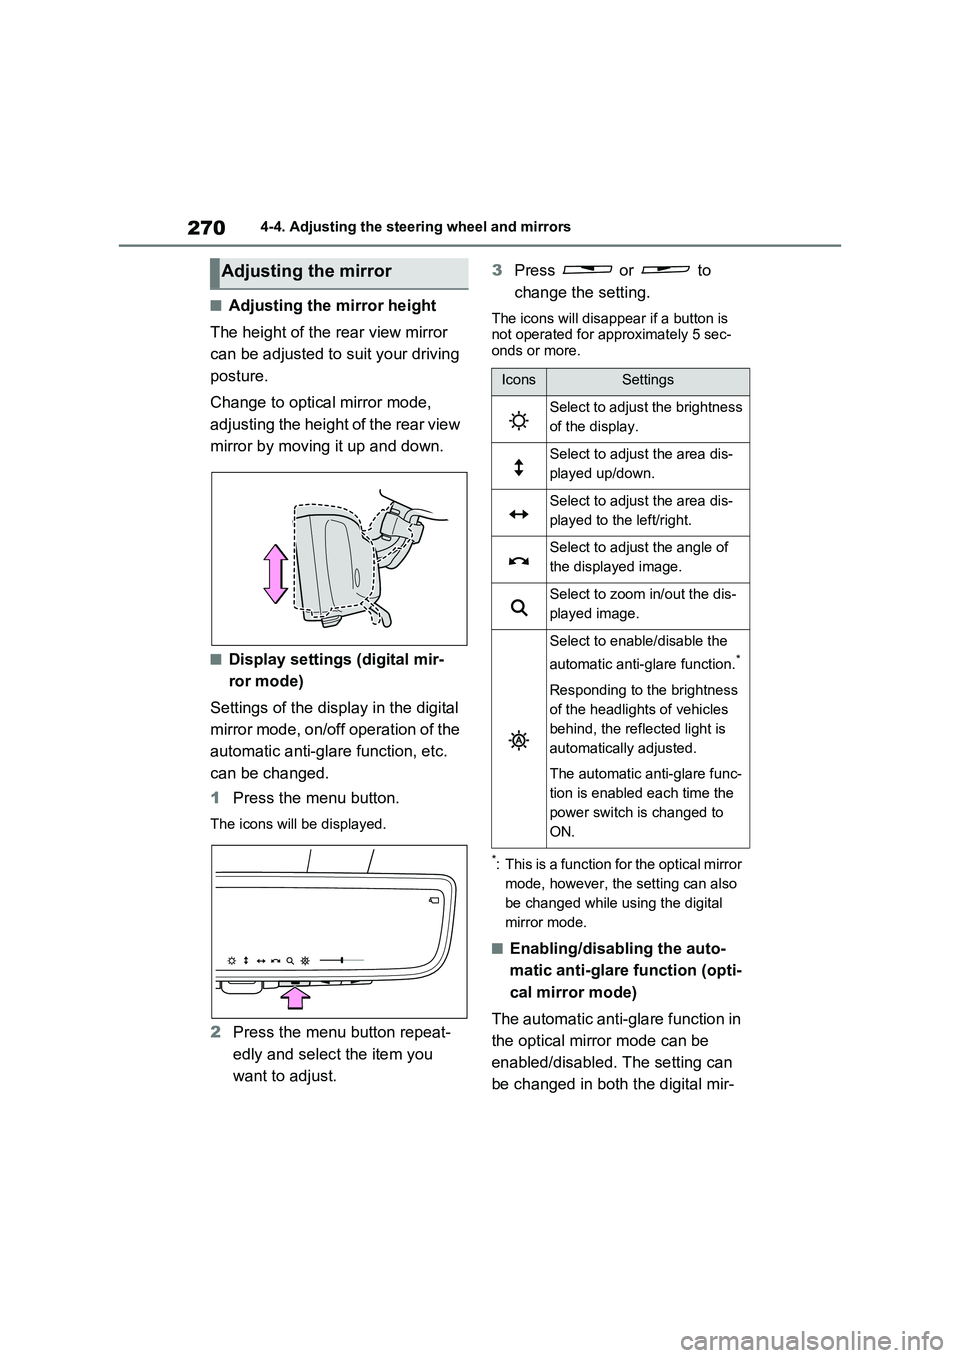
■Adjusting the mirror height
The height of the rear view mirror
can be adjusted to suit your driving
posture.
Change to optical mirror mode,
adjusting the height of the rear view
mirror by moving it up and down.
■Display settings (digital mir-
ror mode)
Settings of the display in the digital
mirror mode, on/off operation of the
automatic anti-glare function, etc.
can be changed.
1Press the menu button.
The icons will be displayed.
2Press the menu button repeat-
edly and select the item you
want to adjust.3Press or to
change the setting.
The icons will disappear if a button is
not operated for approximately 5 sec-
onds or more.
*: This is a function for the optical mirror
mode, however, the setting can also
be changed while using the digital
mirror mode.
■Enabling/disabling the auto-
matic anti-glare function (opti-
cal mirror mode)
The automatic anti-glare function in
the optical mirror mode can be
enabled/disabled. The setting can
be changed in both the digital mir-
Adjusting the mirror
IconsSettings
Select to adjust the brightness
of the display.
Select to adjust the area dis-
played up/down.
Select to adjust the area dis-
played to the left/right.
Select to adjust the angle of
the displayed image.
Select to zoom in/out the dis-
played image.
Select to enable/disable the
automatic anti-glare function.
*
Responding to the brightness
of the headlights of vehicles
behind, the reflected light is
automatically adjusted.
The automatic anti-glare func-
tion is enabled each time the
power switch is changed to
ON.