audio TOYOTA RAV4 PLUG-IN HYBRID 2023 User Guide
[x] Cancel search | Manufacturer: TOYOTA, Model Year: 2023, Model line: RAV4 PLUG-IN HYBRID, Model: TOYOTA RAV4 PLUG-IN HYBRID 2023Pages: 718, PDF Size: 167.55 MB
Page 206 of 718
2043-1. Instrument cluster
tion rate of the electricity when EV driv-
ing is performed and equivalent to the
fuel consumption for the gasoline vehi-
cles. For this vehicle, electricity con-
sumed per 100 km (“kWh/100 km”) is
displayed as electricity consumption on
each screen.
■EV driving range
●When the air conditioning system is
operating, is displayed next to
the EV driving range and the EV driv-
ing range with the air conditioning sys-
tem on is displayed.
●The EV driving range may shorten
even when not driving due to power
consumption by the system.
●For details, refer to “EV driving range”
(P.103)
■Distance to empty
●This distance is computed based on
your average fuel consumption. As a
result, the actual distance that can be
driven may differ from that displayed.
●When only a small amount of fuel is
added to the tank, the display may not
be updated. When refueling, turn the
power switch off. If the vehicle is refu-
eled without turning the power switch
off, the display may not be updated.
●When “Refuel” is displayed, the
remaining fuel amount is low and the
distance that can be driven with the
remaining fuel cannot be calculated.
Refuel immediately.
■ECO Accelerator Guidance/“Eco
Score” will not operate when
The ECO Accelerator Guidance/“Eco
Score” will not operate in the following
situations:
●The Hybrid System Indicator is not
operating.
●The vehicle is being driven using the
dynamic radar cruise control with full-
speed range.
■Driving support system infor-
mation display
Select to display the operational
status of the following systems:
LTA (Lane Tracing Assist)
*
(P.353)
Dynamic radar cruise control
with full-speed range
* (P.368)
Cruise control
* (P.381)
Speed limiter
* (P.384)
*: If equipped
■Navigation system-linked dis-
play (if equipped)
Select to display the following navi-
gation system-linked information.
Route guidance
Compass display
Select to enable selection of an
audio source or track on the dis-
play.
■Drive information
2 items that are selected using the
“Drive Info Items” setting (average
speed, distance and total time) can
be displayed vertically.
The displayed information changes
according to the “Drive Info Type”
Driving support system
information display
Audio system-linked display
Vehicle information display
Page 210 of 718
2083-1. Instrument cluster
Select to enable/disable the battery
cooler. (P.128)
PBD (Power Back Door) (if
equipped) (P.243)
Select to set up the following items.
•System settings
Select to enable/disable the power
back door system.
•“Hands Free”
*
Select to enable/disable the Hands
Free Power Back Door.
• “Opening Adjustment”
Select the open position when power
back door is fully open.
•“Volume”
Select to set the volume of the buzzer
which sounds when the power back
door system operates.
*: Vehicles with Hands Free Power
Back Door
“TPWS” (Tire Pressure Warning
System) (P.488)
• “Setting Pressure”
Select to initialize the tire pressure
warning system.
• “Identifying Each Wheel & Position”
Select to register the ID codes of the
tire pressure sensors to the tire pres-
sure warning system.
•“Setting Unit”
Select to change the units of measure
displayed.
“Rear Seat Reminder” (P.237)
Select to enable/disable the rear seat
reminder.
■ Settings
“Language”
Select to change the language on the
multi-information display.
“Units”
Select to change the units of measure
displayed.
“Meter Type”
Select to change the speedometer dis-
play.
(EV indicator) (P.90)
Select to enable/disable the EV indica-
tor.
(Driving information display
settings)
Select to set up the following items.
•“Hybrid System”
Select to enable/disable the ECO
Accelerator Guidance (P.202).
• “Fuel Economy”
Select to change the display on Fuel
Economy (P.201).
• “Power Consumption”
Select to change the display on Power
Consumption (P.201).
(Audio settings)
Select to enable/disable screen.
(Vehicle information dis-
play settings)
• “Display Contents”
Select to set up the following items.
“Energy monitor”:
Select to enable/disable the Energy
monitor (P.226)
AWD:
Select to enable/disable the AWD sys-
tem display (P.205).
Page 211 of 718
209
3
3-1. Instrument cluster
Vehicle status information and indicators
• “Drive Info Type”
Select to change the drive information
type display between trip and total.
( P.204).
• “Drive Info Items”
Select to set the items on the upper and
lower side of the drive information
screen from three items, average
speed, distance and total time.
“Closing Display”
Select to set the items displayed when
the power switch is turned off.
“Pop-Up Display” (if equipped)
Select to enable/disable the following
pop-up displays, which may appear in
some situations.
• Intersection guidance display of the
navigation system-linked system (if
equipped)
• Incoming call display of the hands-
free phone system (if equipped)
• Audio operation
• Volume operation
• Voice control (if equipped)
“Calender”
Select to set up the calender.
This can only be set if GPS calibration
of clock is turned off in the multimedia
system settings.
“MID OFF”
A blank screen is displayed
“Default Settings”
Select to reset the meter display set-
tings.
■Suspension of the settings display
●In the following situations, operation of the settings display will be temporarily suspended.
• When a warning message appears on
the multi-information display
• When the vehicle begins to move
●Settings for functions not equipped to
the vehicle are not displayed.
●When a function is turned off, the
related settings for that function are not selectable.
Select to display warning mes-
sages and measures to be taken if
a malfunction is detected.
( P.544)
Displays suggestions to the driver
in the following situations. To select
a response to a displayed sugges-
tion, use the meter control
switches.
WARNING
■Cautions during setting up the
display
As the hybrid system needs to be operating during setting up the dis-
play, ensure that the vehicle is parked in a place with adequate ventilation. In a closed area such as a garage,
exhaust gases including harmful car- bon monoxide (CO) may collect and enter the vehicle. This may lead to
death or a serious health hazard.
NOTICE
■During setting up the display
To prevent 12-volt battery discharge, ensure that the hybrid system is oper-
ating while setting up the display fea- tures.
Warning message display
Convenience Services (Sug-
gestion function)
Page 213 of 718
211
3 3-1. Instrument cluster
Vehicle status information and indicators
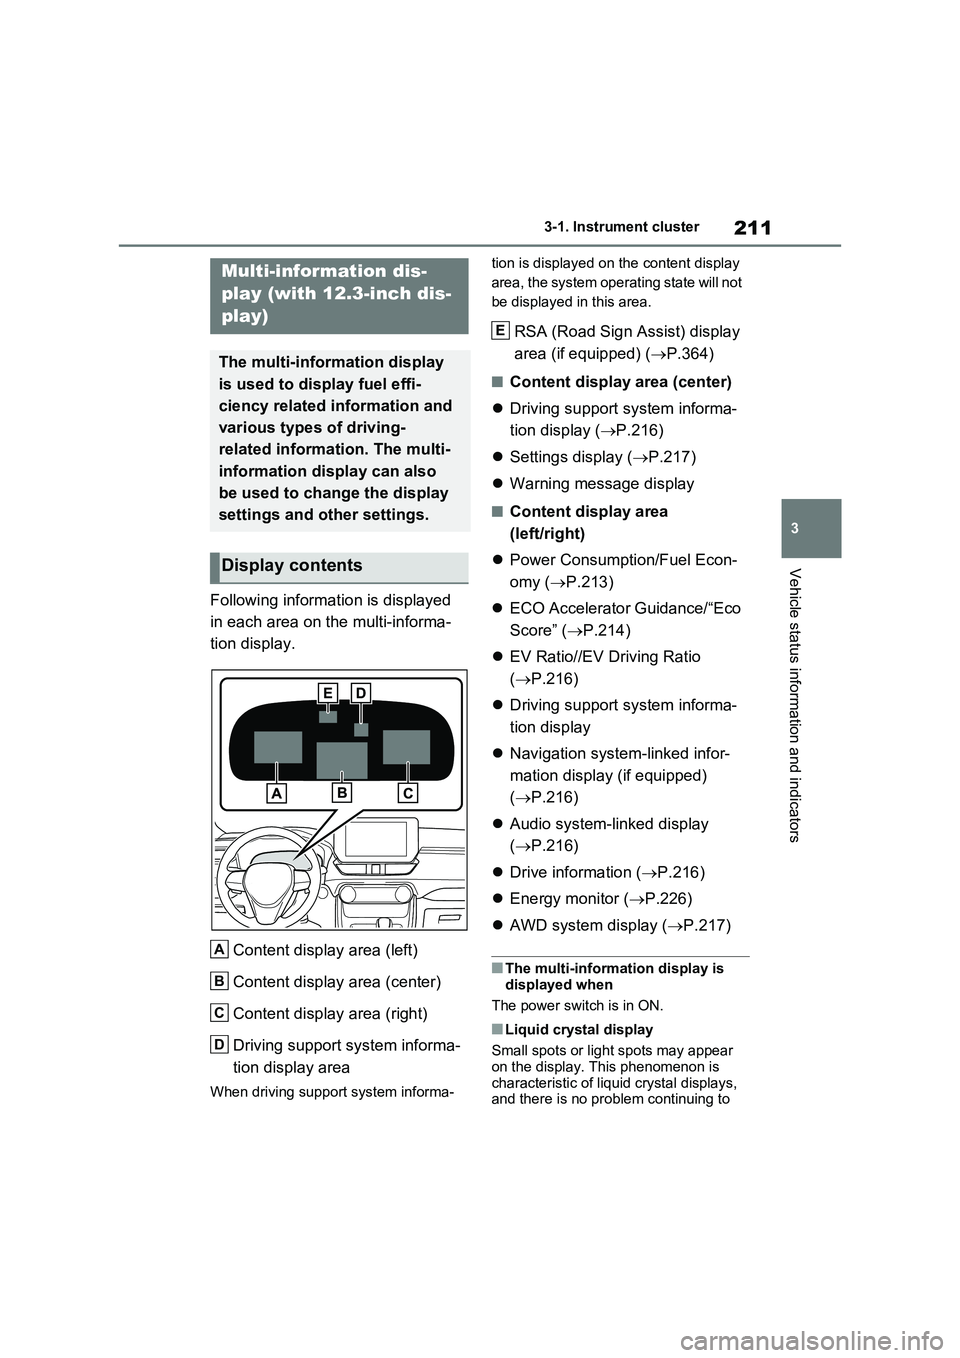
Following information is displayed
in each area on the multi-informa-
tion display.
Content display area (left)
Content display area (center)
Content display area (right)
Driving support system informa-
tion display area
When driving support system informa-tion is displayed on the content display
area, the system operating state will not
be displayed in this area.
RSA (Road Sign Assist) display
area (if equipped) (P.364)
■Content display area (center)
Driving support system informa-
tion display (P.216)
Settings display (P.217)
Warning message display
■Content display area
(left/right)
Power Consumption/Fuel Econ-
omy (P.213)
ECO Accelerator Guidance/“Eco
Score” (P.214)
EV Ratio//EV Driving Ratio
(P.216)
Driving support system informa-
tion display
Navigation system-linked infor-
mation display (if equipped)
(P.216)
Audio system-linked display
(P.216)
Drive information (P.216)
Energy monitor (P.226)
AWD system display (P.217)
■The multi-information display is
displayed when
The power switch is in ON.
■Liquid crystal display
Small spots or light spots may appear
on the display. This phenomenon is
characteristic of liquid crystal displays,
and there is no problem continuing to
Multi-information dis-
play (with 12.3-inch dis-
play)
The multi-information display
is used to display fuel effi-
ciency related information and
various types of driving-
related information. The multi-
information display can also
be used to change the display
settings and other settings.
Display contents
A
B
C
D
E
Page 218 of 718
2163-1. Instrument cluster
dynamic radar cruise control with full-
speed range.
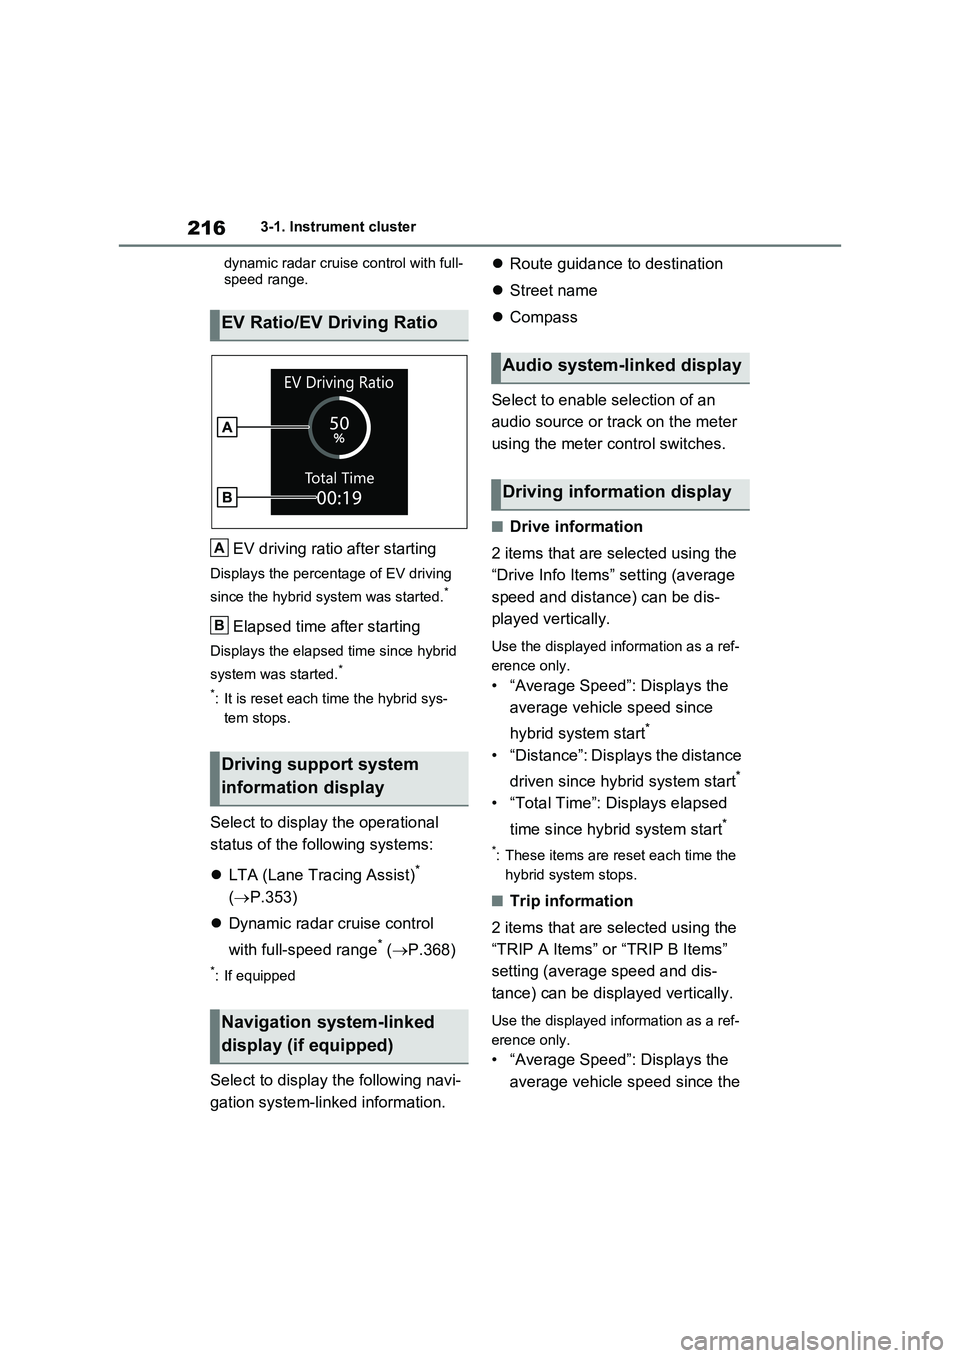
EV driving ratio after starting
Displays the percentage of EV driving
since the hybrid system was started.*
Elapsed time after starting
Displays the elapsed time since hybrid
system was started.*
*: It is reset each time the hybrid sys-
tem stops.
Select to display the operational
status of the following systems:
LTA (Lane Tracing Assist)*
( P.353)
Dynamic radar cruise control
with full-speed range* ( P.368)
*: If equipped
Select to display the following navi-
gation system-linked information.
Route guidance to destination
Street name
Compass
Select to enable selection of an
audio source or track on the meter
using the meter control switches.
■Drive information
2 items that are selected using the
“Drive Info Items” setting (average
speed and distance) can be dis-
played vertically.
Use the displayed information as a ref-
erence only.
• “Average Speed”: Displays the
average vehicle speed since
hybrid system start*
• “Distance”: Displays the distance
driven since hybrid system start*
• “Total Time”: Displays elapsed
time since hybrid system start*
*: These items are reset each time the
hybrid system stops.
■Trip information
2 items that are selected using the
“TRIP A Items” or “TRIP B Items”
setting (average speed and dis-
tance) can be displayed vertically.
Use the displayed information as a ref-
erence only.
• “Average Speed”: Displays the
average vehicle speed since the
EV Ratio/EV Driving Ratio
Driving support system
information display
Navigation system-linked
display (if equipped)
A
B
Audio system-linked display
Driving information display
Page 226 of 718
2243-1. Instrument cluster
• Driving support system information
display
• Compass (if equipped)
• Audio system operation status
Display angle
Select to adjust the angle of the head-
up display.
■Enabling/disabling of the head-up display
If the head-up display is disabled, it will remain disabled when the power switch is turned off then back to ON.
■Display brightness
The brightness of the head-up display
can be adjusted on screen of the
multi-information display. Also, it is auto-
matically adjusted according to the
ambient brightness.
■Driving support system infor-
mation display
Displays the operational status of
the following systems:
LTA (Lane Tracing Assist) (if
equipped) ( P.353)
Dynamic radar cruise control
with full-speed range (if
equipped) ( P.368)
Displayed content is the same as that
displayed on the meter. For details,
refer to the explanations of each sys-
tem.
■Navigation system-linked dis-
play area (if equipped)
Displays the following items which
are linked to the navigation system:
Street name
Route guidance to destination
Compass
Pop-up displays for the following
systems will be displayed when
necessary:
■Driving support systems
Displays a warning/sugges-
tion/advice message or the operat-
ing state of a relevant system.
PCS (Pre-Collision System) (if
equipped) ( P.343)
WARNING
■Caution for changing settings of the head-up display
If the hybrid system is operating when changing the display settings, ensure that the vehicle is parked in a place
with adequate ventilation. In a closed area such as a garage, exhaust gases including harmful carbon mon-
oxide (CO) may collect and enter the vehicle. This may lead to death or a serious health hazard.
NOTICE
■When changing the settings of
the head-up display
To prevent 12-volt battery discharge, ensure that the hybrid system is oper-
ating while changing the settings of the head-up display.
Driving support system
information/navigation sys-
tem-linked display area (if
equipped)
Pop-up display
Page 227 of 718
225
3 3-1. Instrument cluster
Vehicle status information and indicators
Brake Override System
(P.289)
Drive-Start Control (P.289)
Parking Support Brake function
(static objects) (if equipped)
(P.407)
Displayed content is the same as that
displayed on the multi-information dis-
play. For details, refer to the explana-
tions of each system.
■ / icons
Displays the following multi-infor-
mation display linked icons:
: Master warning icon
Displayed when a warning message is
displayed on the multi-information dis-
play.
: Information icon
Displayed when a suggestion/advice
pop-up display is displayed on the
multi-information display.
■Warning message
Some warning messages are dis-
played when necessary, according
to certain conditions.
Displayed content is the same as that
displayed on the multi-information dis-
play. For details, refer to the explana-
tions of each system.
■Audio system operation status
Displayed when an audio remote
control switch on the steering wheel
is operated.
■Hands-free system status (if
equipped)
Displayed when the hands-free system is operated.
■Outside temperature display
Displayed when the power switch is
turned to ON or when the low out-
side temperature indicator is flash-
ing.
■When a pop-up display is displayed
When a pop-up display is displayed, a
current display may no longer be dis-
played. In this case, the display will
return after the pop-up display disap-
pears.
■Outside temperature display
●When the ambient temperature is
approximately 3°C (37°F) or lower,
will flash for approximately 10
seconds and the outside temperature
display will turn off.
●In the following situations, the correct
outside temperature may not be dis-
played, or the display may take longer
than normal to change:
• When stopped (including when using
“My Room Mode”), or driving at low
speeds (less than 20 km/h [12 mph])
• When the outside temperature has
changed suddenly (at the
entrance/exit of a garage, tunnel, etc.)
●When “--” or “E” is displayed, the sys-
tem may be malfunctioning.
Take your vehicle to any authorized
Toyota retailer or Toyota authorized
repairer, or any reliable repairer.
Display content selected by “HUD
Driving Support” on the screen
is displayed. (P.223)
Hybrid System Indica-
tor/Tachometer
Page 235 of 718
233
4
4-1. Key information
Before driving
OFF or other passengers from uninten-
tionally taking the key out of the vehicle, etc., a message that prompts the user to confirm the state of the electronic key or
power switch mode may be shown on the multi-information display. In those cases, follow the instructions on the dis-
play immediately.
■If “Key Battery Low Replace Key Battery” is displayed on the multi-information display
The electronic key has a low battery. Replace the electronic key battery. ( P.511)
■Replacing the battery
P.511
■Confirmation of the registered key number
The number of keys already registered
to the vehicle can be confirmed. Ask any authorized Toyota retailer or Toyota authorized repairer, or any reliable
repairer for details.
■If “New Key Registered Contact Your Dealer if You Did Not Register a New Key” or “A New Key has
been Registered Contact Your Dealer for Details” is displayed on the multi-information display
This message will be displayed each time the driver’s door is opened when the doors are unlocked from the outside
for approximately 10 days after a new electronic key has been registered. If this message is displayed but you
have not had a new electronic key regis- tered, ask any authorized Toyota retailer or Toyota authorized repairer, or any
reliable repairer to check if an unknown electronic key (other than those in your possession) has been registered.
The electronic keys are equipped
with the following wireless remote
NOTICE
■To prevent key damage
●Do not drop the keys, subject them to strong shocks or bend them.
●Do not expose the keys to high temperatures for long periods of time.
●Do not get the keys wet or wash them in an ultrasonic washer, etc.
●Do not attach metallic or magnetic materials to the keys or place the
keys close to such materials.
●Do not disassemble the keys.
●Do not attach a sticker or anything else to the surface of the electronic
key.
●Do not place the keys near objects
that produce magnetic fields, such as TVs, audio systems and induc-tion cookers.
●Do not place the keys near medical electrical equipment such as low-
frequency therapy equipment or microwave therapy equipment, and do not receive medical attention
with the keys on your person.
■Carrying the electronic key on
your person
Carry the electronic key 10 cm (3.9 in.) or more away from electric appli-
ances that are turned on. Radio waves emitted from electric appli-ances within 10 cm (3.9 in.) of the
electronic key may interfere with the key, causing the key to not function properly.
■In case of a smart entry & start system malfunction or other key-
related problems
P.571
■When an electronic key is lost
P.570
Wireless remote control
Page 257 of 718
255
4 4-2. Opening, closing and locking the doors
Before driving
●When the electronic key battery is
depleted
●Near a TV tower, electric power plant,
gas station, radio station, large dis-
play, airport or other facility that gen-
erates strong radio waves or electrical
noise
●When the electronic key is in contact
with, or is covered by the following
metallic objects
• Cards to which aluminum foil is
attached
• Cigarette boxes that have aluminum
foil inside
• Metallic wallets or bags
• Coins
• Hand warmers made of metal
• Media such as CDs and DVDs
●When other wireless key (that emits
radio waves) is being used nearby
●When carrying the electronic key
together with the following devices
that emit radio waves
• Portable radio, cellular phone, cord-
less phone or other wireless commu-
nication devices
• Another electronic key or a wireless
key that emits radio waves
• Personal computers or personal digi-
tal assistants (PDAs)
• Digital audio players
• Portable game systems
●If window tint with a metallic content or
metallic objects are attached to the
rear window
●When the electronic key is placed
near a battery charger or electronic
devices
●When the vehicle is parked in a pay
parking spot where radio waves are
emitted.
If the doors cannot be locked/unlocked
using the smart entry & start system,
lock/unlock the doors by performing any
of the following:
●Bring the electronic key close to either
front door handle and operate the
entry function.
●Operate the wireless remote control. If the doors cannot be locked/unlocked
using the above methods, use the
mechanical key. (P.234)
If the hybrid system cannot be started
using the smart entry & start system,
refer to P.572.
■Note for the entry function
●Even when the electronic key is within
the effective range (detection areas),
the system may not operate properly
in the following cases:
• The electronic key is too close to the
window or outside door handle, near
the ground, or in a high place when
the doors are locked or unlocked.
• The electronic key is on the instru-
ment panel, luggage cover or floor, or
in the door pockets or glove box when
the hybrid system is started or power
switch modes are changed.
●Do not leave the electronic key on top
of the instrument panel or near the
door pockets when exiting the vehicle.
Depending on the radio wave recep-
tion conditions, it may be detected by
the antenna outside the cabin and the
door will become lockable from the
outside, possibly trapping the elec-
tronic key inside the vehicle.
●As long as the electronic key is within
the effective range, the doors may be
locked or unlocked by anyone. How-
ever, only the doors detecting the
electronic key can be used to lock or
unlock the vehicle.
●Even if the electronic key is not inside
the vehicle, it may be possible to start
the hybrid system if the electronic key
is near the window.
●The doors may unlock if a large
amount of water splashes on the door
handle, such as in the rain or in a car
wash when the electronic key is within
the effective range. (The doors will
automatically be locked after approxi-
mately 30 seconds if the doors are not
opened and closed.)
●If the wireless remote control is used
to lock the doors when the electronic
Page 315 of 718
313
5
5-2. Driving procedures
Driving
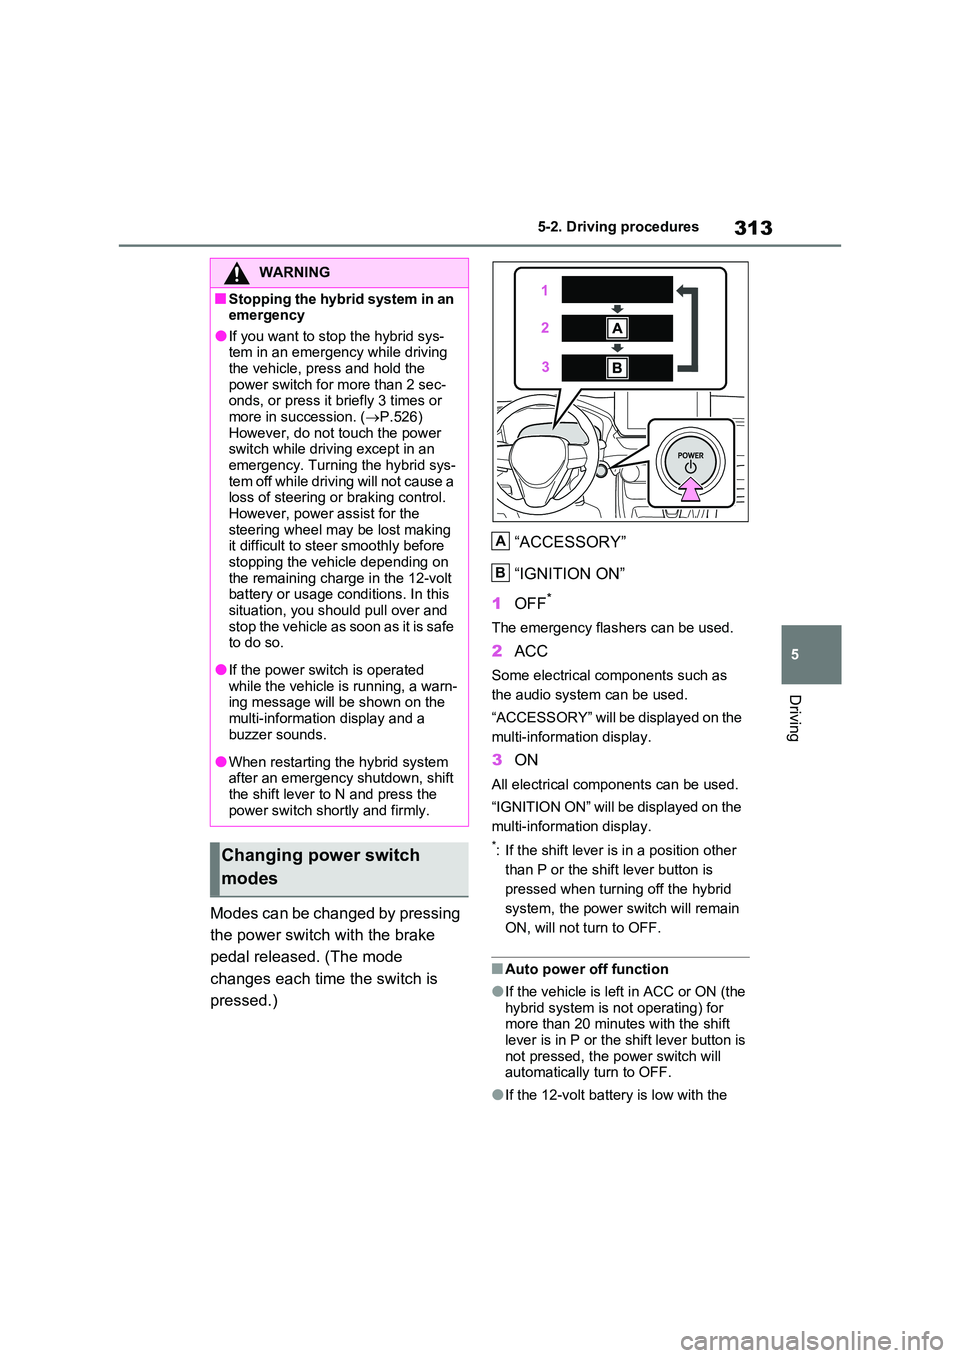
Modes can be changed by pressing
the power switch with the brake
pedal released. (The mode
changes each time the switch is
pressed.)
“ACCESSORY”
“IGNITION ON”
1 OFF*
The emergency flashers can be used.
2ACC
Some electrical components such as
the audio system can be used.
“ACCESSORY” will be displayed on the
multi-information display.
3 ON
All electrical components can be used.
“IGNITION ON” will be displayed on the
multi-information display.
*: If the shift lever is in a position other
than P or the shift lever button is
pressed when turning off the hybrid
system, the power switch will remain
ON, will not turn to OFF.
■Auto power off function
●If the vehicle is left in ACC or ON (the hybrid system is not operating) for more than 20 minutes with the shift
lever is in P or the shift lever button is not pressed, the power switch will automatically turn to OFF.
●If the 12-volt battery is low with the
WARNING
■Stopping the hybrid system in an emergency
●If you want to stop the hybrid sys-tem in an emergency while driving the vehicle, press and hold the
power switch for more than 2 sec- onds, or press it briefly 3 times or more in succession. ( P.526)
However, do not touch the power switch while driving except in an emergency. Turning the hybrid sys-
tem off while driving will not cause a loss of steering or braking control. However, power assist for the
steering wheel may be lost making it difficult to steer smoothly before stopping the vehicle depending on
the remaining charge in the 12-volt battery or usage conditions. In this situation, you should pull over and
stop the vehicle as soon as it is safe to do so.
●If the power switch is operated while the vehicle is running, a warn-ing message will be shown on the
multi-information display and a buzzer sounds.
●When restarting the hybrid system after an emergency shutdown, shift the shift lever to N and press the
power switch shortly and firmly.
Changing power switch
modes
A
B