TOYOTA RAV4 PLUG-IN HYBRID 2023 Owners Manual
Manufacturer: TOYOTA, Model Year: 2023, Model line: RAV4 PLUG-IN HYBRID, Model: TOYOTA RAV4 PLUG-IN HYBRID 2023Pages: 718, PDF Size: 167.55 MB
Page 331 of 718
329
5 5-3. Operating the lights and wipers
Driving
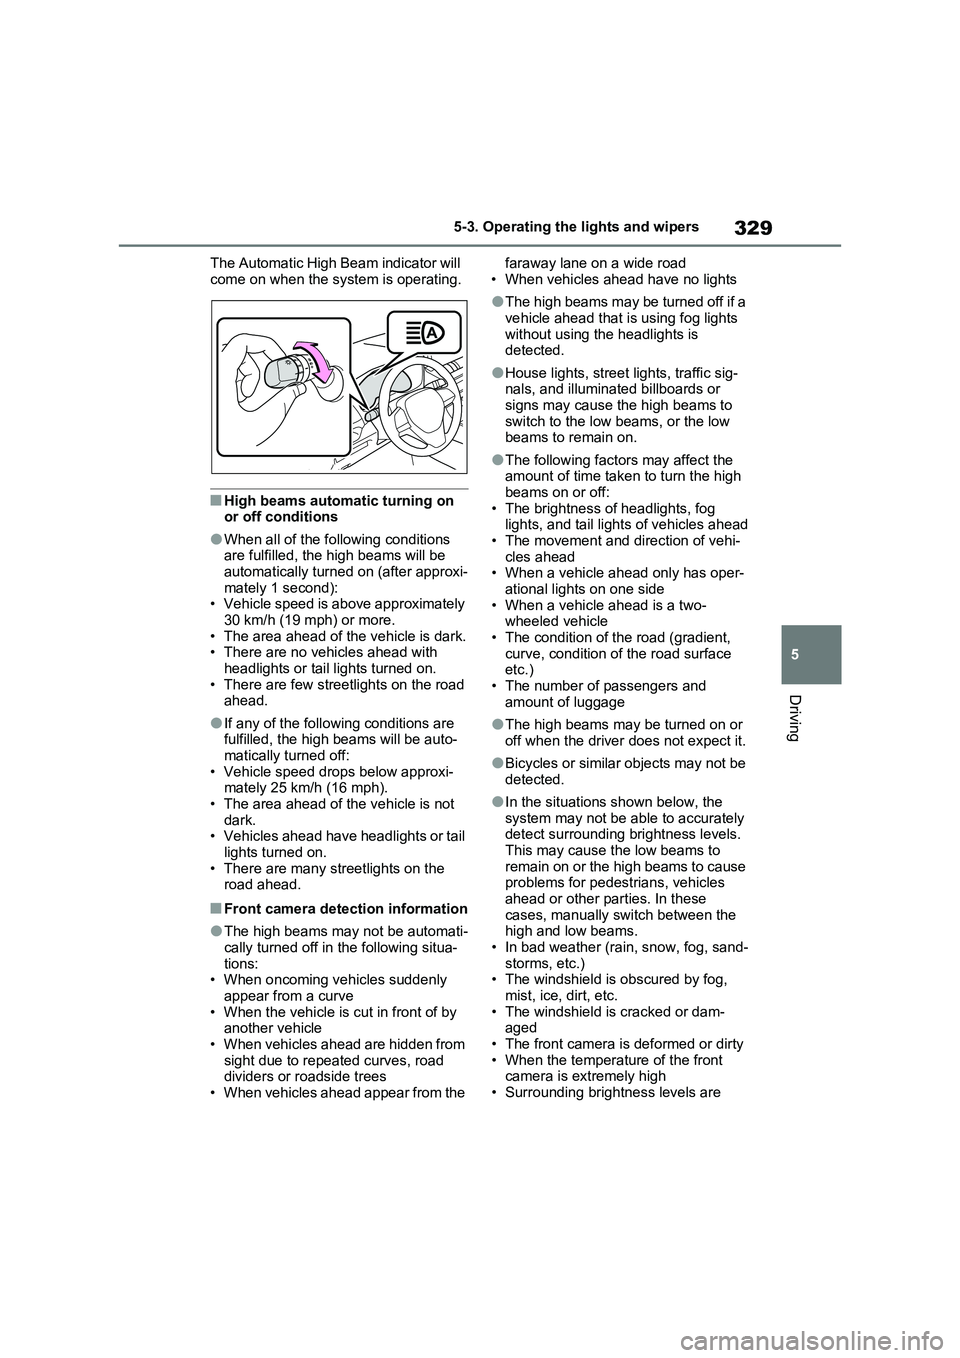
The Automatic High Beam indicator will
come on when the system is operating.
■High beams automatic turning on
or off conditions
●When all of the following conditions
are fulfilled, the high beams will be
automatically turned on (after approxi-
mately 1 second):
• Vehicle speed is above approximately
30 km/h (19 mph) or more.
• The area ahead of the vehicle is dark.
• There are no vehicles ahead with
headlights or tail lights turned on.
• There are few streetlights on the road
ahead.
●If any of the following conditions are
fulfilled, the high beams will be auto-
matically turned off:
• Vehicle speed drops below approxi-
mately 25 km/h (16 mph).
• The area ahead of the vehicle is not
dark.
• Vehicles ahead have headlights or tail
lights turned on.
• There are many streetlights on the
road ahead.
■Front camera detection information
●The high beams may not be automati-
cally turned off in the following situa-
tions:
• When oncoming vehicles suddenly
appear from a curve
• When the vehicle is cut in front of by
another vehicle
• When vehicles ahead are hidden from
sight due to repeated curves, road
dividers or roadside trees
• When vehicles ahead appear from the faraway lane on a wide road
• When vehicles ahead have no lights
●The high beams may be turned off if a
vehicle ahead that is using fog lights
without using the headlights is
detected.
●House lights, street lights, traffic sig-
nals, and illuminated billboards or
signs may cause the high beams to
switch to the low beams, or the low
beams to remain on.
●The following factors may affect the
amount of time taken to turn the high
beams on or off:
• The brightness of headlights, fog
lights, and tail lights of vehicles ahead
• The movement and direction of vehi-
cles ahead
• When a vehicle ahead only has oper-
ational lights on one side
• When a vehicle ahead is a two-
wheeled vehicle
• The condition of the road (gradient,
curve, condition of the road surface
etc.)
• The number of passengers and
amount of luggage
●The high beams may be turned on or
off when the driver does not expect it.
●Bicycles or similar objects may not be
detected.
●In the situations shown below, the
system may not be able to accurately
detect surrounding brightness levels.
This may cause the low beams to
remain on or the high beams to cause
problems for pedestrians, vehicles
ahead or other parties. In these
cases, manually switch between the
high and low beams.
• In bad weather (rain, snow, fog, sand-
storms, etc.)
• The windshield is obscured by fog,
mist, ice, dirt, etc.
• The windshield is cracked or dam-
aged
• The front camera is deformed or dirty
• When the temperature of the front
camera is extremely high
• Surrounding brightness levels are
Page 332 of 718
3305-3. Operating the lights and wipers
equal to those of headlights, tail lights
or fog lights
• When headlights or tail lights of vehi-
cles ahead are turned off, dirty,
changing color, or not aimed properly
• When the vehicle is hit by water,
snow, dust, etc. from a preceding
vehicle
• When driving through an area of inter-
mittently changing brightness and
darkness
• When frequently and repeatedly driv-
ing ascending/descending roads, or
roads with rough, bumpy or uneven
surfaces (such as stone-paved roads,
gravel roads, etc.)
• When frequently and repeatedly tak-
ing curves or driving on a winding
road
• There is a highly reflective object
ahead of the vehicle, such as a sign or
mirror
• The back of a vehicle ahead is highly
reflective, such as a container on a
truck
• The vehicle’s headlights are damaged
or dirty, or are not aimed properly
• The vehicle is listing or titling due to a
flat tire, a trailer being towed, etc.
• The high beams and low beams are
repeatedly being switched between in
an abnormal manner
• The driver believes that the high
beams may be causing problems or
distress to other drivers or pedestrians
nearby
• The vehicle is used in a territory in
which vehicles travel on the opposite
side of the road of the country for
which the vehicle is approved, for
example using a vehicle designed for
right-hand traffic in a left-hand traffic
territory, or vice versa
• When going through the Straits of
Dover
■If “Headlight System Malfunction
Visit Your Dealer” is displayed on
the multi-information display
The system may be malfunctioning.
Have the vehicle inspected by any
authorized Toyota retailer or Toyota
authorized repairer, or any reliable repairer.
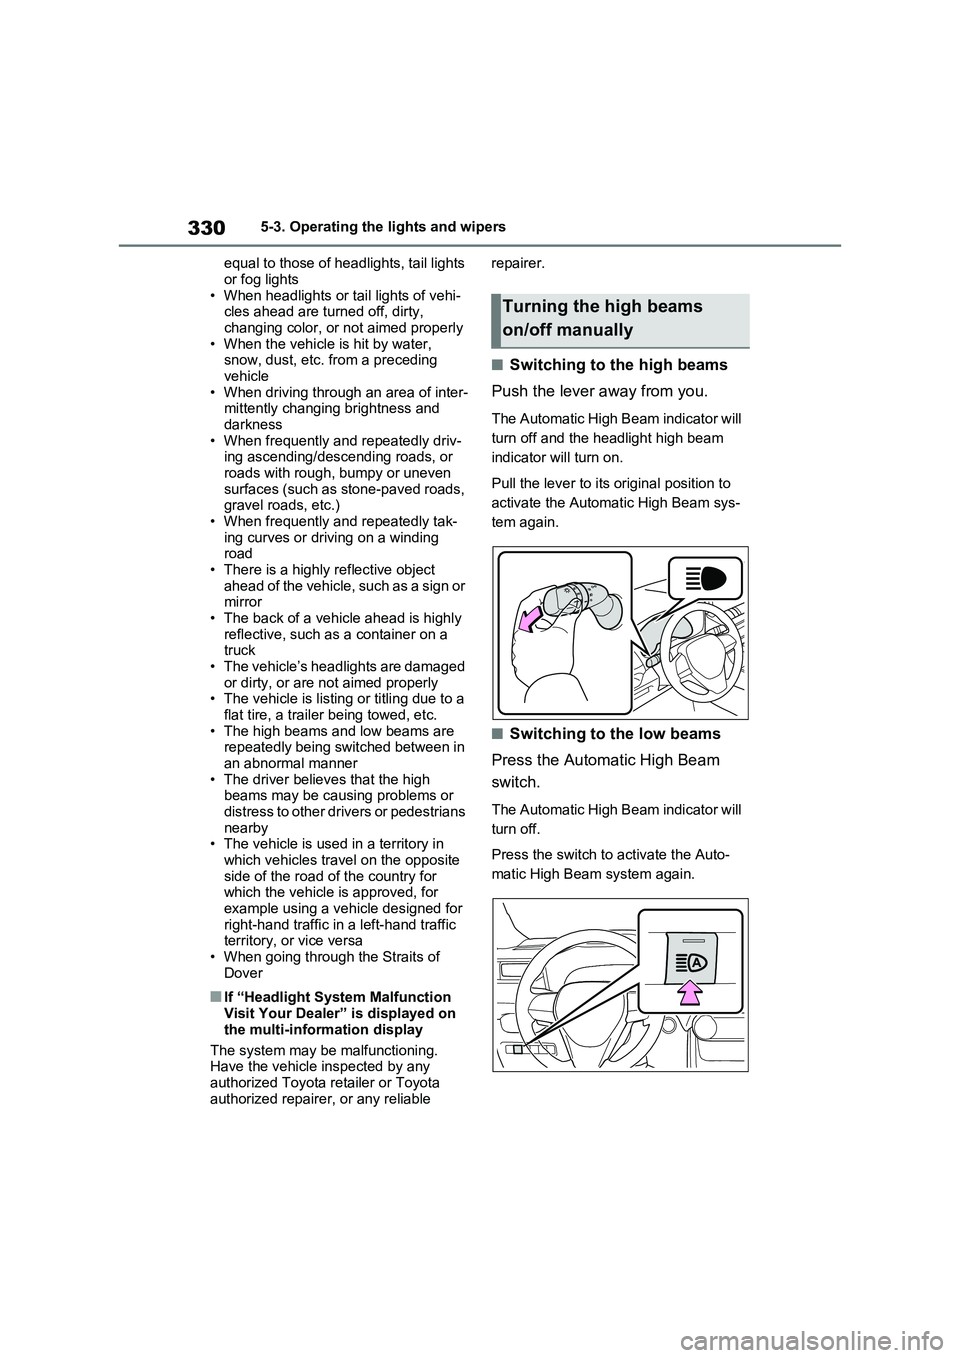
■Switching to the high beams
Push the lever away from you.
The Automatic High Beam indicator will
turn off and the headlight high beam
indicator will turn on.
Pull the lever to its original position to
activate the Automatic High Beam sys-
tem again.
■Switching to the low beams
Press the Automatic High Beam
switch.
The Automatic High Beam indicator will
turn off.
Press the switch to activate the Auto-
matic High Beam system again.
Turning the high beams
on/off manually
Page 333 of 718
331
5
5-3. Operating the lights and wipers
Driving
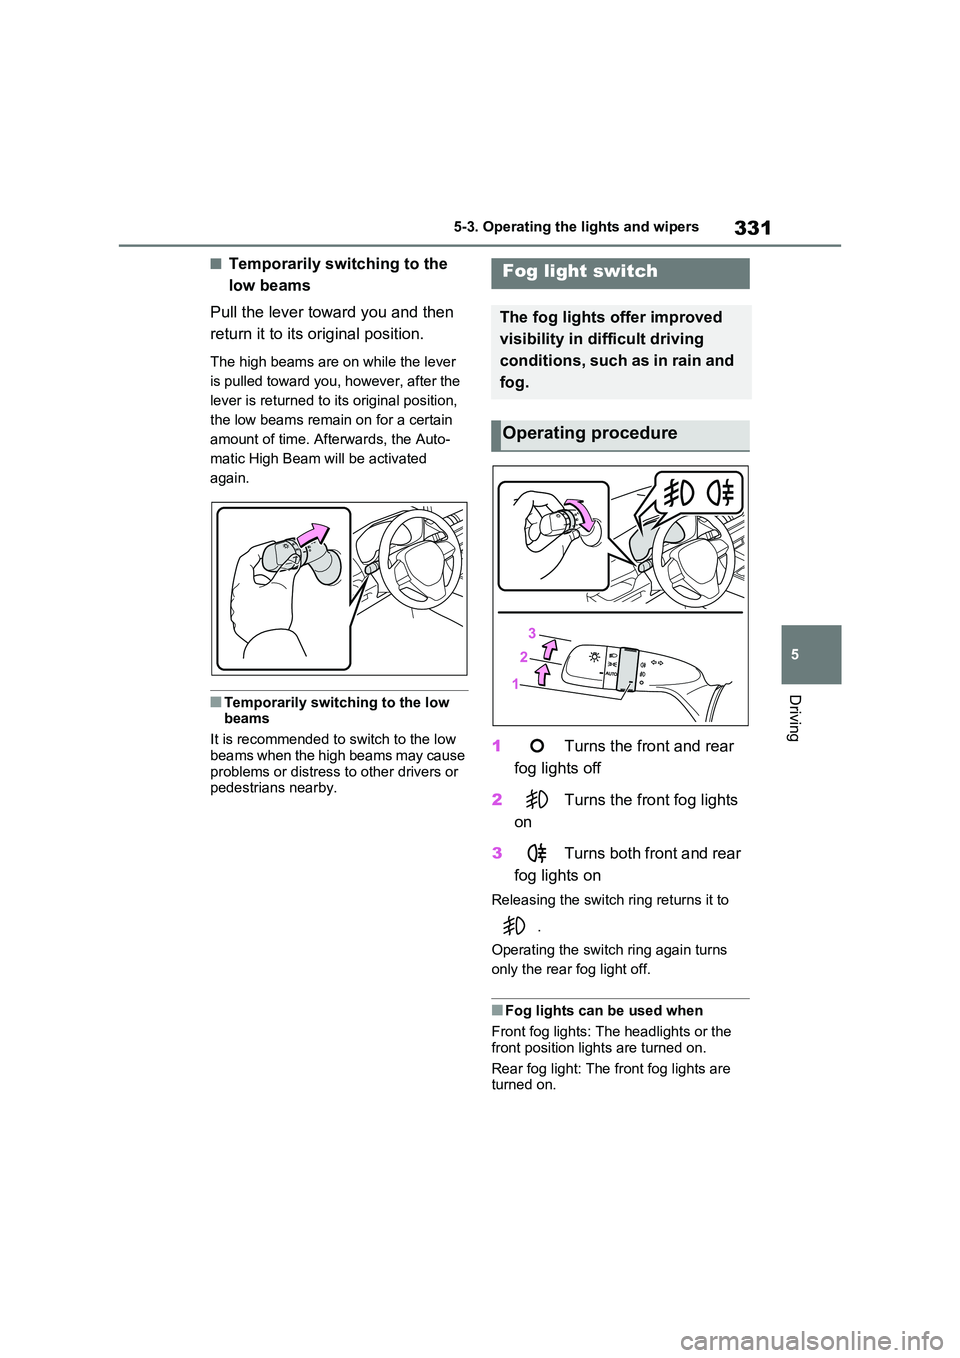
■Temporarily switching to the
low beams
Pull the lever toward you and then
return it to its original position.
The high beams are on while the lever
is pulled toward you, however, after the
lever is returned to its original position,
the low beams remain on for a certain
amount of time. Afterwards, the Auto-
matic High Beam will be activated
again.
■Temporarily switching to the low beams
It is recommended to switch to the low
beams when the high beams may cause problems or distress to other drivers or pedestrians nearby.
1 Turns the front and rear
fog lights off
2 Turns the front fog lights
on
3 Turns both front and rear
fog lights on
Releasing the switch ring returns it to
.
Operating the switch ring again turns
only the rear fog light off.
■Fog lights can be used when
Front fog lights: The headlights or the
front position lights are turned on.
Rear fog light: The front fog lights are turned on.
Fog light switch
The fog lights offer improved
visibility in difficult driving
conditions, such as in rain and
fog.
Operating procedure
Page 334 of 718
3325-3. Operating the lights and wipers
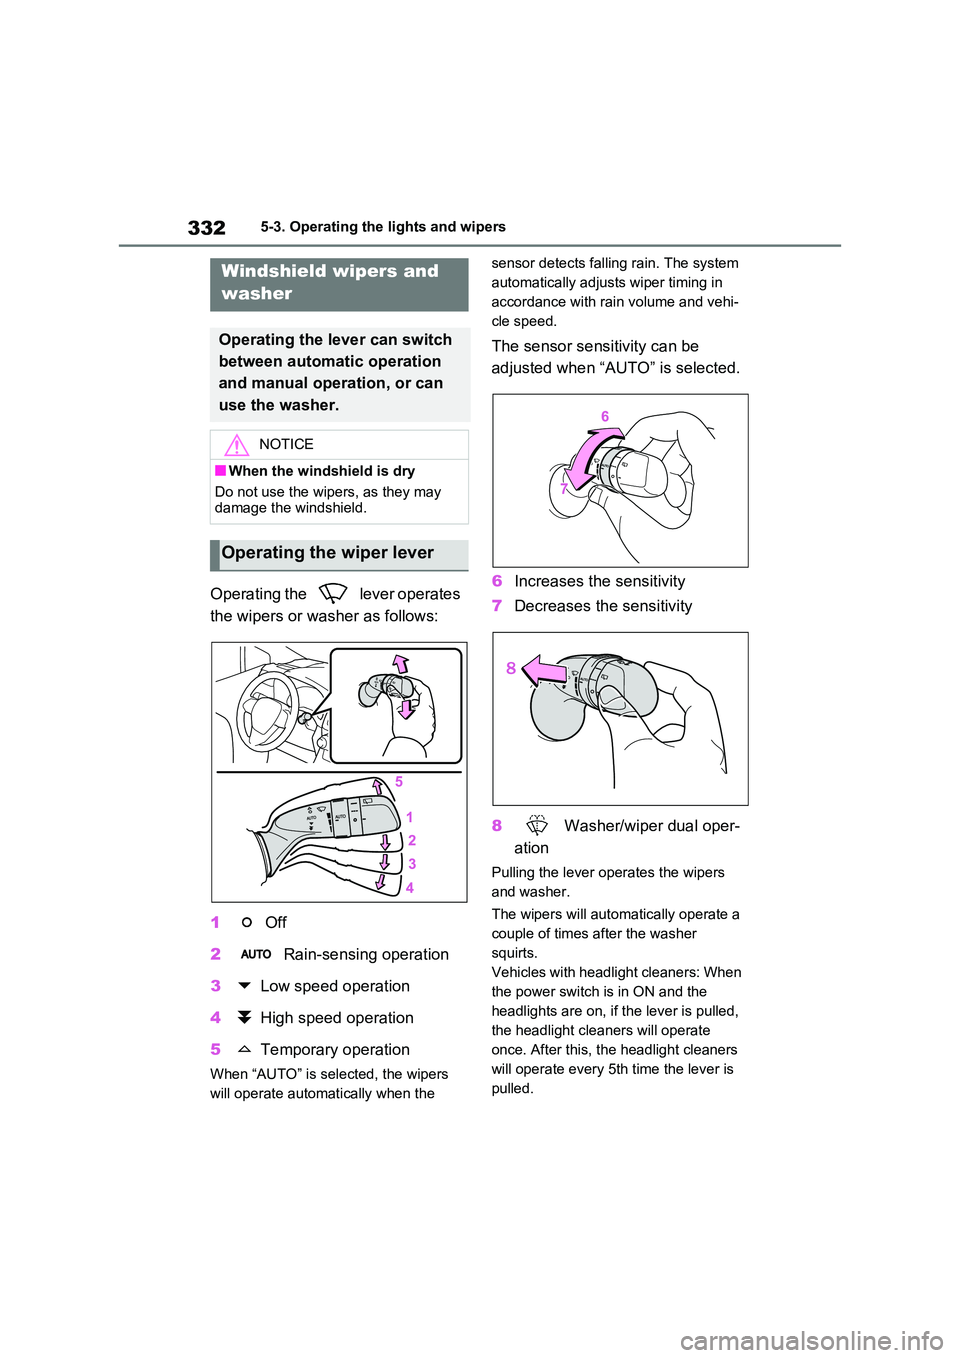
Operating the lever operates
the wipers or washer as follows:
1 Off
2 Rain-sensing operation
3 Low speed operation
4 High speed operation
5 Temporary operation
When “AUTO” is selected, the wipers
will operate automatically when the
sensor detects falling rain. The system
automatically adjusts wiper timing in
accordance with rain volume and vehi-
cle speed.
The sensor sensitivity can be
adjusted when “AUTO” is selected.
6 Increases the sensitivity
7 Decreases the sensitivity
8 Washer/wiper dual oper-
ation
Pulling the lever operates the wipers
and washer.
The wipers will automatically operate a
couple of times after the washer
squirts.
Vehicles with headlight cleaners: When
the power switch is in ON and the
headlights are on, if the lever is pulled,
the headlight cleaners will operate
once. After this, the headlight cleaners
will operate every 5th time the lever is
pulled.
Windshield wipers and
washer
Operating the lever can switch
between automatic operation
and manual operation, or can
use the washer.
NOTICE
■When the windshield is dry
Do not use the wipers, as they may damage the windshield.
Operating the wiper lever
Page 335 of 718
333
5
5-3. Operating the lights and wipers
Driving
■The windshield wipers and washer can be operated when
The power switch is in ON.
■Effects of vehicle speed on wiper operation
With low speed windshield wiper opera-
tion selected, wiper operation will be switched from low speed to intermittent wiper operation when the vehicle is sta-
tionary. (However, when the sensor sen- sitivity is adjusted to the highest level, the mode will not switch.)
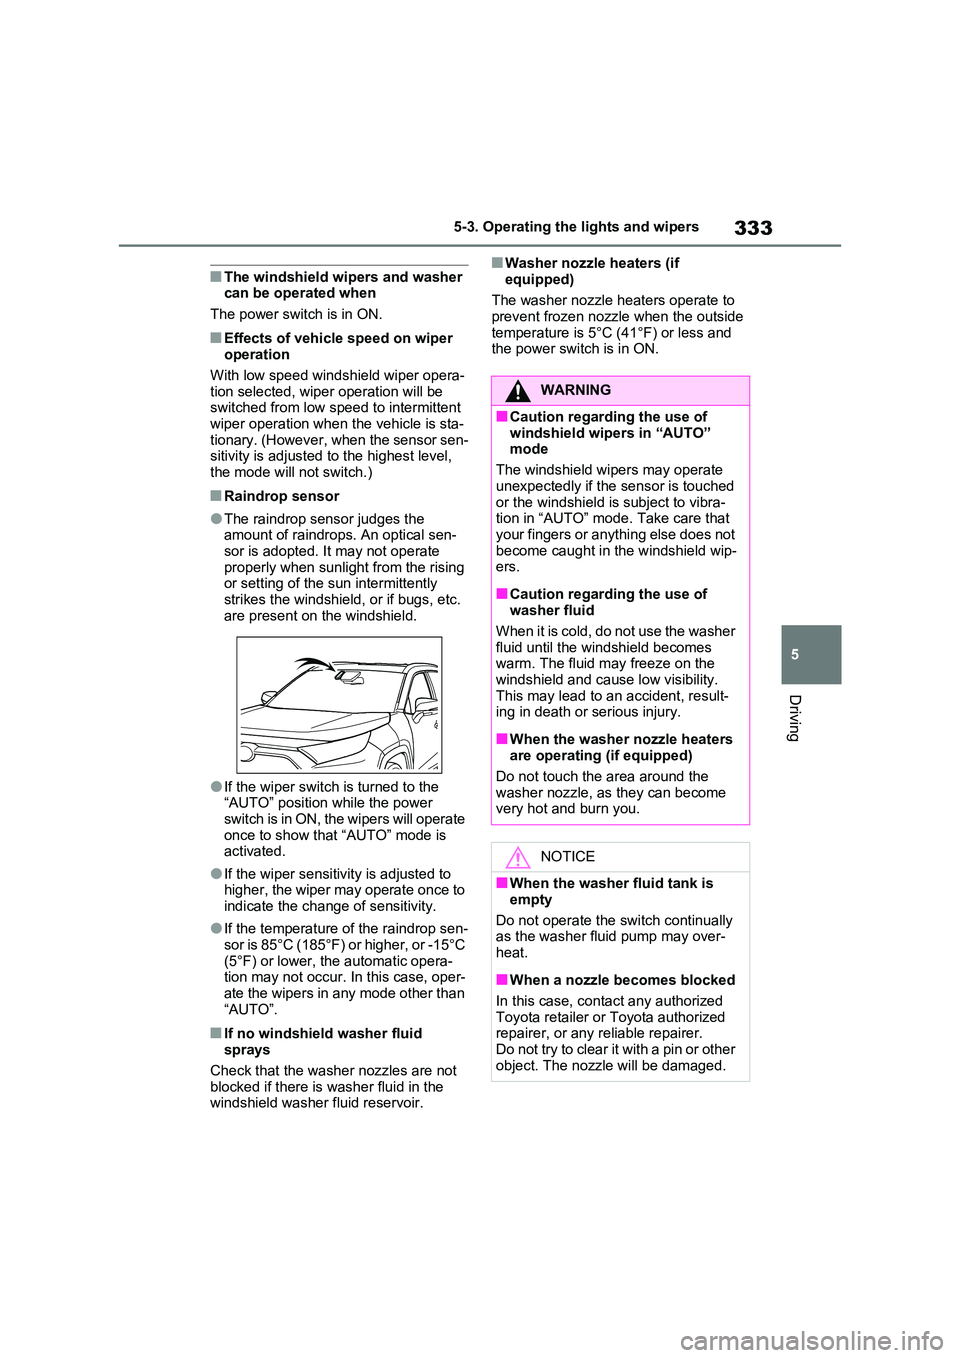
■Raindrop sensor
●The raindrop sensor judges the amount of raindrops. An optical sen-
sor is adopted. It may not operate properly when sunlight from the rising or setting of the sun intermittently
strikes the windshield, or if bugs, etc. are present on the windshield.
●If the wiper switch is turned to the “AUTO” position while the power switch is in ON, the wipers will operate
once to show that “AUTO” mode is activated.
●If the wiper sensitivity is adjusted to higher, the wiper may operate once to
indicate the change of sensitivity.
●If the temperature of the raindrop sen-
sor is 85°C (185°F) or higher, or -15°C (5°F) or lower, the automatic opera-tion may not occur. In this case, oper-
ate the wipers in any mode other than “AUTO”.
■If no windshield washer fluid sprays
Check that the washer nozzles are not blocked if there is washer fluid in the windshield washer fluid reservoir.
■Washer nozzle heaters (if
equipped)
The washer nozzle heaters operate to prevent frozen nozzle when the outside
temperature is 5°C (41°F) or less and the power switch is in ON.
WARNING
■Caution regarding the use of
windshield wipers in “AUTO” mode
The windshield wipers may operate
unexpectedly if the sensor is touched or the windshield is subject to vibra-tion in “AUTO” mode. Take care that
your fingers or anything else does not become caught in the windshield wip-ers.
■Caution regarding the use of washer fluid
When it is cold, do not use the washer fluid until the windshield becomes warm. The fluid may freeze on the
windshield and cause low visibility. This may lead to an accident, result-ing in death or serious injury.
■When the washer nozzle heaters are operating (if equipped)
Do not touch the area around the washer nozzle, as they can become very hot and burn you.
NOTICE
■When the washer fluid tank is
empty
Do not operate the switch continually as the washer fluid pump may over-
heat.
■When a nozzle becomes blocked
In this case, contact any authorized Toyota retailer or Toyota authorized repairer, or any reliable repairer.
Do not try to clear it with a pin or other object. The nozzle will be damaged.
Page 336 of 718
3345-3. Operating the lights and wipers
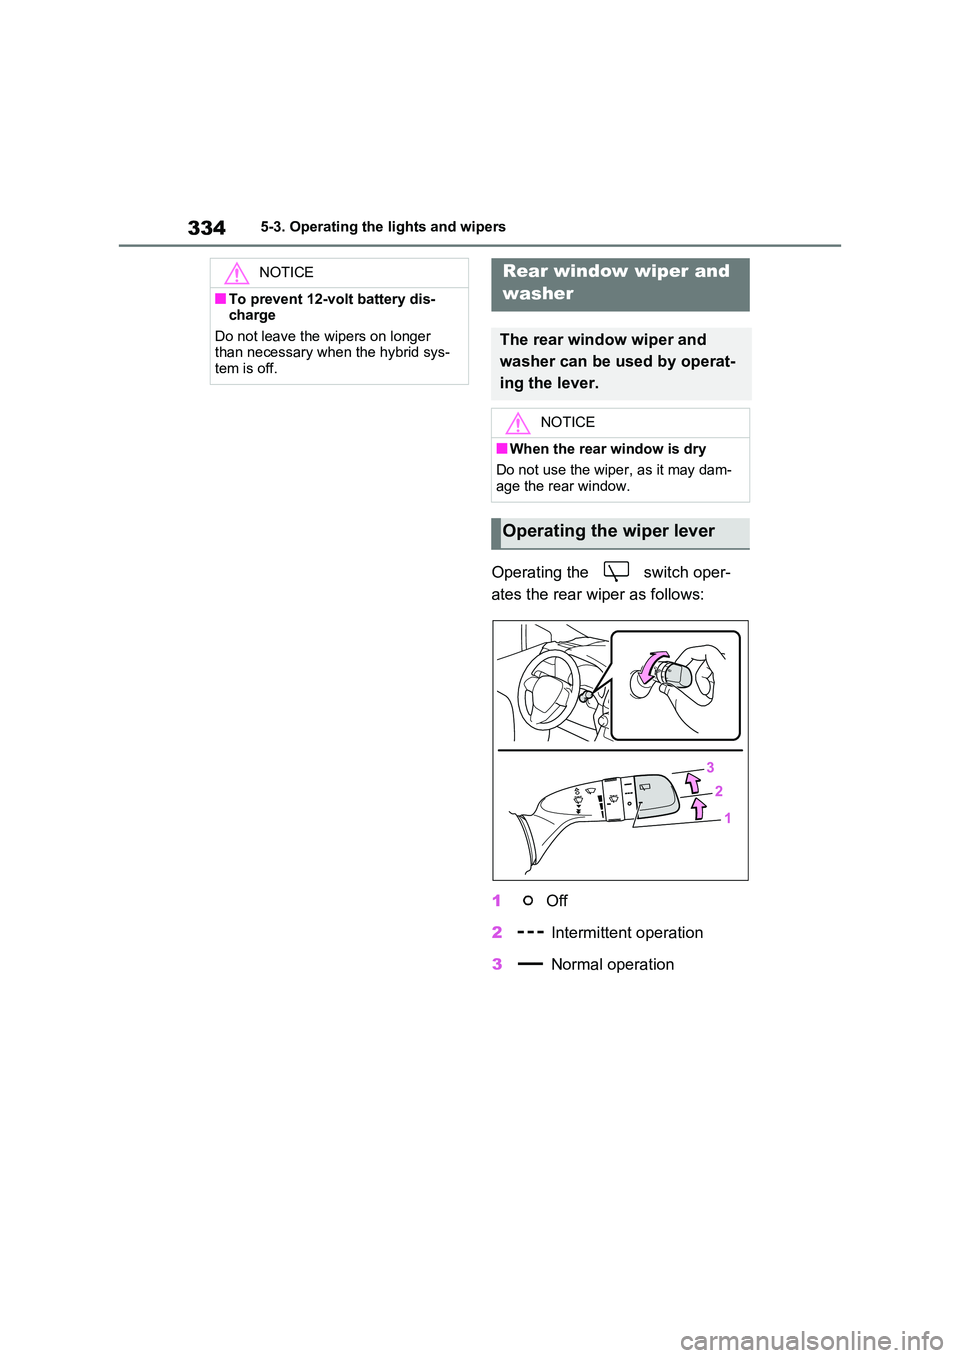
Operating the switch oper-
ates the rear wiper as follows:
1 Off
2 Intermittent operation
3 Normal operation
NOTICE
■To prevent 12-volt battery dis- charge
Do not leave the wipers on longer than necessary when the hybrid sys-tem is off.
Rear window wiper and
washer
The rear window wiper and
washer can be used by operat-
ing the lever.
NOTICE
■When the rear window is dry
Do not use the wiper, as it may dam-
age the rear window.
Operating the wiper lever
Page 337 of 718
335
5
5-3. Operating the lights and wipers
Driving
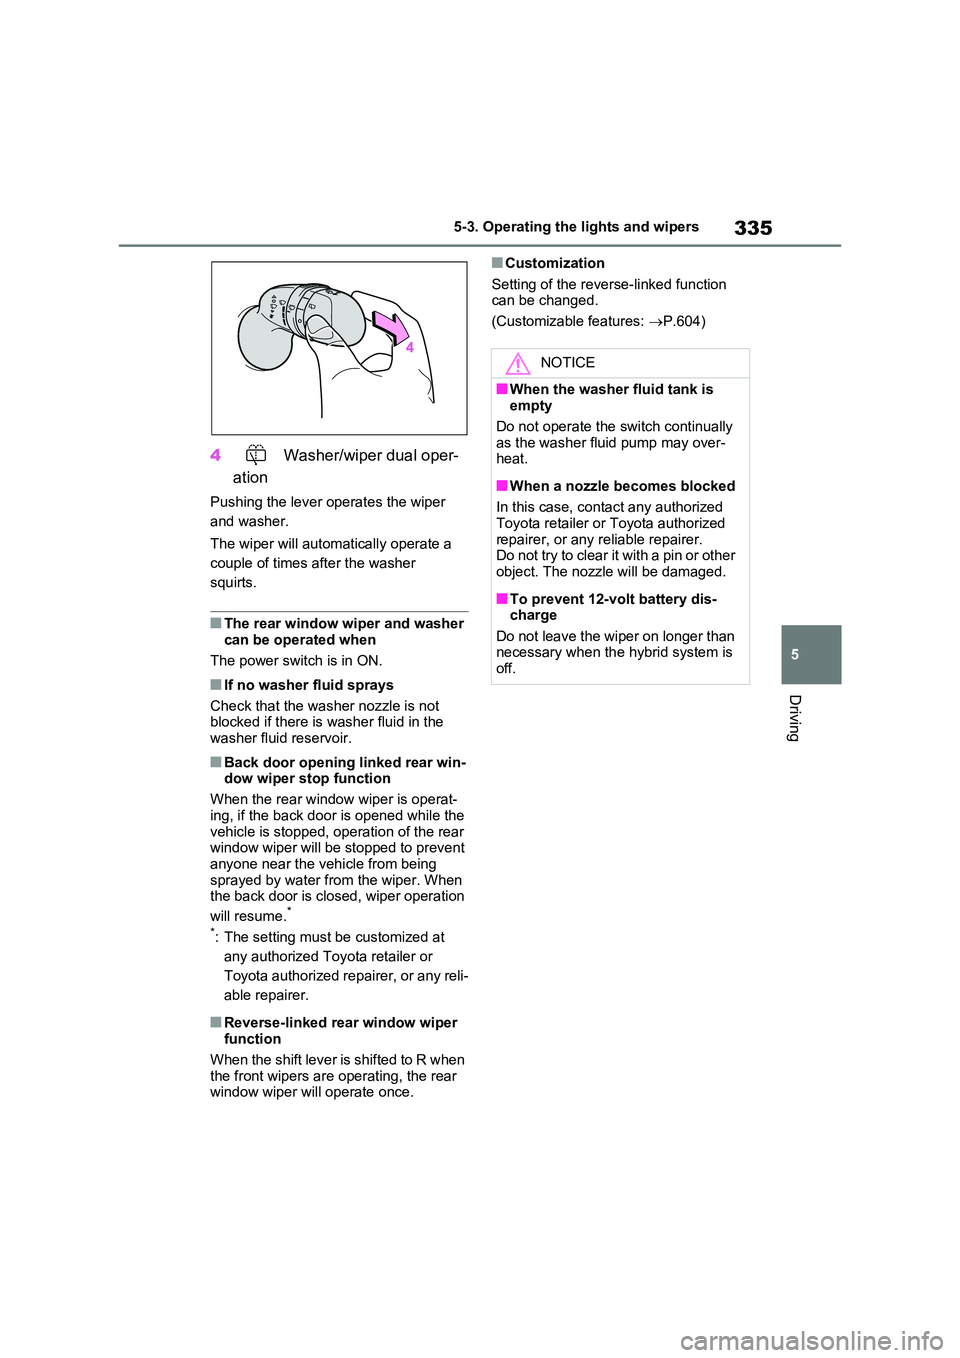
4 Washer/wiper dual oper-
ation
Pushing the lever operates the wiper
and washer.
The wiper will automatically operate a
couple of times after the washer
squirts.
■The rear window wiper and washer can be operated when
The power switch is in ON.
■If no washer fluid sprays
Check that the washer nozzle is not blocked if there is washer fluid in the
washer fluid reservoir.
■Back door opening linked rear win- dow wiper stop function
When the rear window wiper is operat-
ing, if the back door is opened while the vehicle is stopped, operation of the rear window wiper will be stopped to prevent
anyone near the vehicle from being sprayed by water from the wiper. When the back door is closed, wiper operation
will resume.*
*: The setting must be customized at
any authorized Toyota retailer or
Toyota authorized repairer, or any reli-
able repairer.
■Reverse-linked rear window wiper function
When the shift lever is shifted to R when
the front wipers are operating, the rear window wiper will operate once.
■Customization
Setting of the reverse-linked function can be changed.
(Customizable features: P.604)
NOTICE
■When the washer fluid tank is empty
Do not operate the switch continually
as the washer fluid pump may over- heat.
■When a nozzle becomes blocked
In this case, contact any authorized Toyota retailer or Toyota authorized
repairer, or any reliable repairer. Do not try to clear it with a pin or other object. The nozzle will be damaged.
■To prevent 12-volt battery dis-charge
Do not leave the wiper on longer than necessary when the hybrid system is off.
Page 338 of 718
3365-4. Refueling
5-4.Refuelin g
Close all the doors and windows,
and turn the power switch to
OFF.
Confirm the type of fuel.
■Fuel types
P.592
■Fuel tank opening for unleaded gasoline
To help prevent incorrect fueling, your vehicle has a fuel tank opening that only accommodates the special nozzle on
unleaded fuel pumps.
Opening the fuel tank
cap
Perform the following steps to
open the fuel tank cap:
Before refueling the vehicle
WARNING
■When refueling the vehicle
Observe the following precautions
while refueling the vehicle. Failure to do so may result in death or serious injury.
●After exiting the vehicle and before opening the fuel door, touch an unpainted metal surface to dis-
charge any static electricity. It is important to discharge static elec-tricity before refueling because
sparks resulting from static electric- ity can cause fuel vapors to ignite while refueling.
●Always hold the grips on the fuel tank cap and turn it slowly to remove it.
A whooshing sound may be heard when the fuel tank cap is loosened. Wait until the sound cannot be
heard before fully removing the cap. In hot weather, pressurized fuel may spray out of the filler neck
and cause injury.
●Do not allow anyone that has not
discharged static electricity from their body to come close to an open fuel tank.
●Do not inhale vaporized fuel.Fuel contains substances that are
harmful if inhaled.
●Do not smoke while refueling the
vehicle. Doing so may cause the fuel to ignite and cause a fire.
●Do not return to the vehicle or touch any person or object that is stati-
cally charged. This may cause static electricity to build up, result-ing in a possible ignition hazard.
■When refueling
Observe the following precautions to
prevent fuel overflowing from the fuel tank:
●Securely insert the fuel nozzle into
the fuel filler neck.
●Stop filling the tank after the fuel
nozzle automatically clicks off.
●Do not top off the fuel tank.
NOTICE
■Refueling
Do not spill fuel during refueling. Doing so may damage the vehicle,
such as causing the emission control system to operate abnormally or dam-aging fuel system components or the
vehicle’s painted surface.
Page 339 of 718
337
5
5-4. Refueling
Driving
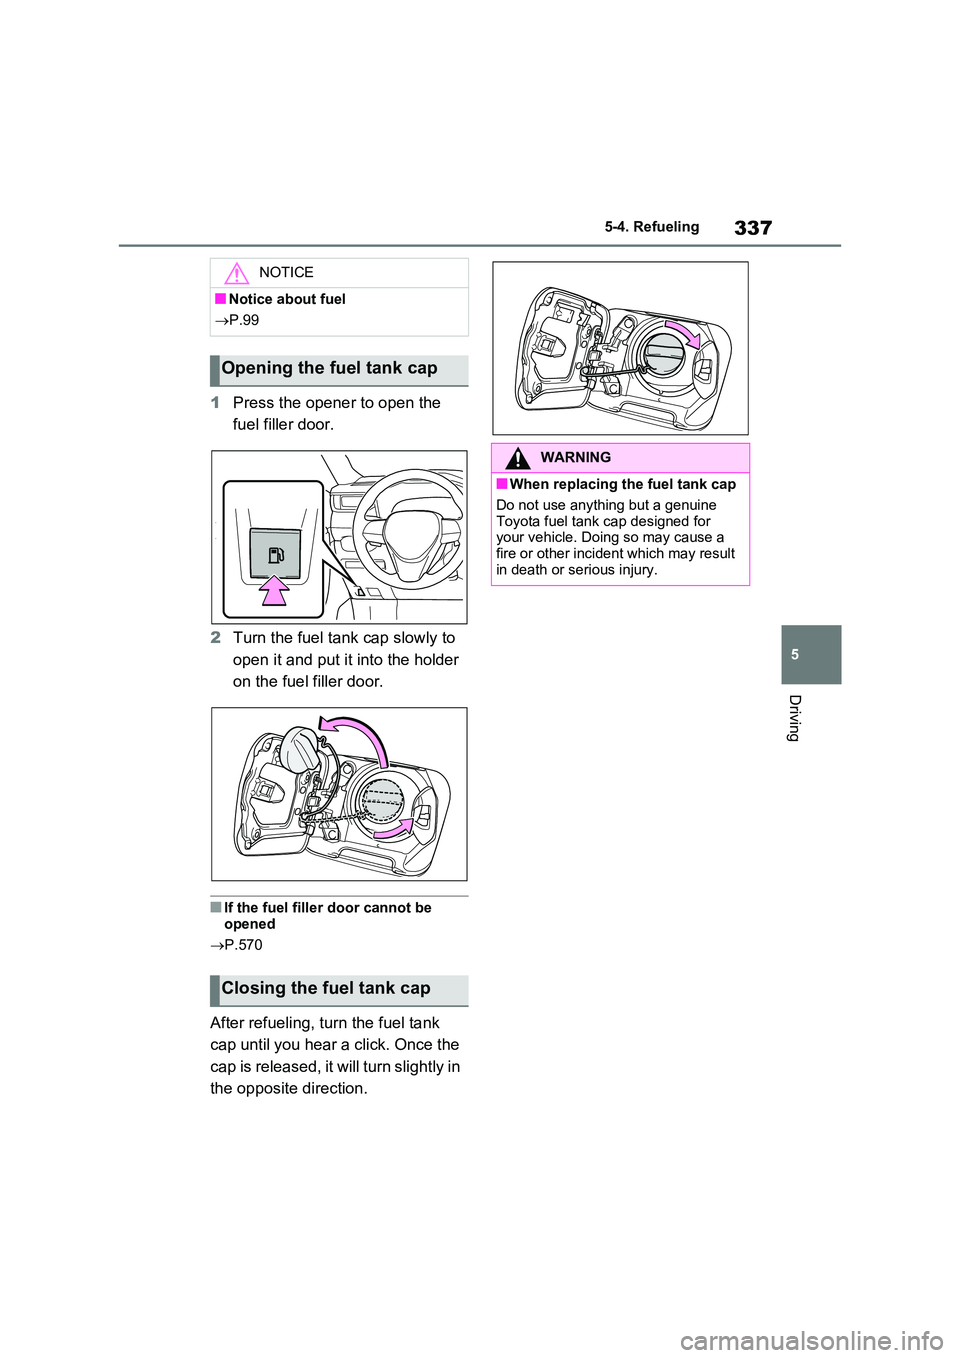
1 Press the opener to open the
fuel filler door.
2 Turn the fuel tank cap slowly to
open it and put it into the holder
on the fuel filler door.
■If the fuel filler door cannot be
opened
P.570
After refueling, turn the fuel tank
cap until you hear a click. Once the
cap is released, it will turn slightly in
the opposite direction.
NOTICE
■Notice about fuel
P.99
Opening the fuel tank cap
Closing the fuel tank cap
WARNING
■When replacing the fuel tank cap
Do not use anything but a genuine
Toyota fuel tank cap designed for your vehicle. Doing so may cause a fire or other incident which may result
in death or serious injury.
Page 340 of 718
3385-5. Using the driving support systems
5-5.Using the d riving s upport sy ste ms
*: If equipped
■PCS (Pre-Collision System)
P.343
■LTA (Lane Tracing Assist)
P.353
■AHB (Automatic High Beam)
P.328
■RSA (Road Sign Assist) (if
equipped)
P.364
■Dynamic radar cruise control
with full-speed range
P.368
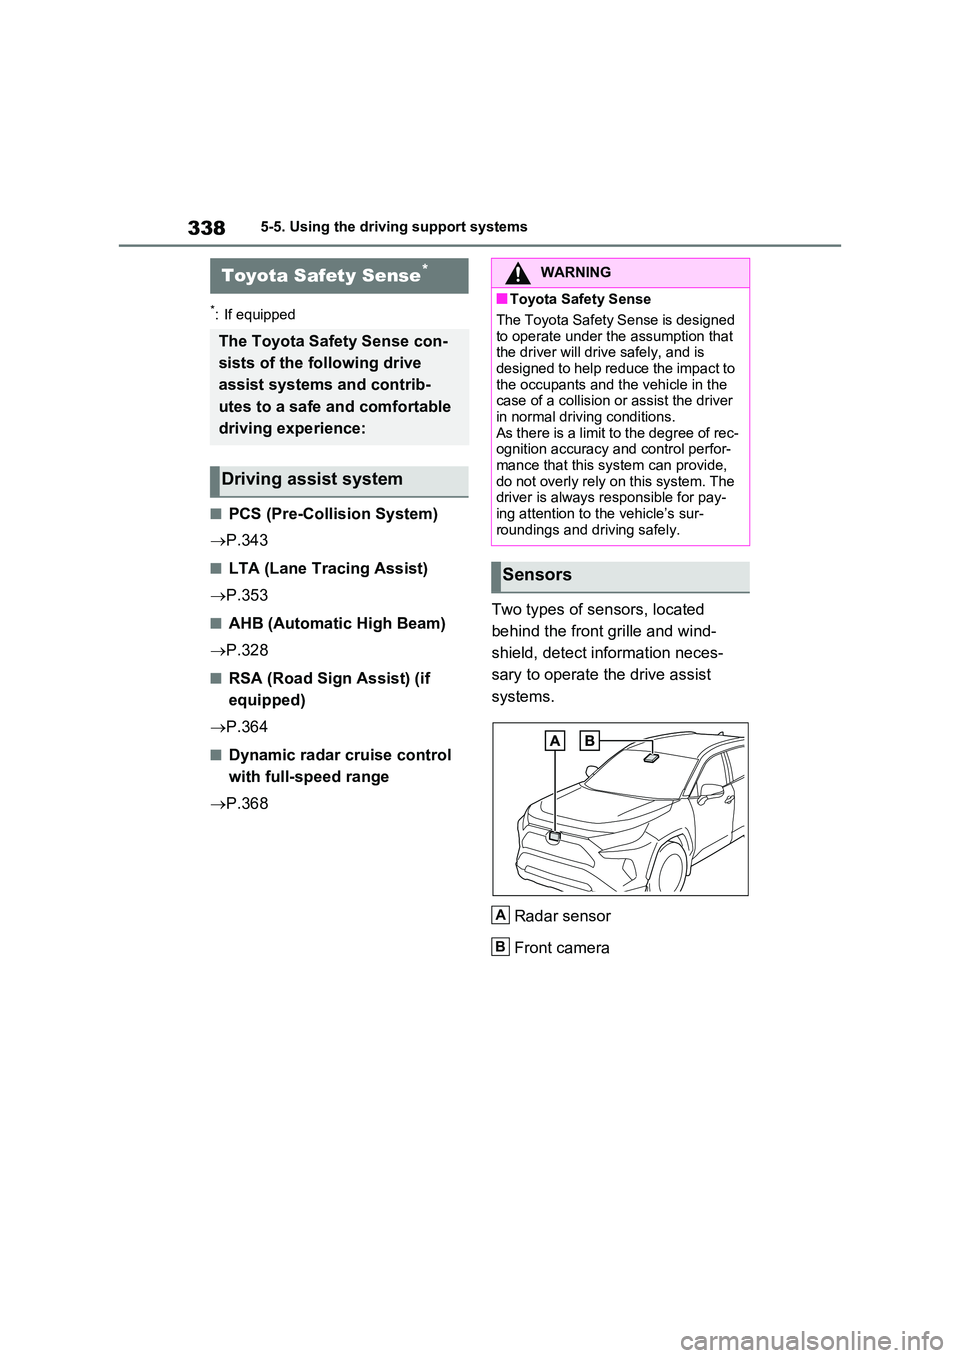
Two types of sensors, located
behind the front grille and wind-
shield, detect information neces-
sary to operate the drive assist
systems.
Radar sensor
Front camera
Toyota Safety Sense*
The Toyota Safety Sense con-
sists of the following drive
assist systems and contrib-
utes to a safe and comfortable
driving experience:
Driving assist system
WARNING
■Toyota Safety Sense
The Toyota Safety Sense is designed
to operate under the assumption that the driver will drive safely, and is designed to help reduce the impact to
the occupants and the vehicle in the case of a collision or assist the driver in normal driving conditions.
As there is a limit to the degree of rec- ognition accuracy and control perfor-mance that this system can provide,
do not overly rely on this system. The driver is always responsible for pay-ing attention to the vehicle’s sur-
roundings and driving safely.
Sensors
A
B