TOYOTA SIENNA 2007 Service Repair Manual
SIENNA 2007
TOYOTA
TOYOTA
https://www.carmanualsonline.info/img/14/57466/w960_57466-0.png
TOYOTA SIENNA 2007 Service Repair Manual
Trending: parking brake, brake fluid, rear view mirror, maintenance, roof, OBD port, coolant reservoir
Page 1201 of 3000
2GR-FE EMISSION CONTROL – HEATED OXYGEN SENSOR (for 2WD)EC–33
EC
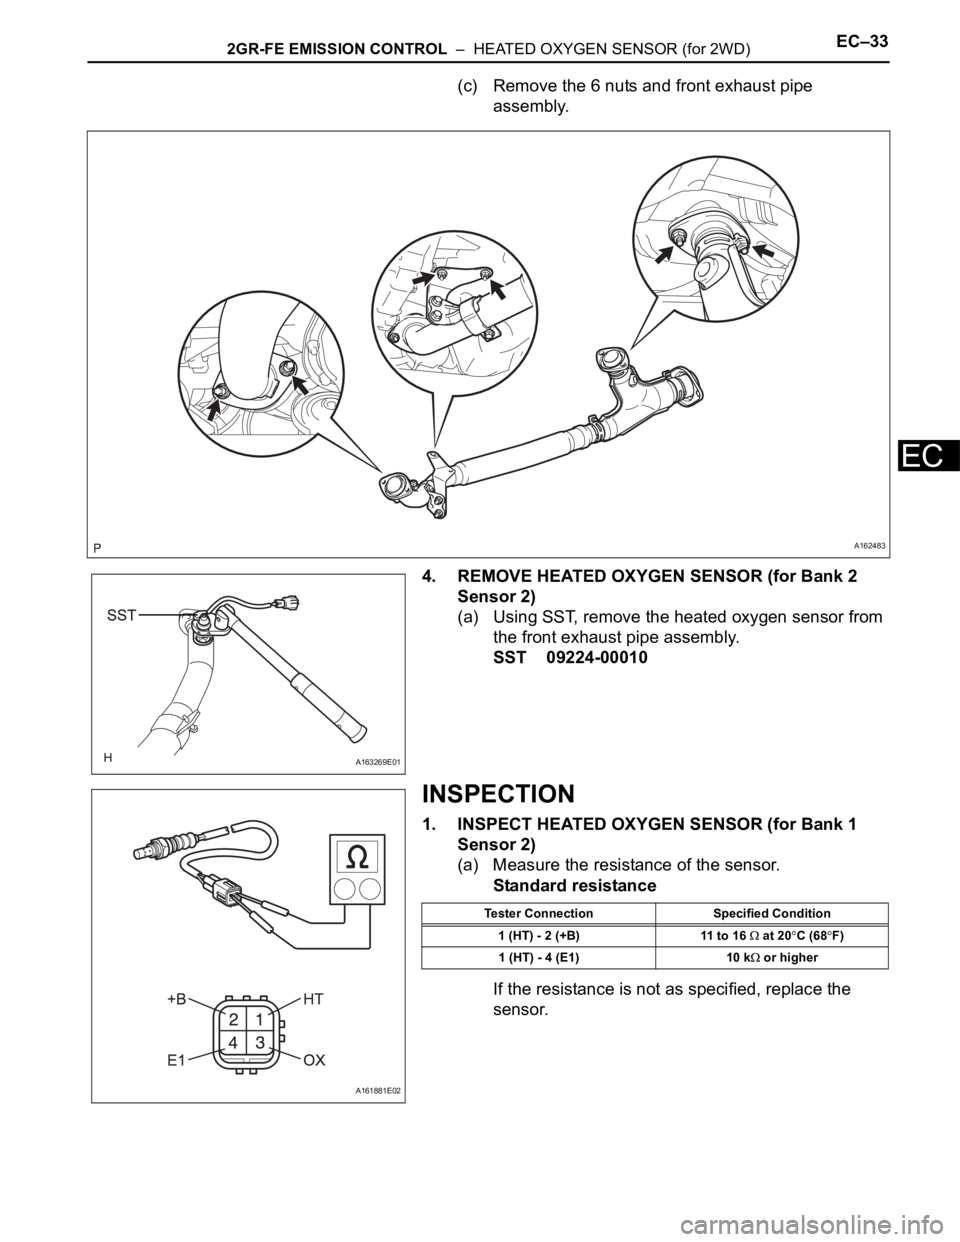
(c) Remove the 6 nuts and front exhaust pipe
assembly.
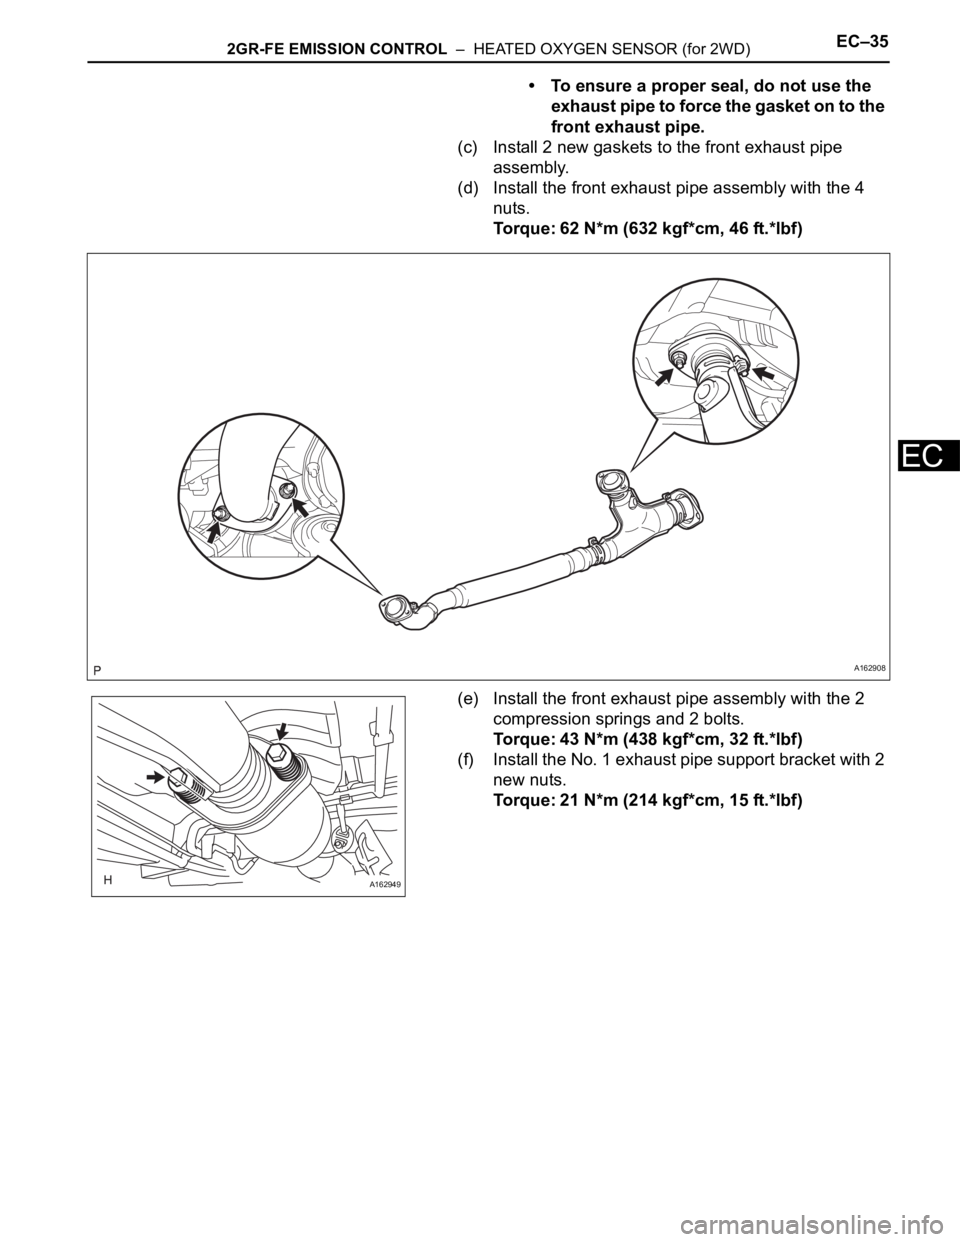
4. REMOVE HEATED OXYGEN SENSOR (for Bank 2
Sensor 2)
(a) Using SST, remove the heated oxygen sensor from
the front exhaust pipe assembly.
SST 09224-00010
INSPECTION
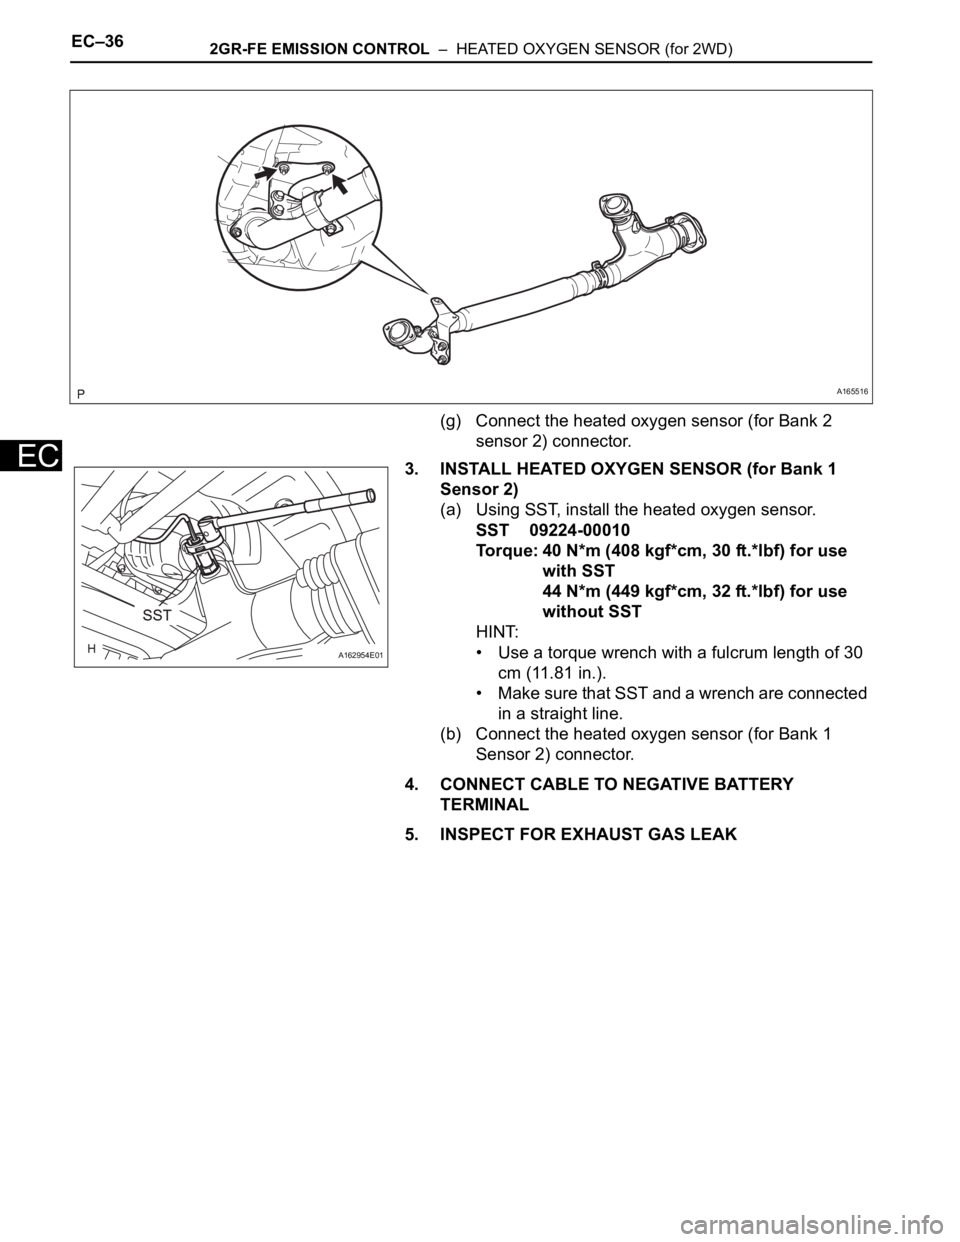
1. INSPECT HEATED OXYGEN SENSOR (for Bank 1
Sensor 2)
(a) Measure the resistance of the sensor.
Standard resistance
If the resistance is not as specified, replace the
sensor.
A162483
A163269E01
A161881E02
Tester Connection Specified Condition
1 (HT) - 2 (+B) 11 to 16
at 20C (68F)
1 (HT) - 4 (E1) 10 k
or higher
Page 1202 of 3000
EC–342GR-FE EMISSION CONTROL – HEATED OXYGEN SENSOR (for 2WD)
EC
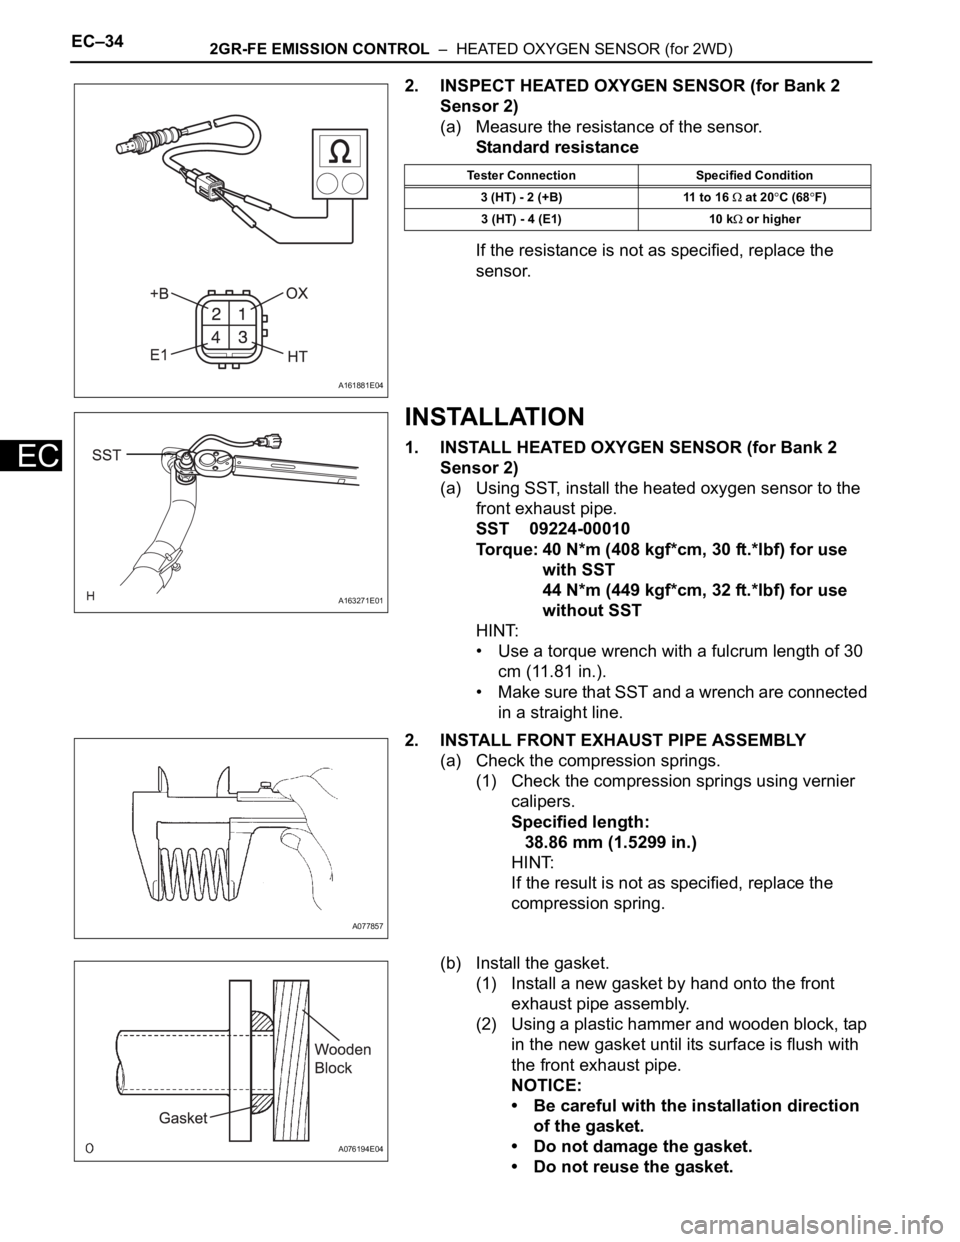
2. INSPECT HEATED OXYGEN SENSOR (for Bank 2
Sensor 2)
(a) Measure the resistance of the sensor.
Standard resistance
If the resistance is not as specified, replace the
sensor.
INSTALLATION
1. INSTALL HEATED OXYGEN SENSOR (for Bank 2
Sensor 2)
(a) Using SST, install the heated oxygen sensor to the
front exhaust pipe.
SST 09224-00010
Torque: 40 N*m (408 kgf*cm, 30 ft.*lbf) for use
with SST
44 N*m (449 kgf*cm, 32 ft.*lbf) for use
without SST
HINT:
• Use a torque wrench with a fulcrum length of 30
cm (11.81 in.).
• Make sure that SST and a wrench are connected
in a straight line.
2. INSTALL FRONT EXHAUST PIPE ASSEMBLY
(a) Check the compression springs.
(1) Check the compression springs using vernier
calipers.
Specified length:
38.86 mm (1.5299 in.)
HINT:
If the result is not as specified, replace the
compression spring.
(b) Install the gasket.
(1) Install a new gasket by hand onto the front
exhaust pipe assembly.
(2) Using a plastic hammer and wooden block, tap
in the new gasket until its surface is flush with
the front exhaust pipe.
NOTICE:
• Be careful with the installation direction
of the gasket.
• Do not damage the gasket.
• Do not reuse the gasket.
A161881E04
Tester Connection Specified Condition
3 (HT) - 2 (+B) 11 to 16
at 20C (68F)
3 (HT) - 4 (E1) 10 k
or higher
A163271E01
A077857
A076194E04
Page 1203 of 3000
2GR-FE EMISSION CONTROL – HEATED OXYGEN SENSOR (for 2WD)EC–35
EC
• To ensure a proper seal, do not use the
exhaust pipe to force the gasket on to the
front exhaust pipe.
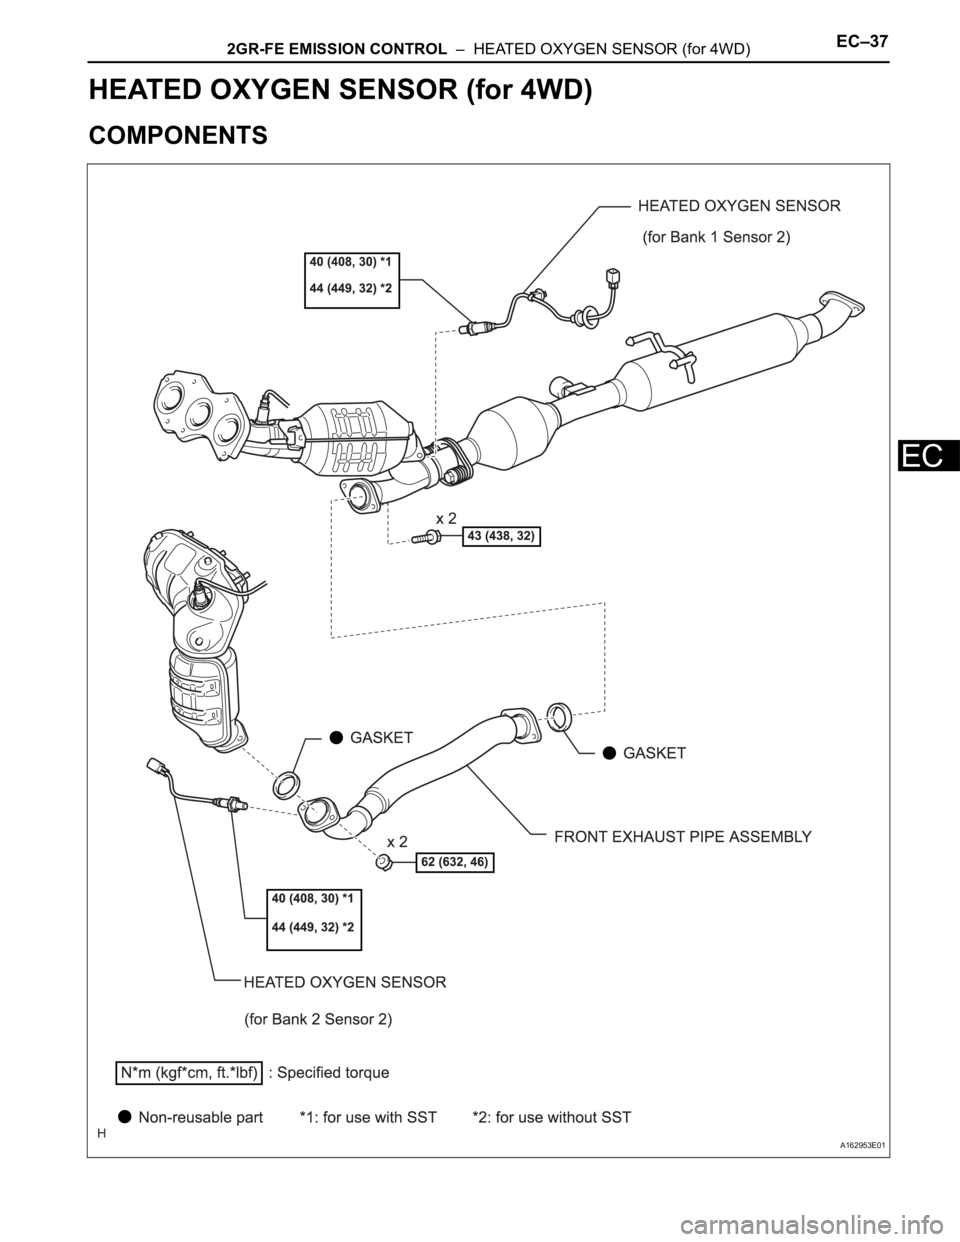
(c) Install 2 new gaskets to the front exhaust pipe
assembly.
(d) Install the front exhaust pipe assembly with the 4
nuts.
Torque: 62 N*m (632 kgf*cm, 46 ft.*lbf)
(e) Install the front exhaust pipe assembly with the 2
compression springs and 2 bolts.
Torque: 43 N*m (438 kgf*cm, 32 ft.*lbf)
(f) Install the No. 1 exhaust pipe support bracket with 2
new nuts.
Torque: 21 N*m (214 kgf*cm, 15 ft.*lbf)
A162908
A162949
Page 1204 of 3000
EC–362GR-FE EMISSION CONTROL – HEATED OXYGEN SENSOR (for 2WD)
EC
(g) Connect the heated oxygen sensor (for Bank 2
sensor 2) connector.
3. INSTALL HEATED OXYGEN SENSOR (for Bank 1
Sensor 2)
(a) Using SST, install the heated oxygen sensor.
SST 09224-00010
Torque: 40 N*m (408 kgf*cm, 30 ft.*lbf) for use
with SST
44 N*m (449 kgf*cm, 32 ft.*lbf) for use
without SST
HINT:
• Use a torque wrench with a fulcrum length of 30
cm (11.81 in.).
• Make sure that SST and a wrench are connected
in a straight line.
(b) Connect the heated oxygen sensor (for Bank 1
Sensor 2) connector.
4. CONNECT CABLE TO NEGATIVE BATTERY
TERMINAL
5. INSPECT FOR EXHAUST GAS LEAK
A165516
A162954E01
Page 1205 of 3000
2GR-FE EMISSION CONTROL – HEATED OXYGEN SENSOR (for 4WD)EC–37
EC
ENGINE
2GR-FE EMISSION CONTROL
HEATED OXYGEN SENSOR (for 4WD)
COMPONENTS
A162953E01
Page 1206 of 3000
EC–382GR-FE EMISSION CONTROL – HEATED OXYGEN SENSOR (for 4WD)
EC
REMOVAL
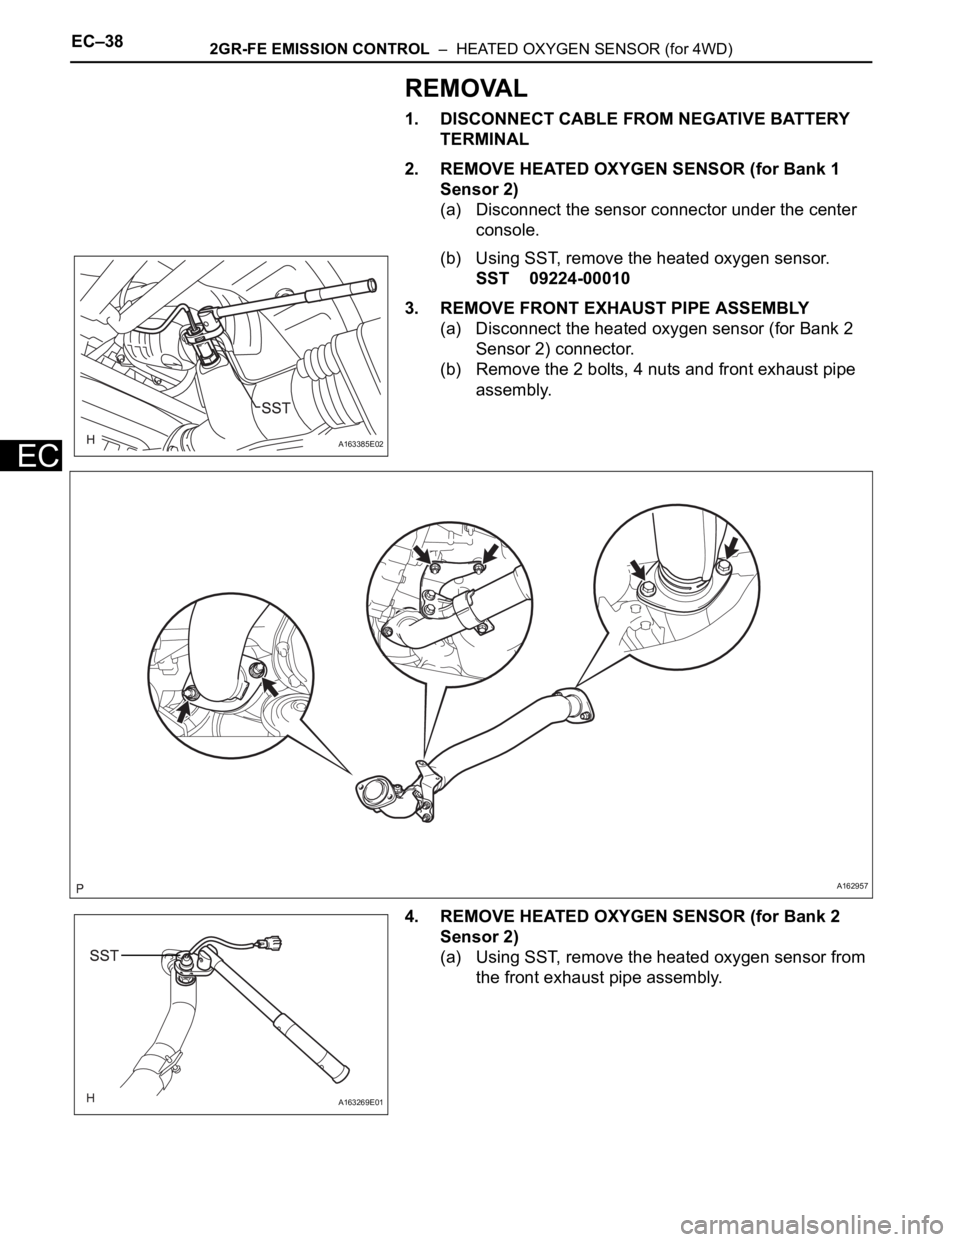
1. DISCONNECT CABLE FROM NEGATIVE BATTERY
TERMINAL
2. REMOVE HEATED OXYGEN SENSOR (for Bank 1
Sensor 2)
(a) Disconnect the sensor connector under the center
console.
(b) Using SST, remove the heated oxygen sensor.
SST 09224-00010
3. REMOVE FRONT EXHAUST PIPE ASSEMBLY
(a) Disconnect the heated oxygen sensor (for Bank 2
Sensor 2) connector.
(b) Remove the 2 bolts, 4 nuts and front exhaust pipe
assembly.
4. REMOVE HEATED OXYGEN SENSOR (for Bank 2
Sensor 2)
(a) Using SST, remove the heated oxygen sensor from
the front exhaust pipe assembly.
A163385E02
A162957
A163269E01
Page 1207 of 3000
2GR-FE EMISSION CONTROL – HEATED OXYGEN SENSOR (for 4WD)EC–39
EC
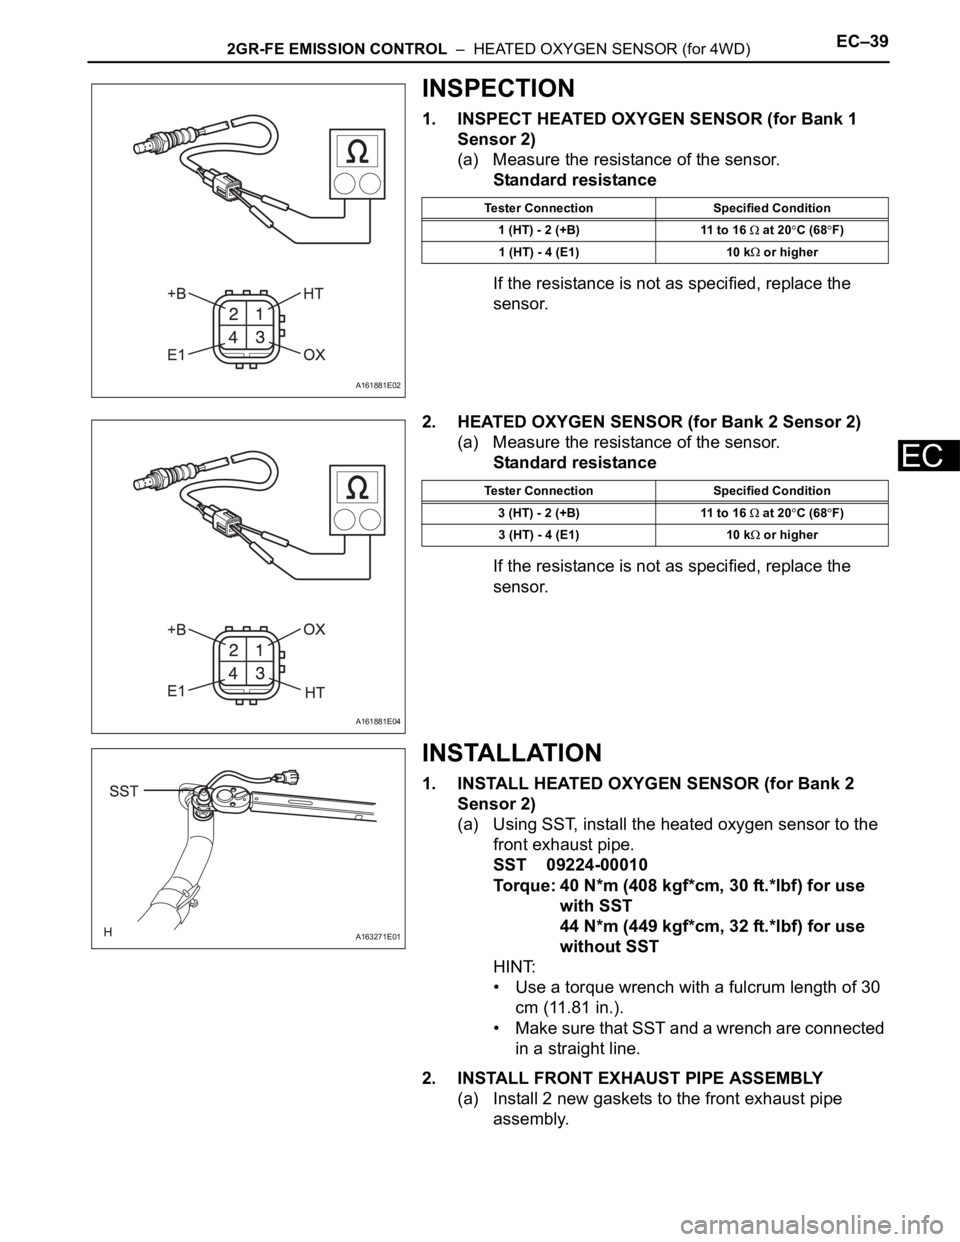
INSPECTION
1. INSPECT HEATED OXYGEN SENSOR (for Bank 1
Sensor 2)
(a) Measure the resistance of the sensor.
Standard resistance
If the resistance is not as specified, replace the
sensor.
2. HEATED OXYGEN SENSOR (for Bank 2 Sensor 2)
(a) Measure the resistance of the sensor.
Standard resistance
If the resistance is not as specified, replace the
sensor.
INSTALLATION
1. INSTALL HEATED OXYGEN SENSOR (for Bank 2
Sensor 2)
(a) Using SST, install the heated oxygen sensor to the
front exhaust pipe.
SST 09224-00010
Torque: 40 N*m (408 kgf*cm, 30 ft.*lbf) for use
with SST
44 N*m (449 kgf*cm, 32 ft.*lbf) for use
without SST
HINT:
• Use a torque wrench with a fulcrum length of 30
cm (11.81 in.).
• Make sure that SST and a wrench are connected
in a straight line.
2. INSTALL FRONT EXHAUST PIPE ASSEMBLY
(a) Install 2 new gaskets to the front exhaust pipe
assembly.
A161881E02
Tester Connection Specified Condition
1 (HT) - 2 (+B) 11 to 16
at 20C (68F)
1 (HT) - 4 (E1) 10 k
or higher
A161881E04
Tester Connection Specified Condition
3 (HT) - 2 (+B) 11 to 16
at 20C (68F)
3 (HT) - 4 (E1) 10 k
or higher
A163271E01
Page 1208 of 3000
EC–402GR-FE EMISSION CONTROL – HEATED OXYGEN SENSOR (for 4WD)
EC
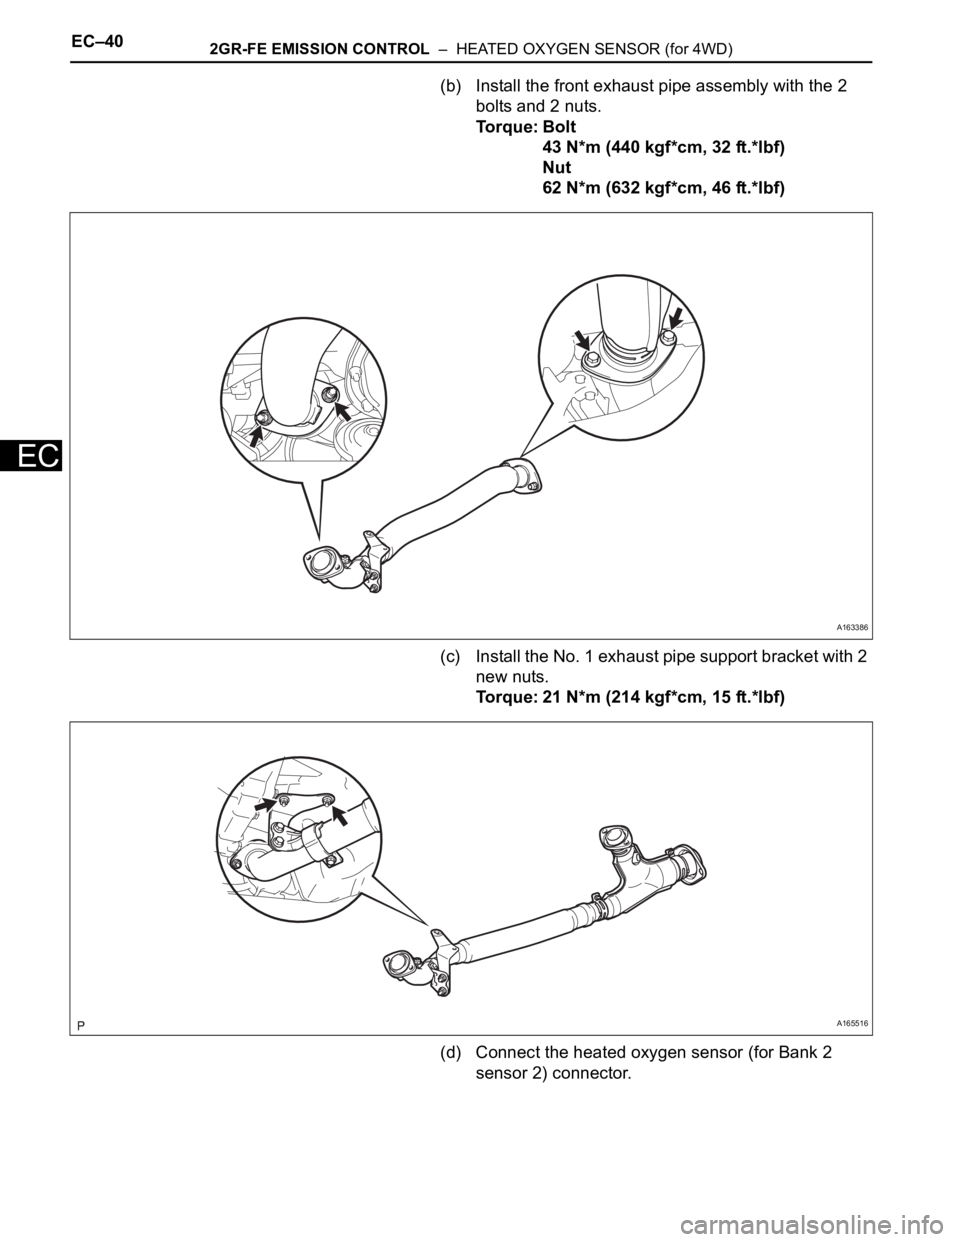
(b) Install the front exhaust pipe assembly with the 2
bolts and 2 nuts.
Torque: Bolt
43 N*m (440 kgf*cm, 32 ft.*lbf)
Nut
62 N*m (632 kgf*cm, 46 ft.*lbf)
(c) Install the No. 1 exhaust pipe support bracket with 2
new nuts.
Torque: 21 N*m (214 kgf*cm, 15 ft.*lbf)
(d) Connect the heated oxygen sensor (for Bank 2
sensor 2) connector.
A163386
A165516
Page 1209 of 3000
2GR-FE EMISSION CONTROL – HEATED OXYGEN SENSOR (for 4WD)EC–41
EC
3. INSTALL HEATED OXYGEN SENSOR (for Bank 1
Sensor 2)
(a) Using SST, install the heated oxygen sensor.
SST 09224-00010
Torque: 40 N*m (408 kgf*cm, 30 ft.*lbf) for use
with SST
44 N*m (449 kgf*cm, 32 ft.*lbf) for use
without SST
(b) Connect the heated oxygen sensor (for Bank 1
Sensor 2) connector.
HINT:
• Use a torque wrench with a fulcrum length of 30
cm (11.81 in.).
• Make sure that SST and a wrench are connected
in a straight line.
4. CONNECT CABLE TO NEGATIVE BATTERY
TERMINAL
5. INSPECT FOR EXHAUST GAS LEAK
A163385E01
Page 1210 of 3000
EC–422GR-FE EMISSION CONTROL – FUEL TANK CAP
EC
FUEL TANK CAP
INSPECTION
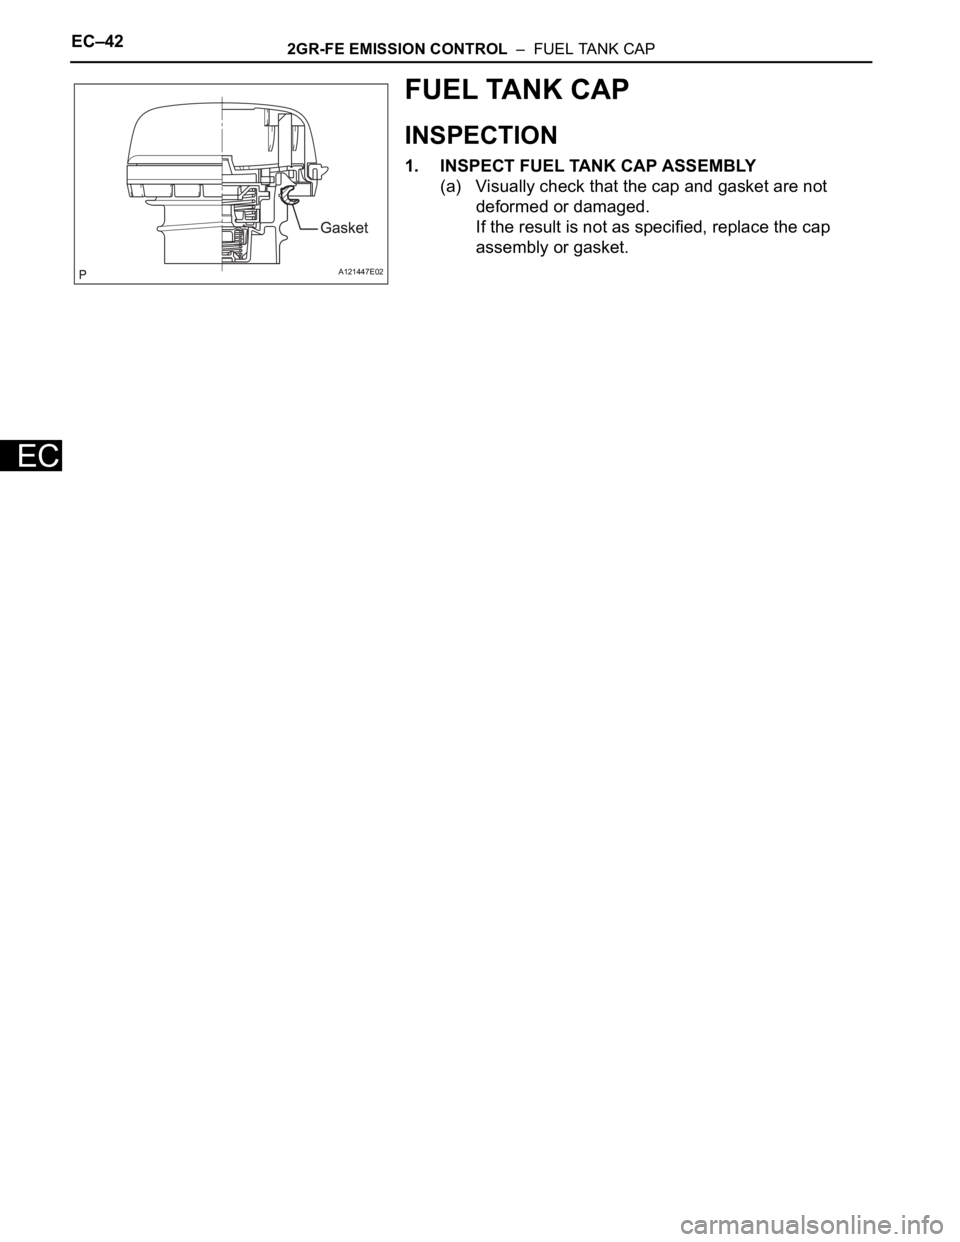
1. INSPECT FUEL TANK CAP ASSEMBLY
(a) Visually check that the cap and gasket are not
deformed or damaged.
If the result is not as specified, replace the cap
assembly or gasket.
A121447E02
Trending: headrest, remote control, fuel cap, display, navigation update, transmission filter, engine overheat
