TOYOTA TACOMA 2009 Owners Manual (in English)
Manufacturer: TOYOTA, Model Year: 2009, Model line: TACOMA, Model: TOYOTA TACOMA 2009Pages: 520, PDF Size: 10.75 MB
Page 121 of 520
121
1-7. Safety information
1
Before driving
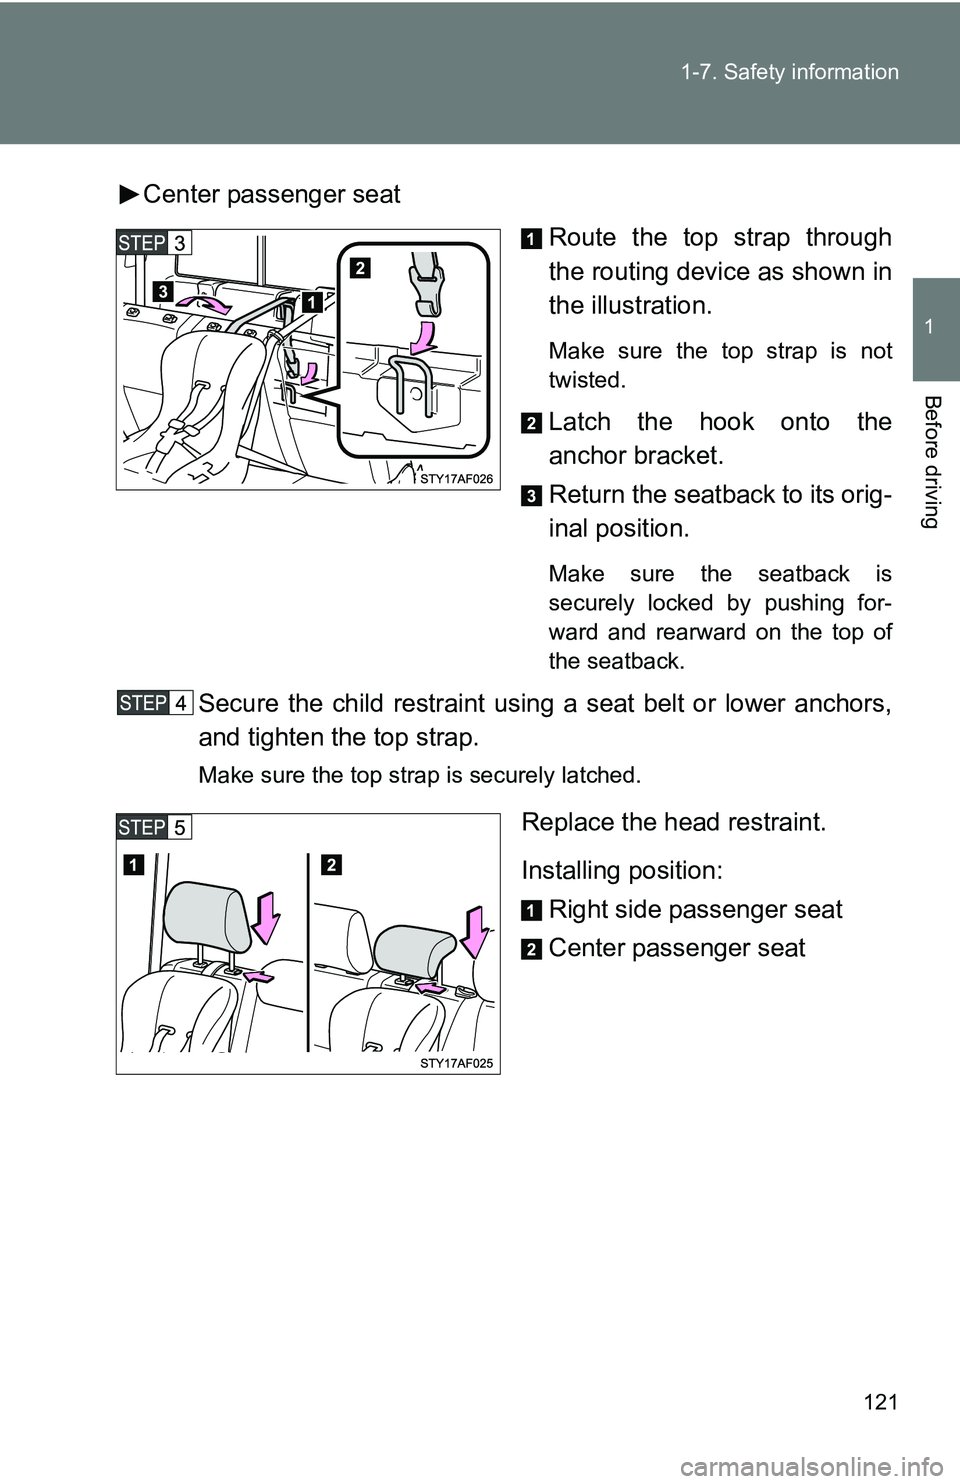
Center passenger seat
Route the top strap through
the routing device as shown in
the illustration.
Make sure the top strap is not
twisted.
Latch the hook onto the
anchor bracket.
Return the seatback to its orig-
inal position.
Make sure the seatback is
securely locked by pushing for-
ward and rearward on the top of
the seatback.
Secure the child restraint using a seat belt or lower anchors,
and tighten the top strap.
Make sure the top strap is securely latched.
Replace the head restraint.
Installing position:Right side passenger seat
Center passenger seat
Page 122 of 520
122 1-7. Safety information
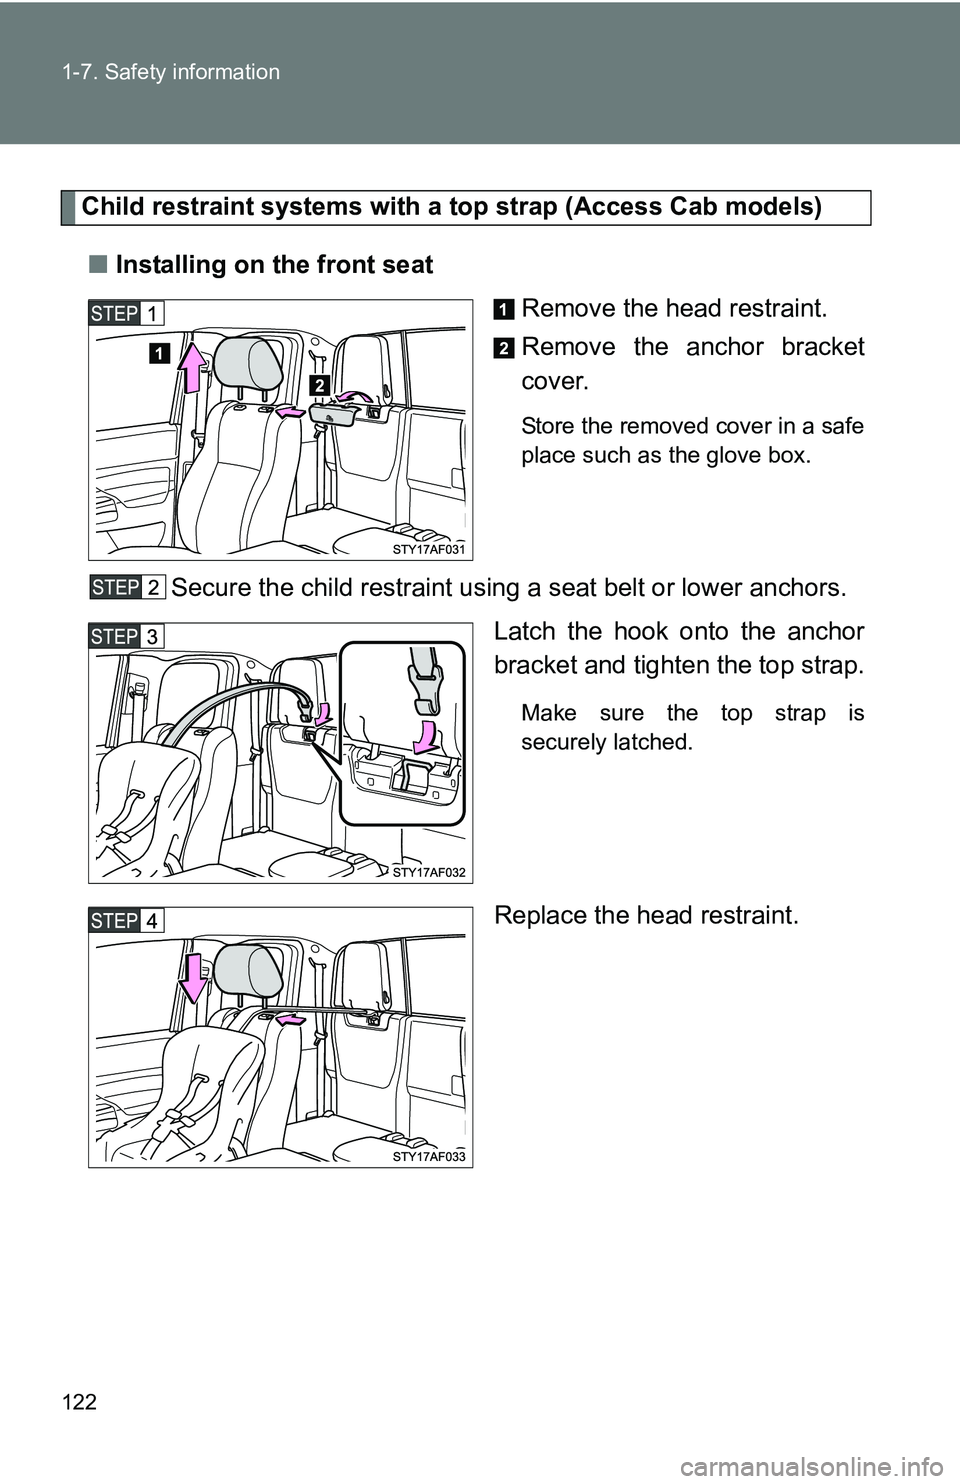
Child restraint systems with a top strap (Access Cab models)■ Installing on the front seat
Remove the head restraint.
Remove the anchor bracket
cover.
Store the removed cover in a safe
place such as the glove box.
Secure the child restraint using a seat belt or lower anchors.Latch the hook onto the anchor
bracket and tighten the top strap.
Make sure the top strap is
securely latched.
Replace the head restraint.
Page 123 of 520
123
1-7. Safety information
1
Before driving
■
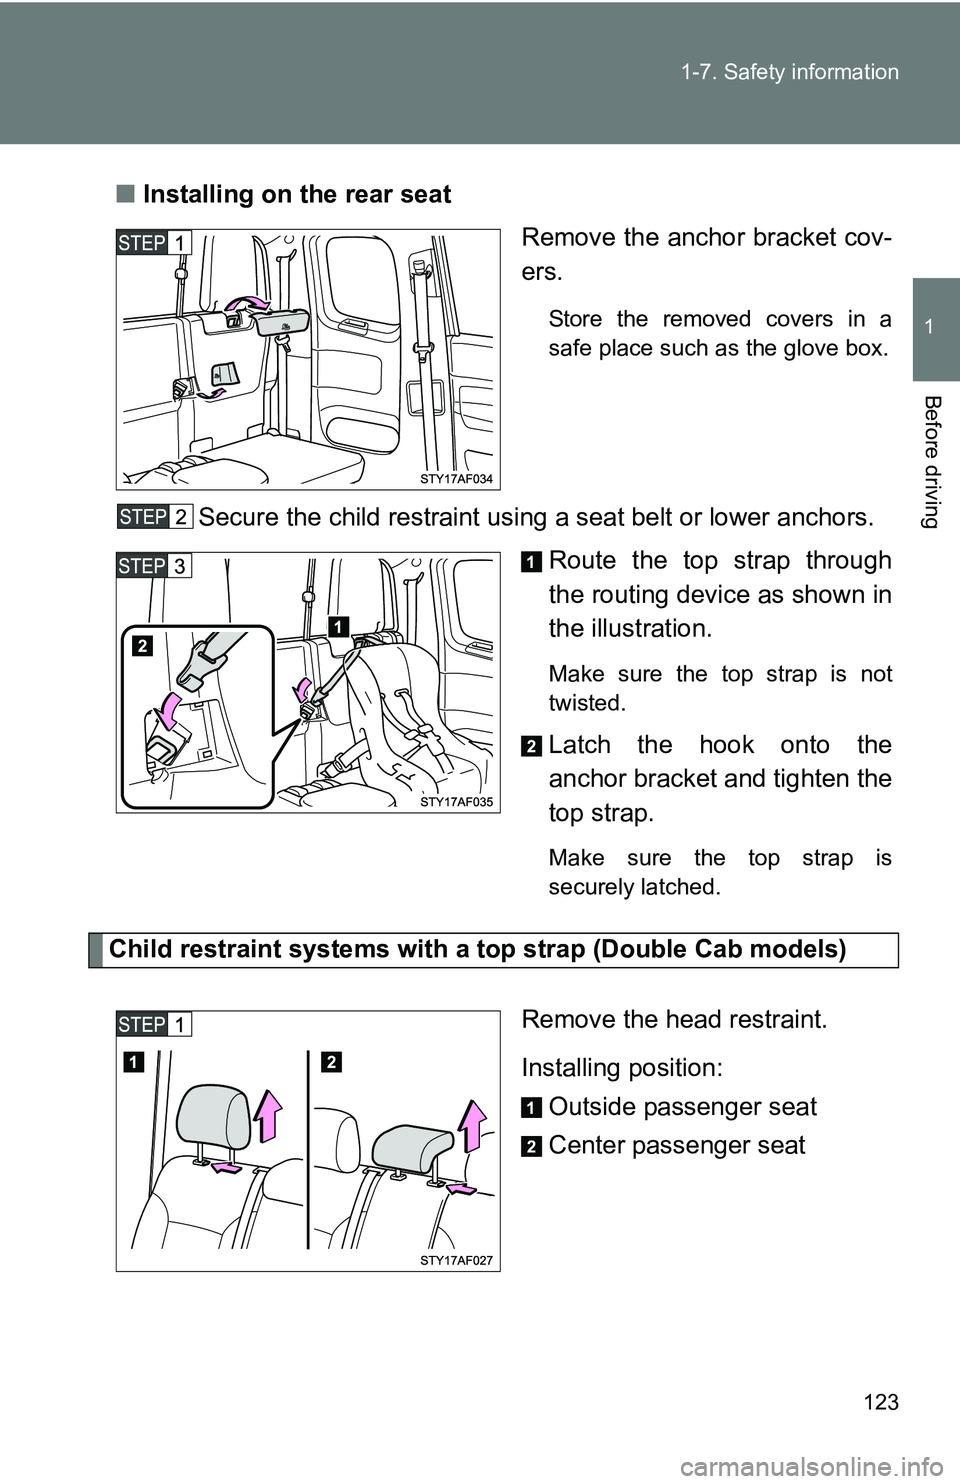
Installing on the rear seat
Remove the anchor bracket cov-
ers.
Store the removed covers in a
safe place such as the glove box.
Secure the child restraint using a seat belt or lower anchors.Route the top strap through
the routing device as shown in
the illustration.
Make sure the top strap is not
twisted.
Latch the hook onto the
anchor bracket and tighten the
top strap.
Make sure the top strap is
securely latched.
Child restraint systems with a top strap (Double Cab models)
Remove the head restraint.
Installing position:Outside passenger seat
Center passenger seat
Page 124 of 520
124 1-7. Safety information
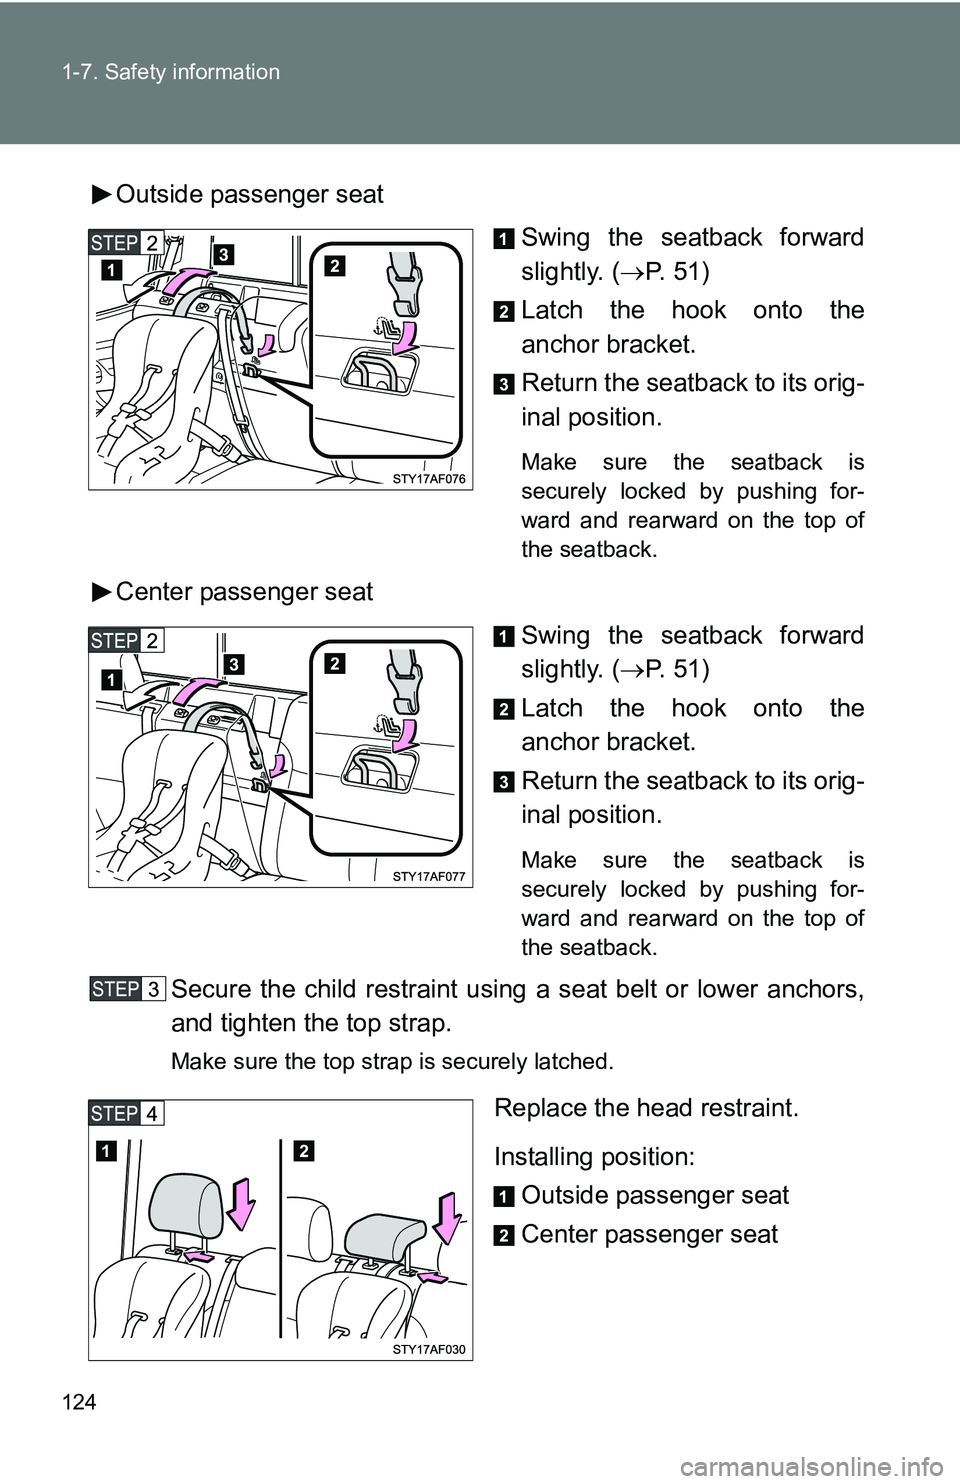
Outside passenger seatSwing the seatback forward
slightly. (P. 51)
Latch the hook onto the
anchor bracket.
Return the seatback to its orig-
inal position.
Make sure the seatback is
securely locked by pushing for-
ward and rearward on the top of
the seatback.
Center passenger seat
Swing the seatback forward
slightly. (P. 51)
Latch the hook onto the
anchor bracket.
Return the seatback to its orig-
inal position.
Make sure the seatback is
securely locked by pushing for-
ward and rearward on the top of
the seatback.
Secure the child restraint using a seat belt or lower anchors,
and tighten the top strap.
Make sure the top strap is securely latched.
Replace the head restraint.
Installing position: Outside passenger seat
Center passenger seat
Page 125 of 520
125
1-7. Safety information
1
Before driving
■
Laws and regulations pertaining to anchorages
Anchorages conform to FMVSS225 or CMVSS210.2.
Child restraint systems conforming to FMVSS213 or CMVSS213 specifica-
tions can be used.
This vehicle is designed to conform to the SAE J1819.
CAUTION
■When installing a booster seat
Do not fully extend the shoulder belt to prevent the belt from going to ALR
lock mode. ( P. 58)
● ALR mode causes the belt to tighten only which could cause injury or dis-
comfort to the child.
● Do not allow the child to play with the seat belt or the child could be killed
or seriously injured.
■ When installing a child restraint system
Follow the directions given in the child restraint system installation manual
and fix the child restraint system securely in place.
If the child restraint system is not correctly fixed in place, the child or other
passengers may be seriously injured or even killed in the event of sudden
braking or an accident.
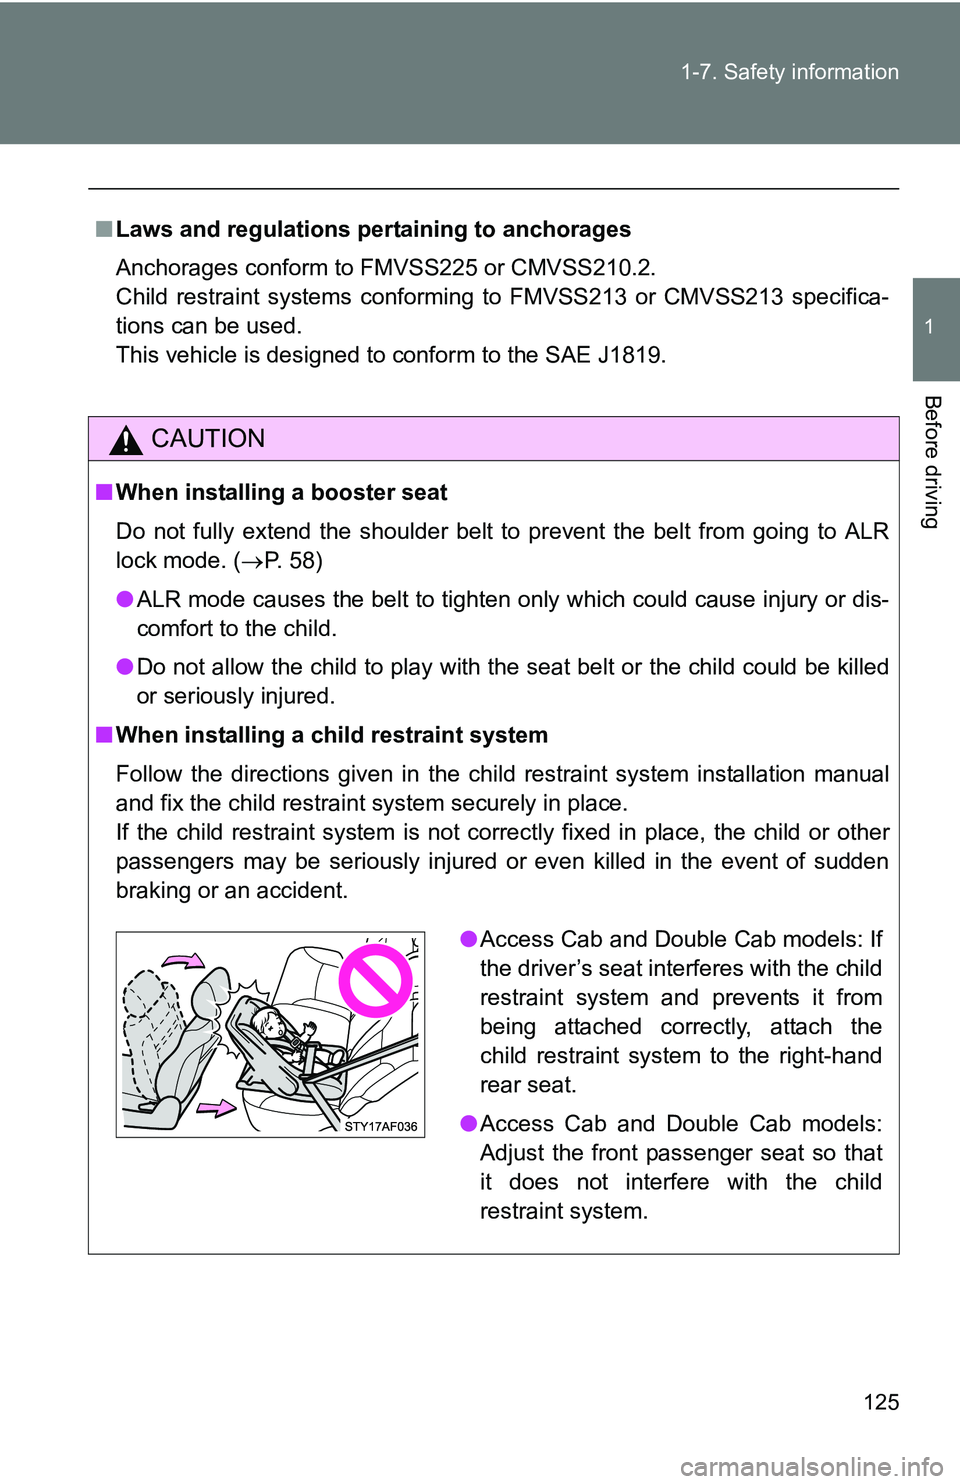
●Access Cab and Double Cab models: If
the driver’s seat interferes with the child
restraint system and prevents it from
being attached correctly, attach the
child restraint system to the right-hand
rear seat.
● Access Cab and Double Cab models:
Adjust the front passenger seat so that
it does not interfere with the child
restraint system.
Page 126 of 520
126 1-7. Safety information
CAUTION
■When installing a child restraint system
●When a booster seat is installed, always ensure that the shoulder belt is
positioned across the center of the child’s shoulder. The belt should be
kept away from the child’s neck, but not so that it could fall off the child’s
shoulder. Failing to do so may result in death or serious injury in the event
of an accident or sudden braking.
● Ensure that the belt and tab are securely locked and the seat belt is not
twisted.
● Push and pull the child restraint system in different directions to be sure it
is secure.
● Follow all installation instructions provided by the child restraint system
manufacturer.
● After securing the child restraint system, never slide or recline the seat.
■ Do not use a seat belt extender
If a seat belt extender is used when installing a child restraint system, the
seat belt will not securely hold the child restraint system, which could cause
death or serious injury to the child or other passengers in the event of a colli-
sion.
■ To correctly attach a child r estraint system to the anchorages
When using the lower anchorages, be sure that there are no foreign objects
around the anchorages and that the seat belt is not caught behind the child
restraint. Make sure the child restraint system is securely attached, or it may
cause death or serious injury to the child or other passengers in the event of
a sudden stop or accident.
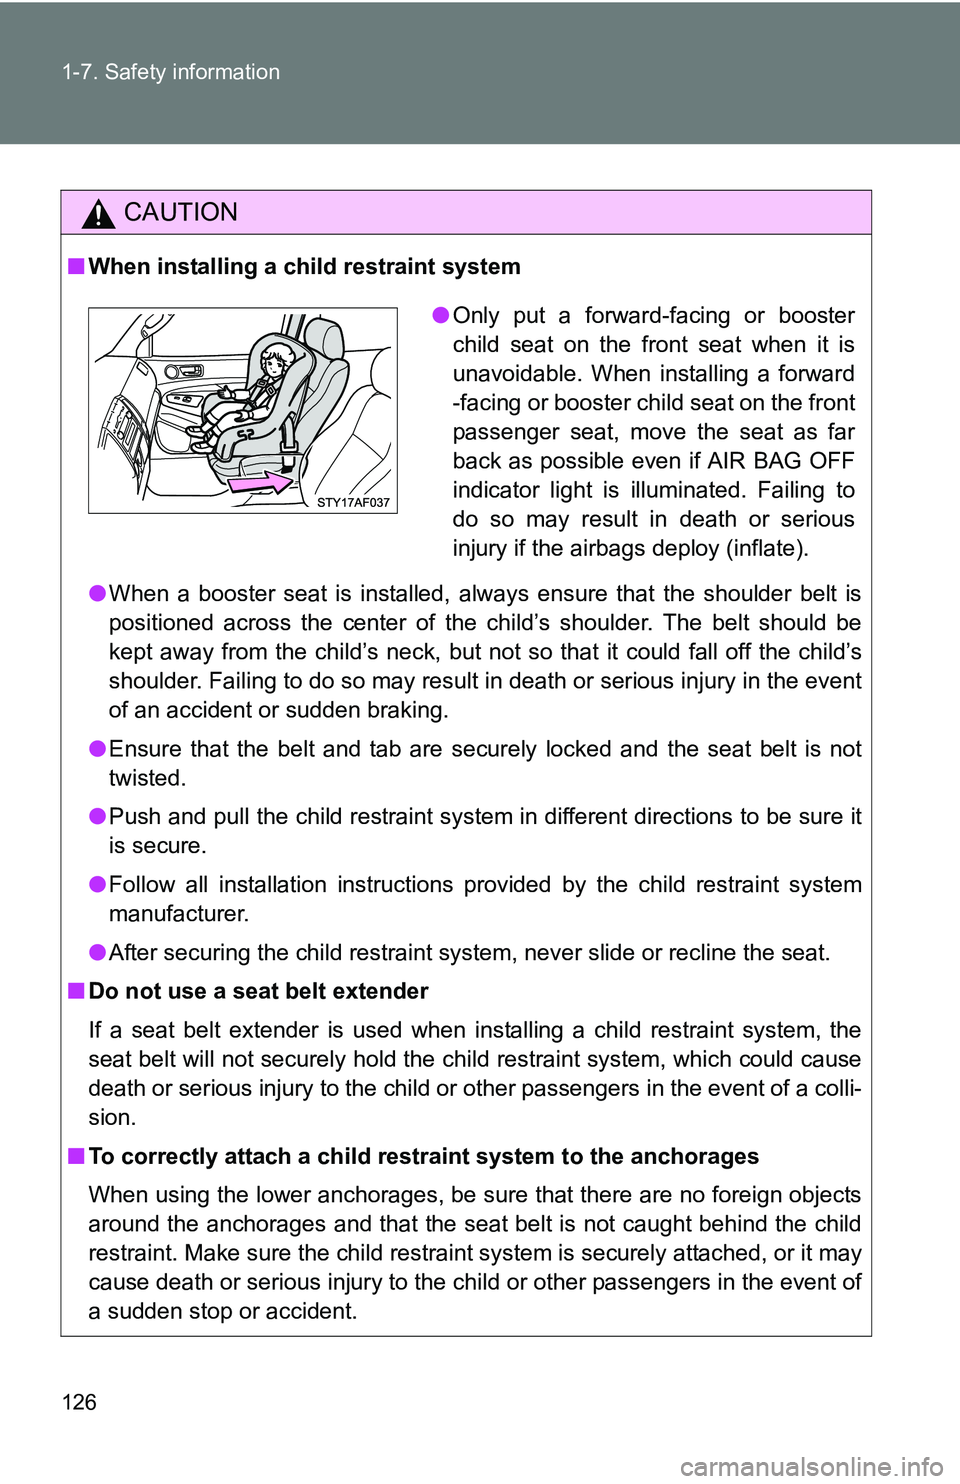
● Only put a forward-facing or booster
child seat on the front seat when it is
unavoidable. When installing a forward
-facing or booster child seat on the front
passenger seat, move the seat as far
back as possible even if AIR BAG OFF
indicator light is illuminated. Failing to
do so may result in death or serious
injury if the airbags deploy (inflate).
Page 127 of 520
When driving2
127
2-1. Driving procedures ........ 128Driving the vehicle............ 128
Engine (ignition) switch .... 138
Automatic
Transmission.... 141
Manual Transmission ....... 144
Turn signal lever .............. 147
Parking brake ................... 148
2-2. Gauges and meters........ 150 Gauges and meters ......... 150
Indicators and warning lights ............................. 153
Accessory meter .............. 156
2-3. Operating the lights and wipers ............................ 157
Headlight switch ............... 157
Fog light switch ................ 159
Windshield wipers and washer ........................... 160 2-4. Using other driving
systems ......................... 163
Cruise control ................... 163
Rear view monitor system (vehicles with auto
anti-glare inside rear
view mirror) .................... 166
Four-wheel drive system ........................... 170
Active traction control system .......................... 174
AUTO LSD system........... 176
Rear differential lock system ........................... 178
Downhill Assist Control system .......................... 181
Clutch start cancel switch ............................. 183
Driving assist systems ..... 184
2-5. Driving information ........ 190 Off-road precautions (4WD models and
PreRunner) .................... 190
Cargo and luggage .......... 195
Vehicle load limits ............ 199
Winter driving tips ............ 201
Trailer towing ................... 205
Dinghy towing .................. 218
Page 128 of 520
128
2-1. Driving procedures
Driving the vehicle
The following procedures should be observed to ensure safe driv-
ing.
■ Starting the engine
P. 138
■ Driving
Automatic transmission
With the brake pedal depressed, shift the shift lever to D. ( P. 141)
Release the parking brake. ( P. 148)
Gradually release the brake pedal and gently depress the
accelerator pedal to accelerate the vehicle.
Manual transmission With the clutch pedal fully depressed, shift the shift lever to
1. ( P. 144)
Release the parking brake. ( P. 148)
Gradually release the clutch pedal. At the same time, gently
depress the accelerator pedal to accelerate the vehicle.
■ Stopping
Automatic transmission
With the shift lever in D, depress the brake pedal.
If necessary, set the parking brake.
When the vehicle is stopped for an extended period of time, shift
the shift lever to P or N. (
P. 1 4 1)
Manual transmission
With the clutch pedal fully depressed, depress the brake
pedal.
If necessary, set the parking brake.
When the vehicle is stopped for an extended period of time, shift
the shift lever to N. ( P. 144)
Page 129 of 520
129
2-1. Driving procedures
2
When driving
Starting on a steep uphill
Automatic transmission With the brake pedal depressed, firmly set the parking brake
and shift the shift lever to D.
Gently depress the accelerator pedal.
Release the parking brake.
Manual transmission
With the parking brake firmly set and the clutch pedal fully
depressed, shift the shift lever to 1.
■Parking the vehicle
Automatic transmission
With the shift lever in D, depress the brake pedal.
Set the parking brake. ( P. 148)
Shift the shift lever to P. ( P. 141)
When parking on a hill, if necessary, block the wheels.
Turn the engine switch off to stop the engine.
Lock the door, making sure that you have the key on your
person.
Manual transmission
With the clutch pedal fully depressed, depress the brake
pedal.
Set the parking brake. ( P. 148)
Shift the shift lever to N. ( P. 144)
When parking on a hill, shift the shift lever to 1 or R. If necessary,
block the wheels.
Turn the engine switch off to stop the engine.
Lock the door, making sure that you have the key on your
person.
Page 130 of 520
130 2-1. Driving procedures
Lightly depress the accelerator pedal at the same time as
gradually releasing the clutch pedal.
Release the parking brake.
■Driving in the rain
●Drive carefully when it is raining, because visibility will be reduced, the
windows may become fogged-up, and the road will be slippery.
● Drive carefully when it starts to rain, because the road surface will be
especially slippery.
● Refrain from high speeds when driving on an expressway in the rain,
because there may be a layer of water between the tires and the road
surface, preventing the steering and brakes from operating properly.
■ Breaking in your new Toyota
To extend the life of the vehicle, the following precautions are recommended
to observe:
●For the first 200 miles (300 km):
Avoid sudden stops.
● For the first 500 miles (800 km):
Do not tow a trailer.
● For the first 1000 miles (1600 km):
• Do not drive at extremely high speeds.
• Avoid sudden acceleration.
• Do not drive continuously in the low gears.
• Do not drive slowly with the manual transmission in a high gear.
• Do not drive at a constant speed for extended periods.
■ Operating your vehicle in a foreign country
Comply with the relevant vehicle registration laws and confirm the availability
of the correct fuel. ( P. 467)
■ Normal characteristics afte r turning off the engine
Approximately five hours after the engine is turned off, you may hear sound
coming from under the vehicle for several minutes. This is the sound of a
fuel evaporation leakage check and, it does not indicate a malfunction.