TOYOTA tC 2010 Accessories, Audio & Navigation (in English)
Manufacturer: TOYOTA, Model Year: 2010, Model line: tC, Model: TOYOTA tC 2010Pages: 284, PDF Size: 32.36 MB
Page 11 of 284
10
V573_E
Page 12 of 284
11
V573_E
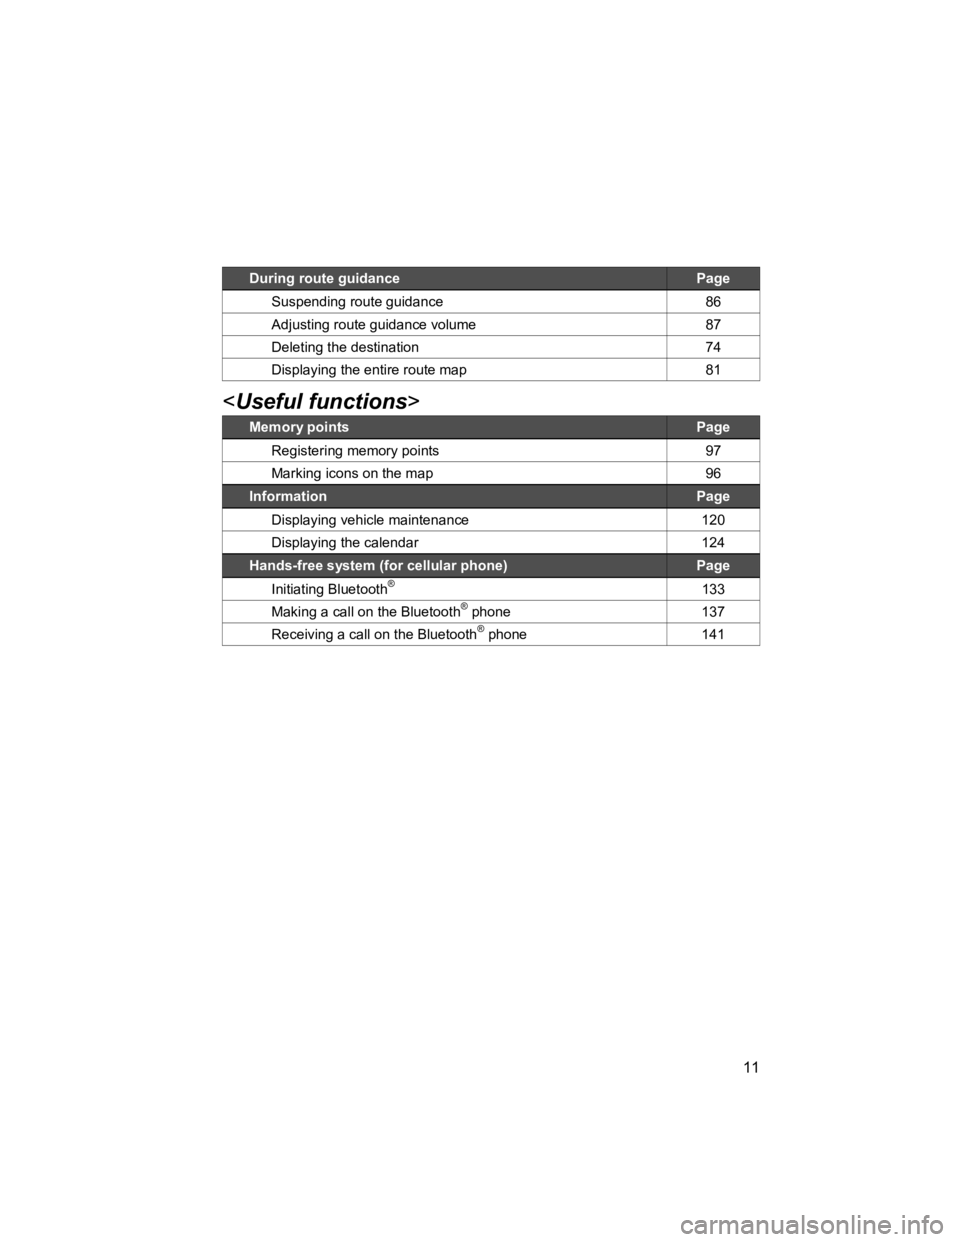
During route guidance Page
Suspending route guidance 86
Adjusting route guidance volume 87
Deleting the destination 74
Displaying the entire route map 81
Memory points Page
Registering memory points 97
Marking icons on the map 96
Information Page
Displaying vehicle maintenance 120
Displaying the calendar 124
Hands-free system (for cellular phone) Page
Initiating Bluetooth® 133
Making a call on the Bluetooth® phone 137
Receiving a call on the Bluetooth® phone 141
Page 13 of 284
12
V573_E
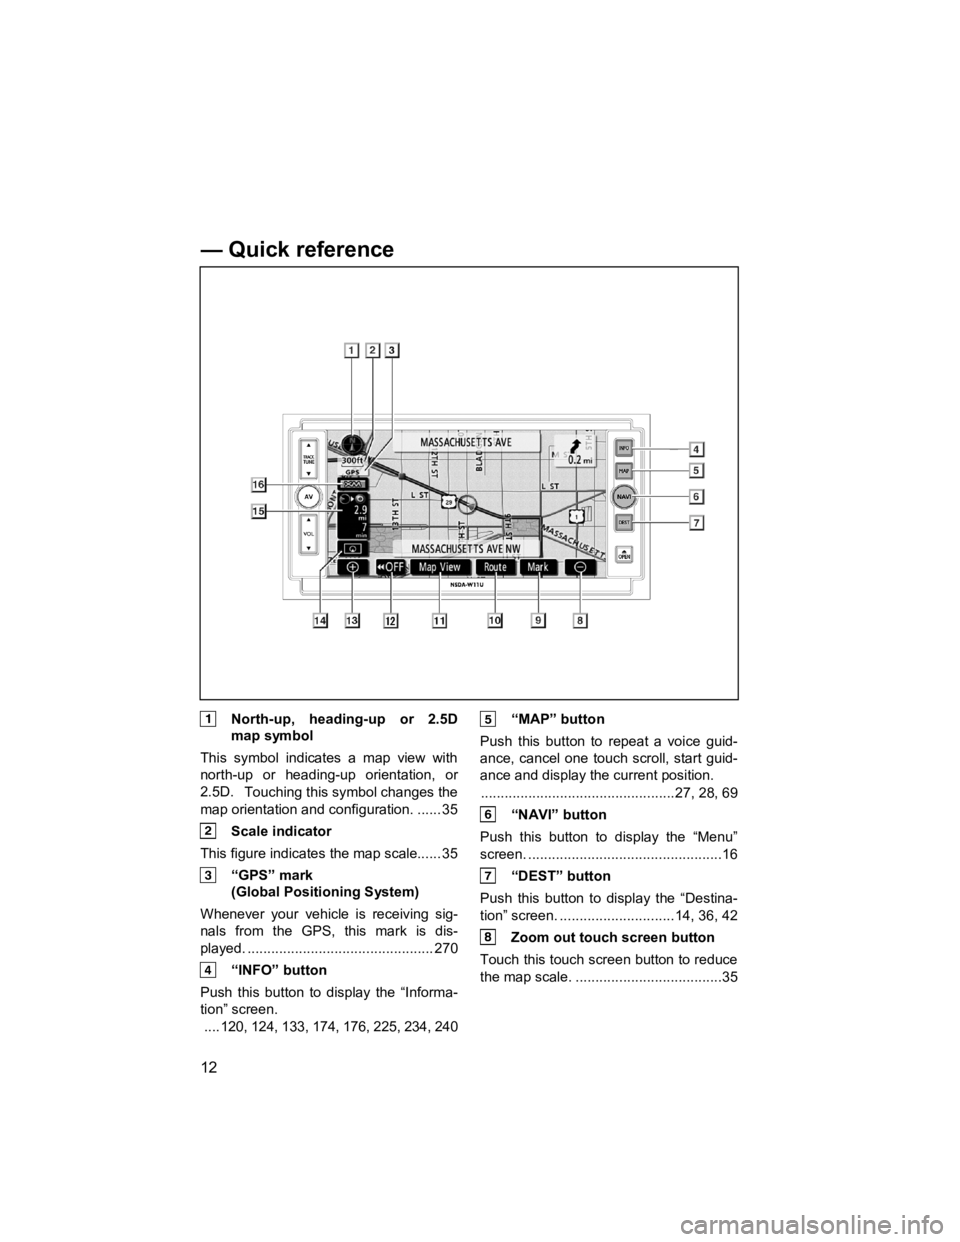
North-up, heading-up or 2.5D map symbol
This symbol indicates a map view with
north-up or heading-up orientation, or
2.5D.
Touching this symbol changes the
map orientation and configuration. ...... 35
Scale indicator
This figure indicates the map scale...... 35
“GPS” mark (Global Positioning System)
Whenever your vehicle is receiving sig-
nals from the GPS, this mark is dis-
played. ............................................... 270
“INFO” button
Push this button to display the “Informa-
tion” screen. .... 120, 124, 133, 174, 176, 225, 234, 240
“MAP” button
Push this button to repeat a voice guid-
ance, cancel one touch scroll, start guid-
ance and display the current position. .................................................27, 28, 69
“NAVI” button
Push this button to display the “Menu”
screen. .................................................16
“DEST” button
Push this button to display the “Destina-
tion” screen. ............................. 14, 36, 42
Zoom out touch screen button
Touch this touch screen button to reduce
the map sca le. .....................................35
— Quick reference
Page 14 of 284
13
V573_E
“Mark”
Touch this touch screen button to regis-
ter the current position or the cursor po-
sition as a memory point. .................... 29
“Route”
Touch this touch screen button to
change the route. .......................... 72, 75
“Map View”
Touch this touch screen button to obtain
information regarding the route to the
destination and information about the
POI (Points of Interest) on the map
screen. ...............................78, 81, 82, 83
“OFF”
Touch this touch screen button to obtain
a broader view. Some of the buttons on
the screen are not displayed. They
reappear by touching the “ON
”.
.......................................................... 112
Zoom in touch screen button
Touch this touch screen button to mag-
nify the map scale. .............................. 35
Screen configuration touch
screen button
Touch this touch screen button to
change the scr een mode..................... 32
Distance and time to destination
Displays the distance, the estimated
travel time to the destination, and the
estimated arrival time at the destination. ............................................................ 71
XM® NavTraffic indicator
This indicator is displayed when XM®
NavTraffic info. is received. ................. 90
Page 15 of 284
14
V573_E
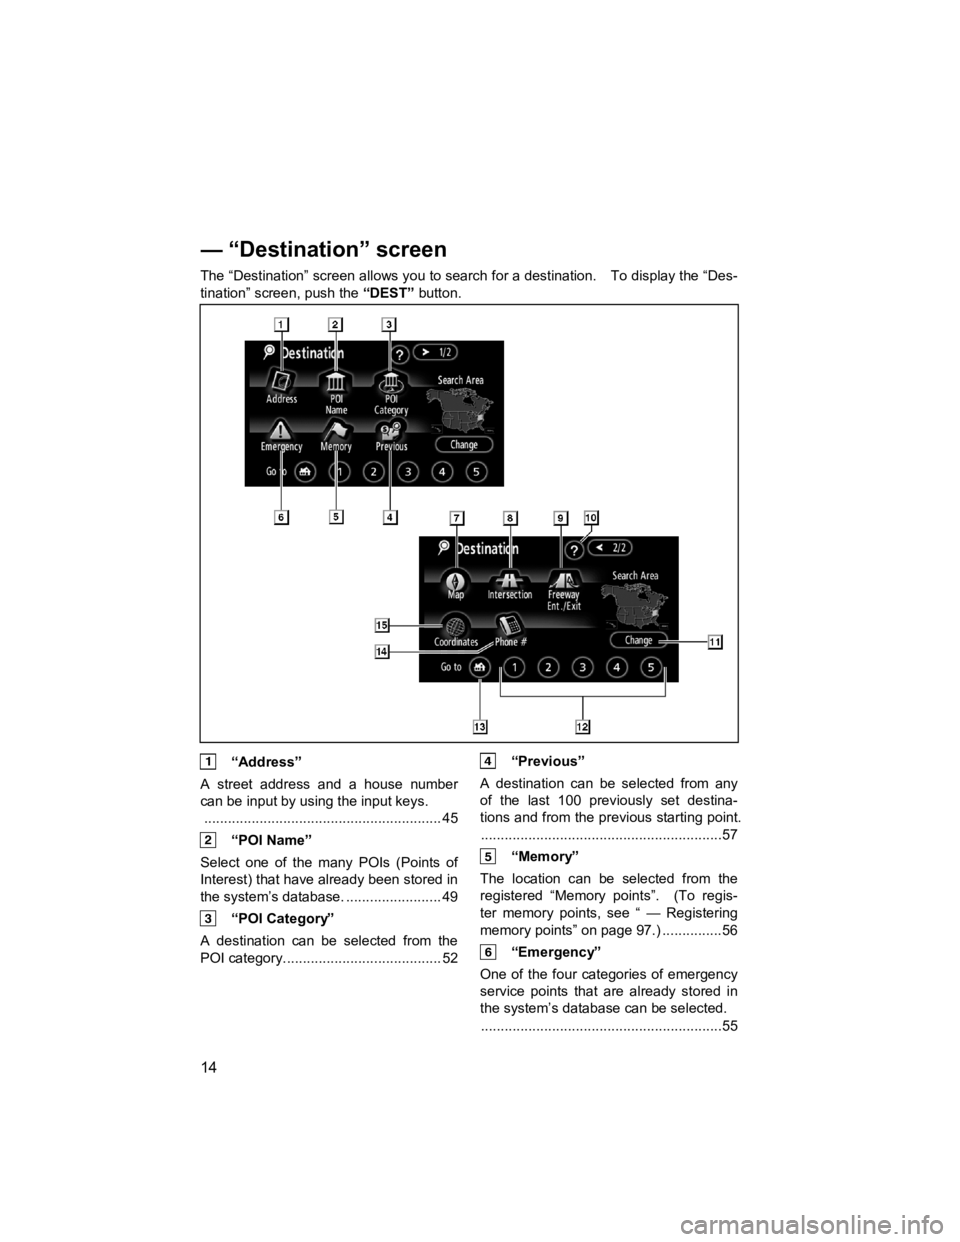
The “Destination” screen allows you to search for a destination. To display the “Des-
tination” screen, push the “DEST” button.
“Address”
A street address and a house number
can be input by using the input keys. ............................................................ 45
“POI Name”
Select one of the many POIs (Points of
Interest) that have already been stored in
the system’s database. ........................ 49
“POI Category”
A destination can be selected from the
POI category........................................ 52
“Previous”
A destination can be selected from any
of the last 100 previously set destina-
tions and from the previous starting point. .............................................................57
“Memory”
The location can be selected from the
registered “Memory points”. (To regis-
ter memory points, see “ — Registering
memory points” on page 97.) ...............56
“Emergency”
One of the four categories of emergency
service points that are already stored in
the system’s database can be selected. .............................................................55
— “Destination” screen
Page 16 of 284

15
V573_E
“Map”
A destination can be selected simply by
touching the location on the displayed
map. .................................................... 57
“Intersection”
The names of two intersecting streets
can be entered. This is helpful if only
the general vicinity, not the specific ad-
dress, is known. .................................. 58
“Freeway Ent./Exit”
The name of a freeway (interstate) en-
trance or exit can be entered .............. 59
“?”
Function help for the “Destination”
screen can be viewed on this screen. ............................................................ 27
“Change”
To change the search area, touch this
touch screen button. ........................... 42
Quick access touch screen but- tons
One of 5 preset destinations can be se-
lected by touching the screen directly.
To use this function, it is necessary to
set the “Quick Access” for each memory
point. (To register a “Quick Access”,
see “ — Editing memory points” on page
98.)...................................................... 45
Home touch screen button
A personal home address can be se-
lected without entering the address each
time. To use this function, it is neces-
sary to set “Home” for the memory point.
(To register “Home”, see “ — Registering
home” on page 103.)........................... 44
“Phone #”
A destination can be entered by the tele-
phone number. .................................... 60
“Coordinates”
A destination can be set by using latitude
and longitude as coordinates. ............. 60
Page 17 of 284
16
V573_E
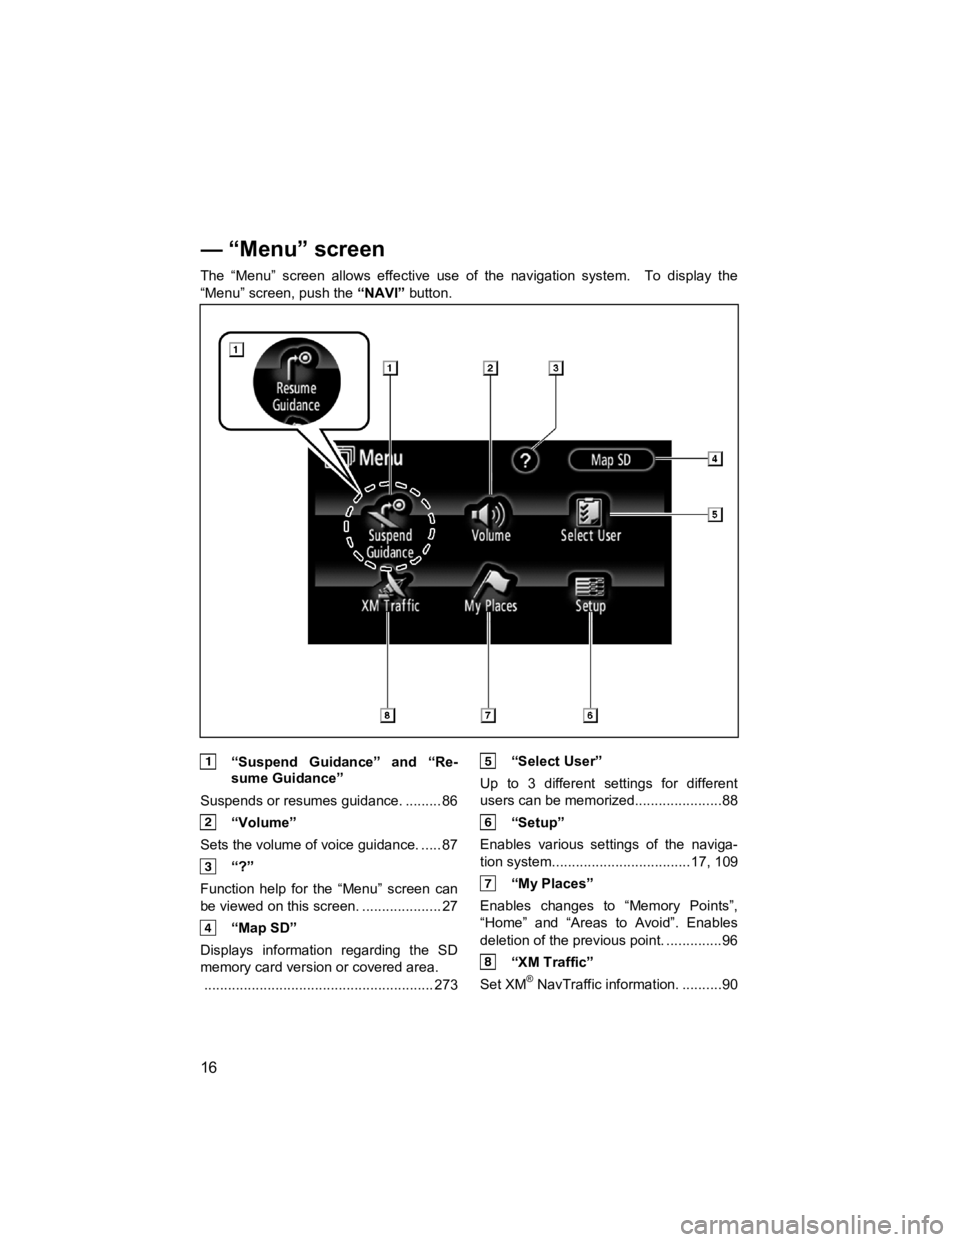
The “Menu” screen allows effective use of the navigation system. To display the
“Menu” screen, push the “NAVI” button.
“Suspend Guidance” and “Re-
sume Guidance”
Suspends or resumes guidance. ......... 86
“Volume”
Sets the volume of voice guidance. ..... 87
“?”
Function help for the “Menu” screen can
be viewed on this screen. .................... 27
“Map SD”
Displays information regarding the SD
memory card version or covered area. .......................................................... 273
“Select User”
Up to 3 different settings for different
users can be memorized......................88
“Setup”
Enables various settings of the naviga-
tion system. ..................................17, 109
“My Places”
Enables changes to “Memory Points”,
“Home” and “Areas to Avoid”. Enables
deletion of the previous point. ..............96
“XM Traffic”
Set XM® NavTraffic information. ..........90
— “Menu” screen
Page 18 of 284
17
V573_E
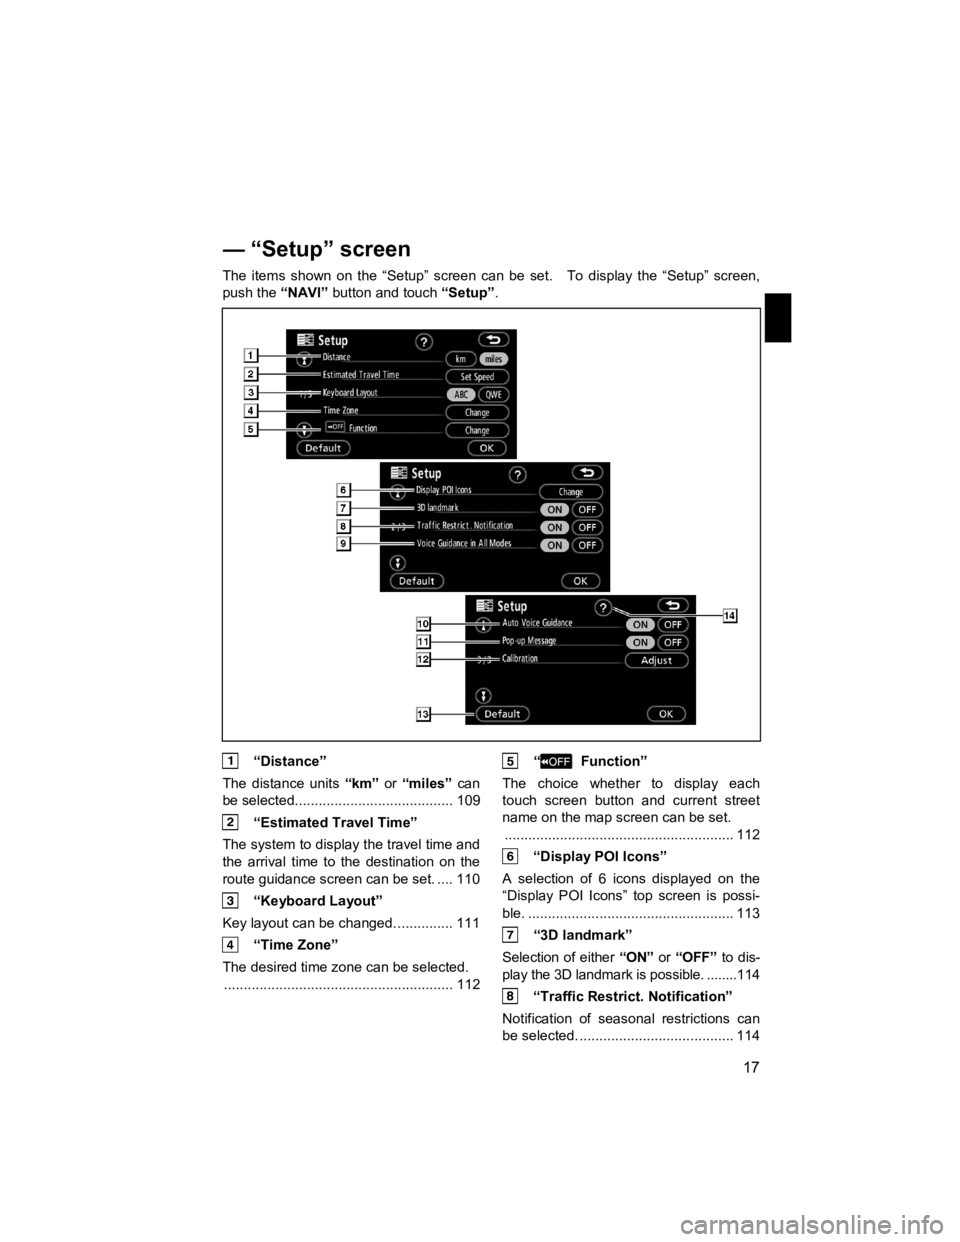
The items shown on the “Setup” screen can be set. To display the “Setup” screen,
push the
“NAVI” button and touch “Setup”.
“Distance”
The distance units “km” or “miles” can
be selected........................................ 109
“Estimated Travel Time”
The system to display the travel time and
the arrival time to the destination on the
route guidance screen can be set. .... 110
“Keyboard Layout”
Key layout can be changed. .............. 111
“Time Zone”
The desired time zone can be selected. .......................................................... 112
“ Function”
The choice whether to display each
touch screen button and current street
name on the map screen can be set. .......................................................... 112
“Display POI Icons”
A selection of 6 icons displayed on the
“Display POI Icons” top screen is possi-
ble. .................................................... 113
“3D landmark”
Selection of either “ON” or “OFF” to dis-
play the 3D landmark is possible. ........114
“Traffic Restrict. Notification”
Notification of seasonal restrictions can
be selected. ....................................... 114
— “Setup” screen
Page 19 of 284

18
V573_E
“Voice Guidance in All Modes”
Voice guidance can be set in all modes. .......................................................... 115
“Auto Voice Guidance”
Automatic voice guidance can be set. .......................................................... 115
“Pop-up Message”
Selection of either “ON” or “OFF” to
display the pop-up message is possible.
.......................................................... 116
“Calibration”
Adjustment of the current vehicle posi-
tion mark can be done manually, or
mis-calculation by changing tire will be
adjusted. ............................................ 117
“Default”
This touch screen button initializes all of
the settings. ....................................... 109
“?”
Function help for the “Setup” screen can
be viewed. ........................................... 27
Page 20 of 284

BASIC FUNCTION
19
V573_E
SECTION 1
BASIC FUNCTIONS
Basic information before operation
�z Display operation ··················\
··················\
··················\
··················\
········ 20
�z Initial screen ··················\
··················\
··················\
··················\
··············· 21
�z Touch screen oper ation ··················\
··················\
··················\
················ 23
�z Inputting letters and numbers/List screen operation ··················\
········ 23
�z Function help ··················\
··················\
··················\
··················\
·············· 27
�z Map screen operation ··················\
··················\
··················\
················ 27
Current position display ··················\
··················\
··················\
············· 27
Screen scroll op eration ··················\
··················\
··················\
·············· 28
Switching th e screens ··················\
··················\
··················\
················ 32
Map scale··················\
··················\
··················\
··················\
················· 35
Changing map orientati on and configuration ··················\
················· 35
�z Example of navigation system operation ··················\
··················\
·· 36
Guiding the route ··················\
··················\
··················\
··················\
····· 36
Registering home ··················\
··················\
··················\
··················\
····· 38