VOLVO V90 2017 Owners Manual
Manufacturer: VOLVO, Model Year: 2017, Model line: V90, Model: VOLVO V90 2017Pages: 594, PDF Size: 15.07 MB
Page 421 of 594
STARTING AND DRIVING
419
IMPORTANT
Mixtures of various fuel types or use of fuels which are not recommended will invalidateVolvo's guarantees and any supplementaryservice agreements; this is applicable to allengines.
NOTE
Extreme weather conditions, driving with a trailer or driving at high altitudes in combina-tion with fuel grade are factors that couldaffect the car's performance.
Related information
•Petrol (p. 419)
• Diesel (p. 420)
• Opening/closing the fuel filler flap and refu- elling (p. 417)
• Economical driving (p. 422)
Petrol
Petrol is a type of engine fuel that is intended for cars with a petrol engine.
Only use petrol from well-known producers. Never use fuel of dubious quality. The petrol mustfulfil the EN 228 standard.
IMPORTANT
• Fuel that contains up to 10 percent by volume ethanol is permitted.
• EN 228 E10 petrol (max10 percent by volume ethanol) isapproved for use.
• Ethanol higher than E10 (max.10 percent by volume ethanol) is not per-mitted, e.g. E85 is not permitted.
Octane rating
•95 RON can be used for normal driving.
• 98 RON is recommended for optimum per- formance and minimum fuel consumption.
When driving in temperatures above +38 °C, fuelwith the highest possible octane rating is recom-mended for optimum performance and fuel econ-omy.
IMPORTANT
• Use only unleaded petrol to avoid damag- ing the catalytic converter.
• Fuel containing metallic additives mustnot be used.
• Do not use any additives which have notbeen recommended by Volvo.
Related information
•Handling of fuel (p. 418)
• Opening/closing the fuel filler flap and refu- elling (p. 417)
Page 422 of 594
STARTING AND DRIVING
420
Diesel Diesel is a type of engine fuel that is intended for cars with a diesel engine.
Only use diesel fuel from well-known producers. Never use fuel of dubious quality. Diesel fuelmust fulfil the EN 590 or SS 155435 standard.Diesel engines are sensitive to contaminants inthe fuel, such as excessively high volumes of sul-phur and metals. At low temperatures (lower than 0 °C) a paraffin precipitate may form in the diesel fuel, which maylead to ignition problems. The fuel qualities thatare sold must be adapted for season and climatezone, but for extreme weather conditions, old fuelor moving between climate zones, paraffin precip-itate may occur. The risk of condensation in the fuel tank is reduced if the tank is kept well filled. When refuelling, check that the area around the fuel filler pipe is clean. Avoid spilling fuel onto thepaintwork. Wash off any spillage with detergentand water.
IMPORTANT
Diesel fuel must: •fulfil the EN 590 and/or SS 155435 standards
• have a sulphur content not exceeding10 mg/kg
• have a maximum of 7 vol % FAME 15
(B7).
IMPORTANT
Diesel type fuels that must not be used:
• Special additives
• Marine diesel fuel
• Heating oil
• FAME 16
and vegetable oil.
These fuels do not fulfil the requirements in accordance with Volvo recommendations andgenerate increased wear and engine damagethat is not covered by the Volvo warranty.
Related information
• Empty tank and diesel engine (p. 420)
• Diesel particulate filter (p. 421)
Empty tank and diesel engine
Once the engine has stopped due to fuel starva- tion, the fuel system needs a few moments tocarry out a check.
Before starting the engine after the fuel tank has
been filled with diesel - proceed as follows:
1. The remote control key must be inside the car.
2. Set the car in ignition position II - turn the
ignition dial to START without depressing
the brake pedal and hold the knob in the START position for approx. 4 seconds. Then
release the knob, which automatically returns to its starting position.
3. Wait approx. one minute.
4. To start the engine: Depress the brake pedal and turn the ignition dial to START again.
NOTE
Before filling with fuel in the event of fuel shortage:
• Stop the car on as flat/level ground aspossible - if the car is tilting there is a riskof air pockets in the fuel supply.
15
Fatty Acid Methyl Ester
16 Diesel fuel with maximum 7 vol % FAME (B7) is permitted.
Page 423 of 594
STARTING AND DRIVING
* Option/accessory.421
Points to remember when filling with a fuel can
When filling diesel with a fuel can, use the funnel located under the floor hatch in the cargo area.Make sure you insert the funnel's pipe firmly intothe filler pipe. The filler pipe has an openablecover and the funnel's pipe must be slid past thecover before filling can begin.
Related information
•Diesel (p. 420)
• Fuel consumption and CO2 emissions(p. 572)
Diesel particulate filter Diesel-driven cars are equipped with a particu- late filter, which results in more efficient emis-sion control.
The particles in the exhaust gases are collected in the filter during normal driving. So-called"regeneration" is started in order to burn awaythe particles and empty the filter. This requiresthe engine to have reached normal operatingtemperature. Regeneration of the particulate filter is automatic and normally takes 10-20 minutes. It may take alittle longer at a low average speed. Fuel con-sumption may increase slightly during regenera-tion.
Regeneration in cold weatherIf the car is frequently driven short distances incold weather then the engine does not reachnormal operating temperature. This means thatregeneration of the diesel particulate filter doesnot take place and the filter is not emptied. When the filter has become approx. 80% full of particles, a yellow warning triangle illuminates, and the message
Particulate filter full See
Owner's manual is shown in the driver display.
Start regeneration of the filter by driving the car until the engine reaches normal operating tem-perature, preferably on a main road or motorway. The car should then be driven for approximately20 minutes more.
NOTE
The following may arise during regeneration:
• a smaller reduction of engine power may be noticed temporarily
• fuel consumption may increase temporar-ily
• a smell of burning may arise.
When regeneration is complete the warning text is cleared automatically. Use the parking heater
* in cold weather - the
engine then reaches normal operating tempera- ture more quickly.
IMPORTANT
If the filter is completely filled with particles, it may be difficult to start the engine and the fil-ter is non-functional. Then there is a risk thatthe filter will need to be replaced.
Related information
• Diesel (p. 420)
Page 424 of 594
STARTING AND DRIVING
* Option/accessory.
422
Economical driving
Drive economically and eco-consciously by driv- ing smoothly, thinking ahead, and adjusting yourdriving style and speed to the prevailing condi-tions.
• For lower fuel consumption, activate ECO drive mode.
• Use the Eco Coast 17
freewheel function -
engine braking will cease and the car'skinetic energy can be used to freewheel forlonger distances.
• Drive in the highest gear 18
possible, adapted
to the current traffic situation and road -lower engine speeds result in lower fuel con-sumption. Use the gear shift indicator.
• Drive at a steady speed and keep a good dis-tance to other vehicles and objects to mini-mise braking.
• High speed results in increased fuel con-sumption - the wind resistance increaseswith speed.
• Do not run the engine to operating tempera-ture at idling speed, but rather drive with anormal load right after starting - a coldengine consumes more fuel than a warmone. •
Drive with the correct air pressure in thetyres and check this regularly - select ECOtyre pressure for best results.
• Choice of tyres can affect fuel consumption -seek advice on suitable tyres from a dealer.
• Remove unnecessary items from the car -the greater the load the higher the consump-tion.
• Use engine braking to slow down, when itcan take place without risk to other roadusers.
• A roof load and space box increase windresistance, leading to higher consumption -remove the load carriers when not in use.
• Avoid driving with open windows.
WARNING
Never switch off the engine while moving, such as downhill, this deactivates importantsystems such as the power steering andbrake servo.
Related information
•
Drive mode ECO (p. 402)
• Approved tyre pressures (p. 574)
• Fuel consumption and CO2 emissions (p. 572)
• Drive-E - cleaner driving pleasure (p. 25)
Towing bracket
*
The car can be equipped with a towing bracket that makes it possible to tow e.g. a trailer afterthe car.
There may be different towing bracket variants available for the car; contact a Volvo dealer formore information. For information on towing capacity and towball load, see the section "Towing capacity and tow-ball load".
IMPORTANT
When the engine is switched off, the constant battery voltage to the trailer connector can beswitched off automatically so as not to drainthe starter battery.
IMPORTANT
The towball needs regular cleaning and lubri- cation with grease in order to prevent wear.
17 See the section "Drive mode ECO".
18 Applies to driving with manual gear changing.
Page 425 of 594
STARTING AND DRIVING
}}
* Option/accessory.423
NOTE
When a hitch with a vibration damper is used, the towball must not be lubricated. This also applies when fitting a bicycle rack that is clamped in around the towball.
NOTE
If the car is equipped with a towing bracket, there is no rear mounting for a towing eye.
Related information
•Driving with a trailer (p. 426)
• Towing capacity and towball load (p. 564)
• Trailer Stability Assist
* (p. 428)
• Towing bracket specifications
* (p. 425)
• Extendable/retractable towing brackets
*
(p. 423)
Extendable/retractable towing brackets *
The extendable/retractable towing hitch is always easily accessible and simple to extend orretract as needed. In the retracted position, thetowing hitch is completely concealed.
WARNING
Follow the instructions for retracting and extending the towing bracket carefully.
Extending the towing hitch
WARNING
Avoid standing close to the bumper in the centre behind the car when extending thetowing hitch.
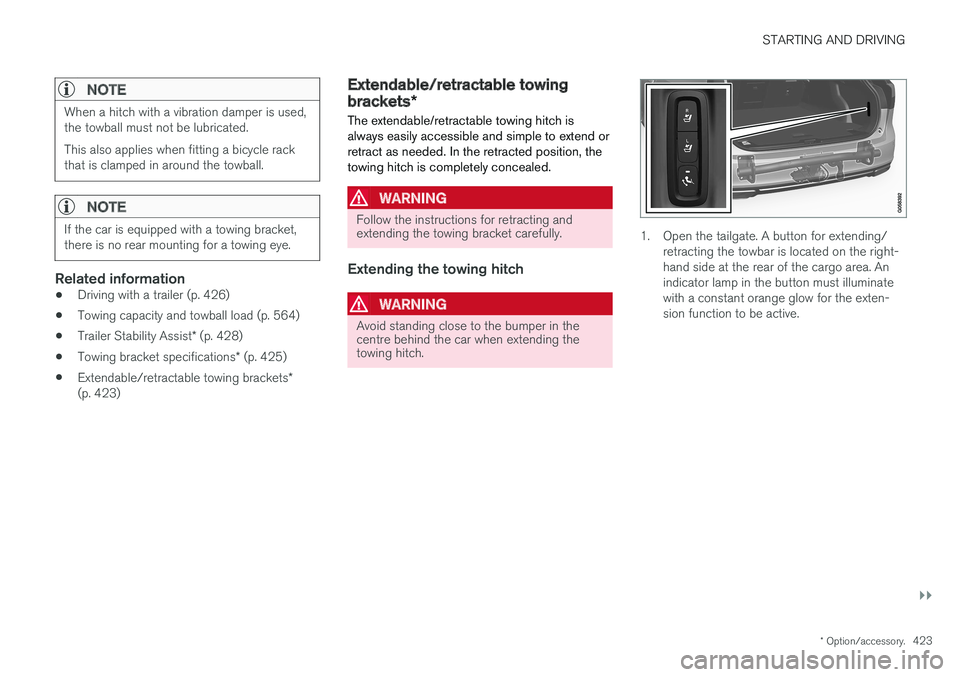
1. Open the tailgate. A button for extending/ retracting the towbar is located on the right- hand side at the rear of the cargo area. Anindicator lamp in the button must illuminatewith a constant orange glow for the exten-sion function to be active.
Page 426 of 594
||
STARTING AND DRIVING
424
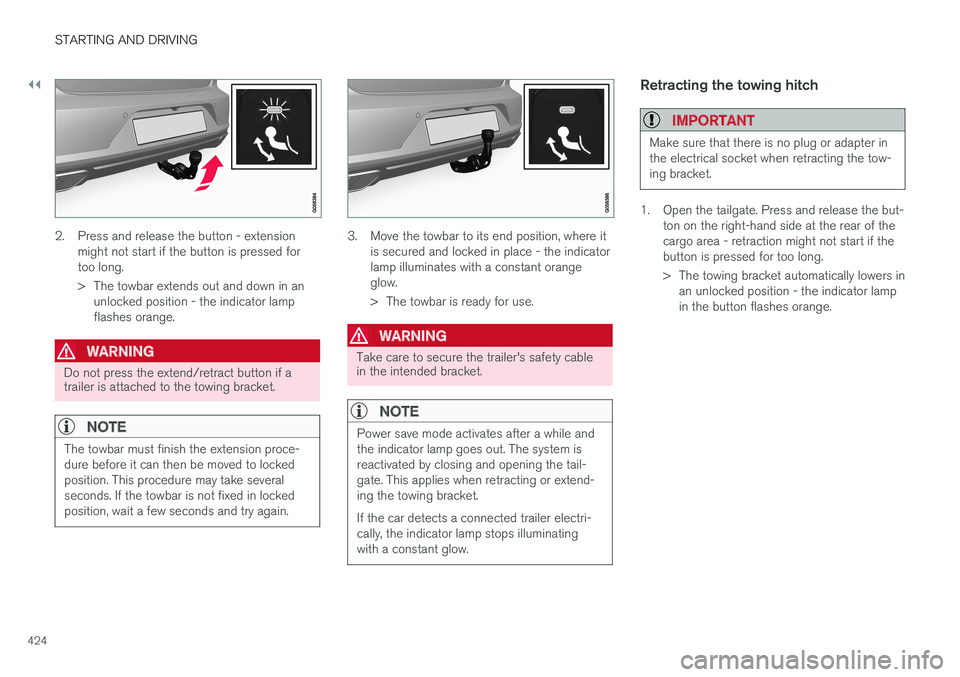
2. Press and release the button - extensionmight not start if the button is pressed for too long.
> The towbar extends out and down in anunlocked position - the indicator lamp flashes orange.
WARNING
Do not press the extend/retract button if a trailer is attached to the towing bracket.
NOTE
The towbar must finish the extension proce- dure before it can then be moved to lockedposition. This procedure may take severalseconds. If the towbar is not fixed in lockedposition, wait a few seconds and try again.
3. Move the towbar to its end position, where it is secured and locked in place - the indicator lamp illuminates with a constant orangeglow.
> The towbar is ready for use.
WARNING
Take care to secure the trailer's safety cable in the intended bracket.
NOTE
Power save mode activates after a while and the indicator lamp goes out. The system isreactivated by closing and opening the tail-gate. This applies when retracting or extend-ing the towing bracket. If the car detects a connected trailer electri- cally, the indicator lamp stops illuminatingwith a constant glow.
Retracting the towing hitch
IMPORTANT
Make sure that there is no plug or adapter in the electrical socket when retracting the tow-ing bracket.
1. Open the tailgate. Press and release the but- ton on the right-hand side at the rear of the cargo area - retraction might not start if thebutton is pressed for too long.
> The towing bracket automatically lowers inan unlocked position - the indicator lamp in the button flashes orange.
Page 427 of 594

STARTING AND DRIVING
* Option/accessory.425
2. Lock the towing bracket by moving it back to
its retracted position, where it is locked.
> The indicator lamp will now illuminate witha constant glow if the towing bracket is correctly retracted.
Related information
• Towing bracket
* (p. 422)
• Towing bracket specifications
* (p. 425)
Towing bracket specifications *
Dimensions and mounting points for the towing bracket.Dimensions, mounting points (mm)
A 1229
B 111.8 C 875
D 437,5 E See the image aboveF 310.5
G Ball centre
Related information
• Towing bracket
* (p. 422)
Page 428 of 594
STARTING AND DRIVING
426
Driving with a trailer
When driving with a trailer, there are a number of points that are important to think about regar-ding the towing bracket, the trailer and how theload is positioned in the trailer.
Payload depends on the car's kerb weight. The total of the weight of the passengers and allaccessories, e.g. towbar, reduces the car's pay-load by a corresponding weight. The car is supplied with the necessary equipment for towing a trailer.
• The car's towing bracket must be of anapproved type.
• Distribute the load on the trailer so that theweight on the towing bracket complies withthe specified maximum towball load. Towballload is calculated as part of the car's payload.
• Increase the tyre pressure to the recom-mended pressure for a full load. For moreinformation on tyre pressure, see the section"Approved tyre pressures".
• The engine is loaded more heavily than usualwhen driving with a trailer.
• Do not tow a heavy trailer when the car isbrand new. Wait until it has been driven atleast 1000 km.
• The brakes are loaded much more than usualon long and steep downhill slopes. Downshiftto a lower gear and adjust your speed. •
Follow the regulations in force for the permit-ted speeds and weights.
• Maintain a low speed when driving with atrailer up long, steep ascents.
• The maximum trailer weights given only applyto altitudes up to 1000 metres above sealevel. At higher altitudes, engine power andthus the car's climbing ability is decreaseddue to the reduced air density, and the maxi-mum trailer weight must therefore bereduced. The weight of the car and trailermust be decreased by 10 % for each addi-tional 1000 m (or part thereof).
• Avoid driving with a trailer on inclines of morethan 12%.
NOTE
Extreme weather conditions, driving with a trailer or driving at high altitudes in combina-tion with fuel quality are factors that consider-ably increase the car's fuel consumption.
Trailer connectorAn adapter is required if the car's towing bracket has a 13 pin connector and the trailer has a 7 pinconnector. Use an adapter approved by Volvo.Make sure the cable does not drag on theground.
IMPORTANT
When the engine is switched off, the constant battery voltage to the trailer connector can beswitched off automatically so as not to drainthe starter battery.
Trailer weightsInformation about Volvo's permitted trailer weights is available in the article "Towingcapacity and towball load".
WARNING
Follow the stated recommendations for trailer weights. Otherwise, the car and trailer may bedifficult to control in the event of suddenmovement and braking.
NOTE
The stated maximum permitted trailer weights are those permitted by Volvo. National vehicleregulations can further limit trailer weightsand speeds. Towbars can be certified forhigher towing weights than the car canactually tow.
Direction indicators and brake lights on the trailer
If one or more of the trailer's direction indicators or brake light bulbs is broken, the driver display
Page 429 of 594
STARTING AND DRIVING
* Option/accessory.427
shows a symbol and a message. Other lamps on the trailer must be checked manually by thedriver before departure, see the heading "Check-ing trailer lamps".
Symbol
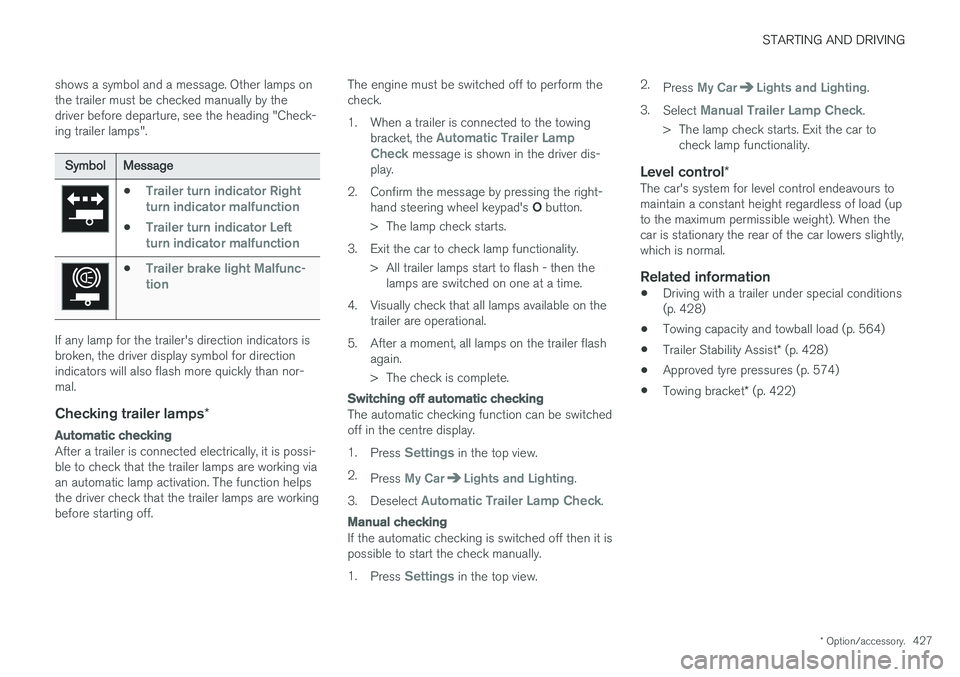
Message
•Trailer turn indicator Right
turn indicator malfunction
•Trailer turn indicator Left
turn indicator malfunction
•Trailer brake light Malfunc-
tion
If any lamp for the trailer's direction indicators is broken, the driver display symbol for directionindicators will also flash more quickly than nor-mal.
Checking trailer lamps *
Automatic checking
After a trailer is connected electrically, it is possi- ble to check that the trailer lamps are working viaan automatic lamp activation. The function helpsthe driver check that the trailer lamps are workingbefore starting off. The engine must be switched off to perform thecheck.
1. When a trailer is connected to the towing
bracket, the
Automatic Trailer Lamp
Check message is shown in the driver dis-
play.
2. Confirm the message by pressing the right- hand steering wheel keypad's O button.
> The lamp check starts.
3. Exit the car to check lamp functionality. > All trailer lamps start to flash - then thelamps are switched on one at a time.
4. Visually check that all lamps available on the trailer are operational.
5. After a moment, all lamps on the trailer flash again.
> The check is complete.
Switching off automatic checking
The automatic checking function can be switched off in the centre display. 1.Press
Settings in the top view.
2. Press
My CarLights and Lighting.
3. Deselect
Automatic Trailer Lamp Check.
Manual checking
If the automatic checking is switched off then it is possible to start the check manually. 1.Press
Settings in the top view. 2.
Press
My CarLights and Lighting.
3. Select
Manual Trailer Lamp Check.
> The lamp check starts. Exit the car to check lamp functionality.
Level control *The car's system for level control endeavours to maintain a constant height regardless of load (upto the maximum permissible weight). When thecar is stationary the rear of the car lowers slightly,which is normal.
Related information
•Driving with a trailer under special conditions(p. 428)
• Towing capacity and towball load (p. 564)
• Trailer Stability Assist
* (p. 428)
• Approved tyre pressures (p. 574)
• Towing bracket
* (p. 422)
Page 430 of 594
STARTING AND DRIVING
* Option/accessory.
428
Driving with a trailer under special conditions
When driving with a trailer in hilly terrain in a hot climate there may be a risk of overheating.
In the event of overheating, a warning symbol illu- minates in the driver display together with a mes-sage, see section "Overheating in the engine anddrive system". The following only applies to cars with automatic gearbox. The automatic gearbox selects the optimum gear related to load and engine speed.
Steep inclinesDo not lock the automatic gearbox in a highergear than the engine "can cope with" - it is notalways a good idea to drive at a high gear withlow engine speed.
Parking on a hill1. Depress the brake pedal fully.
2. Activate the parking brake.3. Select gear position P.
4. Release the brake pedal.Block the wheels with chocks when parking a car with hitched trailer on a hill.
Starting on a hill1. Depress the brake pedal fully. 2.
Select gear position D.
3. Releasing the parking brake.
4. Release the brake pedal and start driving off.
Related information
• Driving with a trailer (p. 426)
• Overheating in the engine and drive system (p. 414)
• Using the parking brake (p. 410)
Trailer Stability Assist
*
The function of the trailer stability assist Trailer Stability Assist (TSA) is to stabilise cars withattached trailers in situations where they begin