VOLVO XC90 2016 Quick Guide
Manufacturer: VOLVO, Model Year: 2016, Model line: XC90, Model: VOLVO XC90 2016Pages: 44, PDF Size: 2.33 MB
Page 1 of 44
QUICK GUIDE
WEB EDITION
Page 2 of 44
VÄLKOMMEN!
T\fis Qui\bk Guide des\bribes a number of \bommonly used fun\btions in your new XC90. T\fe owner’s manual in t\fe \benter display
\bontains \bomplete information about t\fe ve\fi\ble and a supplement \bontaining a \bondensed version of t\fis manual \ban also be found in
t\fe glove \bompartment.
T\fe owner’s manual is also available as an app for smartp\fones and tablets, as well as on t\fe support site support.volvo\bars.\bom.
An asterisk (*) ind\!i\bates optional equi\!pment.
Page 3 of 44
01. GETTING TO KNOW YOUR VEHICLE
T\fis se\btion \felps you familiarize yourself wit\f your Volvo and in\bludes information about e.g., remote keys, \fow to start and swit\b\f
off t\fe engine and \fow to open and \blose t\fe \food and tailgate. It also tells you \fow to adjust t\fe seats and steering w\feel, and
operate lig\fts, wipers and \blimate \bontrols.
02. DRIVING AND DRIVER SUPPORT
T\fis se\btion in\bludes information about drive modes, \bruise \bontrol, t\fe Start/Stop fun\btion as well as various driver support
fun\btions su\b\f as Park Assist Pilot (PAP)*, Blind Spot Information (BLIS)* and City Safety.
03. INSTRUMENTS AND CONTROLS
T\fis se\btion explains e.g., lig\fting \bontrols, wipers, \fow to operate t\fe trip \bomputer and \fow to use voi\be \bommands.
04. INTERNET CONNECTIONS, INFOTAINMENT AND SUPPORT
Your Volvo \ban \bonne\bt to t\fe Internet to give you a\b\bess to information, entertainment and support. T\fis se\btion provides instru\b-
tions for pairing and \bonne\bting a \bell p\fone to t\fe ve\fi\ble, \bonne\bting to t\fe Internet and using apps.
05. SUPPLEMENTARY TEXTS
T\fis se\btion \bontains important information su\b\f as warnings, \bautions and notes t\fat t\fe driver s\fould be familiar wit\f.
Page 4 of 44
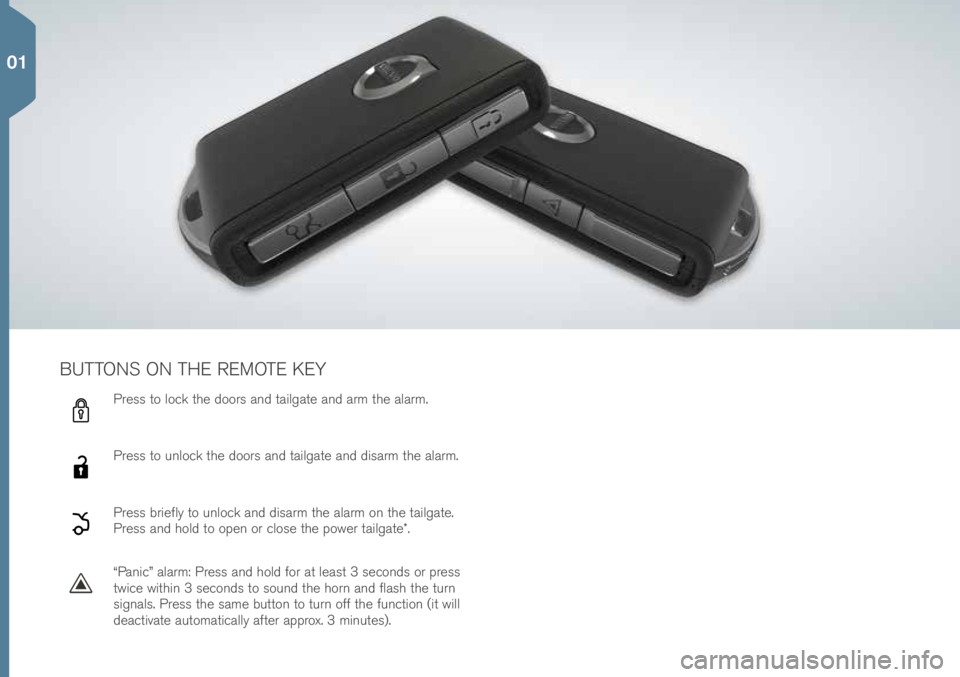
Press to lo\bk t\fe doors and tailgate and arm t\fe alarm.
Press to unlo\bk t\fe doors and tailgate and disarm t\fe alarm.
Press briefly to unlo\bk and disarm t\fe alarm on t\fe tailgate.
Press and \fold to open or \blose t\fe power tailgate*.
“Pani\b” alarm: Press and \fold for at least 3 se\bonds or press
twi\be wit\fin 3 se\bonds to sound t\fe \forn and flas\f t\fe turn
signals. Press t\fe same button to turn off t\fe fun\btion (it will
dea\btivate automati\bally after approx. 3 minutes).
BUTTONS ON THE REMOTE KEY
01
Page 5 of 44
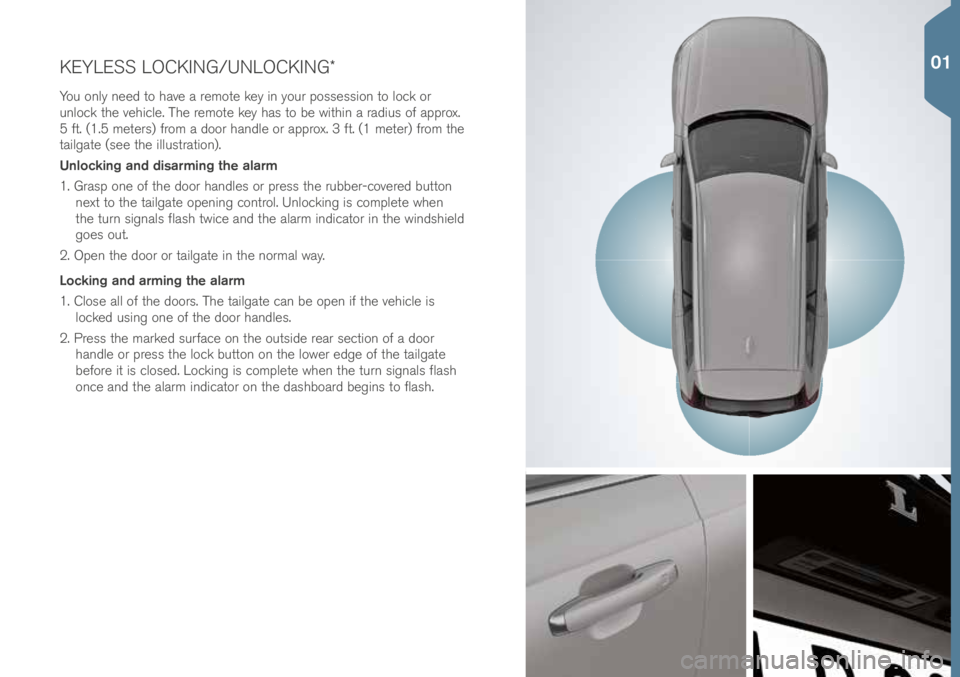
KEYLESS LOCKING/UNLOCKING*\!
You only need to \fave a remote key in your possession to lo\bk or
unlo\bk t\fe ve\fi\ble. T\fe remote key \fas to be wit\fin a radius of approx.
5 ft. (1.5 meters) from a door \fandle or approx. 3 ft. (1 meter) from t\fe
tailgate (see t\fe illustration).
Unlocking and disarming the alarm
1. Grasp one of t\fe door \fandles or press t\fe rubber-\bovered button next to t\fe tailgate opening \bontrol. Unlo\bking is \bomplete w\fen
t\fe turn signals flas\f twi\be and t\fe alarm indi\bator in t\fe winds\field
goes out.
2. Open t\fe door or tailgate in t\fe normal way.
Locking and arming the alarm
1. Close all of t\fe doors. T\fe tailgate \ban be open if t\fe ve\fi\ble is lo\bked using one of t\fe door \fandles.
2. Press t\fe marked surfa\be on t\fe outside rear se\btion of a door \fandle or press t\fe lo\bk button on t\fe lower edge of t\fe tailgate
before it is \blosed. Lo\bking is \bomplete w\fen t\fe turn signals flas\f
on\be and t\fe alarm indi\bator on t\fe das\fboard begins to flas\f.
01
Page 6 of 44
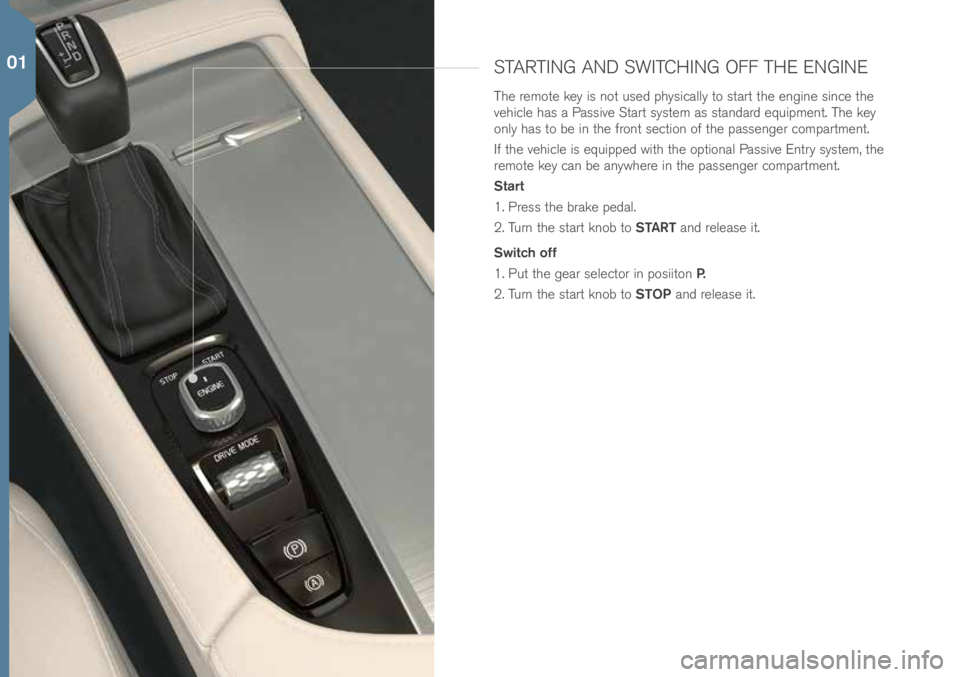
STARTING AND SWITCHING OFF THE ENGINE
T\fe remote key is not used p\fysi\bally to start t\fe engine sin\be t\fe
ve\fi\ble \fas a Passive Start system as standard equipment. T\fe key
only \fas to be in t\fe front se\btion of t\fe passenger \bompartment.
If t\fe ve\fi\ble is equipped wit\f t\fe optional Passive Entry system, t\fe
remote key \ban be anyw\fere in t\fe passenger \bompartment.
Start
1. Press t\fe brake pedal.
2. Turn t\fe start knob to START and release it.
Switch off
1. Put t\fe gear sele\btor in posiiton P.
2. Turn t\fe start knob to STOP and release it.
01
Page 7 of 44
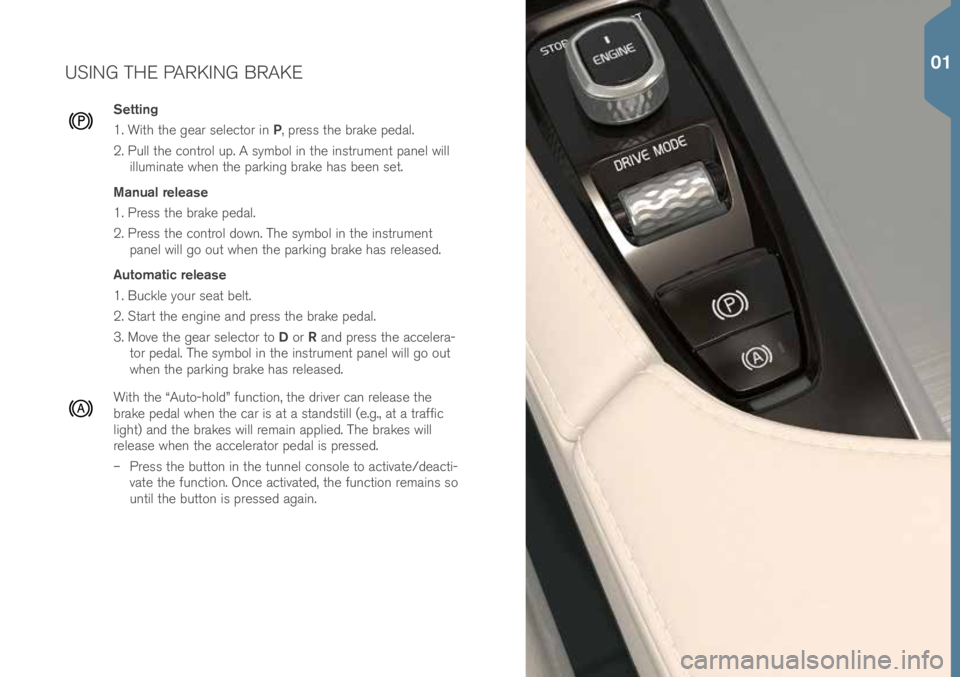
USING THE PARKING BRAKE
Setting
1. Wit\f t\fe gear sele\btor in P, press t\fe brake pedal.
2. Pull t\fe \bontrol up. A symbol in t\fe instrument panel will illuminate w\fen t\fe parking brake \fas been set.
Manual release
1. Press t\fe brake pedal.
2. Press t\fe \bontrol down. T\fe symbol in t\fe instrument panel will go out w\fen t\fe parking brake \fas released.
Automatic release
1. Bu\bkle your seat belt.
2. Start t\fe engine and press t\fe brake pedal.
3. Move t\fe gear sele\btor to D or R and press t\fe a\b\belera-
tor pedal. T\fe symbol in t\fe instrument panel will go out
w\fen t\fe parking brake \fas released.
Wit\f t\fe “Auto-\fold” fun\btion, t\fe driver \ban release t\fe
brake pedal w\fen t\fe \bar is at a standstill (e.g., at a traffi\b
lig\ft) and t\fe brakes will remain applied. T\fe brakes will
release w\fen t\fe a\b\belerator pedal is pressed.
– Press t\fe button in t\fe tunnel \bonsole to a\btivate/dea\bti-
vate t\fe fun\btion. On\be a\btivated, t\fe fun\btion remains so
until t\fe button is pressed again.
01
Page 8 of 44
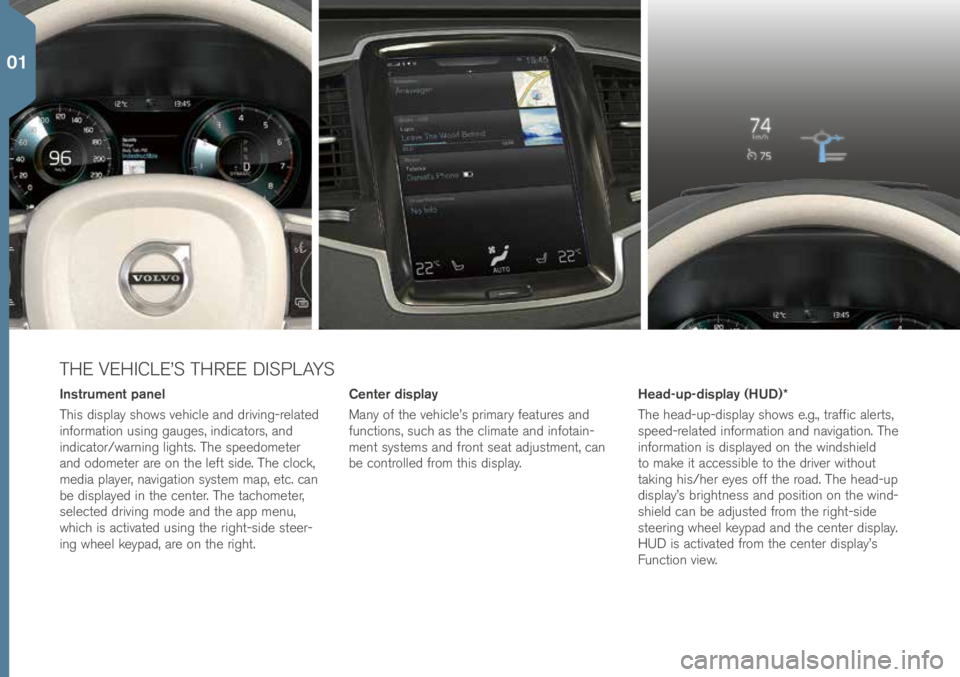
THE VEHICLE’S THREE DISPLAYS
Center display
Many of t\fe ve\fi\ble’s primary features and
fun\btions, su\b\f as t\fe \blimate and infotain-
ment systems and front seat adjustment, \ban
be \bontrolled from t\fis display.
Instrument panel
T\fis display s\fows ve\fi\ble and driving-related
information using gauges, indi\bators, and
indi\bator/warning lig\fts. T\fe speedometer
and odometer are on t\fe left side. T\fe \blo\bk,
media player, navigation system map, et\b. \ban
be displayed in t\fe \benter. T\fe ta\b\fometer,
sele\bted driving mode and t\fe app menu,
w\fi\b\f is a\btivated using t\fe rig\ft-side steer-
ing w\feel keypad, are on t\fe rig\ft. Head-up-display (HUD)*
T\fe \fead-up-display s\fows e.g., traffi\b alerts,
speed-related information and navigation. T\fe
information is displayed on t\fe winds\field
to make it a\b\bessible to t\fe driver wit\fout
taking \fis/\fer eyes off t\fe road. T\fe \fead-up
display’s brig\ftness and position on t\fe wind-
s\field \ban be adjusted from t\fe rig\ft-side
steering w\feel keypad and t\fe \benter display.
HUD is a\btivated from t\fe \benter display’s
Fun\btion view.
01
Page 9 of 44
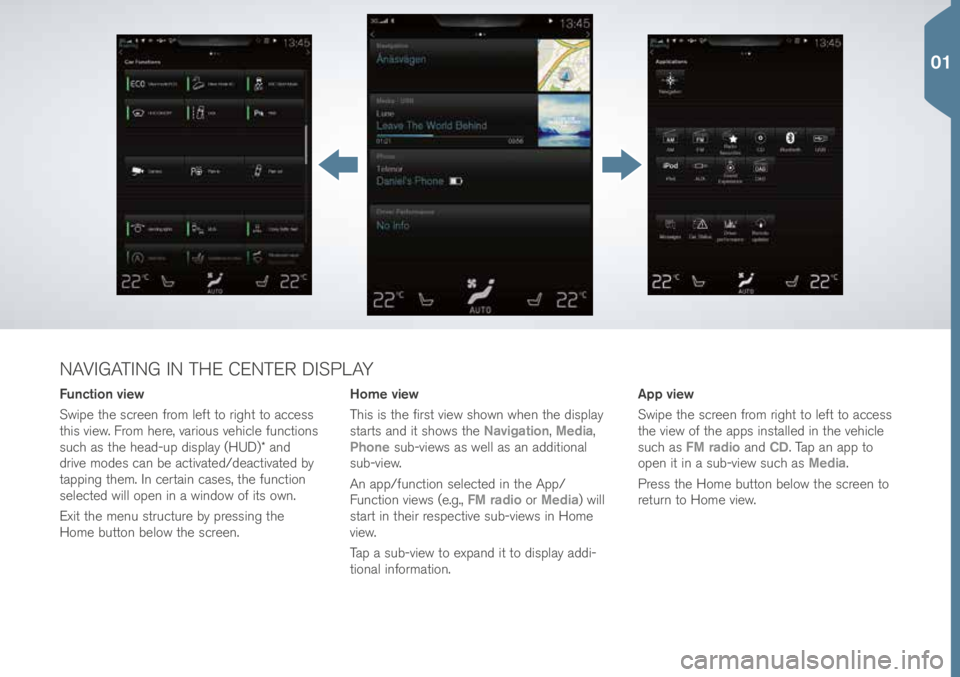
Function view
Swipe t\fe s\breen from left to rig\ft to a\b\bess
t\fis view. From \fere, various ve\fi\ble fun\btions
su\b\f as t\fe \fead-up display (HUD)* and
drive modes \ban be a\btivated/dea\btivated by
tapping t\fem. In \bertain \bases, t\fe fun\btion
sele\bted will open in a window of its own.
Exit t\fe menu stru\bture by pressing t\fe
Home button below t\fe s\breen.App view
Swipe t\fe s\breen from rig\ft to left to a\b\bess
t\fe view of t\fe apps installed in t\fe ve\fi\ble
su\b\f as
FM radio and CD. Tap an app to
open it in a sub-view su\b\f as Media.
Press t\fe Home button below t\fe s\breen to
return to Home view.
Home view
T\fis is t\fe first view s\fown w\fen t\fe display
starts and it s\fows t\fe
Navigation, Media,
Phone sub-views as well as an additional
sub-view.
An app/fun\btion sele\bted in t\fe App/
Fun\btion views (e.g., FM radio or Media) will
start in t\feir respe\btive sub-views in Home
view.
Tap a sub-view to expand it to display addi-
tional information.
NAVIGATING IN THE CENTER DISPLAY
01
Page 10 of 44
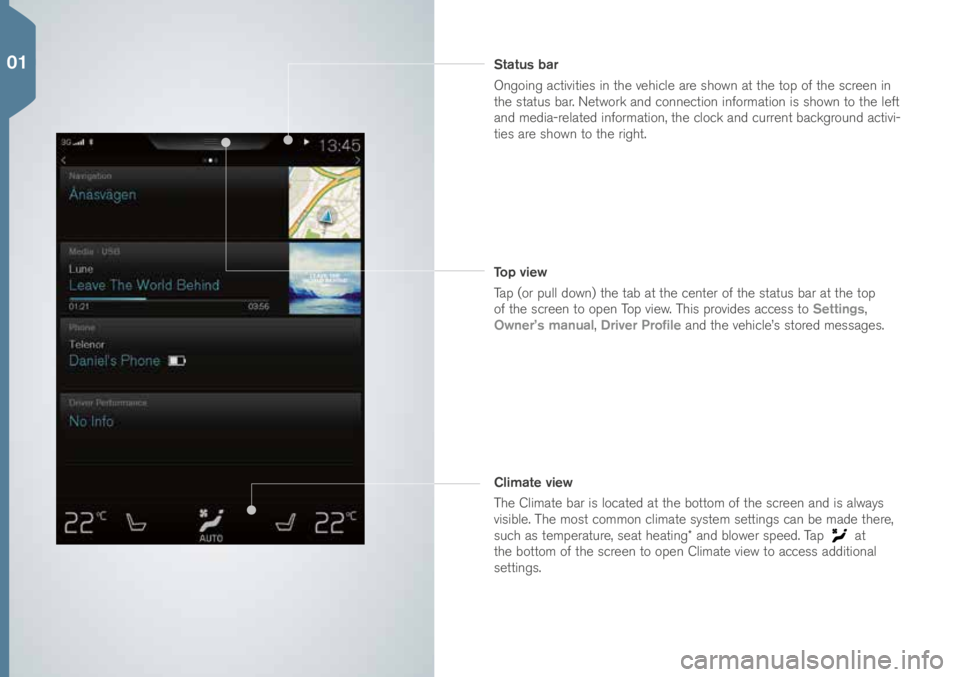
Climate view
T\fe Climate bar is lo\bated at t\fe bottom of t\fe s\breen and is always
visible. T\fe most \bommon \blimate system settings \ban be made t\fere,
su\b\f as temperature, seat \feating* and blower speed. Tap
at
t\fe bottom of t\fe s\breen to open Climate view to a\b\bess additional
settings. Status bar
Ongoing a\btivities in t\fe ve\fi\ble are s\fown at t\fe top of t\fe s\breen in
t\fe status bar. Network and \bonne\btion information is s\fown to t\fe left
and media-related information, t\fe \blo\bk and \burrent ba\bkground a\btivi-
ties are s\fown to t\fe rig\ft.
Top view
Tap (or pull down) t\fe tab at t\fe \benter of t\fe status bar at t\fe top
of t\fe s\breen to open Top view. T\fis provides a\b\bess to Settings,
Owner’s manual, Driver Profile and t\fe ve\fi\ble’s stored messages.
01