YAMAHA RHINO 700 2013 Owners Manual
Manufacturer: YAMAHA, Model Year: 2013, Model line: RHINO 700, Model: YAMAHA RHINO 700 2013Pages: 188, PDF Size: 4.9 MB
Page 141 of 188
8-28
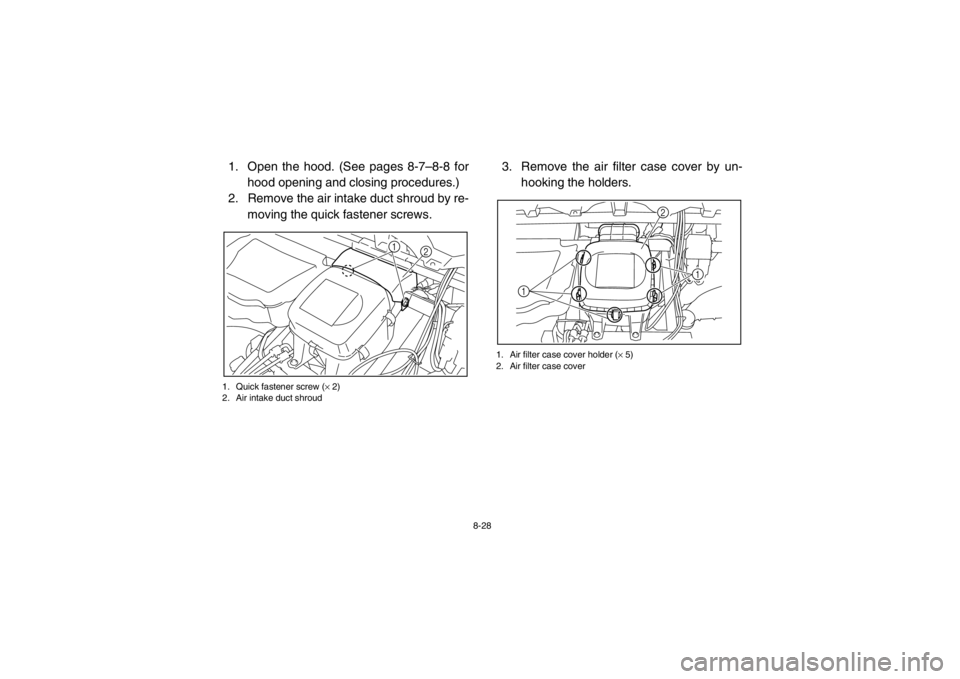
1. Open the hood. (See pages 8-7–8-8 forhood opening and closing procedures.)
2. Remove the air intake duct shroud by re-
moving the quick fastener screws.1. Quick fastener screw ( × 2)
2. Air intake duct shroud
3. Remove the air filter case cover by un-
hooking the holders.1. Air filter case cover holder ( × 5)
2. Air filter case cover
1
2
1 1
2
1RB7A_EE.book Page 28 Tuesday, April 24, 2012 9:07 AM
Page 142 of 188
8-29
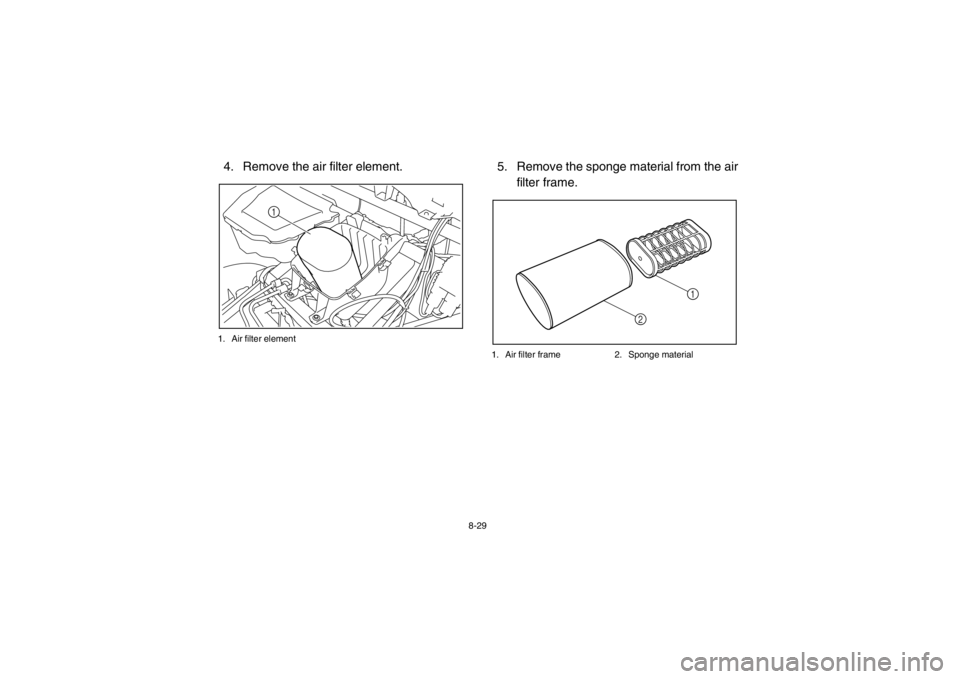
4. Remove the air filter element.1. Air filter element
5. Remove the sponge material from the airfilter frame.1. Air filter frame 2. Sponge material
1
2
1
1RB7A_EE.book Page 29 Tuesday, April 24, 2012 9:07 AM
Page 143 of 188
8-30
6. Wash the sponge material gently butthoroughly in parts cleaning solvent.
WARNING! Using gasoline or other
flammable solvents to clean the air fil-
ter element can cause a fire or explo-
sion, which could lead to serious
injury.
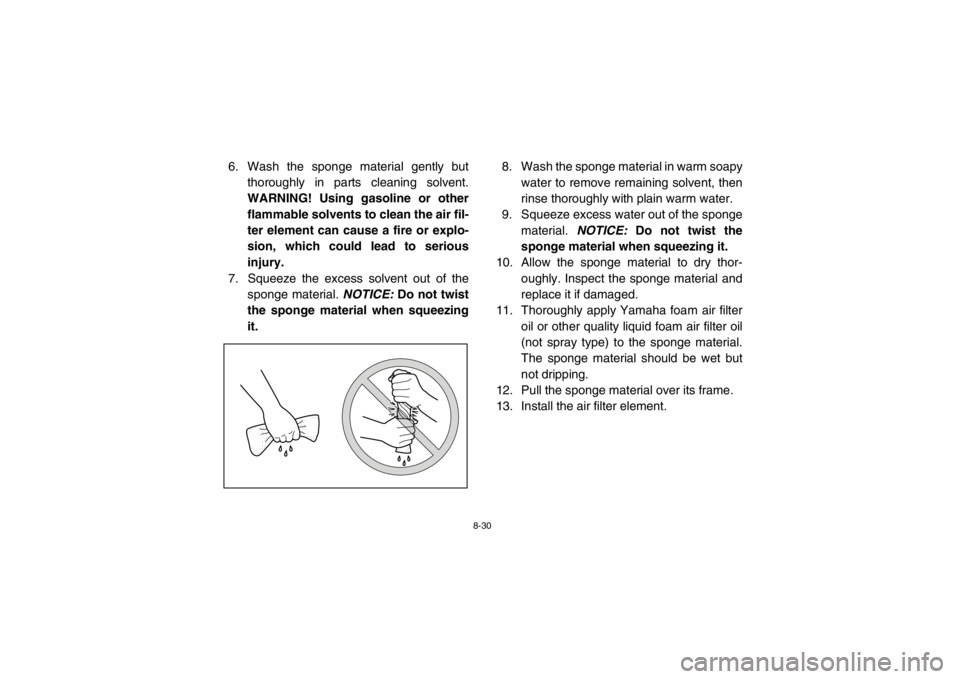
7. Squeeze the excess solvent out of the sponge material. NOTICE: Do not twist
the sponge material when squeezing
it. 8. Wash the sponge material in warm soapy
water to remove remaining solvent, then
rinse thoroughly with plain warm water.
9. Squeeze excess water out of the sponge material. NOTICE: Do not twist the
sponge material when squeezing it.
10. Allow the sponge material to dry thor- oughly. Inspect the sponge material and
replace it if damaged.
11. Thoroughly apply Yamaha foam air filter oil or other quality liquid foam air filter oil
(not spray type) to the sponge material.
The sponge material should be wet but
not dripping.
12. Pull the sponge material over its frame.
13. Install the air filter element.
1RB7A_EE.book Page 30 Tuesday, April 24, 2012 9:07 AM
Page 144 of 188
8-31
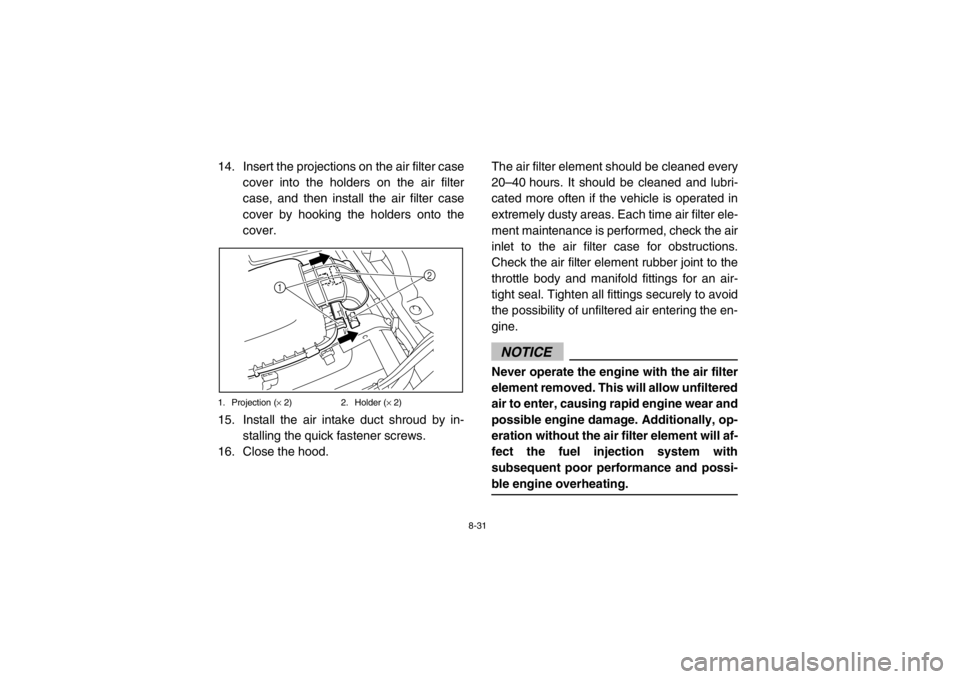
14. Insert the projections on the air filter casecover into the holders on the air filter
case, and then install the air filter case
cover by hooking the holders onto the
cover.1. Projection ( × 2) 2. Holder ( × 2)15. Install the air intake duct shroud by in-
stalling the quick fastener screws.
16. Close the hood. The air filter element should be cleaned every
20–40 hours. It should be cleaned and lubri-
cated more often if the vehicle is operated in
extremely dusty areas. Each time air filter ele-
ment maintenance is performed, check the air
inlet to the air filter case for obstructions.
Check the air filter element rubber joint to the
throttle body and manifold fittings for an air-
tight seal. Tighten all fittings securely to avoid
the possibility of unfiltered air entering the en-
gine.
NOTICENever operate the engine with the air filter
element removed. This will allow unfiltered
air to enter, causing rapid engine wear and
possible engine damage. Additionally, op-
eration without the air filter element will af-
fect the fuel injection system with
subsequent poor performance and possi-
ble engine overheating.
2
1
1RB7A_EE.book Page 31 Tuesday, April 24, 2012 9:07 AM
Page 145 of 188
8-32
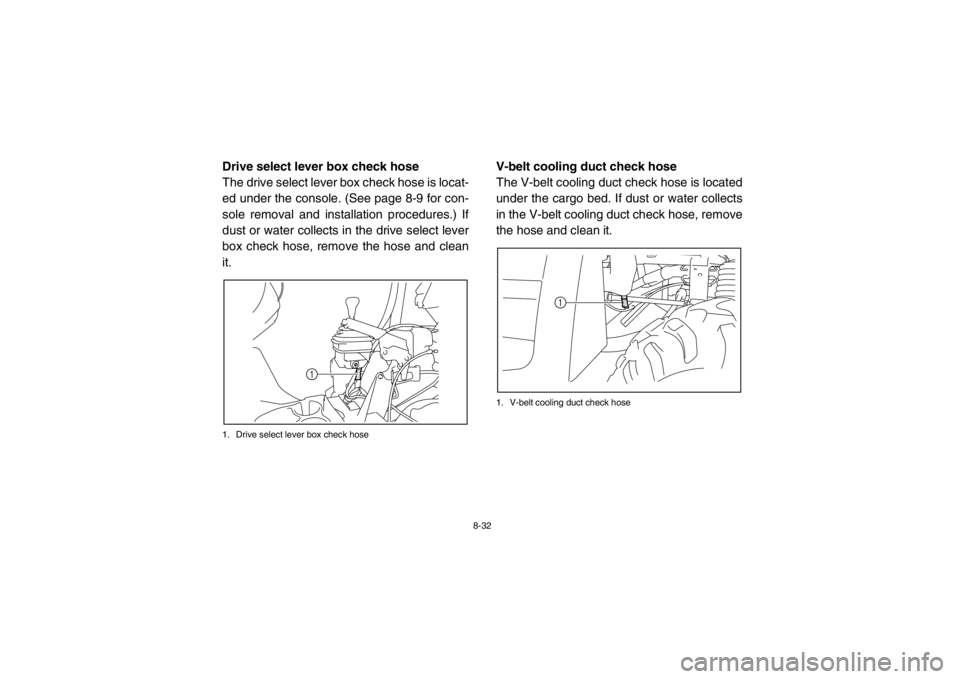
2P512001Drive select lever box check hose
The drive select lever box check hose is locat-
ed under the console. (See page 8-9 for con-
sole removal and installation procedures.) If
dust or water collects in the drive select lever
box check hose, remove the hose and clean
it.1. Drive select lever box check hose
5B410017V-belt cooling duct check hose
The V-belt cooling duct check hose is located
under the cargo bed. If dust or water collects
in the V-belt cooling duct check hose, remove
the hose and clean it.1. V-belt cooling duct check hose
1
1
1RB7A_EE.book Page 32 Tuesday, April 24, 2012 9:07 AM
Page 146 of 188
8-33
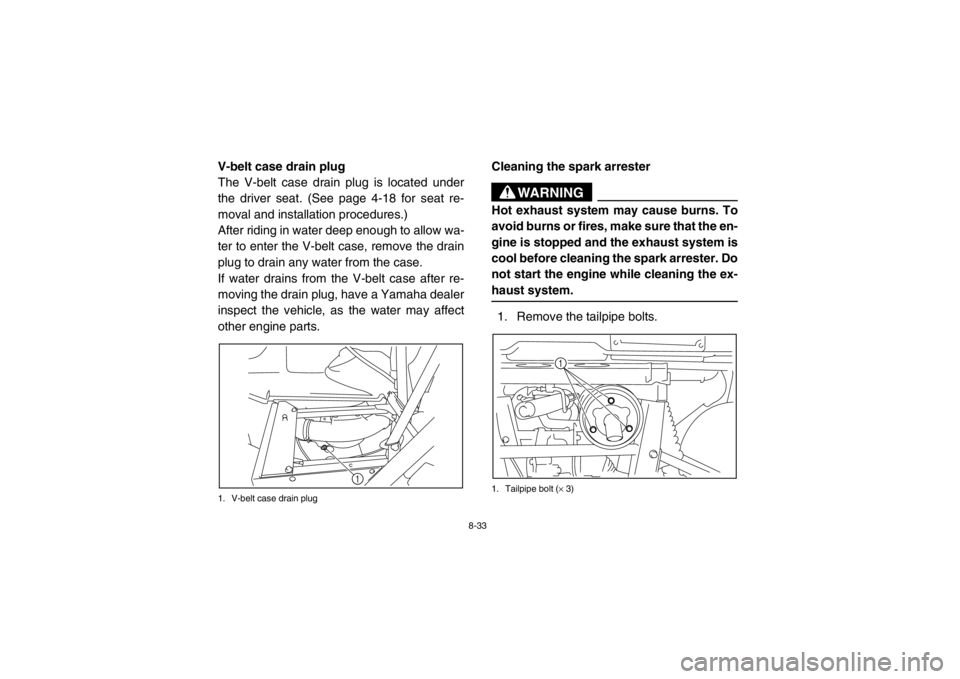
EVU00780V-belt case drain plug
The V-belt case drain plug is located under
the driver seat. (See page 4-18 for seat re-
moval and installation procedures.)
After riding in water deep enough to allow wa-
ter to enter the V-belt case, remove the drain
plug to drain any water from the case.
If water drains from the V-belt case after re-
moving the drain plug, have a Yamaha dealer
inspect the vehicle, as the water may affect
other engine parts.1. V-belt case drain plug
5B410018Cleaning the spark arrester
WARNING
Hot exhaust system may cause burns. To
avoid burns or fires, make sure that the en-
gine is stopped and the exhaust system is
cool before cleaning the spark arrester. Do
not start the engine while cleaning the ex-
haust system.1. Remove the tailpipe bolts.1. Tailpipe bolt (× 3)
1
1
1RB7A_EE.book Page 33 Tuesday, April 24, 2012 9:07 AM
Page 147 of 188
8-34
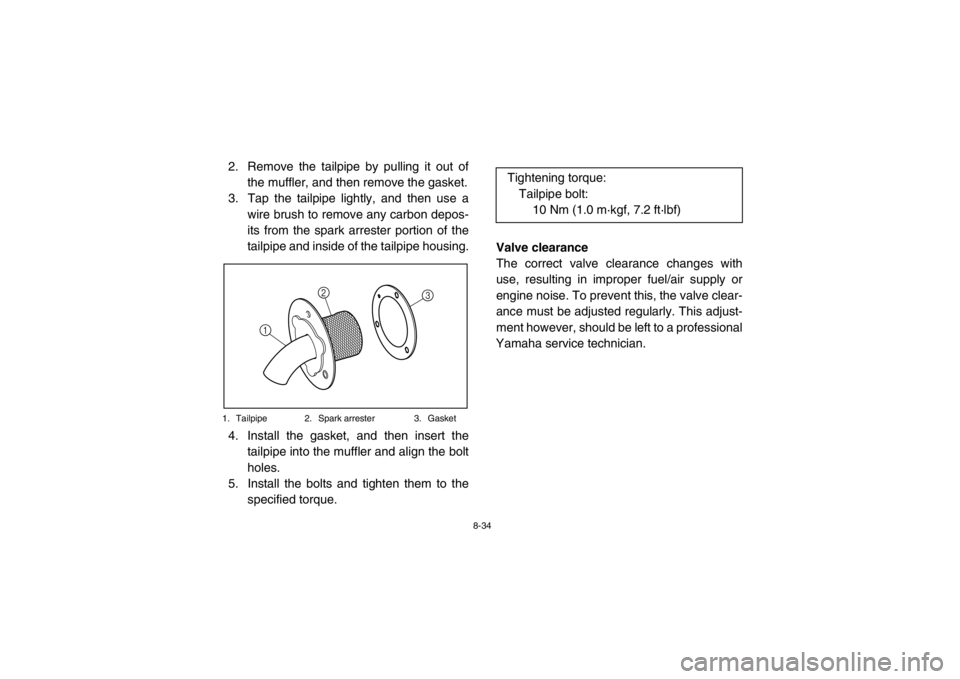
2. Remove the tailpipe by pulling it out ofthe muffler, and then remove the gasket.
3. Tap the tailpipe lightly, and then use a
wire brush to remove any carbon depos-
its from the spark arrester portion of the
tailpipe and inside of the tailpipe housing.1. Tailpipe 2. Spark arrester 3. Gasket4. Install the gasket, and then insert thetailpipe into the muffler and align the bolt
holes.
5. Install the bolts and tighten them to the specified torque. Valve clearance
The correct valve clearance changes with
use, resulting in improper fuel/air supply or
engine noise. To prevent this, the valve clear-
ance must be adjusted regularly. This adjust-
ment however, should be left to a professional
Yamaha service technician.
3
1 2
Tightening torque:
Tailpipe bolt: 10 Nm (1.0 m·kgf, 7.2 ft·lbf)
1RB7A_EE.book Page 34 Tuesday, April 24, 2012 9:07 AM
Page 148 of 188
8-35
Brakes
Replacement of brake components requires
professional knowledge. Brake service should
be performed by a Yamaha dealer.
WARNING
Operating with improperly serviced or ad-
justed brakes could lead to a loss in brak-
ing ability and an accident.5B410019Checking the front and rear brake pads
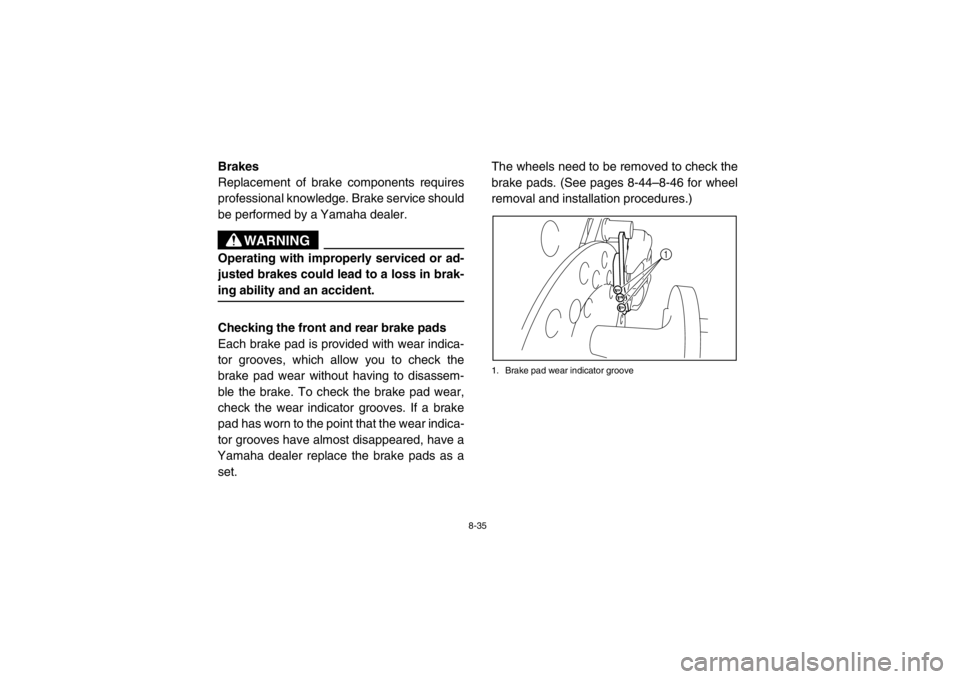
Each brake pad is provided with wear indica-
tor grooves, which allow you to check the
brake pad wear without having to disassem-
ble the brake. To check the brake pad wear,
check the wear indicator grooves. If a brake
pad has worn to the point that the wear indica-
tor grooves have almost disappeared, have a
Yamaha dealer replace the brake pads as a
set. The wheels need to be removed to check the
brake pads. (See pages 8-44–8-46 for wheel
removal and installation procedures.)
1. Brake pad wear indicator groove
1
1RB7A_EE.book Page 35 Tuesday, April 24, 2012 9:07 AM
Page 149 of 188
8-36
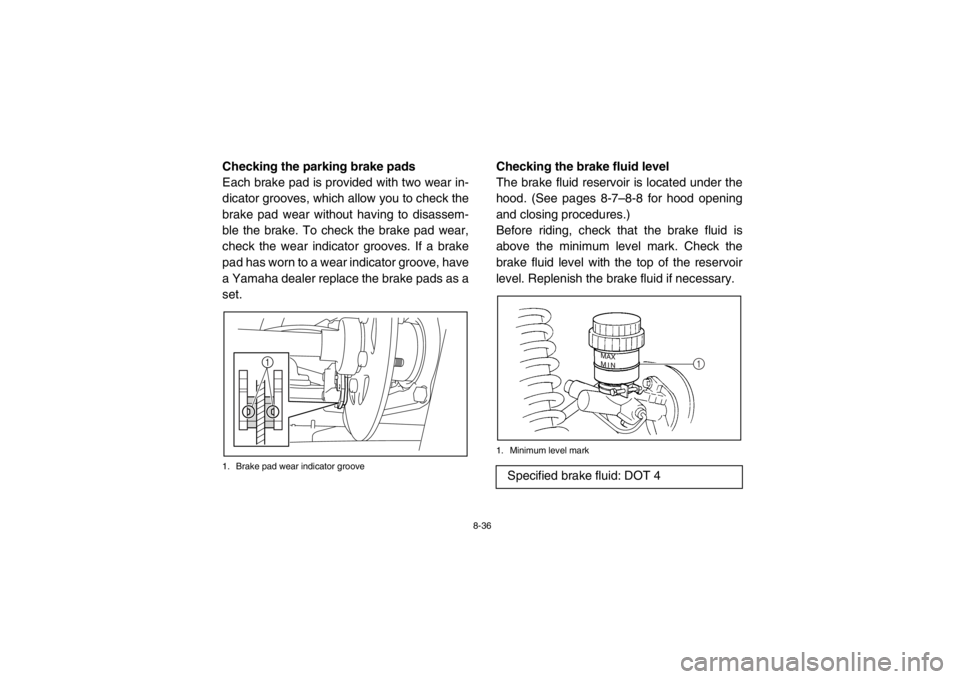
5B410020Checking the parking brake pads
Each brake pad is provided with two wear in-
dicator grooves, which allow you to check the
brake pad wear without having to disassem-
ble the brake. To check the brake pad wear,
check the wear indicator grooves. If a brake
pad has worn to a wear indicator groove, have
a Yamaha dealer replace the brake pads as a
set.1. Brake pad wear indicator groove
EVU00850Checking the brake fluid level
The brake fluid reservoir is located under the
hood. (See pages 8-7–8-8 for hood opening
and closing procedures.)
Before riding, check that the brake fluid is
above the minimum level mark. Check the
brake fluid level with the top of the reservoir
level. Replenish the brake fluid if necessary.1. Minimum level mark
1
Specified brake fluid: DOT 4
1
1RB7A_EE.book Page 36 Tuesday, April 24, 2012 9:07 AM
Page 150 of 188
8-37
WARNING
Improper maintenance can result in loss of
braking ability. Observe these precautions:●
Insufficient brake fluid may allow air to
enter the brake system, reducing brak-
ing performance.
●
Clean the filler cap before removing.
Use only DOT 4 brake fluid from a
sealed container.
●
Use only the specified brake fluid; oth-
erwise, the rubber seals may deterio-
rate, causing leakage.
●
Refill with the same type of brake fluid.
Adding a brake fluid other than DOT 4
may result in a harmful chemical reac-
tion.
●
Be careful that water does not enter
the brake fluid reservoir when refilling.
Water will significantly lower the boil-
ing point of the fluid and may result in
vapor lock.
NOTICEBrake fluid may damage painted surfaces
or plastic parts. Always clean up spilled
fluid immediately.As the brake pads wear, it is normal for the
brake fluid level to gradually go down. A low
brake fluid level may indicate worn brake
pads and/or brake system leakage; therefore,
be sure to check the brake pads for wear and
the brake system for leakage. If the brake fluid
level goes down suddenly, have a Yamaha
dealer check the cause before further riding.EVU00860Brake fluid replacement
Complete fluid replacement should be done
only by trained Yamaha service personnel.
Have a Yamaha dealer replace the following
components during periodic maintenance or
when they are damaged or leaking.●
Replace the oil seals every two years.
●
Replace the brake hoses every four years.
1RB7A_EE.book Page 37 Tuesday, April 24, 2012 9:07 AM